How to Sign In to Windows If Your PIN Isn’t Available
Read this article to find out what to do if sign-in to Windows from your account is impossible, and your PIN is unavailable. You’ll see how to bypass PIN request and reset your account password in Windows. We’ll tell you how to restore access to your PC.
- Why this error occurs
- Method 1. Log in with a password
- Method 2. Sign in with your Microsoft account
- Method 3. Check CNG Key Isolation service
- Method 4. Remove the NGC folder
- Method 5. If there is no option to sign in with a password instead of PIN
- Method 6. Remove a Windows update
- Method 7. Load the latest saved restore point
- Method 8. Password Reset
- Conclusion
- Questions and answers
- Comments
When your PC screen flashes a message that your PIN is not available (“Something happened and your PIN isn’t available”), it can happen because of many things such as corrupted user profile, logon service failure etc. In today’s article, we’ll explore how to log in if such situation occurred, and how to fix this error.

Windows Sign-In Issue? Step-by-Step Guide to Fixing PIN Not Available 2024
Why this error occurs
One of the most common sources of the problem is related to malfunctioning Windows logon service. This service may be playing tricks due to various factors such as:
- Software conflicts, damaged system files, or incorrect settings.
- Sometimes, the problem can be connected with the damage to a user’s profile..
- Incorrect security settings and some operating system updates may lead to conflicts or errors in using PIN.
- Besides, this error may occur because of system file errors, hard disk problems, or hardware issues.
So, let’s begin by finding out how to log in when such error turns up.
Method 1. Log in with a password
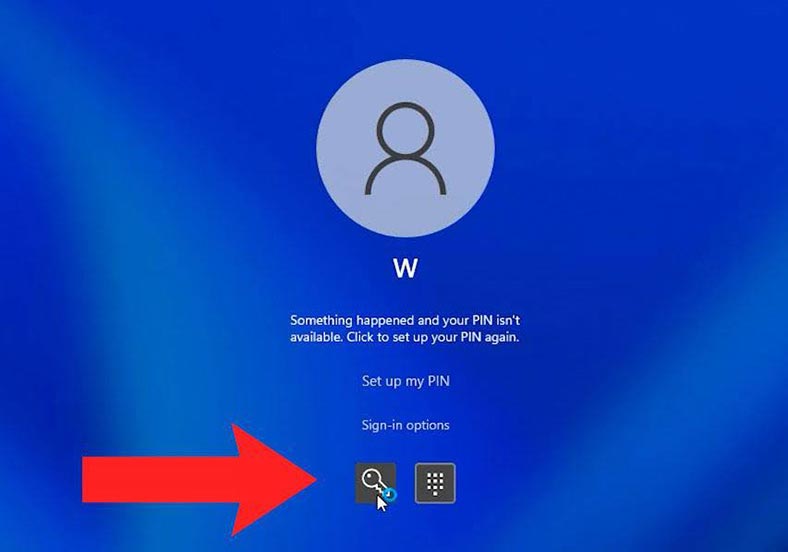
If you use a password along with a PIN to log in, you can use such password if the error “Something happened and your PIN isn’t available” occurs. To do that, click on Sign-in options in the lock screen and choose the option to use the password.
When you log in, reset the PIN to eliminate the problem. To reset a PIN, open Settings – Accounts.
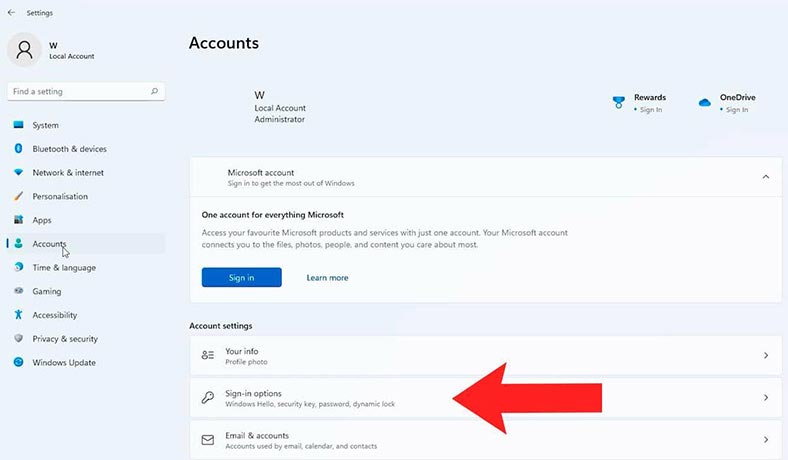
In the Sign-in options tab, choose Windows Hello (PIN)for Windows 10 or PIN (Windows Hello) for Windows 11.
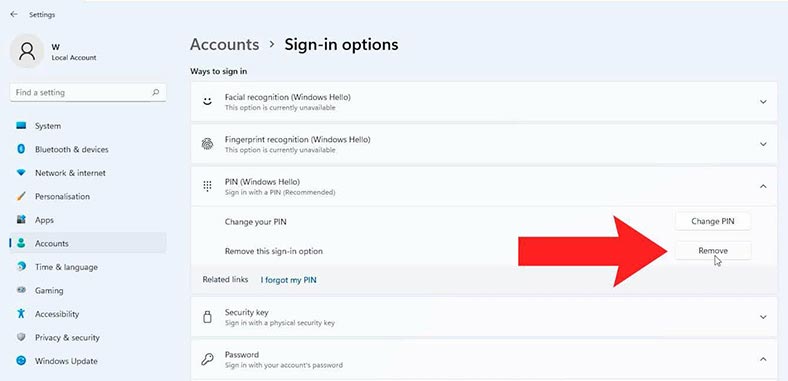
Remove the existing PIN from your computer by entering the password to verify your account.
When the old PIN is gone, click Set up, enter your password and add a new PIN.
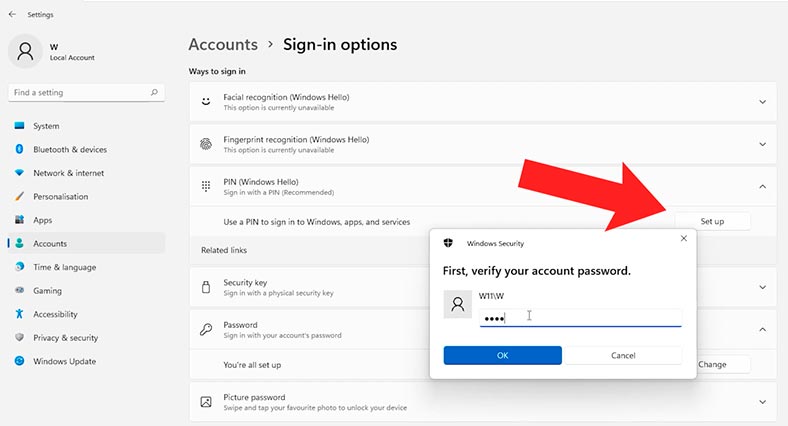
These steps will help you restore access to your system and eliminate the PIN availability issue.
Method 2. Sign in with your Microsoft account
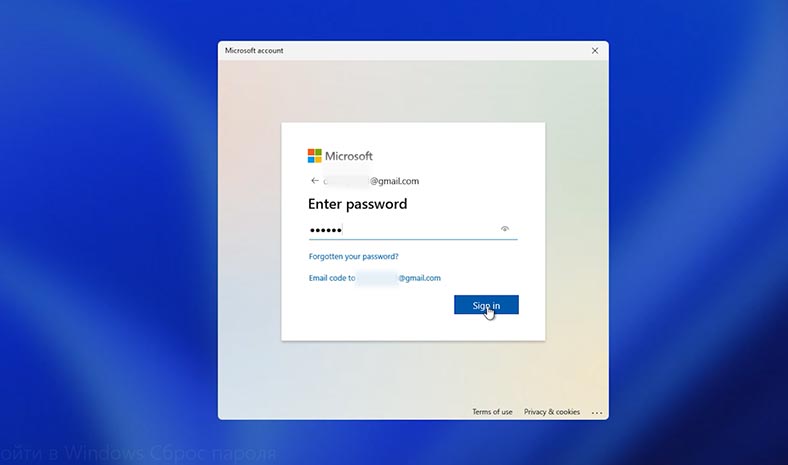
If you have a Microsoft account, you can request a confirmation code to log in to the operating system, if such problem turns up. To sign in, request a code to be sent by SMS or email. When you receive the confirmation code, you should enter it in the sign-in screen instead of the PIN. This method allows you to sign in by way of bypassing the PIN issue.
For this strategy to work out, your computer needs to be connected to the Internet, otherwise it will be impossible to sign in with your Microsoft account.
Method 3. Check CNG Key Isolation service
If you managed to sign in, check CNG Key Isolation service.
To do it, right-click on the Start button and select Run. Type services.msc and press Enter.
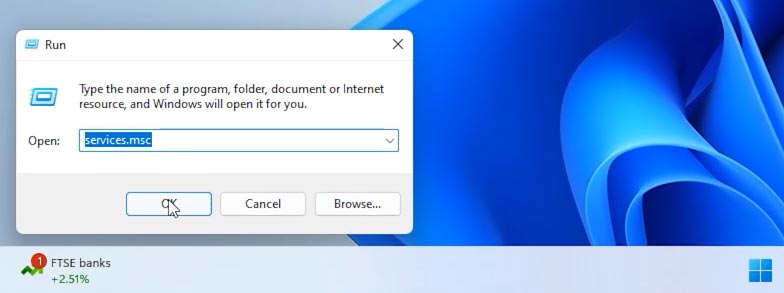
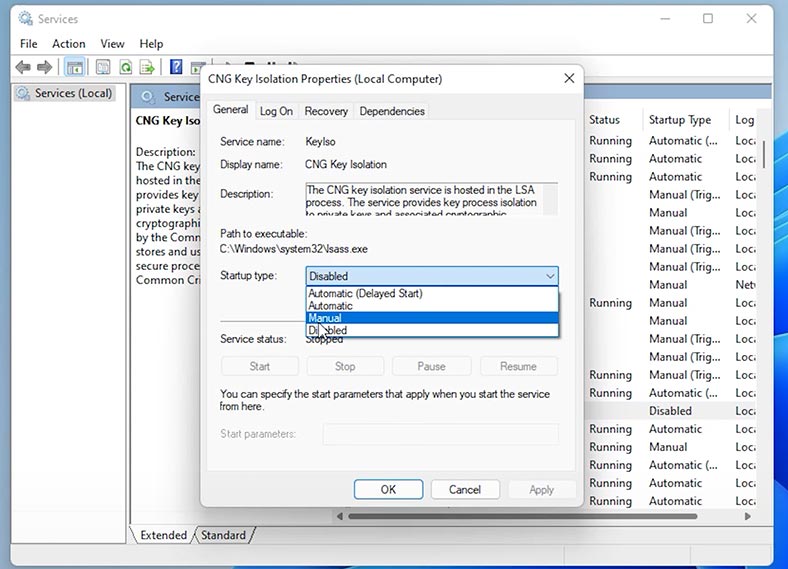
As a result, the services windows will open. Search the list for CNG Key Isolation and double-click on it to open.
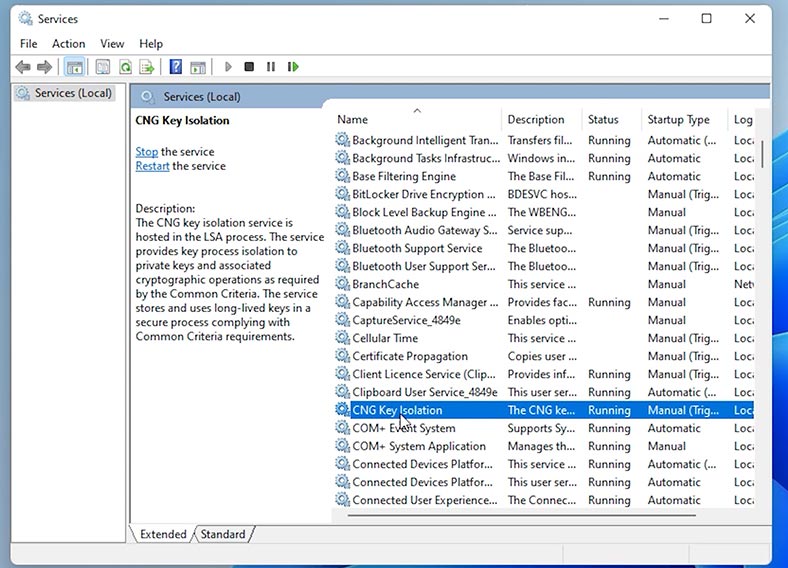
It should be enabled. Change the startup type to Manual and run it, then restart your PC.
Method 4. Remove the NGC folder
Also, you can fix the PIN issue by removing the contents of PIN settings directory.
Windows keeps all information related to PIN settings in a special folder with the name NGC. When this folder is damaged, sign-in with PIN may be unavailable.
To fix the problem, delete all of its contents. To do it, use the Explorer to open View – Show – Hidden items.
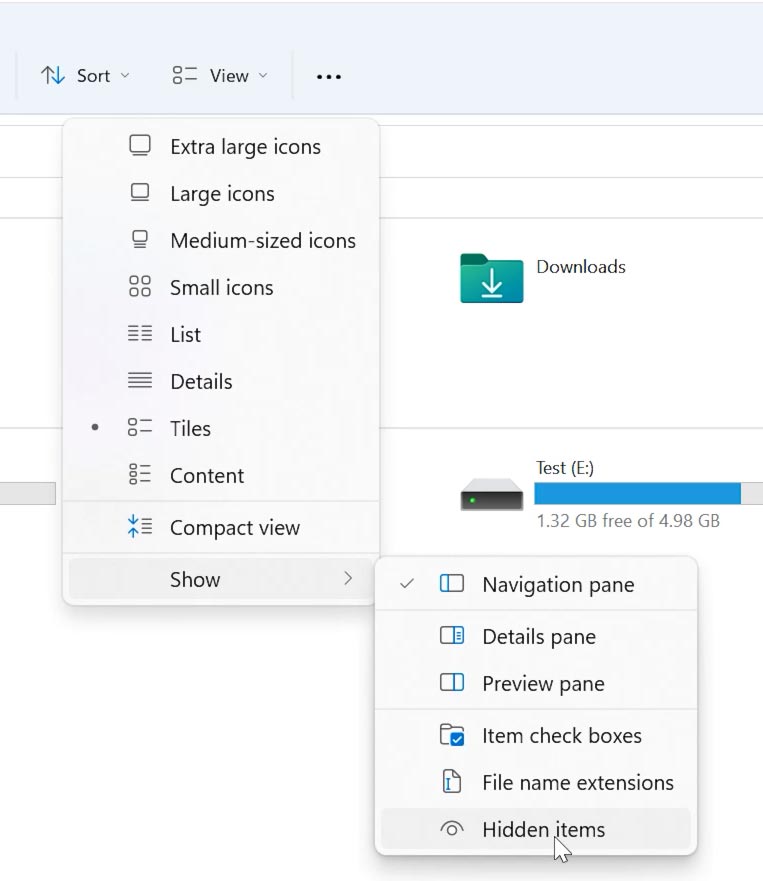
After that, follow this path:
C:\Windows\ServiceProfiles\LocalService\AppData\Local\Microsoft\ Ngc
Select all contents by pressing (Ctrl+A), and then press (Delete).
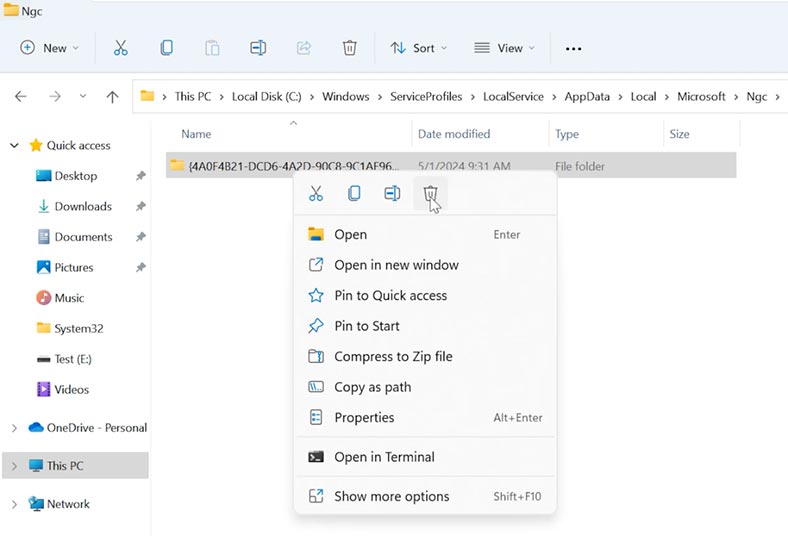
This will remove the PIN, and when you sign in next time, the operating system will no longer ask you to type it.
Method 5. If there is no option to sign in with a password instead of PIN
If there is no option to sign in with a password instead of PIN, you can remove the NGC folder or run the CNG Key Isolation with the help of the command prompt from the system recovery menu.
To run the command prompt, hold down the Shift key and restart the computer.
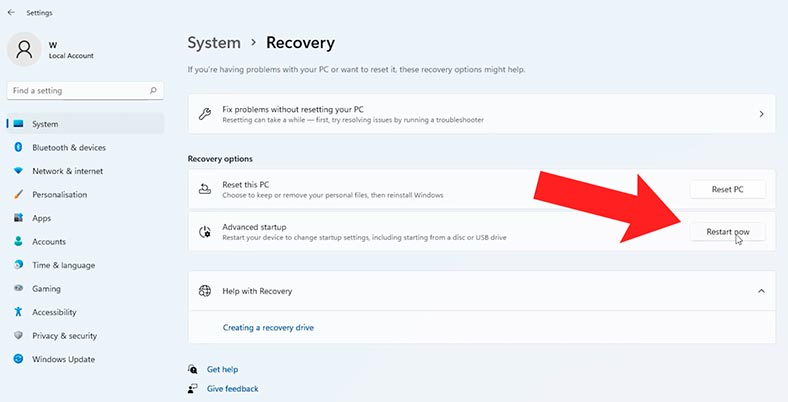
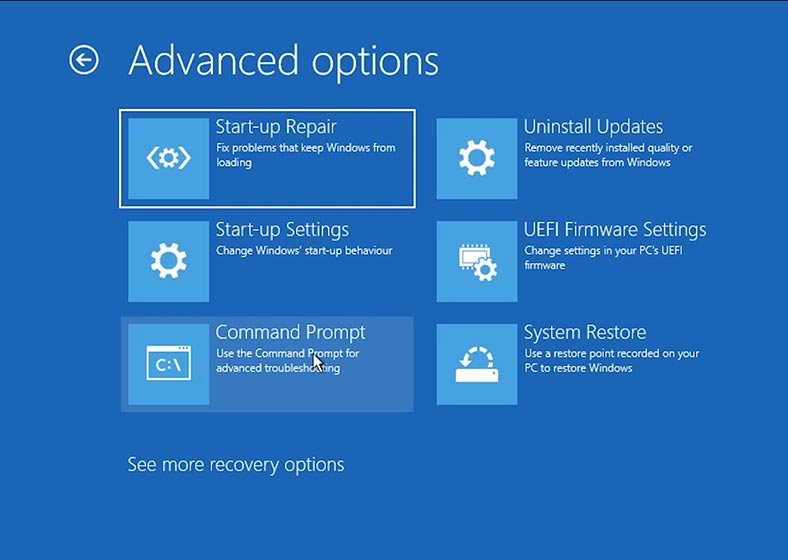
In the recovery menu, select Troubleshoot - Advanced options - Command Prompt.
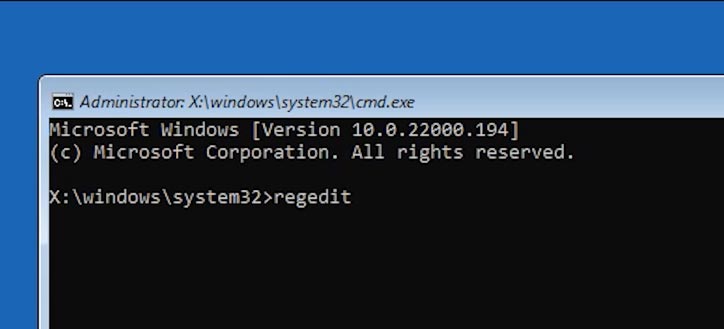
For starters, try to activate the key isolation service. Run the command regedit to open the registry.
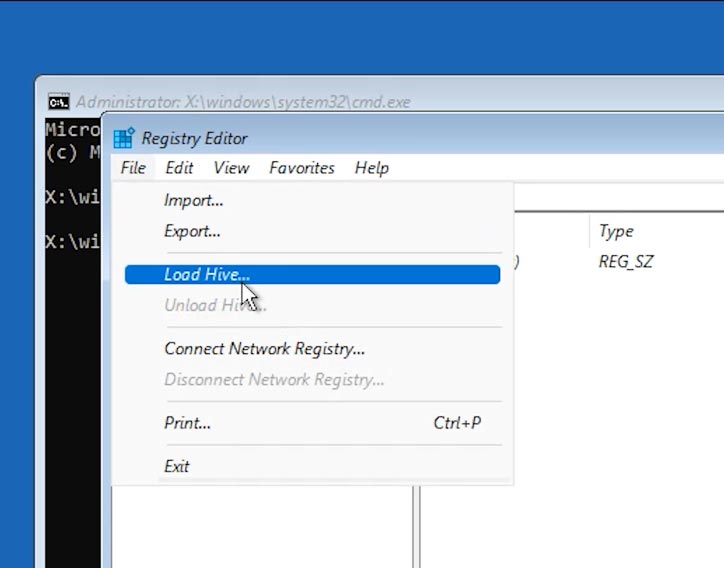
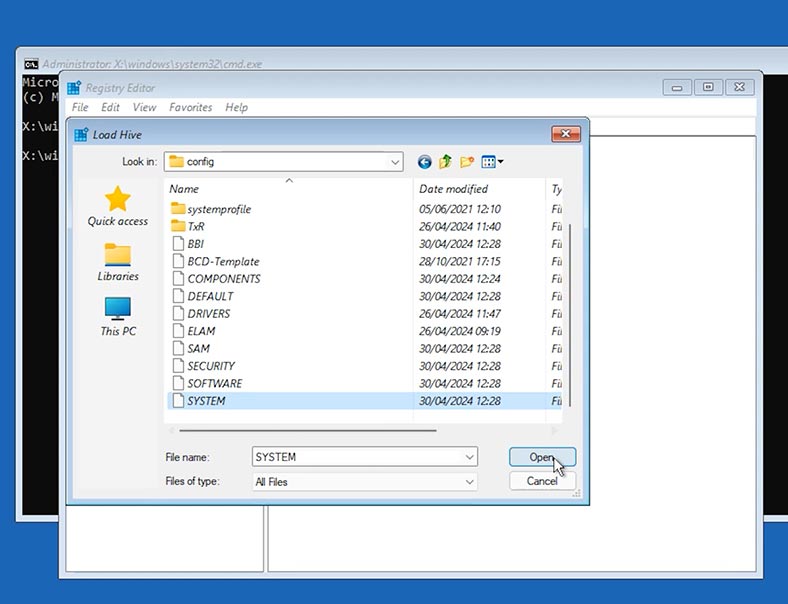
Here, choose HKEY_LOCAL_MACHINE key, and then go the menu – File – Load Hive - and give the path to the file system.
Follow this path:
C:\Windows\System32\config\
The system drive letter may differ, but you can find the right one by the size.
Select the file system and click Open.
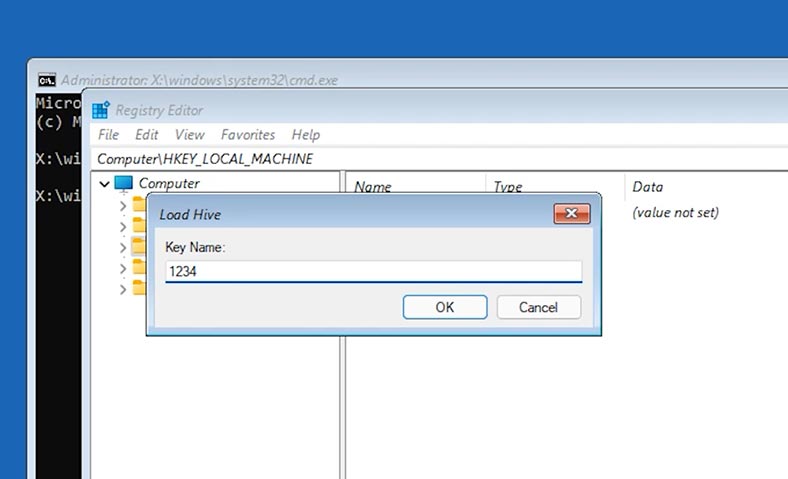
Set a name for it, and then a subkey with the assigned name will appear under HKEY_LOCAL_MACHINE.
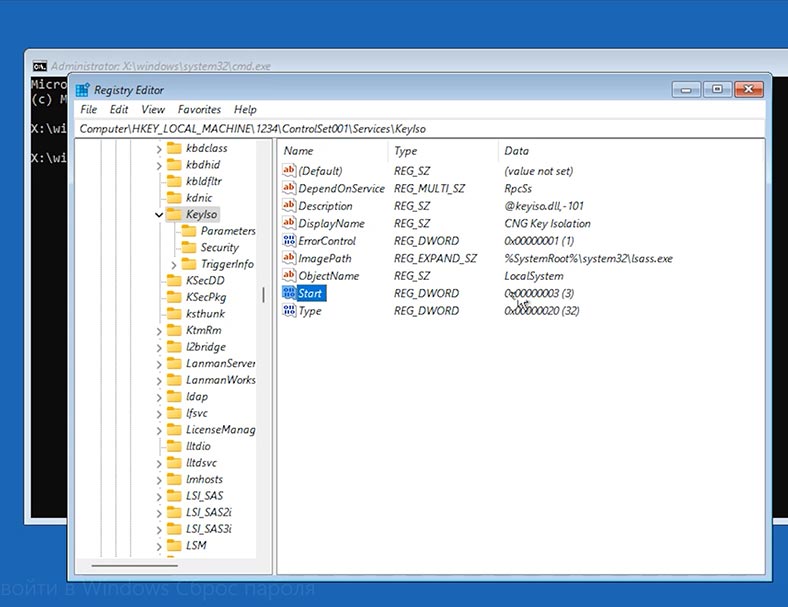
In this subkey, go to:
ControlSet001\Services\KeyIso
Check the registry value for Start. The value should be 3. If it differs, change it.
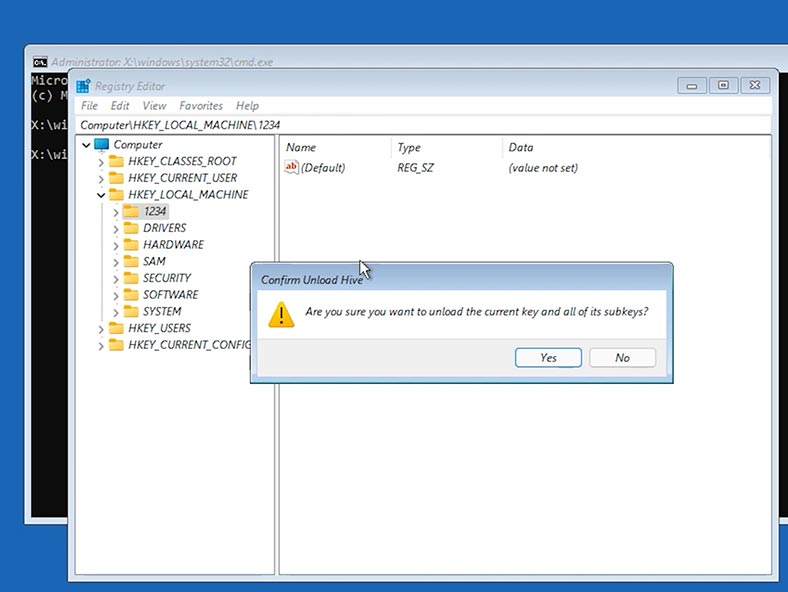
Go back to the subkey you have created, then click File - Unload Hive.
Restart the computer. After all these actions, the PIN should be available again.
If it doesn’t help, remove the NGC folder. Boot your system in the recovery mode - Troubleshoot - Command Prompt.
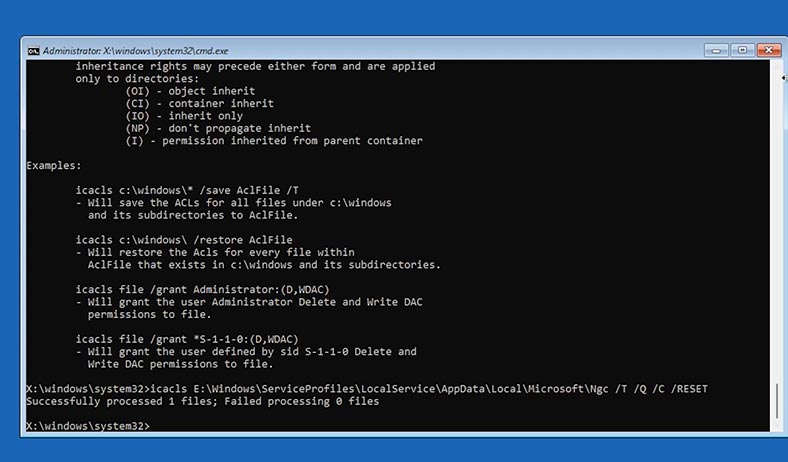
To remove the NGC folder, run these commands one after another:
takeown /f C:\Windows\ServiceProfiles\LocalService\AppData\Local\Microsoft\ngc /r /d y
icacls C:\Windows\ServiceProfiles\LocalService\AppData\Local\Microsoft\ngc /grant Administrators:F /t
RD /S /Q C:\Windows\ServiceProfiles\LocalService\AppData\Local\Microsoft\ngc
MD C:\Windows\ServiceProfiles\LocalService\AppData\Local\Microsoft\ngc
icacls C:\Windows\ServiceProfiles\LocalService\AppData\Local\Microsoft\ngc /T /Q /C /RESET
Restart the computer.
As a result, the PIN will be removed, and you’ll be able to sign in with your password.
Method 6. Remove a Windows update
One more method to fix the PIN problem is to remove the latest system update.
To do it, boot your PC in the recovery mode, then go to Troubleshoot > Advanced options > Uninstall Updates > Uninstall the latest quality update.
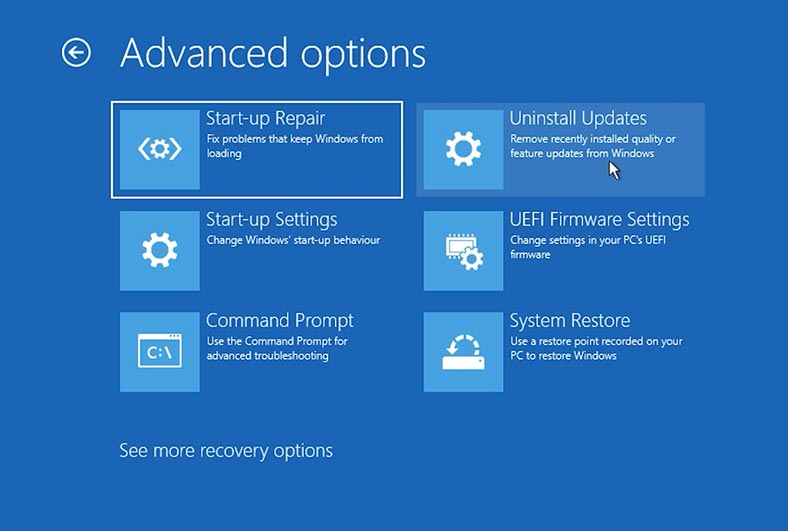
This method can help you if the error was caused by the latest update.
Method 7. Load the latest saved restore point
Also, you can try to load the latest restore point.
To do it, go to the recovery mode, open Troubleshoot - Advanced options - System Restore.
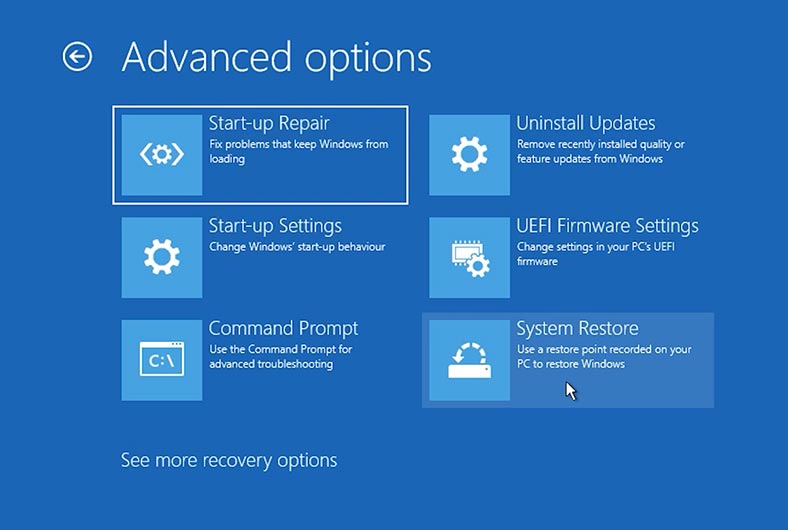
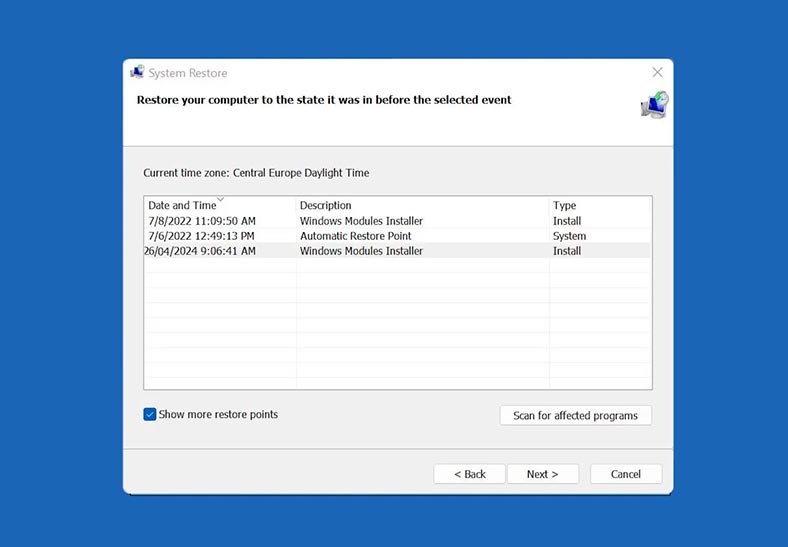
Here, choose and load the latest restore point where everything worked fine.
Be attentive: when going back to a restore point, you may lose some files and latest changes in them.
If you have lost important files or have difficulty to access your system drive, you can bring back your files with the specialized data recovery tool - Hetman Partition Recovery.
Connect the drive to another PC and scan it, find the necessary files and recover them.
Method 8. Password Reset
Finally, the last sign-in fix is to reset your account password.
If you forgot the password, and you can’t sign in with the PIN, try resetting the password. For this method, you will need a bootable drive with Linux.
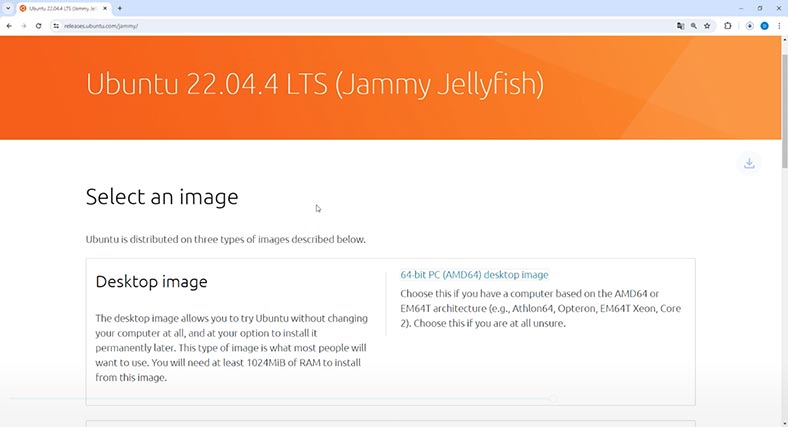
Download the Linux distribution from the official website and create a bootable drive with the help of Rufus, Etcher or another similar application.
Connect the USB drive to the computer and then boot your PC from the USB drive.
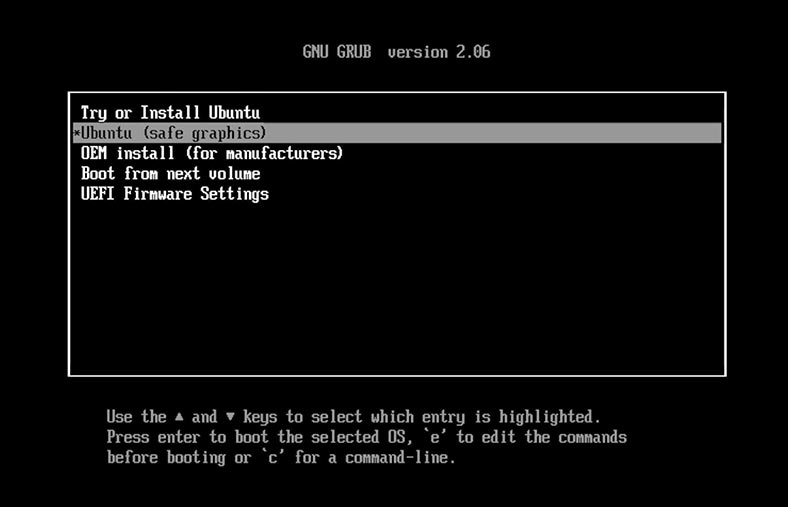
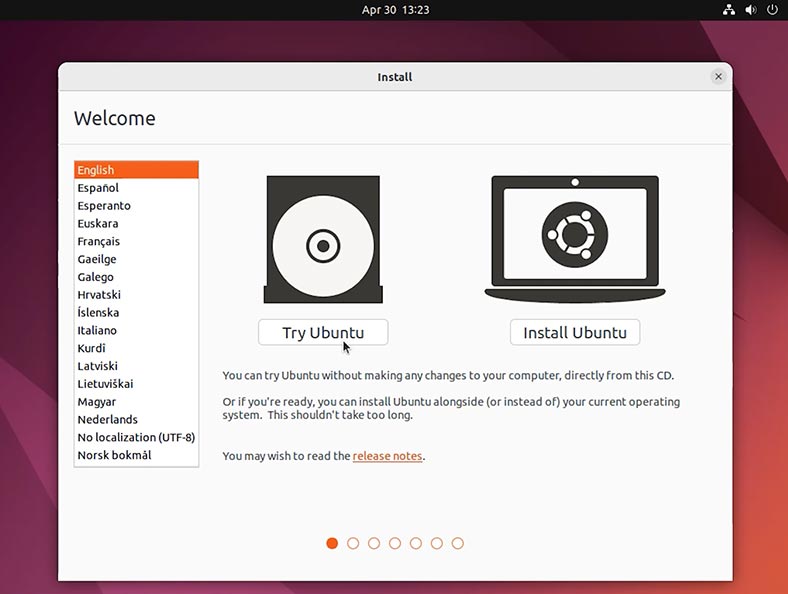
When booting, choose the option – Try Linux (in my case, it’s Ubuntu).
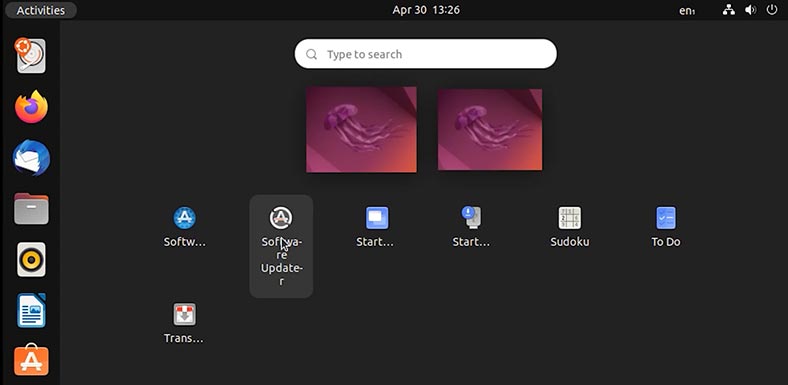
When the operating system boots, open the menu Show applications and run Software Updater.
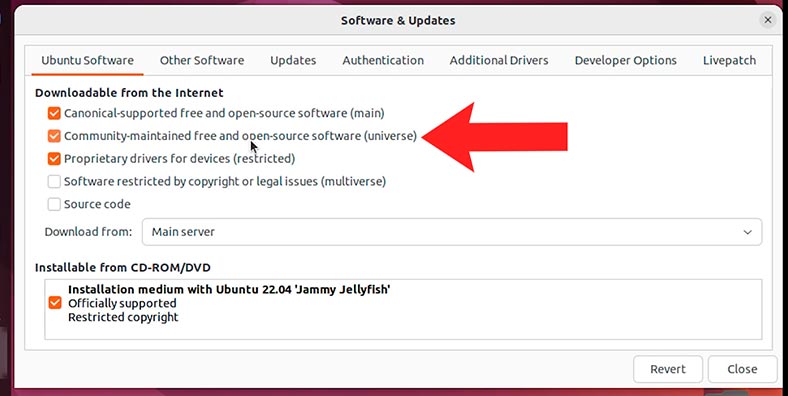
In the window that opens, go to the tab Ubuntu Software, check the box for Community-maintained free and open-source software. Then click Close and Reload. After that, the window can be minimized.
Then right-click on the desktop and run the Terminal.
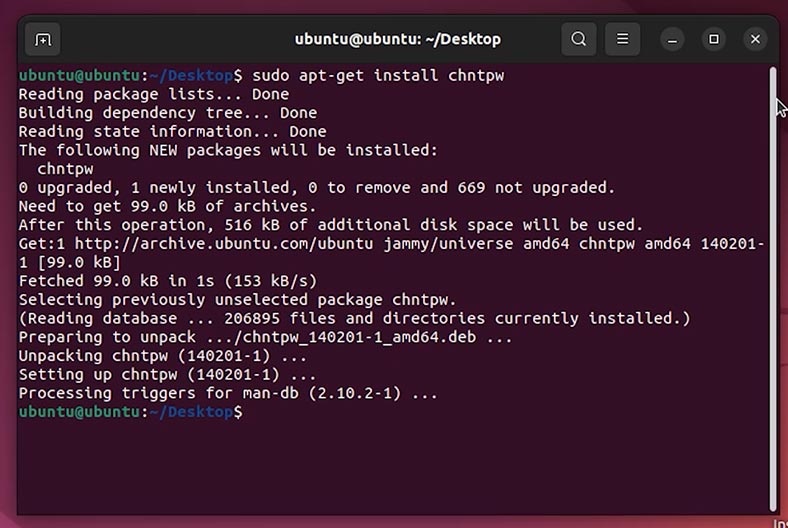
In the Terminal window, run the command to install the package to read and modify Windows password database (SAM) – chntpw.
Sudo apt-get install chntpw
Then go to the Explorer and open the disk where your Windows is installed - you can identify it by size.
Follow this path:
C:\Windows\System32\Config
In this directory, you should see a file with the name SAM, which has to be edited with the previously installed app - chntpw.
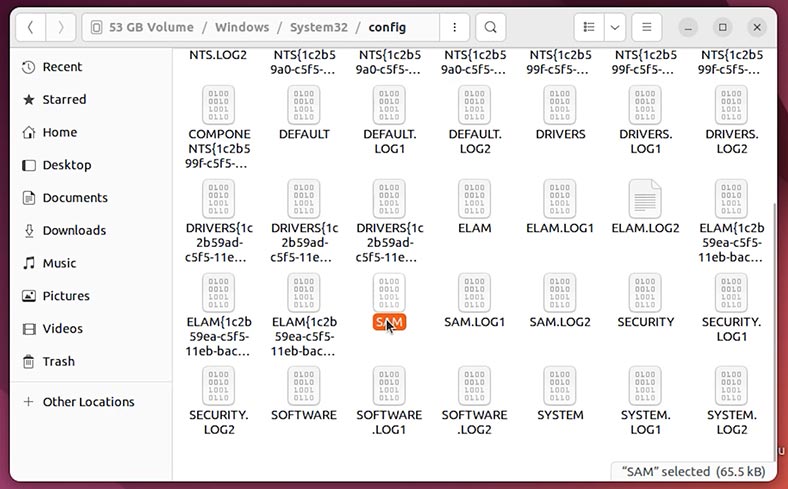
SAM is the Security Accounts Manager in the Windows operating system which handles the accounts database. You can use it to reset the password to a specific user account and sign in without using the password.
For starters, right-click on some empty space and choose Open in Terminal. After that, this folder will be opened in Terminal.
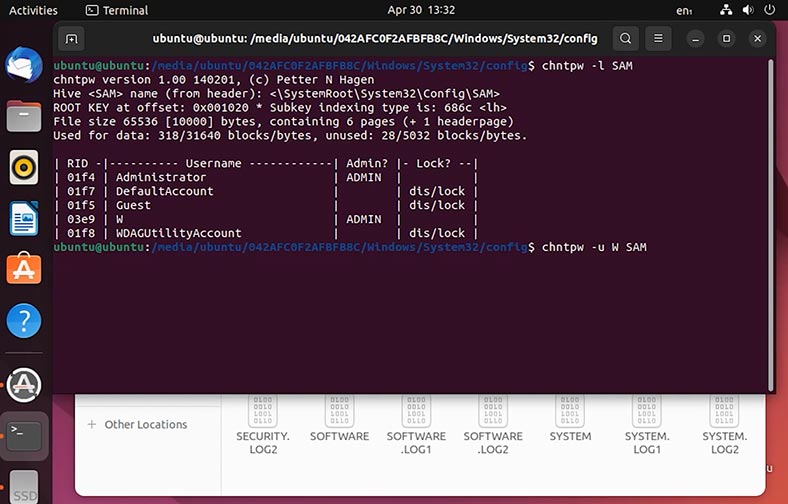
To view Windows accounts in SAM use the following command:
chntpw -l SAM
This action will list all Windows accounts.
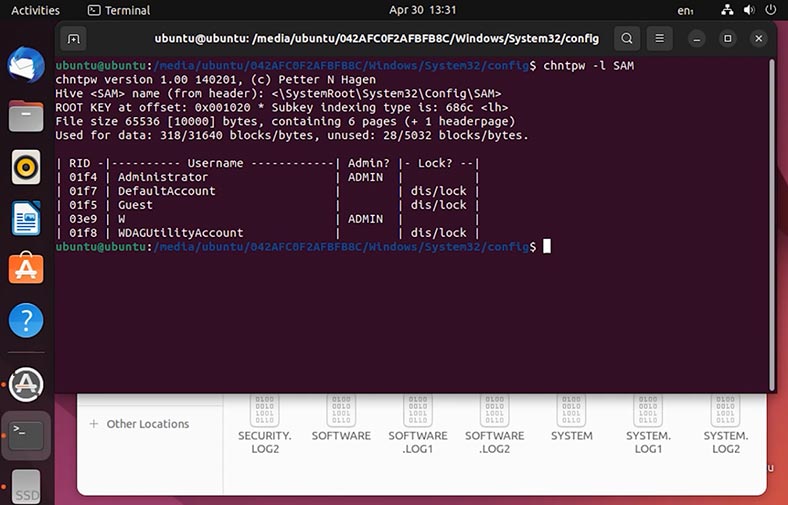
To reset the password for a specific user, enter this command:
chntpw -u W SAM
Give the name of the account for which the password should be reset.
Select the first item from the list - Clear (blank) user password. To do it, type 1 and press Enter.
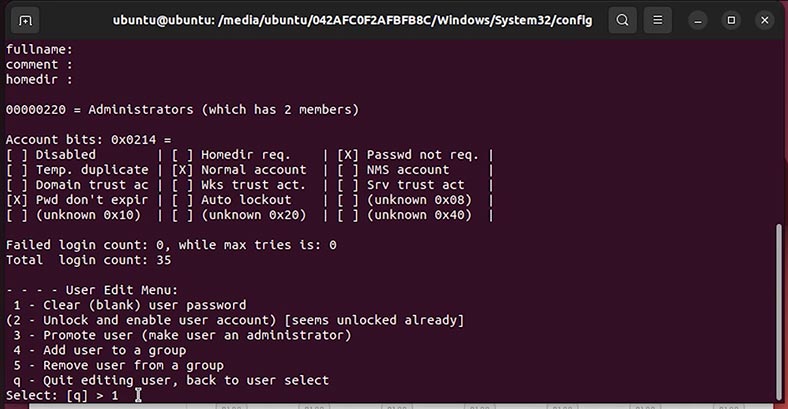
As a result, you’ll get the message Password cleared. Type q to exit.
After that, restart the computer, remove the USB drive and boot to Windows.
As a result, the account password will be reset. After booting, the operating system will not ask you to type a password or PIN, and you will sign in automatically.
Conclusion
As you can see, signing in to Windows can become complicated due to various errors. However, now you know a few methods to fix that problem. They will help you restore access to your account and continue working with the operating system without any hindrance.


