Boosting Performance for Windows 11: Essential Guide for Computer Users
Looking to boost performance for your Windows 11 computer? Look no further! Our comprehensive guide will walk you through expert strategies and techniques to successfully enhance the performance of your Windows 11 system. Say goodbye to sluggish performance and enjoy a smoother computing experience!
- Step 1. Restart and update
- Step 2. Disable startup for applications
- Step 3. Disable animation and visual effects
- Step 4. Change power options
- Step 5. Configure hard disk defragmentation
- Step 6. Change from HDD to SSD and add more system memory
- Step 7. Disable restartable apps
- Step 8. Remove unnecessary apps
- Step 9. Clean up temporary files
- Step 10. Disable notifications and tips
- Step 11. Disable background apps
- Step 12. Disable VBS
- Step 13. Turn game mode off
- Step 14. Configure virtual memory and paging file
- Step 15. Windows troubleshooter
- Step 16. Disable search indexing
- Step 17. Update device drivers
- Step 18. Disable boot menu timeout
- Step 19. Enable Storage Sense feature
- Conclusion
- Questions and answers
- Comments
The performance of Windows 11 has improved slightly in comparison with Windows 10. In the new version of its operating system, Microsoft introduced enhancements to memory and disk management, application priorities and some other things related to CPU and battery performance. However, many users – especially those who installed Windows 11 on unsupported devices – may face performance issues which include lags and regular freezing. Although there are a few minor problems that still remain in Insider builds, I’d like to show you several proven methods to make your Windows 11 work faster and boost your computer’s performance.

🚀 How to Improve Performance for a Windows 11 Computer? 🚀
Step 1. Restart and update
If your computer tends to freeze, or gets too slow with the new operating system, the first step to take is to check for updates and update your Windows if necessary.
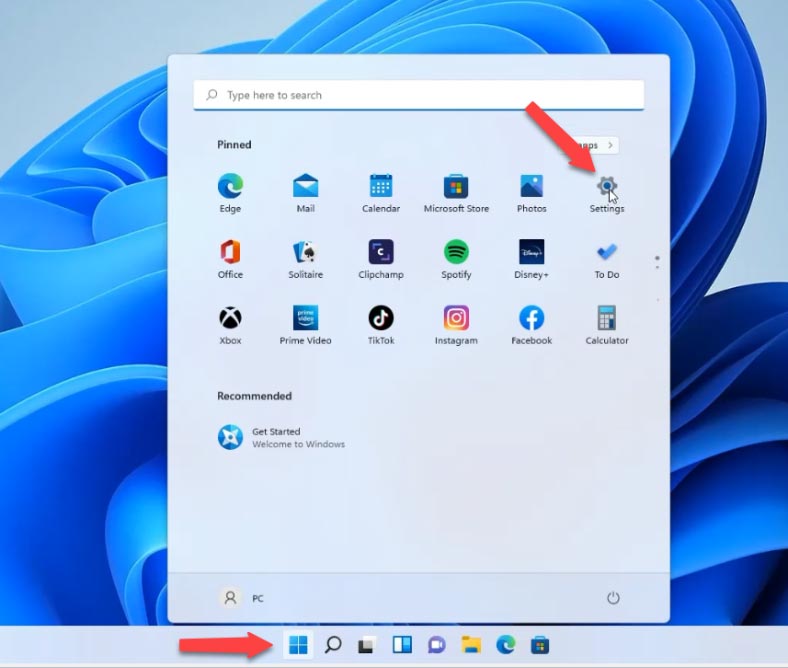
Click on the Start menu – Settings – Windows Update – Check for updates, and if there’s something new on the list, download and install it, and then restart your computer.
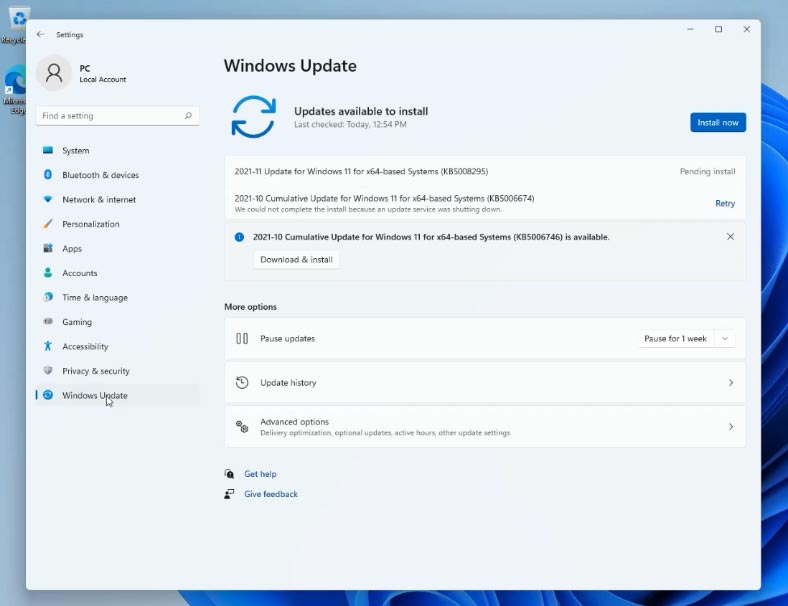
Restarting can also help if you experience an occasional problem that seems to slow down your PC.
Step 2. Disable startup for applications
To make your operating system boot faster, disable startup for certain applications, because some of them start together with the operating system and thus make it boot longer than normal. To do it for typical Microsoft apps like One Drive, Microsoft Teams, or Edge, open Settings – Apps – Startup, and turn off every program you don’t want to start together with Windows.
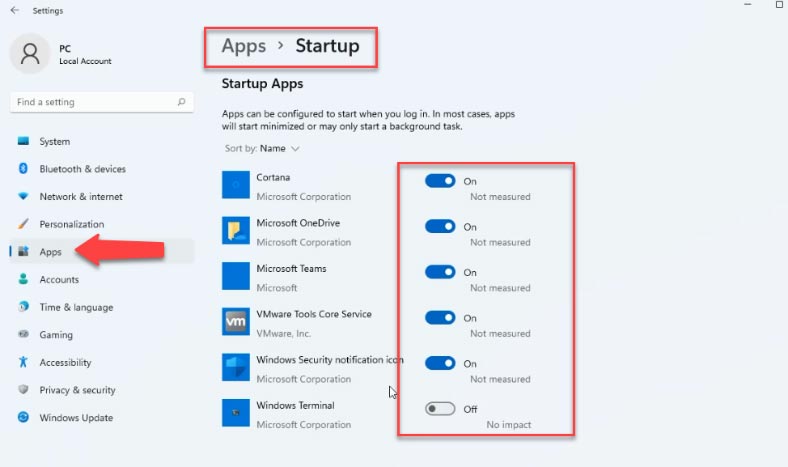
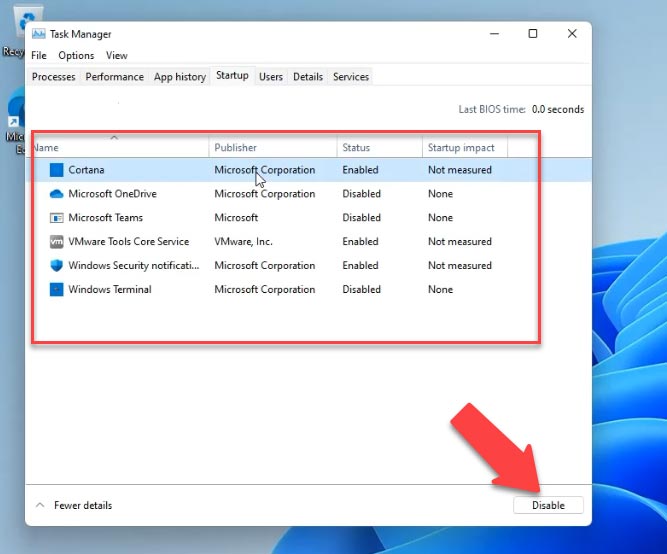
To disable startup for third-party software, open Task Manager. Right-click on the Start menu – Task Manager, then click “More details” here and open the Startup tab, select a program and then click “Disable” below.
Step 3. Disable animation and visual effects
The main visual differences introduced in the new operating system include smooth animation, blurring, transparent interface elements and so on. These novelties in the user interface truly give Windows 11 a brand new look. But once again, all these nice-looking things come at a price, especially if you’re not using a dedicated graphics card. So if you want to configure your Windows 11 for performance rather than appearance, you can change some options accordingly.
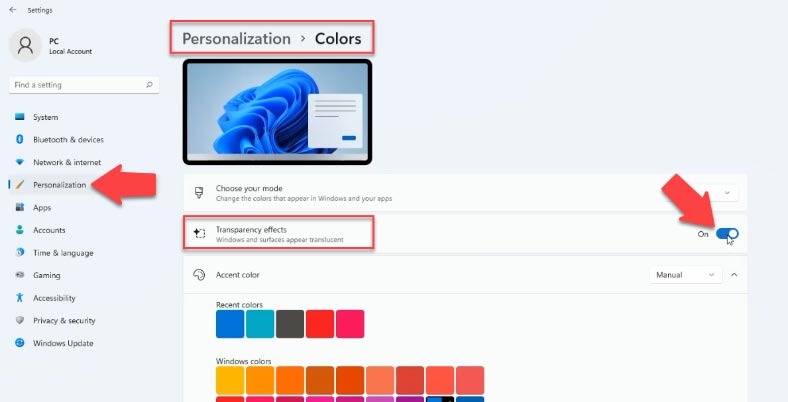
Open Settings – Personalization – Colors. Turn off “Transparency effects”.
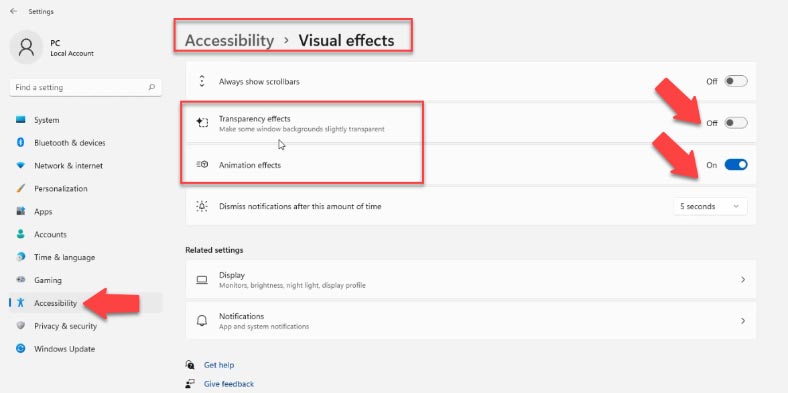
After that, navigate to “Accessibility” tab on the left side panel and then to “Visual effects” on the right. Here, turn off “Transparency effects” and “Animation effects”.
After that, click on the Start menu and search for “View advanced system settings”. In the “System Properties” window that opens, find the section “Performance” and click on “Settings”. From this list, select “Adjust for best performance”, then click OK and “Apply”. This will reduce the burden of visual effects and your computer will be geared for better performance.
Step 4. Change power options
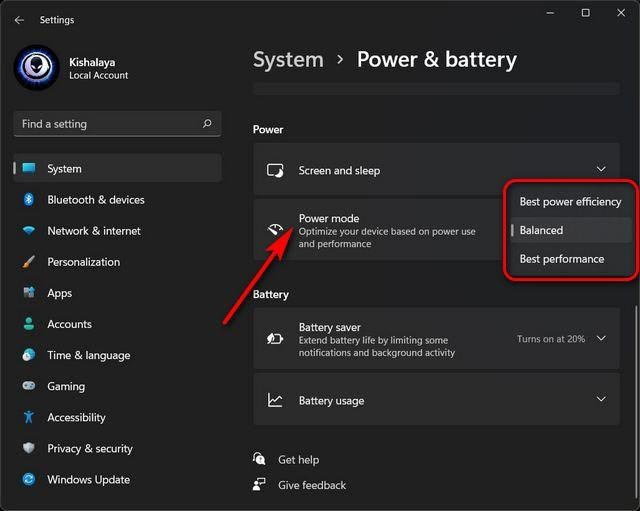
If you have a laptop and you want the best performance in Windows 11, while you don’t care for how long it’s going to work on battery, change your power plan. Open Settings – System – Power battery. In the power plan drop-down list, select High Performance.
Step 5. Configure hard disk defragmentation
Over time, pieces of files get scattered all over the hard disk, and this can also affect your computer’s performance. This problem can be fixed by giving your hard disk a defragmentation session.
Open Settings – System – Storage – Advanced storage settings – Drive optimization. Select a hard disk from the list and click “Optimize”.
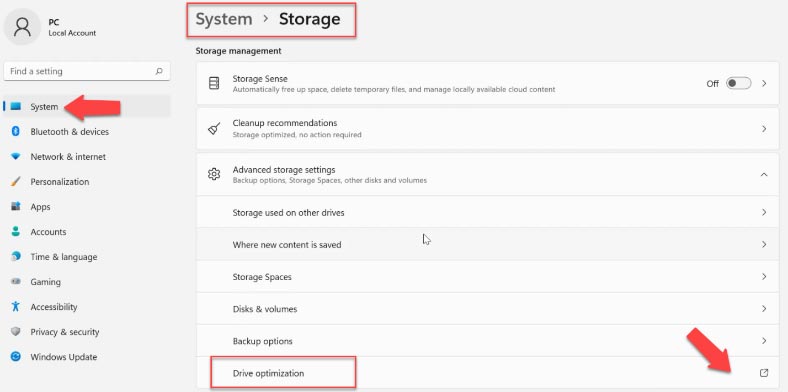
There’s one important thing to keep in mind: it’s not recommended to defragment an SSD, as it will reduce its life cycle.
If “Optimization on schedule” it disabled, click on the “Change settings” button, check the box for “Run on schedule” and then choose how often it should be done. Generally, we believe that setting the schedule option to “Weekly” is the best choice.
The time required for disk defragmentation ranges from a few minutes to several hours and depends on the capacity of your storage and the degree of its fragmentation.
Step 6. Change from HDD to SSD and add more system memory
If you are still using a conventional hard disk as the home to your Windows, it’s high time to consider moving it to a solid-state drive. You will experience a huge performance boost, and you will be surprised by how quickly Windows can boot.
| Parameter | SSD (Solid State Drive) | HDD (Hard Disk Drive) |
|---|---|---|
| Storage Technology | Flash memory (no moving parts) | Magnetic platters and mechanical parts |
| Read/Write Speed | Very high (up to 3500 MB/s and more) | Low (up to 200 MB/s) |
| Reliability | High (no moving parts, less prone to damage) | Lower (mechanical parts can fail) |
| Storage Capacity | Typically up to 4 TB | Up to 16 TB and more |
| Power Consumption | Low | High |
| Price per GB | Higher | Lower |
| Data Access Time | Almost instant | Slower |
| Lifetime | Limited write cycles (typically 3,000-10,000) | Depends on mechanical wear |
| Heat Emission | Low | High |
| Noise | Silent | Audible mechanical noise |
| Weight | Lighter | Heavier |
| Fragmentation | Does not affect speed | Fragmentation affects performance |
These days, we don’t recommend installing any operating system on a hard disk, for any reason. And if your computer tends to freeze when you have many programs running at the same time, it is most likely that you need to add more system memory. As we all know, the amount of RAM has a serious impact on a computer’s speed and performance, and the more you have, the better.
Step 7. Disable restartable apps
To make your work faster and more comfortable, Windows 11 restarts some background apps after you log in. If you have a powerful computer, this feature could be something you really enjoy. On the contrary, you can disable it for older machines and get a performance boost in Windows 11.
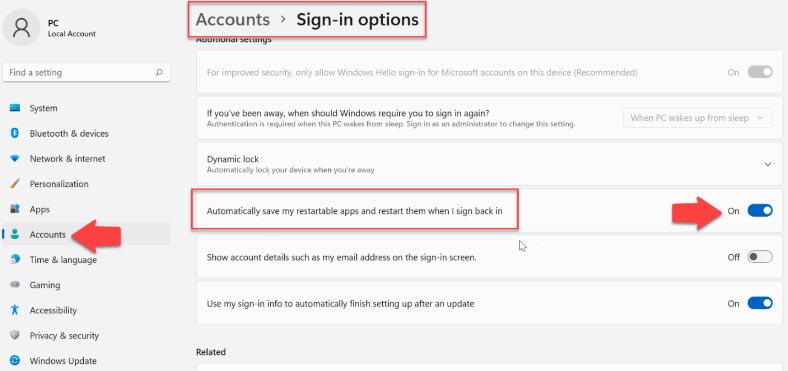
Open Settings – Accounts – Sign-in options, find “Additional settings” and turn off the option “Automatically save my restartable apps”.
Step 8. Remove unnecessary apps
If you no longer use some of the programs which are installed on your computer, it’s time to remove them. Each of them may have background processes or active automatic update options. All of these take up your computer’s system memory and processor time and thus make it work slower than it could. What is more, they also take away your precious disk space, and leave quite a lot of junk files in the registry.
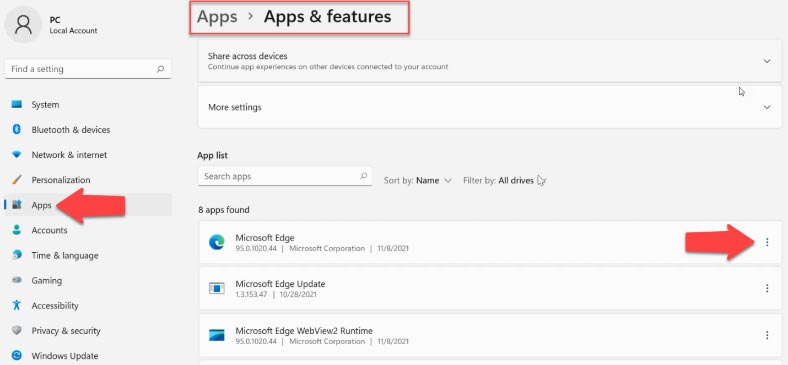
So open Settings – Apps – Apps/features – find the things you don’t need anymore, click on the three dots button and choose to uninstall them.
Step 9. Clean up temporary files
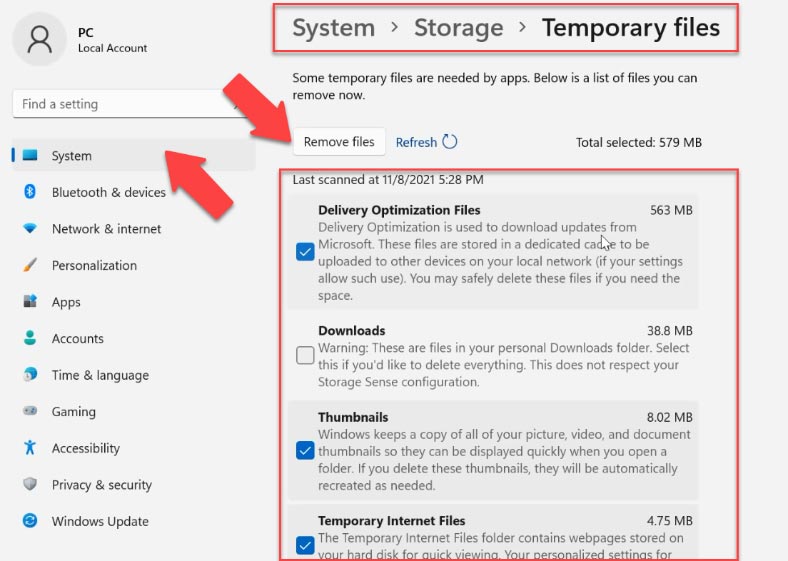
Temporary files stored on the system disk can also make your computer slower than it should be. To say goodbye to them, open Settings – System – Storage – Temporary files; then select what you want to remove – for example, temporary Internet files and thumbnails, then click “Remove files”.
Step 10. Disable notifications and tips
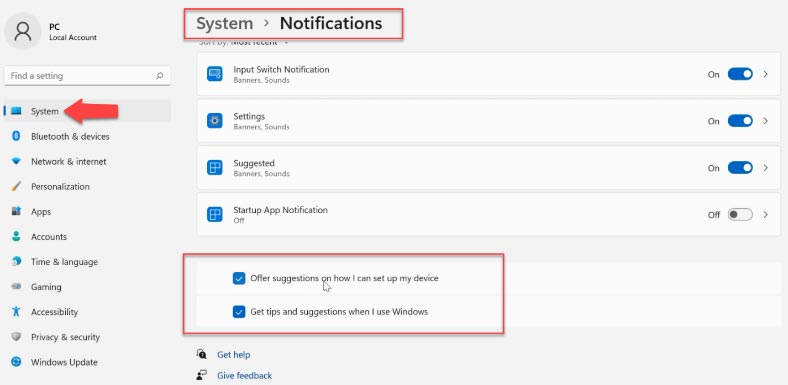
To improve your user experience, the operating system will often show you notifications, advice and recommendations. Before displaying them, it will scan the computer to see what can be improved – and reduce its performance while doing that. To have this feature disabled, open Settings – System – Notifications. There are two options here: “Offer suggestions on how I can setup my device” and “Get tips and suggestions when I use Windows”. Disable both of them.
Step 11. Disable background apps
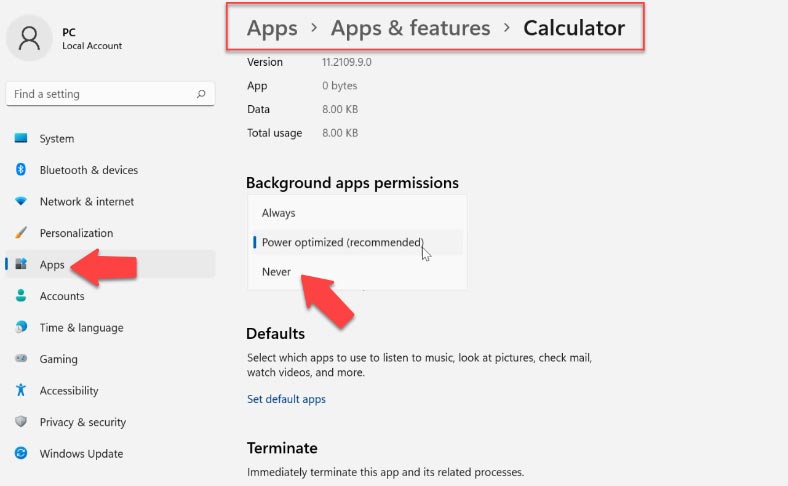
Additionally, there are applications that run in the background. They don’t have a graphical user interface, and unlike your typical apps, such programs work all the time since you install and configure them. To turn them off, right-click on the Start menu and open “Apps/features”, select an application from the list, and click on the three dots button to access “Advanced options”. After that, set the background app permission to “Never”.
To close a currently running background application, right-click on the Start button and start Task Manager; select the application from the list and click “End task”.
Step 12. Disable VBS
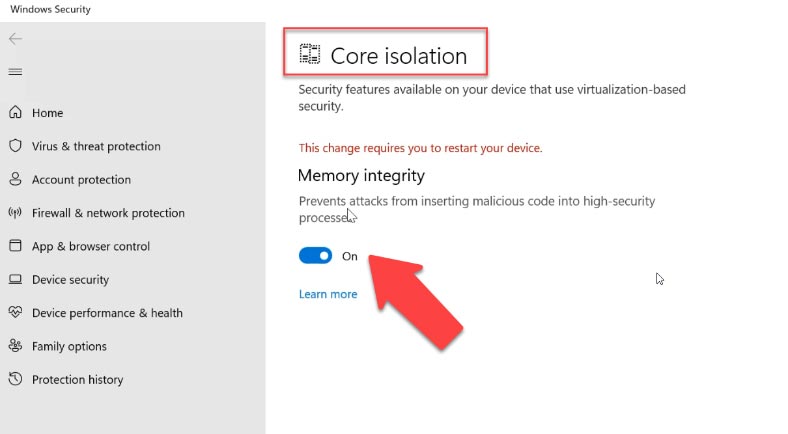
One more thing that you can disable is Virtualization-Based Security (or VBS for short). This is a security feature in Windows 11 that protects the operating system from unsafe code and malware, and it is a part of Hypervisor-Enforced Code Integrity (or HVCI). However, it can reduce computer performance in games from the moderate 5% to the enormous 25%. If you’re keen on games and you want to make the most of your rig while playing in Windows 11, just turn VBS off. Here’s how you do it: use the search feature to find “Core isolation”, open it and disable the option “Memory integrity”.
Step 13. Turn game mode off
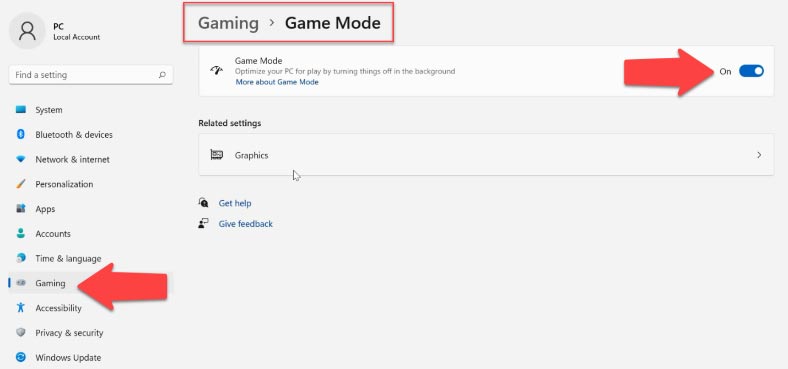
On the other hand, if you don’t play games at all, you can disable the game mode for good. It will stop DVR and other background services related to Xbox, and accelerate your computer a bit more. Open Settings – Gaming – Game Mode, and turn it off by dragging this slider. You can also turn off Xbox Game Bar.
Step 14. Configure virtual memory and paging file
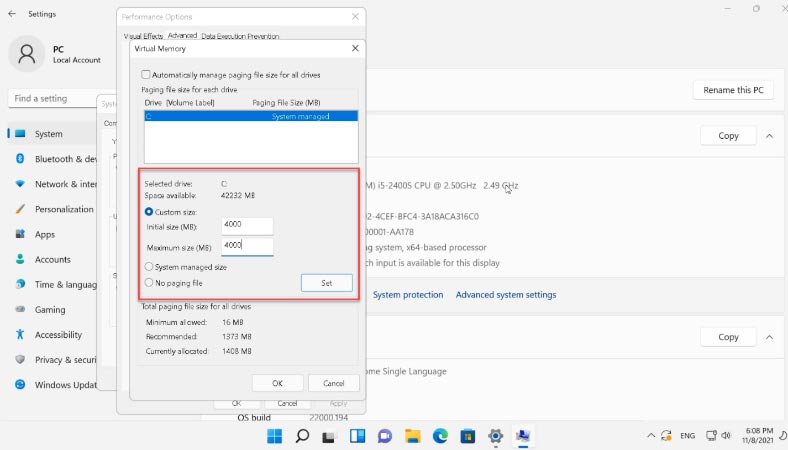
For the same purpose, we recommend to configure your computer’s virtual memory (paging file). This file should be located on the fastest disk of your computer or in the system partition. We do not recommend letting the operating system decide on the size of the paging file, or leaving it dynamic.
- Open Settings – System – About – Advanced system settings.
- In the window that opens, click on “Performance settings” – “Advanced”, and then click “Change” in the “Virtual memory” section.
- Uncheck the box for “Automatically manage paging file size”.
- Choose the drive where you’d like to keep the paging file, specify its size, click “Set” and OK.
- For the virtual memory settings to apply, restart the computer.
Step 15. Windows troubleshooter
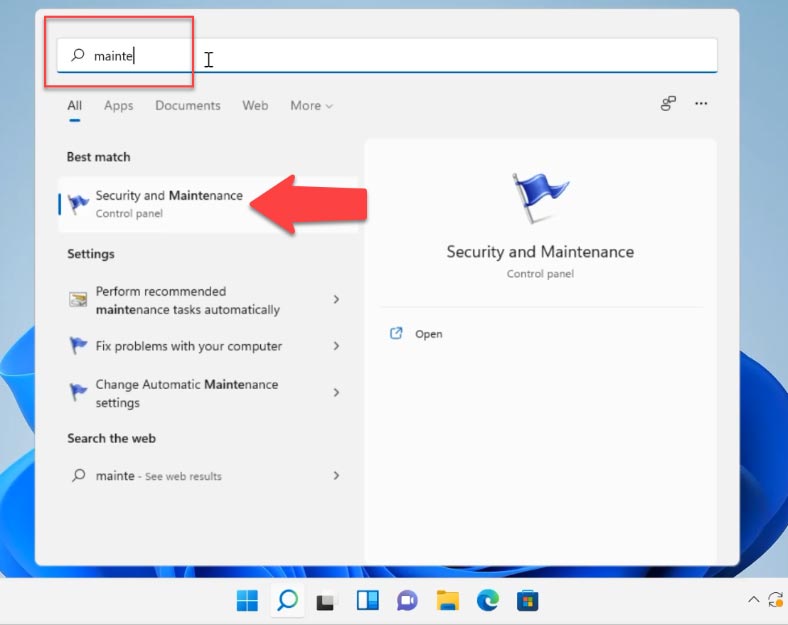
Windows 11 has a special utility that helps you find and troubleshoot various performance issues. Search for “Security and Maintenance” and start the automatic maintenance tool – click “Next” and then “Try troubleshooting as an administrator”. After the diagnostics is over, it is recommended to restart the computer.
Step 16. Disable search indexing
If your computer has a conventional hard disk, it can be too slow because of too many operations involving this disk – such as file indexing, caching, and file search results. Use the search feature to find and start the “Services” app, then find Windows Search on the list and turn it off. Right-click on the service and select “Properties” – “Stop” – “Apply”.
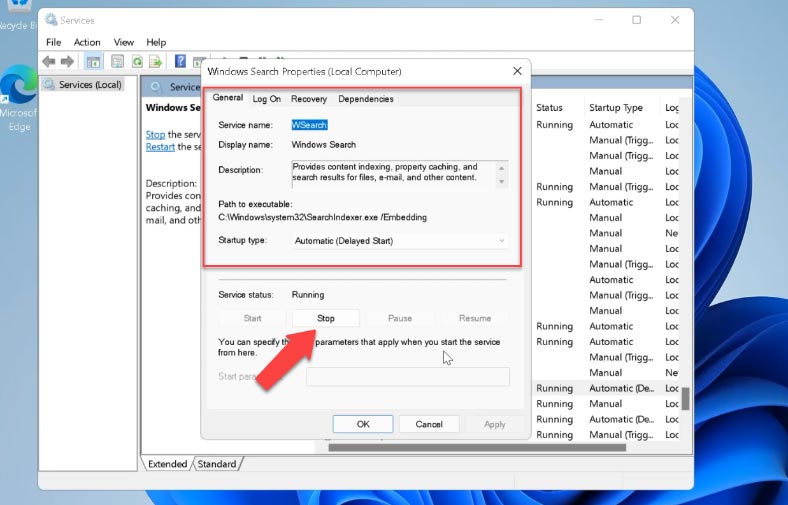
Now restart the computer. When this service is stopped, search will become slower than usual, but the system performance should improve.
Step 17. Update device drivers
Immediately after the installation, Windows 11 should work in a fast and stable manner unless some components are out of date or missing. We recommend installing new updates as soon as they are available. Another case involves obsolete drivers: if you haven’t updated them for a long time, the operating system can’t work properly.
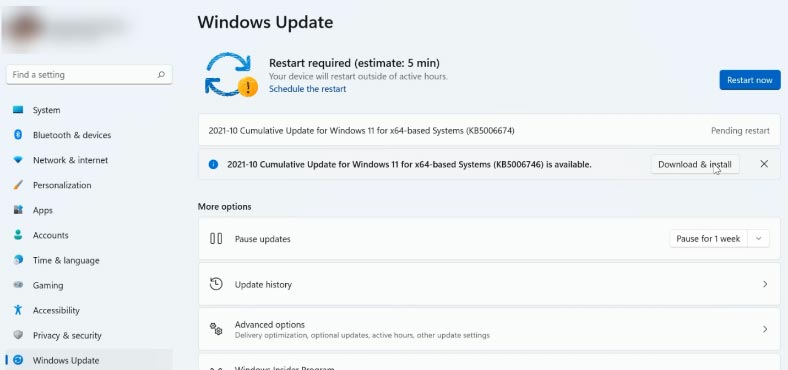
Therefore, it becomes difficult to achieve best performance, and the computer seems to slow down considerably. To keep your Windows 11 in a good shape, always make sure that all your drivers are up to date.
Step 18. Disable boot menu timeout
If you have several operating systems installed on your computer, their list is displayed when booting, and the default time for this is 30 seconds. To speed up the boot process, you can reduce this timeout or even turn it off. Open Settings – System – About – Advanced system settings – Startup and Recovery – Settings.
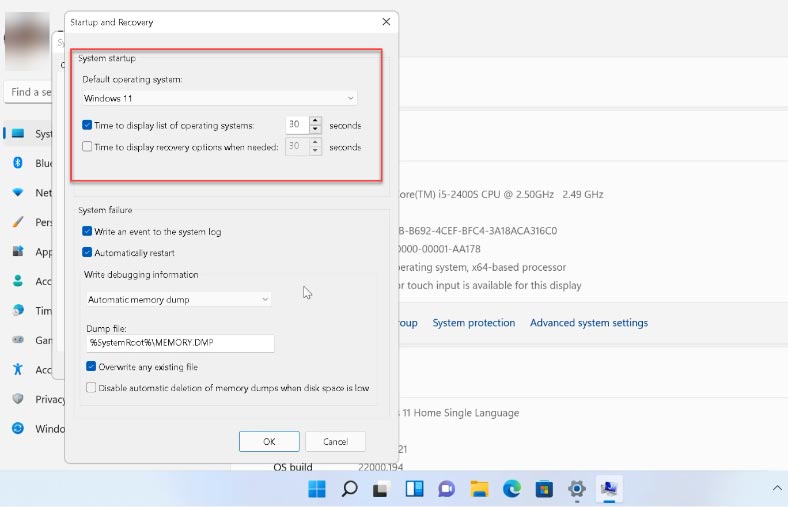
Modify the time or disable this option.
Step 19. Enable Storage Sense feature
The Storage Sense feature lets the operating system monitor the amount of free disk space and manage it by removing unnecessary files automatically. When enabled, it will take care of junk files even without your knowing about it. To enable it, open “Settings” – “System” – “Storage” – and turn on “Storage Sense”.
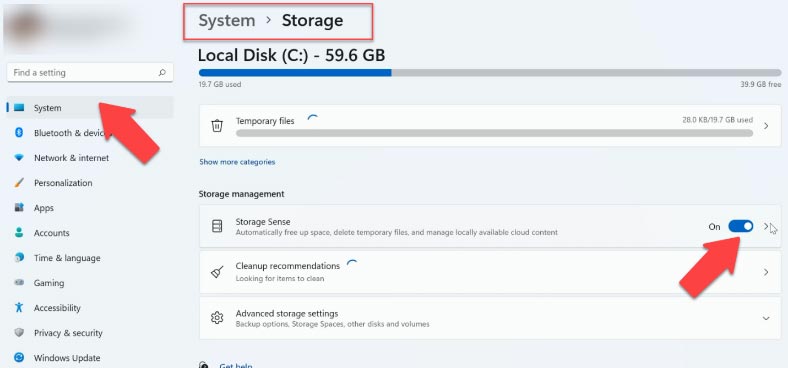
In its additional settings, you can configure cleanup schedules and tell the system what kind of files you want to remove automatically.
Conclusion
Now you know the main factors that cause the operating system to slow down, and a few tricks that will help your Windows 11 work faster.


