No Sound with HDMI TV and Computer: Troubleshooting Guide and Fixes
Experiencing no sound with your HDMI TV and computer? Don’t worry, we’ve got you covered! Our comprehensive guide will walk you through expert strategies and techniques to successfully resolve the no sound issue. Say goodbye to audio troubles and enjoy immersive sound on your HDMI TV and computer setup!
- Why there is no sound
- Method 1. Set the TV as your default playback device
- Method 3. Roll back graphics drivers
- Method 4. Run Windows Troubleshooter
- Method 5. Restart your Android TV
- Method 6. Select the proper HDMI port and cable
- Method 7. Turn Bluetooth off
- Method 8. Change boot options in BIOS
- Conclusion
- Questions and answers
- Comments
As we all know, the HDMI technology allows transferring digital video and audio signal simultaneously from a computer to a television set. However, many users complain about having no sound when they connect their TV to the computer and try to play something like videos or movies. If you also face this problem, this article is for you, because I’m going to show you several ways of fixing it on a Windows operating system.

🔈❌ How to Fix No Sound Problem with an HDMI TV on Windows 🔈❌
Why there is no sound
First of all, let’s find out why exactly there is no sound. Actually, there are lots of things that may potentially cause this problem: To begin with, check if your cable is all right: use it to connect another TV or display with built-in speakers to your computer and see what happens. If you hear the sound, you should check your computer settings; if there is no sound, replace the HDMI cable.
Check the sound settings on your TV – the sound might be disabled.
Talking of computers, here are some common things causing sound issues:
- A wrong sound driver or an incompatible playback device are selected in the settings.
- Or, speakers are selected instead of the HDMI port in default sound settings.
The first step to take after you connect the TV is to restart your computer, as this simple fix is usually the best way to eliminate minor issues and software errors.
Method 1. Set the TV as your default playback device
When several sound output devices or sound cards are connected to one computer, there might be a conflict between them. It is quite possible that an HDMI audio output is not enabled automatically because the speakers (external or built-in) are determined as the default output device.
To change this setting, open Settings – System – Sound, and select the proper output device.
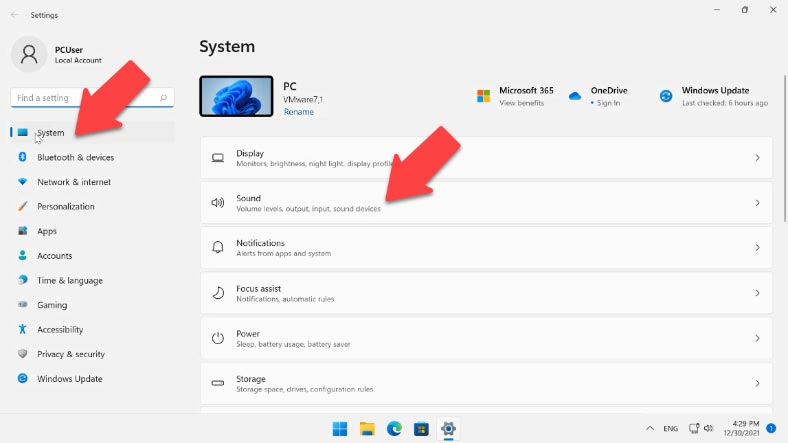
In this tab, select the corresponding output device.
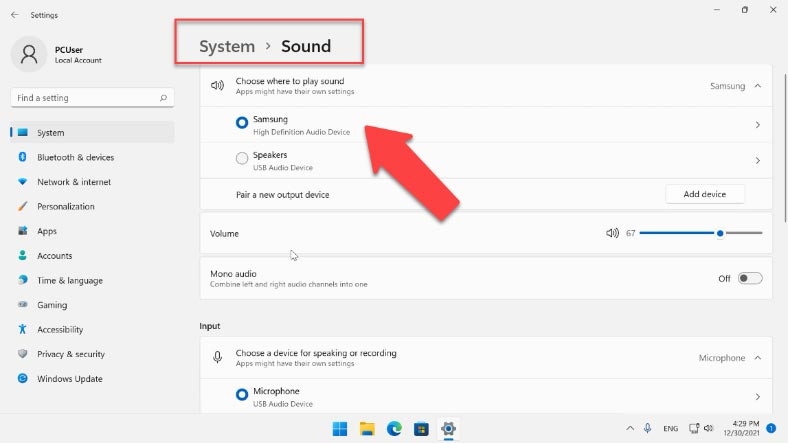
In this section, open “Sound control panel” (More sound settings) – and jump to the tab “Playback”, and your TV should be displayed as one of the choices. Right-click on the TV and choose to set it as default device.
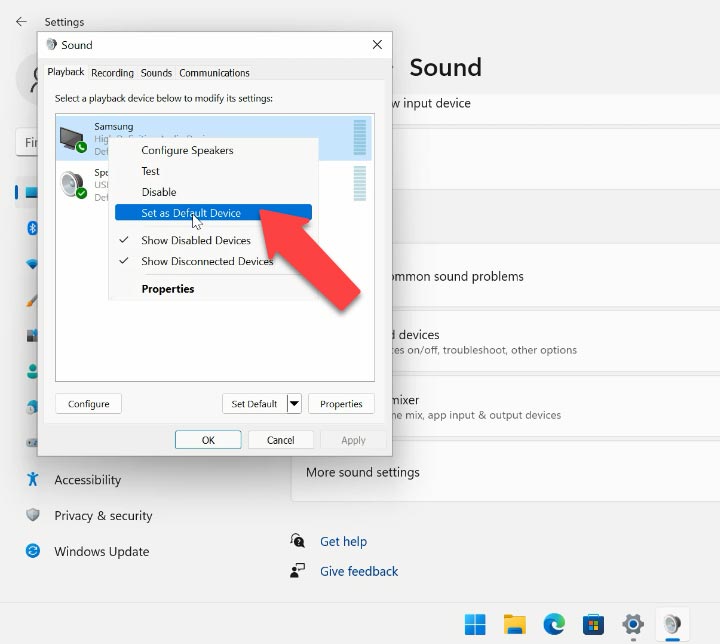
If the TV is not listed here, right-click on an empty area and check if the settings “Show Disabled Devices” and “Show Disconnected Devices” are enabled.
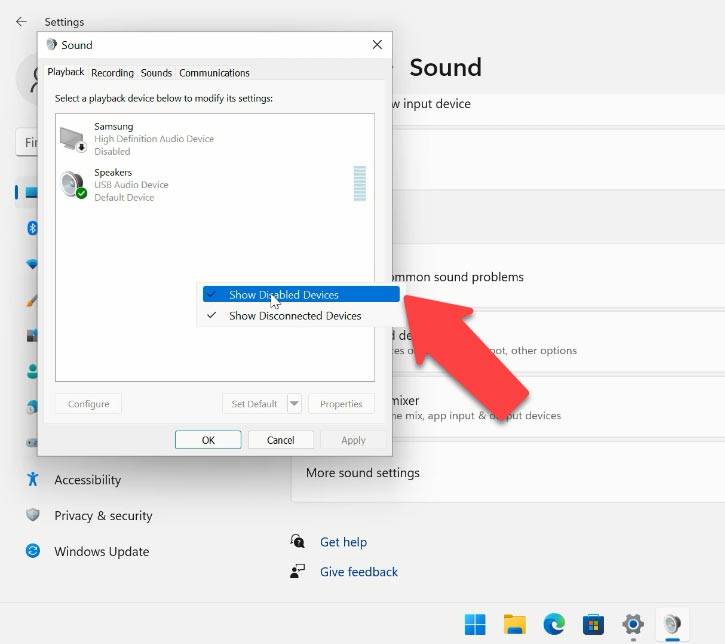
Now right-click on an audio device and check if it is enabled. If it’s not, click here to enable it. After that, click to set it as default choice, “Apply” and OK to save the changes and close the window. After that, check if you can hear the sound. In the same way, you can switch the sound back to the speakers.
Method 2: Update your current drivers
One more thing to cause your sound to disappear when you connect your TV by HDMI is installation of incompatible drivers. So the first step should be to update them. You can do it manually by downloading and installing suitable drivers from the manufacturer’s website – and remember to check that the drivers are compatible with the version of your Windows operating system.
Also, you can update drivers from Device Manager. Right-click on the Start menu and select Device Manager. In the window that opens, select “Sound, video and game controllers”.
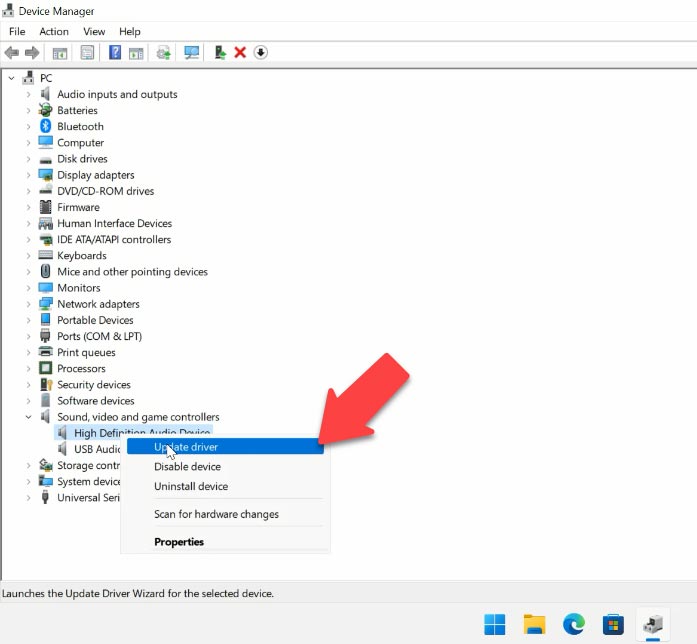
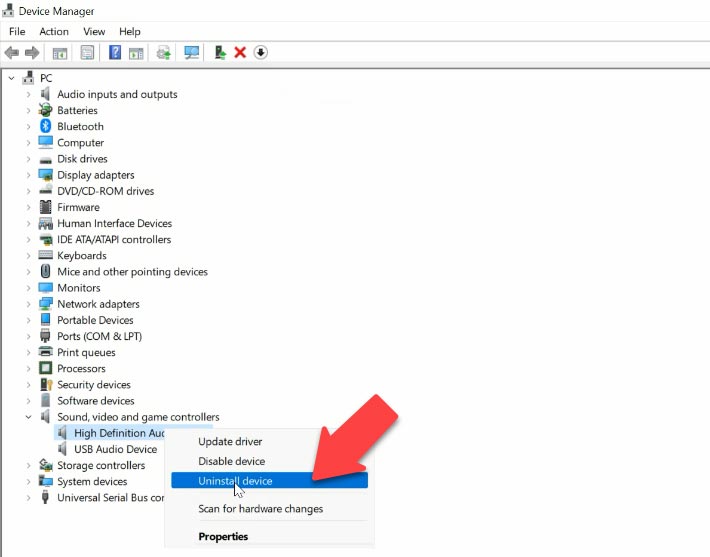
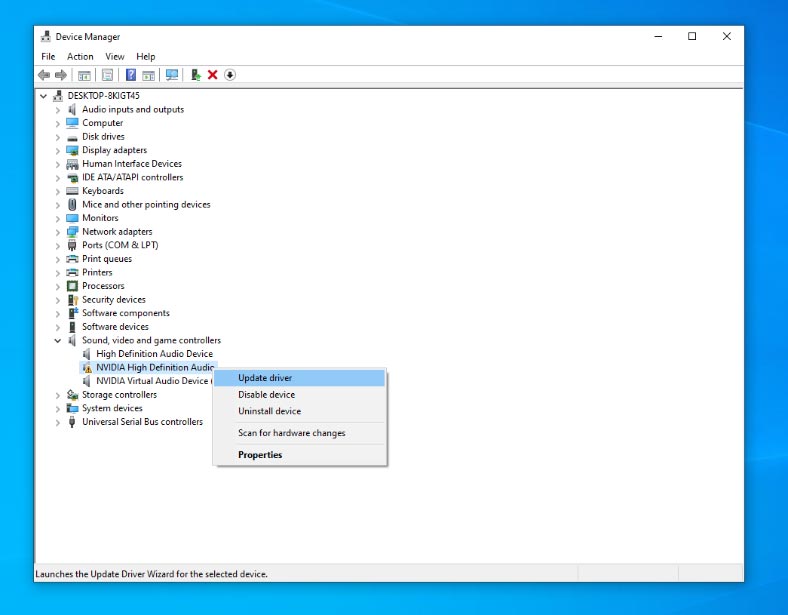
Right-click on the device and choose “Update Driver” – “Search automatically”. Alternatively, right-click on the device and select “Uninstall device” – “Uninstall”.
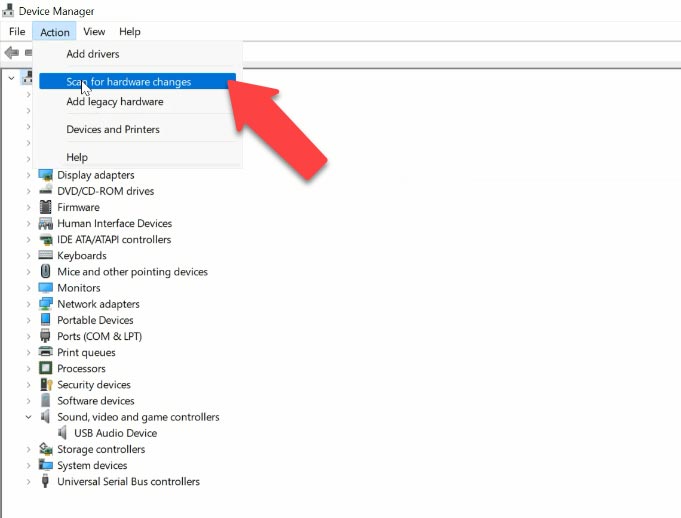
Then look at the menu above and click “Action” – “Scan for hardware changes”. After that, the adapter should be reinstalled, and the sound on your TV connected by HDMI should work properly.
There are more settings to check: expand “Audio inputs and outputs” and if there is a grey arrow next to a device, right-click on it and choose “Enable”.
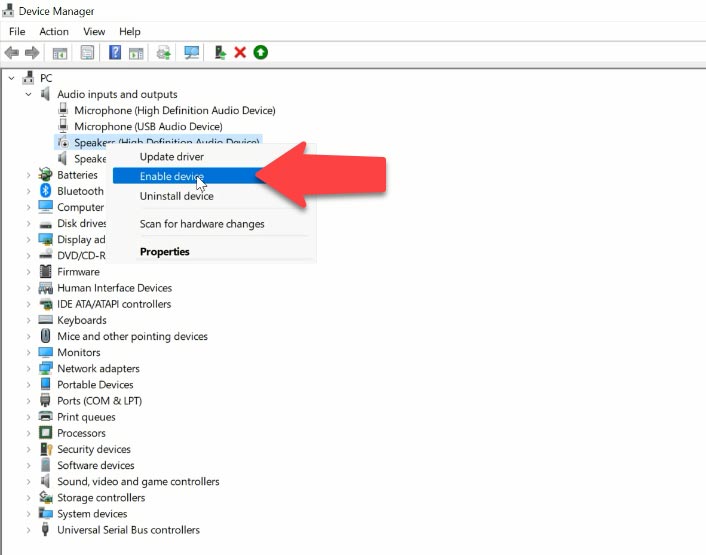
Another method is to uninstall the device and update the drivers.
After that, jump to “System devices”, expand it and find “High Definition Audio Controller” to see if it is enabled. We strongly recommend against uninstalling it – if you do that and restart the computer, it may not be installed automatically, and the sound might be gone for good.
Another thing to check is to have a look in the “Sound, video and game controllers” and find out of there are items like AMD or NVIDIA High Definition Audio – which depends on the actual graphics adapter installed in your system. Enable it, try updating the driver, or uninstalling it and scanning the configuration for hardware changes.
Method 3. Roll back graphics drivers
If your HDMI port worked properly but you began encountering issues after an update, rolling back your graphics drivers could help you. When you roll back a driver, the currently installed driver is removed and replaced with its previous version. This process should eliminate any driver errors and it may fix the problem of having no sound on your TV.
Open Device Manager and find “Display adapters”. Right-click on your graphics card and open its properties. After that, open the Driver tab and click to “Roll Back Driver”, specify the reason.
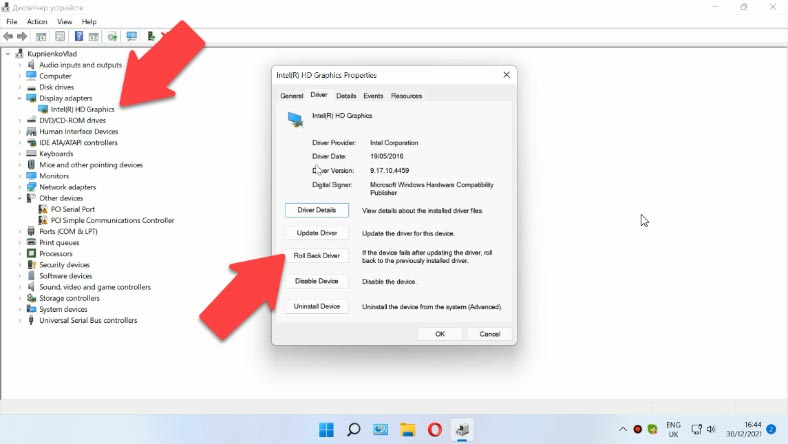
Then click “Yes” to restart the computer. After that, it will boot with the previous version of the graphics drivers. If the “Roll Back Driver” option is greyed out, it means that your operating system does not have any older drivers to fall back on. If that’s the case, try other methods instead.
Method 4. Run Windows Troubleshooter
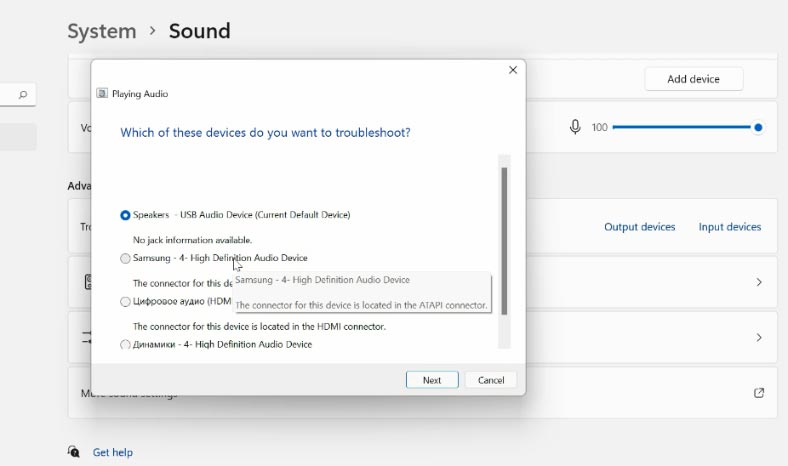
Another method to fix the problem is to use the integrated troubleshooter tool. Open Settings – System – Sound – More sound settings, and click on the option “Troubleshoot common sound problems” for output devices.
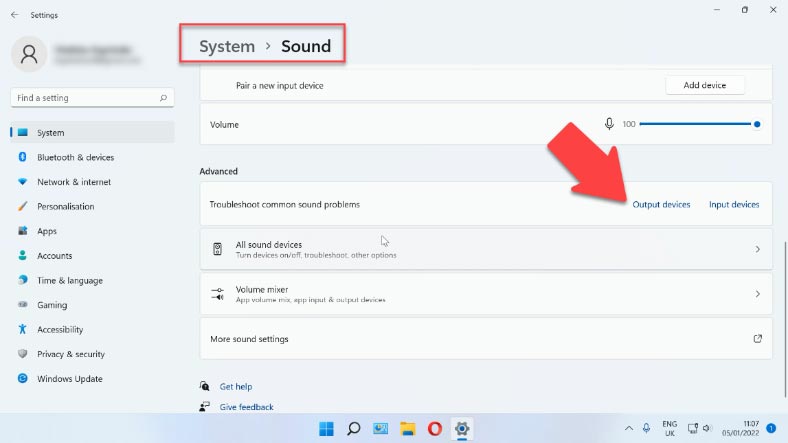
Select the device from the list and click “Next”. You will see some directions on the screen. Follow them to run the troubleshooter and apply recommended fixes. Restart the computer if necessary.
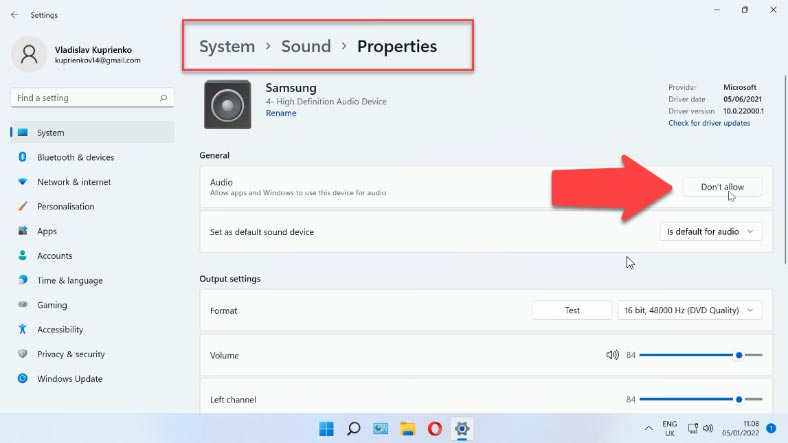
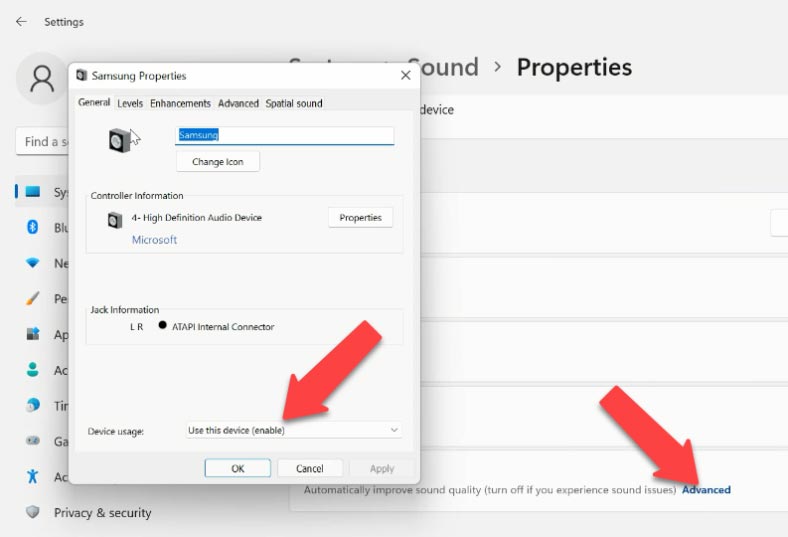
Check the sound settings to see if this device is disabled: open its properties and enable sound here. After that, open “Advanced” to see the “Properties” window, switch to the “General” tab, and find “Device usage”, then change this option to “Use this device” (enable).
Then jump to the tab “Levels” to see if the device is enabled here. The slider should not be anywhere below 50%, and the speaker icon should not be red.
Method 5. Restart your Android TV
If you want to connect a Smart TV, try restarting it after all the cables are in their proper ports. Depending on a specific model and operating system, the restart process may differ, but the usual way is to press and hold the on/off button for a while.
Alternatively, you can find the restart option in the settings.
| Method | Instructions |
|---|---|
| Restart via Menu |
1. Open Settings. 2. Select “System”. 3. Choose “Restart”. 4. Confirm the action. |
| Physical Restart |
1. Unplug the TV from the socket. 2. Wait for 10-15 seconds. 3. Plug the TV back in. |
| Restart Using Remote |
1. Press and hold the power button on the remote. 2. Select “Restart” from the menu. |
Method 6. Select the proper HDMI port and cable
Some TVs have more than one HDMI port, so you should always double-check if you stick the cable into the proper port.
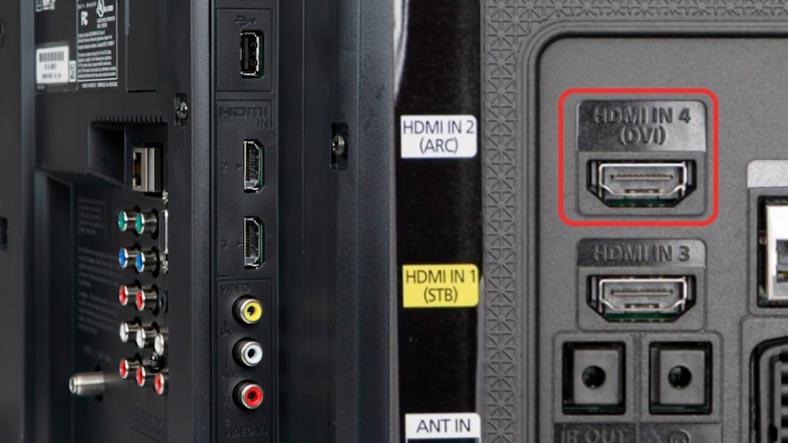
Usually, there is some extra information next to an HDMI port in addition to its number (you can see such abbreviations as DVI, STB, ARC, or MHL). Most of the time, such ports differ by the functionality they offer. If your device has an HDMI (DVI) port, it means this port is intended to connect the TV to computers and laptops, and your TV is going to work as a display – that is, without any sound.
For example, if your TV has an HDMI (DVI) port version 1.3, and you connected your computer to this port with the cable, you’re not going to have any sound at all. On the other hand, the newer HDMI version 1.4 introduces proper support for sound signal. So if you have a relatively old TV, the older standard could be the root of your problem. Try inserting the cable into another port.
| Version | Maximum Resolution | Maximum Refresh Rate | 3D Support | ARC Support | CEC Version | HDR Support |
|---|---|---|---|---|---|---|
| HDMI 1.0 | 1080p | 60 Hz | No | No | 1.0 | No |
| HDMI 1.4 | 4K (30 Hz) | 30 Hz | Yes | Yes | 1.2 | Yes |
| HDMI 2.0 | 4K (60 Hz) | 60 Hz | Yes | Yes | 1.3 | Yes |
| HDMI 2.1 | 8K (60 Hz), 4K (120 Hz) | 120 Hz | Yes | Yes | 2.0 | Yes |
Method 7. Turn Bluetooth off
Some users claim they have fixed the problem by turning off Bluetooth on their laptops. The television sound reappeared as soon as they did that.
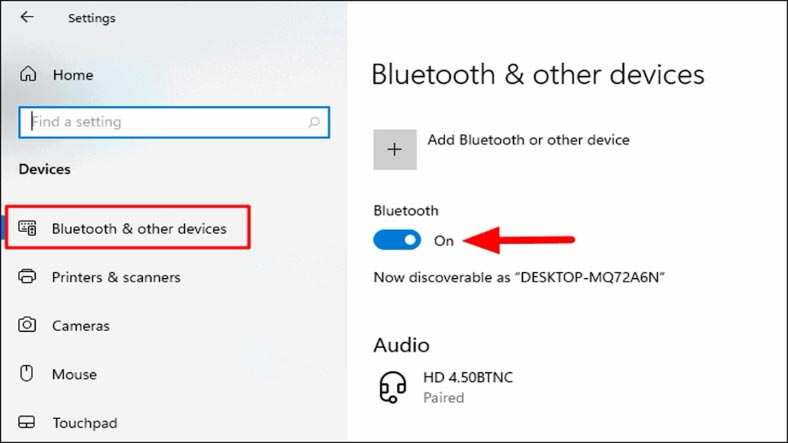
So you can also try turning off Bluetooth in the system settings, or disabling the Bluetooth adapter in Device Manager.
Method 8. Change boot options in BIOS
In one of Internet forums, users discovered that they could fix the sound problem with a Lenovo laptop by changing boot options in BIOS.
With “Legacy Support” and “Legacy First” options enabled, there was no sound signal on HDMI. Everything worked fine when they switched to UEFI boot mode.
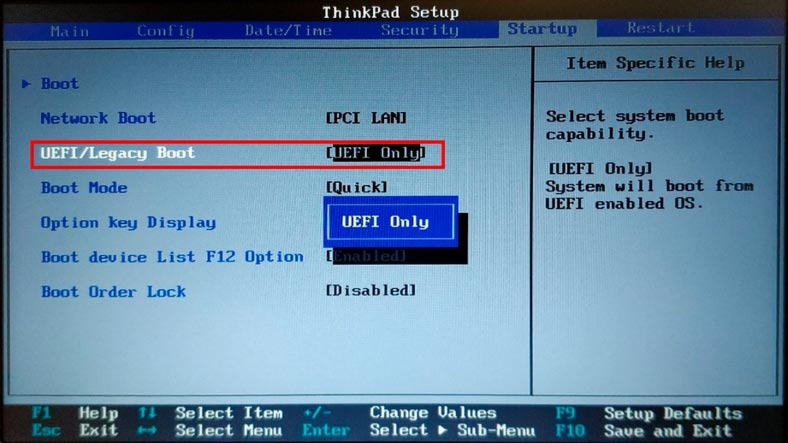
So find the Boot section in your BIOS and change this option.
Conclusion
In this article, we have collected the most widespread issues that may cause loss of sound on your TV connected by HDMI. However, the variety of TV, computer and laptop models available today is truly immense, so you may encounter problems different from the ones we have described here.


It seems like you're experiencing an issue with sound while playing games on your device. There could be a few reasons why this is happening. Here are some troubleshooting steps you can try to resolve the problem:
Check Game Settings: Make sure the in-game sound settings are properly configured. Some games allow you to adjust sound volumes for different elements, such as music, effects, and voice.
Check System Volume Mixer: Your computer might have a separate volume mixer for different applications. Make sure that the game's volume is not muted or set too low in the system volume mixer.
Update Audio Drivers: Outdated or corrupt audio drivers can cause sound issues. Check if there are any updates available for your audio drivers and install them.
Restart the Game: Sometimes, games can encounter glitches that affect sound. Try restarting the game to see if the sound returns.
Restart Your Computer: A simple restart of your computer can sometimes resolve software-related sound issues.
Check Hardware Connections: Ensure that your speakers or headphones are properly connected to your computer. Sometimes, loose or improperly connected cables can cause sound problems.
Check Game's Support Forum: If the issue persists, check the game's official support forum or community for any known issues or solutions that other players may have found.
Check Windows Sound Settings: If you're on Windows, check your sound settings. Right-click on the sound icon in the taskbar and select "Open Sound settings." Make sure the correct output device is selected.
Check Game and System Updates: Ensure that both your game and operating system are up to date. Sometimes, updates can include fixes for sound-related issues.
Reinstall the Game: If none of the above steps work, you could try uninstalling and then reinstalling the game. This might help resolve any corrupted game files causing the sound problem.
Test with Other Games: If the issue is specific to one game, try playing other games to see if you encounter the same sound problem. This can help determine if the issue is game-specific or more widespread.
If you've tried all these steps and the problem still persists, you might want to consider seeking technical support from the game's developer or your computer manufacturer. They might be able to provide more specific guidance based on your system's configuration and the game you're playing.