Syncing Google Chrome Bookmarks: PC, Android, and iOS Devices Guide
Learn How to Sync Google Chrome Bookmarks Across Devices! Tired of managing bookmarks separately on different devices? In this essential tutorial, we’ll show you how to sync Google Chrome bookmarks between your PC, Android, and iOS devices seamlessly. From enabling sync settings to ensuring your bookmarks stay up-to-date across all your devices, we’ll cover everything you need to know to streamline your browsing experience. Whether you’re a beginner or an experienced user, these step-by-step instructions will help you keep your bookmarks organized and accessible wherever you go.
- How to Display, Configure and Hide Bookmarks in «Google Chrome»
- How to Sync Bookmarks Between a Personal Computer, «Android» and «iOS» Devices
- Conclusion
- Questions and answers
- Comments
In this article, we will show in detail how to quickly enable, add or disable bookmarks in «Google Chrome», and how so synchronize them with other data (such as browsing history, passwords, autofill data etc) between various computing devices running popular operating systems («Windows», «Android» and «iOS»).

How to View Browsing History for Google Chrome, Mozilla Firefox, Opera, Edge, Internet Explorer 🌐⏳💻

How to Save and View Saved Passwords in Chrome, Opera, Yandex, Firefox, Edge and Explorer 🔐 🌐 💻
How to Display, Configure and Hide Bookmarks in «Google Chrome»
Turning on bookmarks in Google Chrome is quite easy – just follow the few steps below. «Google Chrome» interface is very minimalistic so it doesn’t distract user’s attention from what is shown in the current tab, and that is why most bookmarks are hidden by default. However, the bookmark panel is not going to clutter the «Google Chrome» page while it can improve the convenience of use greatly, especially if there are so many websites bookmarked by the user.
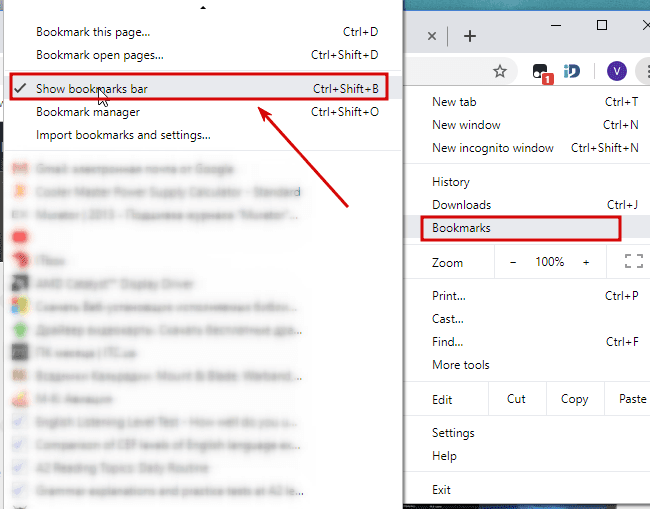
Open «Google Chrome» and look in the upper right corner of the screen, click the «Customize and control Google Chrome» button with three vertical dots on it.

In the context menu that appears, put the cursor on the «Bookmarks» line and wait until the menu shows up: select «Show bookmarks bar». Otherwise, make the bar visible by using the keyboard shortcut Ctrl + Shift + B (in «Windows») or Command + Shift + B (in «MacOS»).
The bookmarks bar will be displayed right under the address bar and show all saved webpages.
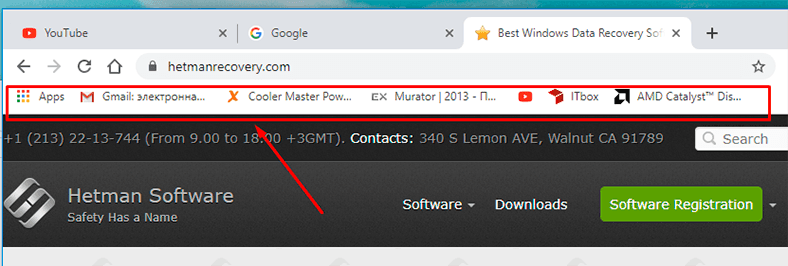
However, if you don’t want to see the bookmarks bar while browsing, you can disable it by following the same steps but in the reverse order. Either form the settings menu or with a keyboard shortcut, make «Google Chrome» look minimalistic again.

«Google Chrome» settings enable you not only to create new bookmarks but also import previously saved bookmarks from other web browsers, in various formats. Go to the «Bookmarks» section in the «Google Chrome» settings menu and select «Import bookmarks and settings».
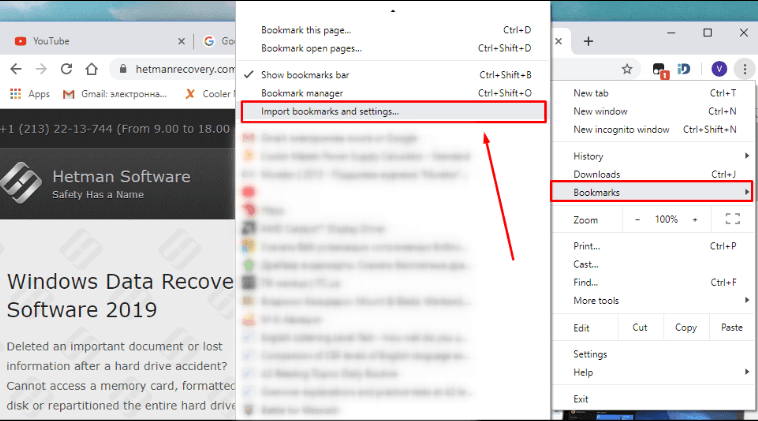
In the new page you will be suggested to import bookmarks both from default browsers within the «Windows» operating system («Microsoft Edge» and «Microsoft Internet Explorer»), and from an «HTML file», previously created in any other browser. Click on «Choose file» and browse for the bookmarks file to be imported.
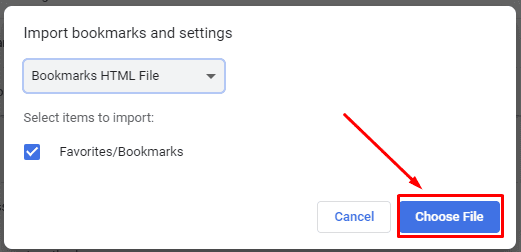
Now bookmarks and user settings are accessible in «Google Chrome».
How to Sync Bookmarks Between a Personal Computer, «Android» and «iOS» Devices
How to Turn Synchronization On or Off in «Google Chrome»
Using the single «Google Chrome» account you can save your data and access it from any computing device. The main requirement is to enable synchronization.
It is difficult to overestimate the advantages of using this mode as with synchronization you are in for some real-life benefits:
- All synchronized user data including bookmarks, passwords, browsing history and other information will be available on all devices and users will be able to update this information from any device.
- Automatic sign-in to «Google» services such as «Search», «Gmail», YouTube, «Google Drive», «Google Photos» becomes possible.
- When switching to another computing device (desktop or mobile) user data becomes available as soon as you sign in to your «Google» account.
- If you enable browsing history and search history, information on all actions in «Google Chrome» will be saved and used by «Google» to personalize its services.
This is how you can enable synchronization for computing devices running different operating systems.
Personal Computers
To enable synchronization in «Google Chrome», you need to have a valid «Google» account.
On your computer, open «Google Chrome», and in the upper right corner on the screen next to the address bar, click on the «current user».

You will be suggested to turn on synchronization by clicking on the corresponding button.
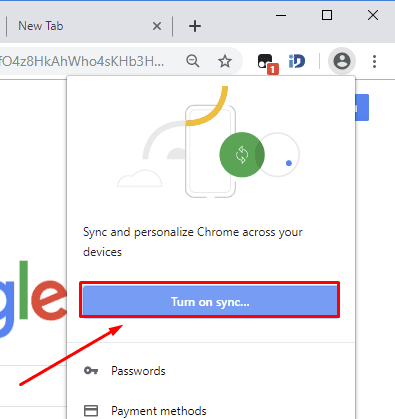
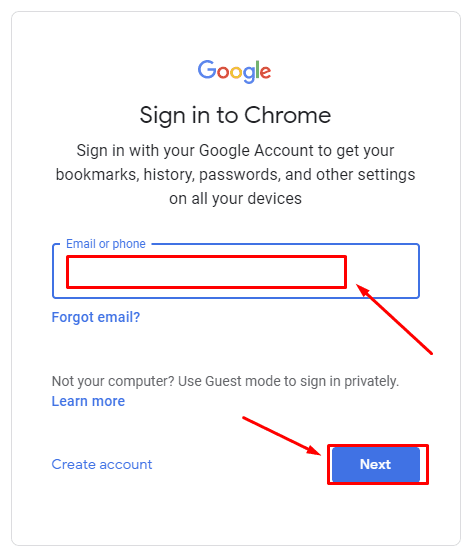
To start, you only need to sign in to your account. Type the phone number or email address that you used to create the account, and click «Next».
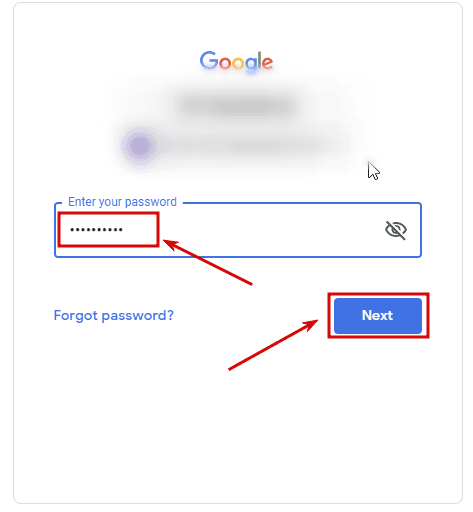
Now enter the password to confirm sign-in to your account and click «Next» again.
In the end, «Google Chrome» will show a pop-up window «Turn on sync», where you need to click «Yes, I’m in» to finally enable synchronization.
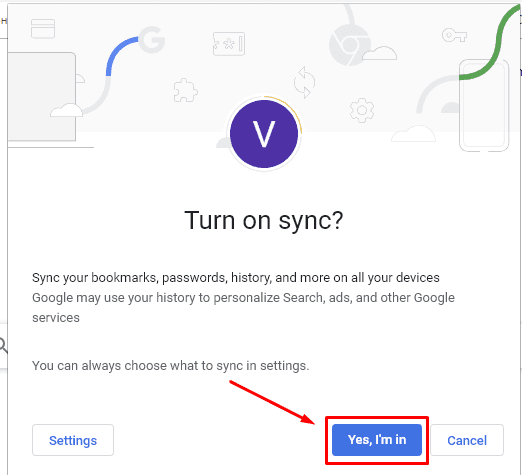
If you ever need to disable synchronization, you can still see your bookmarks, browsing history, payment methods and other data on your computer. However, if you make any changes, these won’t be saved to your «Google» account, and won’t be synched with other connected devices either. If you turn syncing off it also means signing out from other «Google» services such as «Gmail» or «Photos».
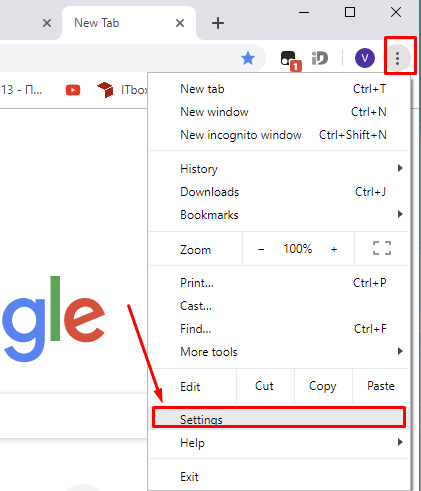
To turn syncing off, open «Google Chrome» again and click on «Customize and control Google Chrome» button next to the address bar and looking like three vertical dots. Select «Settings» from the context menu that appears.
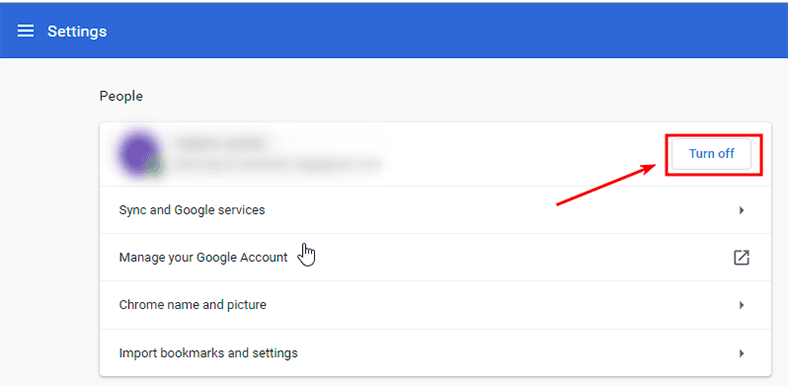
In this page, find the tab «People» and click on «Turn off».
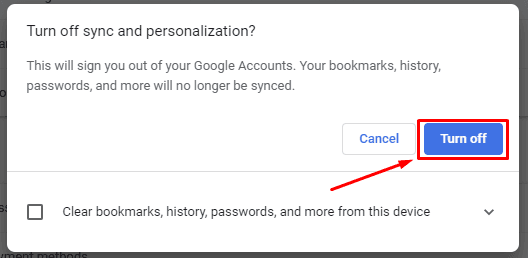
Confirm your decision to disable syncing by clicking on «Turn off» again in the pop-up notification, and synchronization will stop.
«Android» and «iOS» Devices
The procedure for turning on and off the sync mode on mobile devices running either «Android» or «iOS» is almost identical and work properly for both operating systems.
Note. Use a previously created «Google» account to enable this mode.
On an «Android» mobile device (phone or tablet), or an «iOS» device («iPhone» or «iPad»), open «Google Chrome». If you don’t have this app on a specific device, download it from Google Play or App Store, respectively, and install it before you proceed.
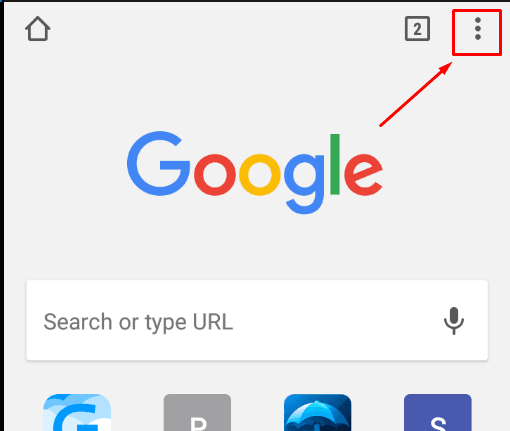
In the upper right corner of the screen, tap on the button with three vertical dots to access «Google Chrome» controls.
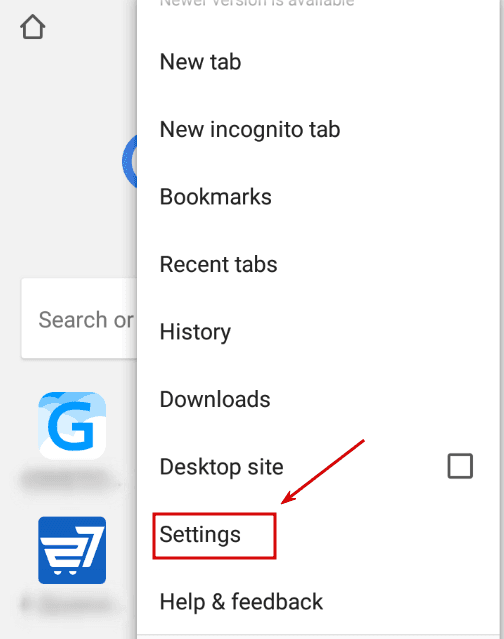
In the menu that appears, select «Settings».
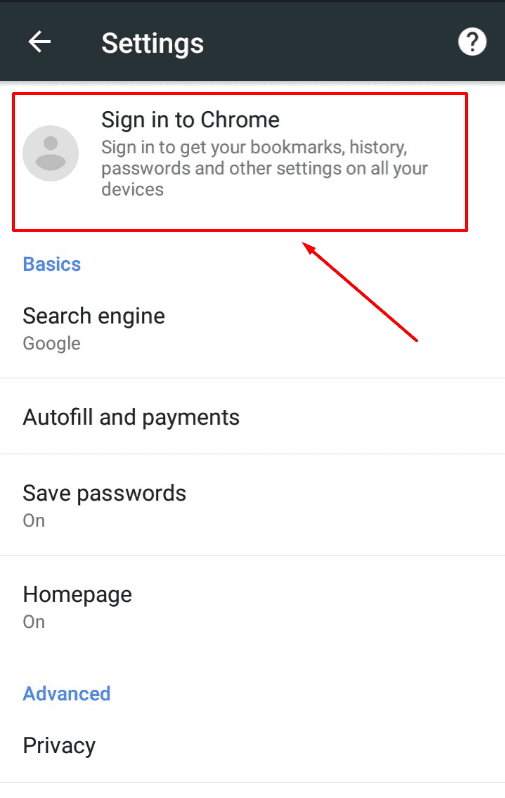
In the settings page, tap on «Sign in to Chrome», (it’s in the top part of the screen).
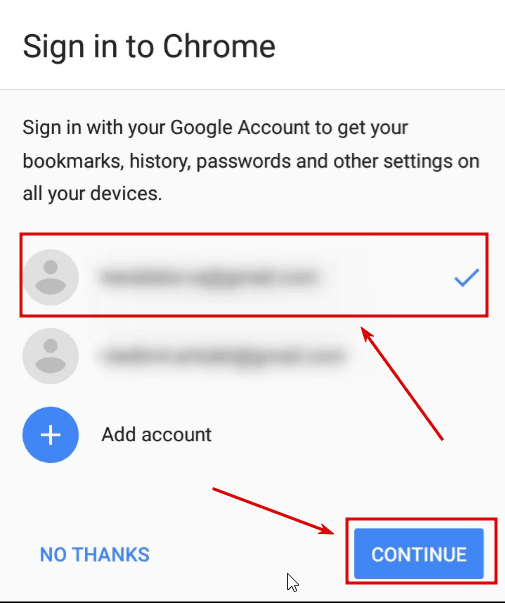
In the «Google» sign-in page, select from the list the user name you need (the selection mark will appear next to it) and then tap «Continue».
In the welcome page informing you about user identification, «Chrome» sync enabled and personalization of «Google» services, tap «ОК» to finish.
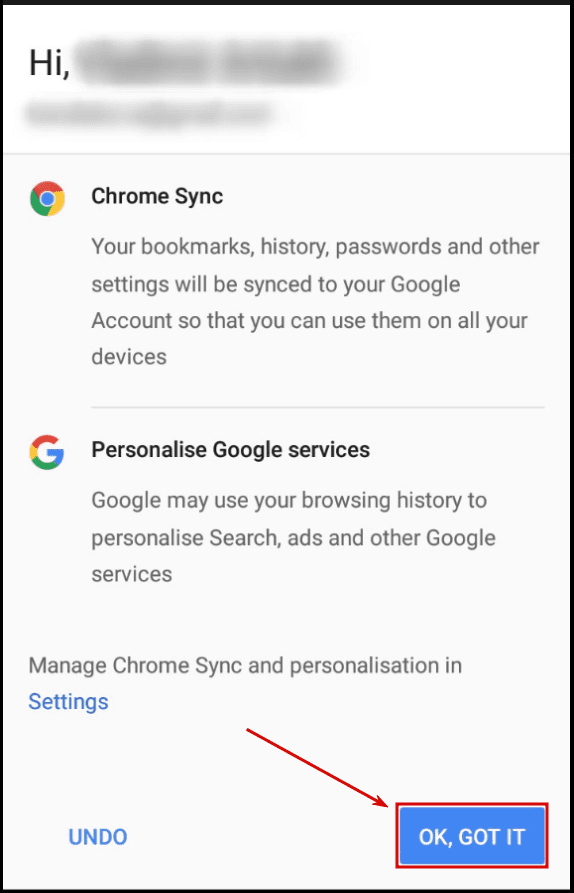
Now «Chrome» synchronization with the selected «Google» account on a mobile device is complete.
When «Chrome» synchronization is disabled, bookmarks, history, recent tabs and other data will still be available, as is the case with desktop computers. However, if any changes are made, these won’t be saved to the user’s «Google» account or synced to other devices.
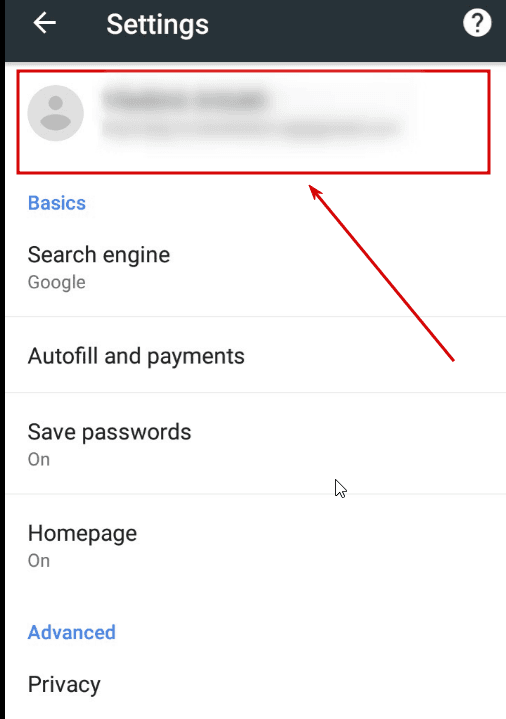
If you want to turn off synchronization on a mobile device, open «Google Chrome», again, go to the controls menu (three vertical dots in the upper right corner of the screen) and select «Settings».

In the top part of the screen, tap on the user’s name.

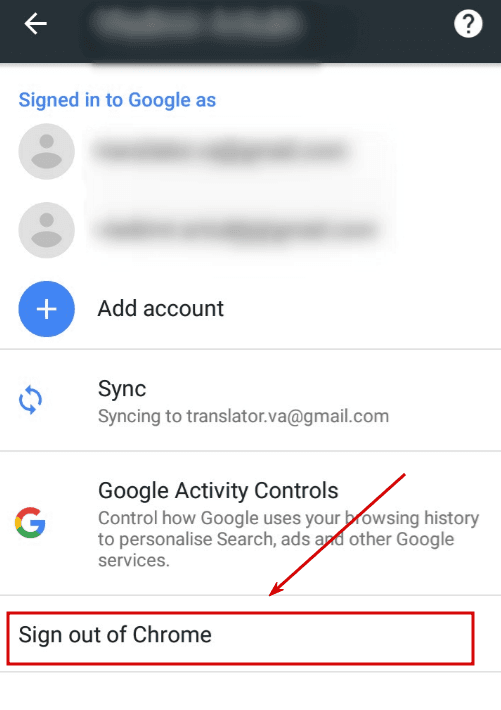
In the account page, scroll down and select «Sign out of Chrome».
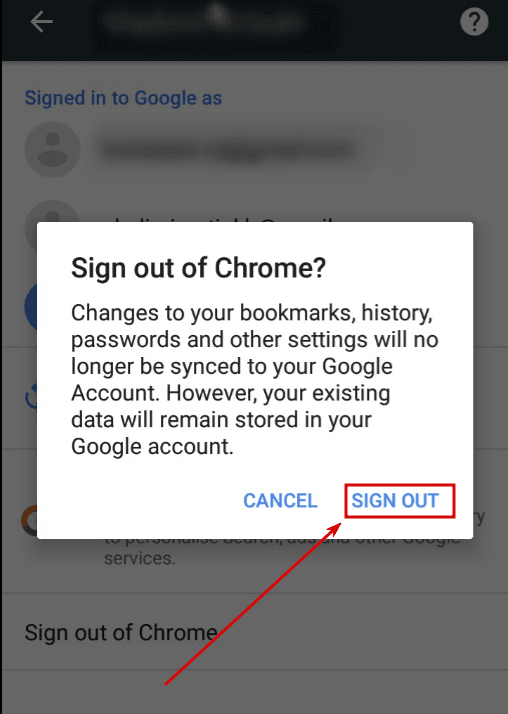
In the system warning «Sign out of Chrome?» tap on «Sign out», and synchronization for «Chrome» will be disabled.
Customize and Control Synced Data
Now that the sync is on, you can access all information saved to the linked «Google» account, such as bookmarks, browsing history and opened pages, protected passwords, autofill data and so on from all kinds of devices.
If you don’t want to synchronize all your data or you’d like to choose certain type of data only, there is a sequence of steps to be taken – which will vary depending on the type of device you are using.
Personal Computers
On a trusted computer, open «Google Chrome», and click on the «Customize and control Google Chrome» button in the right corner next to the address bar. Select «Settings» from the context menu that appears.

At the top of the page, look at the «People» tab and select «Sync and Google services».
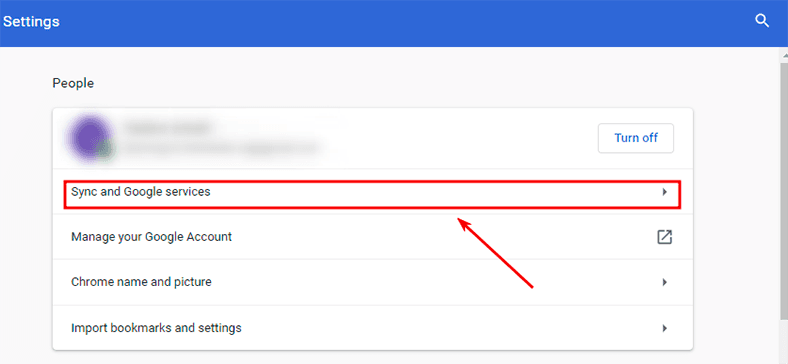
This way you can access various synchronization settings. At the top of the page, find and select «Manage sync».
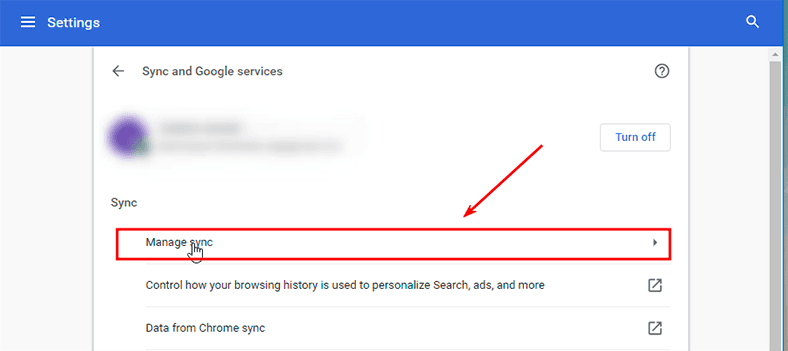
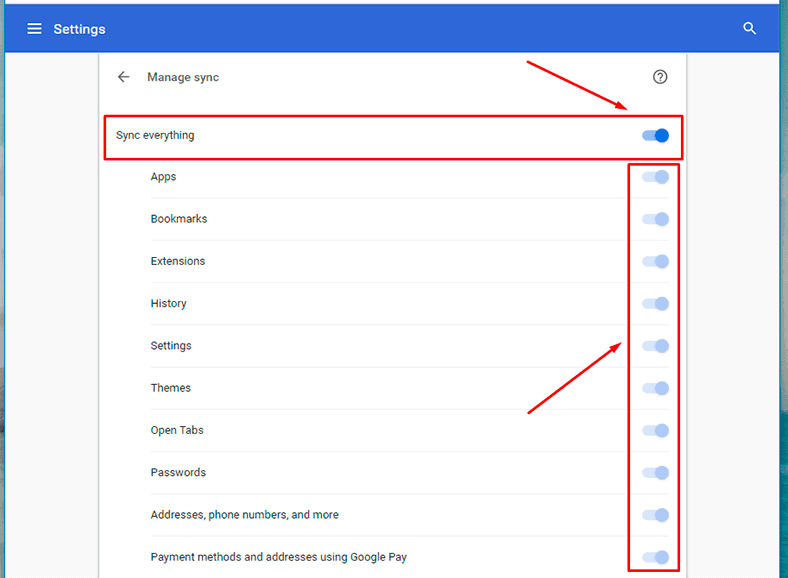
In the new personalized settings page click on «Sync everything», so that its status changes from «enabled» to «disabled» (its color will change from blue to grey), and then turn on or off any data from the list for which you’d like to change the order of synchronization by moving the switches to a corresponding position.
To improve privacy when keeping information in «Google» storage or syncing «Chrome» data you can use special passphrases (which do not apply to payments and addresses in «Google Pay», though). Using an extra password is not a must as all synced data is always transferred via an encrypted channel. However, it’s good to have one more level of security.
After a passphrase is created, you may encounter certain difficulties:
- The passphrase has to be entered every time you are in a new location;
- You will need to enter it on all devices from which an application is entered;
- You will not see offers from the websites viewed in «Google Chrome»;
- The saved passwords panel will not be available for review;
- Browsing history won’t be synced on all devices, except for addresses actually typed in the address bar of «Google Chrome».
To create a passphrase for the sync mode, sign in to «Google Chrome» and turn the sync on as described earlier in this article.
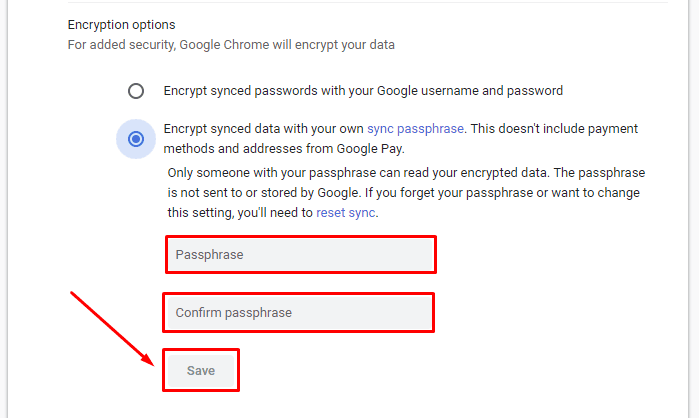
Open the app settings and in the page «Sync and Google services» go to «Encryption options», and check the option «Encrypt synced data with your own sync passphrase. This doesn’t include payment methods and addresses from Google Pay».
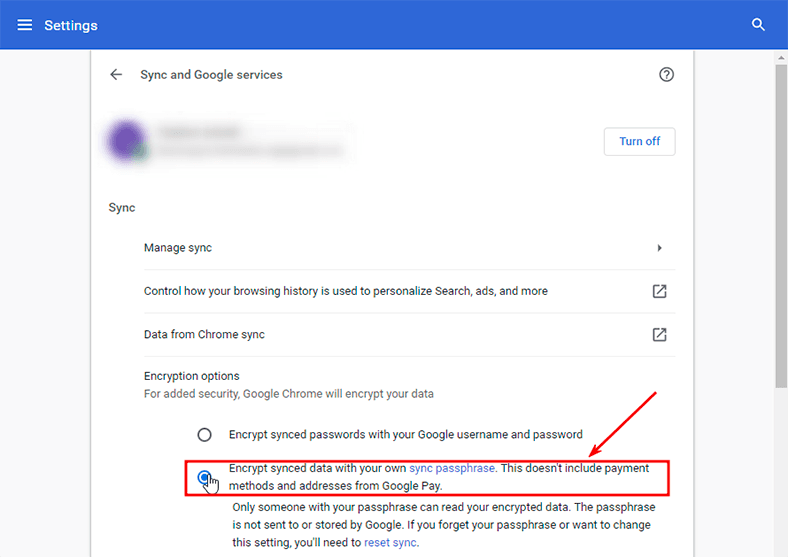
As you do it, some hidden fields are displayed, so type the passphrase and confirm it, then click on «Save» to finish it.
Now that sync is enabled and corresponding settings are configured, you can view the information saved on other devices as well as payment data from «Google Pay». For example, to manage bookmarks, click «Customize and control Google Chrome», in the menu that opens put the cursor over the «Bookmarks» line, and then select «Bookmark manager» from the context menu. Otherwise, use the keyboard shortcut Ctrl + Shift + O to open this page immediately.
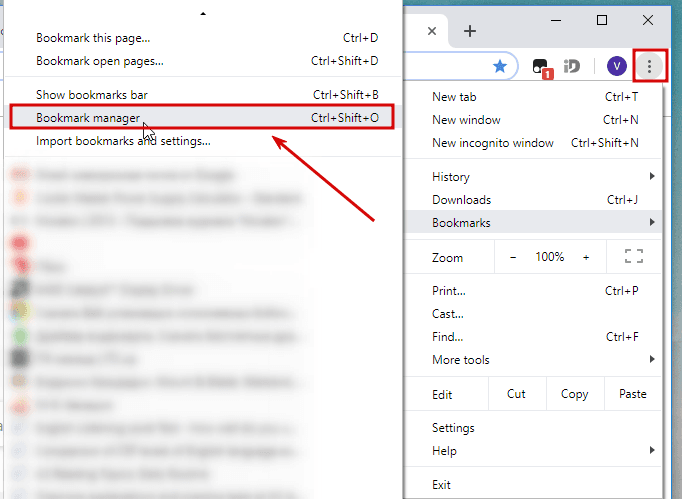
The list of bookmarks synced on all devices will be shown in a separate page.
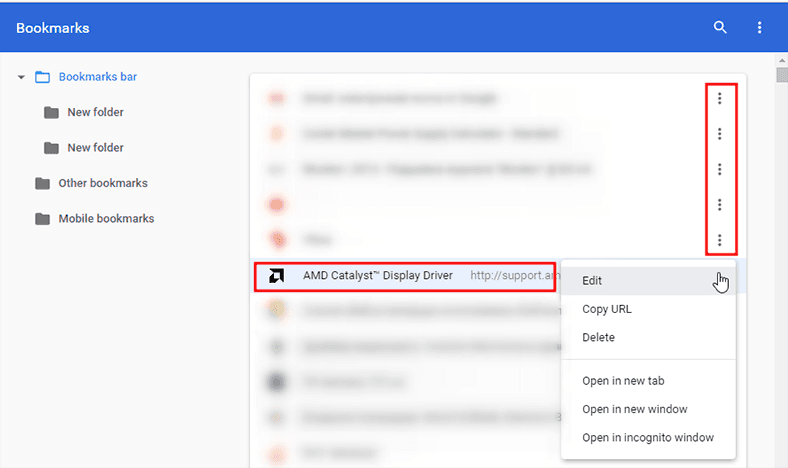
Clicking on «More actions» button (three vertical dots next to every bookmark) will open a menu with a list of possible actions you can do to every saved bookmark. Any changes you make here will apply at once and bookmarks will have the same appearance on all linked devices.
«Android» and «iOS» Devices
Note. The configuration procedure as well as the previously described method for turning «Chrome» synchronization or and off is almost the same for «Android» and «iOS» mobile devices.
Open «Google Chrome» on a trusted «Android» or «iOS» mobile device.
In the upper right corner of the screen, tap on the button with three vertical dots to access «Google Chrome» controls, and select «Settings» from the menu.

In the settings page, select the section with the user name.

In the next page, click on «Sync», for the current user account.
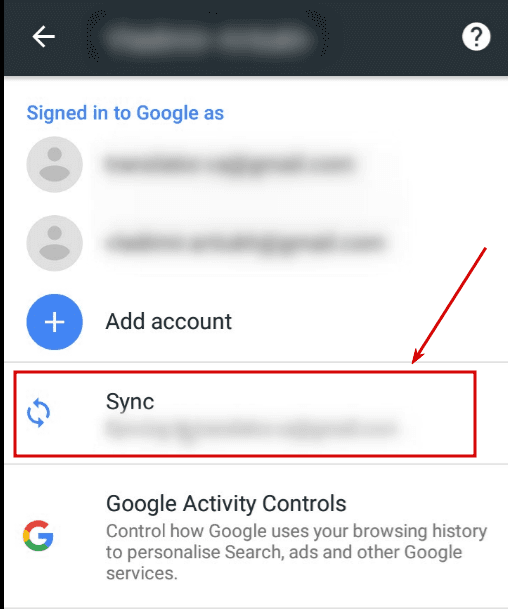
The new sync settings page will show you the types of data which is currently synced.
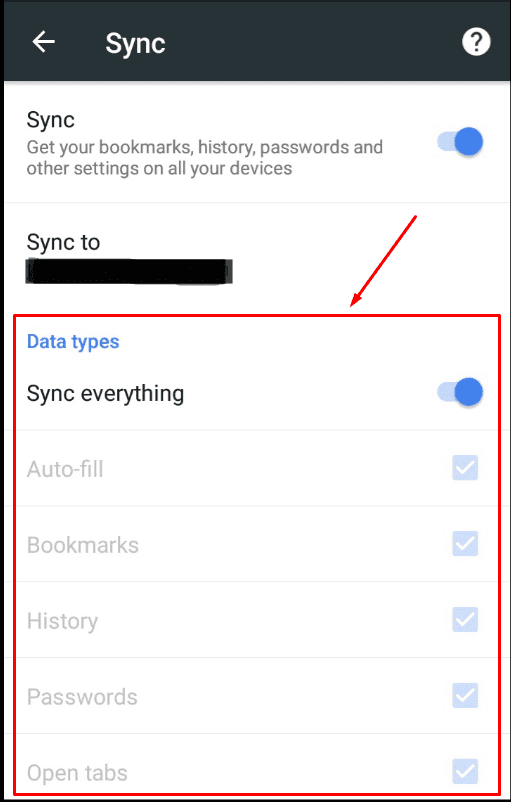
Tap the switch next to «Sync everything» to move it to «disabled» position (the switch will turn from blue to grey).
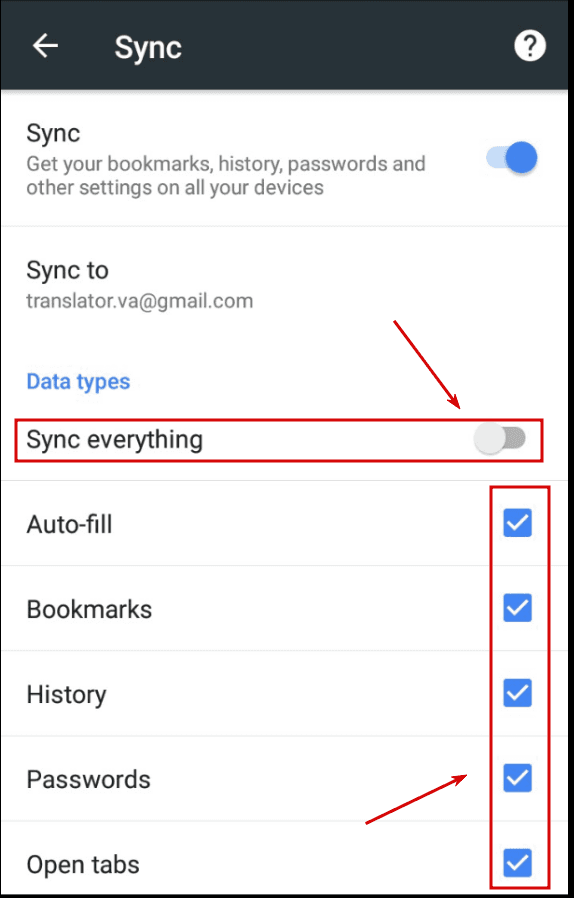
Now uncheck the boxes next to the data types you don’t need to sync and leave only the options you need.
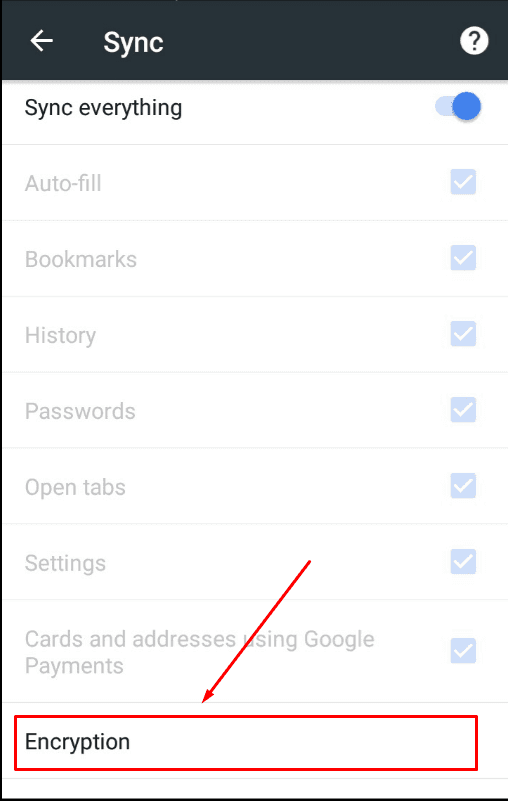
To improve privacy of your mobile device, you may choose to apply encryption and set a passphrase. In the Sync page, look below data types and tap on «Encryption».
In the window that appears, select «Encrypt all synced data with your own synced passphrase» instead of the default choice «Encrypt passwords with Google credentials».
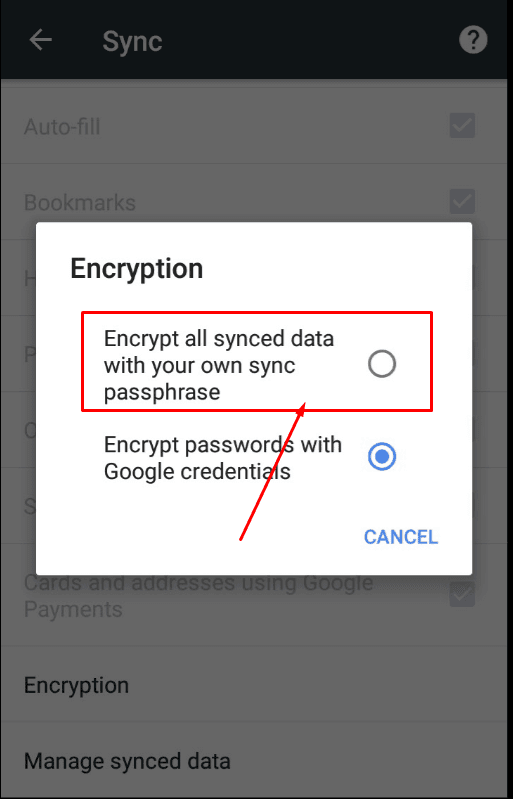
After you do it, the system will ask you for a passphrase and fill in the corresponding fields. When you do it, tap «Save» and the passphrase will be applied.
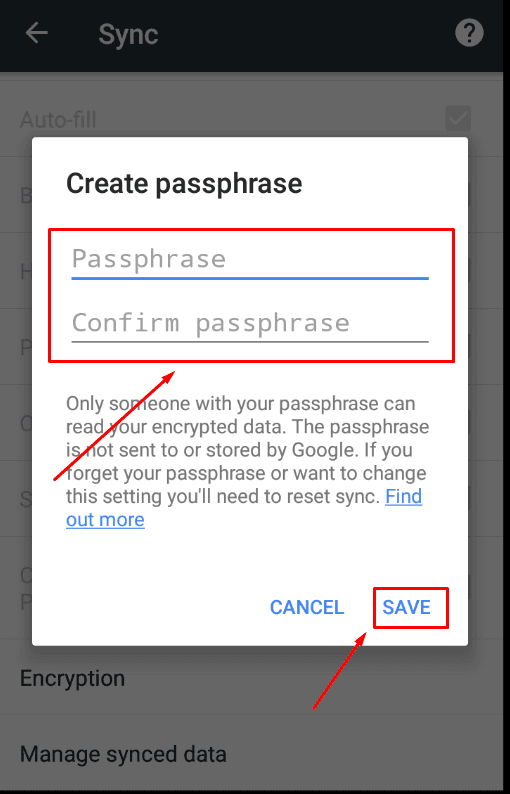
Now the selected data will be accessible from all user devices with the opportunity to control it from any of such devices.
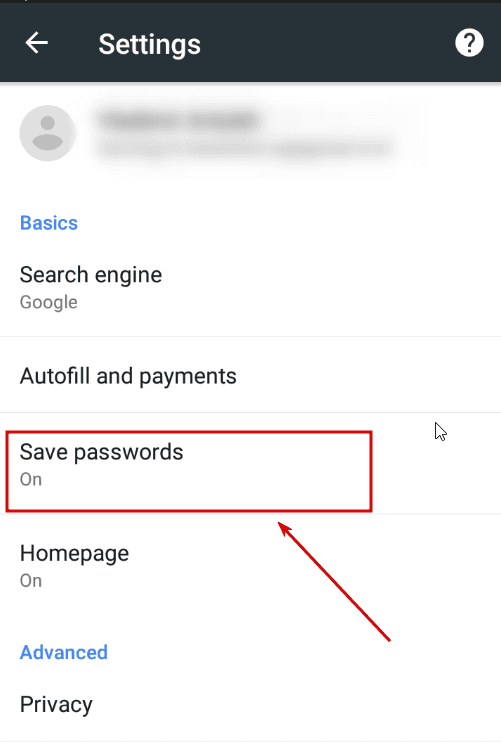
For example, from the main menu in «Google Chrome» you can open its bookmarks, history or another section to access saved data, or go to the settings page and select «Save passwords».
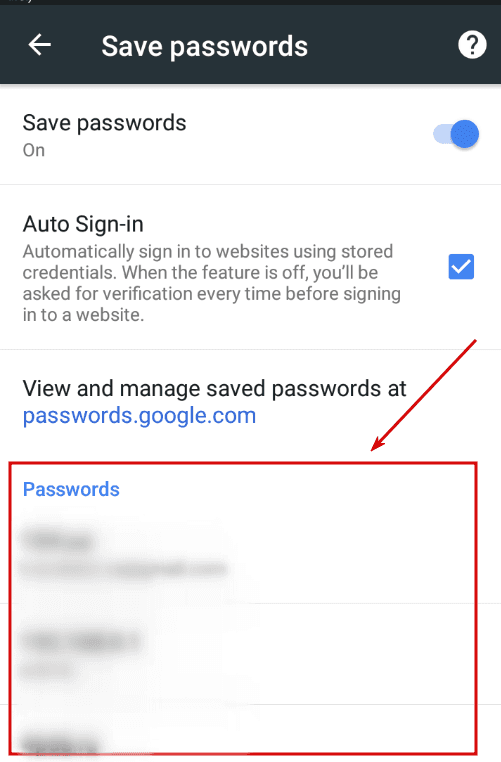
The new page will show you the list of saved passphrases managed from a specific account.
Conclusion
When creating a «Google» account, users not only can use all products by this company but also (after applying certain settings) manage, modify, save and view their own data from any device.
With the advice in this article, you can turn synchronization on for all of your devices using «Google Chrome», configure the types of data to be synced on all devices, view and manage such data from any of your devices. If necessary, you can turn synchronization off or set an additional passphrase to improve protection of your data.
Turning on the synchronization mode between various devices makes using information easier, does not require creating additional copies of specific data, and makes user data highly mobile and reliably protected on «Google» servers.

How to Clear Browsing History and Cache in Chrome, Yandex, Opera, Firefox, Edge 📝🔥🌐


