Windows 11 Defender Deactivation Unleashed: In-Depth Guide
Looking to disable Windows Defender in Windows 11? You’re in the right place! Our comprehensive guide will walk you through step-by-step instructions and expert tips to successfully deactivate Windows Defender on your Windows 11 system. Say goodbye to interruptions and enjoy full control of your security settings!

- First method. Disable it with group policy settings
- Second method. Disable it by modifying the registry
- Third method. Disable it with Autoruns for Windows
- Conclusion
- Questions and answers
- Comments
The Microsoft Defender antivirus (previously known as Windows Defender) is a free tool integrated into Windows 11 to protect your computer from viruses and other malware. In addition to combating viruses and similar programs, Microsoft Defender also offers you to secure your account, improve your safety online, monitor your computer’s performance and health, use parental control options, add a firewall for extra protection, and ensure network safety.
If you are using a third-party antivirus software, you may want to disable the built-in system protection and install that latest antivirus hit. When you try to install a third-party antivirus, some difficulties may appear.

🛡 How to Disable Windows Defender in Windows 11 🛡
First method. Disable it with group policy settings
For starters, disable the system protection and then run the Group Policy Editor. Click on Start – Settings – Privacy and security – Windows Security.
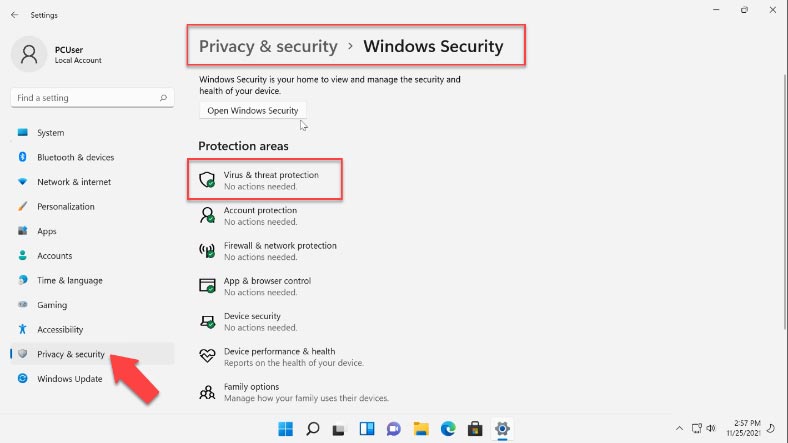
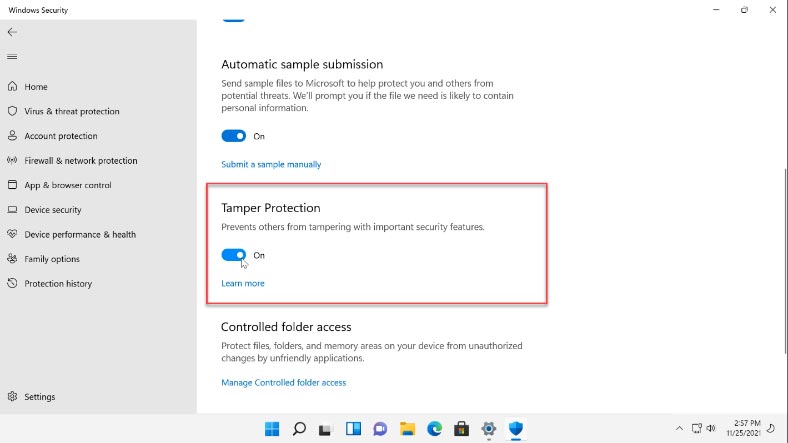
Then go to “Virus threat protection” – “Manage settings”, and disable “Tamper Protection” here.
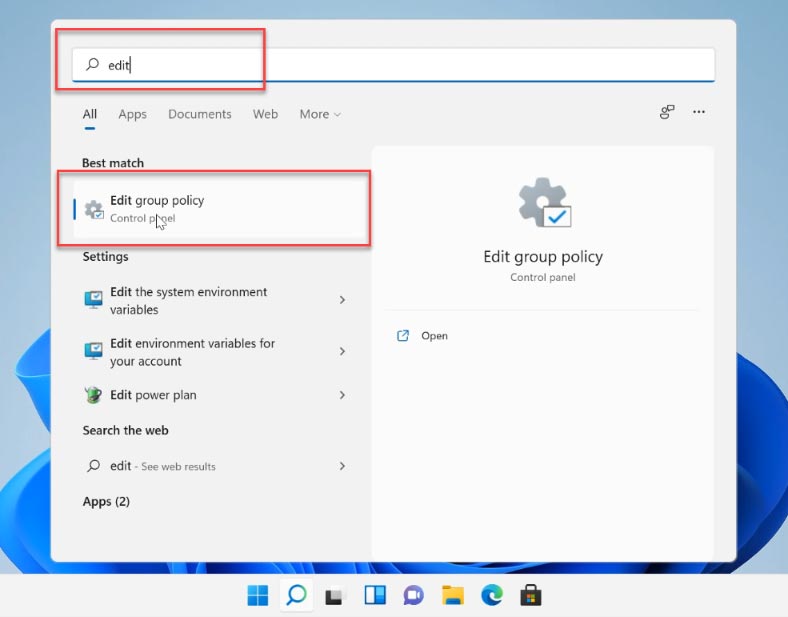
To run the group Policy Editor, find “Edit group policy” with the search feature and click on it.
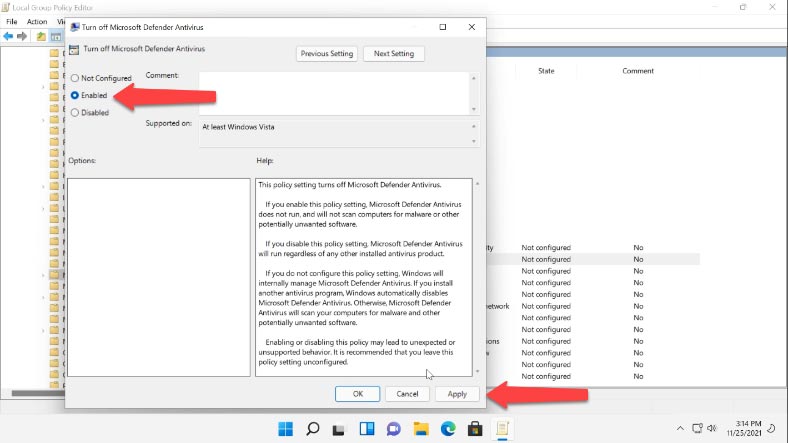
In the program’s window, go to Computer Configuration – Administrative Templates – Windows Components – Microsoft Defender Antivirus. Look to the right to find the setting “Turn off Microsoft Defender Antivirus”.
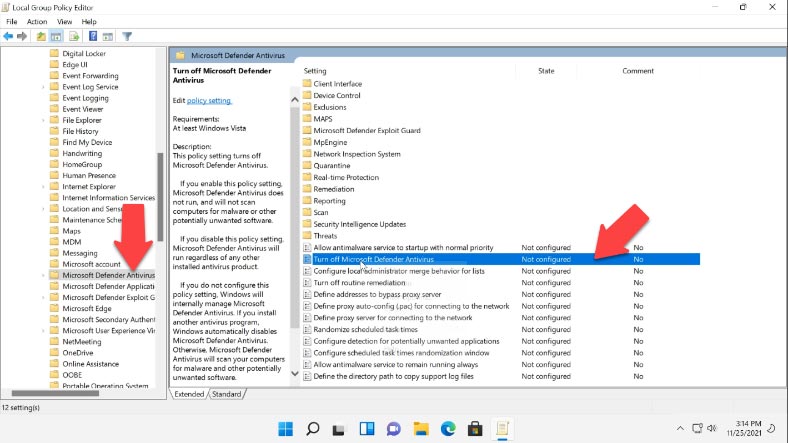
Right-click on it and select “Edit”. In the window that opens, check the option “Enabled”, then click “Apply” and OK.
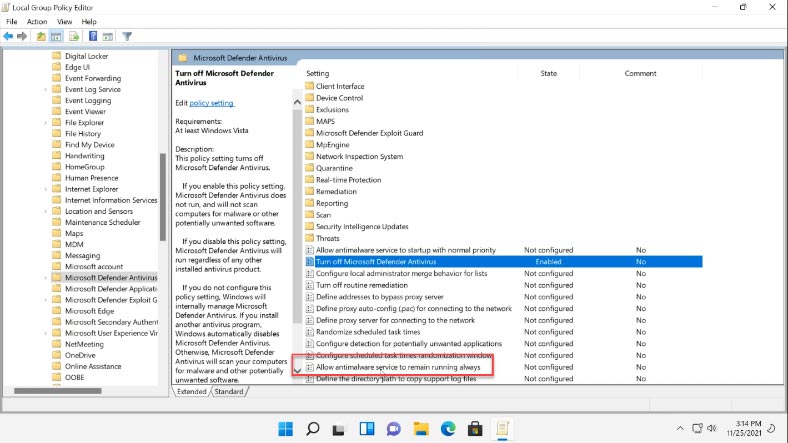
After that, modify the setting “Allow antimalware service to remain running always”, check the option “Disabled”, click “Apply” and OK.
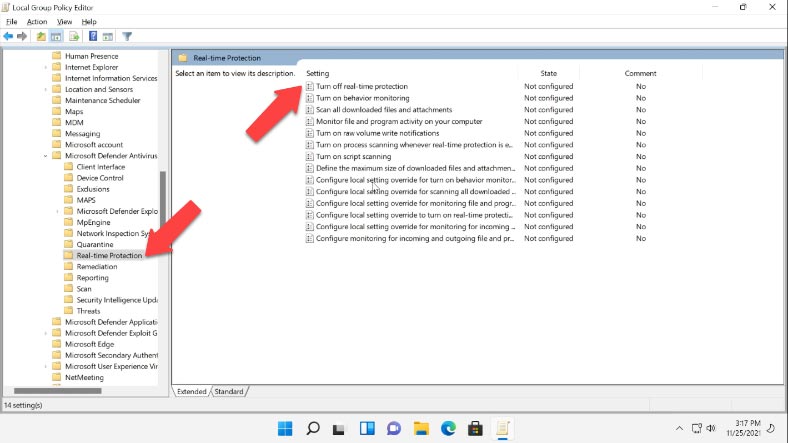
After that, open the folder “Real-time Protection” and open the setting “Turn off real-time protection”. Check the option “Enabled” – click “Apply” – OK.
Now that the group policy is configured, you need to set up Task Scheduler to prevent certain services from running, and to avoid errors after the Windows 11 antivirus has been disabled. Use the search feature to find “Task Scheduler” and open it.
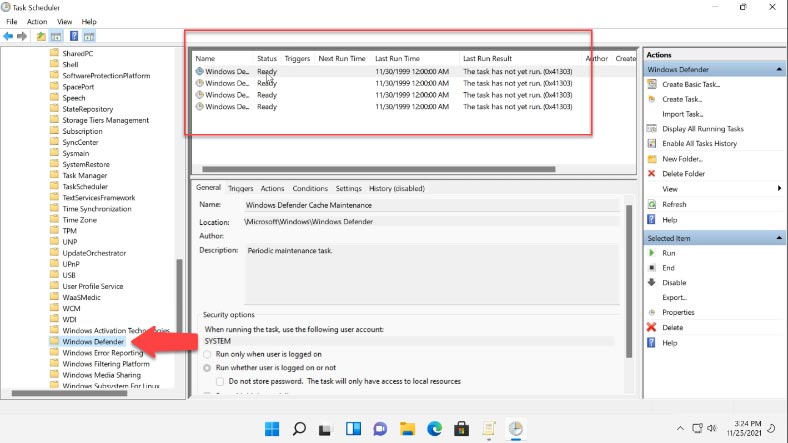
Jump to Task Scheduler Library – Microsoft – Windows – Windows Defender. One after another, disable these four tasks:
- Windows Defender Cache Maintenance
- Windows Defender Cleanup
- Windows Defender Scheduled Scan
- Windows Defender Verification
Right-click on each one and select “Disable”.
After you do it, the Defender will no longer start together with Windows.
Second method. Disable it by modifying the registry
Another way to disable protection is by modifying the registry.
Right-click on the Start menu and select Run, and then type “regedit” in the corresponding field and click OK.

In the Registry Editor window that appears, follow this path:
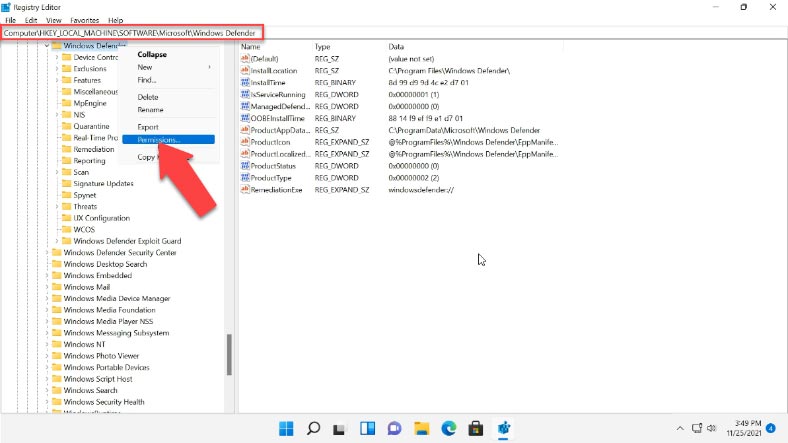
HKEY_LOCAL_MACHINE\SOFTWARE\Microsoft\Windows Defender
To edit or add a value to this folder, you need to change its owner first. By default, the owner is “System”. To change it, right-click on the folder and choose “Permissions”.
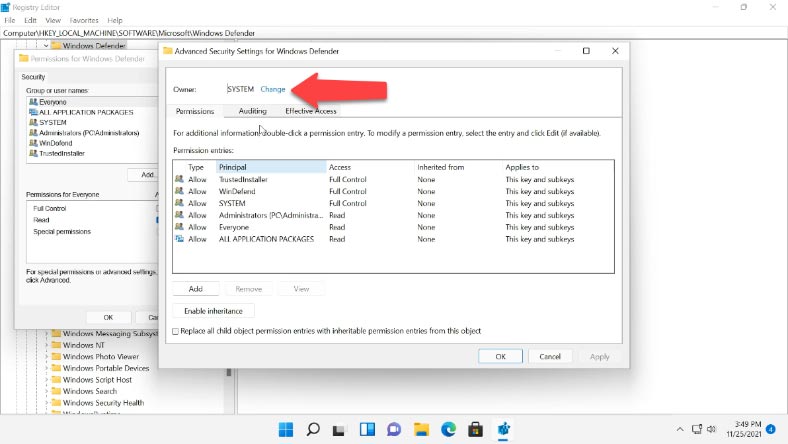
In the window that opens - “Permissions for Windows Defender” - open the tab “Advanced” and click “Change” in the “Owner” field.
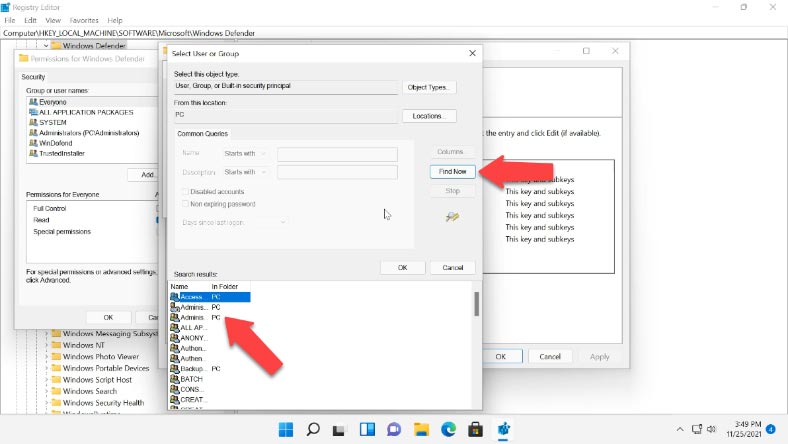
Another window opens. Click “Advanced” - “Find Now” - select the Administrator account or the Administrators group, then click OK, and OK one more time to confirm the changes.
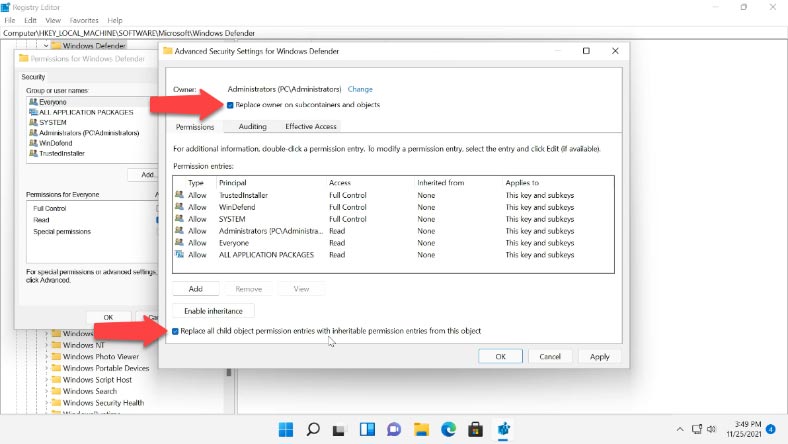
Now check the boxes next to “Replace owner on subcontainers and objects” and “Replace all child object permission entries with inheritable permission entries from this object”, and click “Yes” in the Windows Security warning message that appears.
Going back to the group permissions window, grant the users with full control and click “Apply” and OK to confirm it.
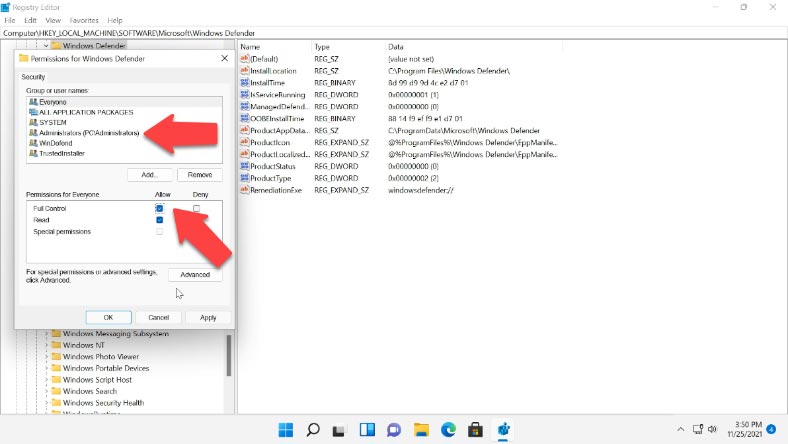
Now you can start editing the registry. In Windows Defender branch, create DWORD values (32 bit) with the following names: DisableAntiVirus, DisableAntiSpyware, ServiceStartStates, and change their values into one.
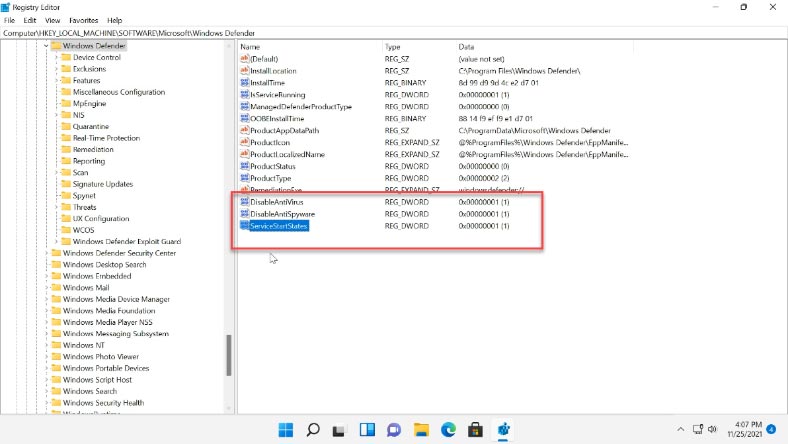
After that, close the registry editor and restart the computer. After the restart, the Defender will be disabled. If you ever need to start it again, go to “Virus and threat protection” and click “Turn on”.
Third method. Disable it with Autoruns for Windows
One more method involves using Autoruns for Windows to disable Microsoft Defender. Download this utility from the official Microsoft website and extract it from the archive.
https://learn.microsoft.com/en-us/sysinternals/downloads/autoruns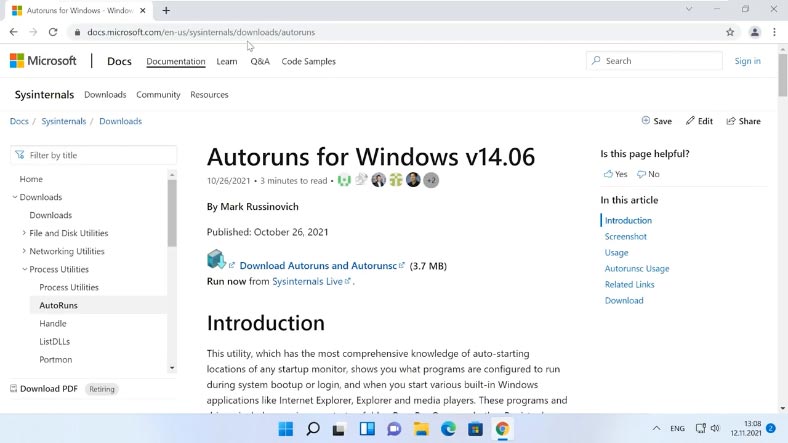
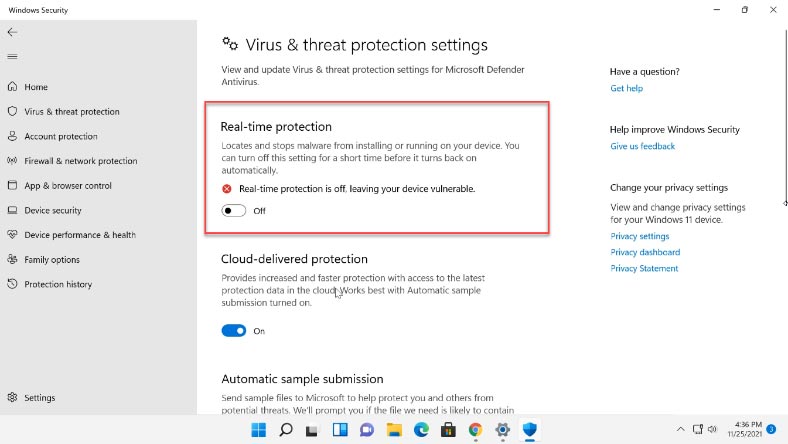
For starters, you need to disable permanent protection and boot in safe mode. Open Settings – Privacy and security – Windows Security – Virus threat protection - Manage settings, and disable Real-time Protection.
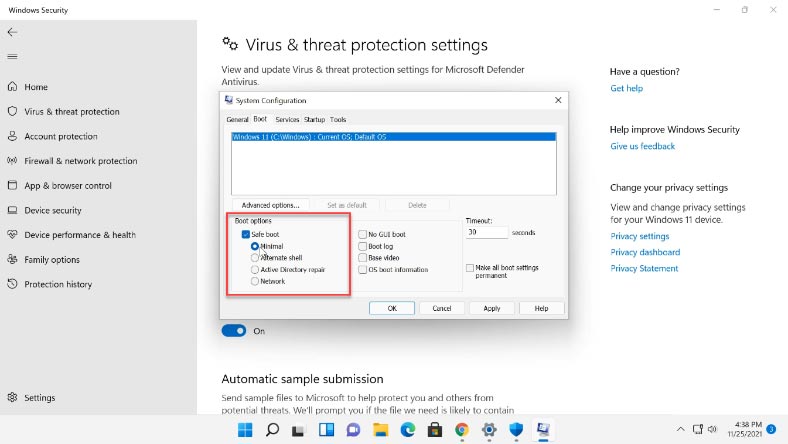
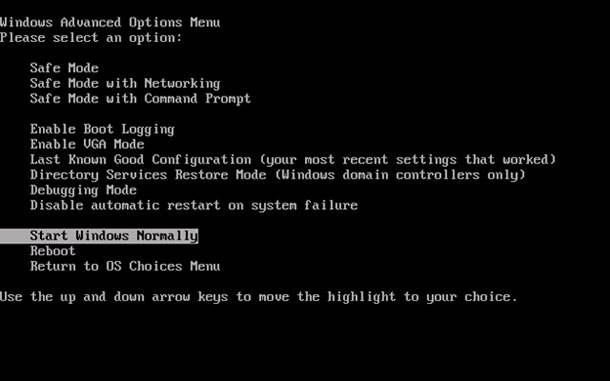
To boot the computer in safe mode, use the search to find “System Configuration”, open the “Boot” tab, check the box for “Safe boot” - “Minimal” - Apply - OK - and hit “Restart”. When the computer boots in safe mode, open Windows Security to check if Microsoft Defender is running.
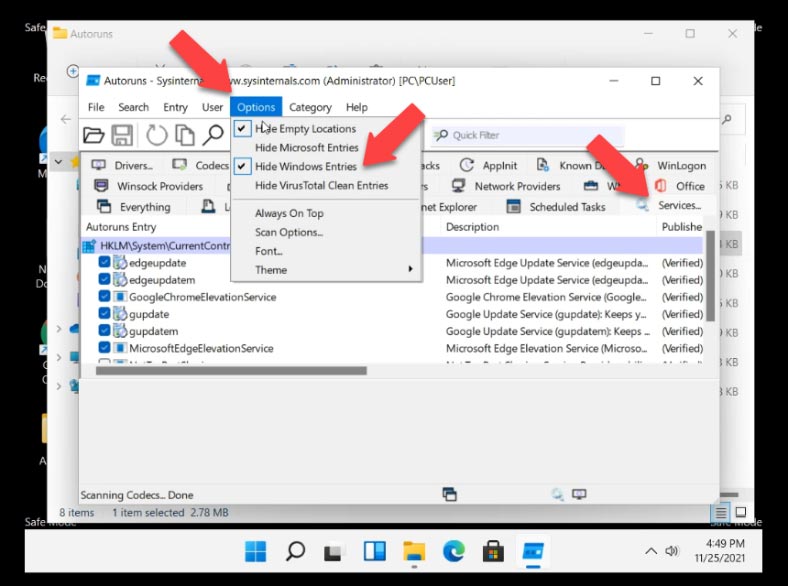
Then go to the folder containing Autoruns for Windows and start Autoruns64.exe In the program’s window, jump to the tab “Services” - by default, Windows services are hidden. To make them visible, open “Options” and uncheck the box for “Hide Windows Entries”.
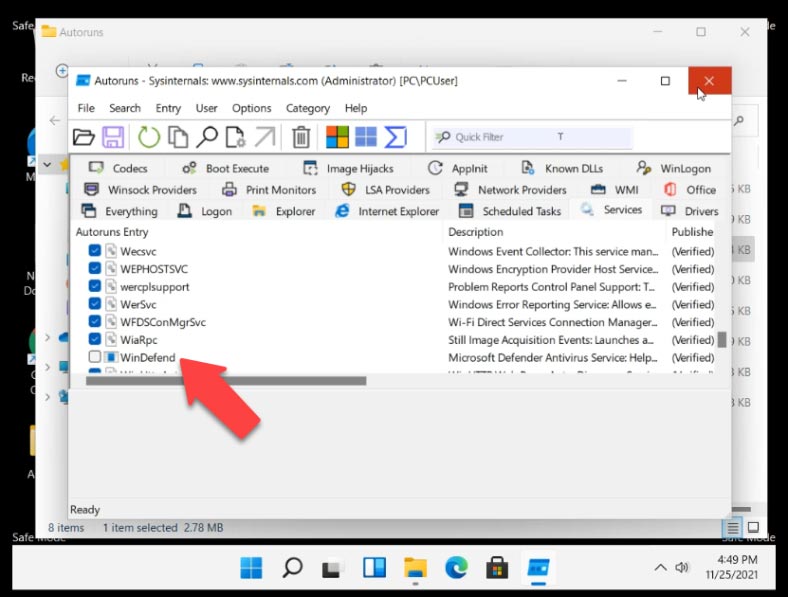
Now search the list of services for Windows Defender and uncheck this box - this will disable automatic startup for Windows Defender every time the computer reboots.
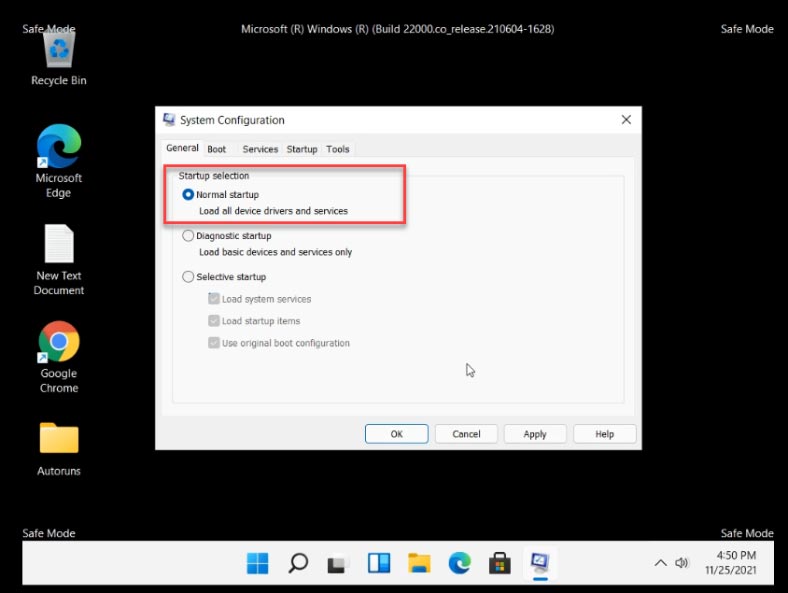
After that, close the utility and boot the computer into the normal mode. Open “System Configuration”, check “Normal startup” here - Apply - OK - Restart. When the computer boots, start Task Manager and check if the Windows Defender service is running.
Open Settings – Privacy and security – Windows Security – Virus threat protection - Home. Here, you can see a circle of loading dots or the protection status is displayed as “Unknown”. This is when the Defender is checking its settings.
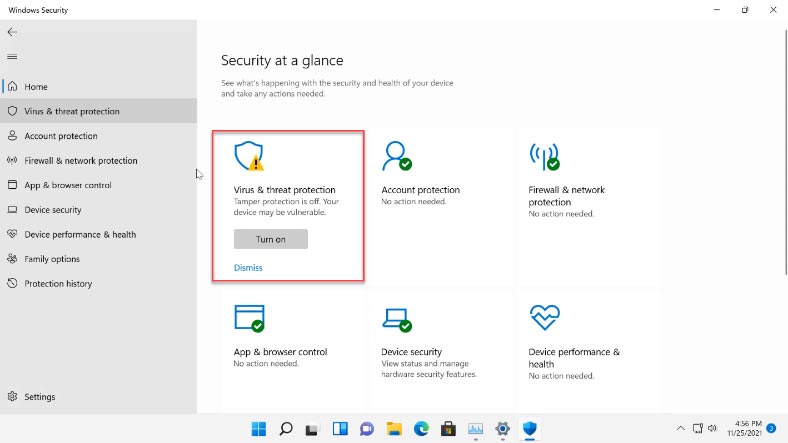
Here is an important thing to keep in mind. Don’t click on the Defender tile while it is updating its information or displaying the unknown status. If you do it, the Defender will be enabled again, so wait until it says “Turned off”.
Conclusion
Now you know how to turn off Microsoft Defender in Windows 11. To have the Defender disabled after you restart the computer, make sure to follow carefully every step of this tutorial. If all of these methods failed to disable Microsoft Defender, you can try looking for third-party tools on the Internet - they are quite numerous.
| Name | Description | Price |
|---|---|---|
| Defender Control | An easy-to-use utility that allows you to quickly disable or enable Windows Defender with a single click. | Free |
| NoDefender | A tool that helps fully disable Windows Defender, even if the system doesn't allow manual disabling. | Free |
| ConfigureDefender | Manage and configure Windows Defender settings through an intuitive interface, with an option to disable it. | Free |
| WinDefender Disabler | A simple tool for disabling Windows Defender and keeping the settings after rebooting. | Free |




Close other tabs, extensions and applications
Restart Google Chrome.
Restart your computer
Check for malware
Open the page in another browser
Fix your network connection errors and report website interruptions
Problematic applications (Windows computers only)
Check if Chrome is open in the background
Configure your antivirus and scan your computer for malware
Restart your computer
Reinstall Chrome