Problem Solved: Successfully Installing DSM on Old NAS for XPEnology RAID Recovery
Looking to install DSM on your old NAS for XPEnology RAID recovery? You’re in the right place! Our comprehensive guide will walk you through step-by-step instructions and expert tips to successfully recover RAID using XPEnology. Say goodbye to data loss worries and reclaim your files with ease!
- Step 1. How to connect a graphics card to Acer H340
- Step 2. Configure booting from USB drive
- Step 3. How to create a bootable USB drive with XPEnology bootloader
- Step 4. How to install Synology DSM
- Step 5. How to create a RAID on Acer H340
- Step 6. How to create a shared folder
- Step 7. How to recover data from a RAID on Synology NAS
- Conclusion
- Questions and answers
- Comments
XPEnology is not a Linux operating system like Ubuntu or another popular distribution. On the contrary, it’s a bootloader for Synology DSM operating system which is used with NAS devices. DSM runs on a special version of Linux developed by Synology, so this system cannot be compared directly with Linux distributions for desktop and server use. This particular one is optimized to work with NAS devices and make the best of their functionality.
XPEnology lets you run DSM on any device – for example, on an old computer, server or NAS storage system. This way, you can turn it into a hardware-based network storage device with multimedia and cloud-based features offered by DSM (DiskStation Manager) operating system.
DiskStation Manager (DSM) is an intuitive operating system with a web interface that helps users manage their files in the network-attached storage. Below, you will find a complete step-by-step tutorial on how to install the DSM operating system on an Acer H340 NAS with the help of XPEnology bootloader. With this tutorial, you’ll be able to install this operating system on any similar device or computer.
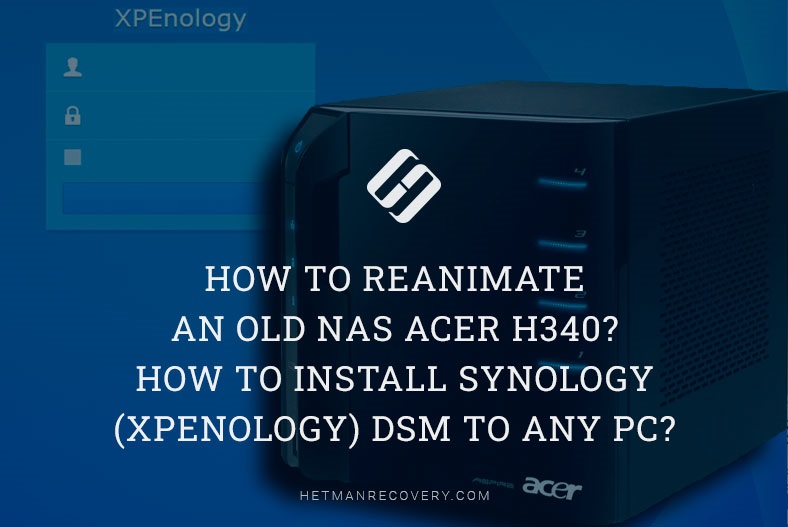
In my case, I failed to reset this NAS device and install a standard operating system, so I decided to install a DSM operating system instead, and do it with the XPEnology bootloader.

⭐How to Reanimate an Old NAS Acer H340. How to Install Synology DSM to Any PC, XPEnology Bootloader⭐
Step 1. How to connect a graphics card to Acer H340
With this NAS model, you can connect a graphics card for further configuration. When trying to do that, we discovered that the operating system cannot complete the installation from the integrated flash memory, and that is why this device is not available over the network.
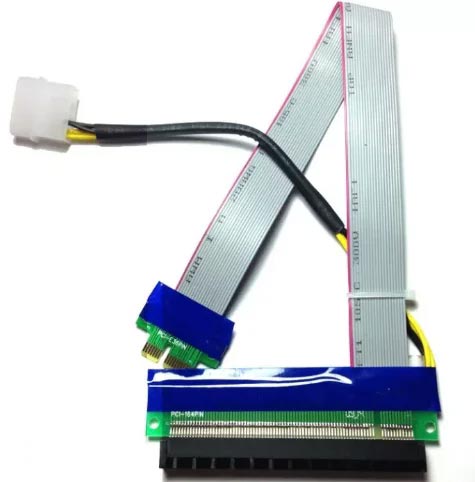
To display images, we will need a graphics card supporting PCIEx X1. As this is not a very popular type of graphics, I used a special Х1 to Х16 adapter.
Step 2. Configure booting from USB drive
Now we need to get into BIOS to configure booting from an external USB drive.
To enter BIOS, set the jumper and connect these two contacts – while the device is powered off. After that, connect a USB drive containing the bootloader, and connect the keyboard, the mouse, and the network cable.
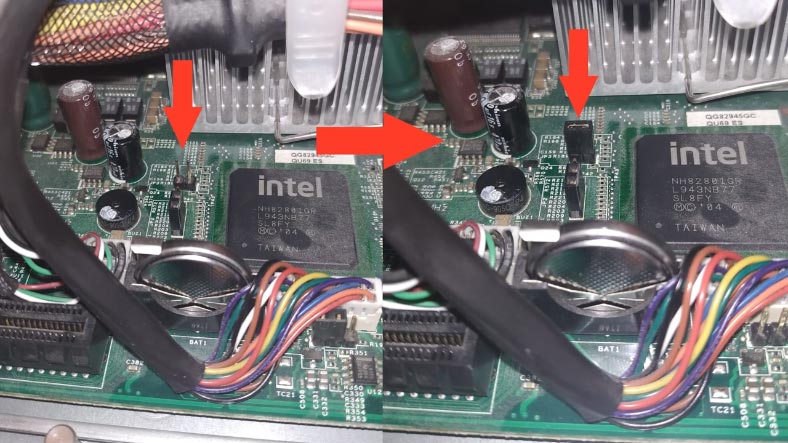
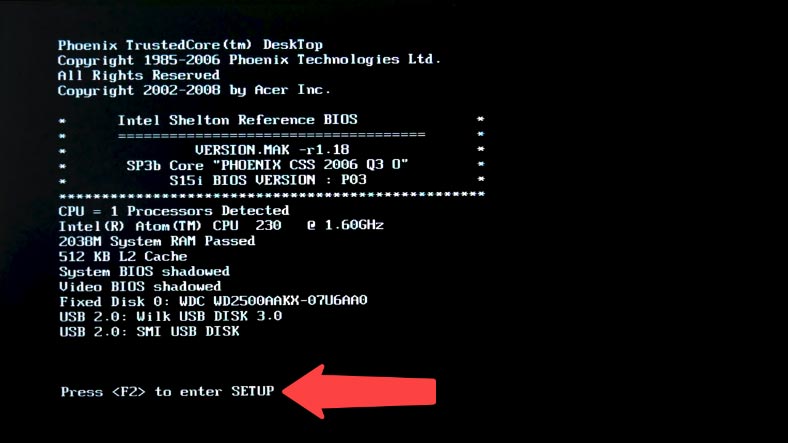
Power on the NAS, and press the F2 key to enter BIOS.
Jump to the Boot tab, find the USB drive on this list and move it to the top by pressing the plus button.
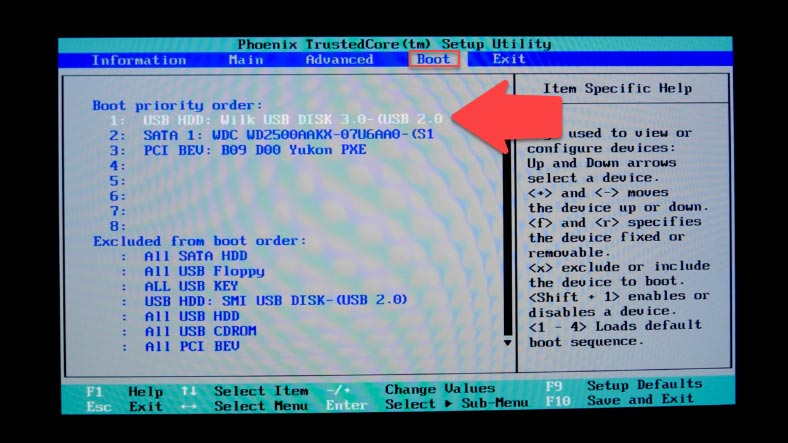
Press the F10 key to save the new settings and restart the device, and now your NAS will boot from the USB drive. To reset the settings, just remove the jumper.
Step 3. How to create a bootable USB drive with XPEnology bootloader
Now that we’re finished with configuring the device itself, let’s explore how to install DSM. To simplify this process, download the utility called XPEnology Tool.
Now you need to decide which version of Synology DSM should be installed, and this choice depends on the type of motherboard inside your computer. If it’s an old one that lacks UEFI support, it’s recommended to use DSM 5.2 or try DSM 6.2.1 with bootloader version 1.04b.
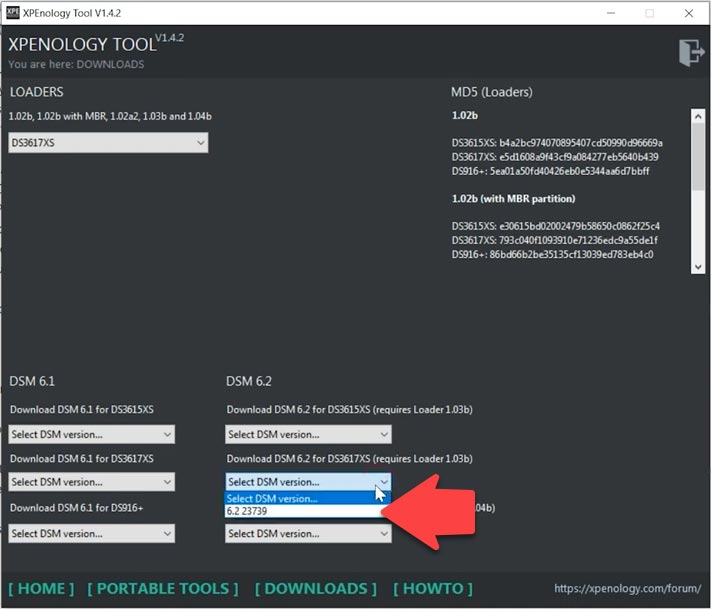
Start XPEnology Tool, open the Downloads tab, select the required bootloader version here; I need version 1.03 for device DS3617; it’s a well-tried bootloader version.
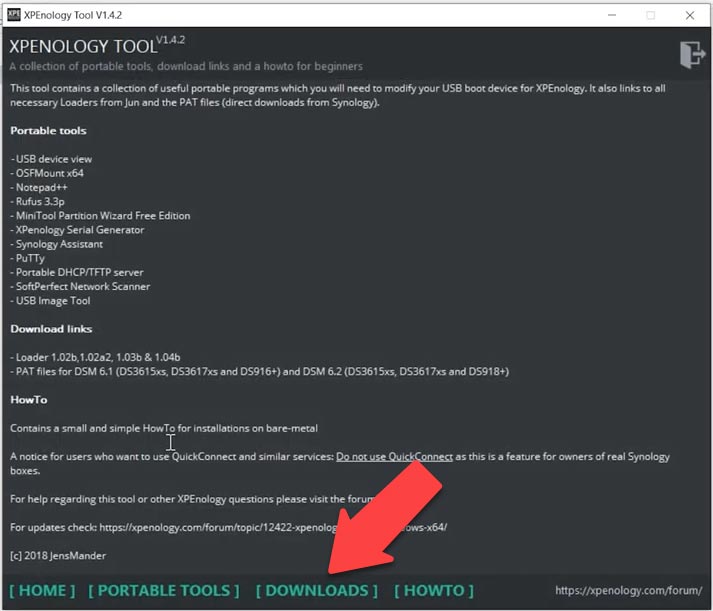
Download the archive synoboot.zip.
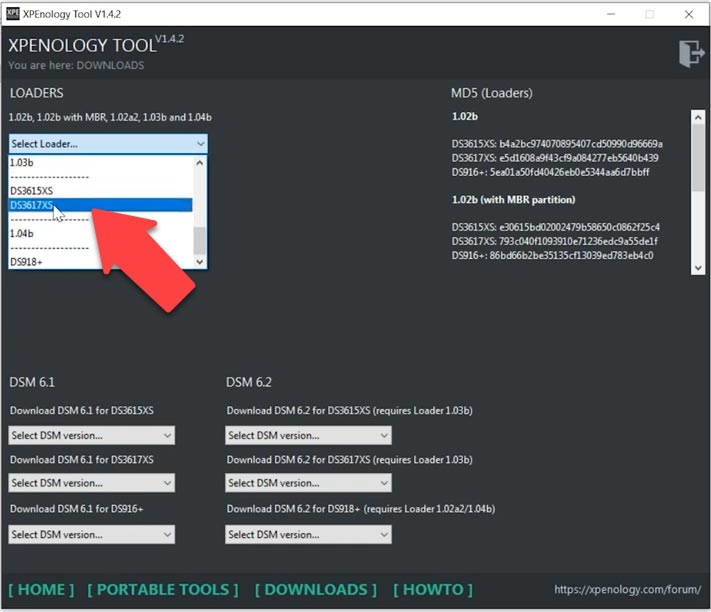
After that, you will need to download the corresponding version of DSM – 6.2 – 1.03 – DS3617.
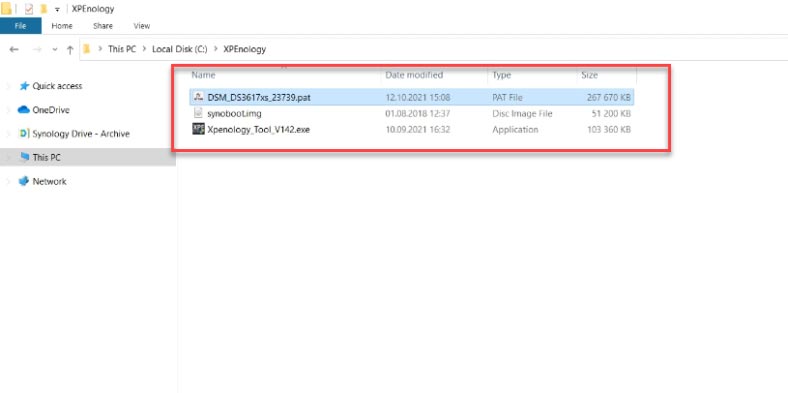
Extract the archive containing the image file synoboot.ISO, and copy a file with the extension .path into the same folder.
Now you can create a bootable USB drive. This USB drive will become a part of the system from which initial drivers and loader will be booted; for this purpose, even an old 4GB USB stick will do. After that, you should mount the bootloader image and edit it a little.
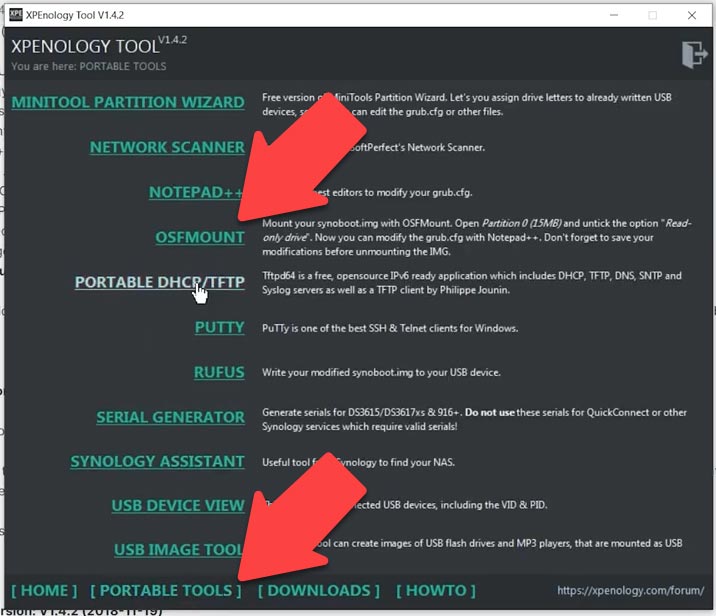
In the XPEnology Tool window, open the tab “Portable tools” and run the OSF Mount utility.
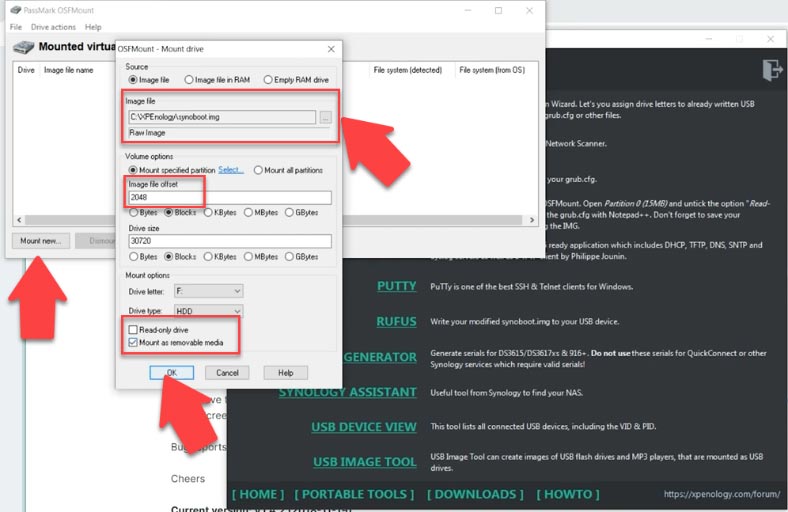
Click “Mount new”, give the path to the ISO image file, select it and click “Open”, choose Partition 0 here or type 2048 into this field; below, uncheck the box for “Read-only” and check the box for “Mount as removable media” – click OK.
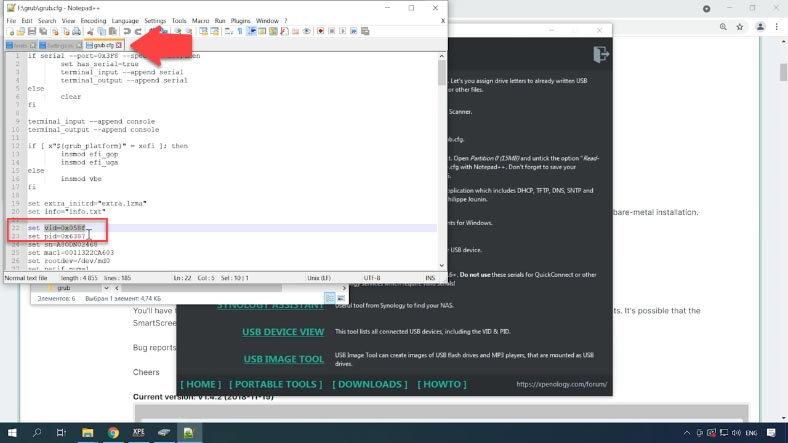
Double-click on it to open, jump to the folder “grub” to find a file with the name grub.cfg and open it with Notepad. In this file, you need to replace the “vid” and “pid” fields by adding your USB drive values instead. You can find these values in the drive properties.
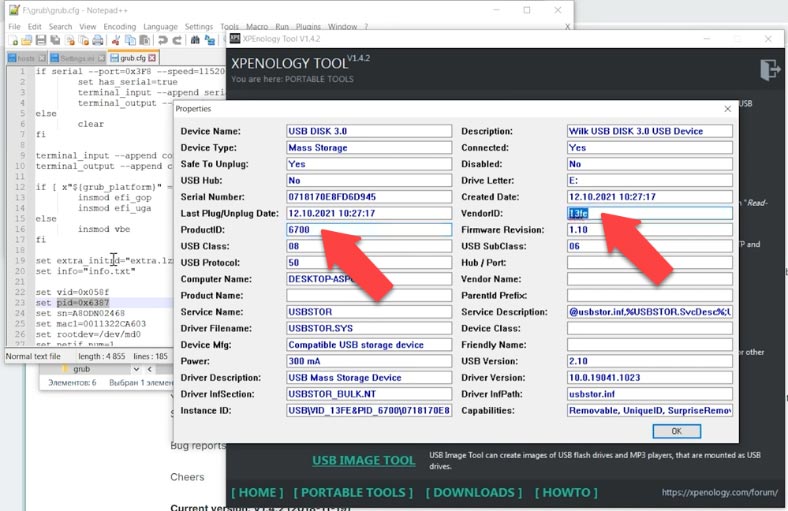
From XPEnology Tool, run the program “USB Device view” – the USB drive is displayed as Mass Storage; to make sure this is the one we need, click on it to open. Copy and transfer the values Product and Vendor ID to the .cfg file.
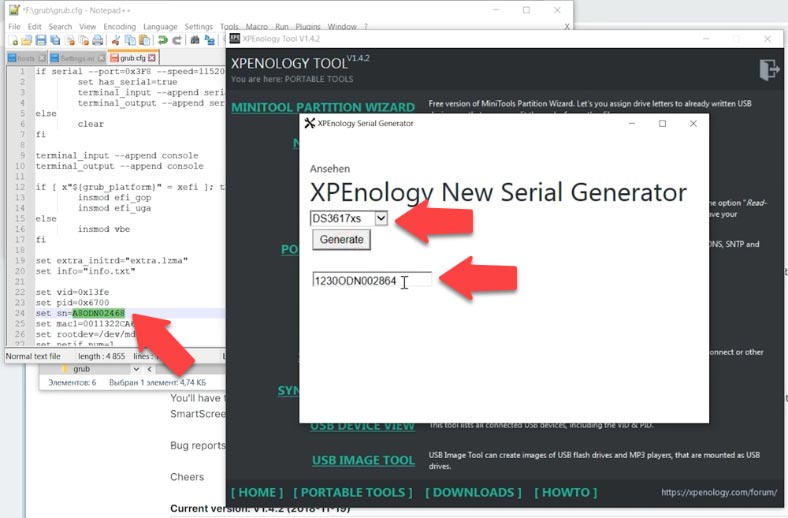
After that, there is one more value to change – the device serial number, in this field. To obtain a serial number, run a utility called “Serial generator,” select the model here – according to the downloaded files it is DS3617 – and click “Generate”. Copy it and paste into the file, then save the changes. Dismount it in OSF Mount and exit the program.
Now this modified image should be copied to a previously prepared USB drive. Open Rufus and create a bootable drive. Select the drive, then the image file, and click “Start”.
| Step | Action | Description |
|---|---|---|
| 1 | Download Rufus | Download the Rufus program from the official website (https://rufus.ie). |
| 2 | Run Rufus | Launch Rufus without installation; the program is portable. |
| 3 | Connect USB Drive | Connect the USB drive to your computer and select it from the “Device” list in Rufus. |
| 4 | Select ISO File | Click “Select” and specify the path to the ISO file of the operating system or tool you want to load onto the USB drive. |
| 5 | Configure Settings | Select the appropriate partition scheme (MBR or GPT) and file system (FAT32 or NTFS) depending on compatibility with your PC. |
| 6 | Start Process | Click “Start” to begin creating the bootable USB drive. Rufus will warn you about data deletion on the drive. |
| 7 | Completion | After the process is complete, you will have a bootable USB drive ready for installing the OS or using other tools. |
Step 4. How to install Synology DSM
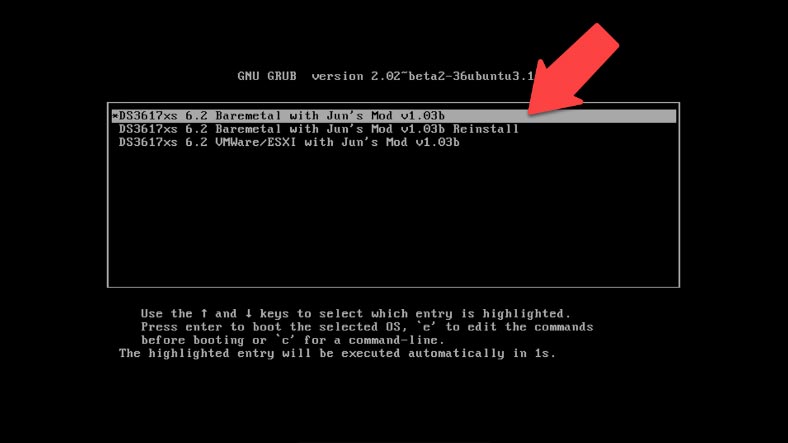
Now that the bootable drive is ready, you can begin the installation. Disconnect the USB drive from the computer and stick it into the network-attached storage. Power on the NAS. Previously, I configured its BIOS to boot from USB, and if everything works as planned, you will see this black screen with white letters. Choose the first option and press Enter. The bootloader is ready for installation.
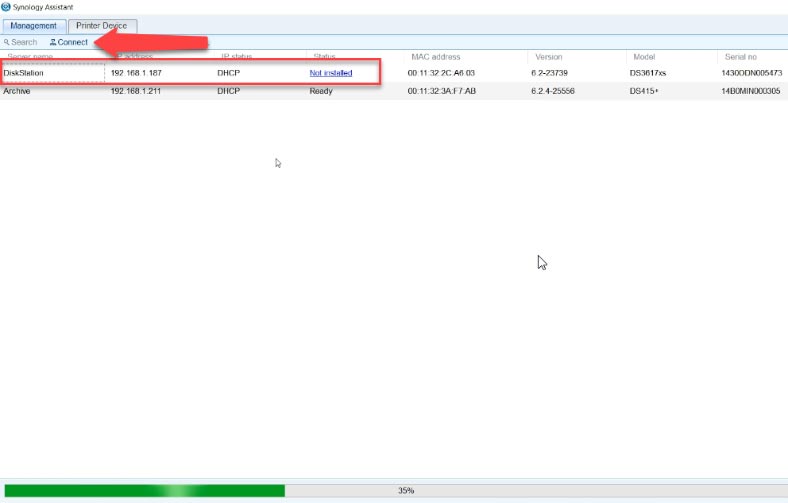
To begin, go to the computer from where you want to manage this device, and start Synology Assistant, then let it get through the firewall. When the program is ready, it starts looking for devices. A DiskStation device should appear on the list with the status “Not installed”. Select it and click “Connect”.
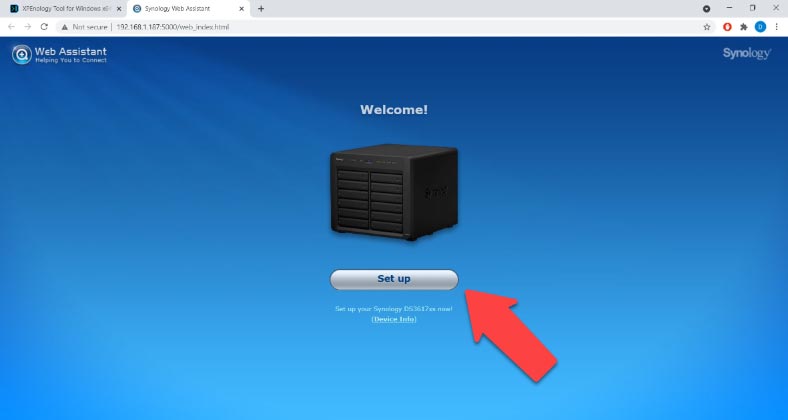
In the browser window that opens, you will see the startup screen for DSM installation. Click “Set Up” here, and then choose “Manual Install”.
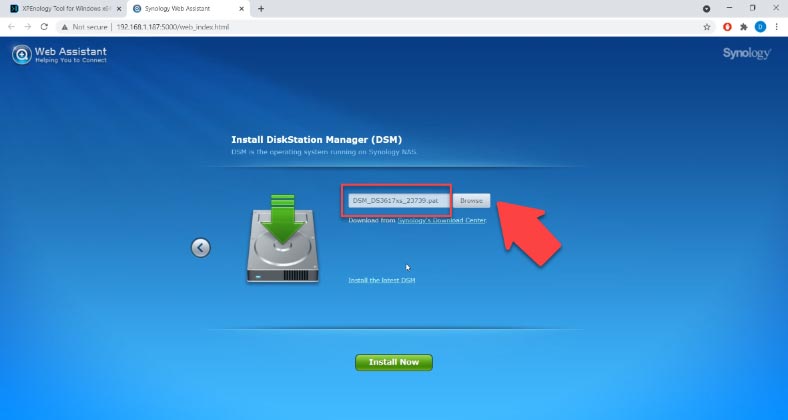
Give the path to the previously downloaded .path file, and click “Install Now”. A pop-up window warns you that all data will be erased from this disk – agree and click OK. It starts the process of partition formatting and installation. The time required for completion depend on the speed of your hard disk. Wait until the device reboots. In a few minutes after the reboot, the NAS should appear on the network.
The operating system is installed, so now you should give the server name, username and password.
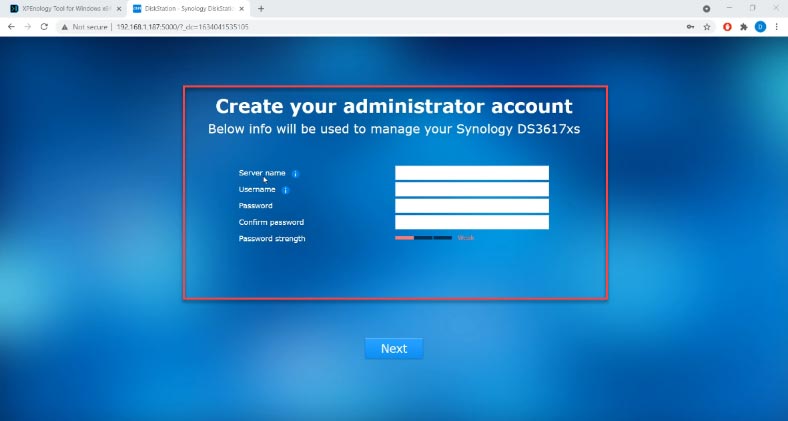
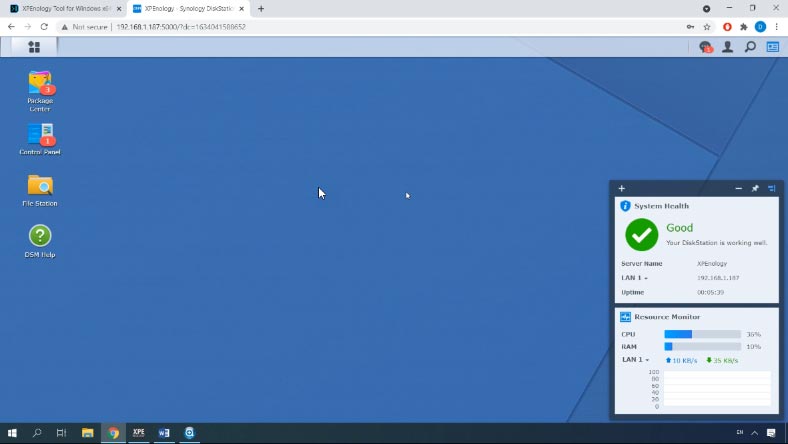
Disable automatic updates, select the notification schedule from the list and click “Next”. It’s better to skip QuickConnect for the unofficial version; if necessary, you can configure it later. This is the end of DSM installation – your device is ready to use. Now you can build a RAID system, set up network access and add shared folders.
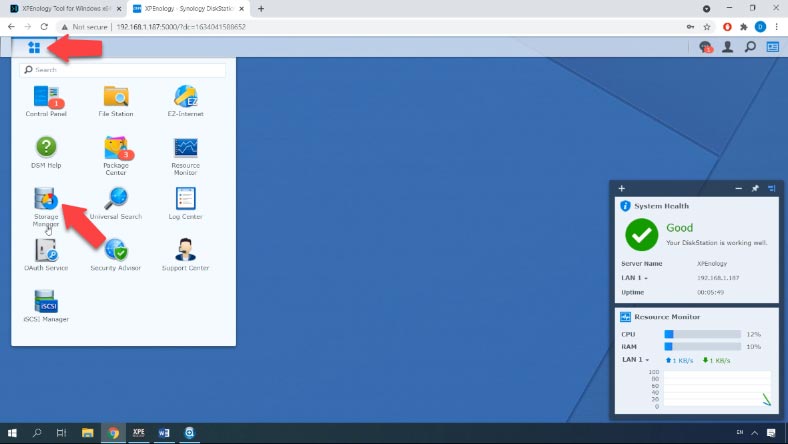
Step 5. How to create a RAID on Acer H340
To combine hard disks into an array, click on the “Main Menu” button and open the Storage Manager.
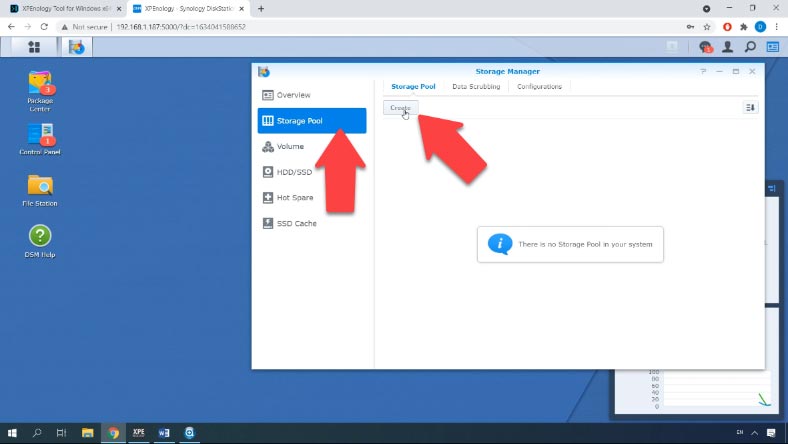
Jump to the tab “Storage Pool” and click “Create” to build a new pool.
Select the pool type – “Better performance” or “Higher flexibility”. Choose the RAID type and hit “Next”.
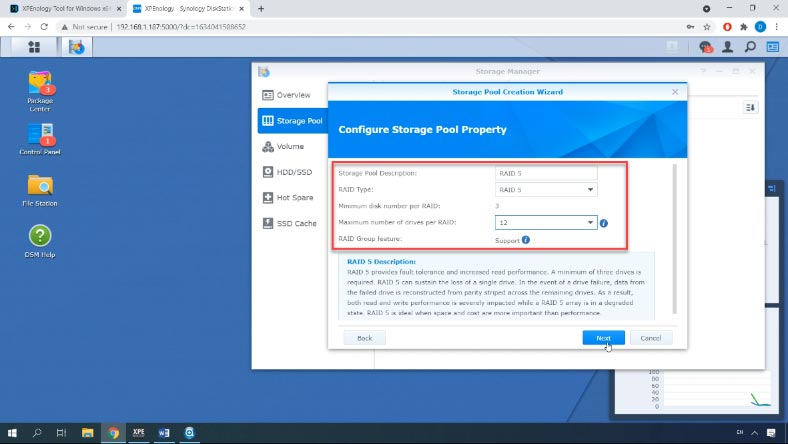
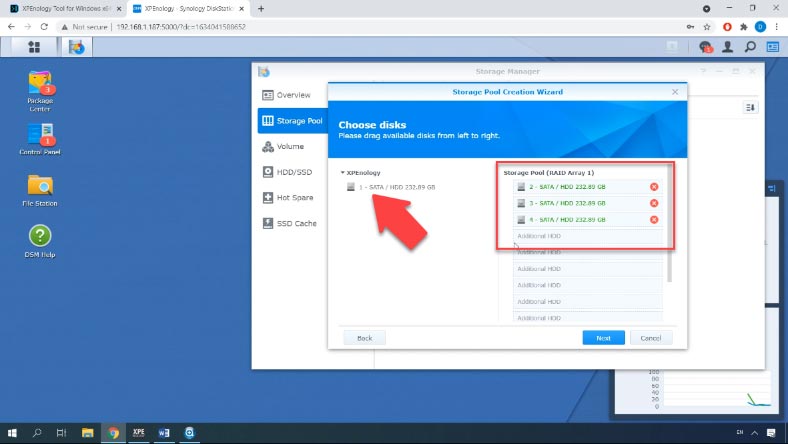
Drag the disks for the new RAID to the right side of the window and click “Next” again. You will see a warning that all data will be erased from the disks – click OK to continue. In the next window, check the values and click “Apply”.
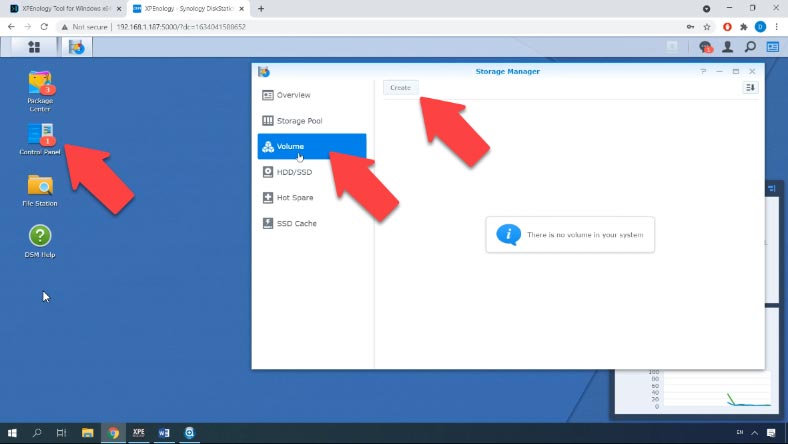
After that, you will see a notice that you need to create a volume before you can start using the storage pool space – click OK. To create the volume, open the “Volume” tab and click “Create”.
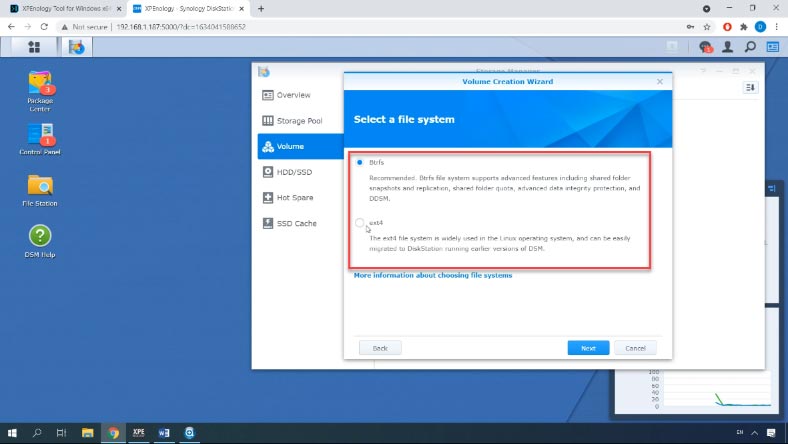
Select the storage pool and hit “Next”. Change the size in the next window if necessary, and click “Next”; select the file system – “Next”, and click “Apply” in the following window to confirm the settings.
Step 6. How to create a shared folder
When the array and partitions are created, you will be able to add a shared network folder.
To do it, open “Control Panel” – “Shared Folder” – “Create”.
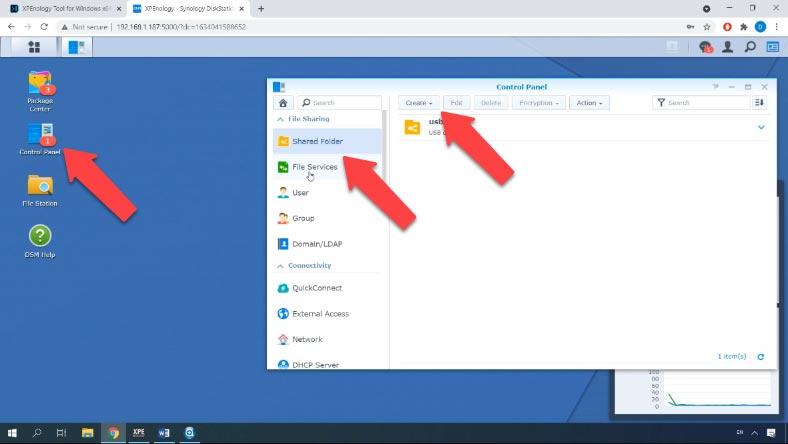
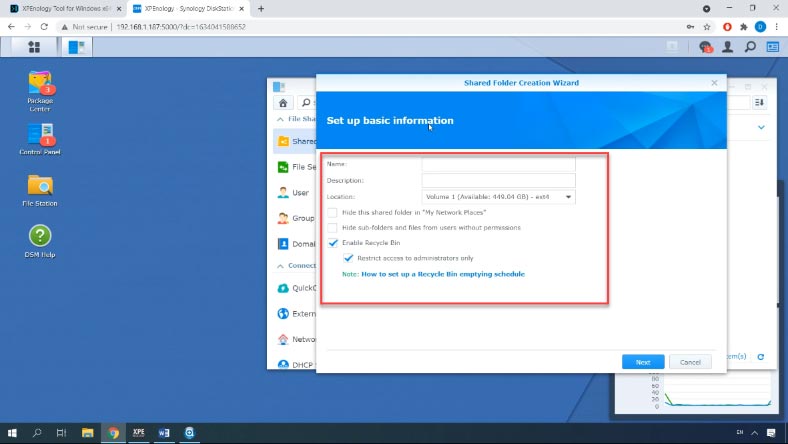
Type the folder name, select a location, remove permission restrictions and click “Next”; set a password if necessary and click “Apply” to confirm the changes you have made. In the next window, set permissions for users and click OK.
Step 7. How to recover data from a RAID on Synology NAS
In any situation involving loss of data from a NAS system, you can always recover information with the help of Hetman RAID Recovery.
This program will help you recover data if files are removed accidentally from a hard disk inside a NAS system, a hard disk is formatted, the disk array is misconfigured, the firmware is installed incorrectly, or in other scenarios involving loss of data, or loss of access to the network drive, or damage to the RAID volume.
It supports most popular file systems, technologies and RAID types, and in most cases it will be able to rebuild the damaged RAID automatically.
For recovery, take the hard disks out of the storage device and connect them to a Windows computer. Download, install and start the data recovery tool. Hetman RAID Recovery will automatically rebuild the damaged RAID system with the available disks.
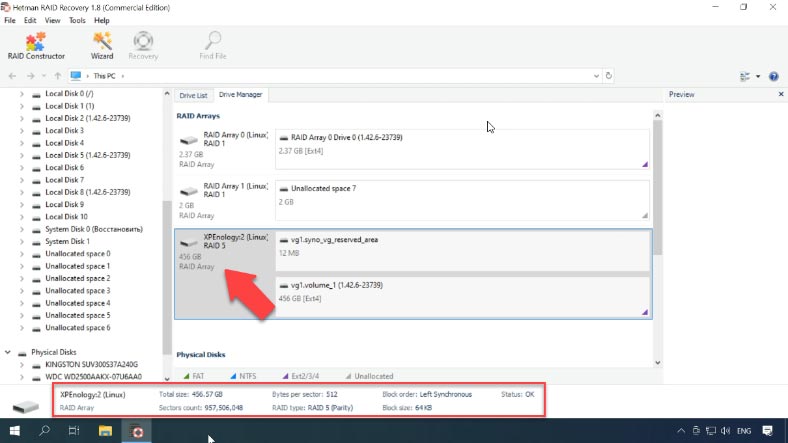
To have the disk array contents displayed, right-click on the disk and choose “Open.” Choose the scan type to run, and click “Next” to start searching for lost files, and then “Finish” when the process is over.
Find the directory where the necessary files used to be stored; by clicking on a file, you can see its contents in the preview window.
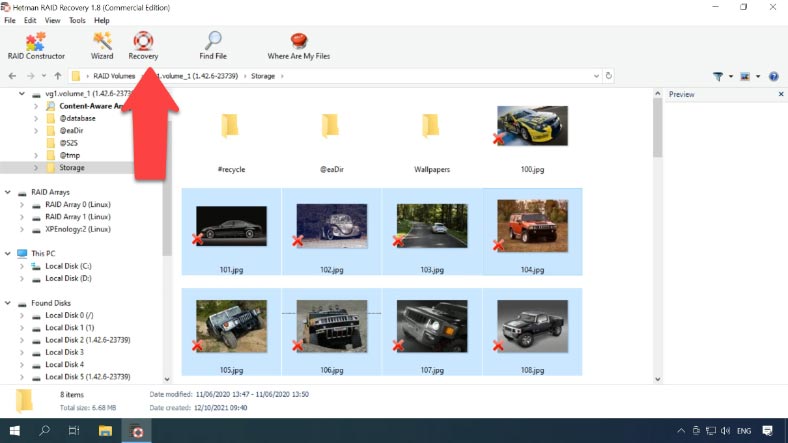
Select all the items you want to recover, click “Recovery,” then specify the disk and folder where you want to save them. After that, follow the path you have chosen and check if the recovered files are there.
Conclusion
Summing up, XPEnology is an excellent and cheap solution for home projects, but if you’re looking for a reliable operating system for an enterprise-level NAS device, it’s better to buy a dedicated Synology device instead.
| Feature | Description |
|---|---|
| Base System | XPEnology is based on the Synology NAS system |
| Supported Formats | Supports Btrfs and ext4 formats |
| Interface | Intuitive web interface |
| Network Support | Supports Ethernet, Wi-Fi, VLAN |
| System Requirements | AMD64 or Intel x86_64, minimum 2 GB of RAM |
| Modules and Applications | Supports Synology packages and applications like Plex, Docker |
| Virtualization | Supports virtualization via Virtual Machine Manager |
| Clustering | Ability to create clusters for high availability |
| Backup | Supports data backup to local and remote servers |
| Security | Includes data encryption, two-factor authentication |


