RAW Disk Conversion: Can You Recover Data After Converting a RAW Disk Into NTFS?
Encountered a RAW disk and lost important data? In this article, we uncover the methods and techniques to convert a RAW disk into NTFS and restore its data. Our experts share valuable insights, tips, and solutions to help you retrieve those crucial files. Whether it’s accidental disk formatting, corruption, or other issues causing the RAW disk status, we’ve got you covered. Learn how to rescue your valuable data!
- What is RAW by Itself
- The Seven Main Causes Why RAW Happens
- Methods to Restore Access to a RAW Disk
- Method 1. Check the Condition of Cables or Connectors
- Method 2. Modify Security Settings in Partition Properties
- Method 3. Modify Security Settings in Partition Properties
- Method 4. Convert RAW Into NTFS File System by Formatting the Disk
- Method 5. Recovering Files from RAW Disks with Data Recovery Software
- Conclusion
- Questions and answers
- Comments
It may become a desperate and frightful experience to open a disk and find some empty unallocated space instead of your data – most users tend to believe all their information is lost forever. Such situation is very unpleasant but not at all critical. All the data in such storage device is still there but the system cannot identify the disk internal structure and give you access to the data. However, you can fix the file system format (shown as RAW) and bring it back to the original condition, and thus get your data back. In this article, we will consider the main seven causes behind this problem and offer you several methods to solve the issue.

How to Recover Data After Formatting, Deleting or Creating Partitions in 2020 📁🔥⚕️
What is RAW by Itself
Before we move on to describing the causes that make your storage device turn into «RAW» format and looking for possible ways out, let’s try to explain the situation in detail.
The notion of RAW is meant to indicate a file system of a volume that cannot be identified (a volume is a part of the computer’s long-term memory considered as a single unified storage area, for convenience of use).
Every volume or storage space have a specific file system representing a certain order and determining a special way to organize, store and indicate data on storage devices within computers and other electronic gadgets.
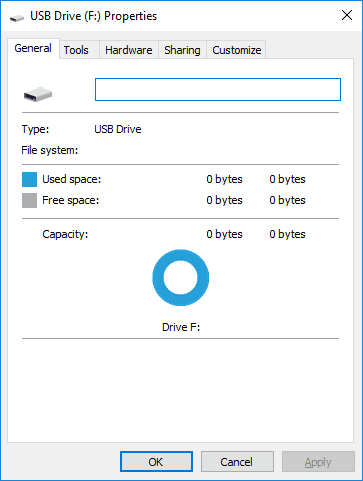
The core has a built-in system component RAWFS, its main function being to notify any applications about the volume size and the version of the file system if they send a corresponding request. When it’s impossible to identify the file system, the indication RAW appears. In other words, it means the that name of the file system in a disk partition cannot be recognized for some reason by any of the file system drivers installed and available in Windows operating system.
In practice, it suggests that the partition is not formatted in a certain format, the file system structure is damaged, or there is a cause that makes the internal contents of the partition (disk) inaccessible. Further on, we will list the main reasons why some partitions turn into RAW.
| Characteristic | Description |
|---|---|
| File system name | RAW |
| Essence | The file system is undefined or damaged, making it unusable |
| Causes | Partition table corruption, improper formatting, OS failure, viruses, sudden power loss |
| Consequences | Inability to access data on the disk, system recognizes the disk as unformatted |
| Recovery methods | Using data recovery programs like Hetman Partition Recovery, EaseUS, Recuva, or disk formatting |
| Risks | Potential data loss if recovery or formatting is done incorrectly |
| File systems after recovery | NTFS, FAT, ExFAT, HFS+, APFS, Ext2/3/4, ReFS, and others |
The Seven Main Causes Why RAW Happens
There are many symptoms of a hard disk partition becoming of RAW format. As we have already described in the previous part of the article, there can be very different causes to make it impossible to recognize the disk file system name. Additionally, the operating system may require that you perform certain actions before you can use the partition of the disk where the file system is shown as RAW. For example, the Windows operating system shows an error warning and suggests to perform the following action: You need to format the disk in Drive … before you can use it. Do you want to format it? In this case, you won’t be able to get access to the disk partition and all the information there until you comply with the operating system requirements.
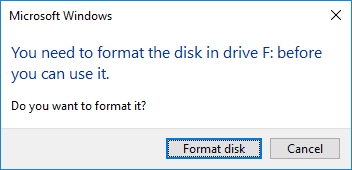
In such a situation, formatting the partition can help you get rid of the RAW format problem. However, this process will destroy all the data stored in such a partition. That’s why we suggest that you get acquainted with the main causes of the problem and useful advice on eliminating them without losing data.
Sometimes a disk or other storage media is shown in the RAW format if their file system is not supported by the current version of the operating system installed on your computer. In this case, you should take some action to open the storage device in the operating system it was originally intended for and which supports the use of such file system.

How to Recover Deleted Files from a USB Drive after Formatting the Drive or a Virus Attack 📁🔥⚕️
Below, there are seven possible causes – and some solutions available for each one.
Cause 1. Bad Sectors
if there are bad sectors (or blocks) in the key areas of a hard disk, such disk will definitely never work properly, which can damage the file system and make it appear as RAW.

How to Use Victoria to Test and Fix Your Hard Disk in 2020 👨💻🛠️💻
Cause 2. Damaged file system structure
The main underlying cause of errors and disk partitions or entire disks to appear as RAW is connected with the reliability of the file system which can be undermined for a number of causes besides bad sectors. Therefore, if the file system contains internal structural damage, a partition may acquire the RAW format.

How to Check Your Hard Disk for Errors and Fix Them in Windows 10 🔎🛠️🗄️
Cause 3. Damaged Partition Table
The next – and no less important – cause of RAW format problems in a disk partition is probably a damaged partition table. For example, wrong values in the MBR table which contains data and a code fragment as well as special signatures required for proper booting of the operating system can also cause this problem.
Cause 4. Reinstallation of the Windows Operating System
When you update the old operating system to its newer version, the file system of the system partition can also be changed into the new version of the file system (for example, it may change from FAT to NTFS). In this case, the file system may not be identified by the new operating system properly, and as a result it will be displayed as RAW.

How To Roll Back to The Previous Build After Creators Update, or Delete Updates in Windows 10 ⚕️💻💽
Cause 5. Virus and Malware Attacks
One of the most widespread causes to make a disk partition appear as belonging to RAW file system is aggressive actions by viruses or other malware. Their malicious attack can damage a part of the partition table which indicates the beginning and the end of the partition and contains other additional data, or change / delete important settings of the hard disk. As a result, it will be impossible to determine the boundaries of the damaged partition and its file system, and it will make the disk partition attacked by malware be displayed as RAW when it is addressed by the computer.
Cause 6. Damaged Cables or Connectors
Sometimes, a hard disk or storage device can be displayed as an unidentified RAW file system when the connecting cable is damaged, or there is poor contact in the connector.
Usually the hard disk cable is the last thing to get out of order, but you should not forget it could be one of the possible causes to make the system identify the disk as RAW. It is especially relevant when there was a power surge or there is a chance of other mechanical damage. Most of the time, there can be problems with the connector used for the hard disk that gets damaged if the disk is connected and disconnected very frequently, or if the connector has a poor contact insufficient for proper display and operation of the data storage device.

Windows 10 Can't See a Hard Disk - How to Connect One? 💻⚙️🗄️
Cause 7. Wrong Drive Access Permissions
One of the possible causes for a partition to acquire the RAW format can be wrongly configured access settings which are directly connected to local security policy settings. As a result, the operating system may restrict your access to a partition and display it as an area with an unidentified file system.
Methods to Restore Access to a RAW Disk

How to Fix a RAW Disk in 2020 and Recover Data from an HDD with RAW Partitions💻⚕️🛠️
Depending on the causes that made a partition or the entire disk be displayed in the RAW format, you will have to follow a certain procedure to fix the problem. The actions described below should be taken one by one until the wrongly displayed disk issue is solved. After each step, check if the problem is eliminated, and go on to the next stage if the result is still negative.
Method 1. Check the Condition of Cables or Connectors
If there was a power surge, you should check cables and connectors for possible damage. Replace the damaged cable with a good one and check the disk again. Otherwise, connect the drive to another connector which you know is in a good working condition and try again. These actions may be enough to solve the problem.
Method 2. Modify Security Settings in Partition Properties
From the viewpoint of configuring partition access permissions, you can modify the necessary security settings in the partition properties window. Open the File Explorer and find your RAW format partition or disk. Right-click on it and open the context menu; from the list of actions, select Properties.
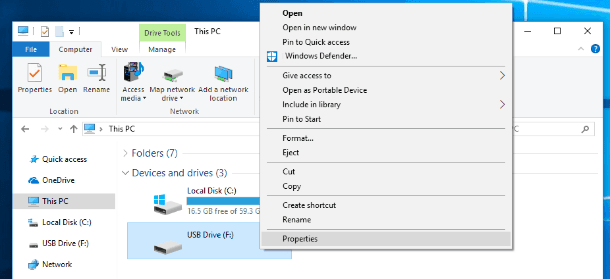
In the new window, switch to the tab Security where you can remove unnecessary users and any junk codes, and add a local user to restore access to the disk.
Method 3. Modify Security Settings in Partition Properties
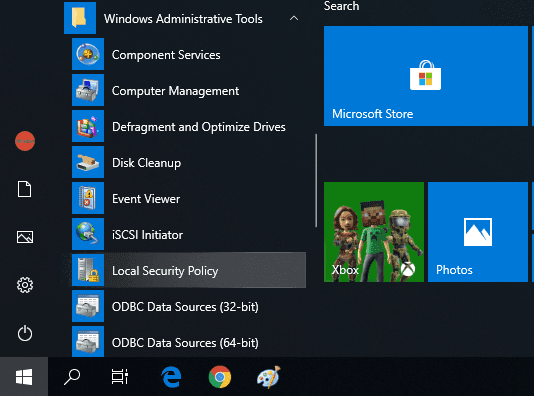
If for some reason you can’t allow access to the required partition, you can modify security settings with the integrated tool of the operating system – Local Security Policy. You can open its window in several ways. For example, click on the Start button in the lower left corner of your desktop, on the Taskbar, and open the main Windows menu. Drag the slider down until you find the line Windows Administrative Tools. Click on it once and open the context menu. From the list of system elements, select Local Security Policy.
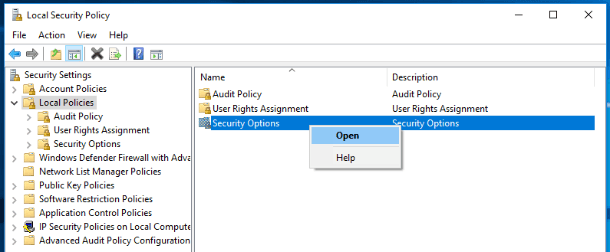
In the window that opens, look at the left panel and select Local Policies, and in the right panel, double-click on Security Options, or right-click on it and choose Open in the context menu.
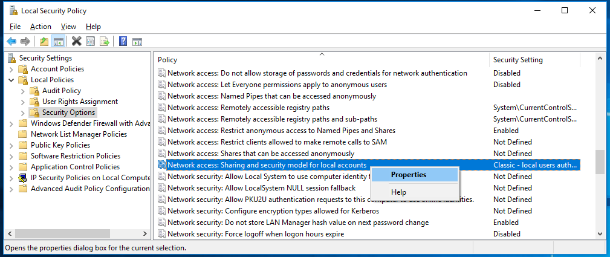
In the right panel of the security options windows you will see the main policies with the settings for each one. Use the slider to scroll down and find the policy Network access: Sharing and security model for local accounts. Double-click on it to access the policy properties. Otherwise, right-click on it and open the context menu, then select Properties.
In the network access window, find the tab Local Security Setting and in the central cell, open the menu to change the previous setting to Classic – local users authenticate as themselves.
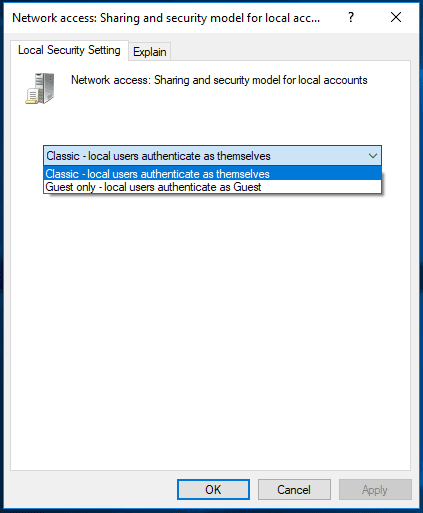
Then click Apply and ОК for the changes to take effect.
Method 4. Convert RAW Into NTFS File System by Formatting the Disk
If the operating system identifies the disk when you switch on the computer or connect a data storage device, there will always be a message suggesting that you should format the disk to restore access and install a correct version of the new file system. In case the information stored on such disk (identified as RAW) is not important, you can click Format disk button at once and start the process of configuring the file system.

However, if the information is valuable, don’t hurry to format the disk and go to section 5 of this article to recover your data. The process of formatting cannot completely erase the information on the RAW disk but it can make the subsequent data recovery more difficult and reduce the final number of files good for further use.
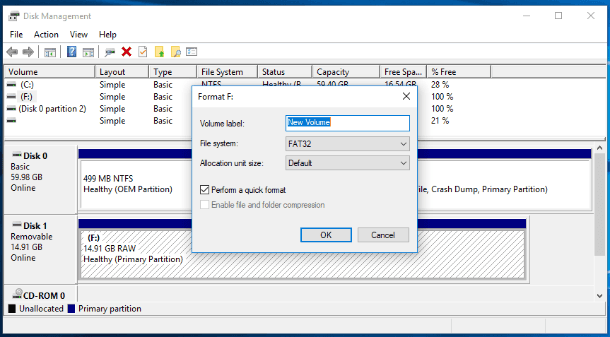
If the message is inactive, you can format the disk from the Disk Management app. There are many ways to open this app. For example, right-click on the Start button in the Taskbar, or press the key sequence Windows + X to open the context menu. From the list, choose Disk Management for direct access.

In the window that opens, right-click on the RAW disk and select Format in the menu.

In the new window, set the format options and click OK to start the process.
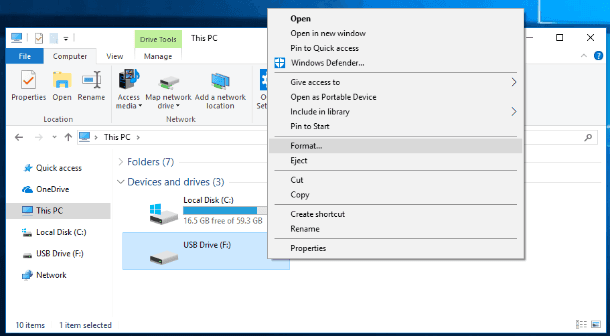
You can also format a RAW disk from the Windows File Explorer. Right-click on the disk name and open the context menu. From the list of available actions, select Format.
Set the required file system and other options if necessary, and click Start to begin the format process.
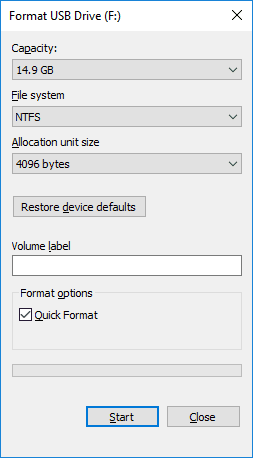
When it’s over, your RAW disk will have the new file system and will be ready for further use.
Method 5. Recovering Files from RAW Disks with Data Recovery Software
If you are interested to save all the data located in the RAW disk, you will have to use some data recovery software capable of such operations. One of such programs enjoying wide popularity and highly appreciated by users for excellent results in recovering lost data is Hetman Partition Recovery developed by Hetman Software It meets the user requirements completely when it comes to the situation with an unrecognized RAW partition, has a convenient and simple interface looking very similar to that of a Windows operating system, is easy to use and shows very good results when recovering files.

How to Fix Flash Drive Errors: The Drive Can’t Be Recognized, Wrong Size, RAW File System 🛠️👨💻🤔
An important advantage is the fact that the program implements the preview option for recovered files to enable users to view, watch or listen to the contents of any files before they decide on saving them Such approach helps you be absolutely confident in choosing and saving the best versions of recovered documents.
Download the installation file for Hetman Partition Recovery from the company’s official website and install it to your laptop or desktop computer. The installation process won’t take much time and is quite easy thanks to the step-by-step wizard. Follow the directions and installation will be successful.
Open the Program and Find the RAW Disk or Partition.
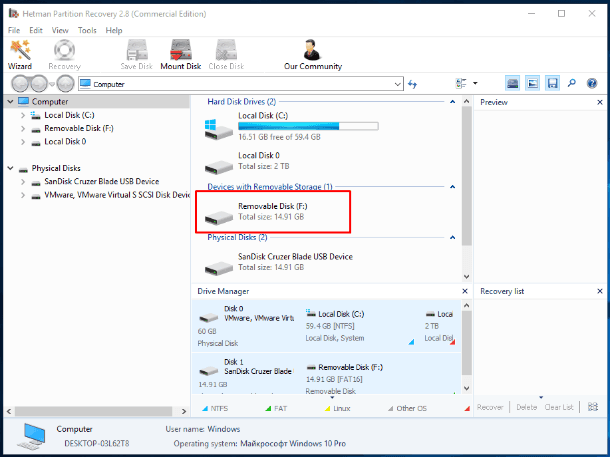
Double-click on it and choose the necessary analysis type in the window that opens. Check the Full analysis option to search for any available information and restore the disk file system.
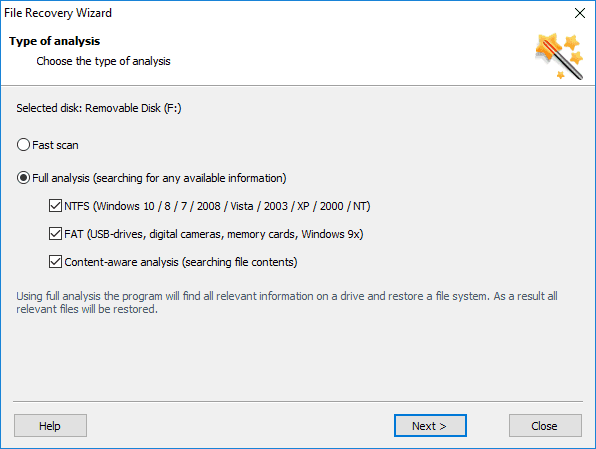
After you are finished with scan settings, click Next and start the process of analysis and data recovery. Depending on how damaged the file system is, the size of the disk and other circumstances, the recovery process may take from a few minutes to several hours. For user’s convenience, the scanning process is shown in real-time mode.
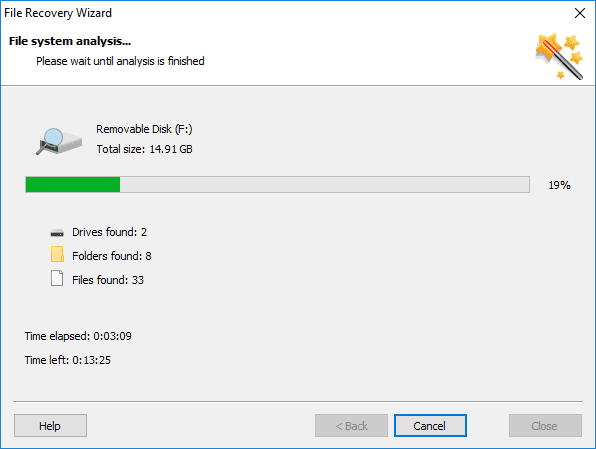
When it’s over, click Finish and go to the preview window to select recovered files and save them. Clicking on every file, you can view its contents and select the one you find the most suitable.
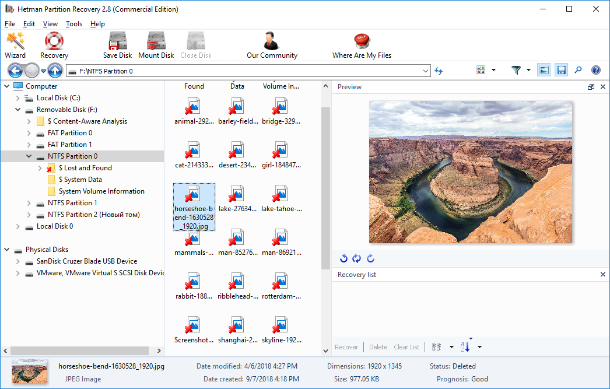
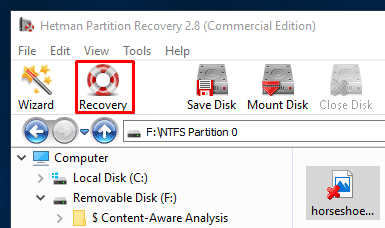
Having selected all the necessary files, click the Recovery button fashioned like a life ring and located in the main ribbon of the window.
The program will offer you to choose from the following variants: to save files to a hard disk, record them to a CD/DVD, create an ISO virtual image or upload by FTP. Depending on your preferences or needs at a certain moment, check the option next to the saving method you like and then click Next to continue.
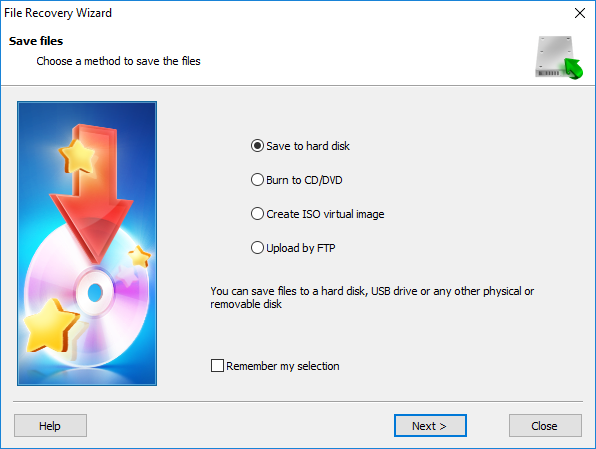
In the next window, check the necessary extra options, for example, specify the path to save the files or use the suggested variant, and click Recovery.
Now that you have recovered all the files that are important for you, you can format your disk or partition into NTFS for further use with the help of the method described previously in Part 4.
Conclusion
Information is of primary importance and it requires safe storage methods. The causes why a disk containing important information can become inaccessible can be very different. However, you can eliminate almost all of them with integrated tools of the Windows operating system or with third-party data recovery software like Hetman Partition Recovery
| Data Recovery from RAW Disks: | Hetman Partition Recovery | Hetman Uneraser | Hetman Photo Recovery | Hetman Office Recovery |
|---|---|---|---|---|
| Recovery of deleted partitions NTFS/ReFS, FAT/exFAT, APFS/HFS+, Ext2/3/4, ReiserFS, XFS, UFS | + | – | – | – |
| Recovery of files from disk after failure/damage | + | + | + | + |
| Recovery of accidentally deleted photos | + | + | + | – |
| Recovery of Microsoft Office and Open Office files | + | + | – | + |
In this article, we have considered the main causes to make hard disks appear in the RAW format and the main ways to solve this problem. If you have any questions or you would like to share your experience in dealing with such issues, post your comments and we will answer them for sure.


