Best Methods for Data Recovery from XFS File System: A Comprehensive Approach!
Are you facing data loss issues with your XFS file system and searching for solutions? In this video, we’ll provide you with essential tips, top 6 tools, and step-by-step methods for recovering data from XFS file system. Read now to learn how to retrieve your valuable data effectively!
- File system structure and the algorithm used to find the lost data
- Allocation Group structure
- Tests and comparisons
- Removing the main superblock
- Conclusion
- Questions and answers
- Comments
XFS is a journaled file system, but unlike EXT file systems, it only records metadata changes into the journal. At the moment, this file system is used by default in many Red Hat-based distributives. The most serious drawbacks of this file system are as follows: it’s impossible to reduce data size, it’s difficult to recover data, and there’s a risk of losing files if there is a power failure while data is being written to the disk, as most information is only stored in the system memory during such operation.

Top Tools to Recover Data from XFS Drives. How to Recover Data from XFS File System
File system structure and the algorithm used to find the lost data
Before we start testing various tools, let’s explore the structure of this file system.
The entire XFS file system is divided into the so-called Allocation Groups, similar to block groups in Ext2FS.
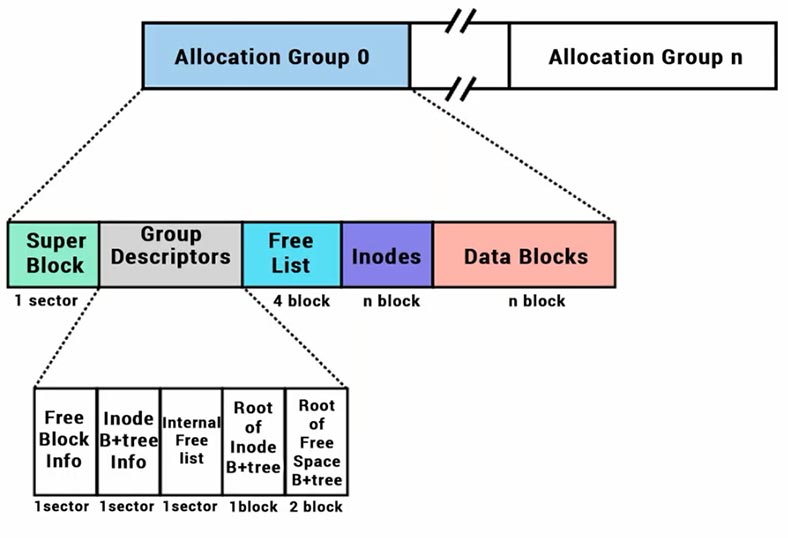
The size, number and other characteristics of Allocation Groups are found in the superblock, and this block is located at the beginning of every Allocation Group (just as it is in Ext2).
Allocation Group structure
At least the first two kilobytes of every Allocation Group have the same format. The Allocation Group zero (together with superblock zero) are located at the beginning of the disk.
The Allocation Group is divided into four kinds of structures:
- Superblock
- List of free blocks
- Information on allocated and free inodes
- Blocks allocated for extension of B-trees
XFS is built as a B-tree. That is why the data is stored in its leaves, and in order to access the information, a data recovery tool has to go down the chain of links before restoring any data. If some elements of this chain are removed, there are chances that the data recovery tool won’t be able to find the path to your data.
In B-trees, keys are combined into blocks containing several of them, which helps to considerably increase their effectiveness on disk storage devices. All leaves are located on one level (the lowest one), and every block (unless it is the only root leaf) should be at least half full of keys.
In today’s tests, we are going to compare results of searching for data deleted from XFS file system, and we will try to delete some elements of the file system structure to find out how top data recovery tools can cope with the problem.
Tests and comparisons
In Windows, you need a specialized utility or a special driver to view the contents of a removable drive (such as a USB flash drive or an external hard disk) formatted into XFS. Fortunately, data recovery tools can recognize such devices and restore data from them.
For our tests, we have selected several popular data recovery tools – Hetman Partition Recovery, Reclaime, UFS Explorer, Disk Internals, Diskdrill, Active@Uneraser, and File Scavenger.
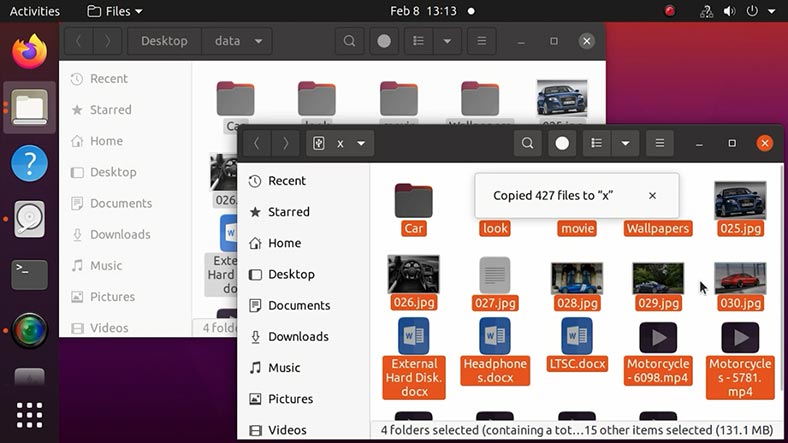
On a computer running a Linux operating system, we’ve created a test disk with XFS file system. We wrote some data to the disk – a few folders containing photos, videos, and documents, and then removed some of them. We will perform the tests on another computer running Windows.
Test 1. Hetman Partition Recovery
Let’s connect the XFS drive. Windows can’t recognize this file system, and when the drive is connected, the operating system suggests formatting it so that the drive can be used.
However, in fact there is no need to format anything – start Hetman Partition Recovery and scan the drive. You can see that the program can recognize the disk, detect its file system and display its name and size properly.
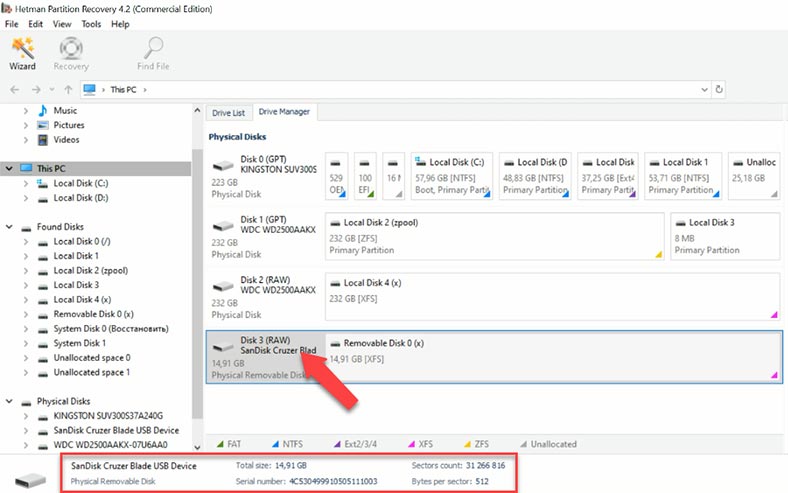
Right-click on the disk, choose “Open” and try “Fast scan” first. This type of analysis will scan the disk quickly and display the results. Here you are, some files and folders have been found.
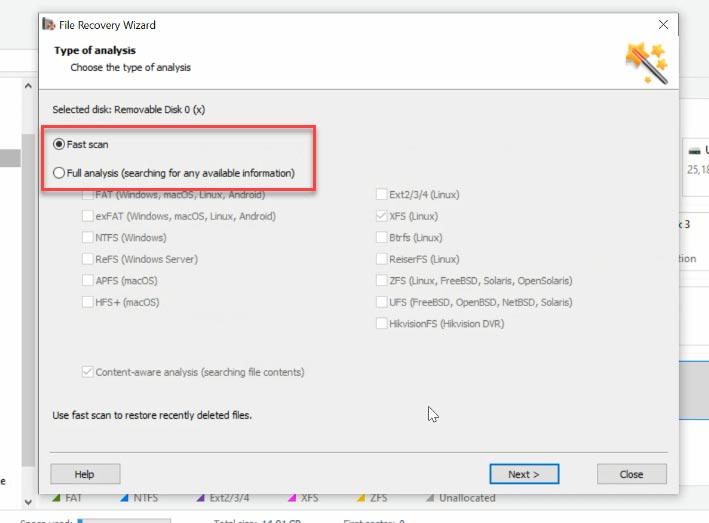
You can see, this tool has no difficulty in finding the files deleted in such a way, and it displays them marked with a red cross. “Full Analysis” was not necessary, and it saved us a lot of time, because “Full Analysis” takes much longer.
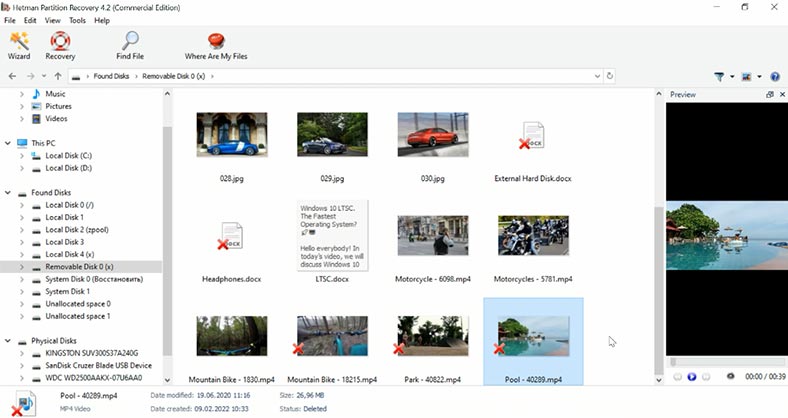
You can see the contents of all files with the preview feature, and you can search files by name. Now, all the files have been recovered. The disk structure is retained, so all files and folders can be found where they used to be, and it makes searching for lost data extremely easy. Without spending too much time and effort, the program was able to find and recover the lost information.
Test 1. Reclaime
Let’s try another candidate, Reclaime. Before reaching the main window displaying the disks, you’ll have to get through several windows containing additional settings. This could make using the program more difficult for beginners.
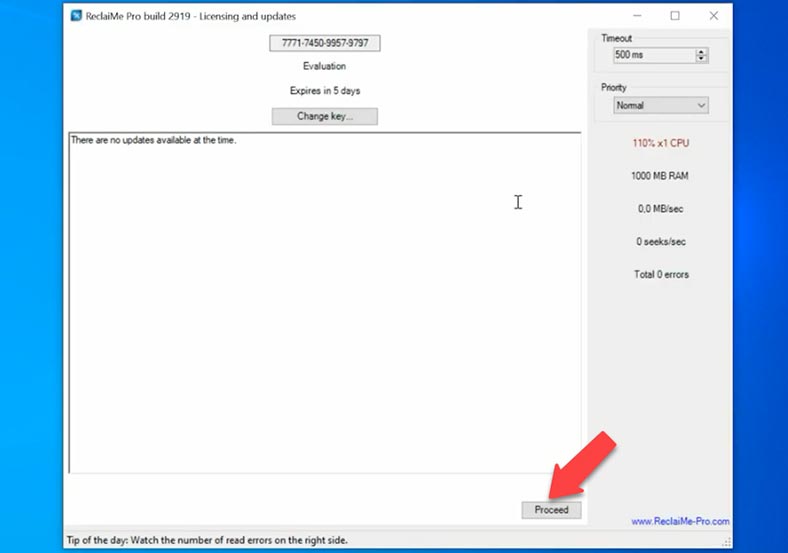
After that, the program will start analyzing connected hard disks and then display their list on the screen, which also takes some time. The program reads service information, identifies the file system, names and so on. When the process is over, we can see the list of recognized devices.
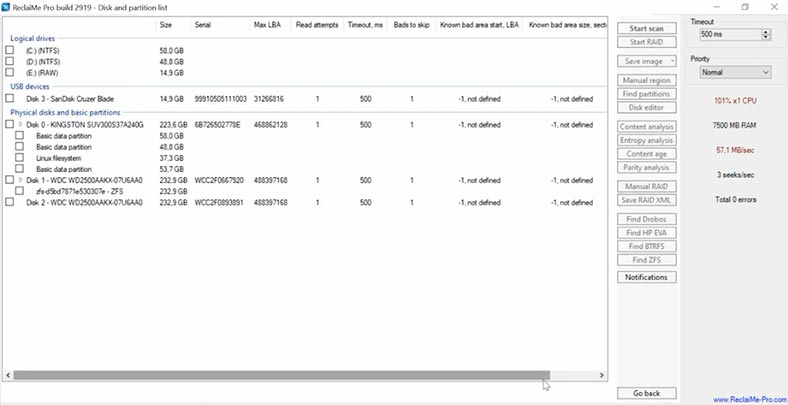
On this list, you can see the test disk we are using in this experiment: the name and capacity are displayed, but the file system has not been identified. Click to start the scan. In the next window, you can choose the scan type: we leave the default option as it is, uncheck unnecessary file system options, and click “Start”.
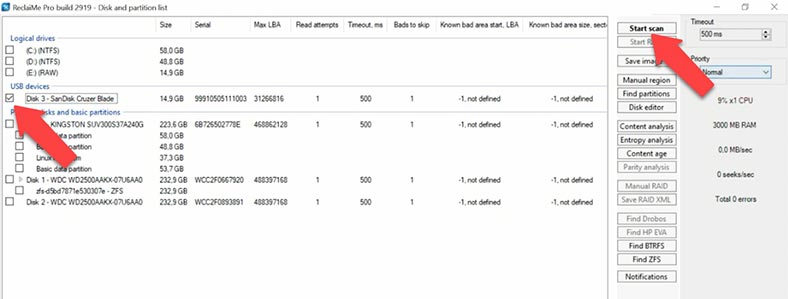
As a result, the program shows some files, but the ones that have been deleted are not displayed. It is difficult to understand if the analysis is over or still running. When we had a closer look, it turned out to be a kind of initial scan, and the deleted files are placed into a separate directory with the name “Unclassified”.
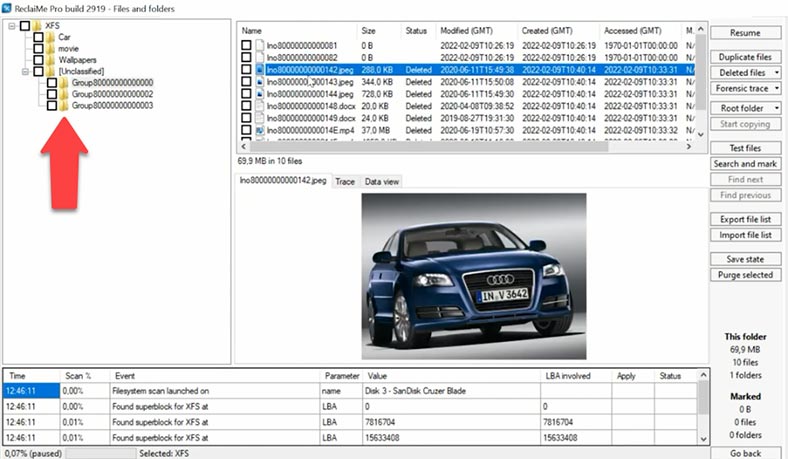
For such files, names are not preserved, but they are available for preview, which gives you an idea if it is possible to recover them. Documents cannot be previewed, so it’s still not clear if the program can recover them completely. Document preview is presented as encoding. As a result, file names have changed, the folder structure is damaged, and this tool is likely to use a quick search algorithm by file type.
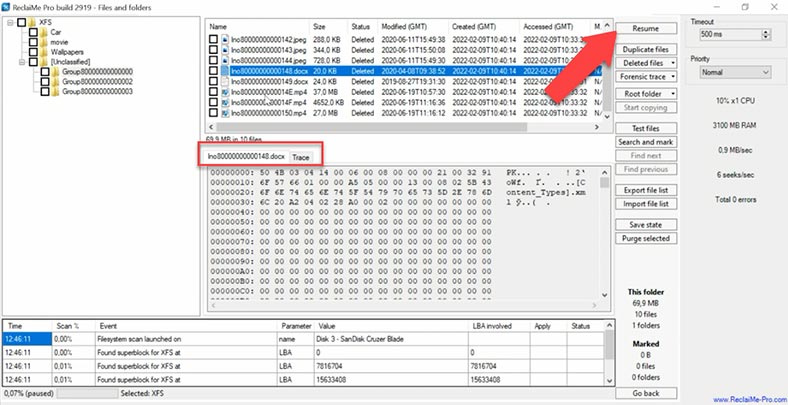
To start a deeper scan, click “Resume”. In the course of the scan, we can see the program is moving files from the Unclassified folder to their previous locations, and restores their names and structure. The program has coped with the task, although it took a really long time to complete.
Test 1. UFS Explorer
It shows the disk name, capacity and an XFS partition below. When you view the contents of this directory, only the files which are still on the disk are displayed. Let’s run a Quick scan.
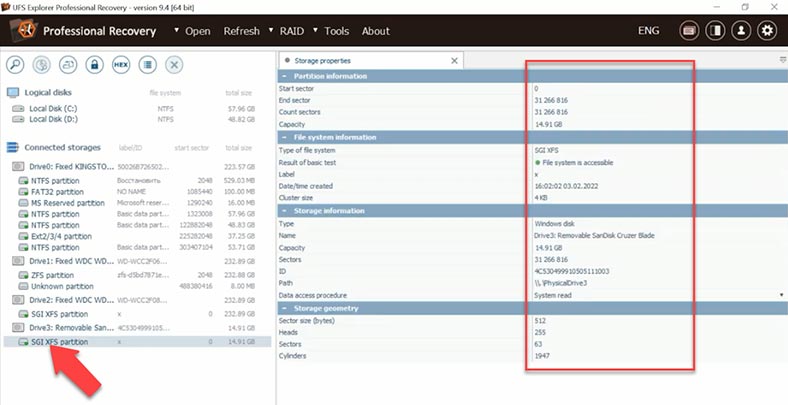
This scan type cannot find the deleted files in the root folder, but displays the files which are placed into other folders. The tool fails to display previews for documents and videos.
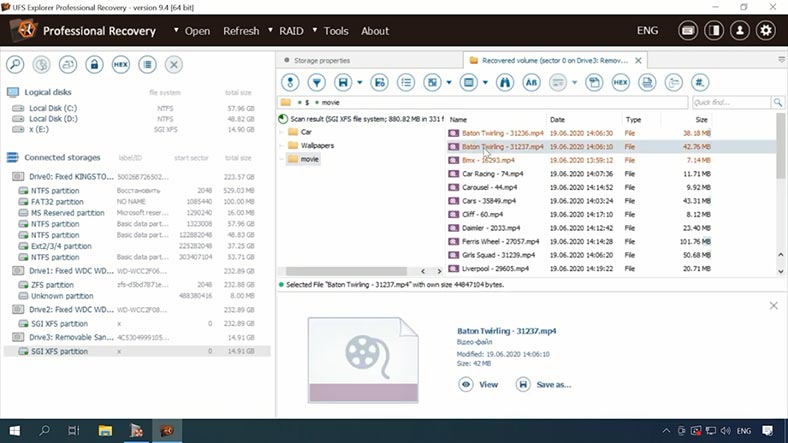
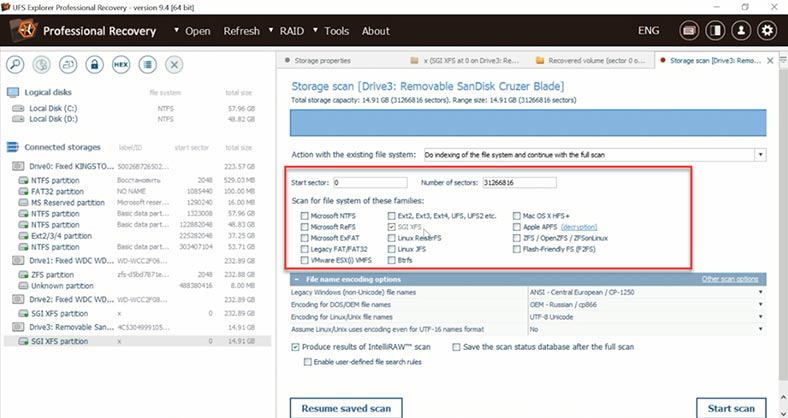
The quick scan has not found some of the deleted files. Let’s check the result of looking for such items. Uncheck unnecessary options – if you don’t do that, the search will take longer. This is a disadvantage for novice users, who are unlikely to notice and disable those options. The search for deleted files is quite long as well.
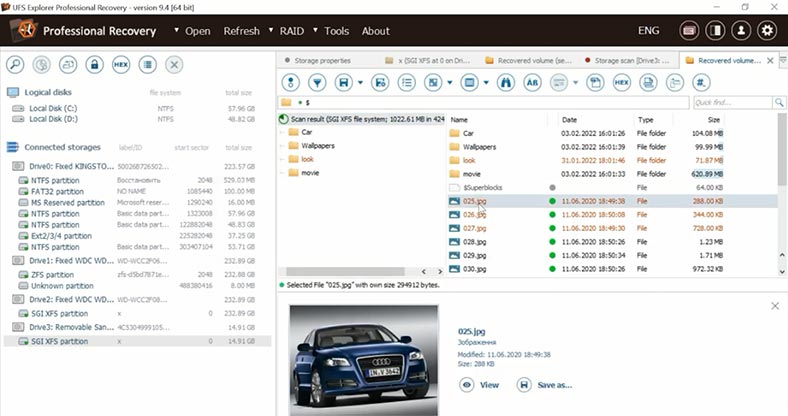
As a result, the program has found the deleted data – it is marked with a different color, but only photos can be previewed. This is another drawback, because we cannot understand if they could be recovered in the end, and if they are going to be damaged. Also, it’s very inconvenient to know so little about your chances of recovery before you actually buy the tool.
Test 1. Disk Drill
The program can see the storage device, its name and capacity, but the file system is not recognized. Quick Scan is not available for this disk as the program was unable to identify its file system. Click “Search for lost data”.
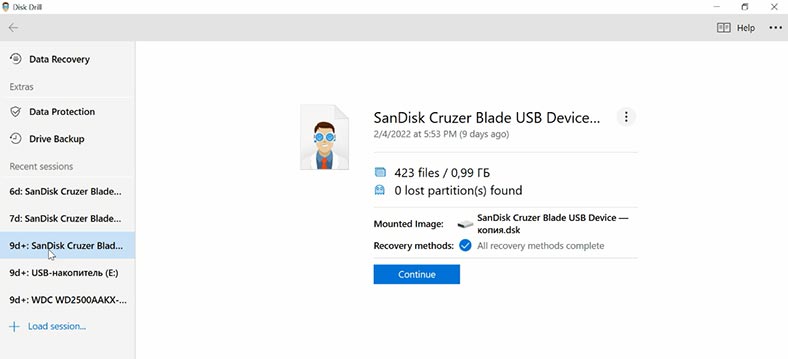
It will start a Deep Scan immediately. As a result, file names are not preserved, it’s difficult to understand which of them were removed, and it’s also hard to tell how effective the final result should be. In the preview window, we can watch a video that has been deleted, but the contents of the documents is not displayed.
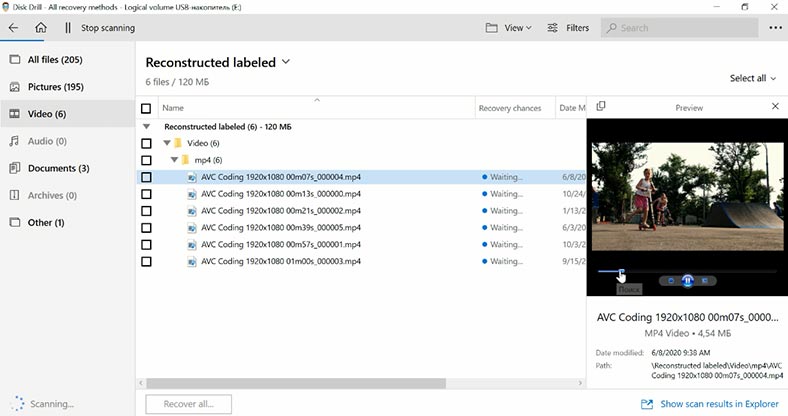
The program has found some deleted data, but it doesn’t offer a quick scan option, deleted files are not marked in any way, file names are not preserved, files are sorted into folders by type, and it’s quite difficult to find the one you need. Also, file search takes quite a long time. We recommend trying a different recovery tool, if possible.
Test 1. Active@ UNERASER
Another one to be tested is Active@UNERASER. Its developers claim that it supports XFS, but in the end all we can see is a drive containing some unallocated space, and the program failed to identify its file system. With QuickScan, no data can be found, while it takes even longer than a deep scan in DiskDrill.
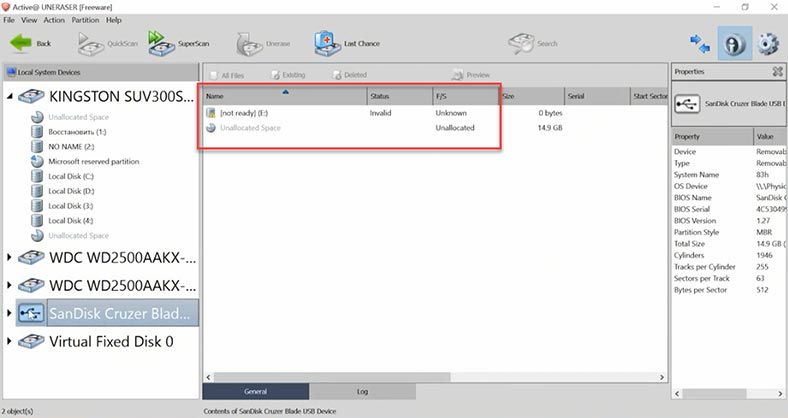
File search by signature has found some data, but there is no way to tell if any of them were removed before as file names and structure are not preserved, so it is difficult to evaluate recovery prospects. Of all files, only photos can be previewed.
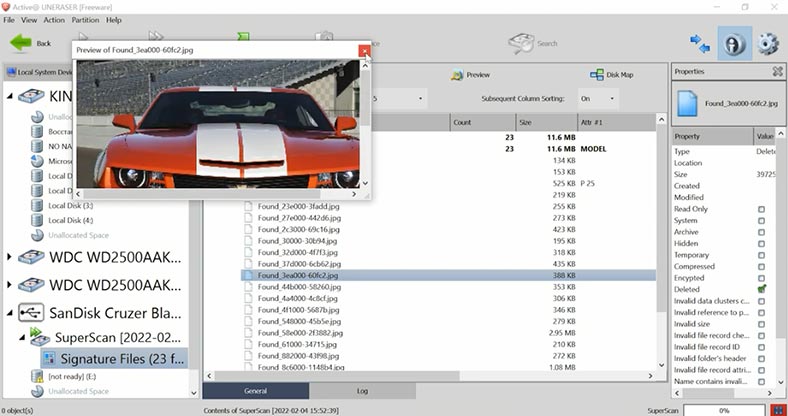
Some deleted files were found; however, it’s difficult to find specific files as their names are structure are not preserved. SuperScan takes a really long time to complete: in half an hour, it didn’t even manage to process 1% of the 10 GB drive.
Test 1. File Scavenger
We received a similar result from FileScavenger, which also claimed to support XFS file system.
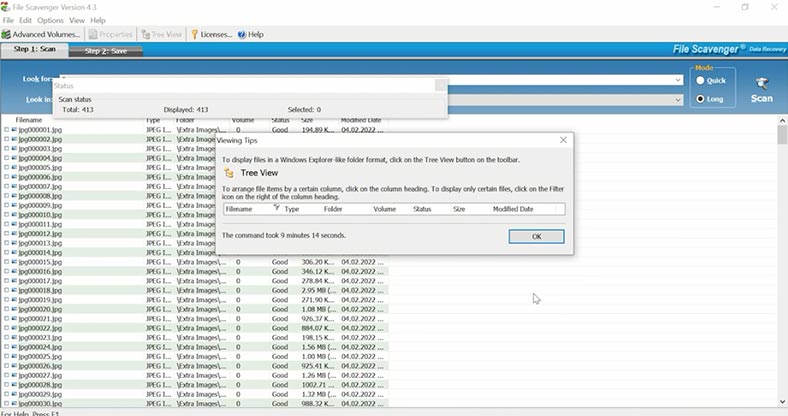
It didn’t find anything with quick scan, and with long scan, it uses a signature search algorithm, with file names and structure being lost in the process. The user interface is not too convenient, so it can be more difficult for beginners to use this product. When looking through the files, we can see that some of the deleted photos have been recovered, but documents and videos cannot be previewed, and the recovery prospects remain unknown. These files can only be previewed after recovery – and you can only recover files after you buy the full version license. Well, as for me, there are better products to choose from.
Test 1. Conclusion
Summing up, we have seen three programs that managed to find all deleted data in XFS file system; some of them were pretty quick, and some needed more time to complete the task. So far, the top three includes Hetman Partition Recovery, UFS Explorer and Reclaime. DiskDrill results are not so good as it looks for files using the signature analysis. To my mind, Active@Uneraser and FileScavenger are not worth your attention, as they are not free, but their recovery prospects are too questionable.
| Program | Description |
|---|---|
| Hetman Partition Recovery | Recovered data with disk structure and file names intact. Displays all files in preview mode, allowing you to evaluate the results before purchasing the full version. Ranks first. |
| UFS Explorer | Recovered data with disk structure and file names intact. |
| ReclaiME Pro | Recovered data with disk structure and file names intact. |
| DiskDrill | Showed a slightly worse result as it searches for files by signatures. |
| Active@ Uneraser | Recovery capability is doubtful, and the program is not free. |
| File Scavenger | Recovery capability is doubtful, and the program is not free. |
Removing the main superblock
In the second half of the test, we are going to erase a part of the file system – one of its superblocks.
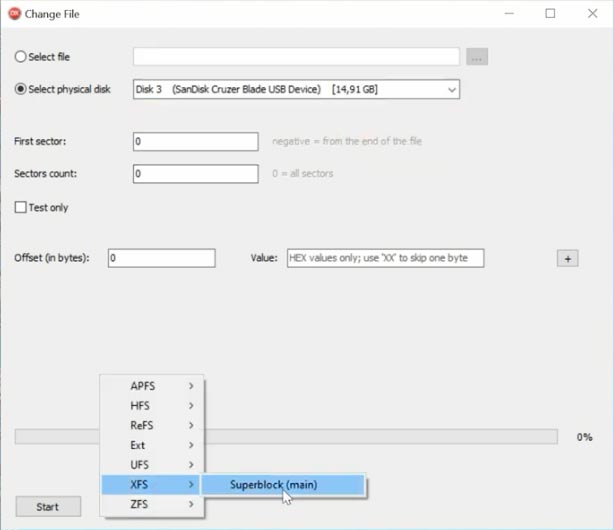
Let’s remove the main superblock.
Test 2. Partition Recovery
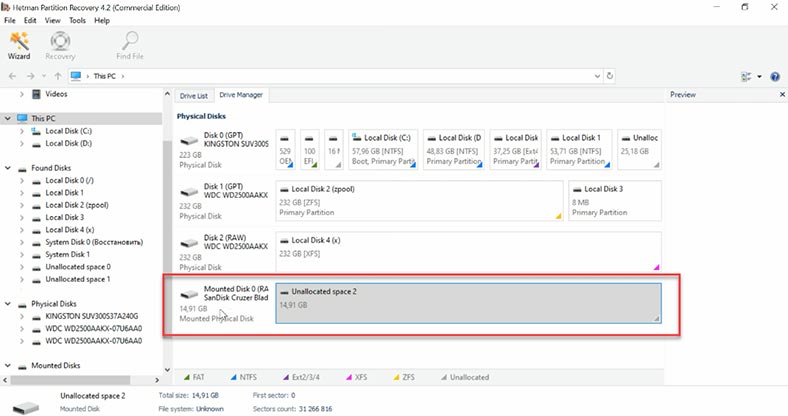
Now we start Hetman Partition Recovery, and it recognizes the erased disk as unallocated space.
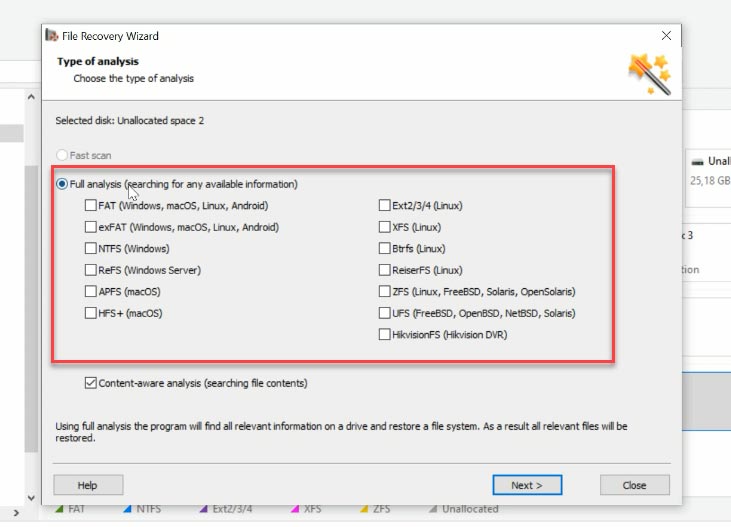
In this case, only “Full analysis” is available. Select the file system, and uncheck the box for searching by file contents (signatures), as it is going to make the scan much longer.
The program has found the partition with XFS file system. As you can see, even with the main superblock erased partially, the folder structure and file names are preserved, and this will make searching for files much easier.
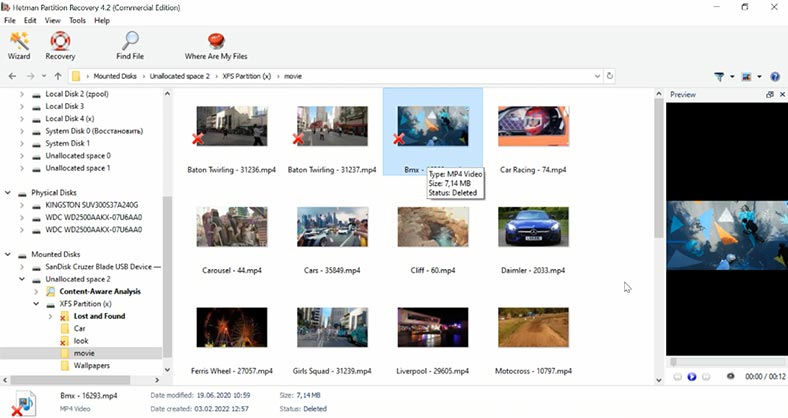
All photos and videos are available for preview, and the only file type you can’t view is deleted documents, but they are recovered in full, without any damage.
Test 2. UFSExplorer
All, right, now let’s test UFSExplorer. This utility also shows a disk with an unknown partition. Select the file system and start the scan. The program has found all files, and the folder structure and file names are preserved.
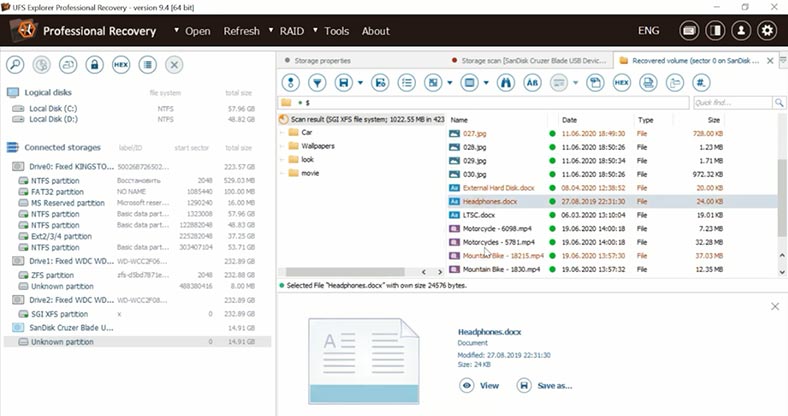
The only downside is that all documents and videos cannot be previewed. Recovery prospects for these files are not clear as you can’t view their contents without saving them to disk first.
Test 2. Reclaime
Another tool to test is Reclaime, and I ran the second test with the disk image, as the file system was erased partially. As I said before, the program’s interface is quite difficult to understand, so it makes the task more complicated for inexperienced users to find their way through the options. Set file system as XFS and start the scan.
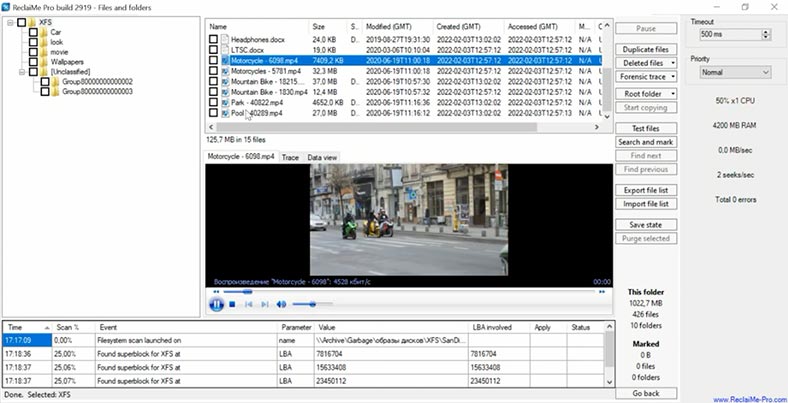
The program has managed to find deleted files, their structure and names are preserved, and deleted data is displayed. However, there are some problems as well: documents can’t be previewed, and the time required for disk scan was two or three times longer in comparison with its rivals.
Test 2. DiskDrill/Active@Uneraser/File Scavenger
DiskDrill, Active@Uneraser and File Scavenger all use signature-based search algorithm, and this scan type is the slowest, while it fails to retain the directory tree and file names.
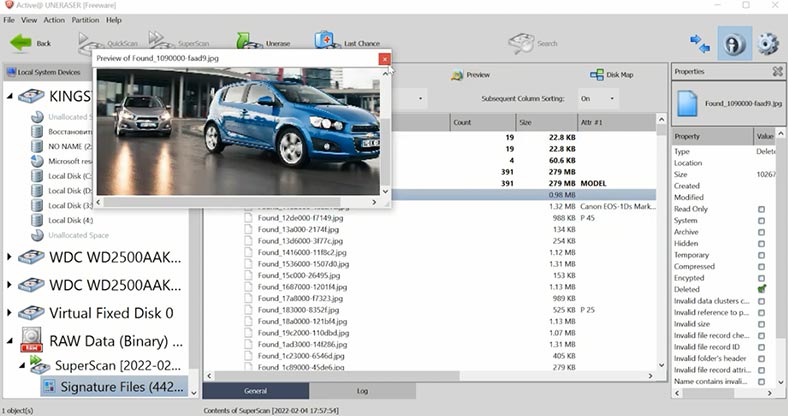
Such result can be classified as poor. Considering that these are commercial products, I would choose a program that offers a more convenient and faster way of searching for lost files.
Conclusion
Now let’s draw the bottom line. Only three tools from the list were able to find the data while retaining the disk structure and file names, and they are Hetman Partition Recovery, UFS Explorer and Reclaime Pro. Some other tools fail to display previews for documents and videos. Without saving the files, it is difficult to estimate if all of them can be recovered in full. And this is very inconvenient, because you have to buy the full version of the program to be able to save files, and in the end, the files could be damaged, and some documents or videos will never open.
On the other hand, Hetman Partition Recovery displays all files in the preview window, and you can evaluate the program’s effectiveness before actually paying for the full version license. The recovery process is very simple because of the convenient and intuitive interface that is easy to navigate even for beginners.
This program lets you retain the folder structure and file names which makes it easier to search for certain data and saves your time. The algorithm used in our product lets you recover data even if the entire structure of the file system is erased, and if the disk has at least some data left, Hetman Partition Recovery can restore it and display it to you due to using signature analysis.
And if you need to recover data from a RAID array with XFS file system which is quite popular with some NAS storage manufacturers, use Hetman RAID Recovery. This tool supports all popular file systems and RAID levels. If you want to learn more about data recovery from RAID systems, check other videos on our channel.
| Feature | Description |
|---|---|
| RAID Array Support | The program supports various RAID array types, including RAID 0, RAID 1, RAID 5, RAID 10, and custom configurations. |
| Automatic Parameter Detection | Automatically detects array parameters such as block size, disk order, and other key characteristics. |
| Data Recovery | Ability to recover data from damaged or deleted RAID arrays, as well as recovery after configuration errors or failures. |
| File Preview | Allows previewing files before recovery to evaluate quality and verify data. |
| File System Support | Supports file systems like FAT, NTFS, ReFS, HFS+, Ext2/3/4, XFS, and others. |
| User-Friendly Interface | Easy-to-use interface with a step-by-step wizard for data recovery. |



Symptoms of data corruption on an XFS file system can include:
These symptoms can be identified by running an XFS integrity check, which will scan the file system for any inconsistencies. Additionally, file system utilities such as xfs_repair and xfs_check can be used to identify and repair any corrupted data.