Comprehensive Guide to Restoring Data from Hyper-V Virtual Machines
In this tutorial, we’ll walk you through the process of recovering data from a Microsoft Hyper-V virtual machine. Whether you’ve experienced accidental deletion, disk corruption, or other data loss scenarios, we’ll guide you step-by-step on how to retrieve your valuable data with ease.
- Installing Windows Hyper-V components
- How to configure a virtual network adapter
- How to create a virtual machine with a Windows operating system on Hyper-V Server 2019
- How to transfer files from the host server to the virtual machine, with the help of the Command Prompt
- Recovering virtual machine data on Microsoft Hyper-V Server
- Conclusion
- Questions and answers
- Comments
Hyper-V is a corporate-class virtualization hypervisor by Microsoft. Microsoft Hyper-V Server lets you create virtual machines also known as guest systems.
Hypervisor is a kind of intermediary between the host and guest machines. The host machine is the actual physical device – the server. The guest machine is a virtual environment created by the hypervisor.
Recovering Hyper-V data from a damaged server or a storage area network (SAN) can be a very complicated and difficult process. In fact, every scenario where a virtual environment is recovered includes two stages. The first one – recovering files from the physical hard disk. The second one – recovering files from the virtual hard disk.
For starters, let’s explore how to create a virtual machine with Microsoft Hyper-V Server 2019.

🔷 How to Recover Data of a Microsoft Hyper-V Virtual Machine 🔷
Installing Windows Hyper-V components
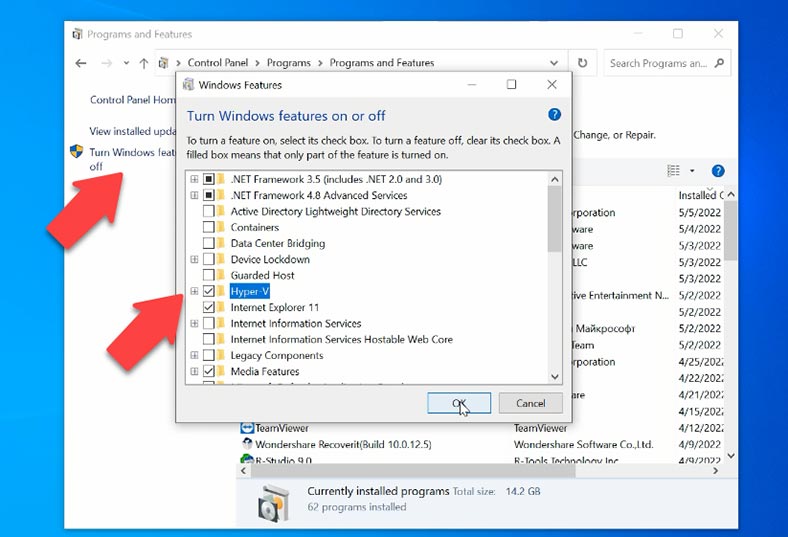
Before connecting to the server and creating a virtual machine on the client computer, you need to turn the Hyper-V feature on. To do that, go to Control Panel – Uninstall a program.
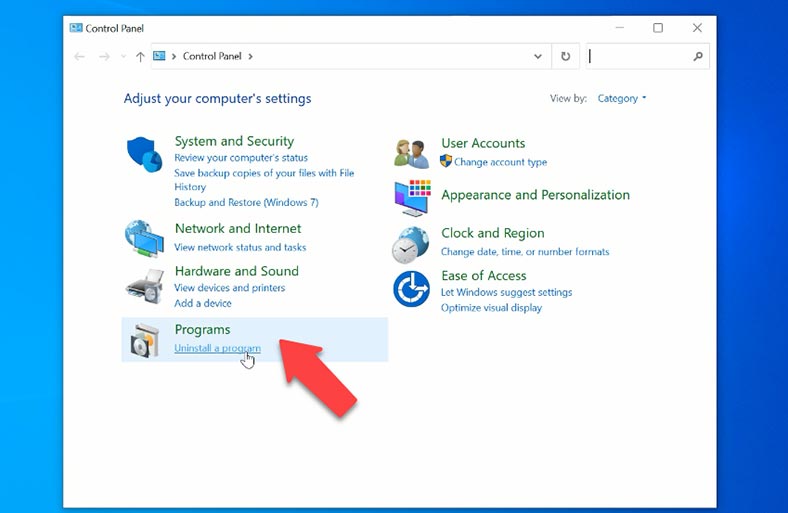
Go to “Turn Windows features on or off”, find Hyper-V on the list and check the box for it, then click OK. After that, the computer needs to restart.
How to configure a virtual network adapter
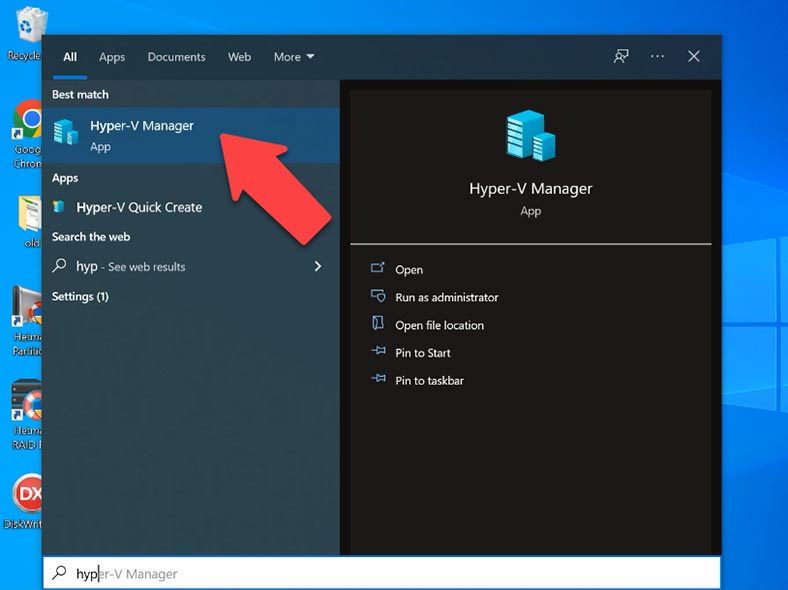
To arrange a network connection for the future virtual machine, we recommend configuring a virtual network adapter before you create the machine. Start Hyper-V: you can find it by clicking on the Start button and using the search function, or by looking for it in the folder “Windows Administrative Tools”.
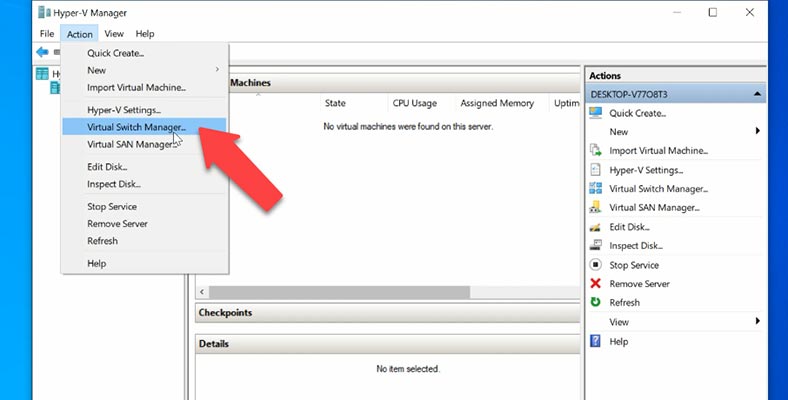
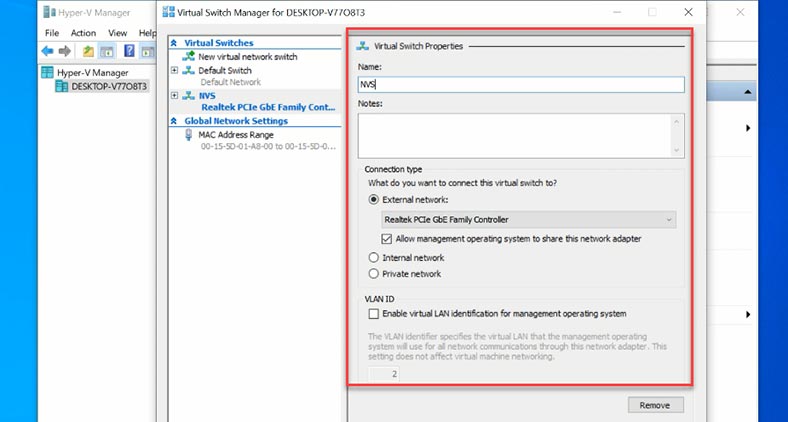
In the upper part of the program’s window click Action – Virtual Switch Manager.
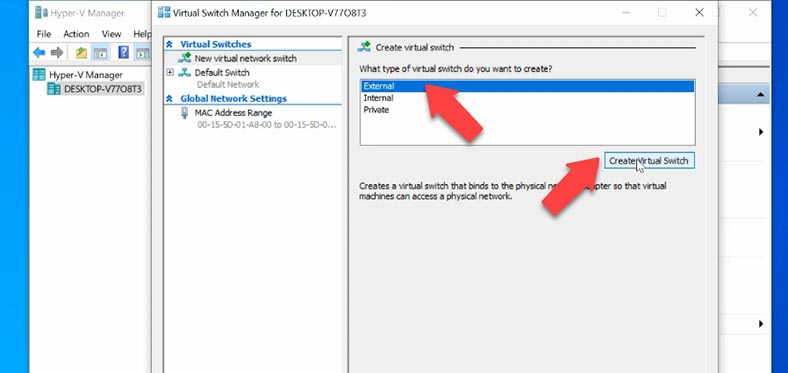
In the Manager’s window, you can see three types of network settings:
- External – if you need to let a virtual machine access the network to which the host computer is connected.
- Internal – if you want to build a network between virtual machines and the host computer (when I say host computer I mean the physical computer on which the virtual machine is running).
- Private – if you want to establish a network between virtual machines on the host computer.
Choose the one you need and click “Create Virtual Switch”.
After that, give the name, select a network adapter, click Apply – OK. Now you can start creating a virtual machine.
How to create a virtual machine with a Windows operating system on Hyper-V Server 2019
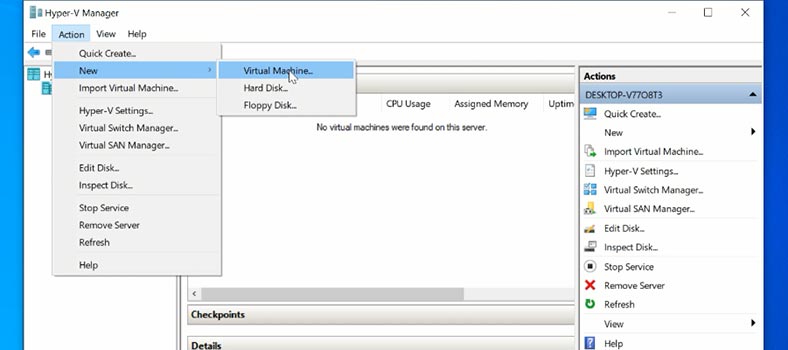
In order to create a virtual machine, open Hyper-V Manager, and in the upper part of the window, click Action – New – Virtual machine. This will open the New Virtual Machine Wizard.
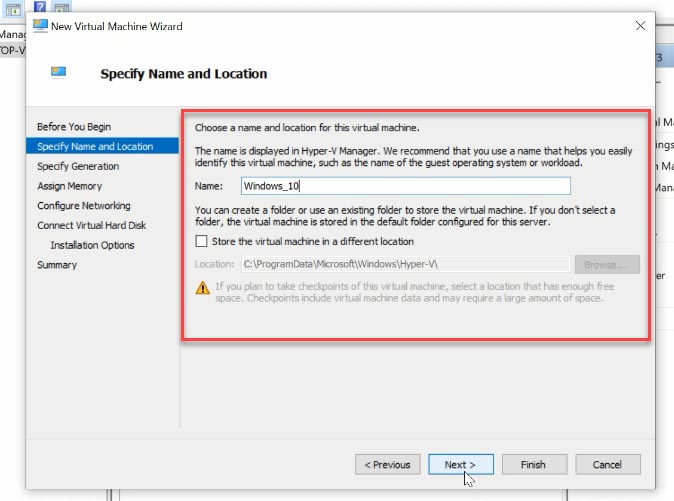
In the first window, click “Next” and then give a name to the new machine. If you need to change the path to your virtual machine location, check the corresponding box and give the specific path, then click “Next”.
Now you have to choose the virtual machine generation. Read the description carefully, choose the generation you need, and click Next. After that, set the amount of virtual memory you’d like to allocate for this machine. Let’s give it 2048 MB. Check the box for “Use Dynamic Memory for this virtual machine”.
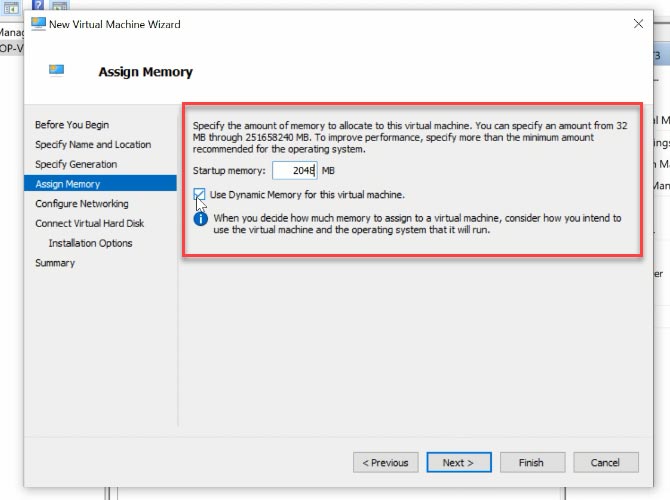
The memory will be distributed between Hyper-V host and the virtual machine running on this host. The number of virtual machines that can run on a specific host depend, partially, on the amount of memory that is available. When this option is enabled, it reclaims the memory which is not currently used by a virtual machine, and it can be used for other machines that need it. This way, you can have more virtual machines working on this host computer. However, you can leave this option unchecked, if you’re not going to run multiple virtual machines at the same time.
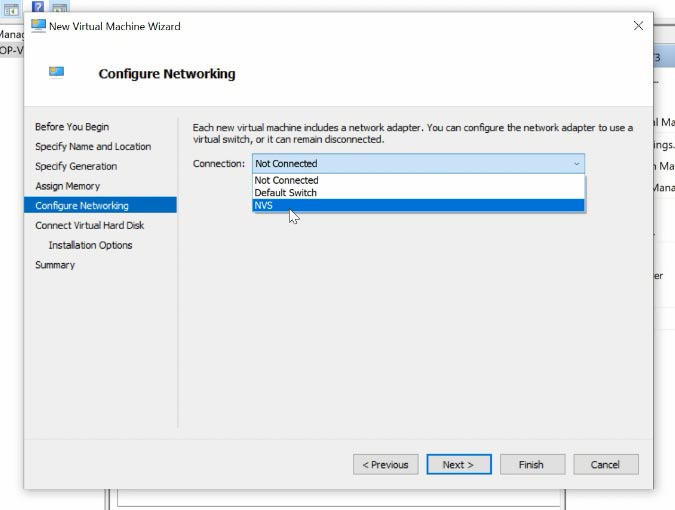
In the network settings, choose the virtual switch that you have previously created, and now it can be used for this virtual machine.
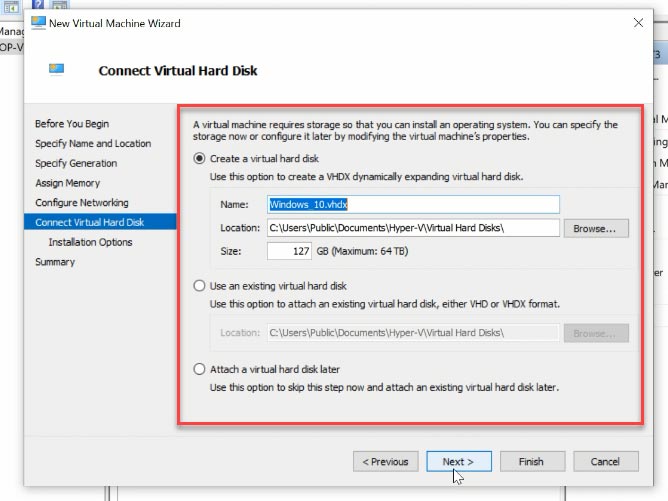
At the next stage, you can connect a virtual hard disk. Give its name, change its location if necessary, set the size, and then click Next.
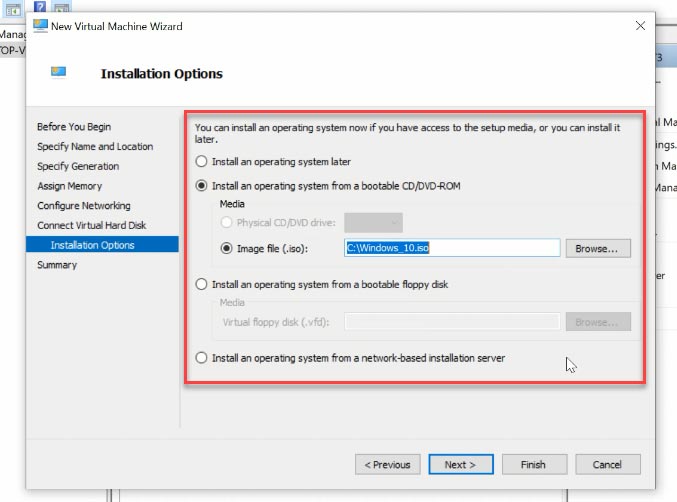
In the Installation options, select to install the operating system from an image file, and give the path to the ISO file you are going to use. Then click Next and Finish to complete the process of creating a new virtual machine.
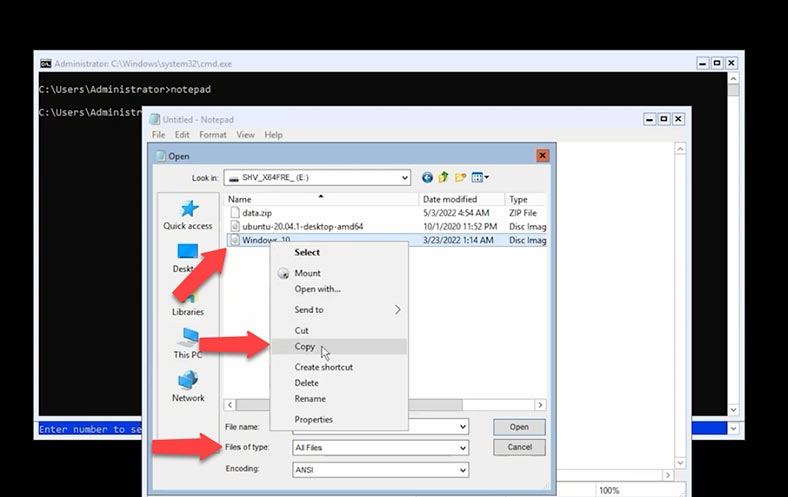
If you encounter any difficulties in transferring the ISO image to the host computer, you can use a USB flash drive and the Notepad app. This is what you do: cope the image file to the USB flash drive, connect it to the server, and use the Command Prompt to start Notepad.
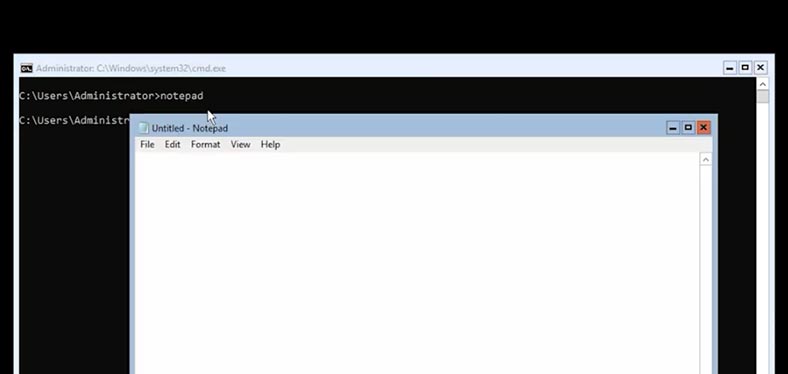
Select all files in this field, go to the connected drive and copy the ISO file to the server. Now, when you select the image, give the path to the folder on the server computer.
To finalize the creation of your virtual machine, you need to run it and install an operating system. To start the machine, double-click on it in the Manager and then hit the green Start button.
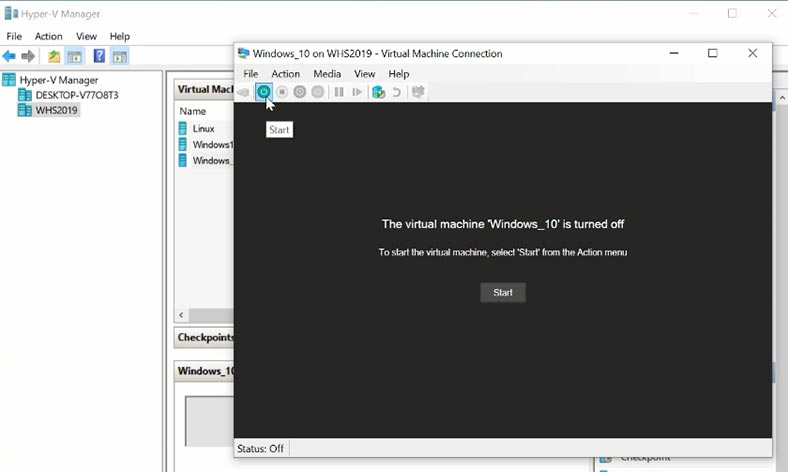
The virtual machine will boot and the installation of the operating system will begin: the process is just the same as if you were doing it on a physical computer.
How to transfer files from the host server to the virtual machine, with the help of the Command Prompt
If you need to transfer files from the host computer to the guest virtual machine, use the Command Prompt. This is the command you need to type to send files to guest (virtual) machines:
Copy-VMFile -Name Windows10 -SourcePath C:\data.zip -DestinationPath C:\ -CreateFullPath -FileSource Host
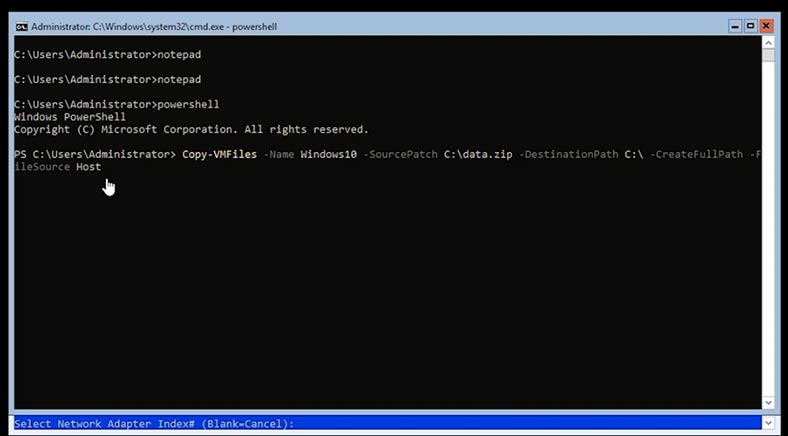
It should contain the virtual machine name, the path to the file which is stored on the server, and then you should type the path to the location on the virtual machine where you want to send the files.
Recovering virtual machine data on Microsoft Hyper-V Server
How to recover data from a Hyper-V Server and virtual machine
When the server’s work is interrupted, it can be a disaster, but with the proper approach, Hyper-V data can be recovered successfully. Most often, virtual machines are stored on a RAID system, and even with the well-known reliability of disk arrays, we cannot exclude the chances of their breaking down.
To rebuild a damaged RAID system inside the server and recover the virtual machine files, use Hetman RAID Recovery. Take the disks out of the server and connect them to a Windows computer. Download, install and run the program. The utility will automatically rebuild the damaged RAID system with the available disks. All you need to do is to scan it and restore the files you need.
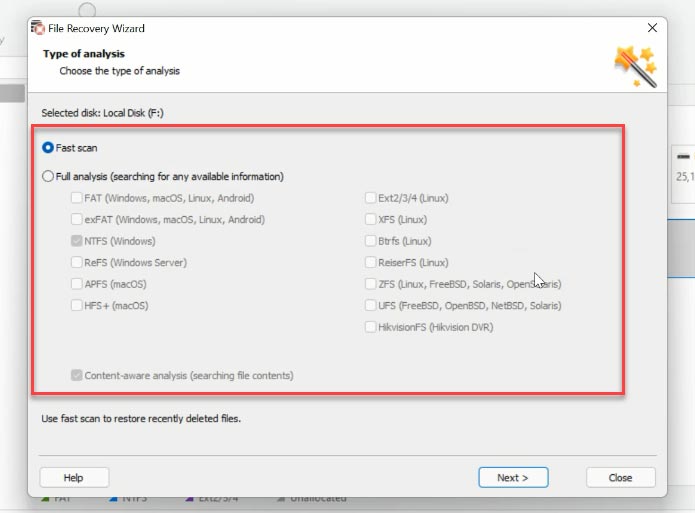
Right-click on the array and choose the scan type. “Fast scan” will check it in a few seconds and display the files. If the program failed to find the lost files with “Fast scan”, go for “Full analysis”, specify the file system and start the search.
After that, go to the directory where virtual hard disk files were stored. By default, they are located here:
С:\Users\Public\Documents\Hyper-V\Virtual hard disks
Look for the files with the name of your virtual machine and such extensions as .vhdx and .avhdx. The first one is the virtual hard disk, and the second is the virtual machine snapshot.
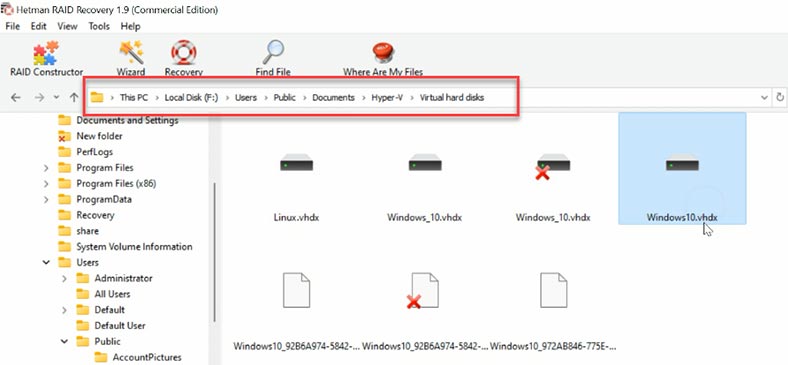
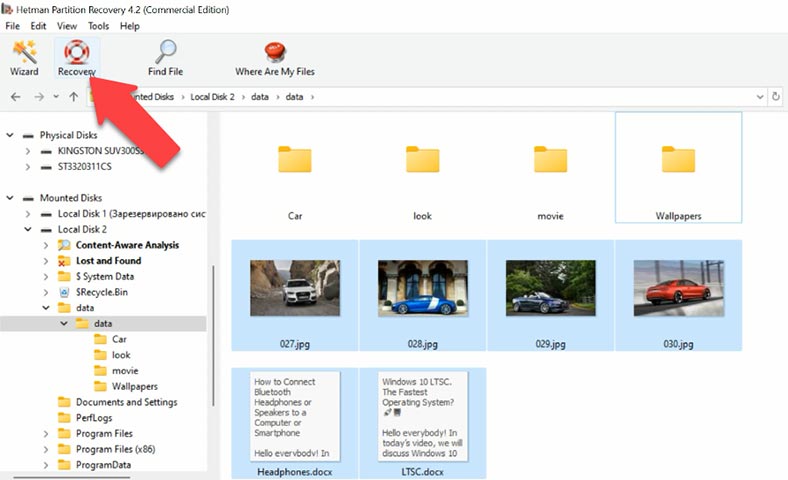
Select the files you want to recover - the names of the required files are similar to the virtual machine name - click “Recovery”, select where you want to save them, and click “Recovery” again. When the entire process is over, you will find the recovered files in the folder you have chosen.
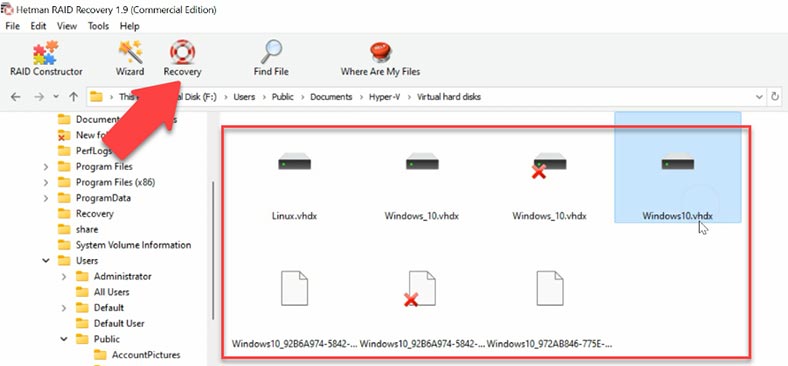
After that, just upload the virtual hard disk files to the new Hyper-V virtual machine, and run it. Now all the information stored inside the machine should be available.
If you try to boot a virtual machine and encounter an error because the files were damaged, or if you accidentally removed some information while working with the virtual machine - don’t worry: with Hetman Partition Recovery, all the lost data will be back.
| Step | Description |
|---|---|
| 1 | Launch the program: Open Hetman Partition Recovery. |
| 2 | Select disk: Choose the disk or virtual disk file (e.g., VMDK or VHD). |
| 3 | Scanning: Click the "Scan" button to start the process. |
| 4 | Analyze results: Review the found files and folders after scanning. |
| 5 | Preview: Preview the files to ensure their integrity. |
| 6 | Select files: Choose the files or folders you want to recover. |
| 7 | Recovery: Click the "Recover" button and specify where to save the recovered data. |
| 8 | Completion: Wait for the recovery process to finish. |
How to recover data from a virtual disk image file
The virtual machine and its contents take up a certain amount of disk space, and when the machine file is removed, this space is marked as empty, i.e. suitable for further use. In other words, the file itself still exists, but it will get overwritten with other information sooner or later. That is why it is extremely important not to waste time and begin the data recovery process as soon as possible - while it still can be done.
Our program supports data recovery from dynamic and fixed-size virtual hard disks, restore points and operating system snapshots.
Hetman Partition Recovery lets you restore both virtual machine files – VHD or VHDX and any data removed from VHDX disks. Also, it can recover data files from formatted virtual hard disks, and it doesn’t matter if the disk used to be a dynamic or a fixed-size one.
After you have recovered .VHDX files or copied them to the computer, you need to upload them to our program.
In the main window, open the Tools tab and choose “Mount disk”. There are two ways to mount it: choose a RAW disk image if necessary, or choose Virtual Machines. After choosing the second option, you can see the list of files and tools that our program supports.
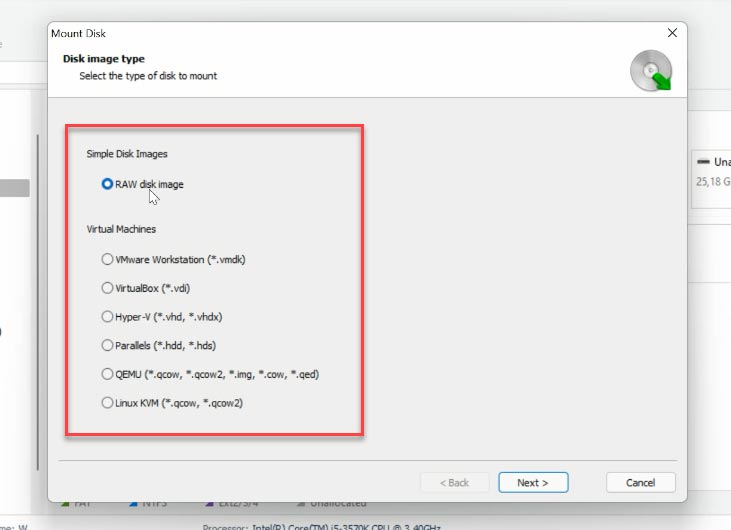
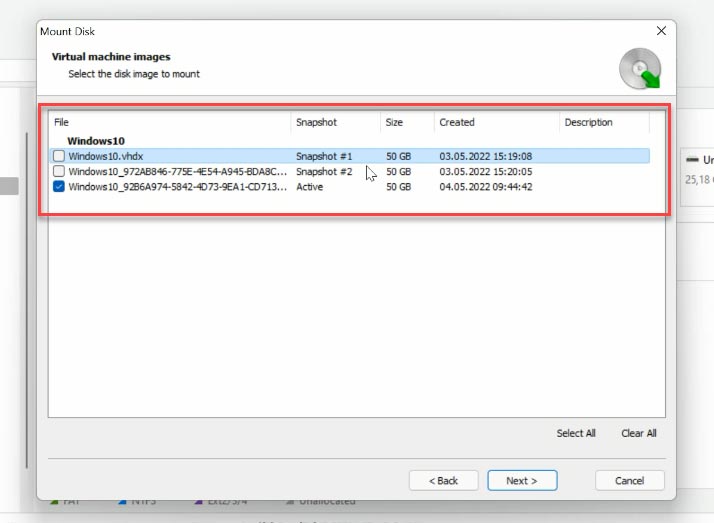
Check the required image type, give the path to the folder containing virtual hard disk files, and click “Select Folder”. The program will display all virtual machine files which exist in such folder. In addition to main disks, there are also restore point files, and snapshots of the virtual machine. The disk file which is currently in use by the virtual machine will be marked as “Active”. Other files are snapshots and restore points, and using the date of their creation, you can decide which one you need to recover. Check the box next to the disk you are interested in, and click Next.
It will appear in the Drive Manager immediately. Right-click on the disk and choose “Open”. Select the scan type, and choose “Fast scan” for starters. If the “Fast scan” can’t find the required files, then go for “Full analysis”. Right-click on the disk - “Analyze again” - “Full analysis” - and specify the file system for this disk.
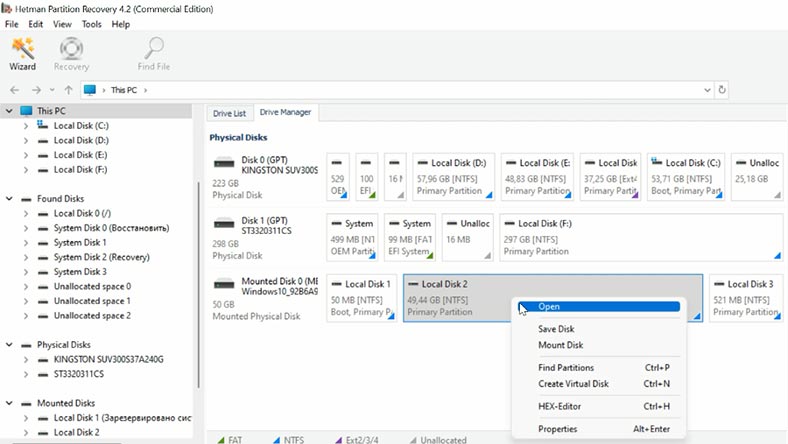
Then go to the folder where the files used to be stored, and look for the ones you need to restore, select them and click “Recovery”, select the disk and folder where to save them, and click “Recovery” again.
Conclusion
Summing up, the damaged server is a really big problem, but with well-tried recovery tools at hand, all Hyper-V virtual machine data can be restored.


