Recover Oracle VM VirtualBox Data
Learn how to recover data of Oracle VM VirtualBox virtual machine (.vdi, *.vmdk, *.vhd, *.hdd, *.qed, *.qcow) with ease in this comprehensive guide. Discover step-by-step instructions and essential tips to seamlessly recover your valuable virtual machine data. Dive deep into Oracle VM VirtualBox virtual machine data recovery techniques and explore insider strategies to maximize your chances of successful data restoration.
- System Files of Oracle VM VirtualBox Virtual Machine
- Method 1. How to Recover a Deleted Oracle VM VirtualBox Virtual Machine
- Method 2. How to Recover the Hard Disk Contents of an Oracle VM VirtualBox Virtual Machine
- Method 3. How to Recover the Disk File of an Oracle VM VirtualBox Virtual Machine from the Virtual Machine Itself
- Questions and answers
- Comments

💻 How to Create an Oracle VirtualBox Virtual Machine and Recover Data from a VDI Disk in 2021 ⚕️
System Files of Oracle VM VirtualBox Virtual Machine
Similarly to any other virtual machine, during installation Oracle VM VirtualBox creates a directory where it places folders of virtual machines which you create later. By default, this folder is named VirtualBox VMs and can be found here:
C:\Users\UserName\VirtualBox VMs
Note: you can change location of the virtual machines folder in the program settings if necessary. To do it, go to File / Preferences / General and specify the folder you want to place virtual machines in.
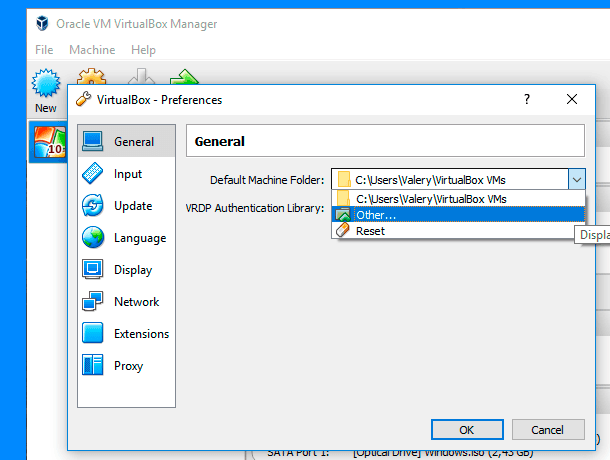
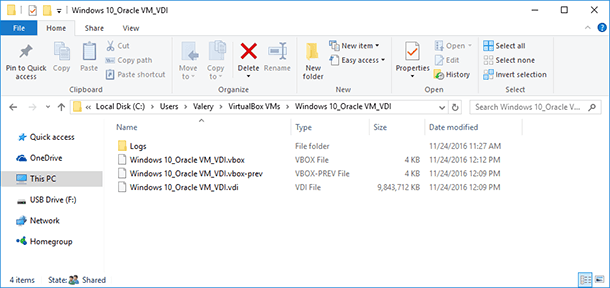
The main files of an Oracle VM VirtualBox virtual machine are as follows:
- *.vbox – a settings file describing the virtual machine and its settings;
- *.vdi (*.vmdk, *.vhd, *.hdd, *.qed, *.qcow) – the file containing a virtual machine disk image
| Characteristic | Description |
|---|---|
| File format | VDI (Virtual Disk Image) – a proprietary virtual disk format used by VirtualBox, designed to store the state of a virtual machine’s hard disk. |
| Maximum size | Supports up to 2 TB for each virtual disk. |
| Dynamic resizing mode | The disk can increase in size during use, from the initially set minimum to the maximum size, while occupying only the necessary space on the physical storage. |
| Fixed size | The disk occupies the entire specified volume on the physical disk immediately after creation. |
| Connection type | Supports various interfaces for connecting disks, including SATA, IDE, SCSI, NVMe. |
| Compatibility | VDI disks can be converted into other virtual disk formats, such as VMDK (VMware) or VHD (Microsoft Hyper-V). |
| Snapshots | Allows creating disk snapshots, which capture the virtual machine’s state at a specific moment, allowing you to return to it if needed. |
| Encryption | VirtualBox supports disk encryption using AES-256, protecting the data on the disk from unauthorized access. |
| Performance | Dynamic disks may have lower performance compared to fixed disks, as their size changes during operation. Fixed disks offer better access speed. |
| Backup | VDI files can be easily copied for backup or transferred to other systems. |
| Host integration | VirtualBox allows using host features to optimize performance, such as input/output caching, which can speed up the virtual machine’s operation. |
While the virtual machine is running, the program can create additional files or folders if necessary:
- Logs – the folder containing virtual machine log files
- Snapshots – the folder containing virtual machine snapshot files (images of the virtual machine condition)
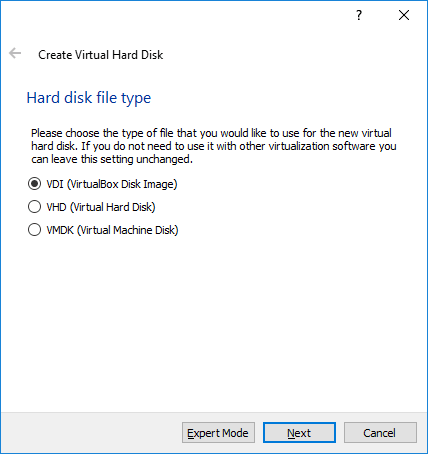
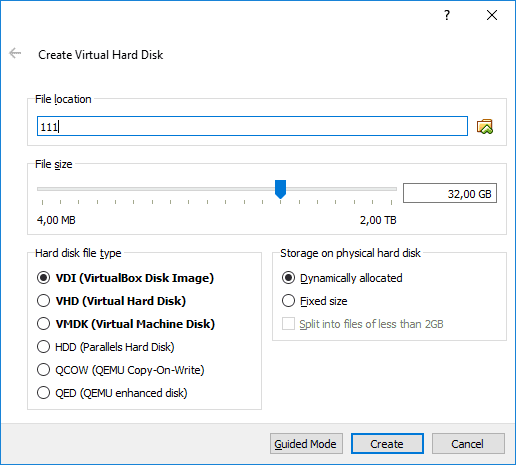
When a virtual machine is created, the default disk format is DVI. However, a user can choose the disk format for the machine being created
- VDI (VirtualBox Disk Image) — VirtualBox disk format
- VMDK (Virtual Machine Disk) — VMware disk format
- VHD (Virtual Hard Disk) — Microsoft disk format
- HDD (Parallels Hard Disk) — Parallels disk format
- QED (QEMU enhanced disk) — the format for QEMU/KVM
- QCOW (QEMU Copy-On-Write) — the format for QEMU (qcow2)
Method 1. How to Recover a Deleted Oracle VM VirtualBox Virtual Machine
Deleting a virtual machine can result in losing large volumes of data and important information, and recovering it can be really difficult. The easiest way to recover the data stored in the virtual machine will be recovering the virtual machine itself.
What does it mean? VirtualBox provides for the opportunity of adding virtual machines which were created with other managers, or which were saved and then deleted, for some reason, from the virtual machine list of your manager. To do it, you should go to the menu Machine / Add and choose the disk of the virtual machine which you need to add to the manager.

That is, if a virtual machine is deleted, the user can recover the files that make it up and add such machine into Oracle VM VirtualBox. To do it:
-
Run Hetman Partition Recovery and scan the disk where the virtual machine was stored
The tool recovers data from any devices, regardless of the cause of data loss.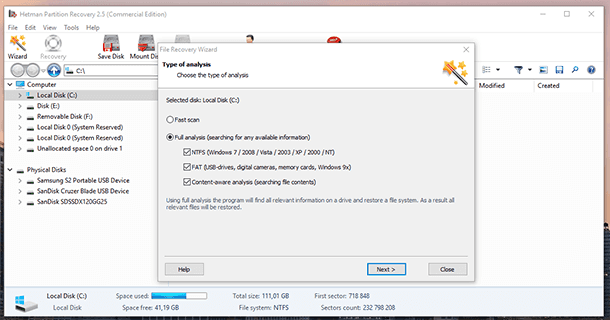
-
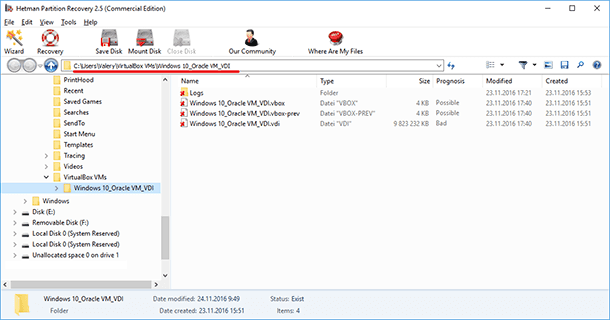
Use Hetman Partition Recovery to go to the folder where the virtual machine was deleted from.
-
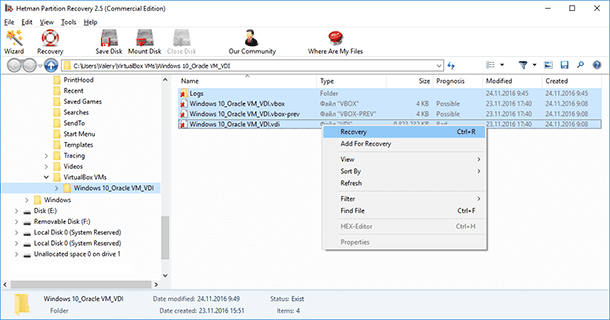
Recover the virtual machine files
-
Add the virtual machine to Oracle VM VirtualBox using the method above and launch it
Method 2. How to Recover the Hard Disk Contents of an Oracle VM VirtualBox Virtual Machine
As we have already said, all files stored in virtual machine disks are located in .vdi files of the virtual disk (in our case). Hetman Partition Recovery, the program for hard disk data recovery, has the function of mounting virtual disks and recovering data from such disks.
NOTE. In case of dealing with virtual machines, the disks of which are created in formats other than *.vdi, but in formats like *.vmdk, *.vhd, *.hdd, *.qed, *.qcow, the method for recovering data will be similar.

If for some reason your virtual machine is no longer working, and there are important files on its disks, this data can be recovered. To do it:
-
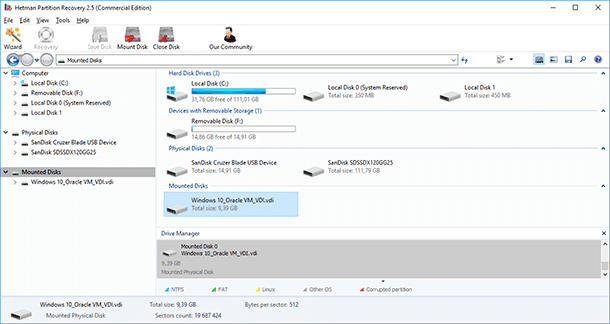
Run Hetman Partition Recovery and mount the virtual machine disk
The tool recovers data from any devices, regardless of the cause of data loss.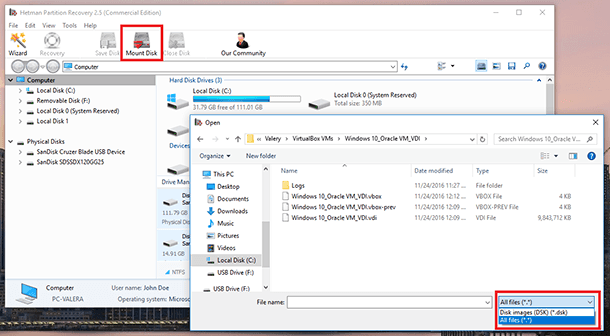
Note. To mount a virtual disk with the help of Hetman Partition Recovery, click on Mount Disk in the quick access menu of the program. As a result, the window of choosing a virtual disk will open. In the right lower corner, specify the file type as «All files (*.*)», go to the folder containing the virtual machine and choose the required .vdi file.
-
As you do that, the section «Mounted Disks» containing the list of mounted virtual disks will appear in the window, where all disks found by the application are shown. If you mount several disks, you will see the entire disk list there.
-
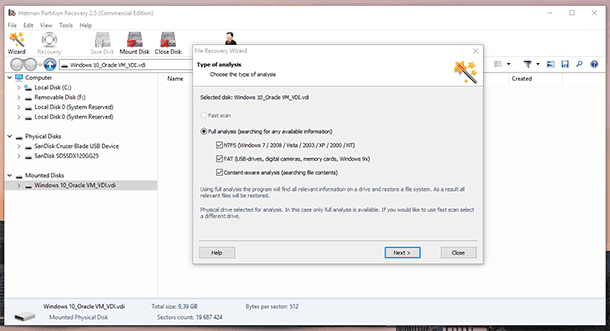
Scan the disk with the application by double-clicking on the disk in the disk manager.
-
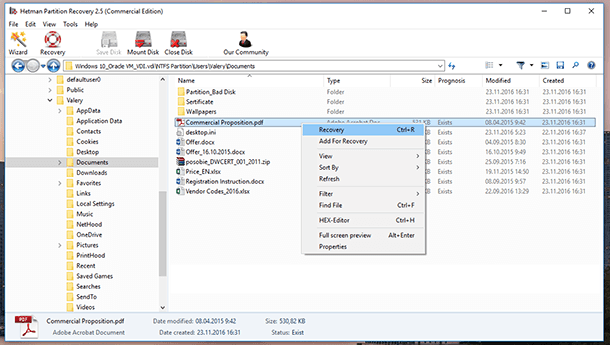
After the analysis, the application will show the directory tree of the scanned disk. Find and recover the required files.
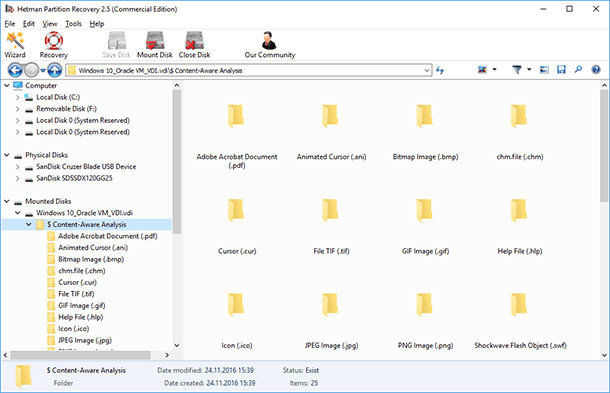
If you looked through the directory tree and you still don’t see the files which you need to recover, or if such files are recovered but they open with errors, then go to the folder Content-Aware Analysis shown by Hetman Partition Recovery and find your files there.
NOTE. In case of dealing with virtual machines, the disks of which are created in formats other than *.vdi, but in formats like *.vmdk, *.vhd, *.hdd, *.qed, *.qcow, the method for recovering data will be absolutely similar.
Method 3. How to Recover the Disk File of an Oracle VM VirtualBox Virtual Machine from the Virtual Machine Itself
As a result of experiments we have established that files deleted or lost inside the virtual machine cannot be recovered.
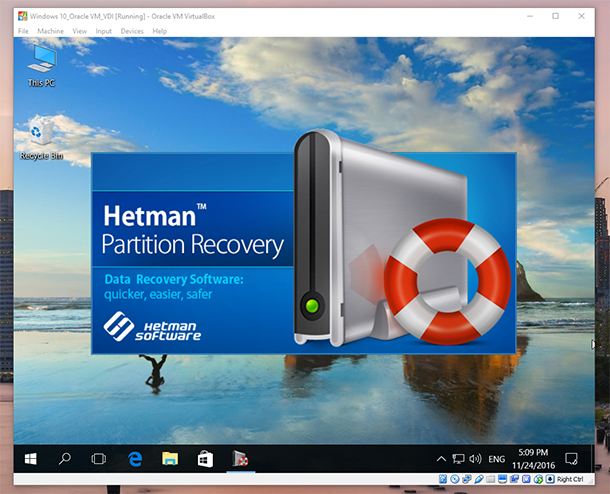
The methods we have described for recovering data of an Oracle VM VirtualBox virtual machine are good for virtual machine regardless of their virtual disk format: *.vdi, *.vmdk, *.vhd, *.hdd, *.qed, *.qcow and they will be absolutely similar for all of these virtual disk formats. In this article, we have used the *.vdi virtual disk format as an example.

🔷 How to Recover Data of an Oracle VM VirtualBox Virtual Machine 🔷


Hetman Partition Recovery can be used to recover lost data in a VirtualBox virtual machine by following these steps: