Mastering RAID Data Recovery: Comprehensive Guide for WDA4NC40000 Users
Need to recover data from a Western Digital ShareSpace RAID array? Our comprehensive guide has got you covered! Learn step-by-step instructions and expert tips for successfully salvaging your data from the WDA4NC40000 system. Say goodbye to data loss worries and hello to recovered files!
- How to create a RAID array
- How to create a shared folder
- Data Recovery from RAID on NAS Western Digital ShareSpace WDA4NC40000
- Questions and answers
- Comments
A network-attached storage (NAS for short) is a computer device used as a file server to let various client devices access certain data. Usually, such devices are based on RAID technology, and it enables them to combine several drives into one big storage space, as well as improve reliability and data security. However, even the most reliable RAID type in the world cannot prevent data loss completely. Hardware and software errors, wrong configuration, accidental removal of files or disk formatting – all these things depend very little on how reliable your RAID setup is, and any of these scenarios may result in losing an entire pool of very important information.
Recovering data from a NAS system involves taking the device apart, connecting its disks directly to another computer, and using specialized data recovery software to retrieve the information.
NAS devices usually run on Linux, so their volumes are formatted in Linux-supported file systems such as EXT, XFS and BTRFS; when choosing a data recovery tool, make sure to check file system support features.
In today’s article, we will explore a step-by-step data recovery process with the server WD ShareSpace supporting the installation of 4 hard disks – WDA4NC40000.
| Feature | Description |
|---|---|
| Model | Western Digital ShareSpace WDA4NC40000 |
| Capacity | 4 TB (expandable) |
| Supported RAID Levels | RAID 0, RAID 1, RAID 5, RAID 10 |
| Connection Interfaces | Gigabit Ethernet, USB 2.0 |
| Supported Operating Systems | Windows, macOS, Linux |
| Disk Type | 3.5″ SATA HDD |
| Operating System | Built-in NAS OS |
| DLNA Support | Yes |
| Network Protocols | SMB/CIFS, NFS, FTP, HTTP, HTTPS |
| Management | Via web interface |
| Power Supply | 100-240V AC, 50/60Hz |
| Dimensions | 170 x 160 x 225 mm |
| Weight | 5.2 kg |

How to Recover Data from a RAID System Based on NAS Server WD ShareSpace WDA4NC40000
How to create a RAID array
For starters, let’s find out how to build a RAID array, for example, a RAID 5 system.
Open the management menu for NAS WD ShareSpace.
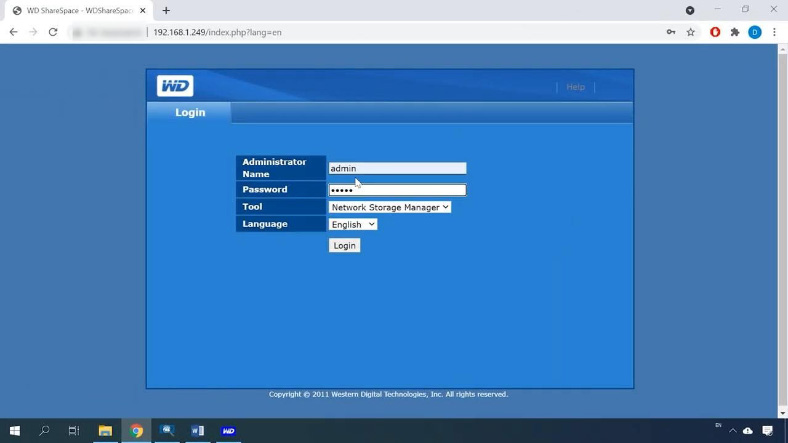
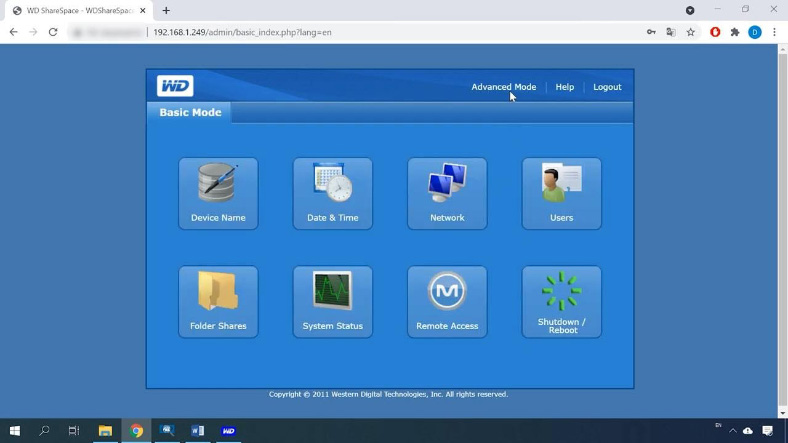
Then go to Advanced Mode.
Jump to the tab Storage, then click on the tile for Volume & RAID Management.
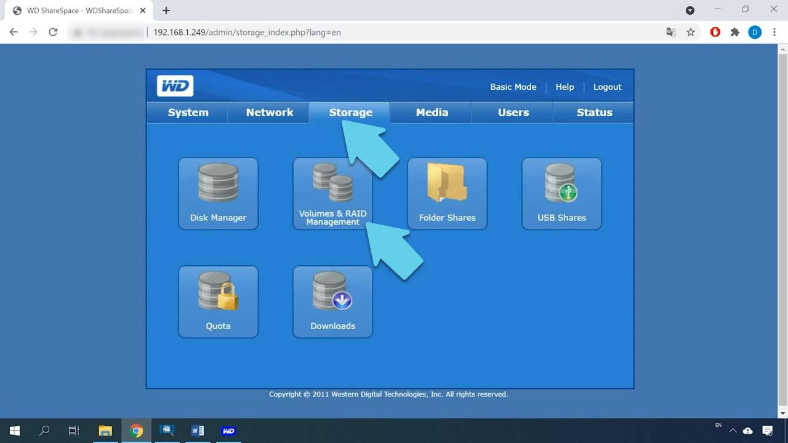
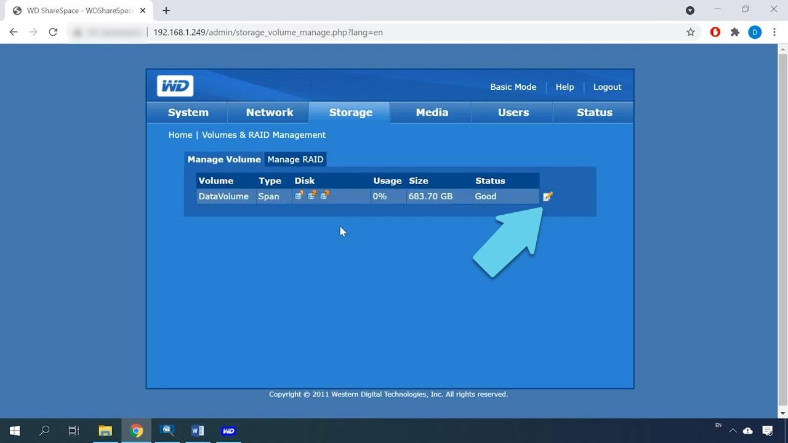
By default, after installation of the operating system it creates a spanned volume with all the disks connected to the device at the moment; in other words, all available disks are combined into one.
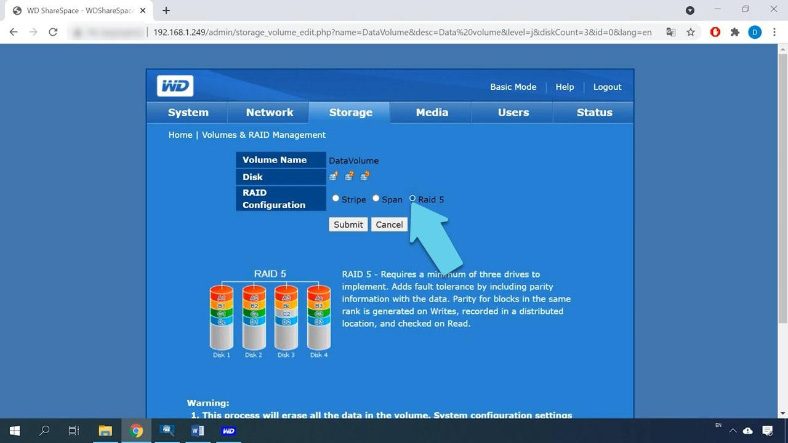
To change the RAID level, select the one you prefer. In my case it is RAID 5; click Submit to proceed.
You will see the warning that all data will be erased, and it takes 16 to 17 hours to rebuild a RAID 5 volume: click OK.
The rebuilding process begins. Now that the RAID configuration has been changed successfully, resynching / formatting is in progress.
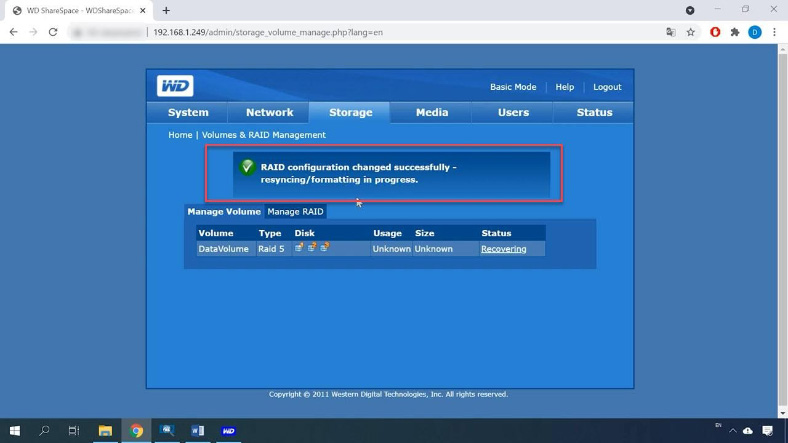
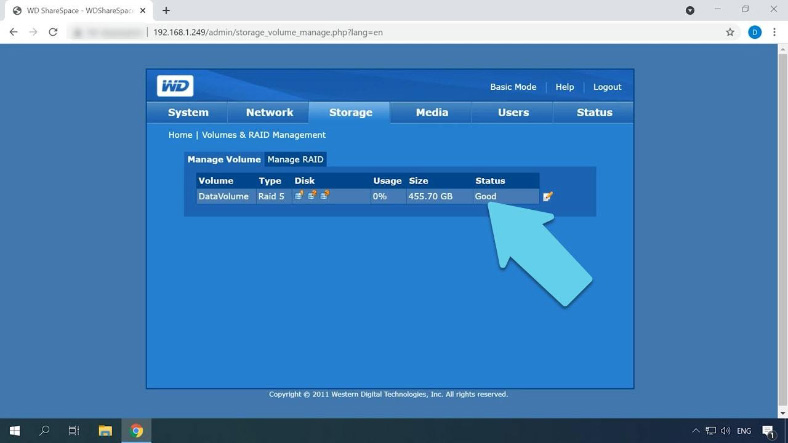
Here is the RAID 5 volume consisting of three disks, and the last column displays its status – Recovering. All you do now is wait for the process to be over, then create a shared folder and write your data to the disk.
How to create a shared folder
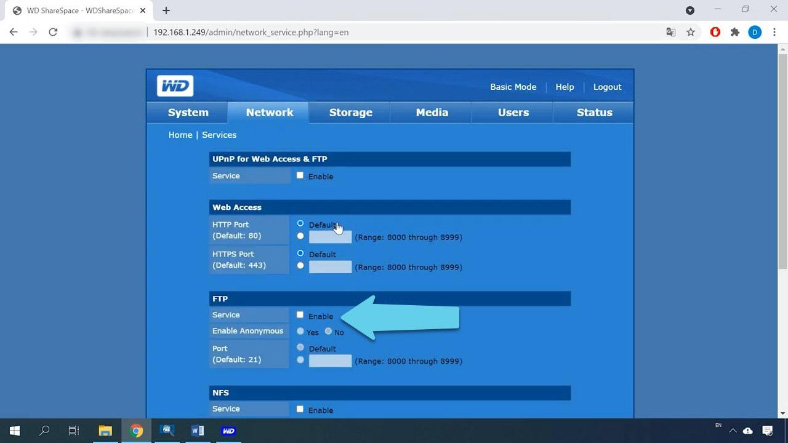
While the RAID system is being rebuilt, let’s enable the FTP network protocol to access the storage. Open the tab Network, jump to Services and enable FTP by checking the corresponding box, then click Submit.
When the disk array is rebuilt, you’ll be able to create shared folders.
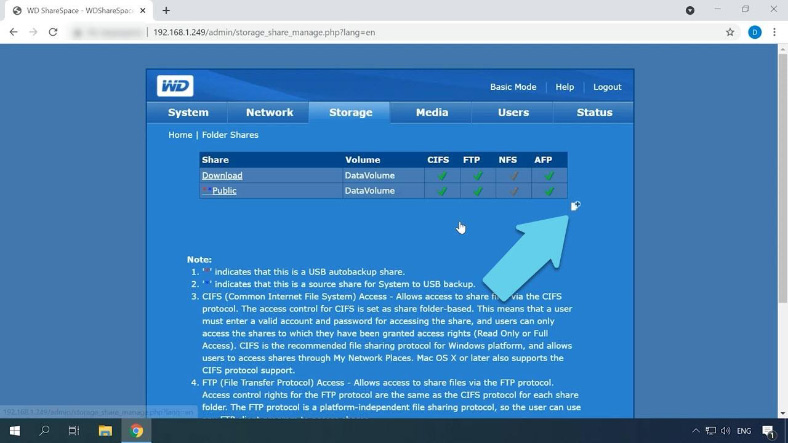
To create one, open Storage, jump to Folder Shares, and click the “plus” button to add a new folder.
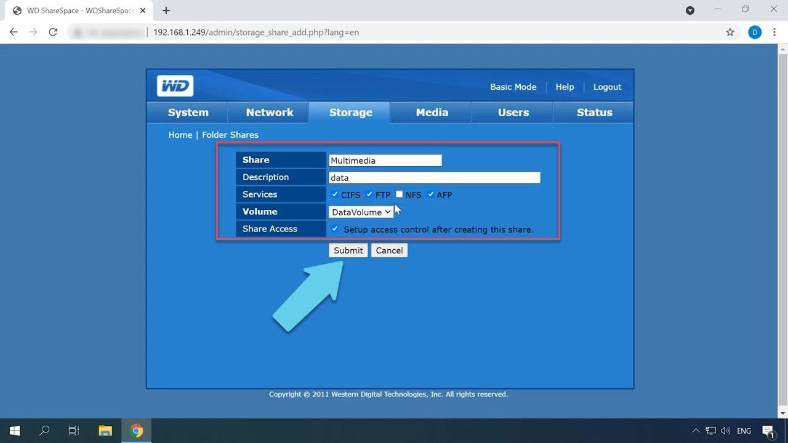
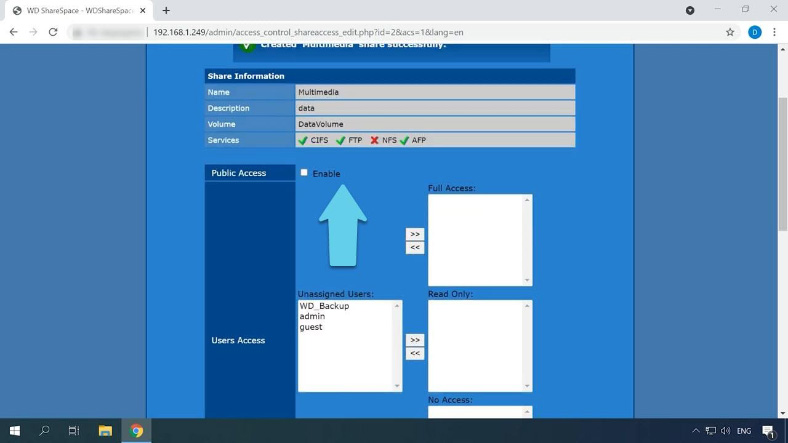
Give a name for this directory, some description, check network services, and click Submit to confirm your choices. Now it’s time to configure access to this shared folder. I will enable public access by checking this box and clicking Submit.
After that, it becomes accessible, so you can go to the network drive and write your data there.
Data Recovery from RAID on NAS Western Digital ShareSpace WDA4NC40000
Method 1. How to recover data from an inoperable NAS
Hardware and software failures, wrong configuration, accidental removal or formatting may cause a major data loss from the disk storage inside your NAS device. In any of these situations, you’ll need a reliable tool to get your information back.
Hetman RAID Recovery is a comprehensive solution for NAS data recovery to help you restore your files in a number of different scenarios. This program supports the most popular file systems including those used in NAS devices. It features an automated advanced scan mechanism that will find the information needed for recovery, such as RAID first sector number, block size, number and order of disks.
NAS information can be recovered both from single-drive solutions and large disk arrays combined into various RAID systems.
Bear in mind that before starting data recovery operations, you should prepare some free disk space with the capacity equal to the amount of data you’re planning to recover from y our NAS.
Take the disks out of the NAS device and connect them to a Windows computer. Make sure that all disks are properly recognized by Windows “Disk Management”. Right-click on the Start menu and select Disk Management.
If you are suggested to initialize the disks, don’t do it under any circumstances – this can erase the remaining data.
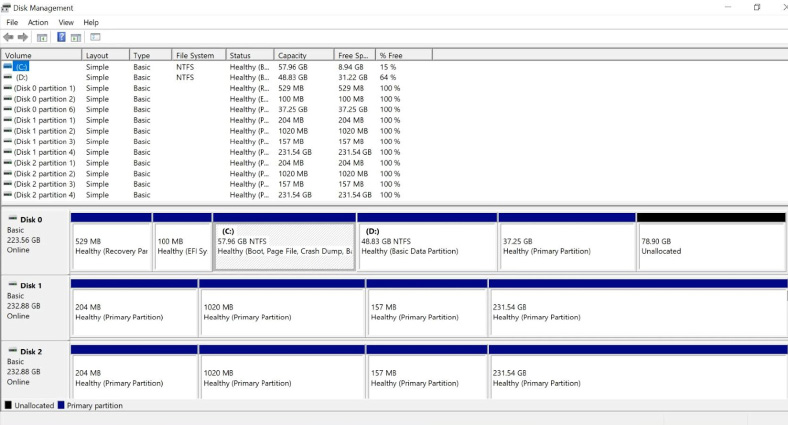
If you are trying to recover data from a RAID 5 system, and the motherboard of the computer where you want to connect the disks to doesn’t have enough SATA ports for all those hard disks, you can connect all but one disk, because this RAID type remains operable even if one of the disks is missing.
Install and run Hetman RAID Recovery.
Thanks to its automatic scan feature, the utility will analyze the disks, read their service information and rebuild the damaged RAID system. The brief RAID information is displayed below: check if the program has read it correctly.
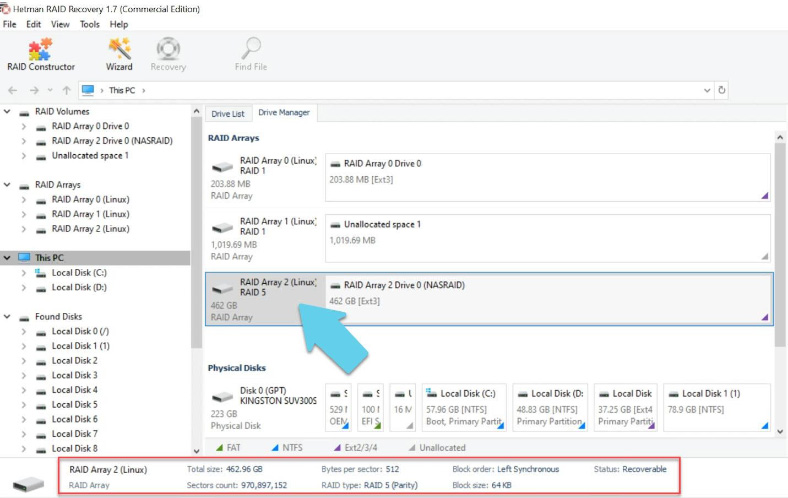
If the properties were detected with errors, you’ll have to build it manually in the RAID Constructor.
To search for information, right-click on the disk – “Open”. Select the scan type and start the analysis. The program will analyze the disks and display their contents when the operation is complete. Now it has found all the data stored on the disks within the array.
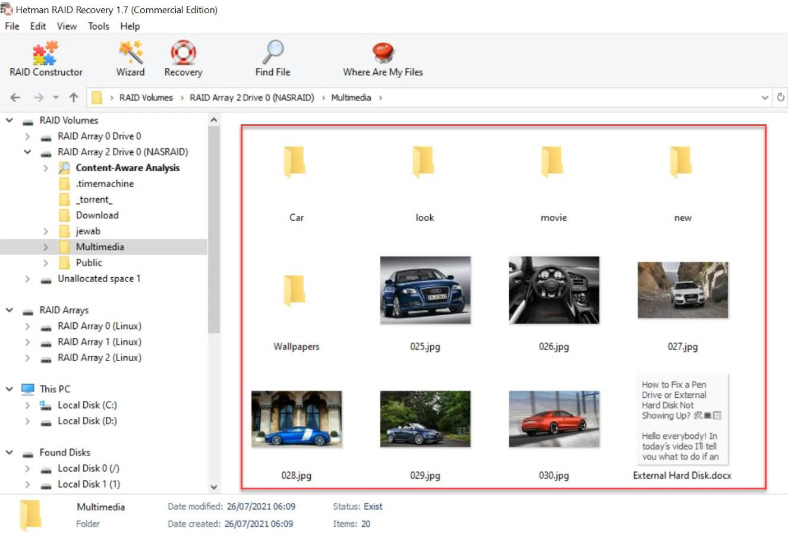
Select the files you want to recover and click “Recovery”, select where you want to save them, and click the same button to recover them.
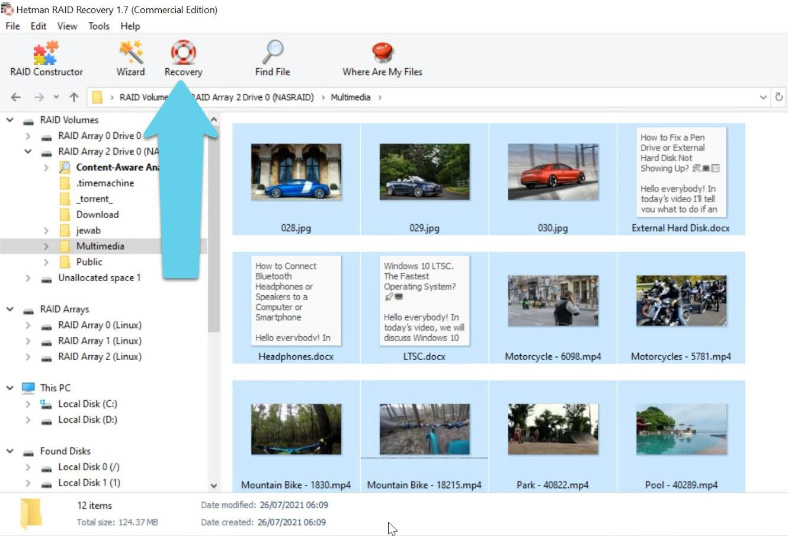
After the recovery process is over, you will find the recovered files in the directory you have chosen.
Method 2. How to recover data after accidental removal
This program can also recover data after disk formatting or accidental removal of files.
After the scan is over, you’ll see the deleted files – they are marked with a red cross. To help you search for specific photos, videos, and documents more efficiently, there’s a nice preview feature.
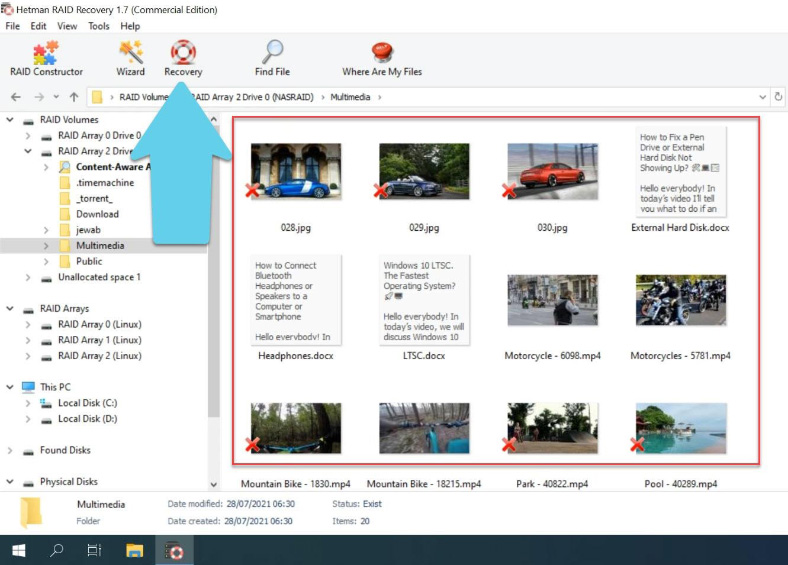
Select and recover accidentally deleted data. When scanning a RAID that had an operating system, the program shows you several disk arrays: a mirror RAID containing the operating system, and a RAID 5 containing the data.
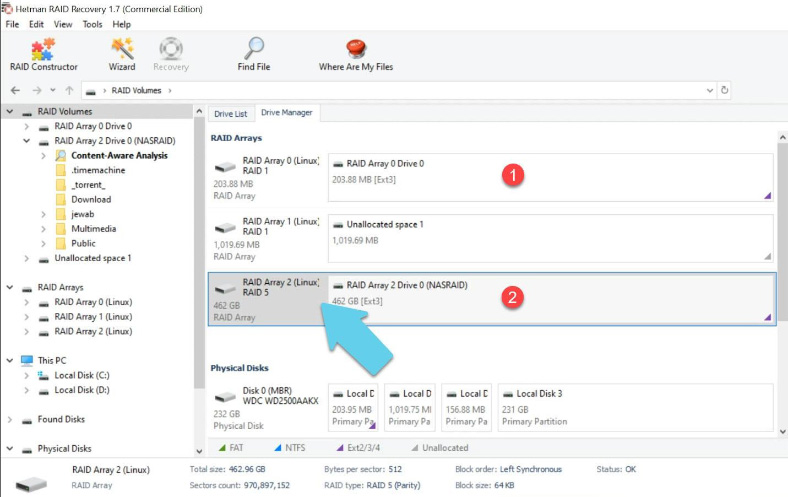
If you want to recover information from a system folder, scan the mirror RAID which stores system files.
Method 3. How to restore a RAID manually, with RAID Constructor
Hetman RAID Recovery is very easy to use. It will automatically find all the information needed for recovery such as first sector number, block size, number and order of disks.
When a disk is damaged or service information is erased, the program may have difficulties with rebuilding the RAID automatically; however, you can do it manually with the RAID Constructor if you know the properties of this damaged array.
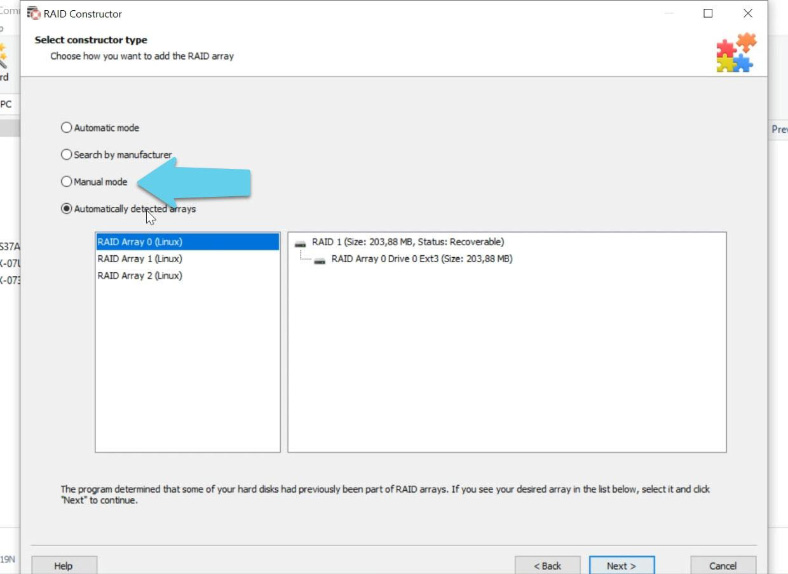
Open the Constructor, and select the option “Manual mode”.
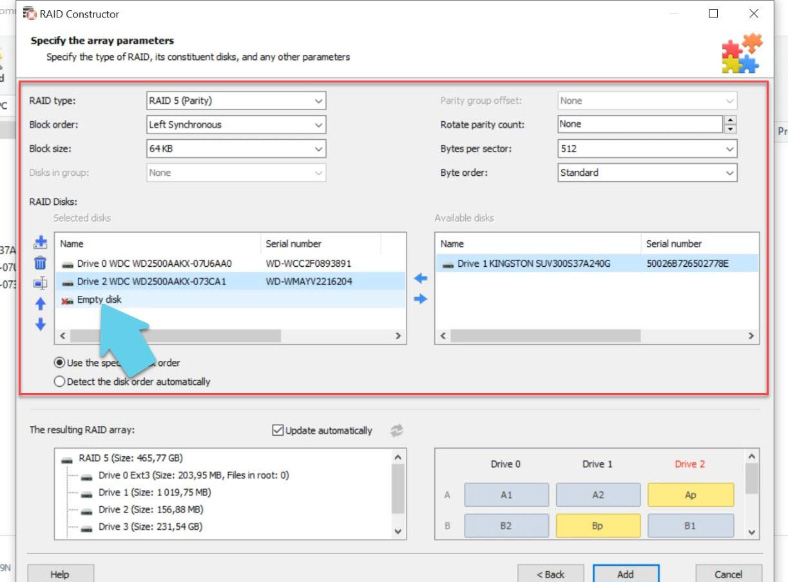
Fill in all the information you know: the RAID type, block order and size, add the disks it used to include, use the arrows to fill the missing space with empty disks their order, and replace the missing disks with empty drives by clicking the “plus” button.
Usually, if you give correct properties data, the newly built RAID system has at least one partition. Expand it to check for the folders that you need. If those folders are displayed, then you have built the array properly.
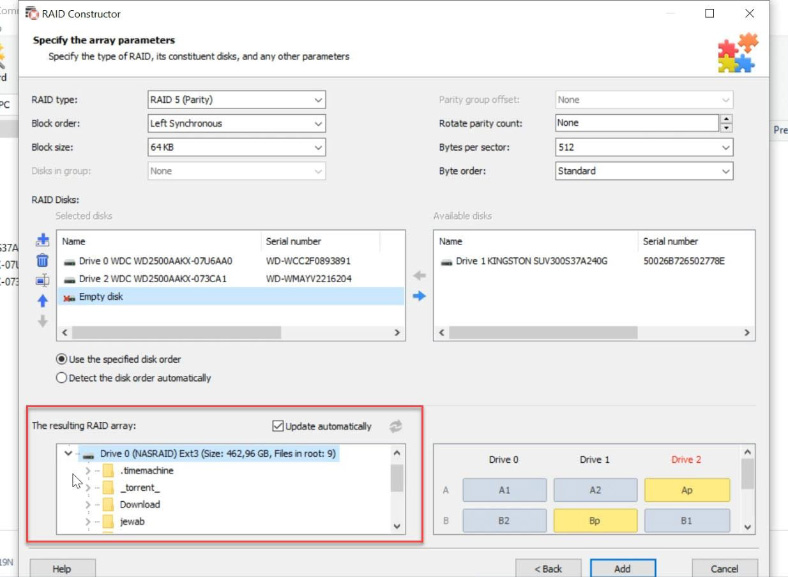
When all the properties are given, click “Add” for the RAID system to appear in the Drive Manager. For recovery, scan the array you have just added, look for the files you need, select and recover them.



It sounds like you are experiencing issues with accessing your WD ShareSpace NAS from your Mac. Since you can access the network storage manager interface through the browser, it indicates that the NAS itself is functioning properly, but there might be some compatibility issues with your Mac.
Before considering reformatting the drives, which would result in data loss, I recommend trying the following steps to troubleshoot the issue:
Update the firmware of your WD ShareSpace NAS to the latest version. This might resolve any compatibility issues with your Mac.
Check the network settings on your Mac to ensure it is on the same network subnet as the NAS.
Try connecting to the NAS using the IP address instead of the hostname.
Reset the network settings on your Mac and try connecting again.
Check if there are any firewall settings on your Mac that might be blocking the connection to the NAS.
If after trying these steps you are still unable to connect to the NAS from your Mac, you can consider reformatting the drives. However, before doing so, make sure to back up any important data that you want to keep.
If you need to recover data from the NAS before reformatting, you can use a data recovery software like Hetman RAID Recovery. It supports various RAID configurations, including RAID 1, and can help you recover data from the WD ShareSpace NAS.
Once you have recovered the data, you can reformat the drives and set up the NAS for use with your Mac. If you encounter any issues during the data recovery process or need further assistance, feel free to reach out to our tech support team for help.