Definition, Types, and How to Create One: RAID Systems Explained
Interested in setting up a RAID system but not sure where to start? You’re in the right place! In this article, we’ll provide you with an essential guide to RAID systems, covering the definition, types, and step-by-step instructions on how to create one. Whether you’re a beginner or an experienced user, understanding RAID is crucial for optimizing data storage and ensuring data redundancy. Join us as we demystify RAID systems and empower you to create your own. Watch now and take your storage to the next level!
- What is a RAID system (array)?
- Array types
- How to create a RAID array?
- Software RAID
- RAID data recovery software
- Questions and answers
- Comments
Every year, computer hardware is becoming more and more efficient and powerful. Central processors are developing more cores and threads, while effective frequencies of graphical cards are getting higher and higher. The typical speed of hard disks has long stopped at 7,200 rpm. Despite the widespread advance of their even faster successors, SSDs, the new disk type has a relatively lower resource potential and its reliability leaves much to be desired.
That is why some users prefer the so-called RAID arrays (systems) which can increase read and write speeds almost twofold.
There are various RAID types out there, some of them focusing on a speed boost, and others improving reliability of data storage.
Below, we will explore all known RAID types and explain which are perfect for ordinary users, and which are better suited for working with server equipment. You will learn about the reasons to have such arrays, how to build them, and what is required for this purpose.

💿 Data Recovery Tool for Damaged RAID Arrays 💿
What is a RAID system (array)?
RAID is the abbreviation for redundant array of independent disks. This is a data storage virtualization technology that combines multiple physical disk drives into one logical unit for the purposes of data redundancy, performance improvement, or both. To build a RAID system, you need at least two disks, but this number may vary depending on the type and purpose of the RAID array.
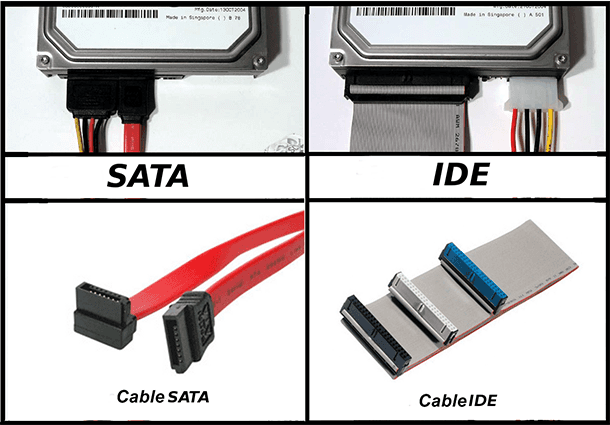
Almost every modern motherboard comes with out-of-the-box support for SATA RAID.
Let’s have a closer look at various RAID types.
Array types
RAID 0
The first type is RAID 0.
It is based on the principle of data striping. Data is split up into blocks of similar length that get written across all the drives in the array. The main purpose of such system is to achieve superior performance (twofold or even more) while full disk capacity of all disks within the system is available. In simple terms, it’s like combining two or more disks into one big drive.
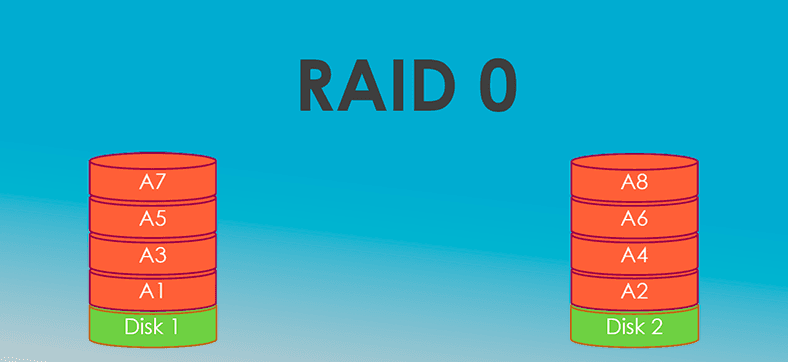
The number of disks in a RAID 0 array is unlimited. However, if the disks are of different speed, the data exchange rate for such array will be determined by its slowest disk.
Within RAID 0, you can combine disks of any capacity: for example, a 500 Gb drive can be arranged to work with a 1 TB or 2 TB drive.
For RAID 0, you need at least two disks.
Advantages of this array: Suppose you have two disks, each having the capacity of 500 GB and write speed of 100 MB/s. When combined into a RAID 0 system, you get 1 TB of space and a write speed soaring to 200 MB/s.
Such an impressive performance boost is possible due to distribution of data handling tasks between the two disks.
In this array type, disks of different capacity and speed can be used, and in the end, their space and write speeds will be summed up.
This RAID type is mostly used for storing temporary files. However, there is no point in storing a database inside a RAID 0 system, because even if one of the disks fails, the entire array is down, and you’re going to lose all the information.
It happens because data is written in turns to each of the disks, so a large file may be “spread” over all the disks you have combined into the system. Hence, RAID 0 has nothing to offer in terms of fault tolerance / failure protection.
If you are running a system based on 3 or 4 disks and one of them fails, all the data will be lost. Summing up, enjoy the high speed but remember to back up your data very often.
RAID 1
Another type is RAID1, which uses the principle of data mirroring.
Data is written in parallel to the main, or data drive, and a mirror drive. In other words, data is written to the main disk and copied to the mirror disk. Such pattern of disk usage doesn’t affect their performance at all, but only half of the total disk capacity is available.
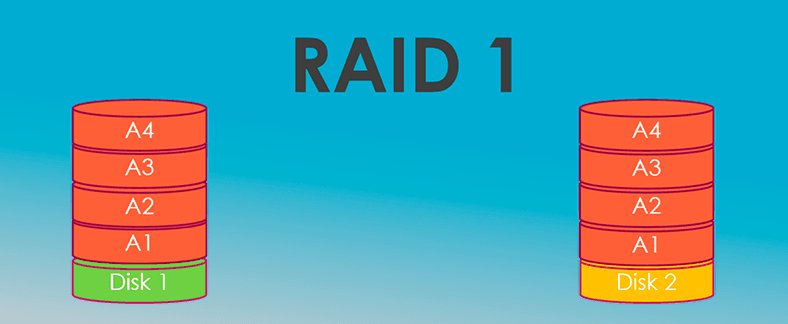
This array type is widely used in servers, because even if one of the drives fails, all copied data is safely stored on other drives.
Such systems are meant for storing data backups and cloning critical information. Arrays of this type are quite reliable and can operate as long as there is at least one healthy disk in the system.
The most serious disadvantage of RAID 1 is that you can use the capacity of one disk only, while you actually have two (or more) of them.
RAID 10
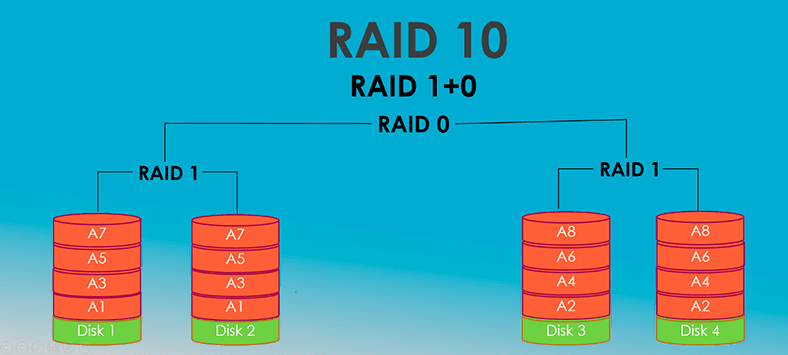
RAID10 is a combination of RAID 0 and RAID 1. Data is written in parallel to two drives, while copies of such data are written to the other two drives.
Such approach offers a performance boost and improved security for data storage. To build this type of array, you need at least 4 disks. In the end, you’ll get double read and write speed (if compared to single disk figures), but only two disks out of four actually available for storing data.
Even if two disks fail at the same time, your information will not be lost.
RAID 2
RAID 2, 3 and 4 are quite rare and less popular, as they make use of Hamming code for error correction, striping data at the bit (rather than the block) level, and checksums.
In RAID 2, information is spread across data drives, just as in RAID 0. That is, it is divided into small blocks according to the number of drives. The remaining drives are consigned to storing ECC (error correction code) data, which could be used for recovering information, should any of the data drives fail.

A prominent advantage of this RAID type is extremely high data transfer rates as compared to results achieved by a single disk.
This RAID type is hardly popular in home systems due to the number of hard disks required: for example, in an array made of seven drives, only four of them can be used for data storage. Redundancy will drop as the number of drives grows. The main advantage of RAID 2 is the possibility to implement “on the fly” data error correction without sacrificing the speed of data exchange between the disk array and the CPU.
RAID 3 and RAID 4
These two types are very similar in terms of architecture. Both require several drives to store data, and one of the drives is used exclusively as a dedicated parity disk (that is, it stores checksums needed for data recovery if a drive fails).
To build RAID 3 and RAID 4, you need at least three hard disks. Unlike RAID 2, “on the fly” data recovery is impossible – information can only be recovered after you replace the faulty drive, and it takes some time to complete.
The major difference between RAID 3 and RAID 4 lies in the level of data striping. RAID 3 consists of byte-level striping with dedicated parity, which suggests a considerable slowdown in reading / writing large numbers of small files.
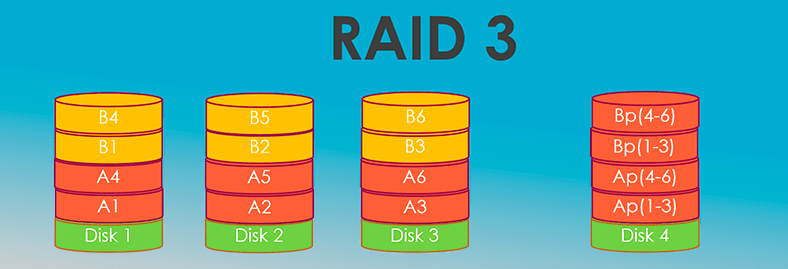
On the contrary, RAID 4 consists of block-level striping with a dedicated parity disk, and every block is no bigger than a disk sector. As a result of its layout, RAID 4 provides good performance when dealing with small files which could be of critical importance for personal computers. This is why RAID 4 is more popular.

A considerable downside for these two array types is the high workload on the parity disk (the one that stores checksums) which reduces its lifespan effectively.
RAID 5


🏆 How to Recover a Crashed RAID 5EE After Controller Failure or Multiple Disk Failure 🏆
Another array type is RAID 5. It is based on a principle very similar to that of RAID 1, the biggest difference being that RAID 5 needs at least three drives, one of them used to store copied information.
In this case, you will be able to use almost all disk space within the system, except for the one disk used to store recovery data. In addition, you will get a performance boost, but don’t expect it to be as impressive as in the case with RAID 0. This array type is best suited for specific tasks that involve large groups of hard drives.
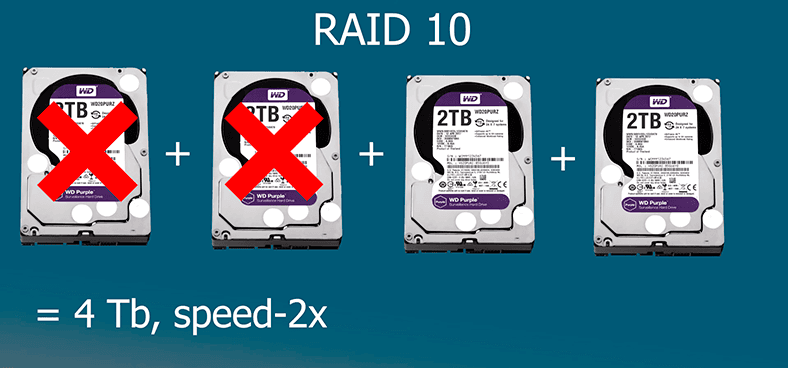
Suppose you have 4 disks, 2 Tb each. With RAID 10, you get disk capacity of 4 TB, double data read / write speed, and the opportunity to completely recover all the information even if two main drives fail at the same time.
In the same scenario, RAID 5 will offer you 6 TB of disk space, a slight increase in write speed, and the opportunity to recover data from one damaged disk only.
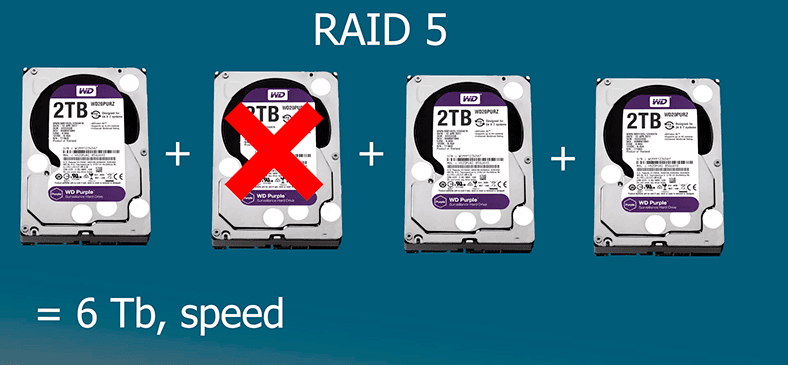
In this light, RAID 10 looks more attractive than RAID 5. For a relatively small fee of 2 GB, you get high performance and vast recovery options.
However, things do change a lot, when you are going to use disks in great numbers. If you have 10 drives, 2 TB each, with RAID 10 you only work with the 10 TB of space you can access. On the contrary, it’s the huge 18 TB you can enjoy with RAID 5 (all disks are available – except one that has to be sacrificed to copied data).
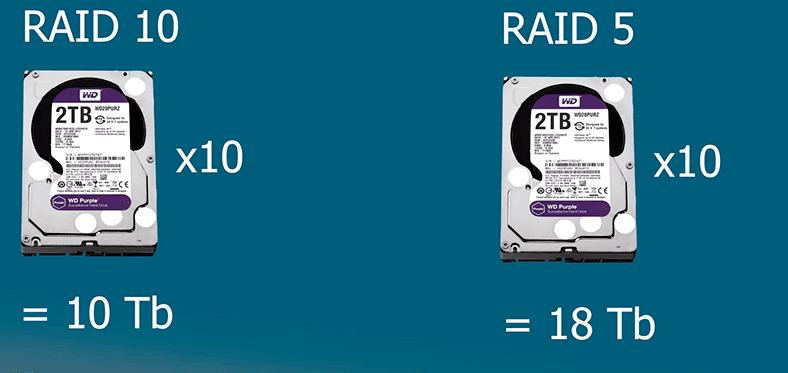
As you can see, being able to use only 50% of the physical space seems too high a price to pay for double speed and full recovery prospects. To many users, it looks more appealing to get a small performance bonus, lose only a small share of disk space and be able to recover data from any disk (provided that only one of them failed).
RAID 6
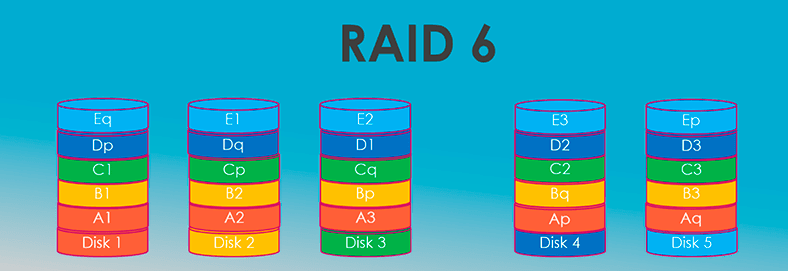
Building a RAID 6 array allows to solve this problem, to a great extent. This array type allocates total volume of two disks for storing checksums, which are spread over different disks in a cyclic and regular way. Instead of one checksum, two checksums are calculated, which ensures data integrity even if two drives within one array fail at the same time.
RAID 6 advantages are higher data protection and less performance loss (as compared to RAID 5) in case of recovering data after the faulty drive is replaced.
The disadvantage for RAID 6 is a 10% decrease in overall data transfer rate caused by the growing amount of calculations required to produce the checksums and the increasing volumes of data to be read and written.

How to Recover RAID 6 Data After Three Disks Fail, the Controller Breaks Down, or the Array Rebuilt
How to create a RAID array?
So how do you go about creating a RAID system? There are two main ways – hardware and software. In the first case, you will need several hard disks connected to the motherboard plus a RAID controller (unless your motherboard already supports RAID).
RAID should be enabled in BIOS settings.
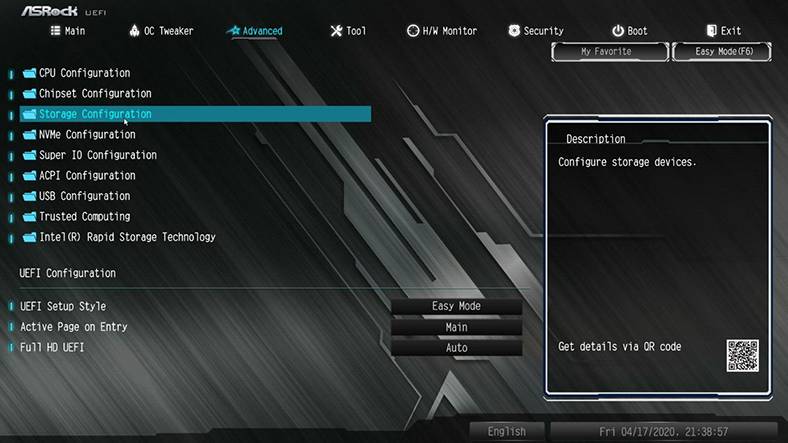
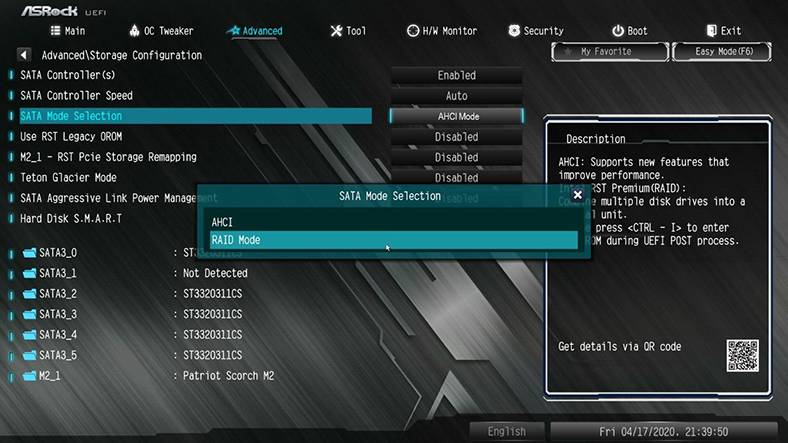
When you restart the computer, there should be a chart with more detailed RAID settings. If it doesn’t show up, restart again and try pressing the key shortcut “Ctrl + I” when the computer starts booting.
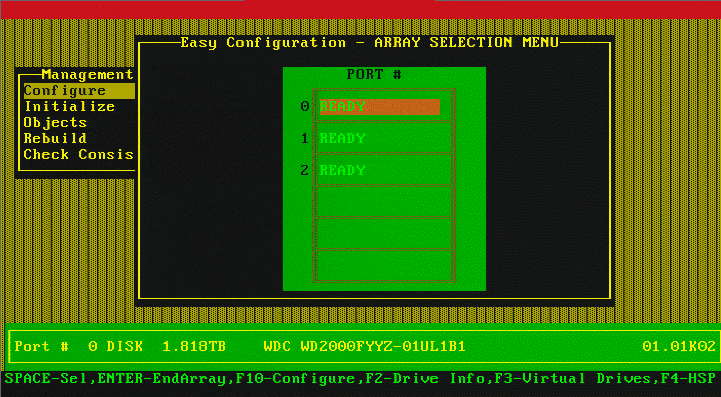
If you use an external controller, it’s likely you will have to press F2 button.
In the chart, choose Configure and select the level you need.
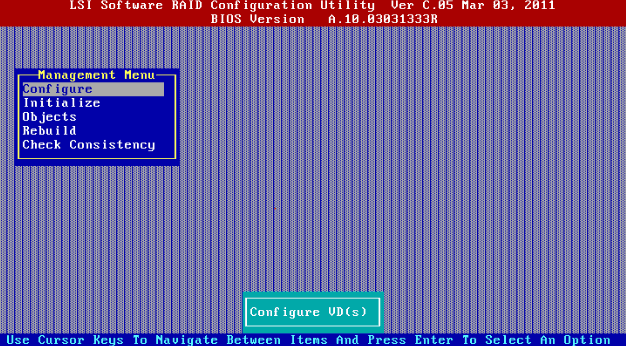
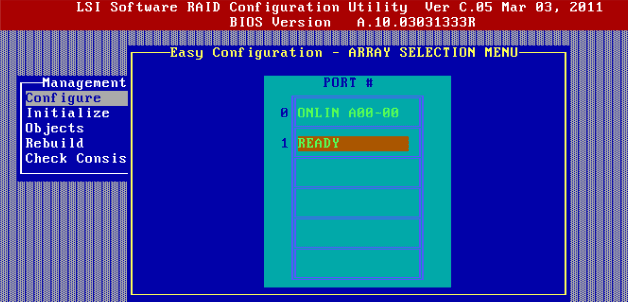
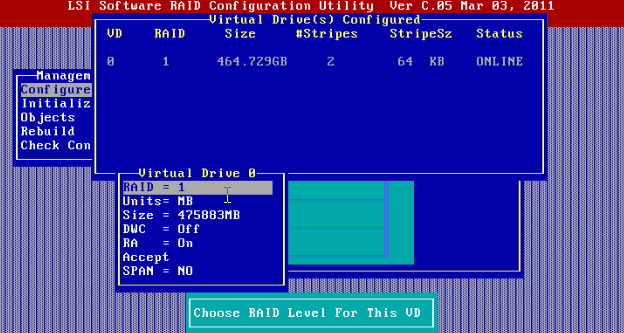
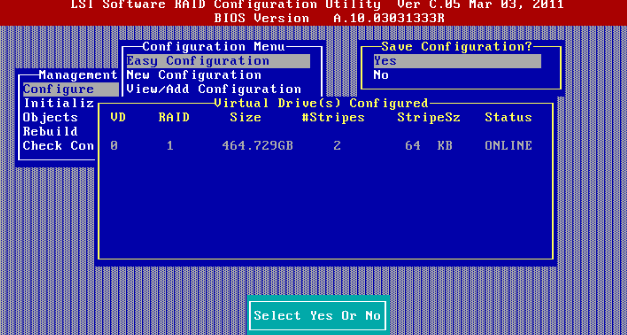
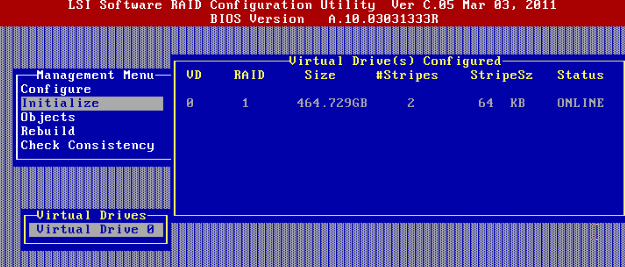
After the RAID array is created in BIOS, boot the computer, open Disk Management and format the unallocated space. This is the RAID array you have just created.

Software RAID
For a software raid, you don’t need to enable or disable anything in BIOS. In fact, you don’t even need your motherboard to support RAID. As we have mentioned before, this technology can be implemented with the CPU and the integrated operating system tools.
This way, you can create a RAID 1 system.
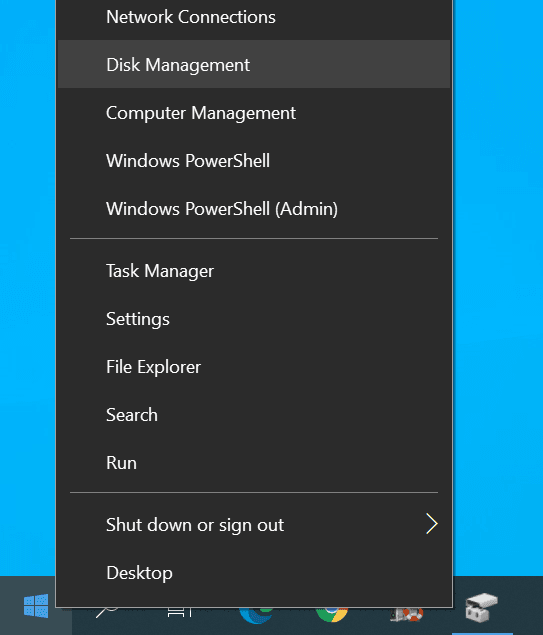
Right-click on the Start button and select Disk Management.
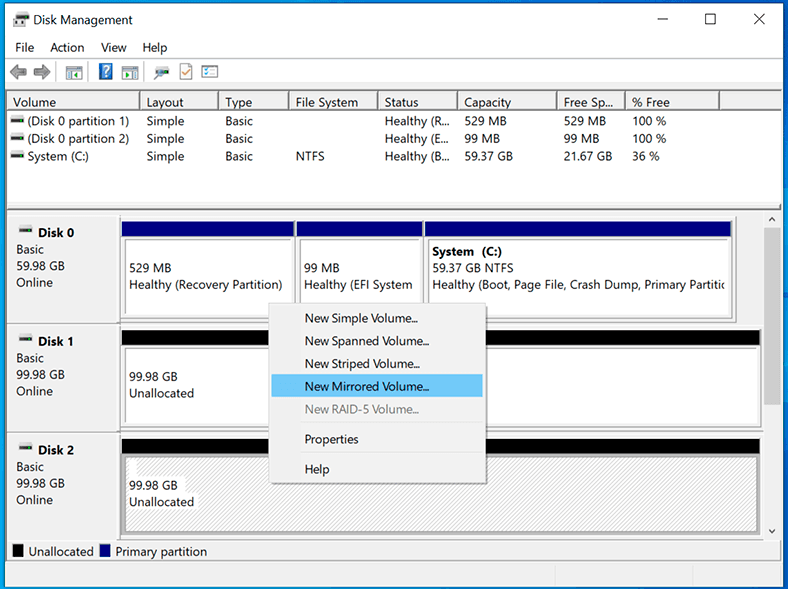
Then click on any of the drives you have prepared for building a RAID system and select New Mirrored Volume.
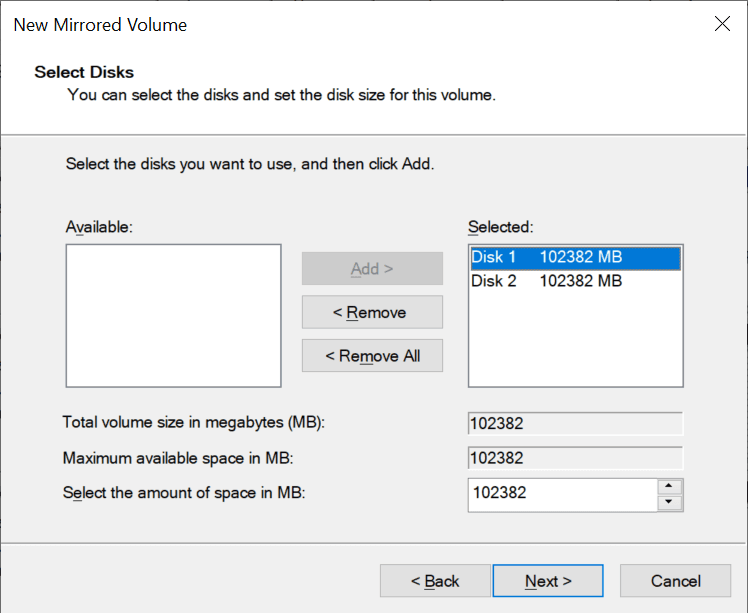
In the next window, select the disk which you want to mirror the other disk, assign the drive letter and format this new partition.
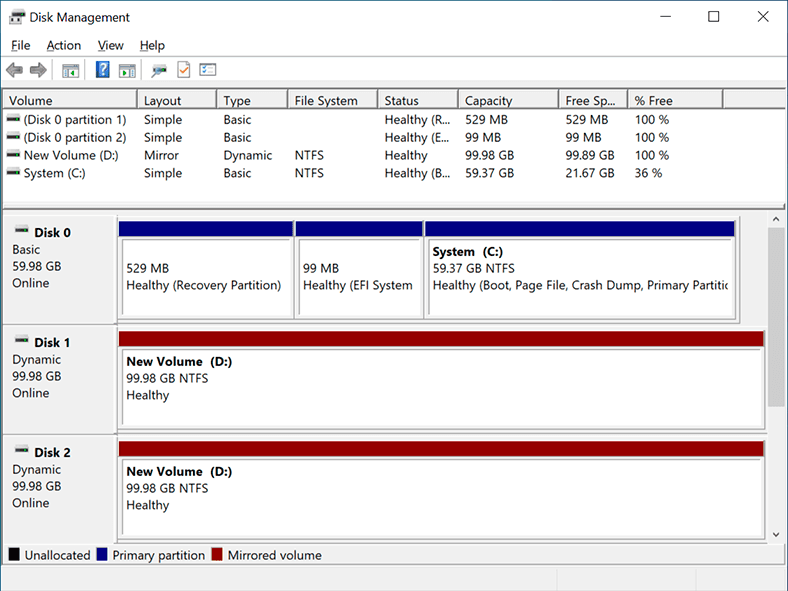
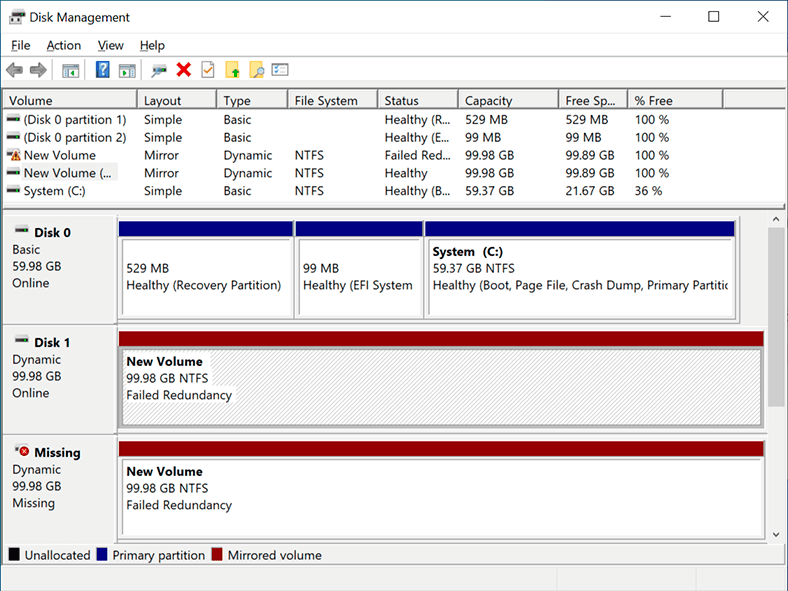
In Disk Management, mirrored volumes are highlighted in the same color and have the same drive letter. Files are copied to both volumes: at first to one volume, and then to the other.
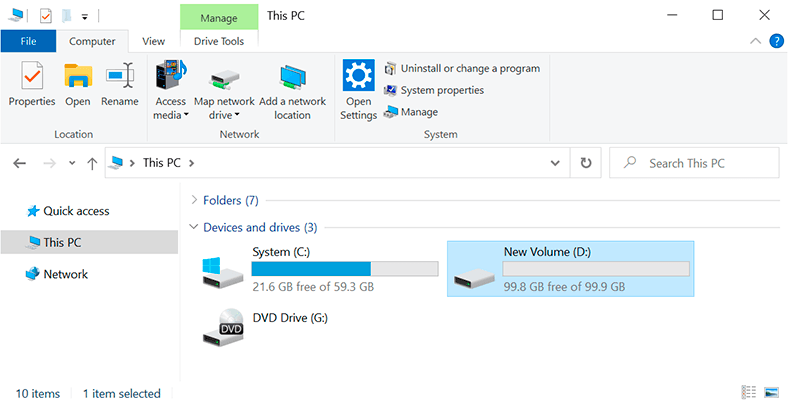
In This PC window, the array will be displayed as one partition.
If any of the disks within the system fails, you will see an error saying Failed redundancy, while all data in the second disk will be intact.
However, it doesn’t mean you should allow a bit of carelessness: when you create a RAID system, all data on the disks involved into the process will be erased. Before you start, make sure that important data is backed up elsewhere.
That is all to know about it, at this basic level. Hopefully, now you can find your way through the variety of RAID types, and grasp the principles behind their architecture.
Check one of the following articles in our blog to read about creating a RAID 5 system at home, choosing specific hardware for the task, and building a computer with a RAID array on board.
RAID data recovery software
| Parameter | Description |
|---|---|
| Name | Hetman RAID Recovery |
| Purpose | Recovery of data from RAID arrays, damaged, deleted, or inaccessible partitions. |
| Supported RAID | RAID 0, RAID 1, RAID 5, RAID 6, RAID 10, JBOD, software and hardware RAID. |
| Supported File Systems | FAT/exFAT, NTFS/ReFS, APFS/HFS+, Ext2/3/4, ReiserFS, XFS, Btrfs, ZFS, VMFS. |
| Operating Systems | Windows, macOS, Linux |
| Device Types | Hard drives, SSDs, NAS devices, memory cards, USB drives. |
| Features |
|
| NAS Support | QNAP, Synology, Western Digital, Seagate, D-Link, Netgear, and others. |
| File Formats | Documents, photos, videos, archives, emails, and other file types. |
| License | Trial version with saving data limitations. |
| Interface Languages | Multilingual support. |


