Resolving Data Loss After Compacting a Virtual Hard Disk on VMware, Hyper-V, VirtualBox
Discover how to recover data after compacting a virtual hard disk on VMware, Hyper-V, VirtualBox in this complete guide. Whether you’ve encountered data loss due to disk compacting or seeking proactive measures, this tutorial provides expert insights and practical solutions. From diagnosing issues to implementing recovery strategies, we’ll equip you with the knowledge and tools necessary to retrieve your valuable data and mitigate downtime effectively.
- Dynamically expanding virtual hard disk
- How to compact a virtual hard disk in VMWare
- How to compact a virtual hard disk in Hyper-V
- How to compact a dynamic disk in Oracle VirtualBox
- How to recover data from a compacted virtual hard disk
- Conclusion
- Questions and answers
- Comments
When a virtual machine is created by the hypervisor, it receives a virtual hard disk of dynamic type by default. Such disks increase their size as more and more data is written to them. Unfortunately, their size doesn’t shrink back when you remove any data from there. In the end, the virtual machine size keeps growing until the physical disk runs out of free space. To reduce the virtual machine disk size after deleting certain files, there is an option to compact the disk which can be found in your machine settings.

How to Recover Data After Compacting a Virtual Hard Disk on VMware, Hyper-V, VirtualBox
Dynamically expanding virtual hard disk
So what kind of disk is a dynamic (dynamically expanding) one? It’s the type of disk that lets you use the physical storage space efficiently. When you create a dynamic disk for the first time, its size is pretty small and it only takes as much storage space as it really needs.
A dynamic disk grows in size as new data is added, and it helps to minimize the cost of storage. Besides, dynamic disks work well in development and test environments, and are pretty compatible with servers running applications that don’t require intensive use of storage devices.
However, unless monitored properly, a virtual hard disk may increase to a maximum size consuming lots of physical storage space. And even deleting files from such virtual hard disk won’t fix the problem. The only way to solve it is to reconfigure the disk manually by shrinking or compacting it.
So what’s the difference between shrinking and compacting virtual hard disks? When you shrink a virtual machine disk, you reduce its maximum size limit. When you compact a virtual disk, the physical storage space used by such virtual disk is reduced and unused physical disk space becomes free.
Disks can be shrunk inside the virtual machine, in its disk management utility, and this is how you can extend or reduce the disk storage capacity. Meanwhile, disks can be compacted in virtual machine settings of the specific virtualization software that you are using.
| Feature | Description |
|---|---|
| Type | Dynamically Expandable Disk |
| Function | Automatic expansion of disk space without restarting the system. |
| Flexibility | Ability to add new disks or increase the capacity of existing ones with minimal impact on performance. |
| Management | Volume management through an administration interface or specialized software. |
| Updates | Volume changes can be made “on the fly” without needing a reboot. |
| Redundancy | Automatic data redundancy during expansion to prevent data loss. |
| Performance | Impact on performance depends on the type and number of disks used but is usually minimal. |
| Compatibility | Supports various file systems and RAID configurations. |
| Cost | May be more expensive than static systems due to the need for specialized hardware and software. |
| Advantages | Flexibility in volume management, continuous operation without system downtime. |
| Disadvantages | Can be more complex to set up and manage compared to traditional disks. |
How to compact a virtual hard disk in VMWare
Now let’s explore how to compact a virtual disk file in VMware. You should understand that this action will reduce the disk size only if it has increased over time and you have deleted some data recently. If you have just created a dynamic disk, its size will not change. However, if you created a dynamic disk, added 5 Gb of data there, and then removed it, you’ll be able to reduce its size for about the same 5 Gb.
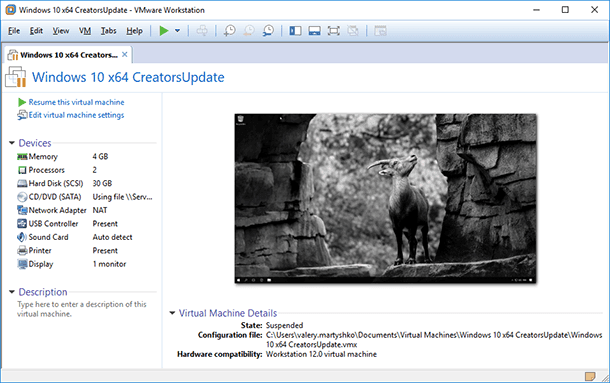
To reduce the virtual machine size in VMWare, start the program, select the virtual hard disk you need to make smaller and click Edit virtual machine settings. In the settings window that opens, access the Hard Disk options to see the current disk size. To reclaim the unused disk space, click on the Compact button, and it will start the process of rebuilding the disk contents and freeing up the space which is not used.
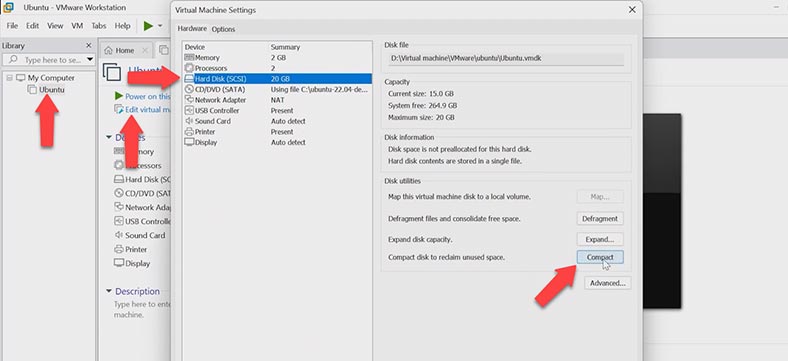
In the end, the disk size will be reduced to the total size of the files it uses. For better cleanup results, we recommend running disk defragmentation.
How to compact a virtual hard disk in Hyper-V
Before compacting a virtual hard disk, we recommend emptying the Recycle Bin, performing disk defragmentation, and then backing it up to protect important data against a disk failure; such failure can make you lose data if there are any issues with starting the virtual machine or other problems.
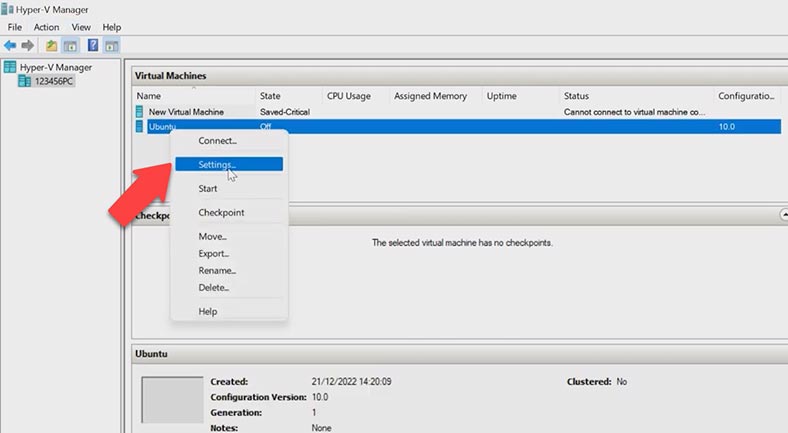
This process reduces the virtual hard disk size by removing empty blocks. You should also remember that it is impossible to compact a fixed-size virtual hard disk. The virtual machine using the disk which you want to compact should be powered off. Open the Hyper-V manager, right-click on the virtual machine and choose Settings.
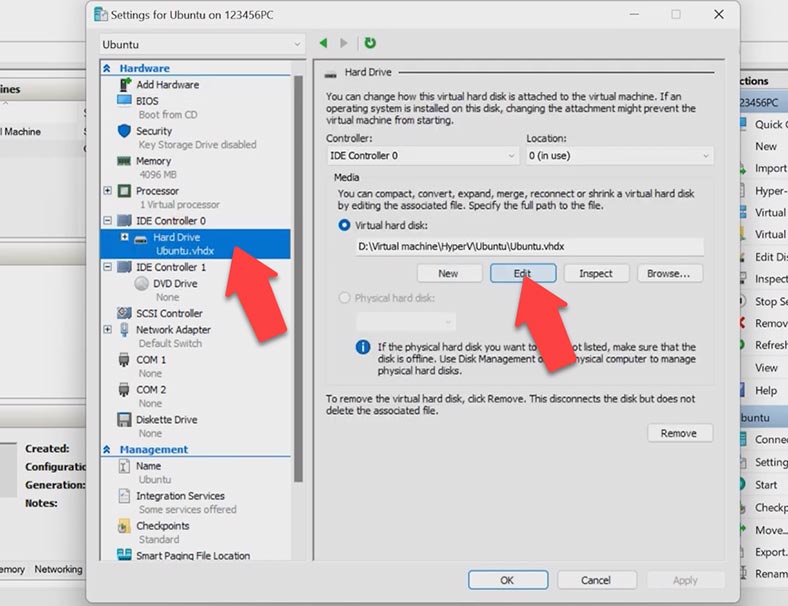
Open Hard Drive settings and click on the Edit button on the right. Move on to the next step at once since you have already chosen the right virtual disk file – click Next.
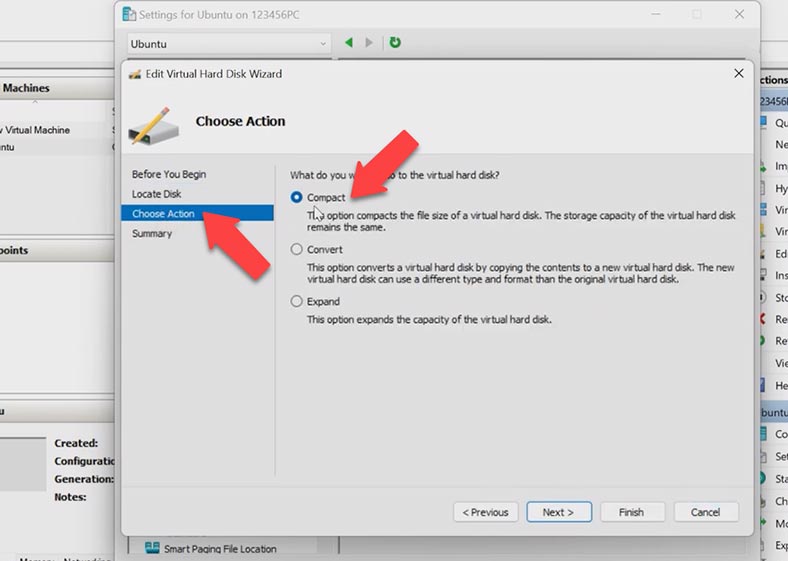
In the Choose Action page, select Compact. In the next window, you’ll be able to check what changes you are going to make to this disk. Click Finish to start the process.
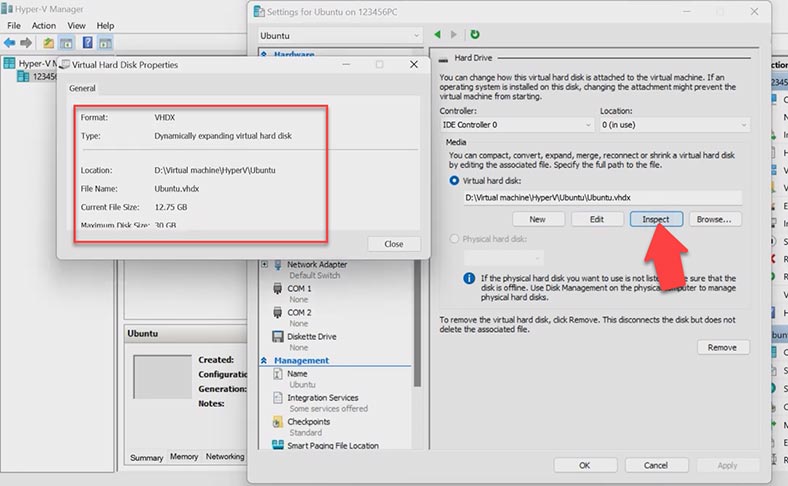
To make sure that the file size has actually decreased, click on the Inspect button.
How to compact a dynamic disk in Oracle VirtualBox
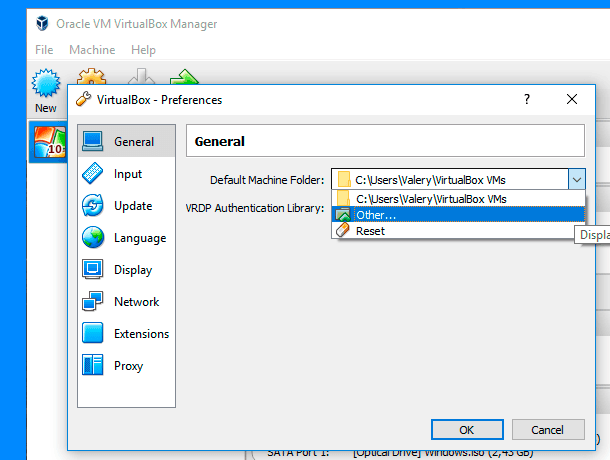
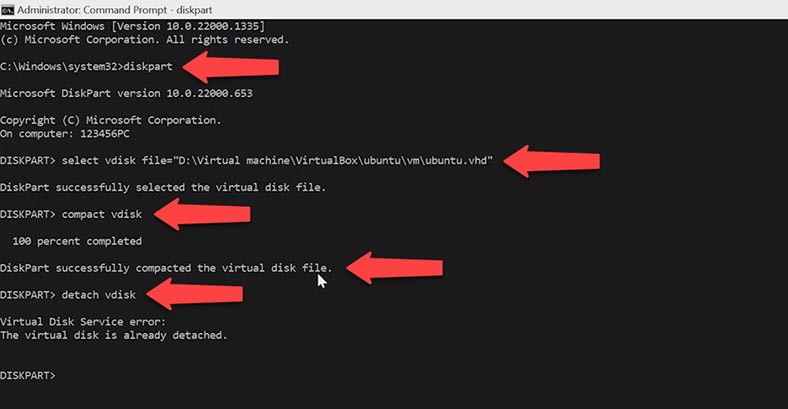
In Oracle VirtualBox, you can compact a dynamic virtual disk with the help of the command prompt. Depending on the disk type, there are several ways of compacting. If you are using a VHD disk, it can be compacted with the Diskpart utility integrated into Windows. Shutdown the virtual machine, the disk of which you want to compact, open the command prompt as administrator, and run the diskpart command to start the utility. After that, choose the disk to be compacted by using this command:
select vdisk file="D:\Virtual machine\VirtualBox\ubuntu\vm\ubuntu.vhd"
Here, you should type the path to the virtual disk file. To compact the disk, run this command:
compact vdisk
This process can take quite a long time depending on the actual size of the virtual disk. If the compact process is successful, you will see this message on the screen:
DiskPart successfully compacted the virtual disk file
Now you should dismount the disk with this command:
detach vdisk
After that, you can run the virtual machine again.
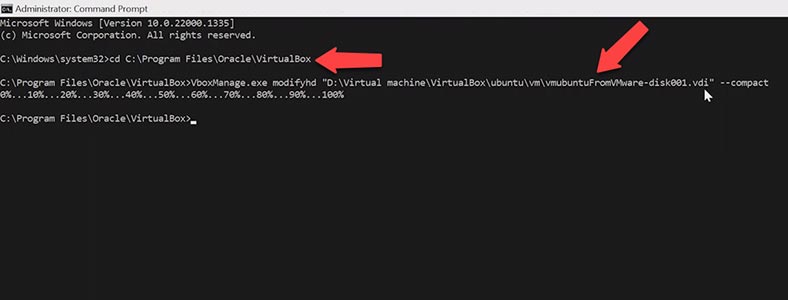
If you are using a VDI disk, use the command prompt to navigate to the folder where VirtualBox is installed.
cd C:\Program Files\Oracle\VirtualBox
After that, run VboxManager with the command modifyhd, the path to the virtual disk and the compact key.
VboxManage.exe modifyhd "D:\Oracle VM VirtualBox\Windows 10 x86 Ent 1607.vdi" --compact
This is going to take some time, depending on the size of the virtual disk.
How to recover data from a compacted virtual hard disk
As you have already noticed, the virtual hard disk size can only be reduced manually. If you decide to just remove its contents, you will free some space on the virtual hard disk, but it will not affect the physical hard disk. To free up some space on the physical disk as well, you should shrink or compact virtual hard disks depending on what you need to do.
Before you start the shrinking or compacting process, it’s always better to be prepared to the worst scenario possible. An unexpected system error or failure may render all your infrastructure inaccessible. That’s why you need to make sure that the data stored on your disks is reliably protected and can be successfully recovered in case the hard disk fails.
A specialized data recovery software tool, Hetman RAID Recovery, will help you restore data if it gets lost. This utility supports all popular file systems and can recover data from virtual hard disks including compacted disks.
If you have lost some data in the process of compacting a virtual hard disk, just download, install and run Hetman RAID Recovery. To have the virtual disk displayed in the program’s window, you should upload it. To do it, click on the menu button - Tools - Mount Disk.
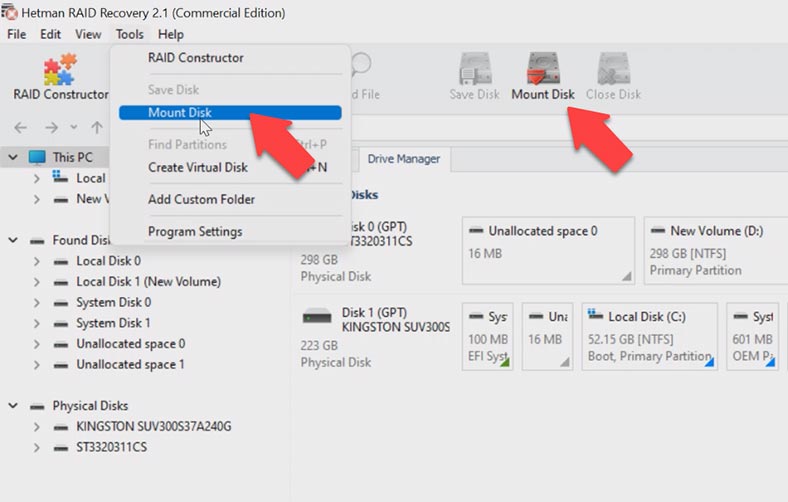
Select the virtual machine type from which the data should be recovered and click Next. Specify the location of the virtual disk file, select the folder where this file is stored, and click OK. Choose the disk file - Next. After that, the mounted disk will appear in the program’s window.
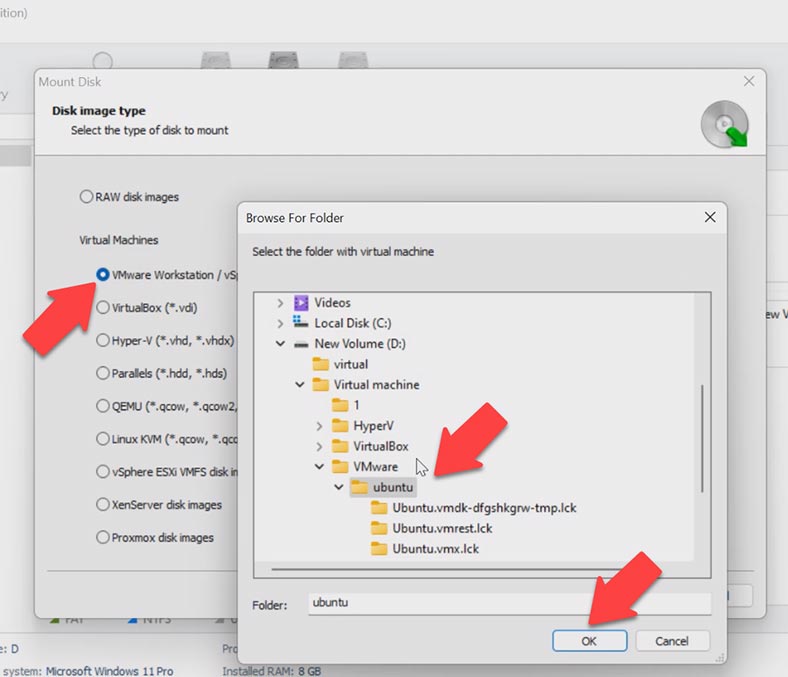
Right-click on the disk and choose Open. At the next stage, select the scan type: for starters, we recommend choosing Fast scan, as it will take less time and help you recover data in most cases. If the program failed to find the necessary files, then run Full analysis. To do it, return to the main menu, right-click on the disk and choose Analyze again. After that, select Full analysis, specify the file system type for this disk, uncheck the box for Content-Aware analysis to accelerate the search process and hit Next.
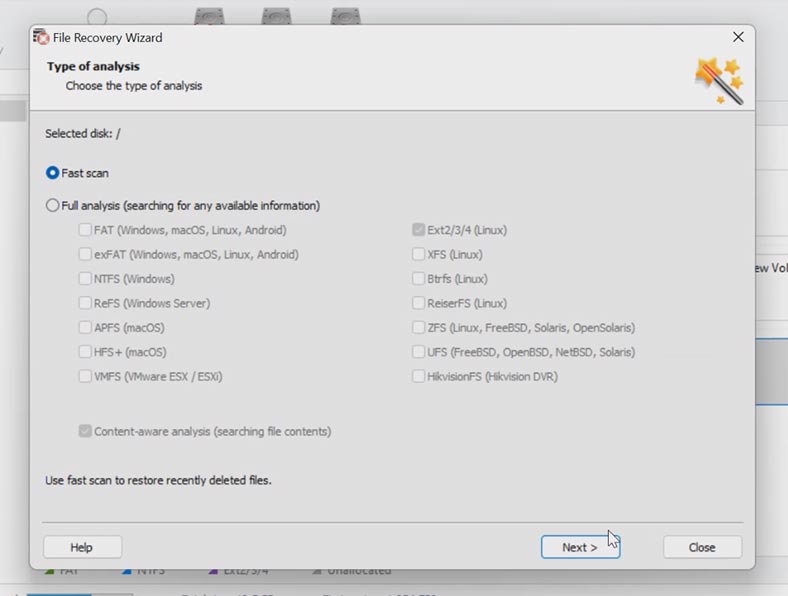
However, in my case, the Fast scan was enough. The program managed to find all files stored on the virtual disk including the deleted ones - and this category is marked with a red cross. You can use the preview window to see the contents of all files. In order to recover the data, select the necessary files and folders and click Recovery.
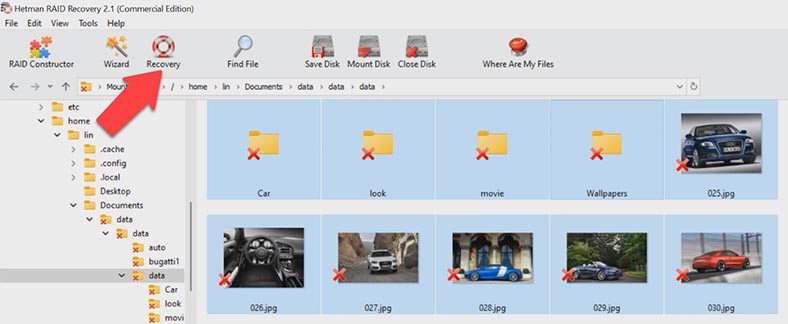
After that, specify where to save the data, choose a disk and folder, and then hit the Recovery button. When the process is over, you will find the recovered files in the folder you have chosen for saving them.
Conclusion
This is how you will be able to recover data from a virtual hard disk after it was compacted, regardless of the hypervisor which was used to create this specific virtual machine, be it VMware, Hyper-V, VirtualBox and so on.


