Recovery Tactics: Data Recovery from a RAID System on Oyen Digital Mobius 3R5-EB3-M
Discover effective methods to recover data from a RAID system on Oyen Digital Mobius 3R5-EB3-M in this comprehensive guide. Whether you’re encountering data loss due to RAID failure or seeking proactive measures, this tutorial provides expert insights and practical solutions. From diagnosing issues to implementing recovery strategies, we’ll equip you with the knowledge and tools necessary to retrieve your valuable data and mitigate downtime effectively. Don’t let RAID system configurations hinder access to your data!
- How to create a RAID on Mobius 5-Bay
- Oyen Digital Mobius 3R5-EB3-M data recovery
- Conclusion
- Questions and answers
- Comments
Storage devices offered by Oyen Digital are designed with both high performance and reliability in mind. Mobius 5 RAID System is a powerful tool to manage a RAID storage with a range of flexible connectivity options, hot swap support, and easy access to hard disks. This device lets you create the following array types: RAID 0, RAID 1, RAID 10, RAID 3, JBOD and RAID 5. Although the RAID technology is a most reliable one, we cannot exclude the possibility to lose some important data. Information can be lost any moment and there may be numerous causes behind such misfortune including accidental removal, misconfiguration or hardware breakdowns, since all devices fail sooner or later.
If your device doesn’t work, the disks are damaged or the RAID system is crashed, you need a special program capable of retrieving mission-critical data from the hard disks.
| Number | Program Name | Advantages | Disadvantages |
|---|---|---|---|
| 1 | Hetman RAID Recovery |
– RAID array recovery of various configurations – Automatic RAID configuration detection – Support for NAS and DAS devices – High success rate of data recovery |
– Trial version does not allow saving data |
| 2 | R-Studio |
– Wide range of supported file systems – High accuracy of data recovery – Support for advanced RAID configurations |
– Complex interface for beginners |
| 3 | DiskInternals RAID Recovery |
– Specialized in RAID array recovery – Support for various RAID configurations – Support for both NAS and DAS systems |
– Lack of support for some rare file systems |
| 4 | UFS Explorer RAID Recovery |
– Powerful data recovery tools – Support for various storage systems and RAID arrays |
– High license cost |
| 5 | EaseUS Data Recovery Wizard |
– User-friendly interface – Support for various data storage types – Well-suited for home use |
– Limited functionality in the free version |

How to Recover Data from a RAID System on Oyen Digital Mobius 3R5-EB3-M
How to create a RAID on Mobius 5-Bay
To understand how this device works, let’s explore how to create a RAID system on it.
There are several methods of doing it on this storage device model. For example, you can create an array by using special switches on the back panel of the device, or with the device management tool.
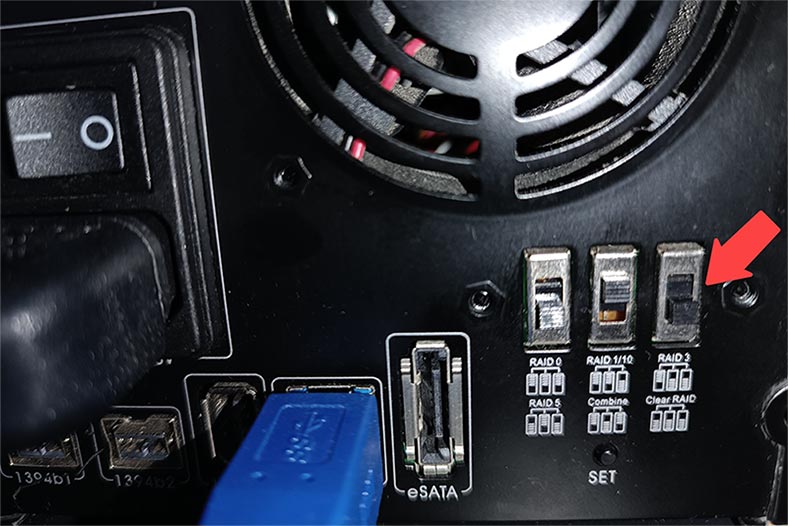
Method one: When the hard disks are installed for the first time, you should run the RAID clear procedure. It configures the disks for use with the Mobius storage; at the same time, it is impossible to remove a partition or data from separate disks at your own choice – this procedure erases all the files without exception. On the back panel of storage device, set the switches to the position Clear RAID by turning them down. After that, press and hold the Set button, and power on the device. Keep holding the Set button until you hear the second sound signal. As a result, all previous configurations will be deleted, and set to the JBOD mode.
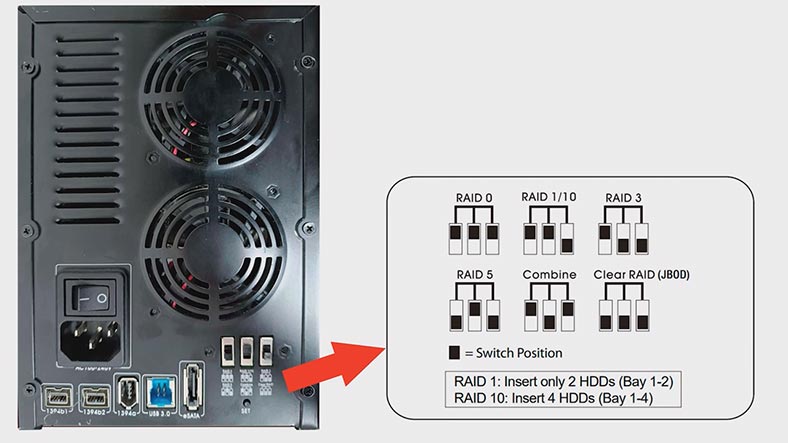
After that, set the switches to the required RAID position – in my case, it is RAID 5 – and power on the device while holding down the Set button. Keep holding the Set button until the second sound signal. After all these steps, your RAID will be ready to use, and all data will be erased from the hard disks. The last step is to open Disk Management and partition the new disk.
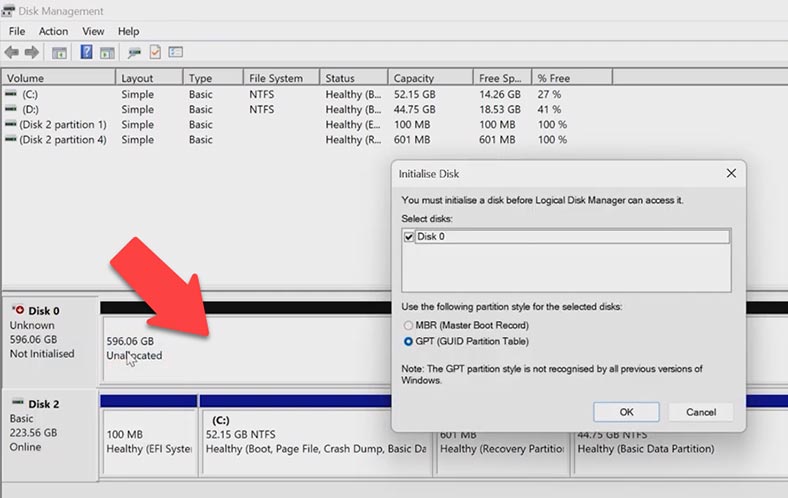
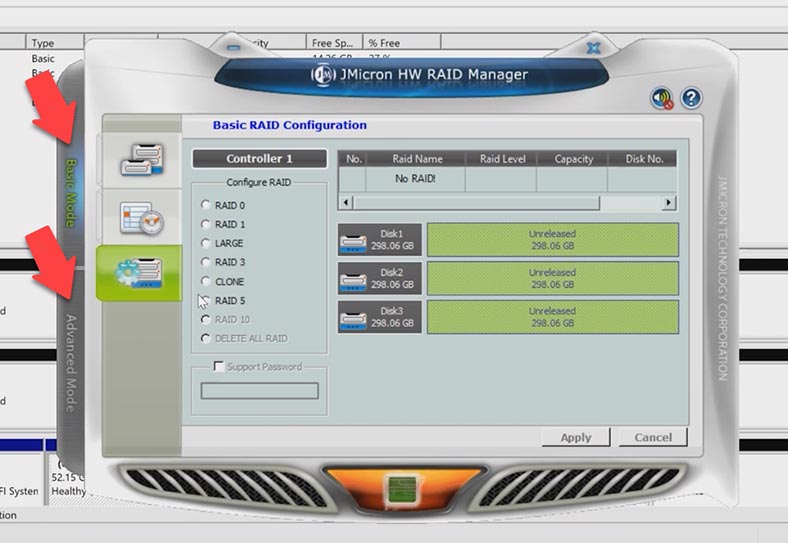
Method two: create a RAID by using the special administration utility – JMicron HW RAID Manager. Its graphical interface is available in two modes, Basic and Advanced. Creation of a RAID system is available in both modes.
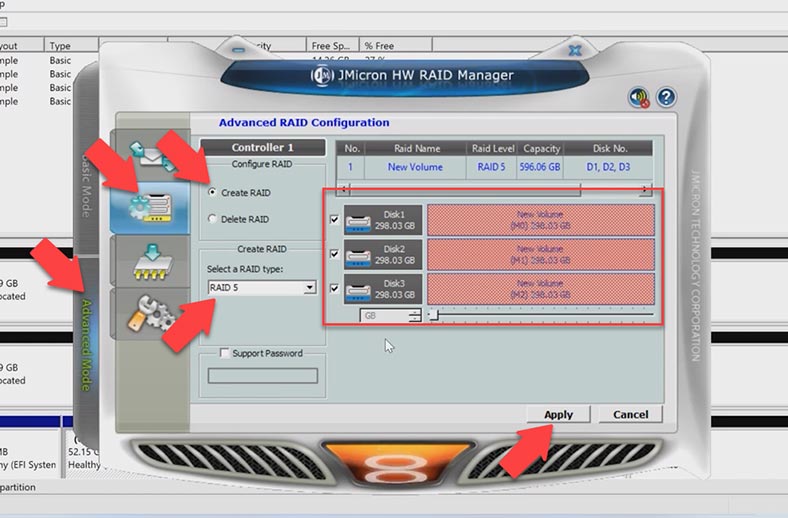
To create a RAID, open the tab Advanced RAID Configuration, check the box next to the item Create RAID, then select the array level from the list below, look to the right to select the disks which should be included into the RAID, and click Apply to confirm your choice.
As a result, you’ll see a warning saying that all data will be erased from the disks. Click Yes to continue. It starts the process of building the RAID, so you’ll have to wait a little until it’s over. When the RAID is created, click OK. The last step is to open Disk Management and partition the new volume.
Oyen Digital Mobius 3R5-EB3-M data recovery
Method 1. How to recover deleted data from a properly working Mobius disk array
If you accidentally removed important files from a disk array, while the RAID and the storage device are both in good working order, you can easily restore information with the help of a data recovery tool, Hetman Partition Recovery. If the RAID works properly, you don’t have to take the hard disks out of the storage device and connect them directly the PC in order to find the missing files.
To restore deleted files, open the program and scan your disk array. Right-click on the disk and choose Open. After that, choose the scan type – Fast scan or Full analysis.
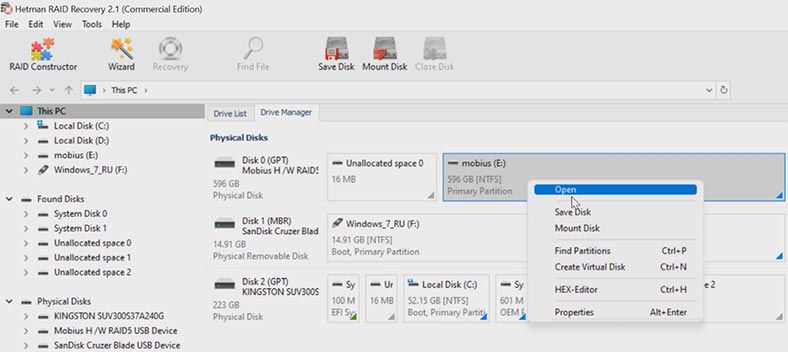
Run a fast scan first – it will take less time. If the program failed to identify the lost files, run Full analysis. To do it, return to the main menu, right-click on the disk and choose Analyze again – Full analysis. Choose the file system type and uncheck the option for signature-based search, as it will make the process go faster. In very complicated scenarios, you can choose to scan the disk with Content-Aware analysis – and click Next.
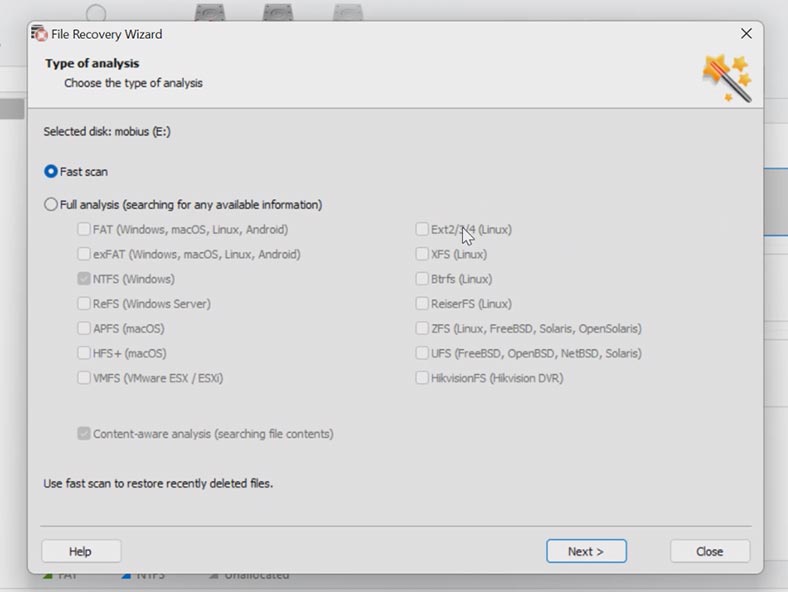
In my case, the program has easily found all the files with Fast scan, and the deleted files are marked with a red cross. Also, you can use the preview feature to see the file contents before buying the utility.
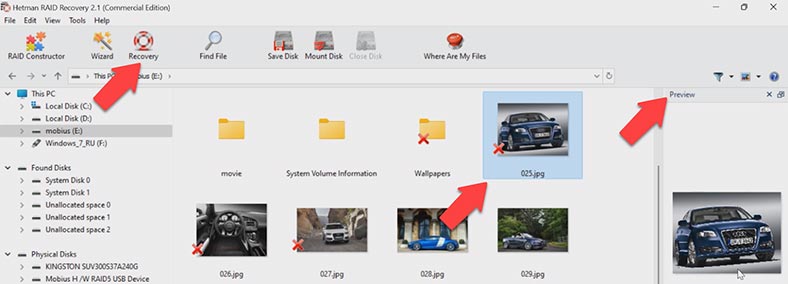
Select all the items you want to recover and click the Recovery button. Specify where to save the data (choose the disk and folder), click Recovery and Finish. In the end, you will find the recovered files in the folder you have chosen.
Method 2. How to recover data from a non-operable storage device
If the storage device breaks down and you can’t access the disk array anymore, it can still be rebuilt and the data can be retrieved with the help of a data recovery tool called Hetman RAID Recovery. It supports most popular file systems and RAID types. This tool will help you recover data after a device breakdown, accidental removal, formatting, misconfiguration or NAS firmware issues.
If you lose access to data stored on a network-attached device as a result of a hardware error, a controller failure or other hardware issues, the data on the disks remains intact and can be handled with specialized data recovery tools. To access the disks, they need to be taken out of the faulty storage device and connected to a computer directly.
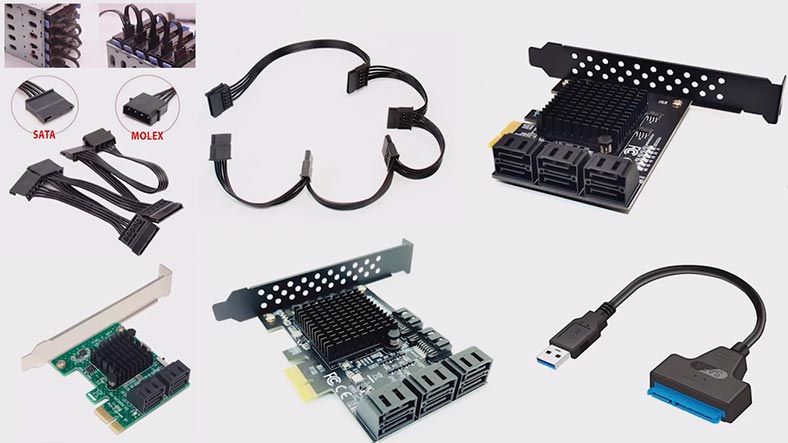
Take the disks out of the NAS device and connect them to a Windows computer. If your motherboard has less SATA ports or power connectors than necessary, you will need additional adapters and expansion cards. Also, you will need a hard drive with the capacity equal or exceeding the amount of the information you are going to recover: you can use external hard disks, another network-attached storage, or other storage devices.
If the operating system of the computer to which you have connected the disks tells you to initialize or format them, don’t do that because it will make recovery a lot more complicated.
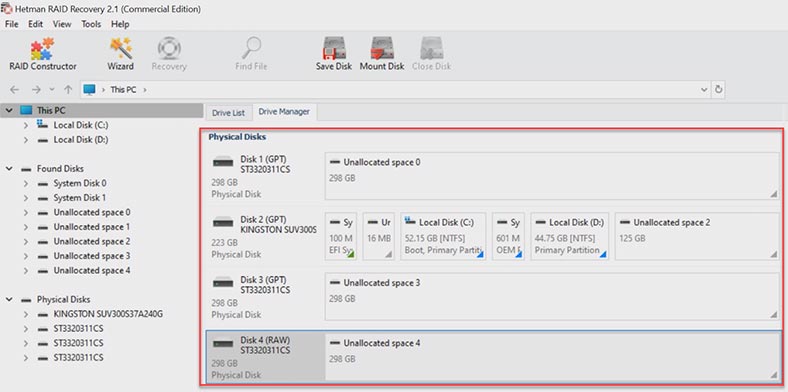
In my case, the program was unable to automatically rebuild the RAID on this Mobius device. The matter is that this NAS model doesn’t write RAID technical data to the hard disks. All data is written from the very beginning of the disk, starting with the zero byte. Because of this peculiarity, the program cannot identify the information about the disk array, the RAID type, the number of disks it includes, their order and so on. In this situation, I’ll have to rebuild the RAID manually.
Start the program and open RAID Constructor, click Next, check the option for Manual mode, and click Next again. In the next window, give all the parameters you know. It was a RAID 5, so let’s give its type. The block order is unknown, so leave the setting Detect automatically and do the same for block size.
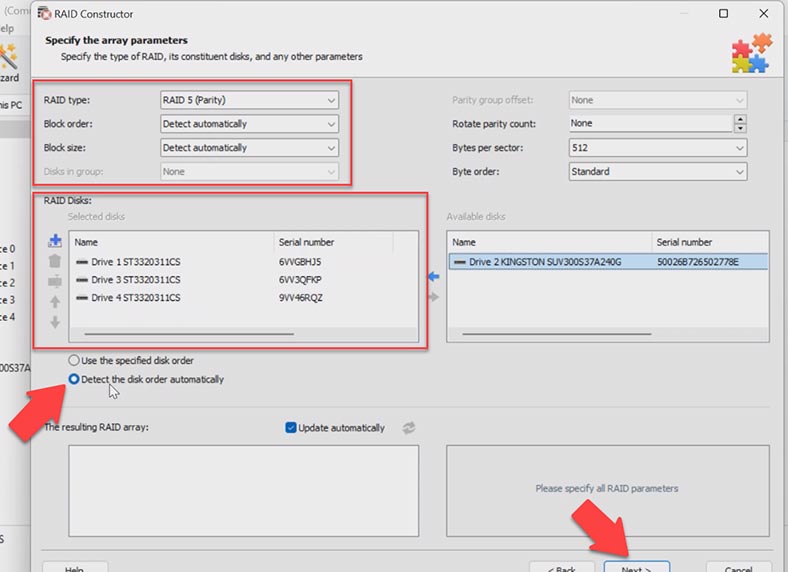
After that, add the disks that the RAID used to include. The order of the disks is unknown so choose the option Detect the disk order automatically. After that, click Next to search for possible configurations. Wait until the search is complete.
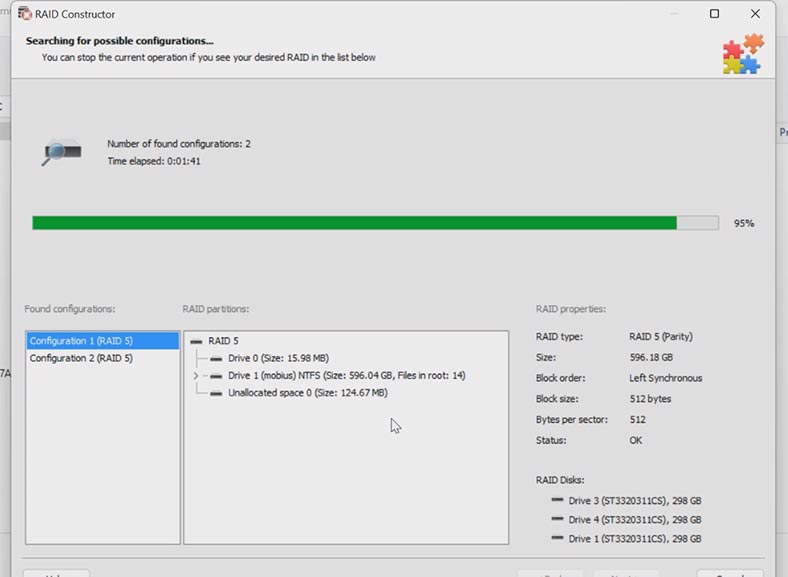
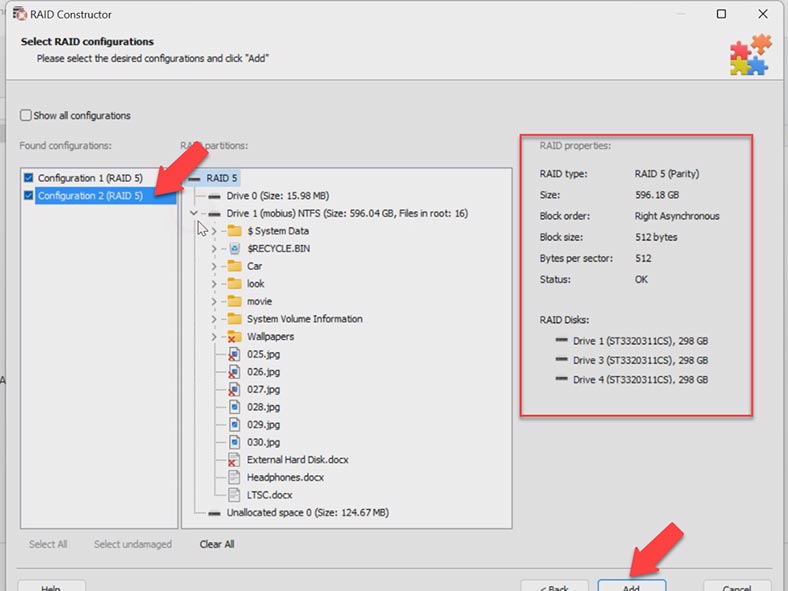
In my case, the program has found several configurations, and they differ by the order of disks. Select the most suitable one, uncheck the others and click Add. The RAID system will appear in the Drive Manager.
To start searching for lost files, right-click on the array and choose Open. Select the scan type. We recommend choosing Fast scan for starters. If the Fast scan can’t find the required files, then go for Full analysis. Choose the file system and click Next.
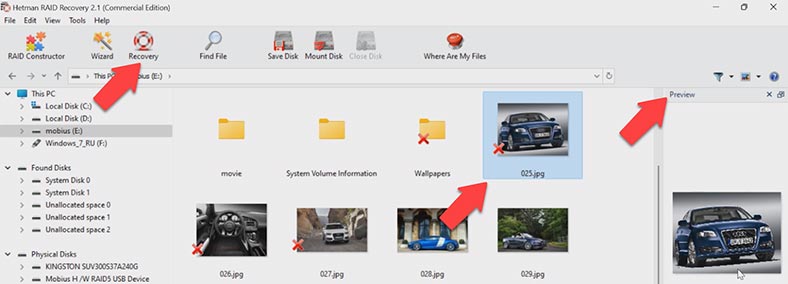
The program has easily found all the information that used to be stored on the disks, including the previously deleted files, which are marked with a red cross. You can use the preview window to see the contents of all files. Select the files you want to restore, and click the Recovery button. Specify where to save the data (choose the disk and folder), and click Recovery again. When the operation is over, you will find the data in the folder you have chosen.
Conclusion
This is how you can recover data from any RAID system created on this storage device. Following the instructions in this tutorial, you’ll be able to recover easily the files which are still there, on the hard disks.


