Moving a Virtual Machine from Hyper-V to Proxmox VE
Discover the step-by-step process of migrating a virtual machine from Hyper-V to ProxmoxVE in this comprehensive guide. Whether you’re a system administrator or a user looking to transition your virtualized environment, this tutorial covers essential steps and best practices for seamless VM migration. From exporting VMs to importing them into ProxmoxVE, we’ll walk you through the entire process, ensuring a smooth transition without data loss.
- Why you need to move a virtual machine
- Hyper-V virtual machine backup
- How to move a virtual machine
- How to install VHD2IMG to Proxmox
- Conclusion
- Questions and answers
- Comments
Nowadays, virtualization has become an integral part of IT infrastructure, and many companies use all kinds of hypervisors to launch their apps and services. Sometimes, users may need to move a virtual machine from one hypervisor to another. In this case, if you have a virtual machine working on Hyper-V and you would like to transfer it to Proxmox, you may need additional information about how to do it properly. Below, we will explore the steps you need to take to move a virtual machine successfully from Hyper-V to Proxmox.
| Step | Description |
|---|---|
| 1. Stop VM | Stop the virtual machine in Hyper-V. |
| 2. Export VM | Export the virtual machine from Hyper-V. |
| 3. Convert Disk | Convert the virtual machine disk to a format compatible with ProxmoxVE (e.g., using qemu-img). |
| 4. Import to ProxmoxVE | Import the converted disk into ProxmoxVE. |
| 5. Configure VM | Configure the virtual machine settings in ProxmoxVE. |
| 6. Start VM | Start the virtual machine in ProxmoxVE. |

How to Move a Virtual Machine from Hyper-V to ProxmoxVE
Why you need to move a virtual machine
There can be a few reasons to make you want to transfer a virtual machine from Hyper-V to Proxmox:
- Transition to a different virtualization platform. If you have a virtual machine which you would like to run on a different virtualization platform, you may have to transfer the machine to that platform.
- Better performance. If you notice that your virtual machine works too slowly or not too effectively on Hyper-V, moving it to Proxmox may improve the situation.
- Software update. If you are planning to update your Proxmox or Hyper-V, you may need to transfer the virtual machine to a new platform.
Server failure. If one of the servers where the virtual machine is running suddenly breaks down, moving it to another server might be required to make sure that your work continues without any downtime.
In any of the cases I have listed, moving a virtual machine elsewhere could be the step you are required to take to preserve the system operability.
Hyper-V virtual machine backup
Before you take any actions affecting your virtual machine, we strongly recommend creating a backup so that you don’t lose any important data. Creating a virtual machine backup before it is moved to a new platform (in this specific case, it’s Proxmox), is extremely important. You need this backup so that you can always revert changes in case something goes wrong with the migration process.
Also, creating a backup gives you a chance to see that the virtual machine works properly before this machine is moved elsewhere. If the virtual machine encounters certain issues after the migration, you can always go back to the backup file and try to fix the problem. Besides, creating a backup is a good virtualization practice, because it helps you to prevent data loss and possible system damage in case of any system failures or user errors.
To create such a file, you can use the tools for scheduling automatic backup. To create a backup in Hyper-V, just export the virtual machine. After that, you will need to import a machine in order to restore it.
How to move a virtual machine
Here are a few simple steps to take if you want to move a virtual machine.
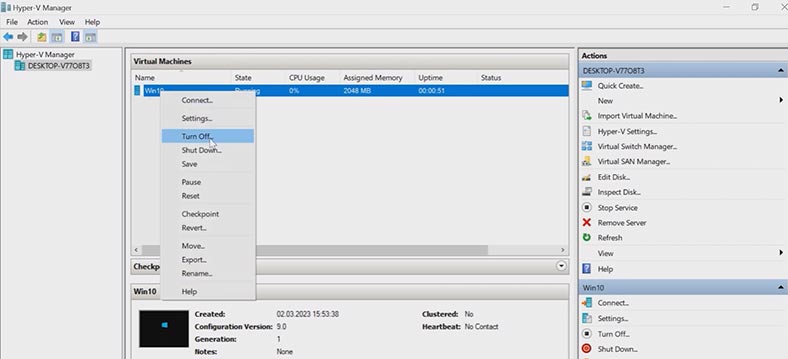
Step 1.Before you start moving a virtual machine from Hyper-V to Proxmox, you need to make sure it is stopped. Choose a virtual machine to move and stop it if it’s running.
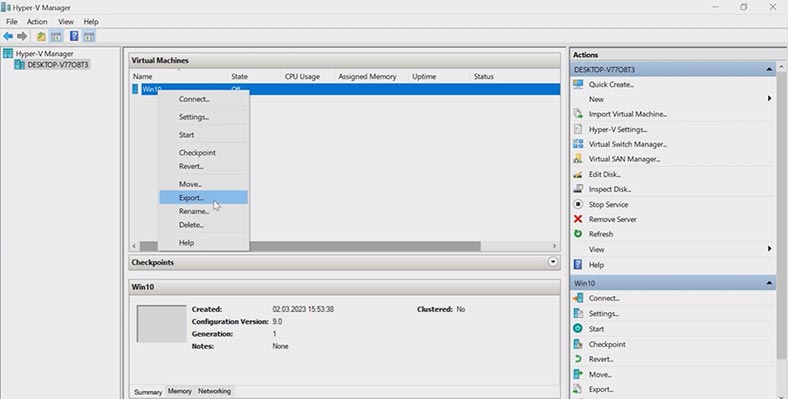
Step 2.Create a virtual machine image. After the virtual machine is stopped, you should create its image. To do it:
-
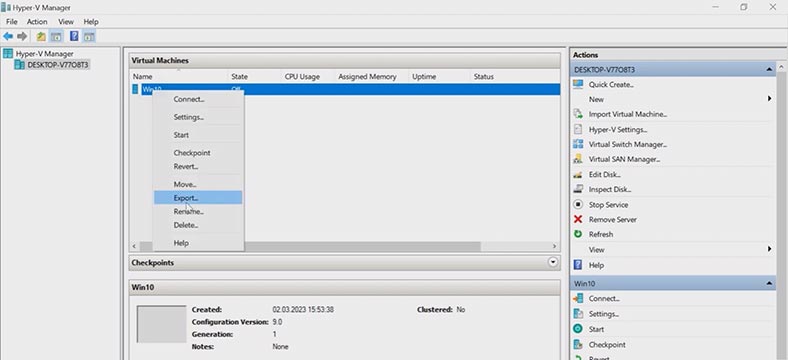
Open Hyper-V Manager and choose the virtual machine you’d like to move.
-
Right-click on it and select“Export”.
-
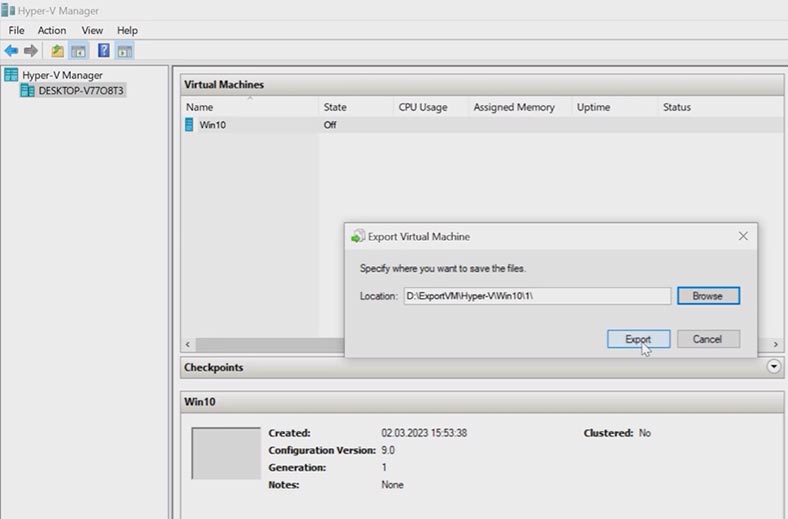
After that, select a directory where to save the virtual machine image and choose required export options. Then click “Export” and wait for the process to finish.
Step 3.Move the virtual machine image to Proxmox.
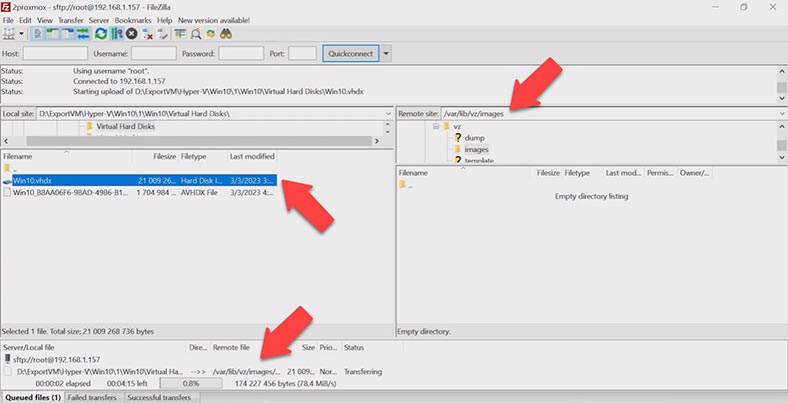
For this purpose, you can use any FTP client. Connect to the Proxmox server by FTP and upload the exported virtual machine file.
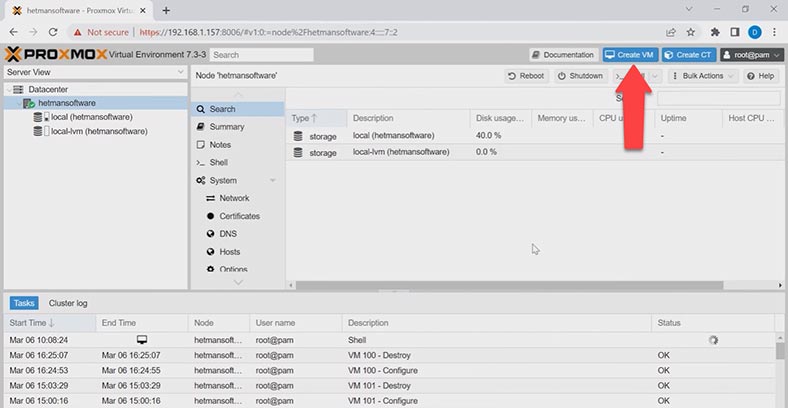
Step 4.Now you should create a new virtual machine in Proxmox. To do it, open a browser to access the hypervisor controls. Create a new machine by clicking on Create VM. Give all of its properties.
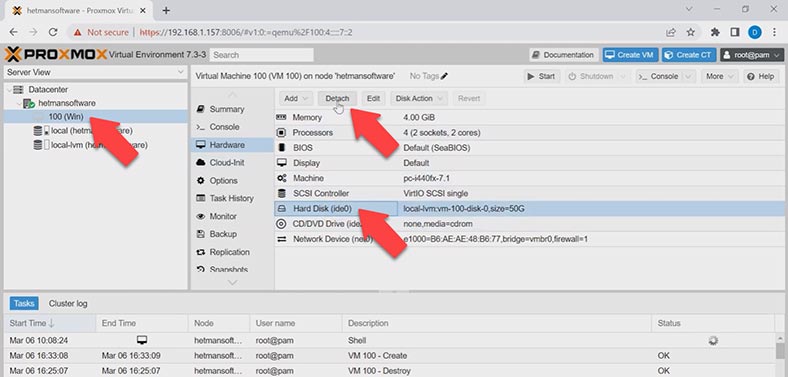
Step 5.In the virtual machine you have just created, remove the existing disk and import a new one.
Open the new virtual machine settings, jump to the Hardware tab, select the hard disk and click on the Detach button.
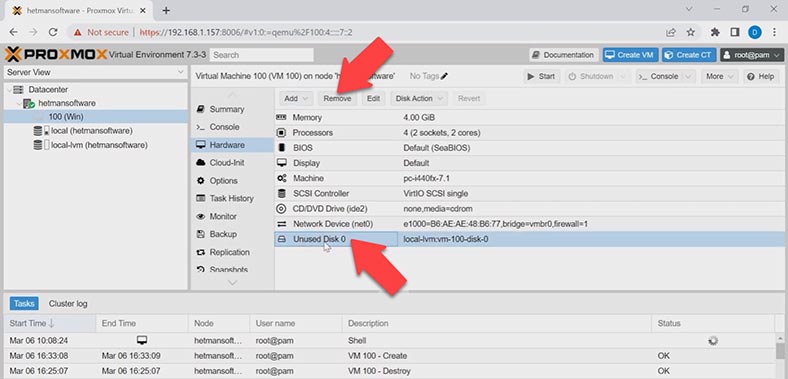
When the disk is detached, you can remove it by clicking on the corresponding button that appears.. Click Remove.
Step 6. Now you need to convert the virtual machine file into the format which is supported by Proxmox hypervisor. You can choose between using a utility like StarWind V2V Converter or using package manager tools in Linux. I’ll show you how to convert VHD into an .img file and the import it to a virtual machine. To do it, let’s install the command prompt utility called VHD2IMG.
How to install VHD2IMG to Proxmox
This utility can be installed to Proxmox with standard package managers in Linux. Here are the steps you should take to install VHD2IMG to Proxmox:
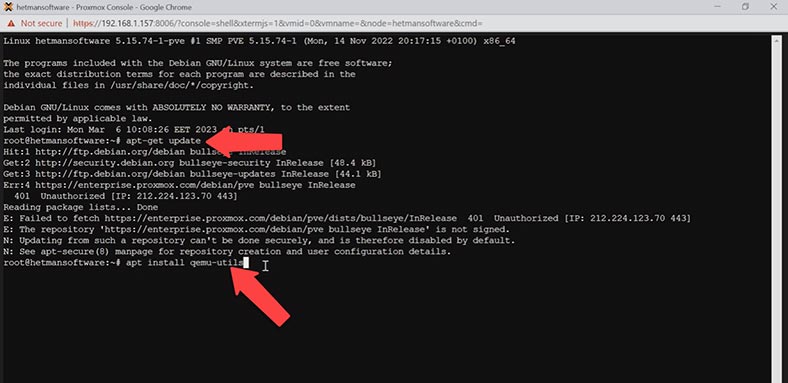
Open the Shell on Proxmox and run the command:
sudo apt-get update
Install VHD2IMG with this command:
sudo apt install qemu-utils
Check if VHD2IMG utility is installed, using another command:
which qemu-img
If the command runs successfully, the utility is installed and ready to use.
Now use one more command to convert the virtual machine file:
qemu-img convert -f vhdx -O raw /var/lib/vz/images/Win10.vhdx /var/lib/vz/images/Win10.img
At the beginning, the virtual machine file format - VHDX - and the path to such file are given. They are followed by the path to the converted file.
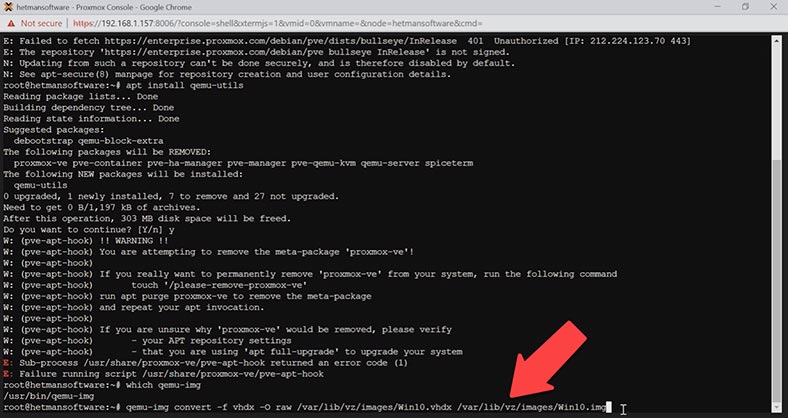
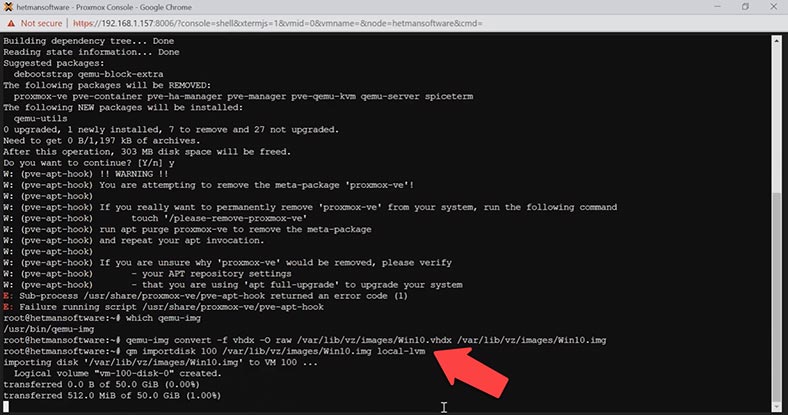
After conversion, the resulting file should be imported into Proxmox. Here is the command to use:
qm importdisk 100 /var/lib/vz/images/Win10.img local-lvm
It contains the virtual machine ID, the path to the .img file, and the storage directory. This tool lets you convert files into the .img format which is also supported by Proxmox.
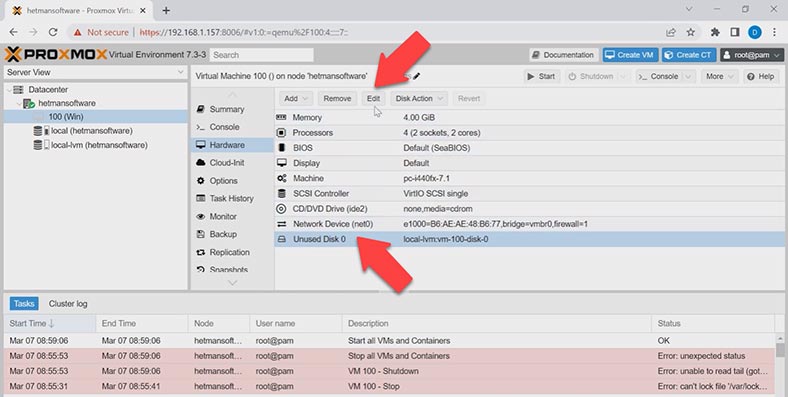
Open the virtual machine settings in Proxmox hypervisor, choose Hardware, and you will see a new disk which is unused. Click on the Edit button.
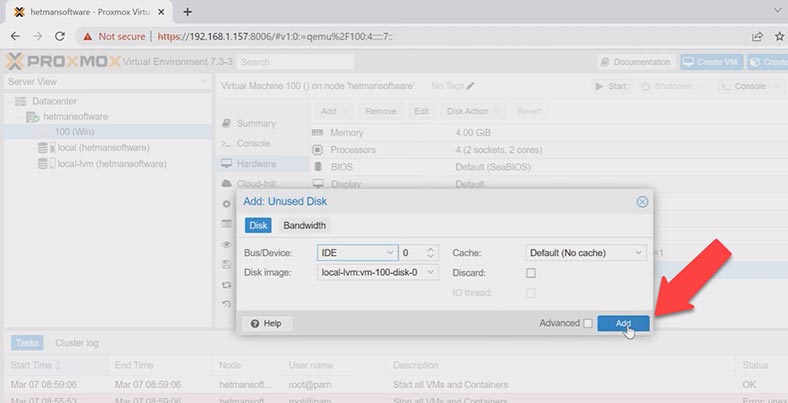
In the window that opens, click Add. Now that the disk is added, check the work of your virtual machine.
Conclusion
Moving a virtual machine from Hyper-V to Proxmox can be a challenging task, but with the right kind of planning and preparation, it can be as seamless as possible.
For starters, you need to understand the differences between Hyper-V and Proxmox, and make sure that your virtual machine is supported by the new platform. After that, create a virtual machine backup and prepare the new Proxmox server for importing the virtual machine.
In the course of transferring the machine, make sure that all of its settings have been correctly moved to the new platform. After the transition process is over, check if the machine works properly. If any issues arise, you can use the backup to revert the machine to its previous state.
Finally, it should be noted that moving a virtual machine is a complicated process, so if you have any doubts or you lack confidence in your skills, it’s better to contact professionals - or study manuals and tutorials more closely.
And if you lost any data from your virtual machine, use the proper tool to bring it back - Hetman RAID Recovery. It will help you restore lost files from virtual disks. This program supports all popular hypervisors including Hyper-V and Proxmox.


