Essential Tips: Data Recovery from a Damaged RAID 1 on Netgear ReadyNAS Duo RND2000
Learn how to recover data from a damaged RAID 1 configuration on the Netgear ReadyNAS Duo RND2000 in this comprehensive guide. Don’t let a damaged RAID 1 configuration compromise your data – watch now and take control of your storage system!
- How to change from X-RAID to flex-RAID
- How to add a shared folder and enable recycle bin feature
- Netgear ReadyNAS Duo RND2000 Data Recovery
- Questions and answers
- Comments
Netgear ReadyNAS devices are quite fast and safe storage solutions. The manufacturer declares multiple levels of protection against data loss. To get the most out of this storage system, you should understand the available concepts of disk configuration.
This NAS uses the X-RAID data storage system by default, but it can also use the conventional storage system, also known as flex-RAID. Each storage type provides certain degree of reliability, but none can give you a 100 percent guarantee against possible data loss. Below, we’ll show you how to change the data storage type on this NAS, how to recover accidentally deleted data, and how to retrieve information from the damaged RAID.

How to Recover Data from a Damaged RAID 1 on Netgear ReadyNAS Duo RND2000
How to change from X-RAID to flex-RAID
As we mentioned earlier, this NAS uses X-RAID by default. In order to change to Flex-RAID, you should factory reset it, and then choose flex-RAID.
Also, you can change the RAID type in the settings of the Raidar utility. Remember that a factory reset clears all data and settings from your ReadyNAS system. For this operation, there is a dedicated Reset button on the NAS case. To factory reset the device, press it several times when it boots.
| Parameter | Description |
|---|---|
| Name | RAIDar |
| Purpose | A program for managing network storage (NAS) and monitoring RAID array status. |
| Supported Devices | Network storage from NETGEAR (ReadyNAS series). |
| Features |
– Device detection on the local network – RAID array management – Monitoring the system and hard drive status – Storage configuration – Displaying event logs |
| Compatibility | Windows, MacOS |
| Interface | Simple and intuitive graphical interface |
| Advantages |
– Free to use – Easy to install and configure – Support for various RAID configurations |
| Limitations |
– Compatibility only with NETGEAR ReadyNAS devices – Limited functionality compared to professional tools |
| License | Free |
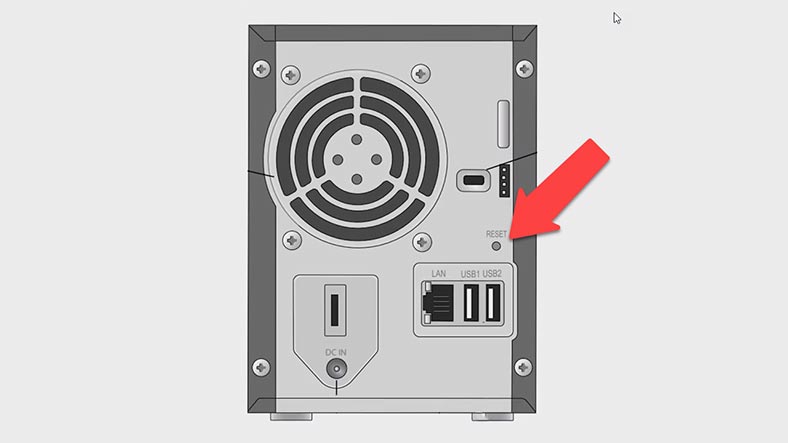
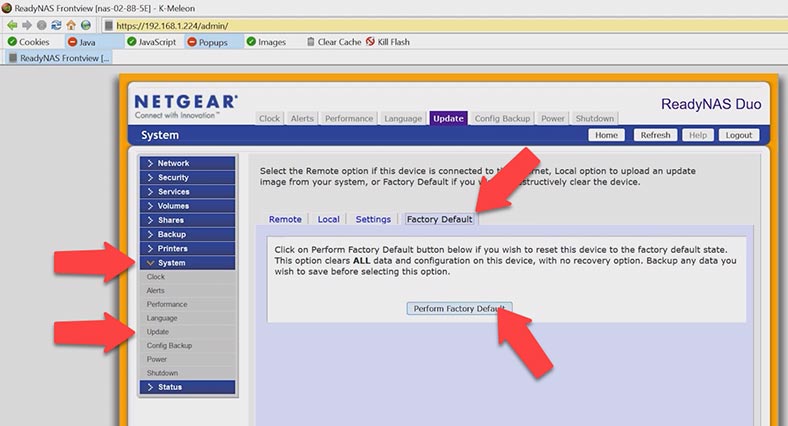
Otherwise, go to System – Update – Factory Default and click on Perform Factory Default, then FACTORY and Ok to confirm it.
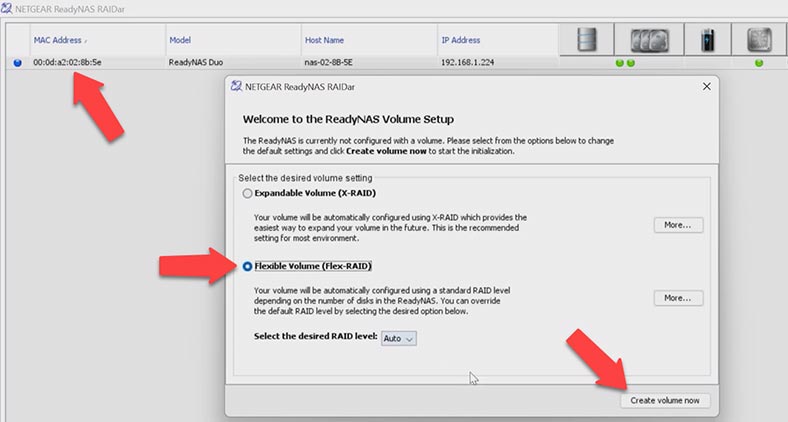
Open the Raidar utility, choose your NAS from the list and click Setup. After that, check the box next to Flexible Volume and click Create volume. It starts the process of creating RAID.
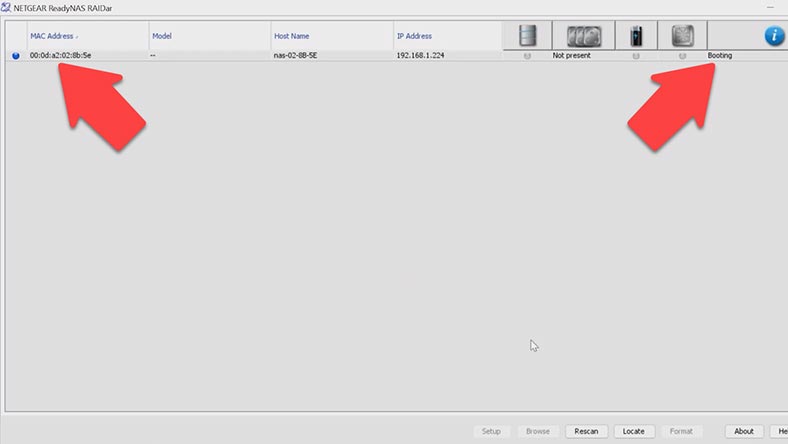
When it’s over, the status Installing will change to Creating Volume and then to Booting. The operation was successful, and you have a new volume.
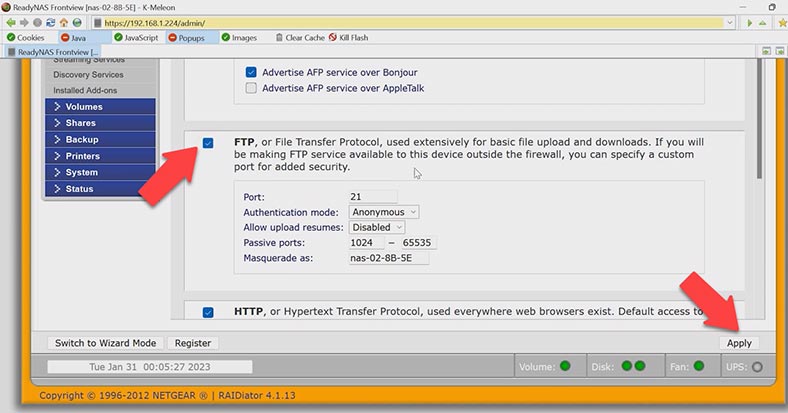
Now let’s configure FTP access to the storage. To enable FTP server, go to Services – Standard File Protocols, check the box next to FTP and click Apply.
How to add a shared folder and enable recycle bin feature
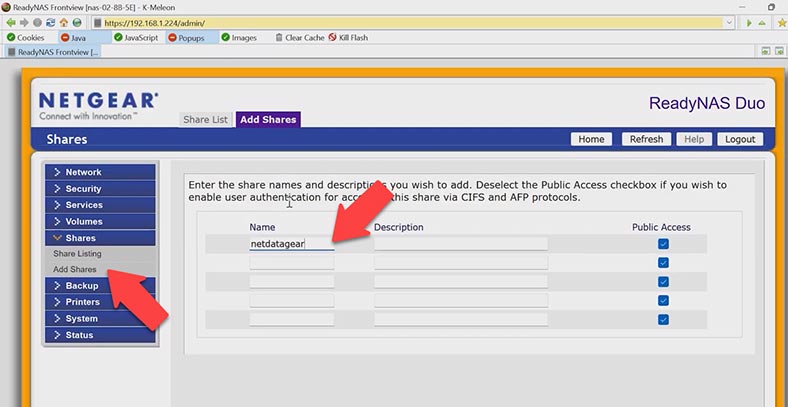
After all that, you can create a shared folder and set access permissions. To do it, open Shares – Add shares, give a name for the shared directory and click Apply.
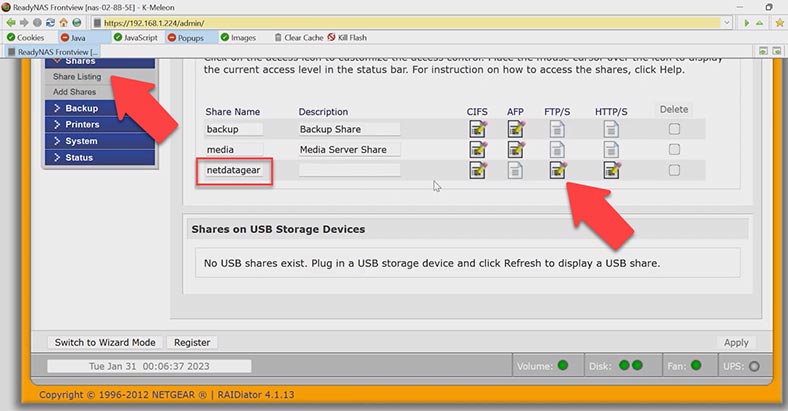
The next step is to configure security options for this folder. Open Share Listing and click Edit FTP access settings next to the new folder. Set access permissions and click Apply.
Netgear ReadyNAS Duo RND2000 Data Recovery
Method 1. How to recover data from the Recycle Bin
For protection against accidental removal, this NAS lets you enable the Recycle Bin feature. The Recycle Bin in NETGEAR ReadyNAS is a function of CIFS (Common Internet File System) protocol. When it’s enabled, users can restore deleted files from the Recycle Bin, and the default time period for that is 10 days. When the Recycle Bin feature is active and your resources can be accessed under the CIFS protocol, deleted files are temporarily kept in the Recycle Bin, and after 10 days, they are removed completely. Also, deleted files can be removed if the shared directory is accessed via another protocol. Before recovery, make sure that this setting is enabled for your shared folder.
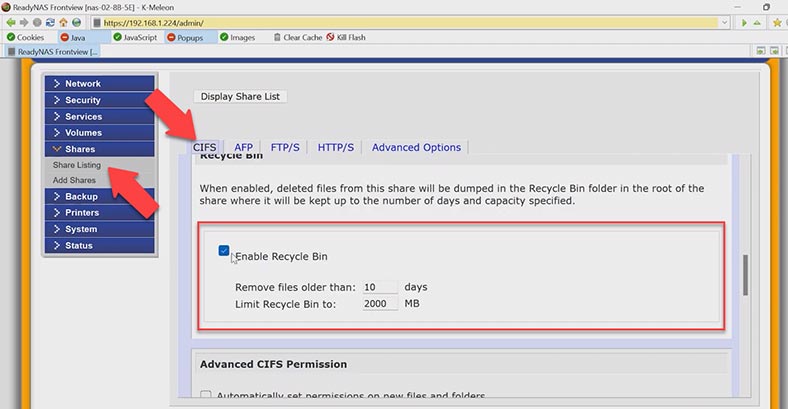
Open Shares – Share Listing, and click on the CIFS tab. Scroll down to see if the Recycle Bin option is active.
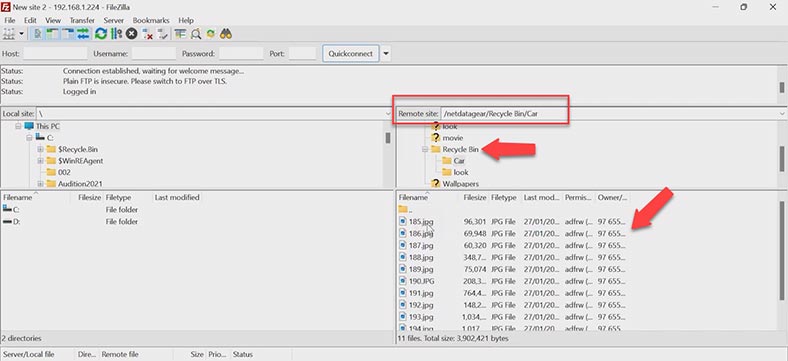
If it is, you will see a folder with the name “Recycle Bin” in the root directory of the shared resource that contains the deleted files. View and select the files you want to recover, and then right-click on them for recovery.
If the Recycle Bin is disabled, use a data recovery tool.
Method 2. How to recover data from RAID0 NETGEAR
If you failed to retrieve the files from the Recycle Bin, and you have no backup to rely on, or the storage system is broken so the RAID has crashed so you can’t access the data, your information can still be saved with a data recovery tool. Download and install such program – Hetman RAID Recovery.
It supports all popular file systems and RAID types, and it will automatically rebuild the damaged RAID with the available hard disks, so that you’ll be able to retrieve important data. To start the recovery process, take the drives out of the storage device and connect them directly to the motherboard of a Windows computer.
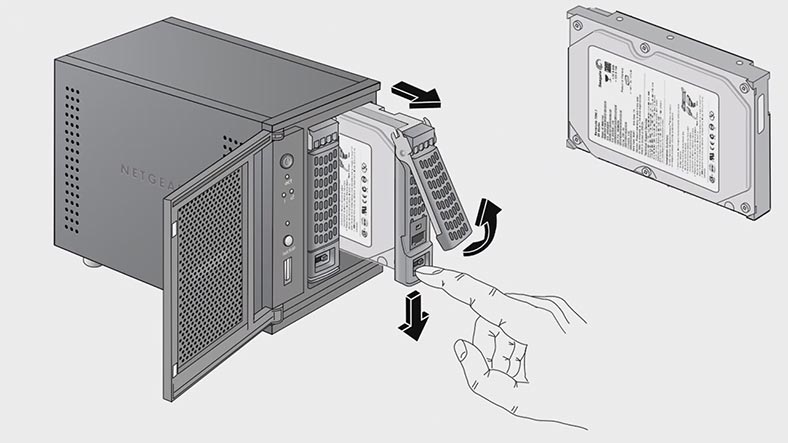
Bear in mind that before starting data recovery operations, you should prepare some free disk space with the capacity equal to the amount of data you’re planning to recover from your disk array.
If one of the hard disks breaks down, you can lose a part of your data, depending on the RAID level, and this data is impossible to recover. If you’re using RAID 0 and one hard disk is down, some information will be lost permanently. The matter is that this array type is meant for higher performance – which is achieved through striping. It means that data is written to either disk in parts which provides users with high input/output performance at a low cost. At the same time, though, it gives you no redundancy at all. So if that’s your case, be ready to face the bitter truth: you won’t be able to recover all your stuff.
When the hard disks are connected and the program starts, it will automatically scan the disks and rebuild the damaged RAID. The detailed information on your RAID system is displayed below.
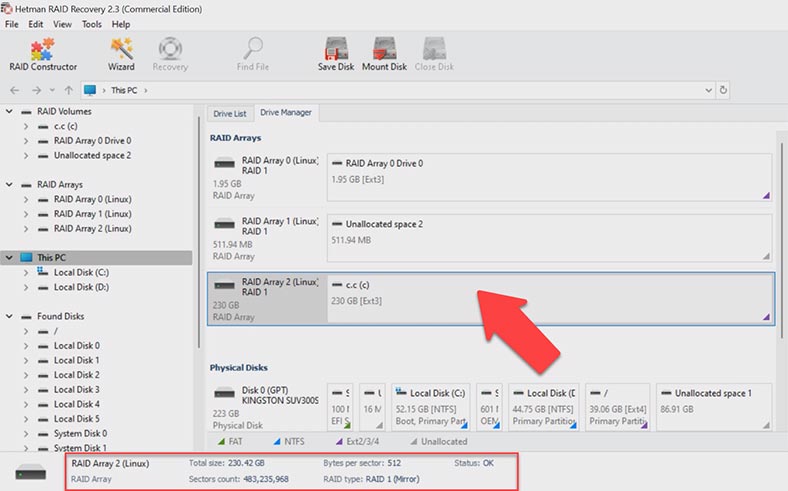
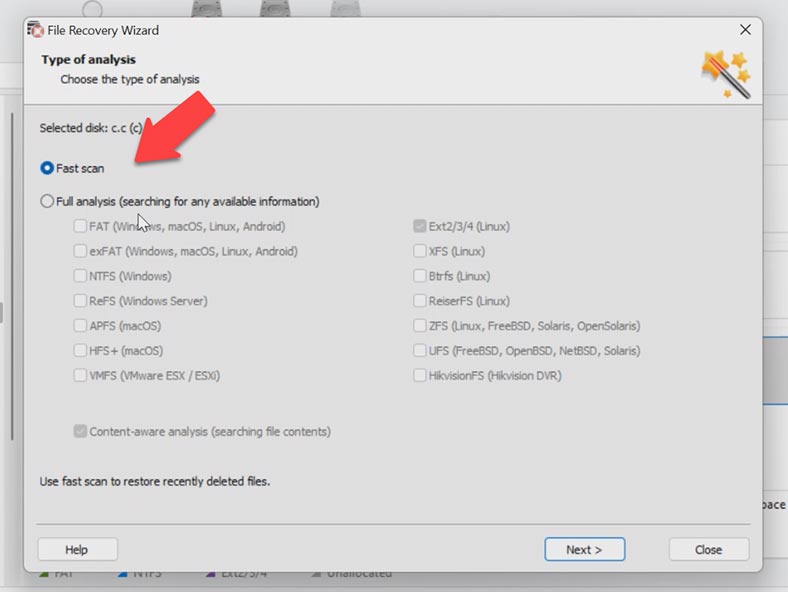
To search for deleted files, right-click on the volume and choose Open. After that, choose the scan type – Fast scan or Full analysis. If the NAS is down, but the program manages to rebuild the RAID correctly, a Fast scan is enough.
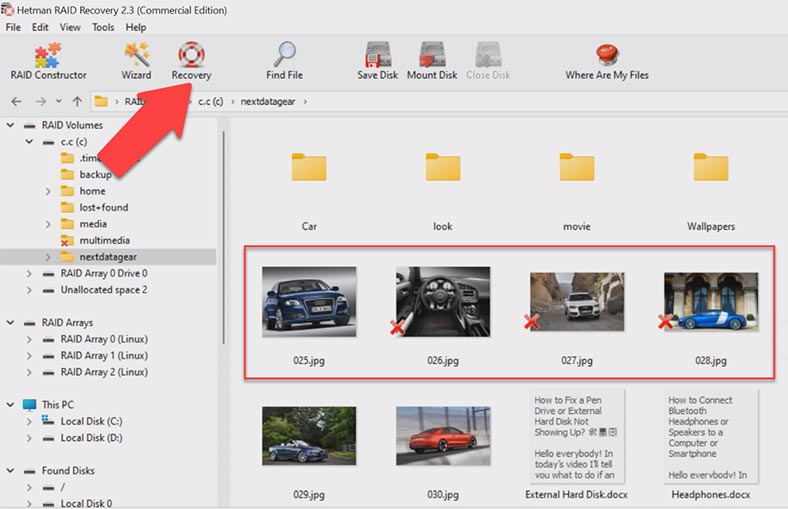
When the scan is over, open the folder where the lost files were stored. This program retains the entire structure and file names, so it will be easy to find the required items, and you can use the preview window to see their contents.
Select all the items you want to recover and click the Recovery button.
Specify where to save the data (choose the disk and folder), click Recovery and Finish. You will find the recovered files in the folder you have chosen.
If the program can’t find the missing files after the Fast scan, then go for Full analysis. To do it, return to the main menu, right-click on the disk and choose “Analyze again.”
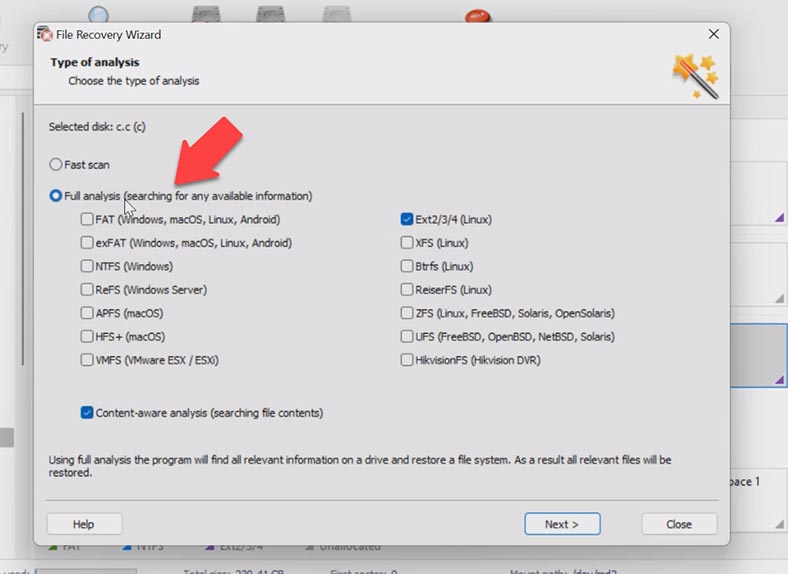
Select the file system type for this disk, and uncheck the box for Content-Aware analysis to accelerate the search process. Follow the instructions to complete the search.


