How to Expand a Virtual Machine Disk or Add New Disks in VMware, VirtualBox, Hyper-V
In this article, we’ll explore how to expand a disk and how to add new disks in such virtual machines as VmWare, VirtualBox, HyperV. When a new virtual machine is created, you also create a virtual hard disk for it, and you specify the disk size in the settings. However, as you work with the machine, it may turn out that this disk size is not enough for your needs. What should you do in this case? How to increase the size of an existing disk?
Before you start doing the things described below, I strongly recommend backing up your virtual hard disk file.
| Platform | Operation | Steps |
|---|---|---|
| VMware | Extending an existing disk |
1. Power off the virtual machine. 2. Open the virtual machine settings. 3. Go to the “Hard Disk” section. 4. Enter the new disk size. 5. After extending, increase the partition inside the OS using disk management tools (e.g., Disk Management in Windows). |
| Adding a new disk |
1. Power off the virtual machine. 2. Go to the virtual machine settings. 3. Add a new hard disk, selecting the type and size. 4. Start the virtual machine and configure the new disk inside the OS. |
|
| VirtualBox | Extending an existing disk |
1. Power off the virtual machine. 2. Use the VBoxManage modifymedium command in the terminal:VBoxManage modifymedium <path to disk> --resize <new size in MB>.3. In the OS, increase the partition to use the entire new space. |
| Adding a new disk |
1. Power off the virtual machine. 2. Open the virtual machine settings. 3. Select “Storage”, then add a new hard disk. 4. Start the virtual machine and configure the disk in the system. |
|
| Hyper-V | Extending an existing disk |
1. Power off the virtual machine. 2. Open the virtual machine settings. 3. In the “SCSI Controller” section, select the hard disk. 4. Enter the new size. 5. Increase the partition size inside the OS. |
| Adding a new disk |
1. Power off the virtual machine. 2. Open the virtual machine settings. 3. Add a new hard disk through “SCSI Controller”. 4. Start the virtual machine and configure the disk inside the OS. |
VMware Workstation

🔷 How to Expand a Virtual Machine Disk or Add New Disks in VMware, VirtualBox, Hyper-V 🔷
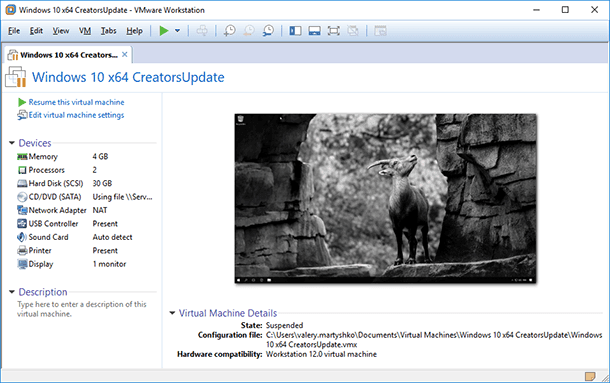
VMware Workstation is quite a popular tool for working with virtual machines. It has a good graphical interface, and it is simple and convenient enough for personal use.
Here is a video about creating a VMware virtual machine:
To expand the disk, start VMware Workstation:
Select the necessary virtual machine, click on the Virtual Machine button, then click on click on the Settings menu.
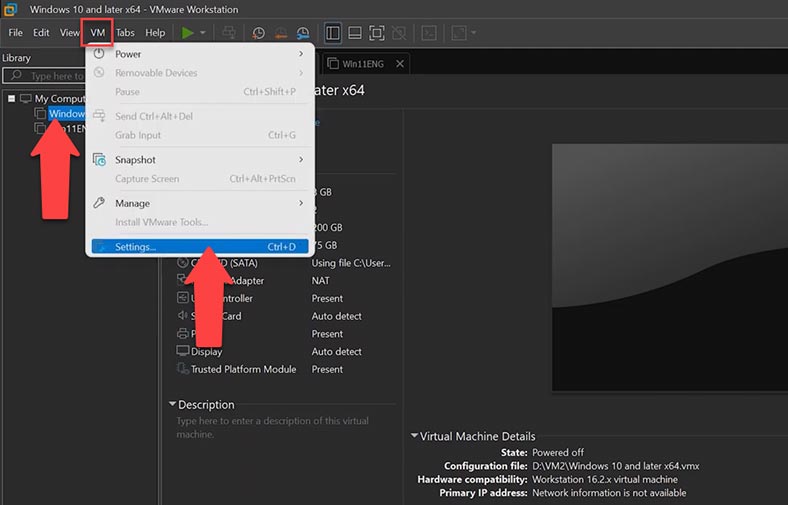
Now choose the Hardware tab and click on the Hard Disk option. In the menu on the right, find the Expand disk capacity option. Click Expand next to it, then OK. Now specify the new disk size and click Expand.
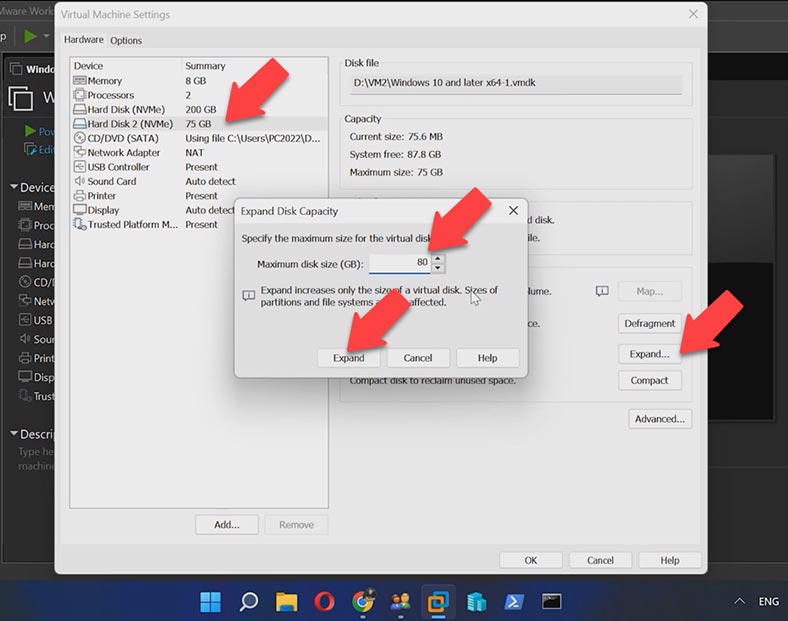
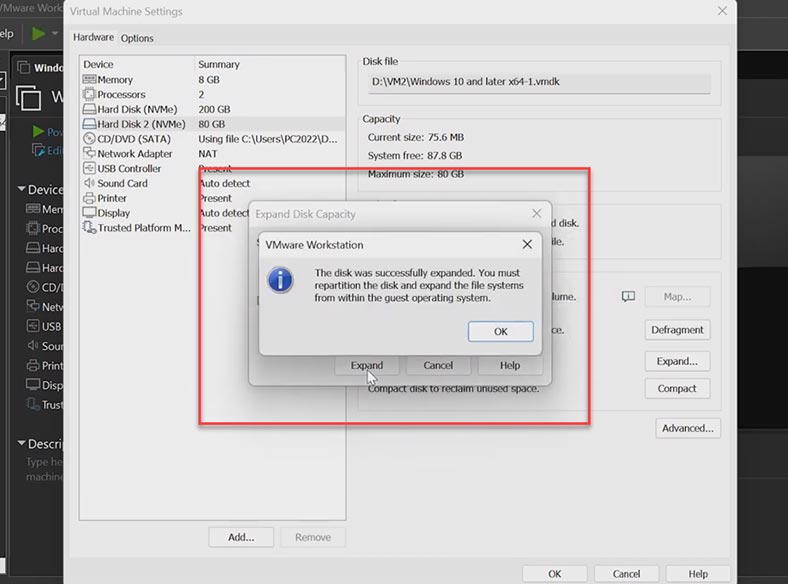
After some time, the program will inform you that the disk was successfully expanded.
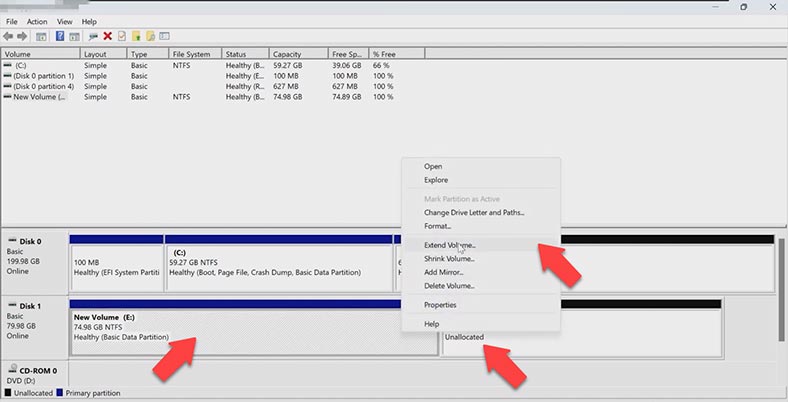
After that, power on the virtual machine and check the disk capacity in the Disk Management window. Now you need to extend the volume on the virtual machine. Right-click on the disk and choose Extend Volume, add the required amount of space and click Next; the disk is extended but all the data is still intact.
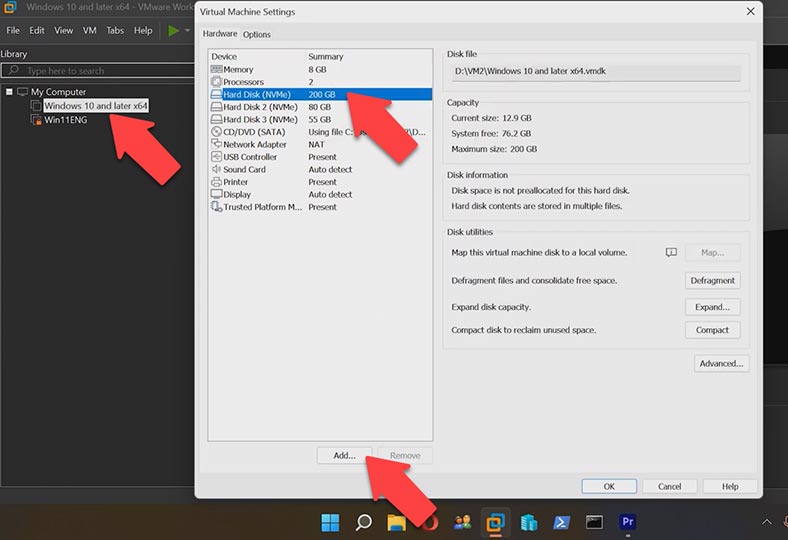
Also, if the original size of the hard disk is insufficient, you can add one more virtual disk. You can both add an existing disk or create a new one.
To do it, power off the virtual machine, and click “Edit virtual machine settings” in the information page. In the Hardware tab, select the Hard Disk option and click Add below.
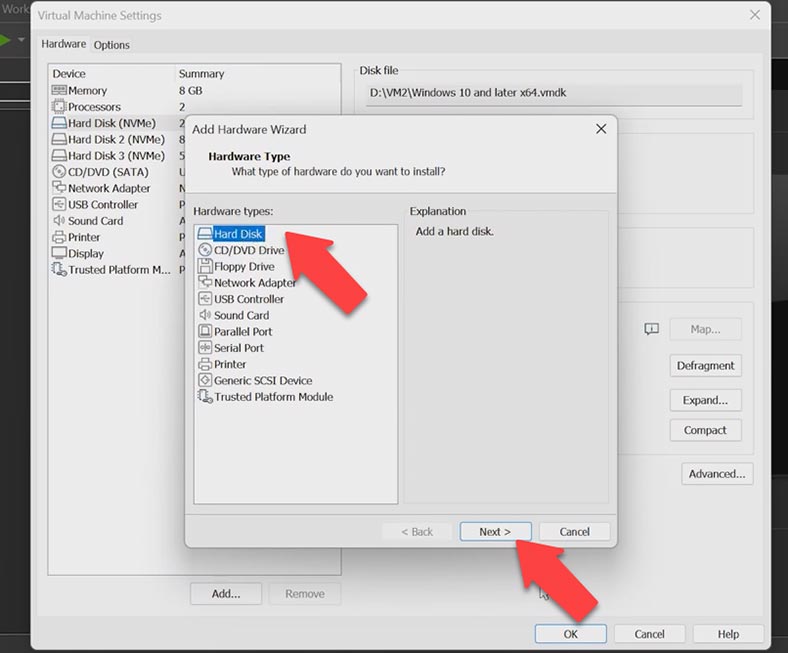
It starts the Add Hardware Wizard. Select Hard Disk and click Next. Leave the predefined setting as it is and click Next again.
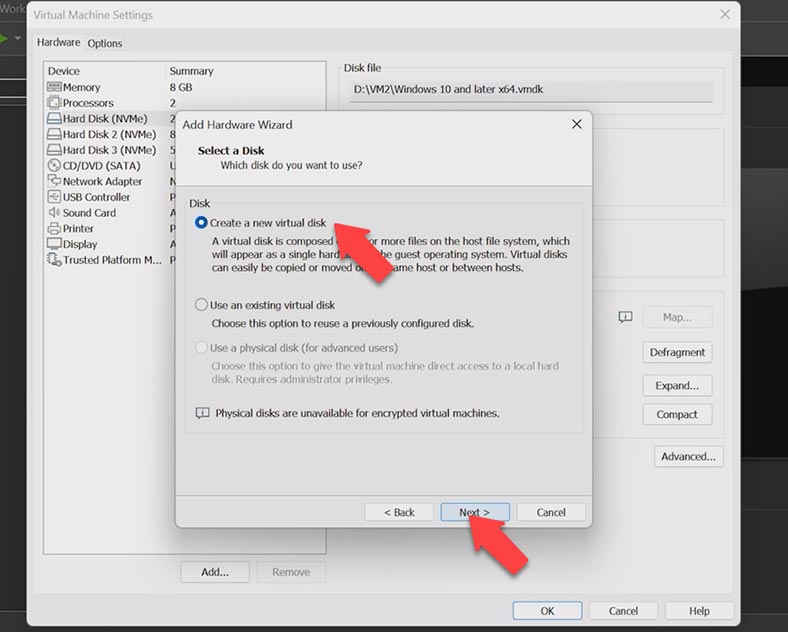
In this Select Disk window, you can give a path to an existing virtual disk, or create a new virtual disk. In my case, I’ll be creating a new one, so I click Next.
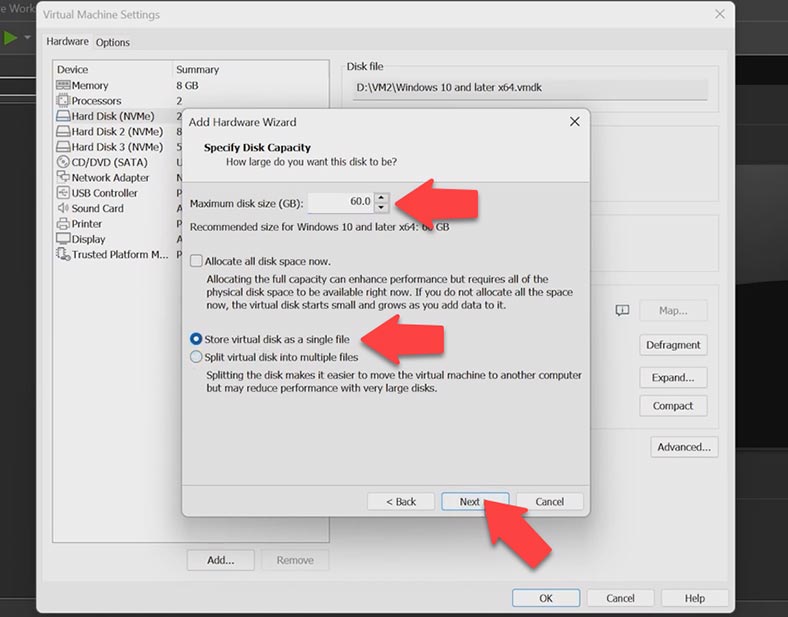
At the next step, set the virtual disk capacity and choose the option Store the virtual disk as a single file, and click Next.
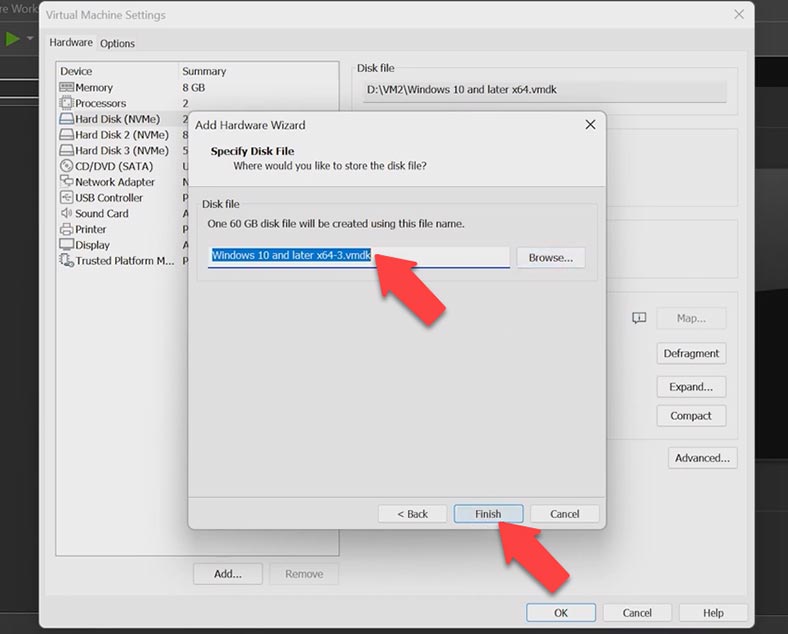
Give the path and name for this disk, click Finish. The virtual hard disk is now created and displayed on this list. Click OK to leave the settings.
After that, the operating system recognizes the freshly created virtual disk as an unallocated space without partitions. We’ll fix it by initializing the disk. Click on the Start menu and go to Disk Management. The integrated utility has detected the new disk automatically and suggested to initialize it, so click OK.
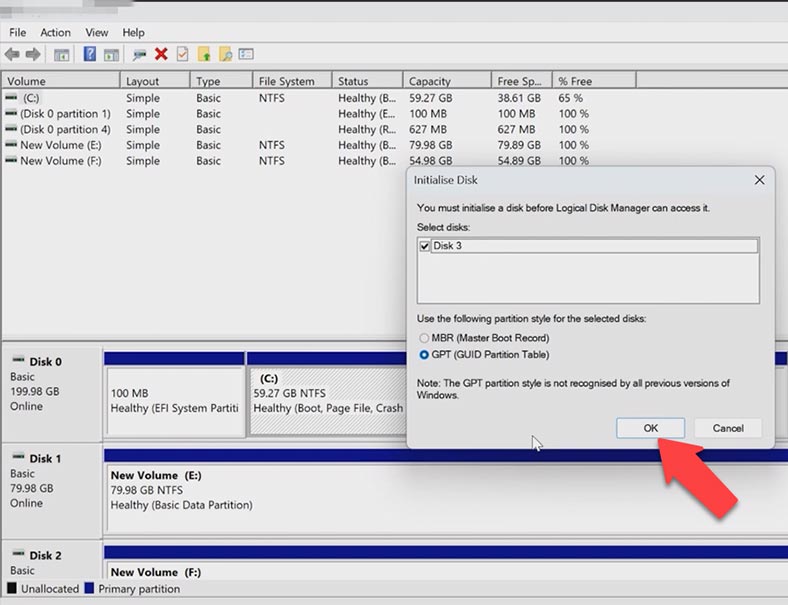
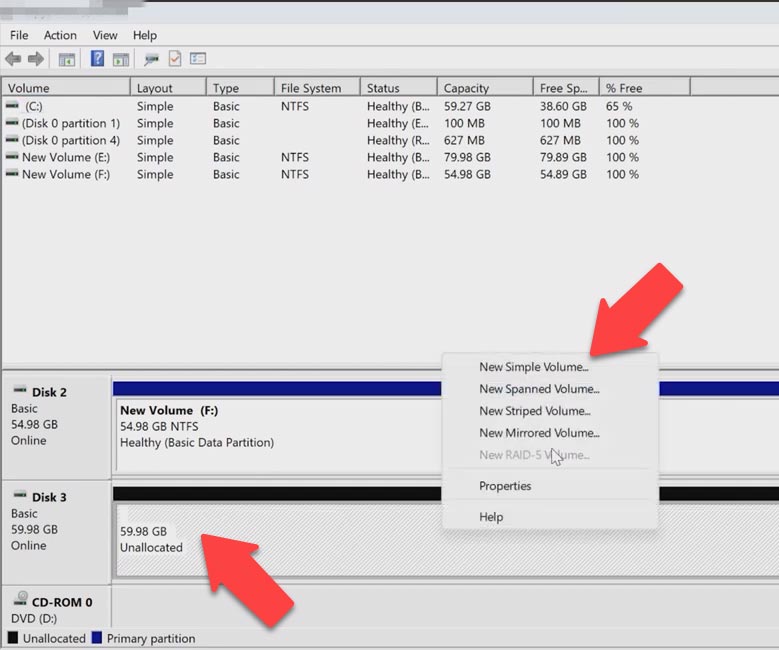
Go back to the utility window. Click on the disk with unallocated space and choose New Simple Volume, click Next, give the volume size, choose a disk letter and click Next.
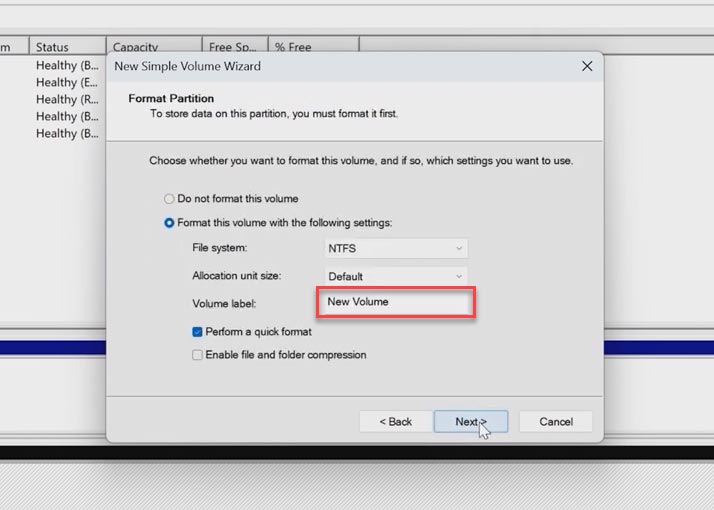
In the next window you can change the volume label; click Next and Finish, which formats the disk and makes it ready to use.
Oracle VirtualBox
When creating a virtual machine in the VirtualBox tool, it is difficult to calculate the exact disk space you will need after the operating system is installed. There are two methods of adding free disk space to the virtual machine without removing its data and the virtual machine image itself.
Beginning with VirtualBox 6.0, we can use the graphical feature for resizing virtual disks. To use it, start the program, go to the File menu / Virtual Media Manager.
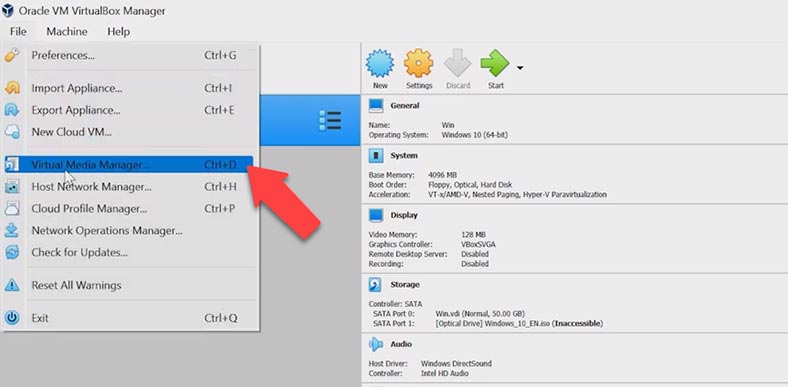
Next to the operating system, you will see the disk virtual size. Select your virtual machine, and then drag the slider, or just type the required size in this field and click Apply.
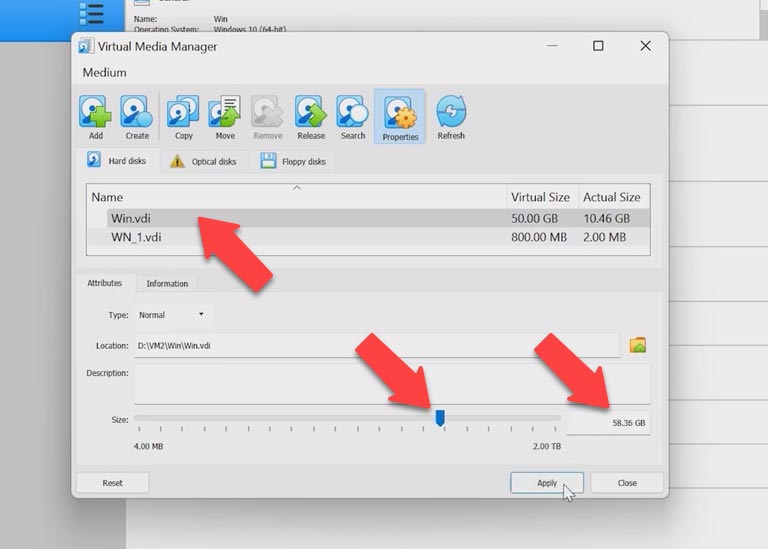
Close the Virtual Media Manager and start the operating system. Extend the volume with the help of Disk Management in Windows as shown in the previous example.
If you have a different version of VirtualBox (older than version 6.0), then you need to use the VBoxManage command in the command prompt to increase the disk size.
Before you start, shut down the virtual machine and launch the command prompt as administrator.
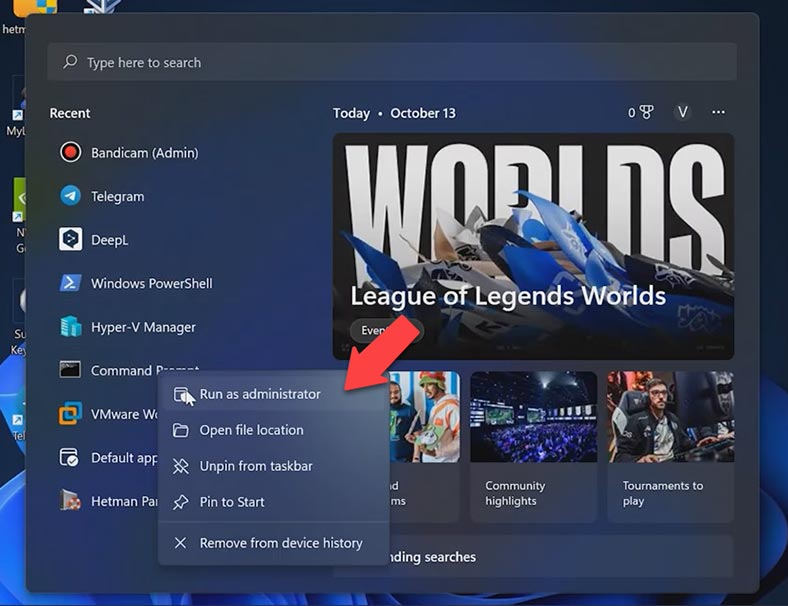
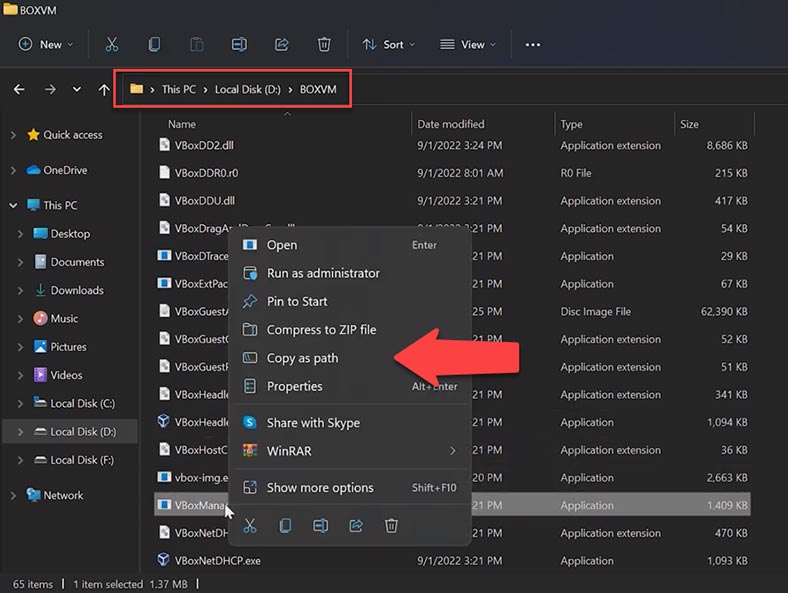
After that, navigate to the root folder containing the program and find a file with the name VBoxManage.exe, right-click on it and copy its path.
Then switch to the command prompt, paste this path and add this command: modifyhd.
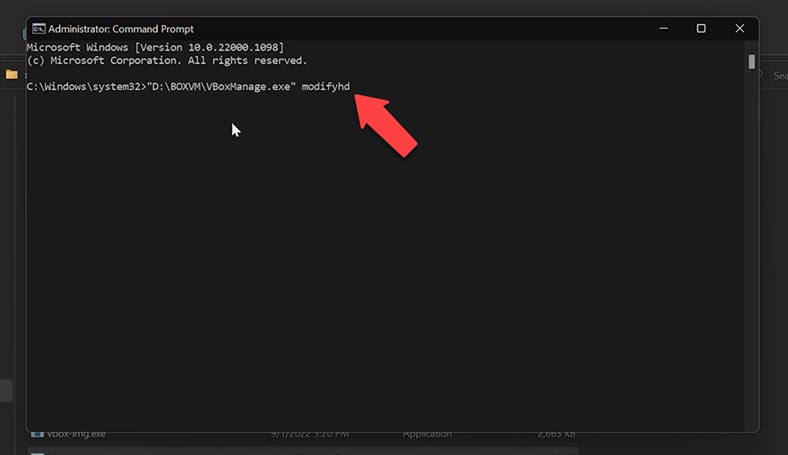
Now you should give the path to the existing virtual disk, the size of which you need to increase. Go to the folder where your disk is stored and copy its path, paste it into the command prompt and type the command resize, adding the necessary amount of additional disk space.
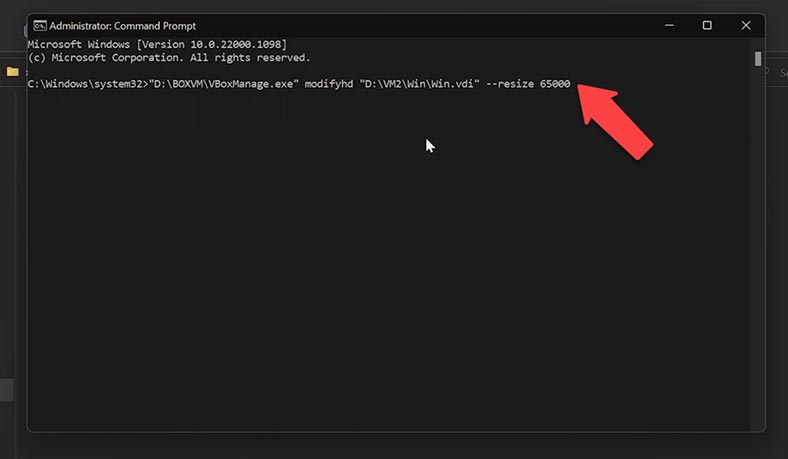
After that, switch to the program and run the guest OS to extend the volume in the same way as we did it in the previous method. Now that the disk has increased in size, you can continue your work.
If this disk runs out of free space soon, you can add – or even create – a second disk to store your data. You can do it quite easily. Switch to the program, select the required virtual machine, then access its settings, open the Storage tab. Next to the SATA Controller tab, click on the Add button.
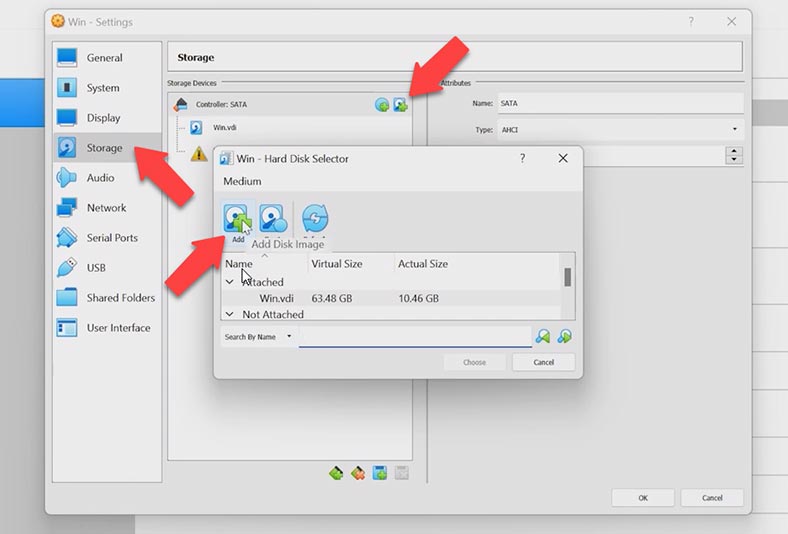
You can add an existing disk or create a new one. For the latter option, click on Create, don’t change anything in the wizard window and just click Next. Choose a dynamically allocated disk so that it takes less space.
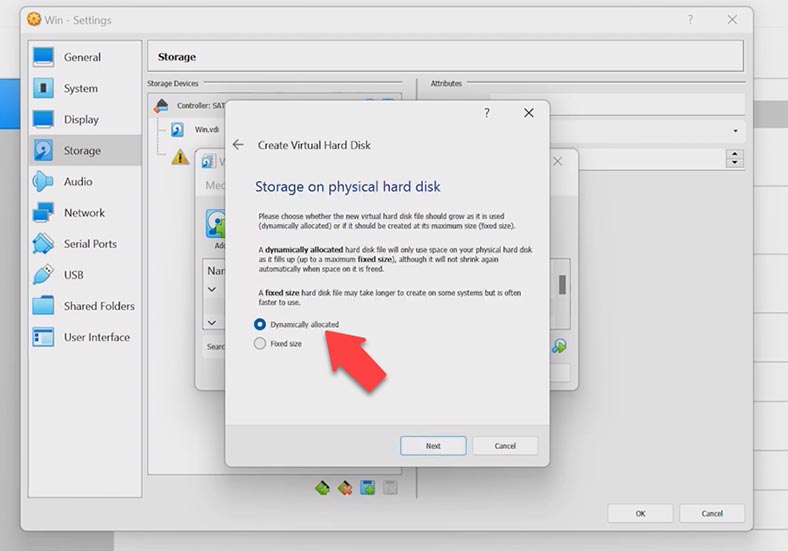
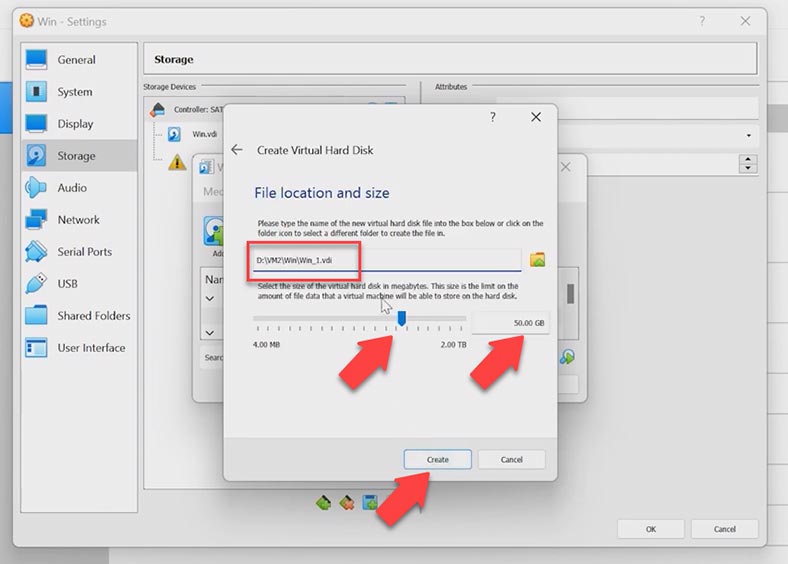
Specify disk location and size, and then click Create. Find your disk on the list and click Choose, so the new disk will be added. Click ОK and run the virtual machine.
In the virtual machine, the disk will be empty and without any file system. You will have to initialize the disk just like we did it before.
Microsoft Hyper-V
The last program we’ll be exploring today is Hyper-V. The opportunity to change disk size dynamically has been available in Hyper-V since Windows Server 2012 R2. The feature called Online VHDX Resize lets you increase or reduce the size of a virtual disk.
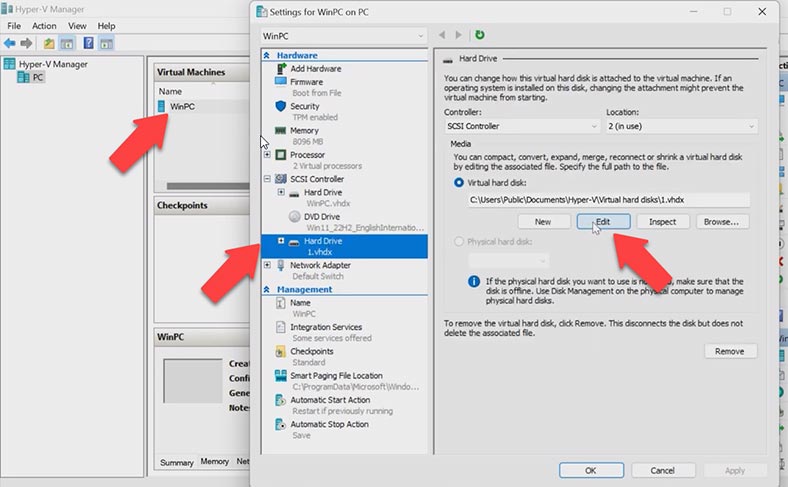
You can modify the size of any Hyper-V disk, be it fixed-size or dynamic. To do it, open Hyper-V virtual machine manager, select the required virtual machine, open Settings, choose a virtual disk and click on the Edit button.
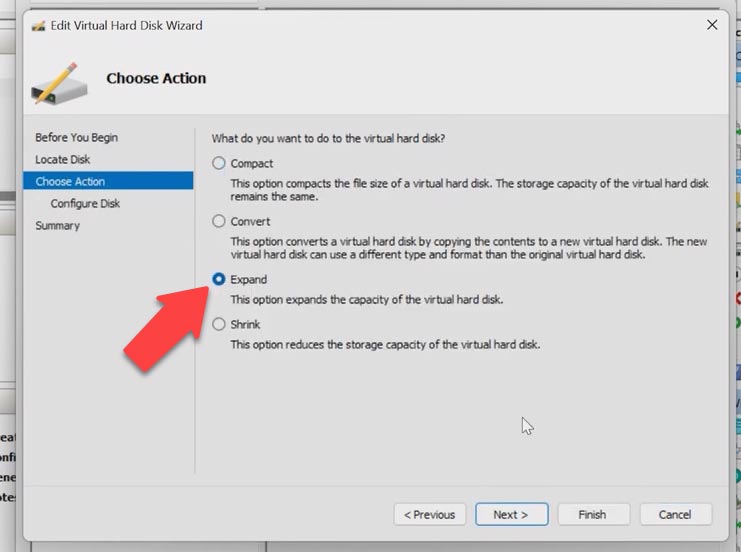
In the wizard window that opens, choose Expand and give the new size for the hard disk.
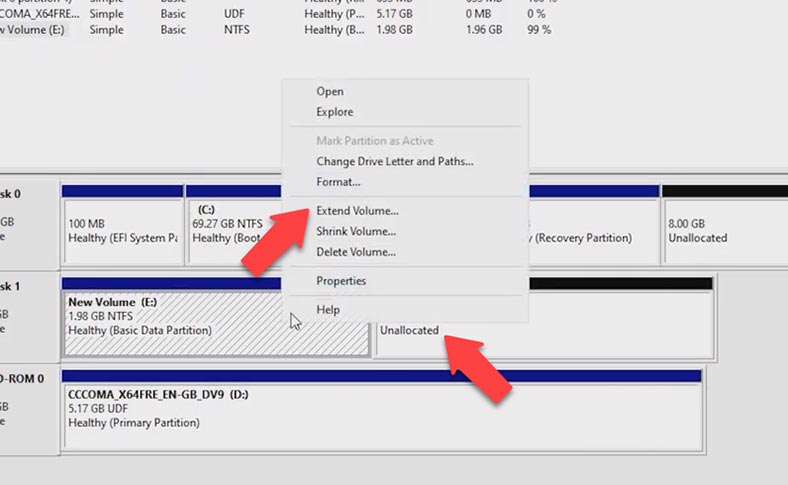
Now start the guest OS, open the Disk Management panel. There is an unallocated area on the disk. Click on the volume that needs to be extended. Keep in mind that you can only extend the volume which is located on the left of the unallocated space. Now this disk has increased in size.
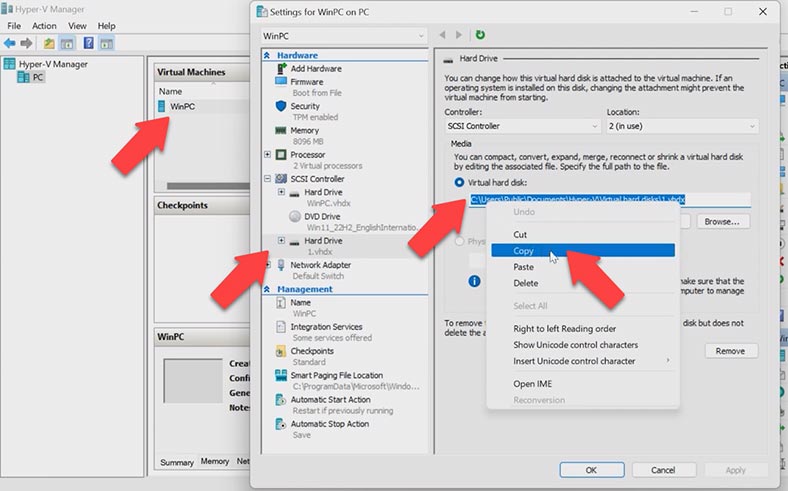
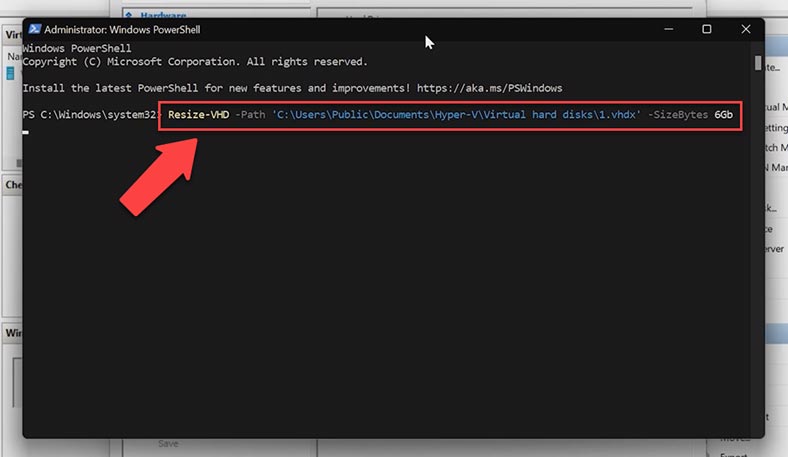
Also, you can modify the size of a VHDX disk with PowerShell. You need to get a full path to the virtual machine disk. Go to Hyper-V Manager, click on the virtual machine, go to Settings, look at the SCSI Controller tab: by clicking on the disk, you can see its path. Copy it.
Run PowerShell as administrator, type the command Resize-VHD -Path and paste the path to the virtual machine disk; after that, add the command -SizeBytes and give the required size to which the disk should be expanded. Remember that if you give a virtual disk size smaller than the actual space it occupies on the disk, you will get an error. After that, you’ll have to extend the volume in the Disk Management tool.
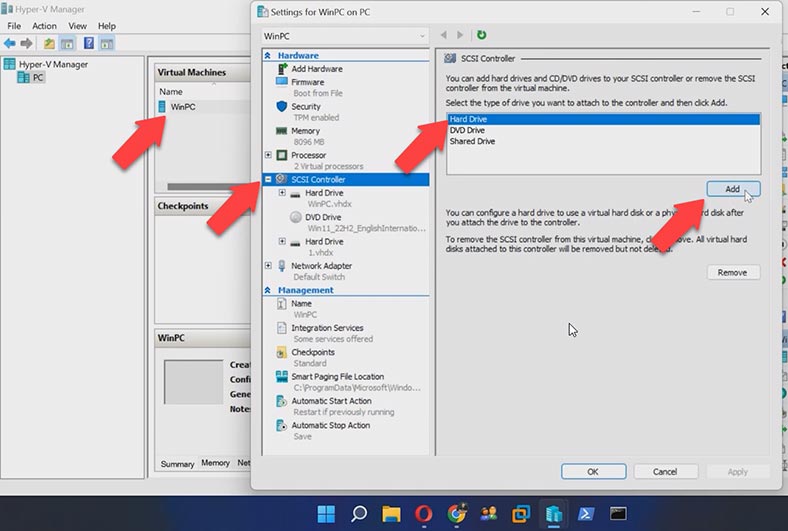
Just like with all other hypervisors we have explored today, in Microsoft Hyper-V you can add a virtual hard disk or create a new one. To create a new virtual disk, start Hyper-V Manager, right-click on the virtual machine and open its settings. In the SCSI tab, specify the disk type and click Add, and then click New.
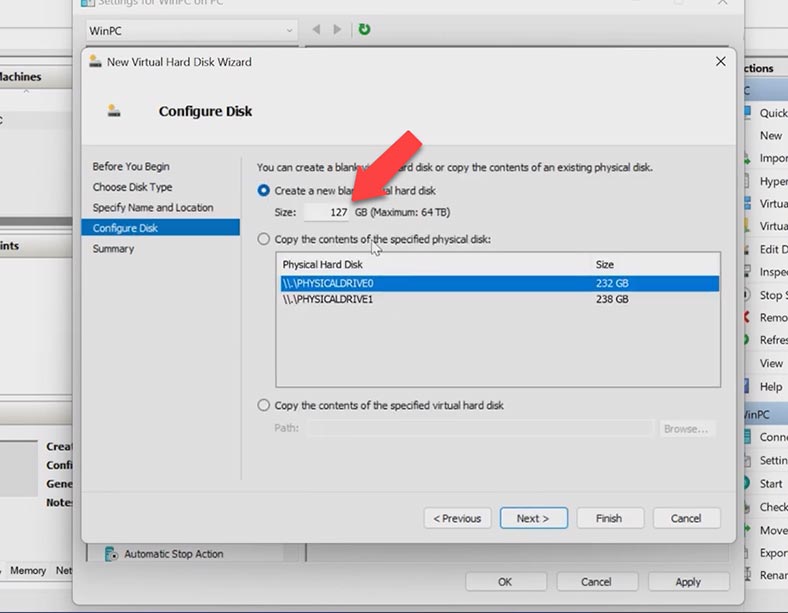
In the New Virtual Hard Disk Wizard, click Next. At the second stage, select Fixed size. Give the disk name and path, and at the final stage, click Finish and Apply.
When you start the virtual machine, the new disk should be initialized and partitioned so that you can use it in your work. Just follow the same procedure for initialization as before.
Conclusion
Also, I would like to remind you: if you have lost your virtual machine data for any reason, you can visit our channel to find a good video about recovering virtual machine data.


