Dead Dell PERC H310 Controller? Recover Your Data with These Steps
In this article, we’ll explore how to recover data from a RAID system with a dead Dell PERC H310 controller. Whether you’re facing data loss due to a controller failure or seeking proactive measures, this tutorial provides expert insights and practical solutions. From diagnosing issues to implementing recovery strategies, we’ll equip you with the knowledge and tools necessary to retrieve your valuable data and mitigate downtime effectively.
- 1. How to create a RAID on Dell Perc H310 controller
- 2. How to recover data from a crashed RAID after controller breakdown
- 3. How to build a RAID manually after the configuration was erased
- 4. Conclusion
- Questions and answers
- Comments
The controller is a key component for organizing and managing your RAID system, and when it stops working, you might face grave consequences.
When the controller is down, your array is no longer operable and your data cannot be accessed. There is a wide variety of things that may knock out a controller: hardware failures, all kinds of damage, defects and even wrong configuration. As a result, you lose access to important files, documents or media content. If you faced this kind of problem, don’t give way to despair: there are certain methods and tools to help you cope with the problem and restore access to your data.
We will explore a situation when all problems are caused by the faulty Dell Perc H310 controller, and find out how to retrieve data from a crashed RAID system. Let’s suppose you have taken all possible steps to make sure that all troubles are caused by the controller. If the controller is not to blame, don’t worry: this tutorial is good for any scenario when information is lost from hard disks.

How to Recover Data from a RAID System With a Dead Dell PERC H310 Controller
1. How to create a RAID on Dell Perc H310 controller
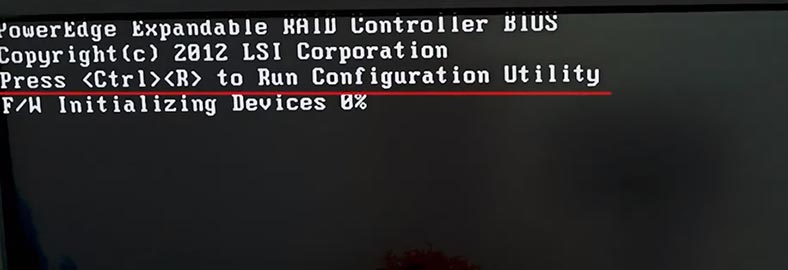
For better understanding of the recovery process, let’s explore how to create a RAID system on this specific device. When creating a disk array, we’ll pay attention to the settings you may need to know in the course of recovery. To build a RAID system, open the controller BIOS. For this model, use the key shortcut Ctrl + R.
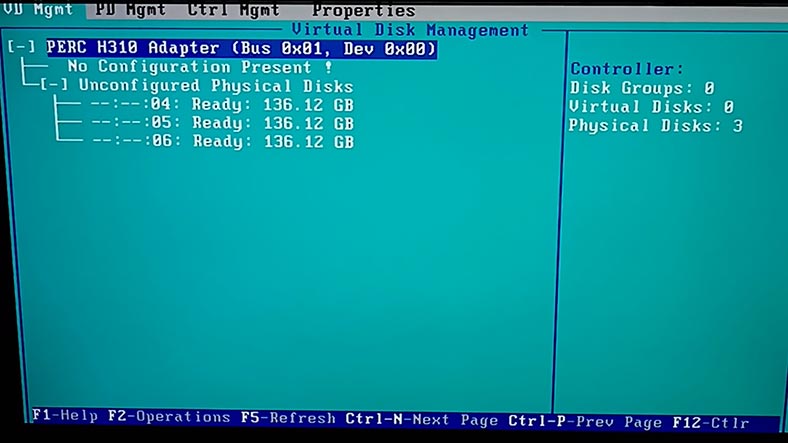
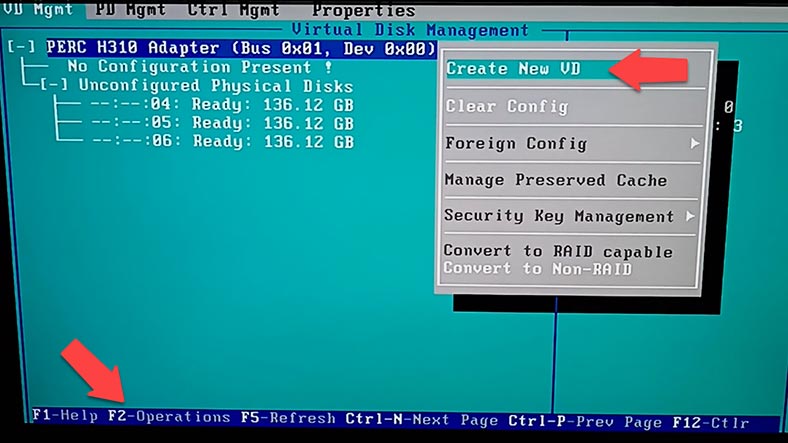
When the hardware is initialized, the BIOS window appears. In the virtual disk management tab (VD Mgmt), you will see the connected drives.
To create a new array, press F2 on your keyboard. Then choose Create New VD.
In the virtual disk manager window that opens, select the RAID level using the arrow keys to navigate the list, as well as the Enter and Tab keys. Press Space to select a disk.
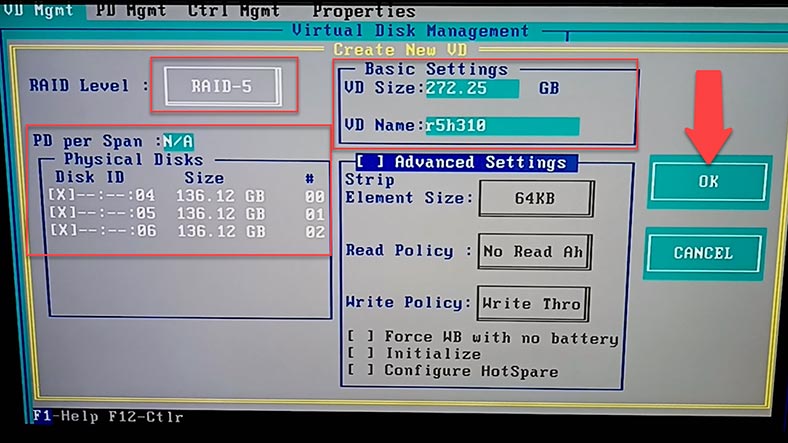
Select the level, choose disks, give the virtual disk name, and add advanced settings if necessary. Take note of your array parameters – you may need to enter them during the recovery process. For confirmation, jump to the OK button and press Enter.
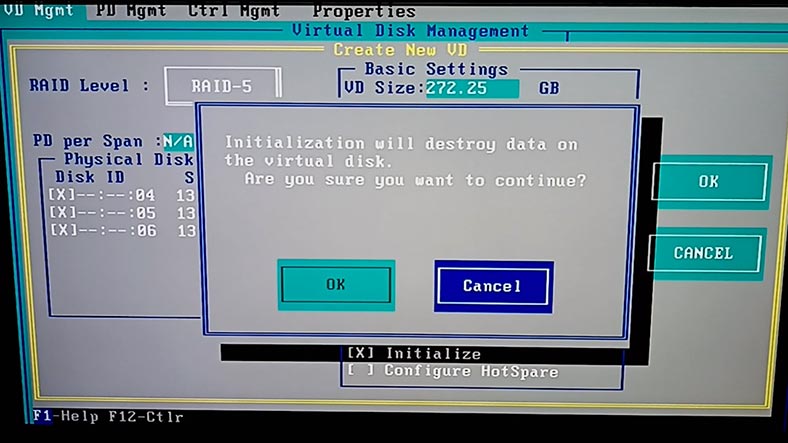
As a result, you will see a warning that all data on this virtual disk will be erased, so click OK to confirm it. After that, the process of disk initialization begins. When it’s over, restart the computer. Now the RAID is ready for work.
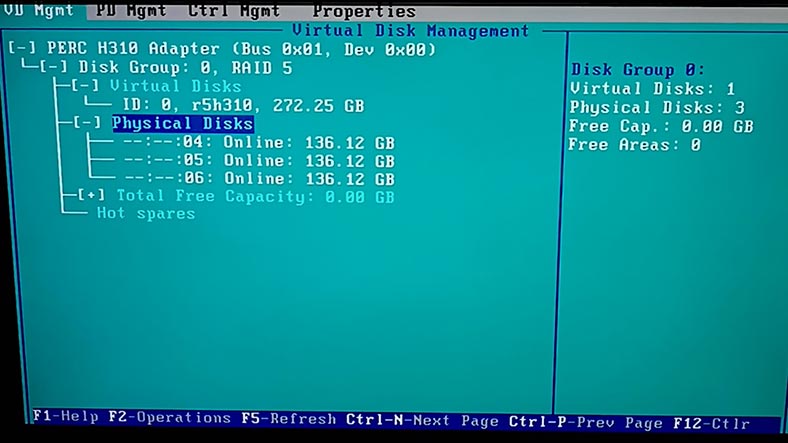
Now that we have examined and remembered RAID system settings, let’s explore the recovery process.
2. How to recover data from a crashed RAID after controller breakdown
As we mentioned before, when the controller breaks down, the array becomes inoperable, and this means you lose access to all your files. To restore the RAID operability, you will need a controller of exactly the same model, which will allow you to rebuild the crashed RAID with the old configuration and without losing any data. Also, you can try using a compatible controller model which can upload a third-party configuration and restore the RAID.
However, before taking any steps in this direction, you should study this topic carefully, because any mistake can make the recovery process even more complicated.
If you don’t have a chance to replace the controller, or the replacement operation didn’t help you to rebuild the crashed array, use a specialized recovery tool – Hetman RAID Recovery.
This utility supports all popular RAID types, most file systems and various array patterns used by various RAID controllers.
For data recovery, you need to connect all the hard disks to the motherboard of a Windows computer.
If they are SAS drives, you will need special adapters or, for example, an HBA controller which allow to connect the drives directly without using the RAID technology.
| Parameter | Value |
|---|---|
| Interface Type | SAS (Serial Attached SCSI) |
| Data Transfer Speed | 6 Gbit/s, 12 Gbit/s, 24 Gbit/s |
| Capacity | From 300 GB to 18 TB and more |
| Spindle Speed (RPM) | 7,200 RPM, 10,000 RPM, 15,000 RPM |
| Mean Time Between Failures (MTBF) | 1.2 million hours and more |
| Purpose | Servers, data storage, high-load systems |
| Advantages | High reliability, stability, good scalability |
| Disadvantages | Higher cost compared to other HDD types, requires specialized equipment |
When connecting the disks with a RAID controller that support direct connection, you need to clear the old configuration to switch BIOS to Non-RAID mode. As a result, it may complicate the recovery process, since this operation erases the beginning of the disk and destroys service information required to identify RAID settings. On the other hand, an HBA controller lets you connect the disks directly without clearing the RAID configuration.
Having connected the disks, check if the program recognizes all connected devices. If only some of them are displayed, open the Disk Management app and review the list.
If the system can’t see all the disks, you’ll have to connect them one by one and create disk images, and then recover data from those images.
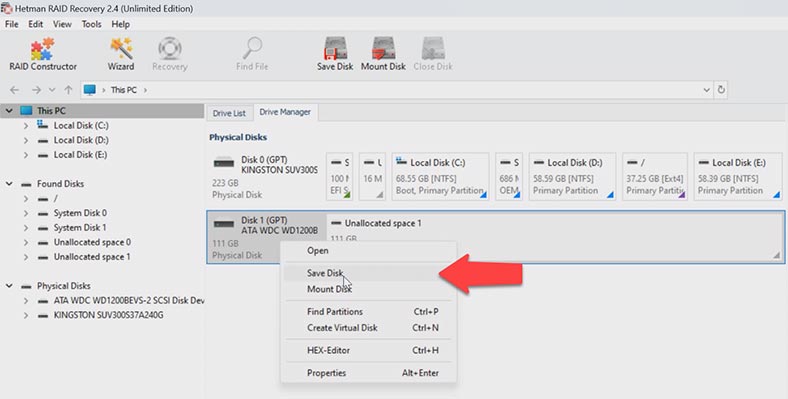
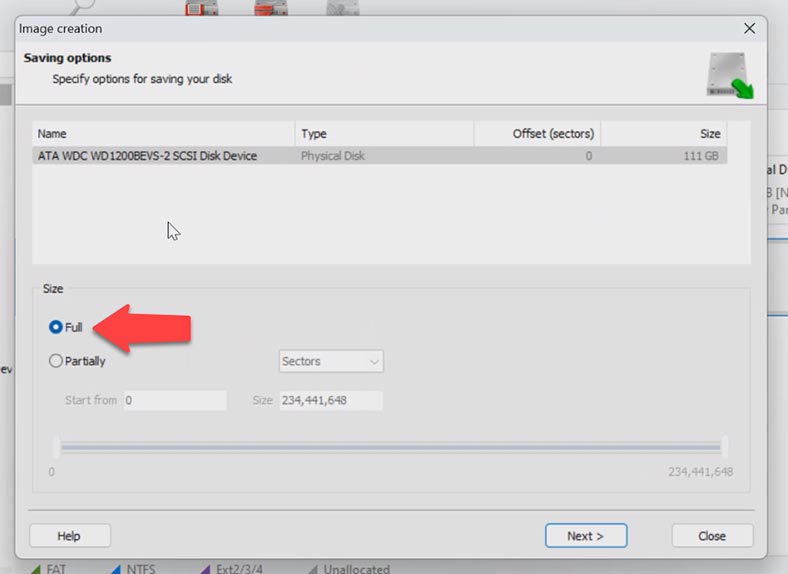
To create a disk image, right-click on a disk and choose Save Disk. Make sure that the option to save the entire disk is active and click Next.
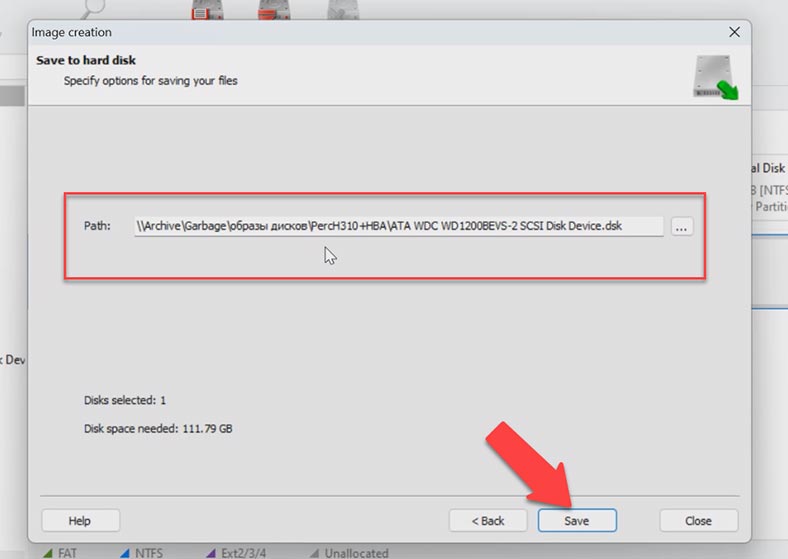
Choose to save it to hard disk give the path where to save the image. You can also save it to a network folder. Click Save.
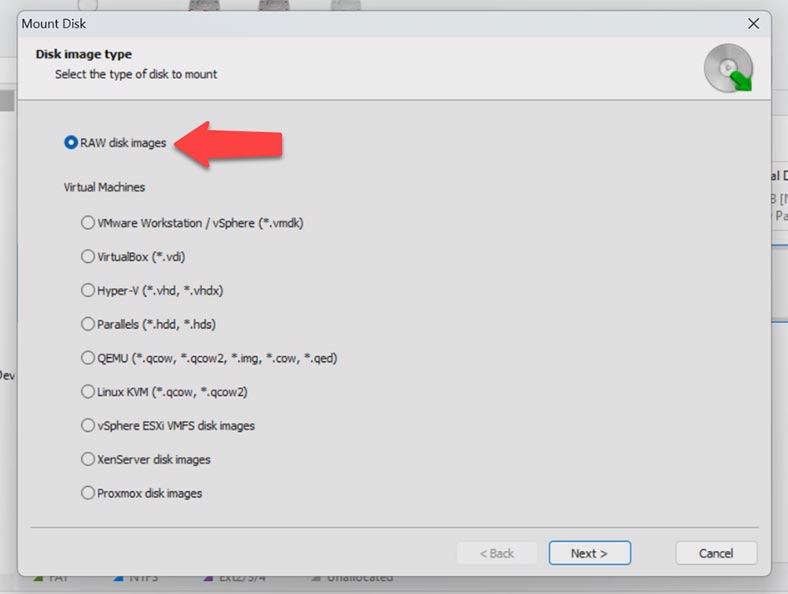
Having saved the images for each disk, you should mount them in the utility. Click the Tools menu – Mount Disk – RAW Images.
Select the correct images and click Open.
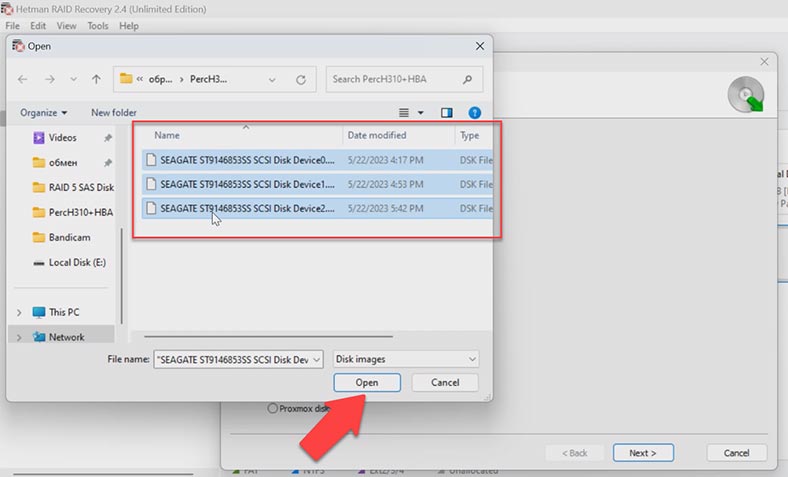
As a result, the utility will use the images (as if they were physical disks) to rebuild the RAID automatically. Select it and check its parameters below to see if the utility has built it correctly. These are the same properties that we looked at when the array was created a bit earlier.
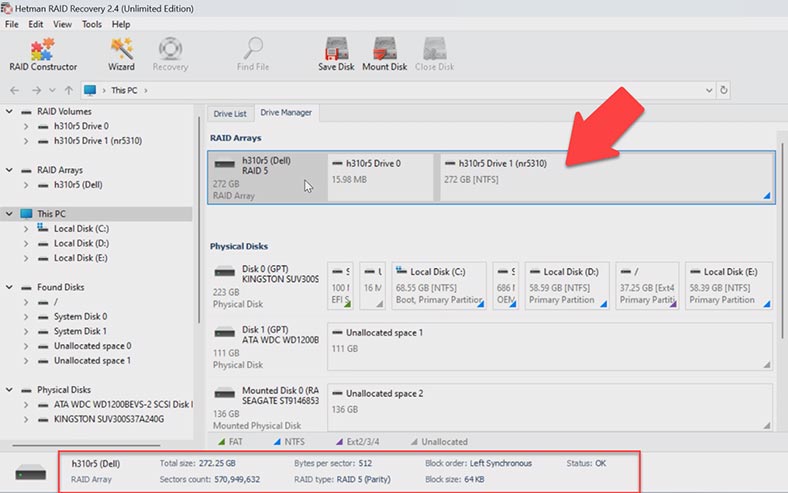
If the program rebuilt the array correctly, right-click on the volume and choose Open. Choose the search type, Fast scan or Full analysis.
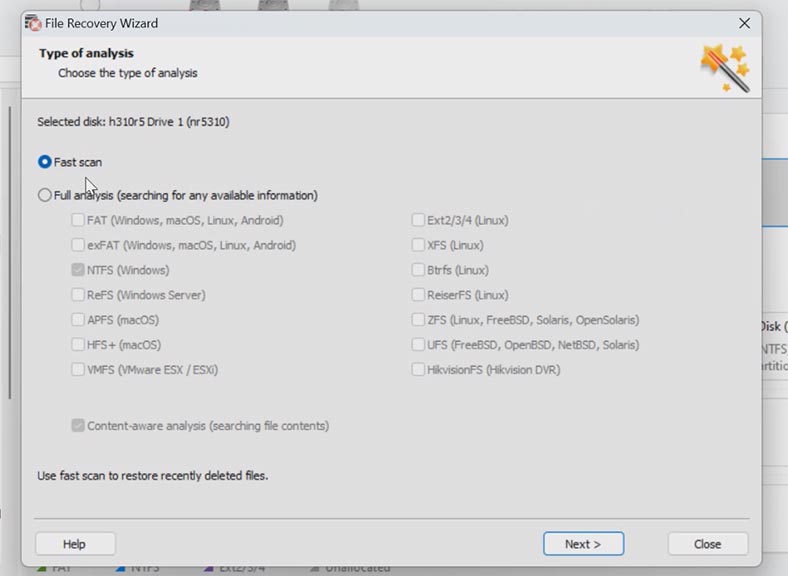
For most simple cases, Fast scan is enough. You can see that the program has no difficulty in rebuilding the RAID from the saved SAS images and finding the files that used to be stored on the disk array. It has also found the files that have been deleted (they are marked with a red cross). You can use the preview window to see their contents.
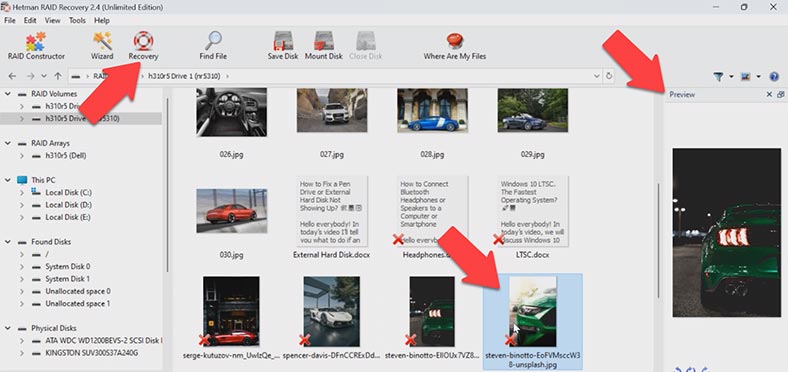
Select all the items you want to recover and click the Recovery button. Give the path where to save them, chose the disk and folder – and click Recovery again. When the recovery process is complete, you’ll see all the files in the specified directory.
3. How to build a RAID manually after the configuration was erased
In some situations, the program may fail to rebuild the RAID automatically. It can happen when the service information on the disks is erased, so the program cannot identify parameters of the crashed RAID. For such situations, the program has the manual mode for rebuilding with RAID Constructor. This feature will help you rebuild the array if you cleared a third-party configuration or erased the beginning of the disk.
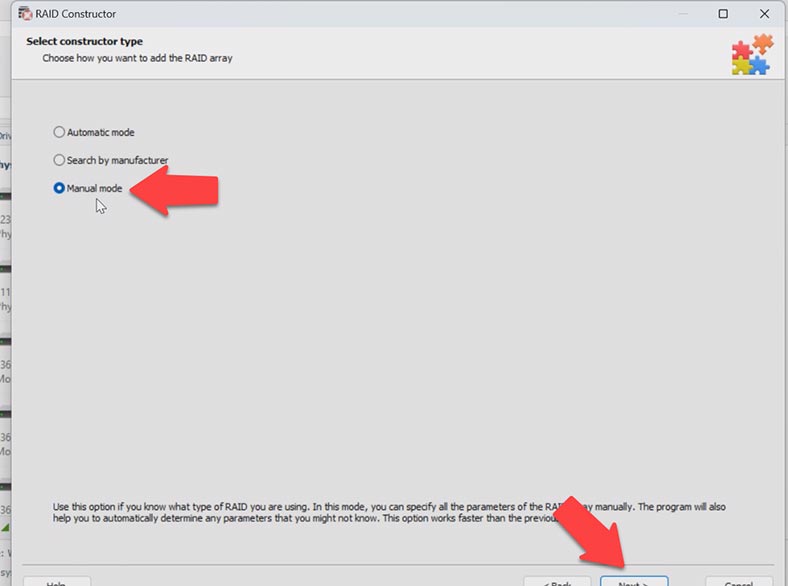
To use this mode, you need to know all the information about the array. Open the Constructor – choose Manual mode. Specify the properties – RAID level, block order and size. Add the disks it used to include.
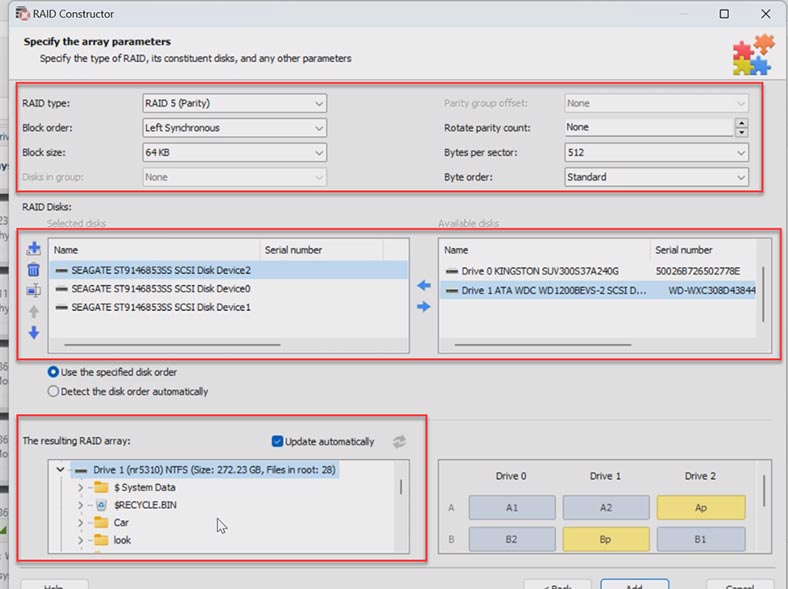
In some situations, you may have to specify the offset which tells you where the beginning of the disk is located. After that, specify the disk order.
When you give all the parameters you know, you will see your RAID, and if all properties are correct, you will see its folders here. Click Add, and it will appear in the Drive Manager immediately. Now start the scan, search for files, and recover the ones you need.
4. Conclusion
Data recovery after RAID controller failure is a task that requires special attention. If you are not too confident of your skills, then it’s better to contact professionals. Any wrong actions can erase the remaining information completely. I hope that our advice and recommendations will help you restore access to important files and minimize losses.
| Program | SAS Disk Support | Platforms | Features |
|---|---|---|---|
| Hetman RAID Recovery | Yes | Windows | Support for various RAID types; Data recovery from SAS disks; Support for file systems: NTFS, FAT, exFAT, ReFS, HFS+, Ext2/3/4, Btrfs, XFS; Automatic RAID configuration detection; Recovery of damaged or formatted arrays; File preview before recovery |
| R-Studio | Yes | Windows, Mac, Linux | Automatic RAID configuration detection; Data recovery from SAS disks; Support for various file systems; Disk image creation |
| DiskInternals RAID Recovery | Yes | Windows | Data recovery from SAS disks; Recovery of damaged arrays; Support for various file systems; Data recovery without RAID controller |
| EaseUS Data Recovery Wizard | Yes | Windows, Mac | User-friendly interface; Data recovery from SAS disks after formatting or system failure |
| Stellar Data Recovery | Yes | Windows, Mac | Data recovery from SAS disks; Recovery from various RAID types; File preview; Support for various file systems |
| UFS Explorer RAID Recovery | Yes | Windows, Mac, Linux | Support for SAS disks; Data recovery from various RAID types; Recovery of damaged arrays; Disk image creation |


