Qnap QTS Data Backup Tutorial: Protect Your Files
In this comprehensive tutorial, discover how to protect your valuable data by creating a Qnap QTS data backup. Whether you’re a novice or experienced user, this step-by-step guide will walk you through the process of backing up your files with ease. From setting up the backup schedule to verifying the integrity of your data, we cover it all. Take the first step towards securing your digital assets!
- How to back up your system configuration
- Creating a data backup
- How to recover files from backup
- How to configure data sync
- Google Photos backup - Multi-Application Recovery Service
- Recovering data with Hetman RAID Recovery
- Addressing Common Queries
- Conclusion
- Questions and answers
- Comments
There are lots of reasons why you might need to create a backup copy of a shared network resource and QNAP NAS system configuration. First of all, it’s the question of data safety. There might be all kinds of unforeseen situations such as hardware failures, virus attacks or accidental file removal. In any of these cases, you can lose important documents, photos or other valuable files as long as there is no backup at hand.
Over time, even the most reliable equipment becomes older and can suffer from unexpected problems. Creating a backup copy of your files will prevent data loss if a hard disk fails or any other hardware issues arise. It’s a kind of safety precaution to ensure uninterrupted work and help you avoid long periods of recovery.
And for business, working without interruptions and preserving data is vitally important. Backups help to organize continuous work while providing access to critical data even in case of emergency.

Qnap QTS Backup Creation: Safeguard Your Data Now
How to back up your system configuration
For starters, let’s find out how to back up Qnap QTS system configuration.
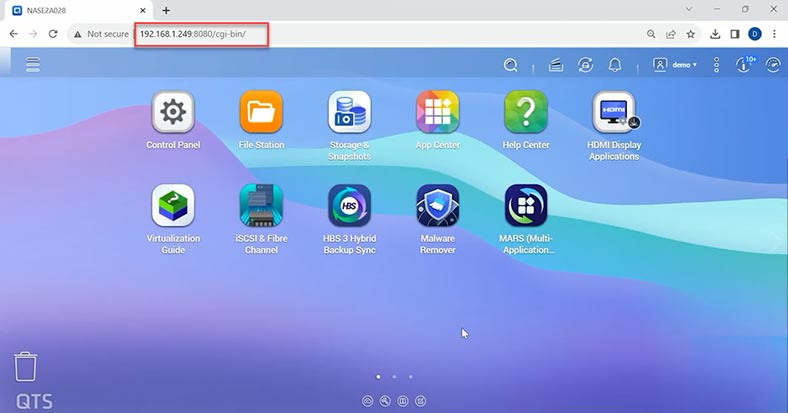
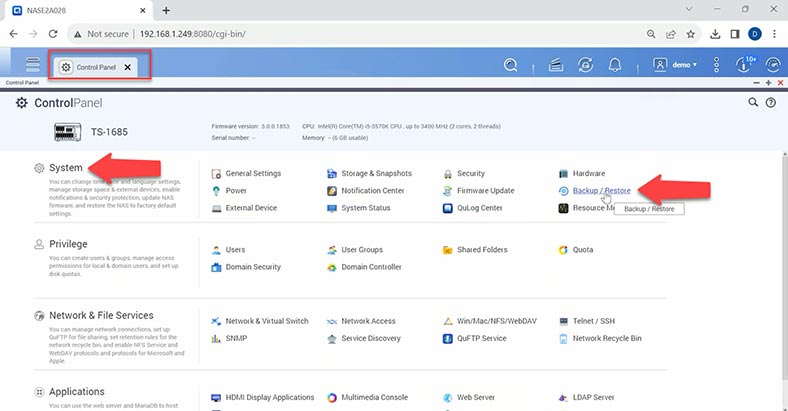
Qnap provides an integrated tool for system configuration backup. To find it, open the admin panel for your storage system, then go to the menu and then – to Control Panel. Find the System tab – open Backup / Restore.
To create a copy of the system configuration just click on the Backup button.
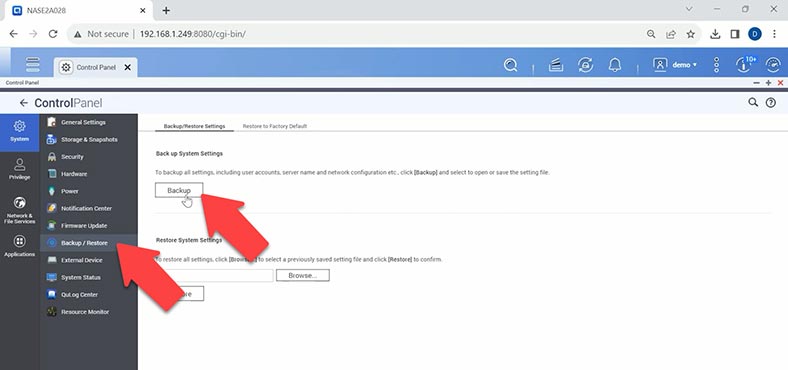
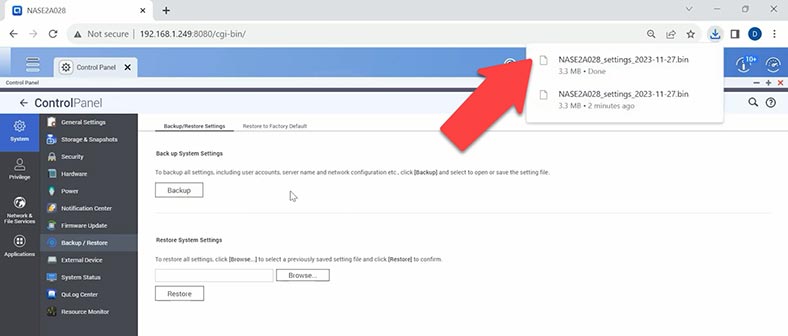
This operation will create copies of all NAS settings including user accounts, network configuration, application settings etc. The backup file will be saved to your computer and you can find it in the Downloads folder.
And to restore the network storage configuration from such backup, look below to find the Browse button, click on it and give the path to your backup file – click Open. After that, click on the Restore button. This will start the recovery process. When it’s over, all QTS operating system settings will be loaded.
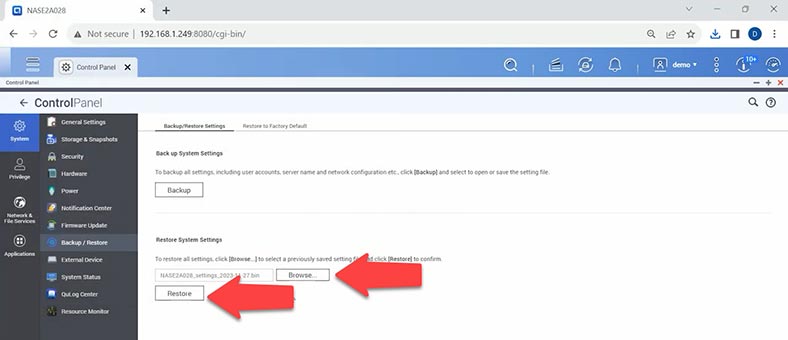
This is how you can restore operability of your system, or restore all settings on a new storage device after the old one broke down, or restore the previous system configuration after an unsuccessful attempt to change some settings for your NAS device.
The system has to be restarted for the changes to apply. In the window that appears, click Yes to restart.
Creating a data backup
Also, it’s very important to back up your data regularly in order to protect it against loss.
QNAP offers various backup solutions to ensure availability of your data. You can start creating your backups using the tools provided in the App Center. Both cloud services and local storage options can be used to store your backups.
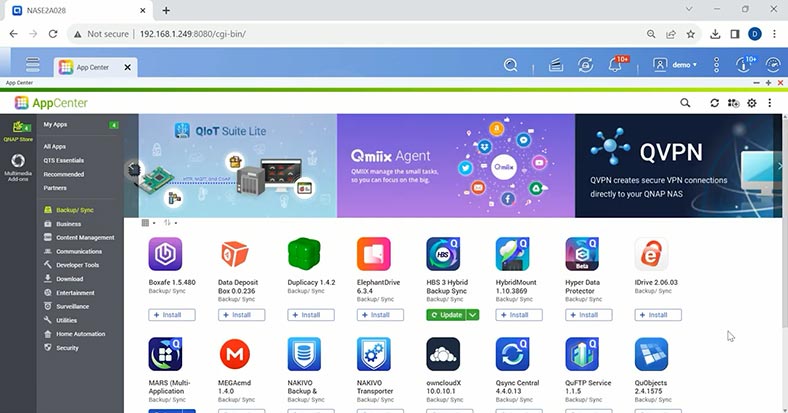
Typically, an app called “HBS 3” (Hybrid Backup Sync 3) is used for backup purposes on QNAP devices running the QTS operating system. Open the App Center, find Hybrid Backup and install it.
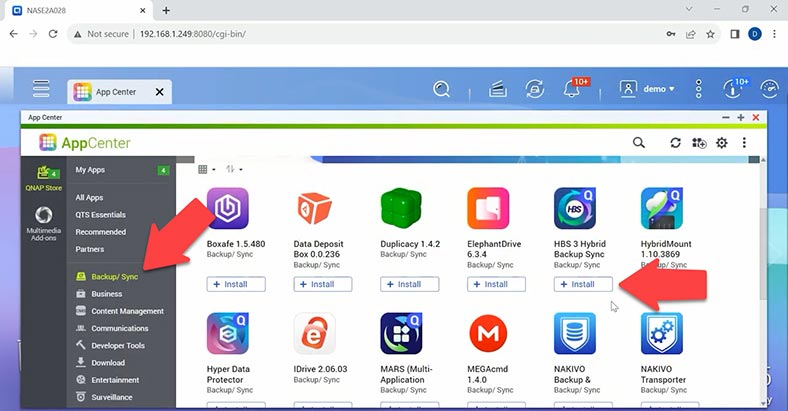
Hybrid Backup Sync is a versatile solution for data backup and emergency recovery. You can create several jobs for backup and sync between a local NAS device and several target storage devices (including a remote NAS device, external devices and cloud storage services). Hybrid Backup Sync improves effectiveness of data deduplication and encryption for backup purposes. This useful tool also includes various features to simplify job configuration and management.
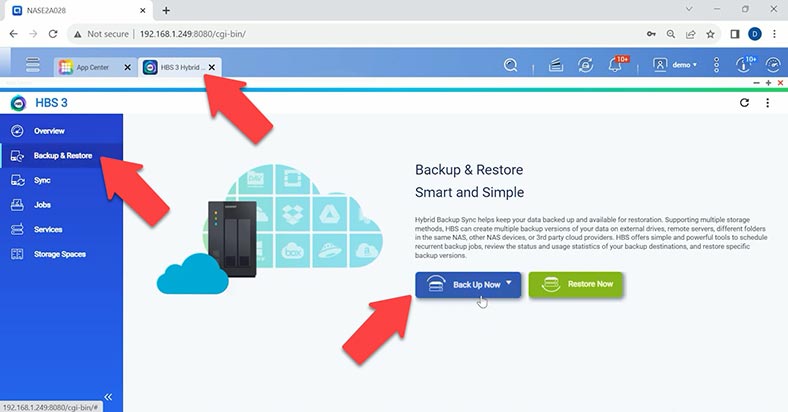
Open the tool, and in the window that opens, go to Backup & Restore. Now click on the button Back Up Now, and then – New backup job.
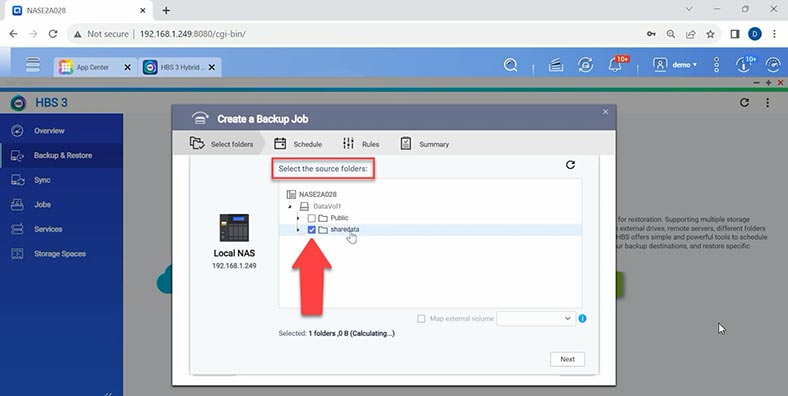
After that, choose the source folder which should be backed up and click Next.
Now you need to select the destination storage space – it can be a NAS device or a cloud storage. If you choose Local NAS, the backup will be downloaded to another directory of the same storage device. It could be another hard disk or even another folder. Choose where you’d like to save the backup and click OK, then click Next.
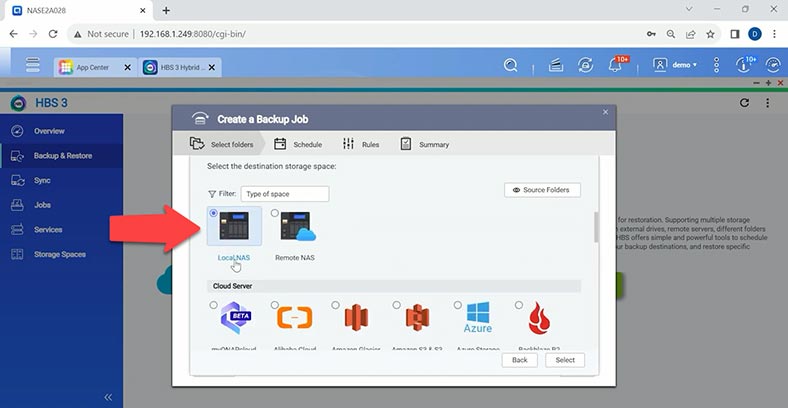
After that, you’ll be suggested to set the backup job schedule. It’s quite easy: just choose the time and frequency and so on. For one-time backup, check the option No schedule and the option Back Up Now – Next.
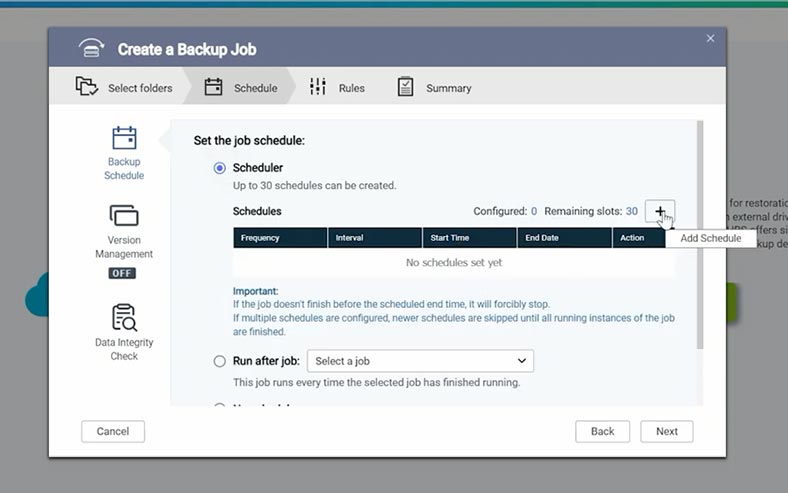
Also, you can configure additional filters, policies and settings. We recommend to enable “Check file contents” option to ensure their integrity – Next.
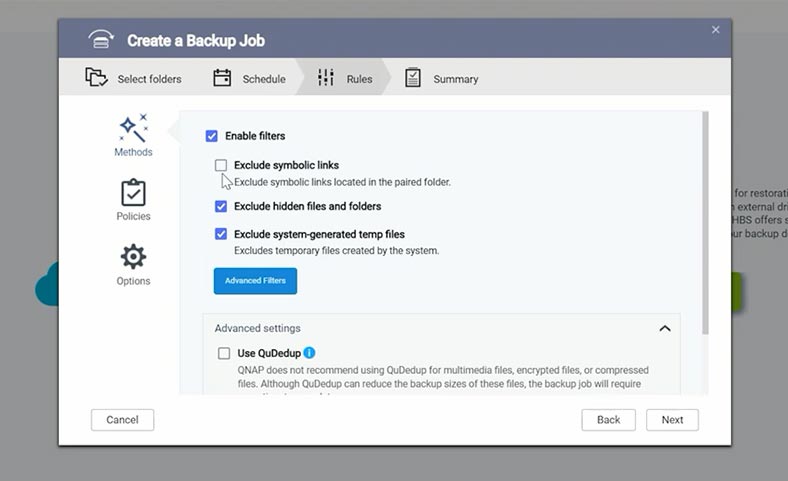
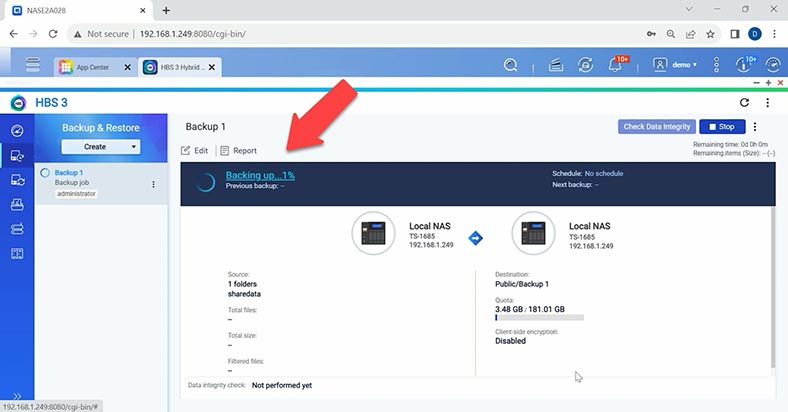
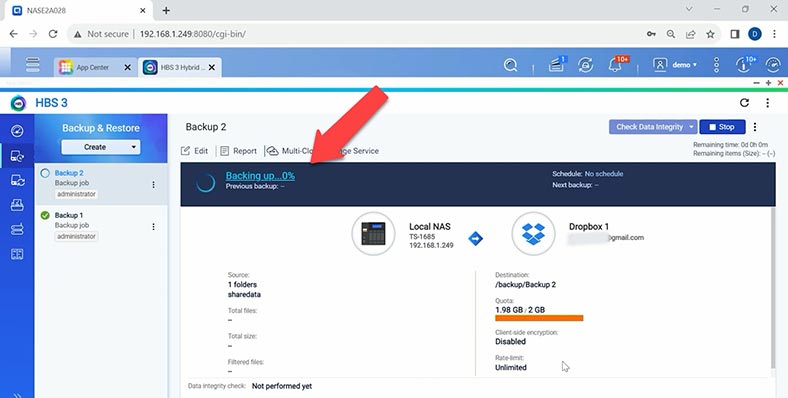
Click Create to start the process. It begins the process of creating a backup copy in the directory you have chosen.
Remote NAS – if your network includes one more NAS storage device, you can choose to save your backup there. You’ll have to give your IP address, port and credentials for the user that has administrator rights. Other settings are similar – schedule, filters, policies and so on. As a result, the data backup copy will be downloaded to another NAS.
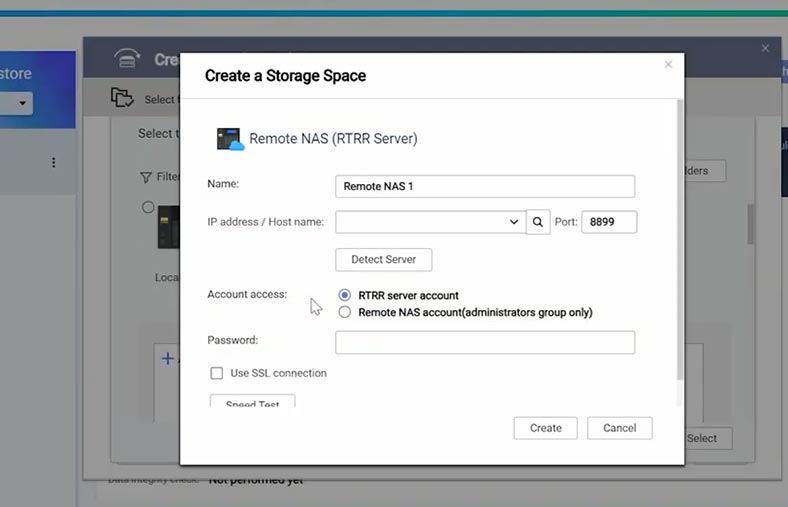
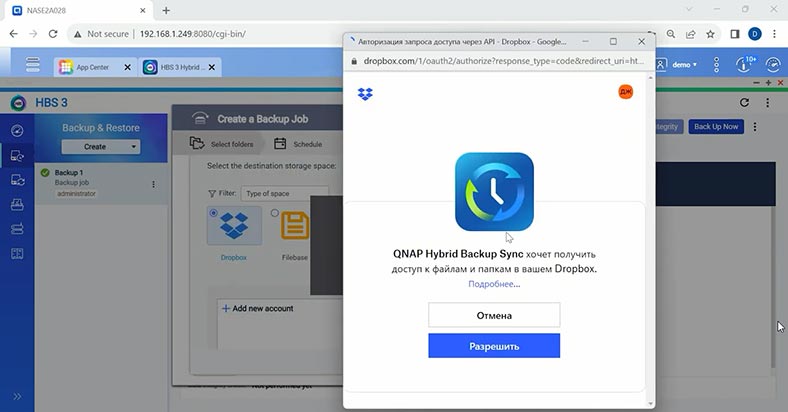
The other storage type available to you is a cloud service, and there is large list of possible choices. If you use one of these services, you can upload your backup to the cloud, and it will largely improve the safety of important data. I’ll show you how to upload a data backup with the example of DropBox. Select a service, then provide access to files and folders in the cloud storage.
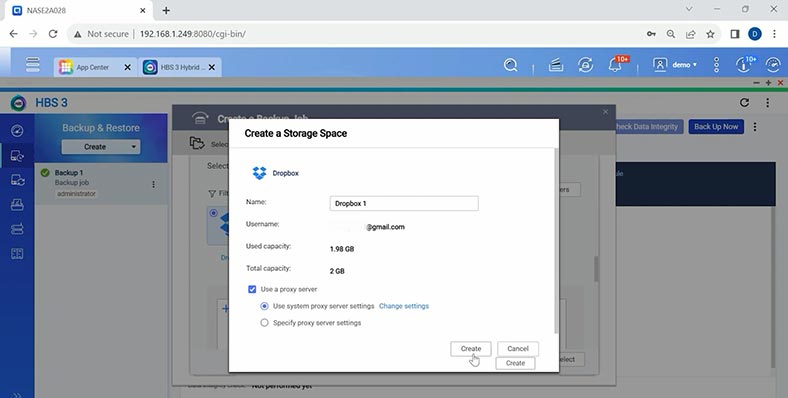
After that, click Create, then Select, choose a folder in this cloud storage – click OK and Next. Now, you can configure backup schedule and other additional settings just like we did it for the local storage. Click Create to start the backup process.
Backup configuration for other cloud services is very similar. The only important aspect is that you should have an account with a cloud service of your choice, and enough space to store your backup files.
How to recover files from backup
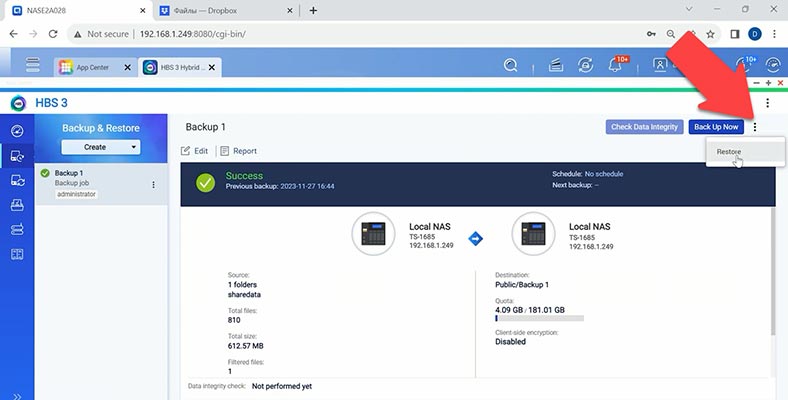
To recover data from a backup, access the menu and click on Restore.
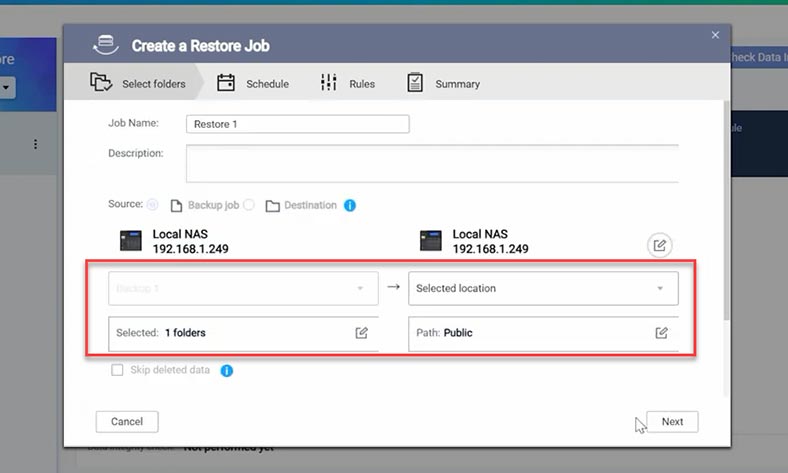
After that, choose the disk space in the source storage, the destination, and then choose where your backup is stored – Next.
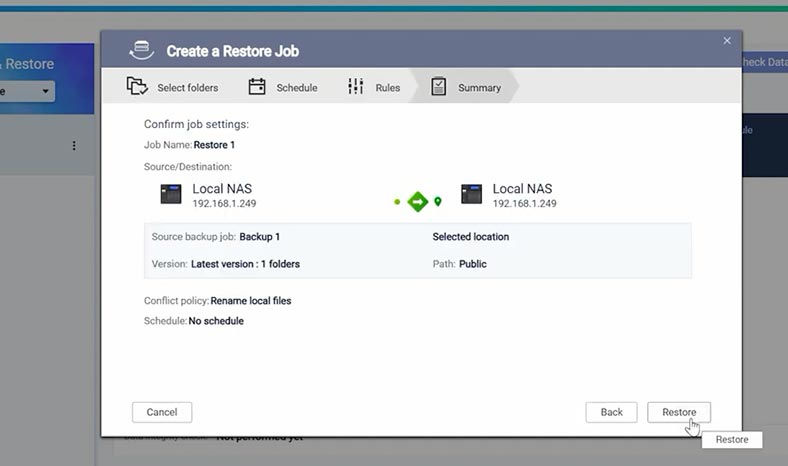
After additional settings are configured, hit Restore.
Now the data will be recovered from your backup.
How to configure data sync
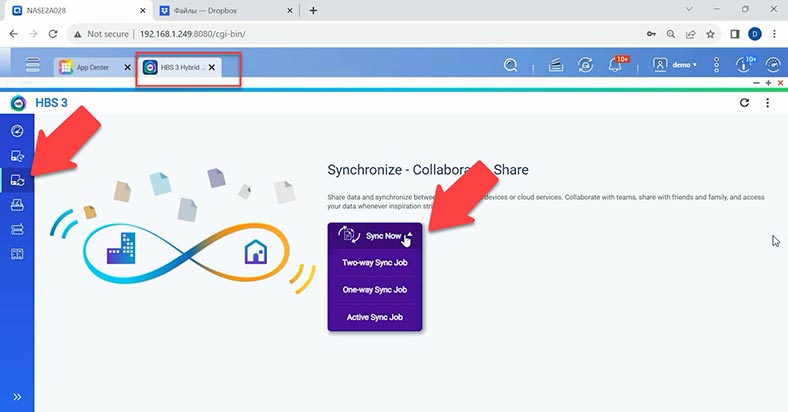
In addition to backup, you can also configure data synchronization. In this case, all changes in a specified folder will be automatically recorded to the target directory. To configure synchronization, click on the button Sync Now and choose one of the three jobs: Two-way Sync, One-way Sync, or Active Sync.
Now choose the disk space in the target storage – it can be a Local NAS, a Remote NAS, a remote server or a cloud server.
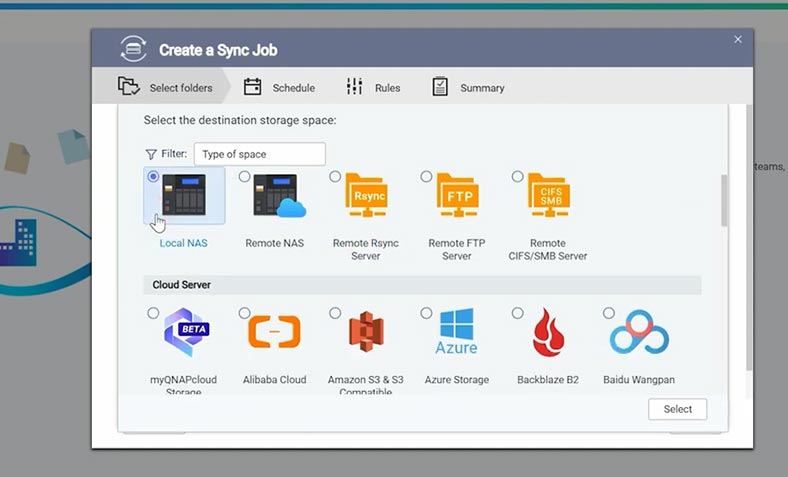
Add folders to sync data. You can also configure backup schedule and other additional settings.
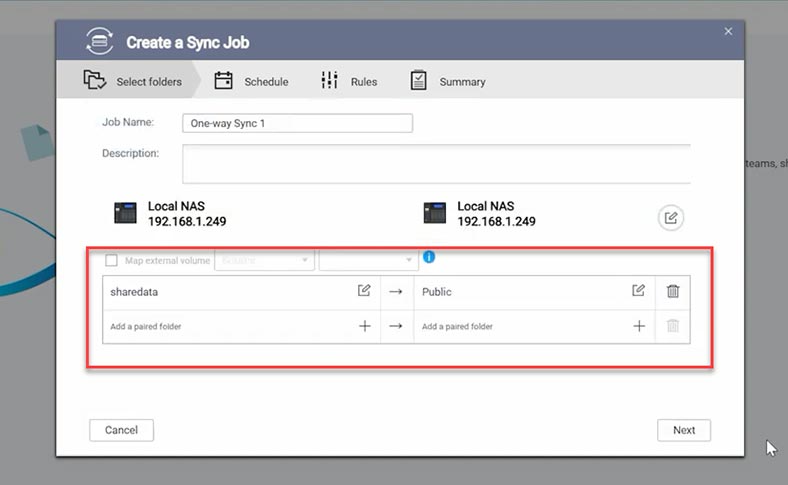
As a result, we have configured syncing for two folders.
Google Photos backup – Multi-Application Recovery Service
Talking of latest news, QNAP has joined Google Photo partner program and presented an innovative solution for photo and video backup – MARS (Multi-Application Recovery Service).
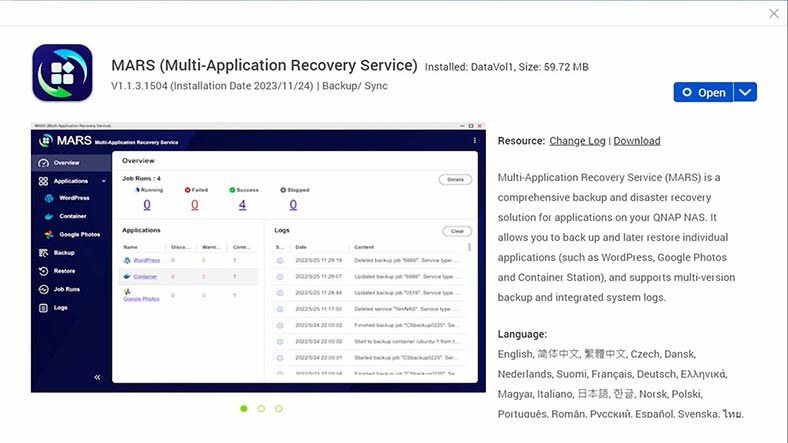
MARS is an application that copies files from Google Photos to QNAP network devices. It helps users to save their storage space in cloud services, and it doesn’t require any subscription fee.
When you open this tool, you can see two apps available at the moment – WordPress and Google Photos. To start work, you only need to enter your Google account credentials. Click here to “Add Service,” give a service name, click on “Connect to Google Photos.”
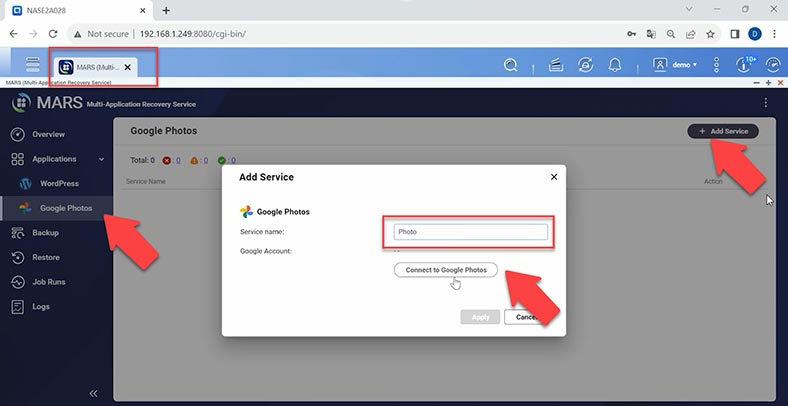
Choose an account, give your permission, and then click Apply. Now we have connected Google Photos to our Qnap storage device.
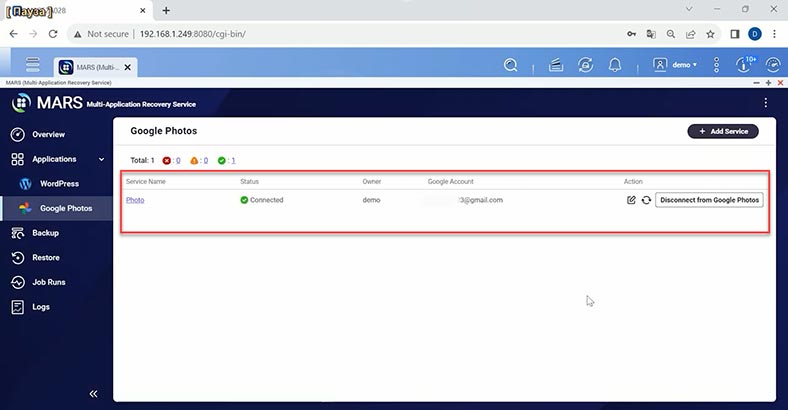
After creating your first backup from Google Photos to NAS storage, you can configure automatic scheduled backup. It can be performed on a daily, weekly or monthly basis. Such regular backup will let you free the limited space on Google Photos, especially when you remember that many pictures are uploaded from mobile devices known for having limited size of their internal memory.
Create a new backup job. Choose service, give the job a name, select the source and destination. Also, you can choose specific files for backup, and configure backup schedule. When all the settings are ready, click Backup Now.
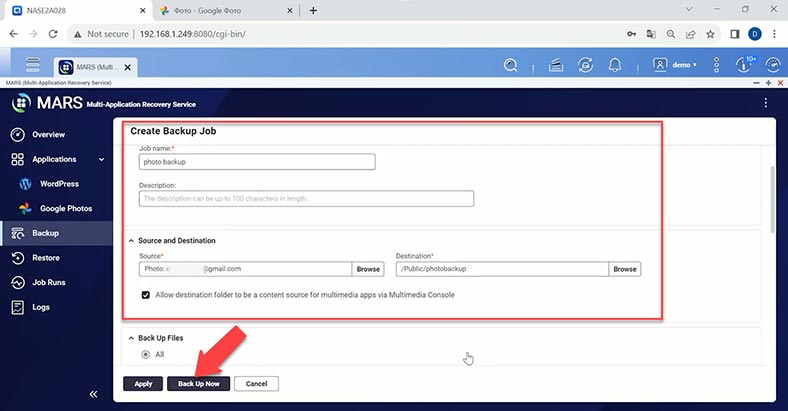
When the process is over, a backup of your photos and videos from Google Photos will appear in this folder. Also, you can use this backup to restore these files back to the cloud service by creating and configuring a new restore job.
As to WordPress in MARS, if you want to back up your database, you’ll need to install a QNAP NAS Backup plugin to WordPress and get an access key. After that, you’ll be able to create a WordPress service in MARS.
Recovering data with Hetman RAID Recovery
If you ever have any issues in restoring files from your backup, a backup file is damaged or missing, you can always restore data accidentally removed from a Qnap-based RAID system as long as you have a dedicated tool – Hetman RAID Recovery.
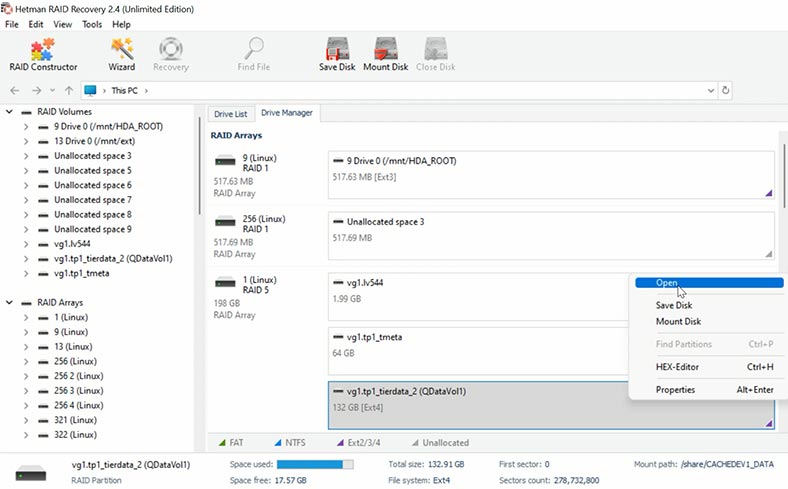
Hetman RAID Recovery will help you recover data if your RAID has crashed, if you deleted files accidentally, or if the disks inside your RAID have been formatted. The program will automatically rebuild the damaged RAID with the available hard disks and display its contents.
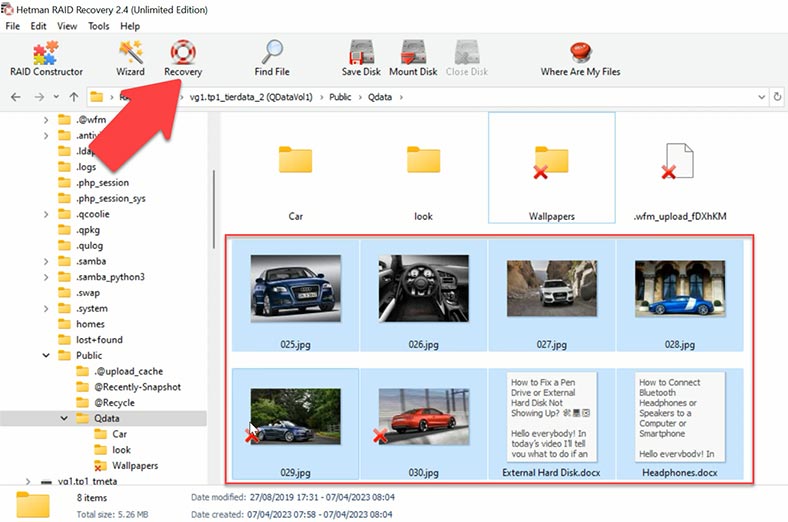
To recover your files, start the scan and wait until it’s over. After that, open the folder where the lost files were stored, and recover them.
| Advantage | Hetman RAID Recovery | Other Programs |
|---|---|---|
| Support for all RAID levels | Yes | May have limited support for some RAID levels |
| User Interface | Convenient and simple, step-by-step instructions | May be less intuitive or more complex to use |
| NAS Qnap Support | Direct work with NAS Qnap is possible | May require additional settings or not support NAS directly |
| Recovery Speed | Optimized for fast data recovery | Speed may depend on the program and system configuration |
| Additional Tools | Includes tools for RAID analysis and recovery | May not have the same number or variety of tools |
| Support Availability | Well-established technical support | Support may be less available or limited |
Addressing Common Queries
- Initiating a data backup on a QNAP NAS running QTS involves accessing the Backup/Restore section, selecting the appropriate backup method, and configuring backup task settings.
- Automatic backups can be scheduled on QNAP QTS by configuring replication jobs, specifying backup sources and destinations, and setting backup schedules.
- QNAP QTS is compatible with various storage media for data backup, including external hard drives, NAS devices, cloud storage services, internal hard drives, SSDs, NFS, and virtualization platforms.
- Built-in tools and applications in QTS specifically designed for data backup include Hybrid Backup Sync, RTRR, Snapshot, External Backup, and Cloud Backup.
- Data restoration from a backup on QNAP QTS involves accessing the Backup Station app, selecting the backup source and destination, configuring restore settings, and initiating the restore process.
Ensuring data safety through robust backup strategies is essential for both personal and business users. By leveraging the backup tools and solutions offered by QNAP, users can protect their valuable data and minimize the impact of unforeseen events.
Conclusion
Today we have explored how to back up your operating system, back up important data, and recover files from such backup. Checking your backups regularly will help to ensure that your data is protected safely, and information can be restored easily, if necessary.
Remember that backups are a key element in the strategy to ensure the safety of your files, and backup tools give you an effective and convenient way to manage this process.


