Configuration Backup and Data Restore on Synology NAS | Guide
Learn how to create a reliable backup in Synology NAS with this comprehensive guide. Explore how to create a configuration backup for Synology Disk Station Manager (DSM) and backup network storage data. Learn to restore data from a backup on Synology NAS. Essential for safeguarding your data and ensuring peace of mind.
- Getting ready for backup
- Configuring DiskStation Manager (DSM)
- How to backup Synology DSM configuration
- Creating a Data backup task.
- How to restore data from a backup.
- Conclusion
- Additional Considerations For Backup in Synology NAS
- Questions and answers
- Comments
In the present-day world, where digital data is of key importance, safety and integrity of information is becoming more and more crucial. Family photos or important files for work – any loss of data may become a disaster. In this context, ensuring reliable backup options becomes an integral part of a comprehensive data safety strategy.
But how can we choose an appropriate backup tool that would combine reliability and ease of use? One of the options to be covered in today’s video is using default backup features integrated into an operating system. Synology DSM both provides a wide range of data management tools and ensures safe data storage. We will also explore how to configure data backup on Synology DSM with the help of Hyper Backup, how to back up the system using its integrated features, and how to restore Synology NAS data and configuration status. We’ll have a closer look at every step, main functions, and detailed backup configuration – all of these to ensure the best possible level of data protection.

How to Create a Reliable Backup in Synology NAS
Getting ready for backup
Let’s start by exploring how to get ready for backup. The first step on the way to an effective backup system on Synology DSM is creating a Synology account.
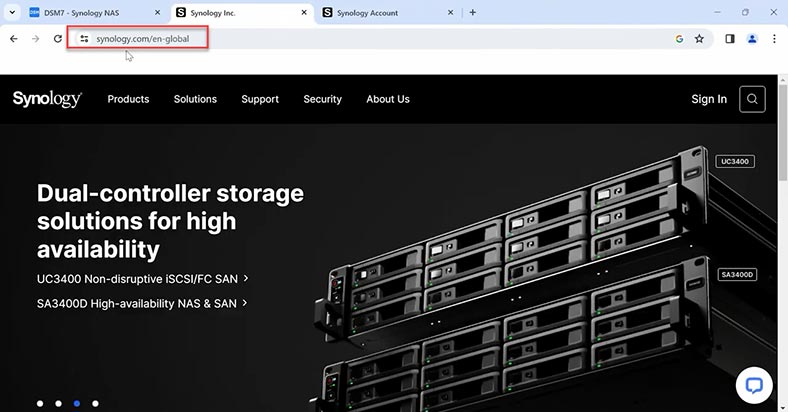
This account will be used to access DSM (DiskStation Manager), the main Synology operating system.
-
To do it, go to Synology official website.
-
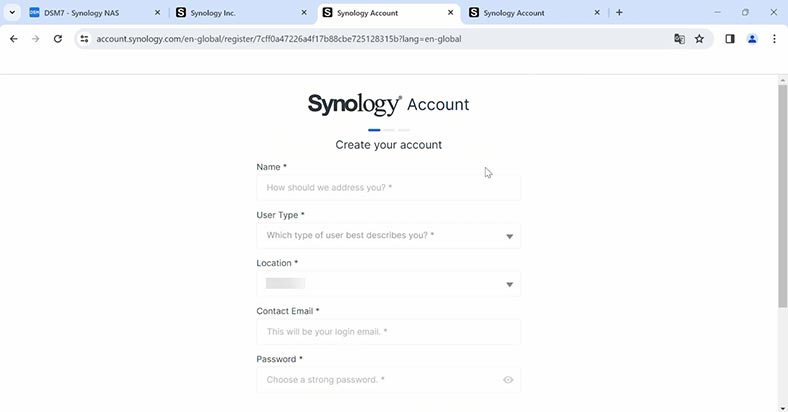
Click on the link Create a Synology Account.
-
Fill in all required information such as your email address, password and other credentials.
-
Confirm your account by checking the email you have received and following the instructions in it.
Configuring DiskStation Manager (DSM)
After successful registration and confirmation of your account, let’s configure DSM to get Synology ready for backup operations.
- Sign in to your Synology account using the email address and password.
- Go to DSM (DiskStation Manager).
- Check for DSM updates and install them if any are available to make sure your system is up-to-date.
How to backup Synology DSM configuration
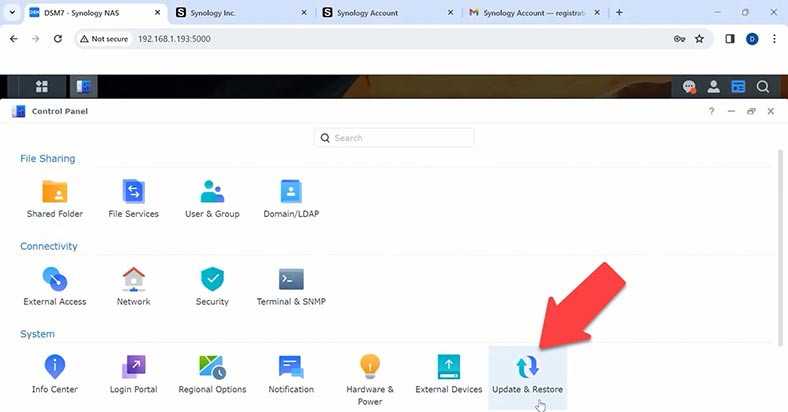
For starters, let’s explore how to back up Synology DSM configuration. Open Control Panel – Update & Restore.
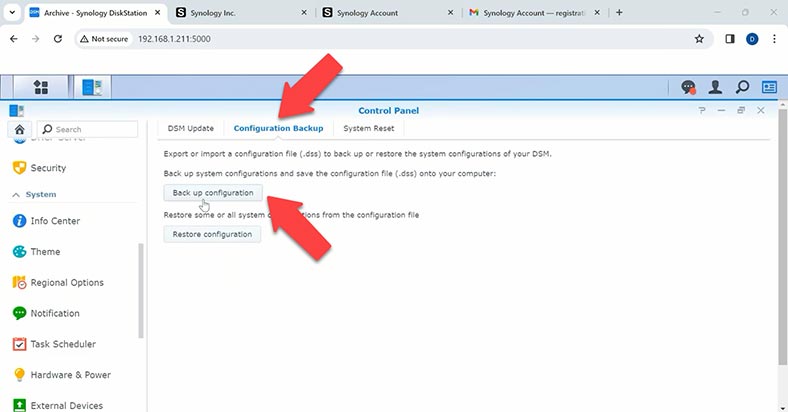
Jump to the tab Configuration Backup and click Back up configuration.
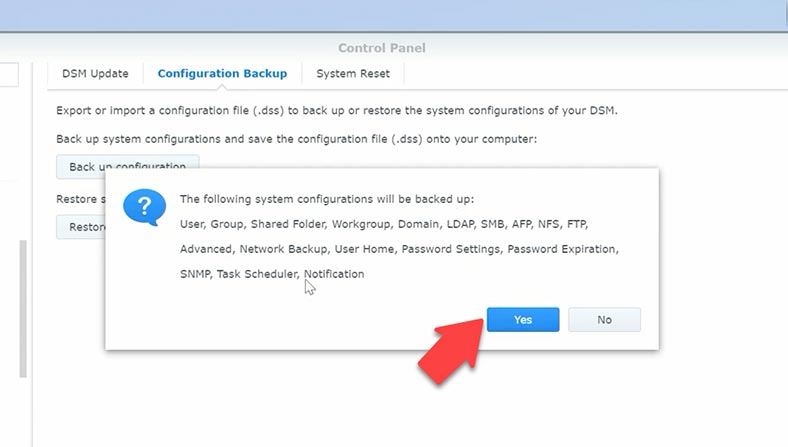
After that, you will see the list of configurations to be included into this backup. Click Yes to continue. The backup archive will be downloaded to your computer.
For recovery, go back to the same Control Panel menu and click Restore configuration. After that, give the path to the backup file and click OK. This will load the old configuration again.
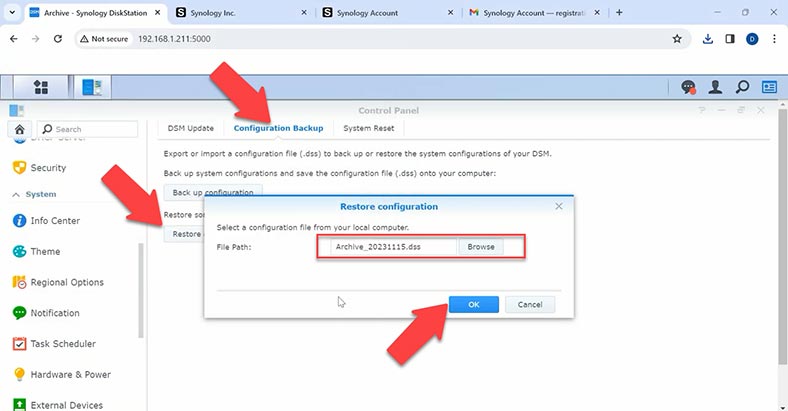
This way, you can restore an old configuration on a new device. However, you should understand that DSM versions of both systems must be the same, otherwise the recovery attempt will end in a failure.
Installing Hyper Backup
Another backup method involves a special utility – Hyper Backup. This is a free tool to help you configure data backup on your network storage system. To start backing up your Synology DSM, make sure that the utility is installed and ready to use.
For installation, go to Package Center in DSM. Use the Search field to find Hyper Backup. Install the utility by following the instructions.
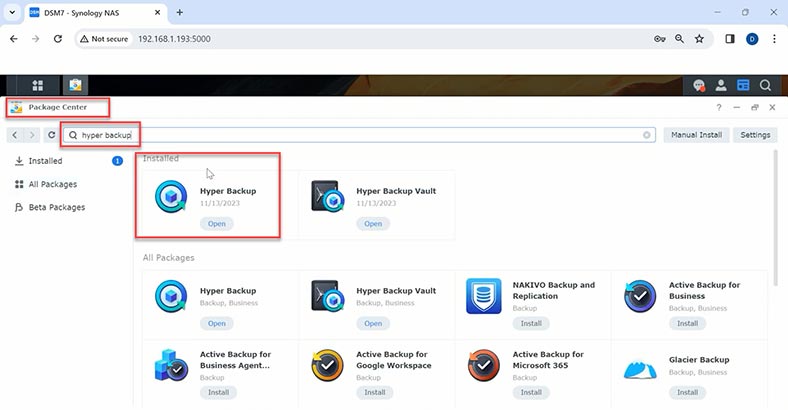
Now Synology DSM is ready to create reliable copies of your data with Hyper Backup. It is a powerful application for Synology DSM designed to create and manage data backups. It provides the necessary flexibility and reliability to store your information. Open the Hyper Backup app on your Synology device. Let’s start by clicking on the Plus button and creating a Data backup task. This app offers you two ways to back up your stuff: a data backup task and a LUN backup task.
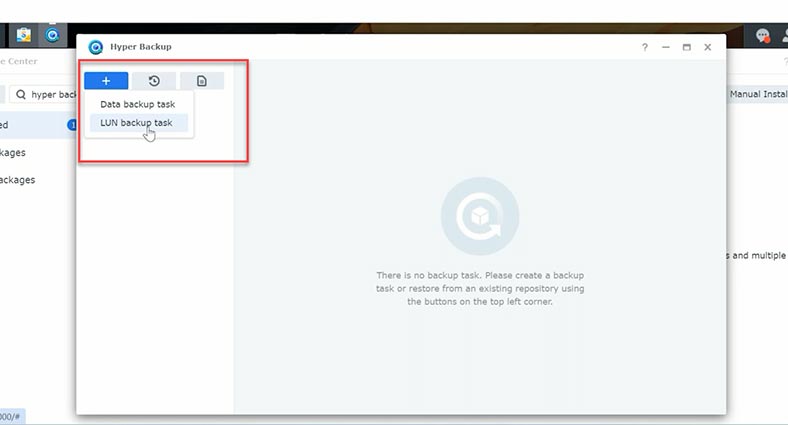
- Data backup task means copying folders from your storage device.
- LUN backup task means copying network drives.
Creating a Data backup task.
Click on Data backup task.
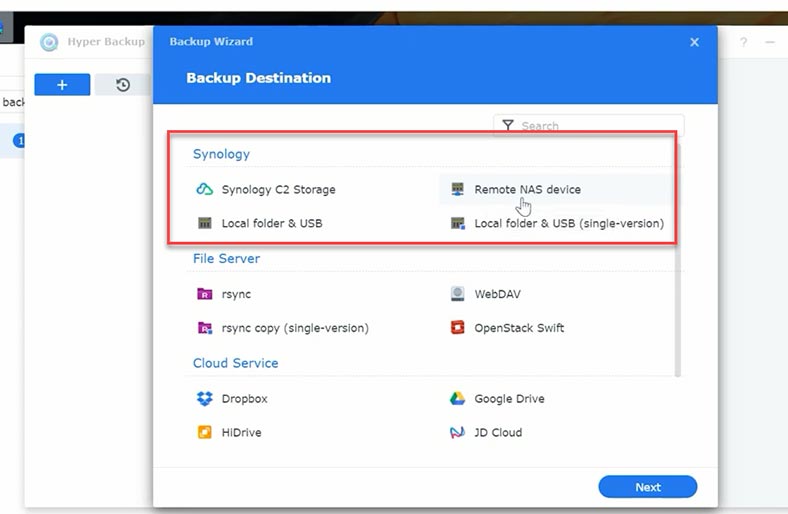
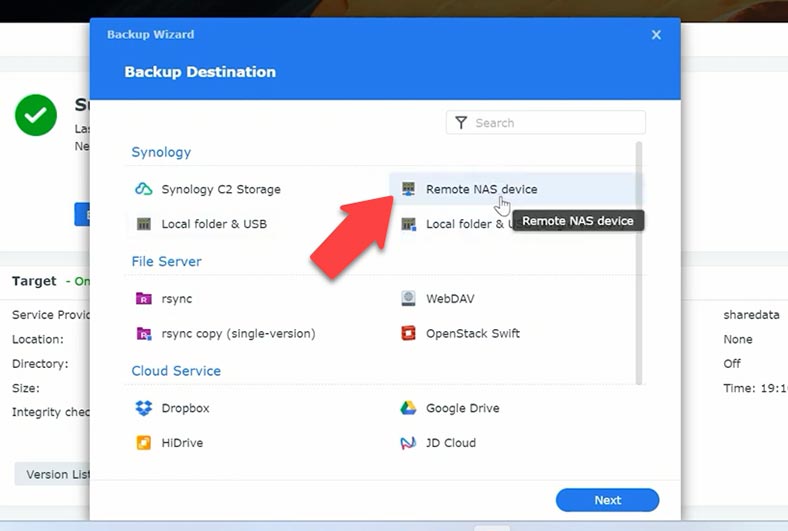
In a new window that opens, choose the backup destination:
- Synology C2 Storage, a backup to Synology cloud service.
- Remote NAS device – you can save a backup to another network storage system.
- Local folder or USB (Local folder & USB).
- Local folder or USB (Local folder & USB single-version). These two options differ by how data is stored: the first option means you create a full copy first, and other copies will only contain changes made at a later time. The second option means you will create and store a series of full copies.
Now let’s explore each storage method in detail.
Synology C2 Storage
For starters, choose Synology C2 Storage – Next, and sign in to your Synology account.
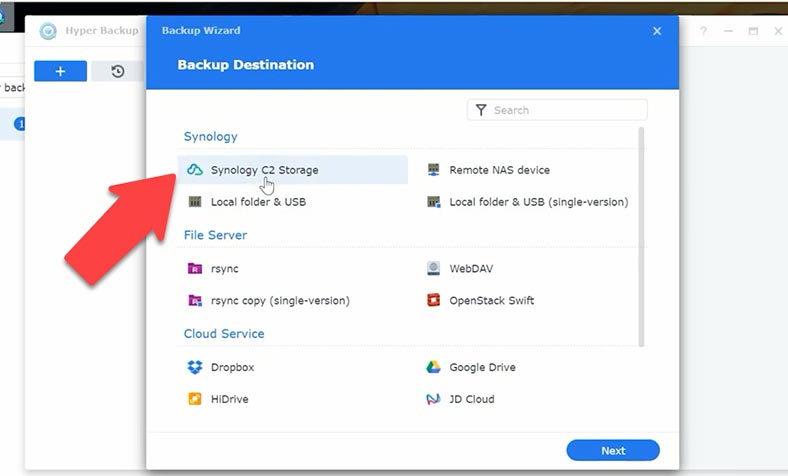
Synology C2 Storage is the cloud storage provided by Synology itself.
This service is commercial, and you can have a free trial period to see how it works. Choose your subscription and click Next.
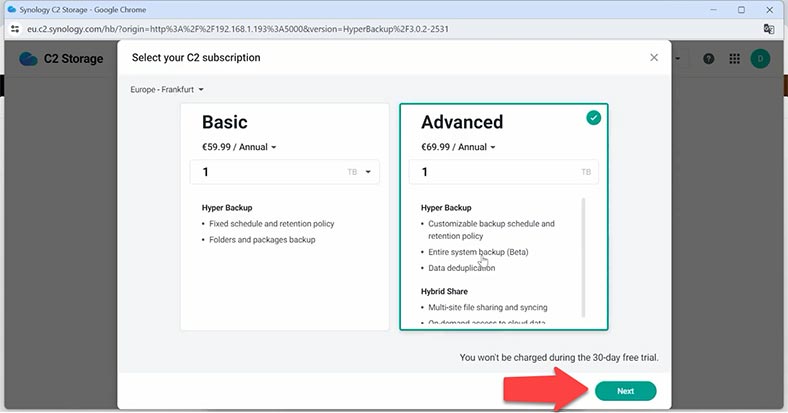
Now you need to select a folder for backup.
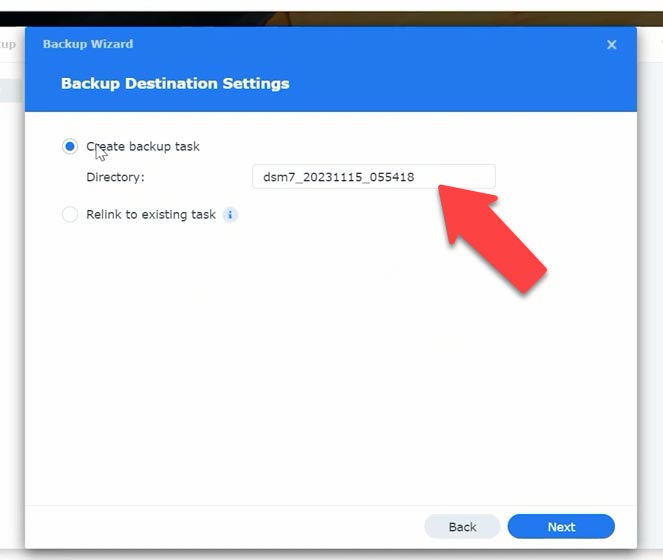
Configure backup schedule.
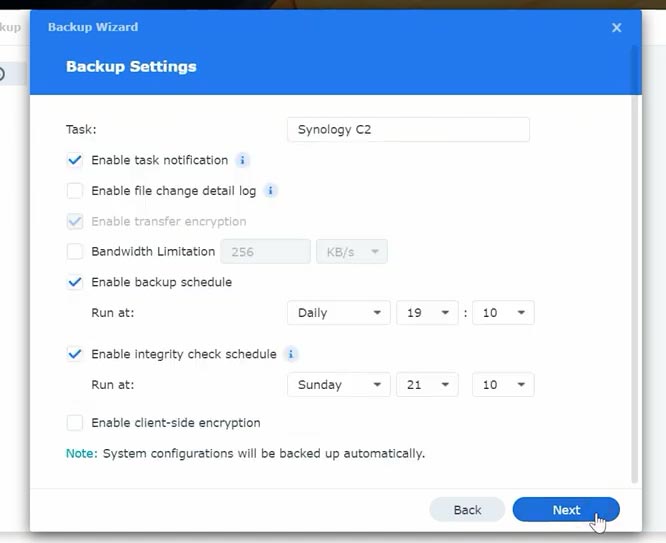
After that you can start the backup process. Click to back up now.
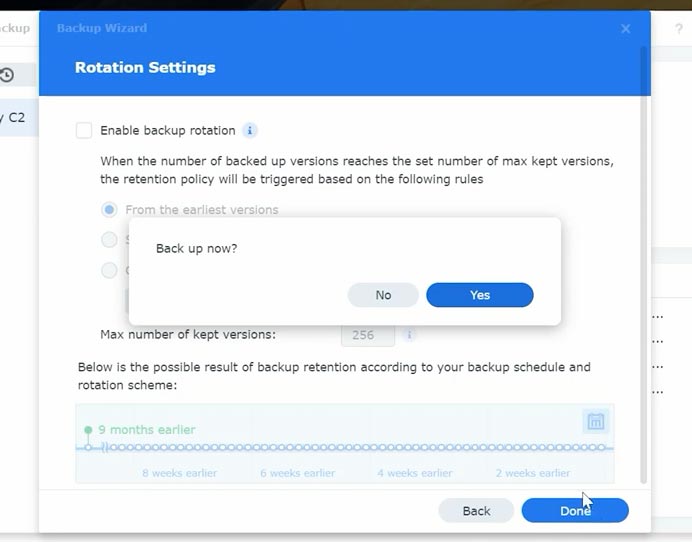
When the file is ready, it will be uploaded to the cloud service.
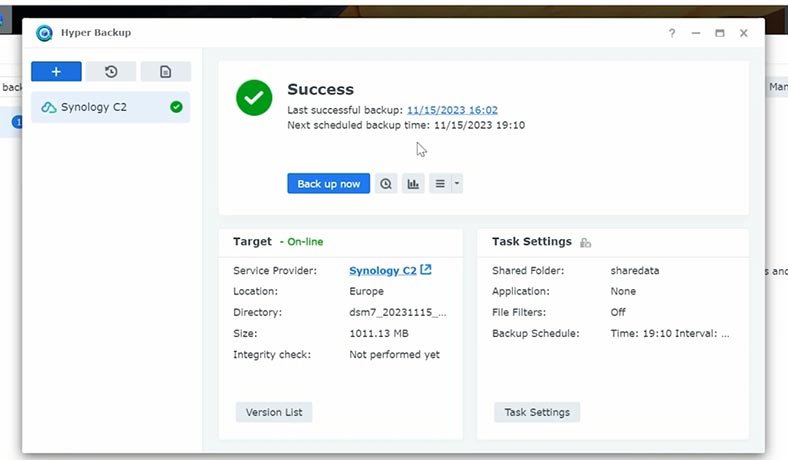
Remote NAS device
If you have one more network-attached storage, you can configure your backups to be saved to that device.
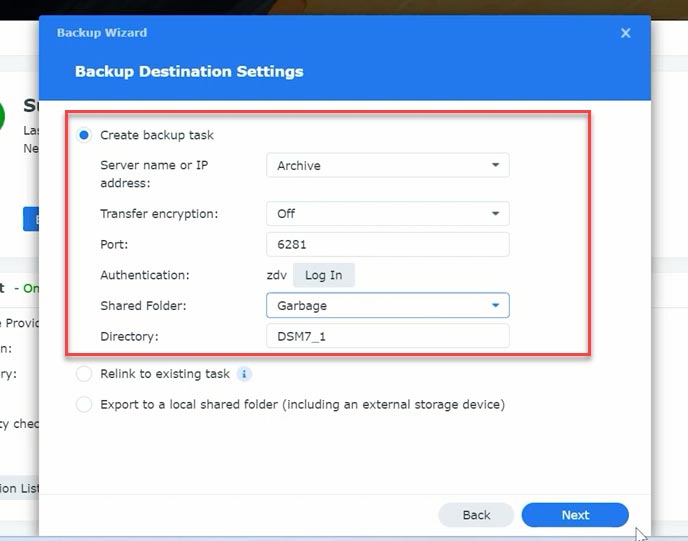
Specify the storage IP address, the username and password. Remember that the target device should have its backup feature activated. If this is a Synology device, install the Hyper Backup Vault package.
After that, select a shared folder on the target device and choose a directory – Next.
Now select the folder which should be backed up and click Next; if necessary, add applications to your backup, and click Next.

Add application backup – Next. Configure backup schedule and click Next, then Done.
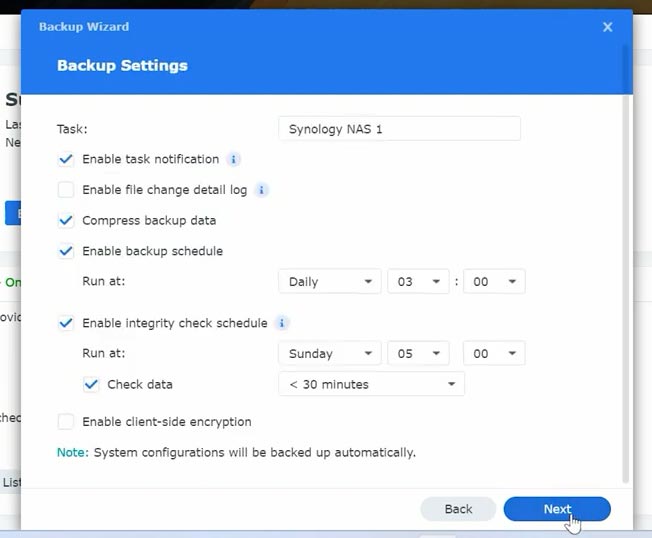
Back up now? – Yes.
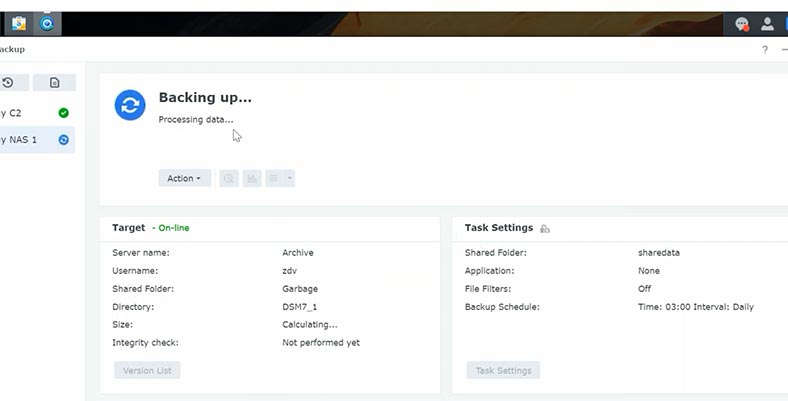
After that, your backup will be created.
Local folder & USB
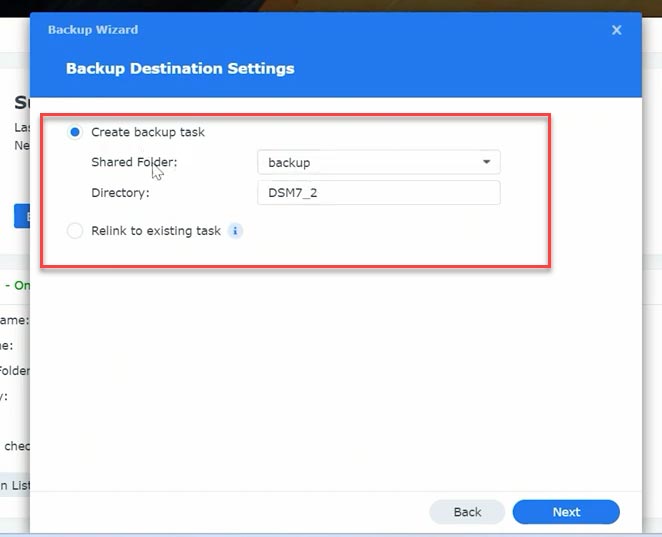
Another backup type is back up to a local folder. In this case, the copy of your data will be stored on the same device.
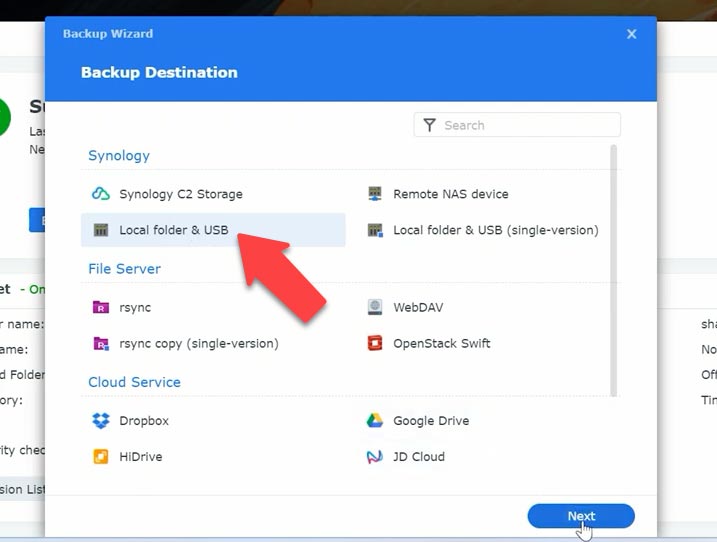
You should select a target folder where the backup file should be stored, and choose the folder which should be backed up.
Add application backup and configure the schedule. After that, you will see the same message as in the previous backup method. Click Yes to create a backup.
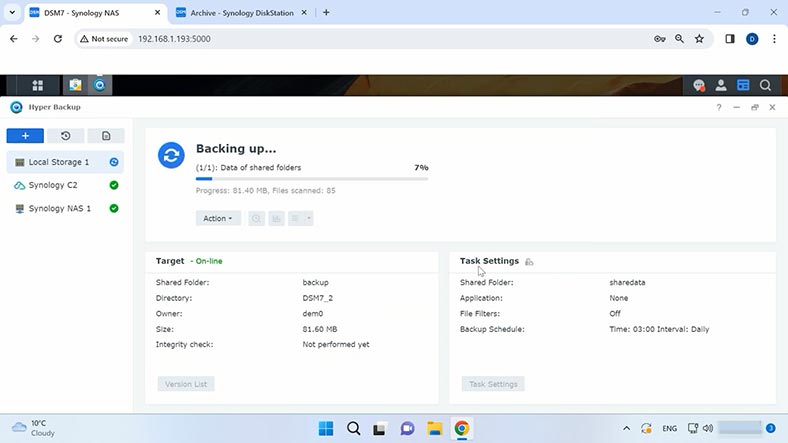
Rsync
Another backup method is File Server. Rsync is the option that lets you save a copy of your data to another Synology NAS in your network.
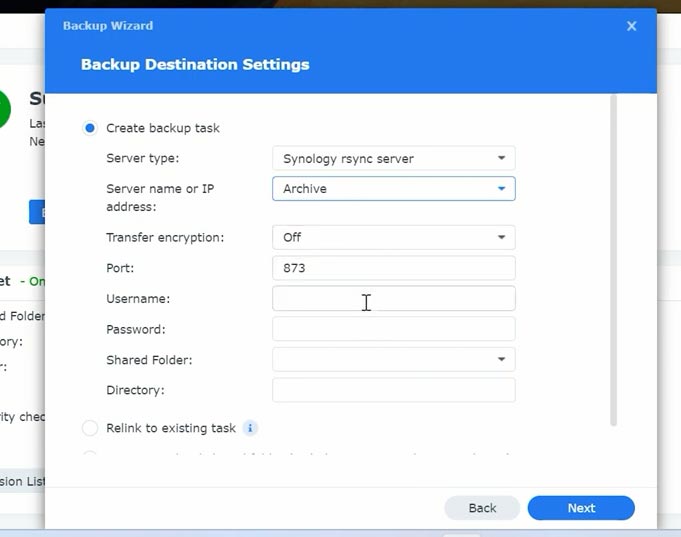
The settings are similar to those I have shown you when we were connecting to another NAS system. You’ll have to give your IP address and user credentials. After that, the shared folder and the folder you need to back up. Add applications and configure the schedule.
Back up now? – Yes.
A few more cloud servers
WebDAV is an extension to the HTTP protocol which provides functionality for networking with files on remote servers. It lets you save copies of your data to a remote web server.
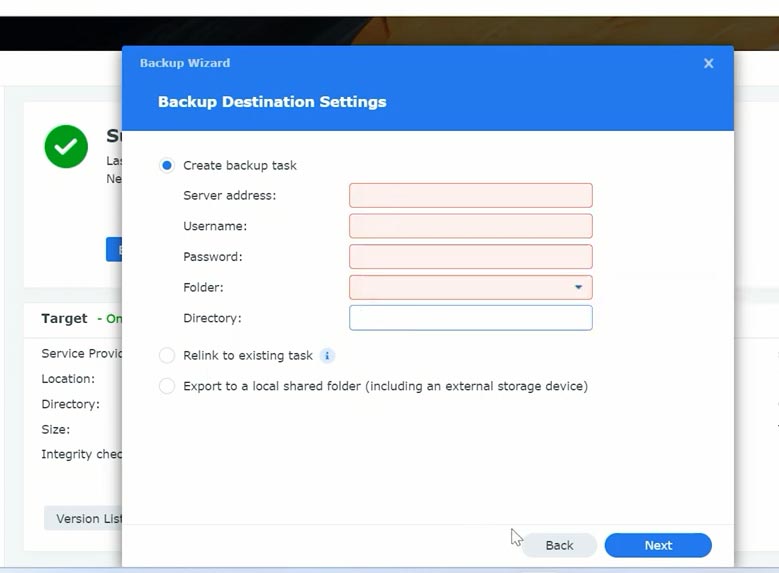
You’ll have to give your IP address, folders, and user credentials.
Also, you can save your backups with the help of OpenStack Swift.
OpenStack Swift is an Object Storage module in an OpenStack framework.
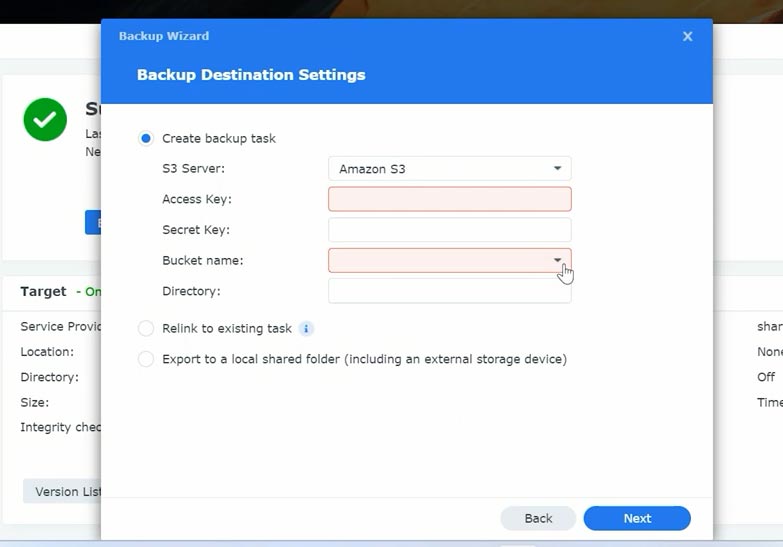
S3 Storage by Amazon. Here, you need to select the server where your cloud storage is configured, type your access key, secret key, bucket name, and directory.
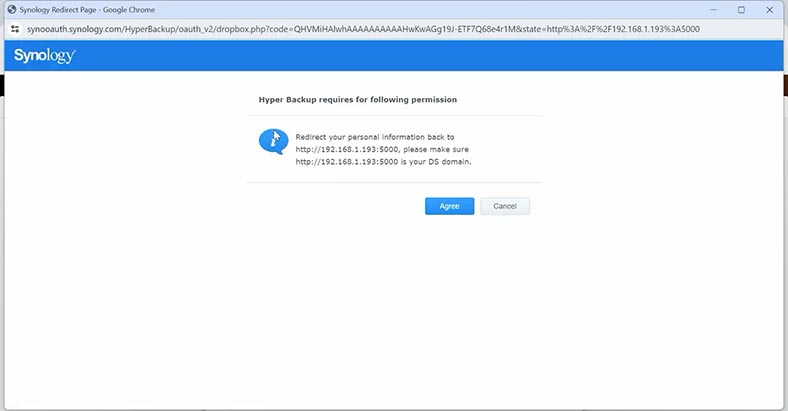
You can also upload your data backup to Dropbox or Google Drive. This way is very easy: sign in to your account, allow Hyper Backup to access this service, and provide permissions. After that, just choose your folders and save their backups.
Also, if you have an account with any of the following services – HiDrive, JD Cloud, Microsoft Azure, Rackspace, hicloud S3, hubiC – you can keep your backup files there – their settings are very easy to understand.
The source data can be a whole volume or a few specific folders that you would like to include into your backup.
In each of the backup settings, you can edit the schedule, specific folders, application data, and other things.
When configuring your options in Hyper Backup, you can choose one of these cloud services depending on your needs and preferences. Just remember that before doing that, you must ensure compatibility and safety of a certain cloud service provider.
How to restore data from a backup.
Now that you have a backup file, you can recover data on Synology DSM. As a result, you’ll be able to restore deleted files, recover your system after a failure, or even transfer your data to a new device.
Open the Hyper Backup app on your Synology device. In the menu, click on the Restore button. Now select the source backup.
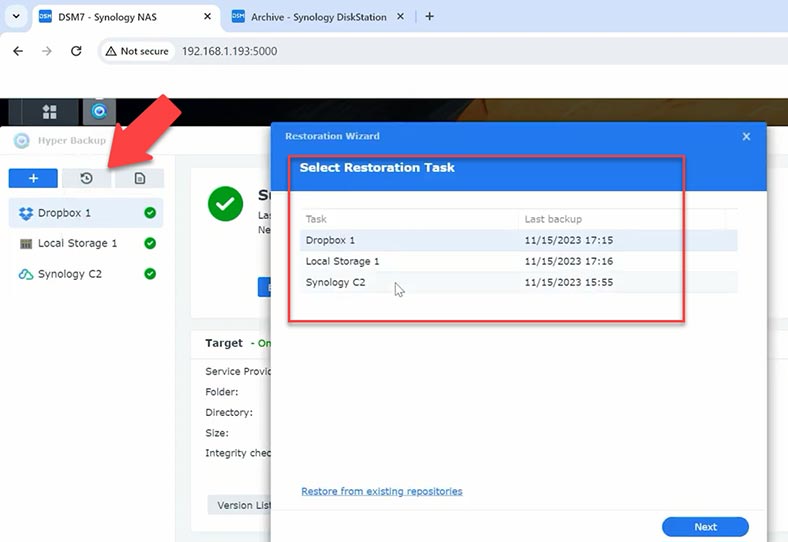
From the list of available backups, choose the one you’d like to use for data restoration. This could be a specific point in time or a specific file. Now choose the destination. Select where you want to restore your data. This could be the original destination of this data, or any other directory on your storage device.
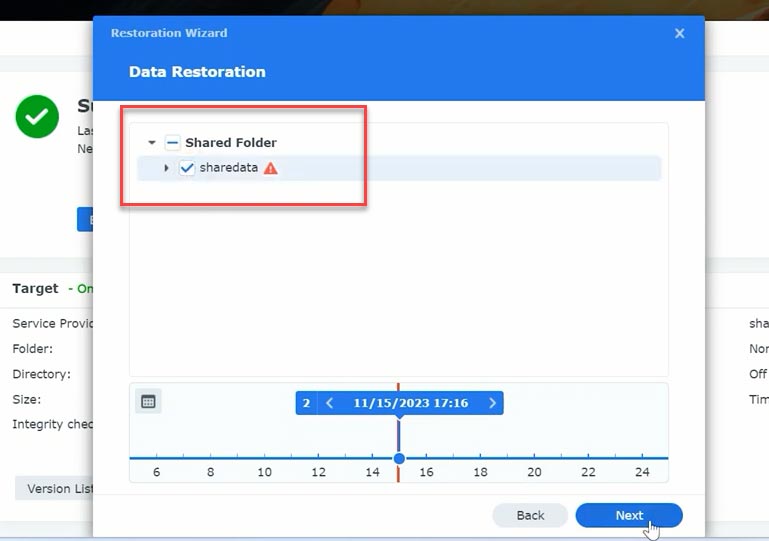
Depending on your choice, additional restoration settings may be available. For example, you can choose to retore either all data, or specific files and folders only. To start the restoration, click Next.
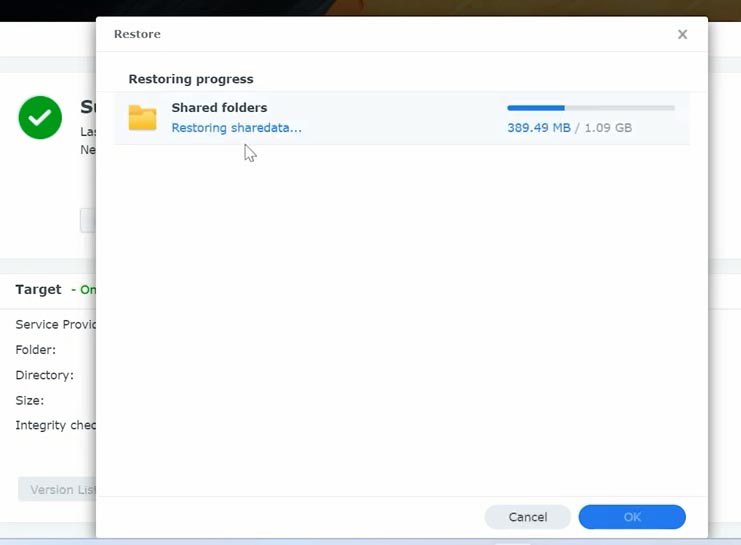
Hyper Backup will display the restoration progress and you’ll be able to see which data is already restored. When it’s over, you’ll see a window saying that your data has been restored successfully.
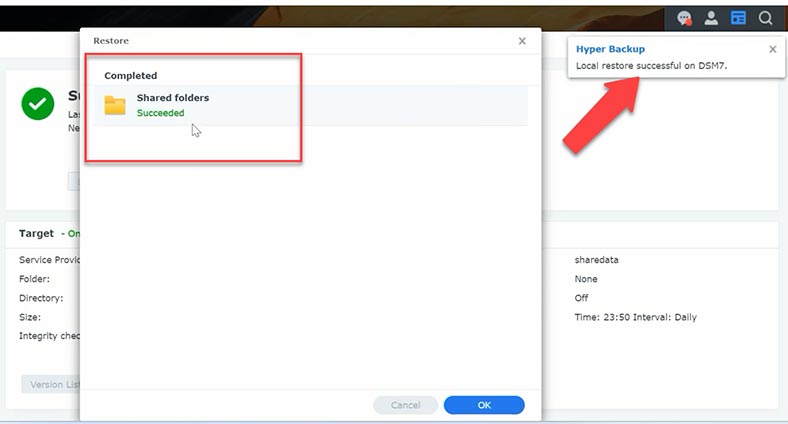
So, this is how we have restored deleted data from a backup. It is important to remember that backing up your data regularly helps you maintain safety and accessibility of all your information.
Conclusion
So, today we have explored how to back up the operating system, its data, and how to restore files from a backup file. Checking your backups regularly will help to ensure that your data is protected safely, and information can be restored easily, if necessary.
Remember that backups are a key element in the strategy to ensure the safety of your files, and Hyper Backup gives you an effective and convenient way to manage this process.
If you ever have any issues in restoring files from your backup, a backup file is damaged or missing, you can always restore data accidentally removed from a Synology-based RAID system as long as you have a dedicated tool – Hetman RAID Recovery.

Hetman RAID Recovery will help you recover data if your RAID has crashed, if you deleted files accidentally, or if the disks inside your RAID have been formatted. The program will automatically rebuild the damaged RAID with the available hard disks and display its contents.
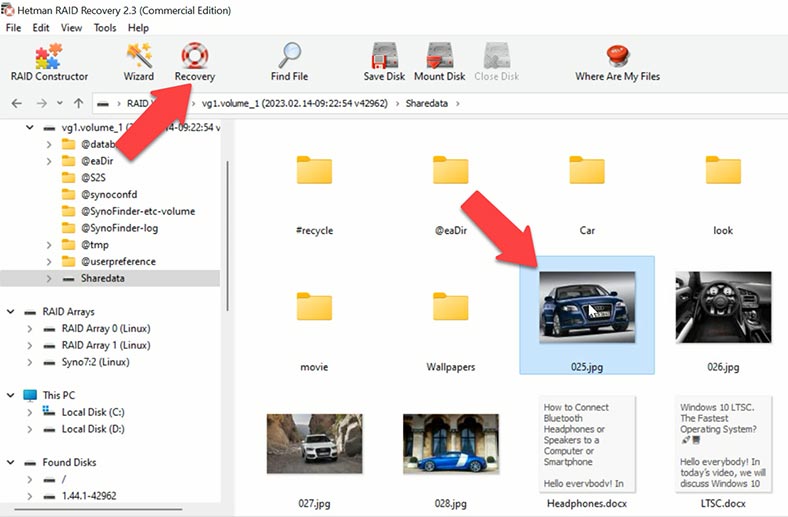
To recover your files, start the scan and wait until it’s over. After that, open the folder where the lost files were stored, and recover them.
| Program | RAID Array Support | File System Support | Interface | Platforms |
|---|---|---|---|---|
| Hetman RAID Recovery | RAID 0, 1, 5, 6, 10, JBOD, RAID 1E, SHR (Synology Hybrid RAID), RAID-z, RAID 50, RAID 5E, RAID 60 | NTFS, FAT, exFAT, ReFS, Ext2/3/4, APFS, HFS+, ReiserFS, XFS, UFS, ZFS | User-friendly interface with step-by-step instructions | Windows |
| R-Studio | RAID 0, 1, 5, 6, 10 | NTFS, FAT, exFAT, HFS+, Ext2/3/4 | Technical interface aimed at professionals | Windows, macOS, Linux |
| UFS Explorer RAID Recovery | RAID 0, 1, 5, 6, 10, JBOD | NTFS, FAT, exFAT, ReFS, Ext2/3/4, HFS+ | Intuitive interface with customization options | Windows, macOS, Linux |
| DiskInternals RAID Recovery | RAID 0, 1, 5, 6 | NTFS, FAT, Ext2/3/4 | Technical interface for experienced users | Windows |
| EaseUS Data Recovery Wizard Technician | RAID 0, 1, 5 | NTFS, FAT, exFAT | Clear interface with simple tools | Windows, macOS |
Additional Considerations For Backup in Synology NAS
When considering a reliable backup strategy for your Synology NAS, it’s essential to incorporate various elements to ensure comprehensive data protection. One crucial aspect is the utilization of external storage devices, such as external hard drives, to create backups. By backing up your Synology NAS to an external drive, you add an extra layer of security against data loss. This method provides a tangible backup solution that you can store separately from your NAS, safeguarding your data in case of hardware failures or other emergencies.
Another valuable tool in your backup arsenal is the Synology Drive client, which enables seamless synchronization of files from your Synology NAS to another device. This feature allows you to back up critical files from your NAS to your computer or other network-attached storage systems, ensuring redundancy and accessibility. By utilizing Synology Drive, you can maintain up-to-date backups of your data across multiple platforms, enhancing data integrity and availability.
Additionally, implementing a differential backup strategy can further optimize your backup process. By performing regular differential backups, you can efficiently capture only the changes made since the last full backup, reducing backup time and storage requirements. This approach minimizes the risk of data loss by ensuring that your backup files are always current, providing a reliable solution for protecting your valuable data.
In conclusion, creating a reliable backup system for your Synology NAS involves leveraging a combination of tools and strategies to ensure comprehensive data protection. By incorporating external storage devices, utilizing Synology Drive for seamless file synchronization, and implementing a robust backup strategy, you can safeguard your data against loss and maintain accessibility in any situation. With the right backup approach in place, you can enjoy peace of mind knowing that your valuable data is securely backed up and readily available when needed.


