Setting Up Virtual Machine Backup Options & ESXi Configuration
In today’s IT landscape, where virtualization servers are the backbone of many organizations, ensuring reliable backup options and automated processes is paramount. One of the leading virtualization platforms, VMware ESXi, requires robust backup strategies to safeguard critical data and system configurations. Let’s delve into various methods and tools available for creating reliable backups of VMware ESXi environments.
- The importance of backups
- How to back up ESXi system configuration
- How to create a data backup
- How to configure automatic backup with ghettoVCB script
- How to configure an NFS storage
- Recovering data with Hetman RAID Recovery
- Conclusion
- Additional Considerations for Backup of VMware ESXi
- Questions and answers
- Comments
The importance of backups
Virtual machines are often used to store critical information such as databases, mail servers, web applications and much more. Loss of such data can result in grave consequences causing business downtime, loss of customers, and even legal issues. Regular backup allows to recover virtual machines after errors and failures, and thus reduce the idle period of the whole system. This is especially important for business processes that require permanent availability of certain resources.
When the system configuration is modified, software is updated or certain patches are applied, there is always a risk of encountering problems. Backup files let you roll back all changes if an update goes wrong. Also, backups make it easier to migrate to new hardware or upscale your infrastructure. You’ll be able to recover virtual machines easily on new servers or in cloud-based environments.
Data backup and system configuration backup are two important elements in the strategy to ensure security in the IT field.
Data backup is focused on saving and restoring actual data stored in a system. It could be files, databases, multimedia content, and other information assets.
System configuration backup is meant to save system settings and options, including operating system settings, application settings, security settings, network settings and other parameters that determine the system structure and functionality.

How to Create a Reliable Backup of VMware ESXi
How to back up ESXi system configuration
For starters, let’s explore how to back up a configuration of ESXi hypervisor. The easiest way to create a backup of ESXi host system and recover stuff from there is to use special commandlets included into PowerCLI. To use this backup method, you should install an extension called vSphere PowerCLI. I’ll show you how to create a backup on a Windows PC connected to the host machine over the network.
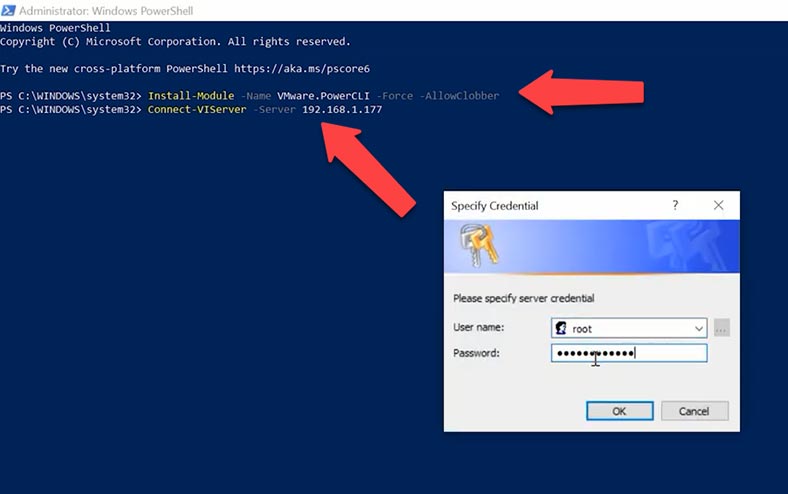
For starters, make sure that you have PowerCLI installed. Run PowerShell as administrator. Here is the command you need to use for installation:
Install-Module -Name VMware.PowerCLI -Force -AllowClobber
After that, connect to the host. Use this command:
Connect-VIServer -Server 192.168.1.177
In this command, you need to give a correct IP address of the host.
To back up an ESXi host server configuration, run the following command:
get-vmhost "192.168.1.177" | get-vmhostfirmware -BackupConfiguration -DestinationPath "D:\BackupESXi"
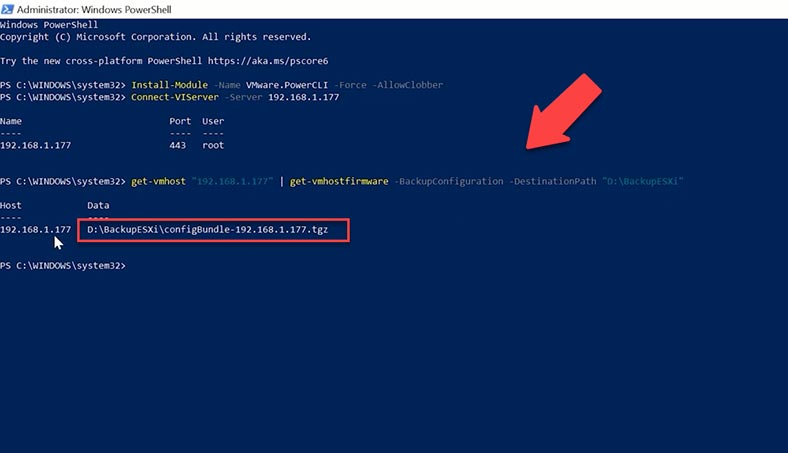
Give the ESXi server’s IP address and the path to save the backup file; in my case, it will be Disk D, and the folder – BackupESXi. After running the command in this directory - D:\BackupESXi, a file appears which contains the ESXi server configuration backup. Now you have this ESXi server configuration backup, and if there is a server breakdown, you’ll be able to recover its configuration with the help of of this backup file.
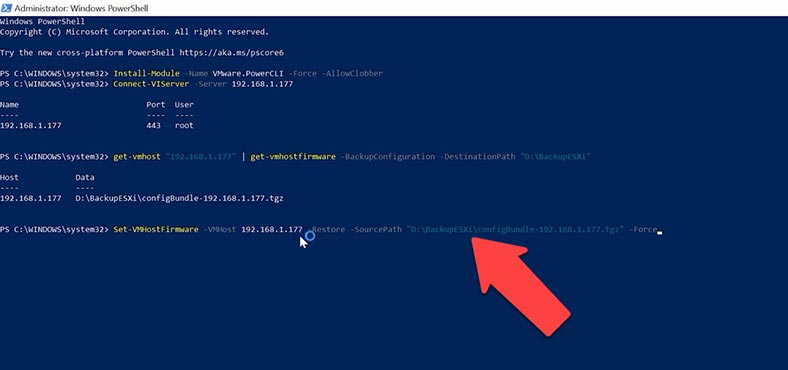
For recovery, use this command:
Set-VMHostFirmware -VMHost 192.168.1.177 -Restore -SourcePath "D:\BackupESXi\configBundle-192.168.1.177.tgz" -Force
There is one thing to keep in mind: an ESXi configuration from backup should be recovered to exactly the same version of ESXi, otherwise it may not be successful.
How to create a data backup
As to virtual machines, VMware vSphere (ESXi) offers several ways to create their backups. I’m going to show you two main methods: one using the web interface and the other using command line utilities (PowerCLI).
1. The first method
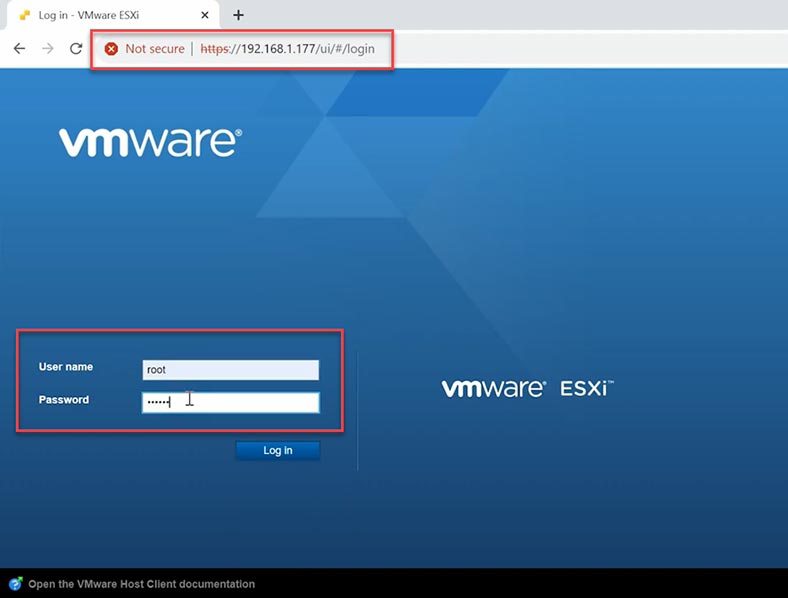
For the first method, we’ll be using the web panel. Open a browser and type the address of your ESXi host, and then give the login and administrator’s password to log in. In the main page, choose the Virtual Machines tab on the left.
Find the necessary virtual machine on the list, right-click on it and choose – Snapshot – Take snapshot.
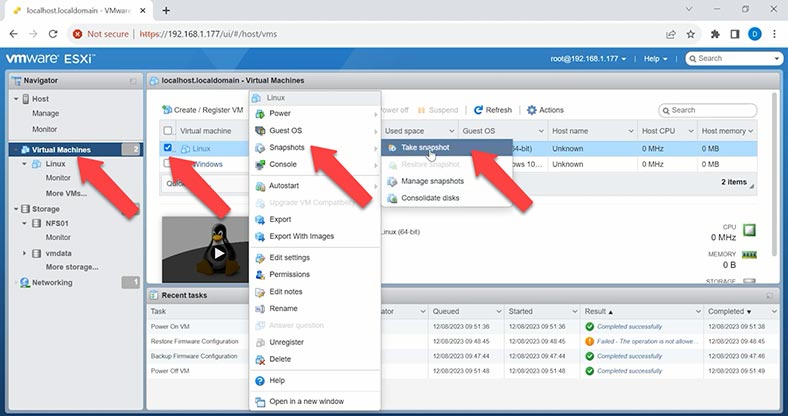
Give the snapshot a name and description, then click Take snapshot.
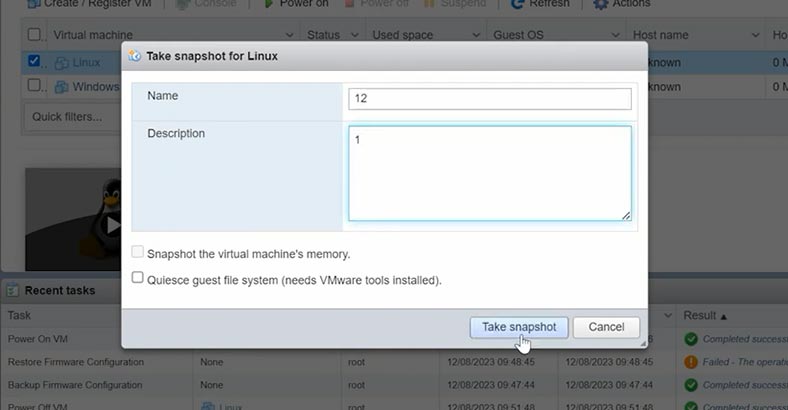
You can use various options to manage snapshots, such as restoring or deleting snapshots, and you can use them to restore the previous condition of your system from a snapshot you took at an earlier time.
2. The second method
There is also the second method to take a snapshot of a virtual machine with the help of PowerShell and PowerCLI:
Previously, we have already installed this tool, so now you need to connect to the ESXi server, open PowerShell and type the following command:
Connect-VIServer -Server your-esxi-host
To take a snapshot, run this command:
New-Snapshot -VM "Linux" -Name "LinBackup" -Description "2"
Give the correct name of your machine, then the snapshot name and description.
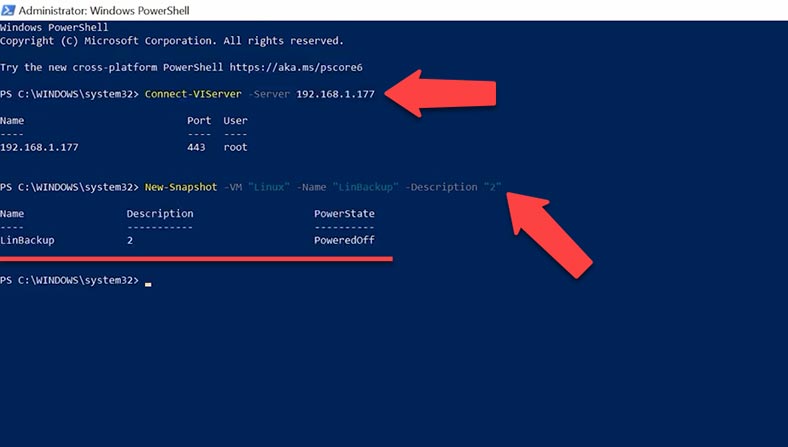
You can also use other PowerCLI commandlets to manage snapshots, such as Get-Snapshot, Remove-Snapshot, and so on.
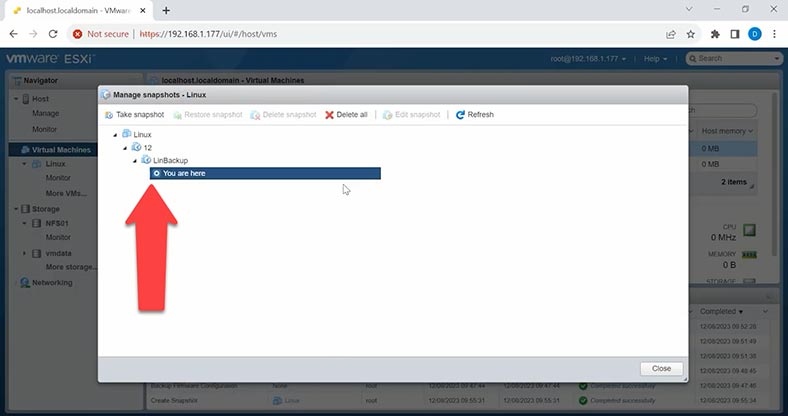
Please note that taking snapshots can take some time and resources. Also, remember to manage snapshots regularly so they don’t accumulate in big numbers and can’t cause possible storage issues.
How to configure automatic backup with ghettoVCB script
One more way to create a backup copy of the virtual machine involves a third-party tool, GhettoVCB.
GhettoVCB is a script designed to back up virtual machines in VMware ESXi environment. It’s a flexible way to back up virtual machines.
This utility is similar to VMware VCB (VMware Consolidated Backup) tool which is also used for backup purposes. Using ghettoVCB.sh involves taking a snapshot of the virtual machine, running backup operations, and then removing the snapshot after backup operations are over. One peculiarity of this scenario is that it can create backups while the virtual machine is online, without having to shut it down.
As a simple backup solution for ESXi virtual machines, ghettoVCB can create only a full backup file every time, so if you want to create backups of the differing data - or, in other words, create incremental backups or differential backups - you need to find another tool for the job.
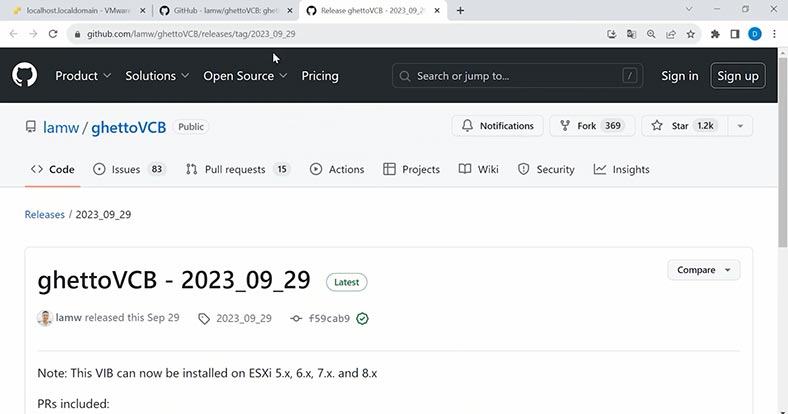
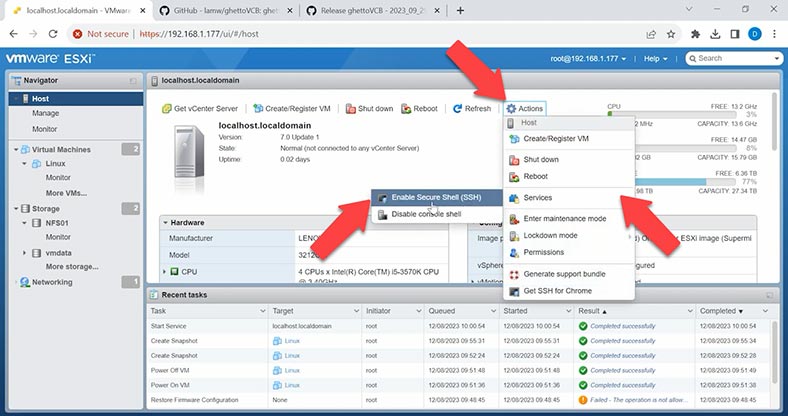
To use this method, download GhettoVCB from the official webpage on GitHub. You need to get Source code (tar.gz) After that, enable access by SSH on the ESXi host and download ghettoVCB to the server. To enable SSH, look at the control panel, find the Hoststab, click on Actions – Services – Enable Secure Shell.
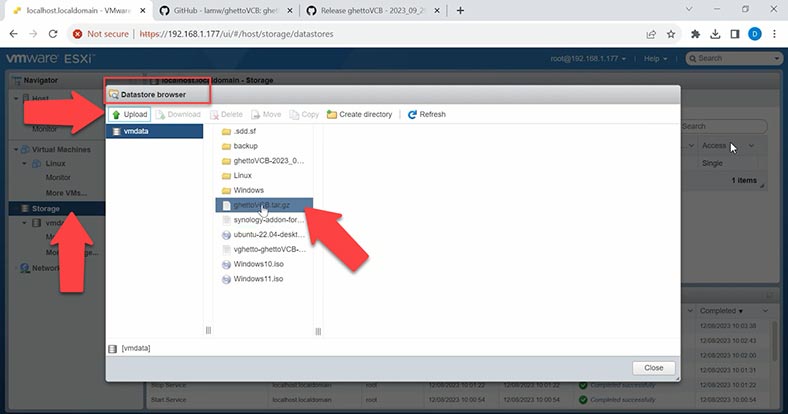
Now, to download the script to the server, go to the Storage tab and click Datastore browser. In the window that opens, choose the storage where the archive should be downloaded and click Upload, then give the path to the archive and click Open, and the download will start.
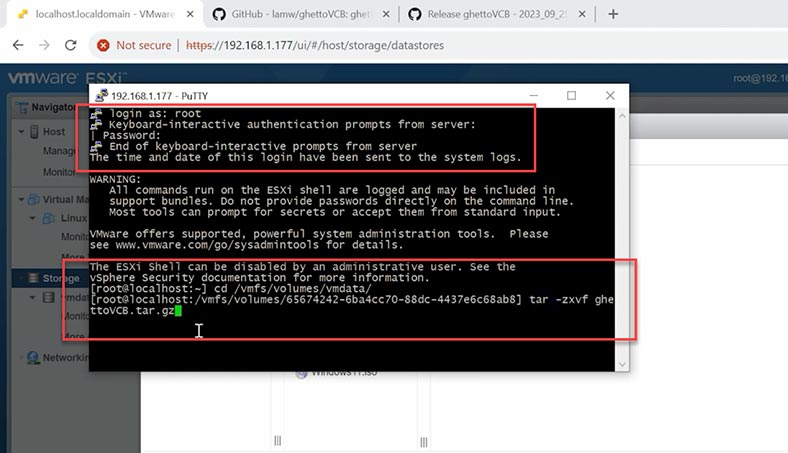
When it’s over, extract the archive. To do it, connect to ESXi host with an SSH client - for example, Putty. Type the host IP address and then the login and administrator’s password.
After successful login, go to the data storage where you downloaded the archive, type the command “cd” and the path:
cd /vmfs/volumes/vmdata/
To extract the archive, run this command:
tar -zxvf ghettoVCB.tar.gz
Give the correct archive name.
Now you have a folder on your server containing the GhettoVCB script.
Let’s create a special folder to keep your virtual machine backups - and let’s give it a simple name, backup. In addition to the local storage, you can also set up an NFS storage. If you have one more server or NAS, you can configure NFS access and save a backup file there. A bit later, I will show you how to configure NFS access on Synology NAS.
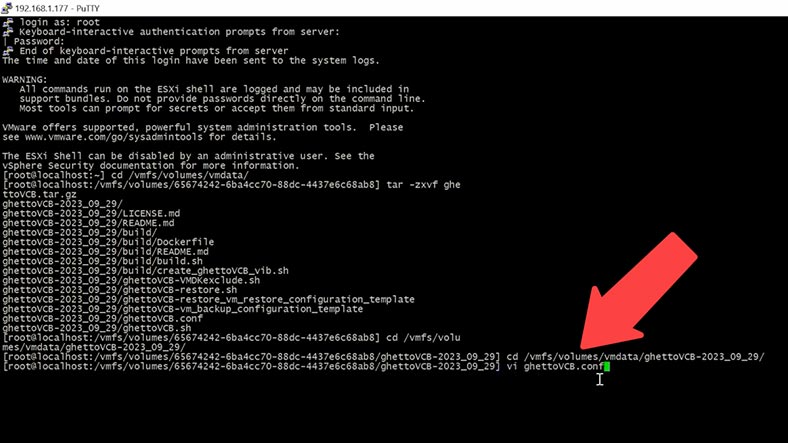
But now let’s modify the configuration file ghettoVCB.conf
Go to the folder containing the script:
cd /vmfs/volumes/vmdata/ghettoVCB-2023_09_29/
Open the configuration file in a text editor:
vi ghettoVCB.conf
Press the i key to edit.
You can modify some settings or delete everything and enter only the options you need.
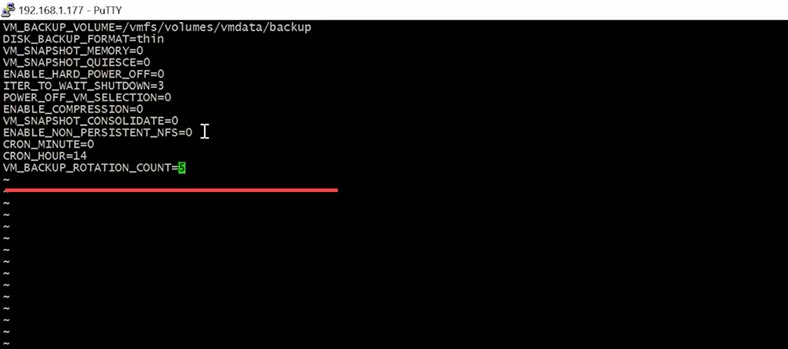
VM_BACKUP_VOLUME=/vmfs/volumes/vmdata/backup
DISK_BACKUP_FORMAT=thin
VM_SNAPSHOT_MEMORY=0
VM_SNAPSHOT_QUIESCE=0
ENABLE_HARD_POWER_OFF=0
ITER_TO_WAIT_SHUTDOWN=3
POWER_OFF_VM_SELECTION=0
ENABLE_COMPRESSION=0
VM_SNAPSHOT_CONSOLIDATE=0
ENABLE_NON_PERSISTENT_NFS=0
For starters, give the path to the folder where the backup should be stored; backup format - thin volume. Now, one of the important settings is the schedule: I will configure a daily backup at 2 pm, with the CRON parameter.
Add the variable CRON_MINUTE=0, and you can set any digit from 0 to 59.
And the variable CRON_HOUR=14, from 0 to 23.
After you run the script, a virtual machine backup will be created every day at the specified time.
Now let’s reduce the number of saved backups to 5 so that they don’t take up too much space.
Add VM_BACKUP_ROTATION_COUNT=5
This means that ghettoVCB will keep a maximum of 5 backup files, and when a new one is created, the oldest file which is now the sixth file, will be removed. Now let’s save the changes: press Esc, and type a combination of colon and wq (:wq). Now you can start the backup operations.
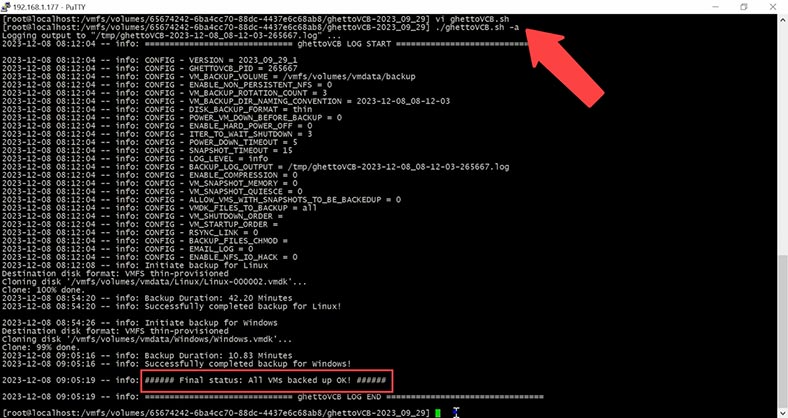
To check the configuration, run the script ghettoVCB:
./ghettoVCB.sh -a
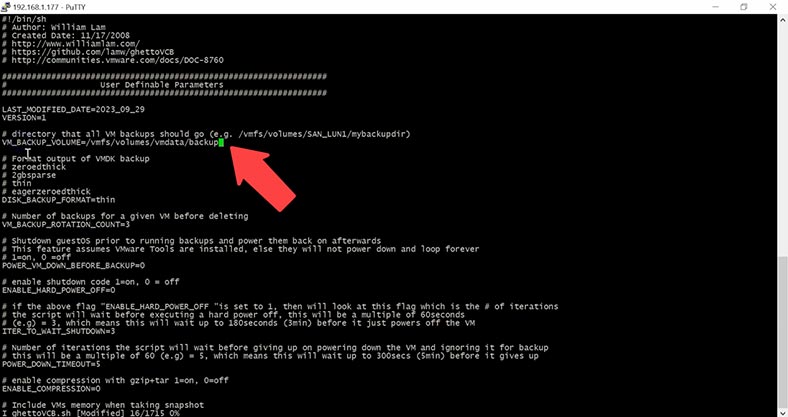
If you see an error saying that a backup can’t be saved and it shows a backup folder path different from the path you have given in the configuration file, you need to change the script file itself.
Open it in the script editor:
vi ghettoVCB.sh
Here, change the path to the backup folder, press the “i” key to edit
VM_BACKUP_VOLUME=/vmfs/volumes/vmdata/backup
Then press Esc - :wq to save the changes.
Run the script one more time.
./ghettoVCB.sh -a
- Parameter “-a” indicates backing up all virtual machines on the host.
- By giving the “-f” parameter, you can add a list of virtual machines for backup.
To create a list, open a text editor with a name for the list of virtual machines.
vi vm_backup
Add machine names
Linux
Windows
Esc :wq
The command using the list of virtual machines will look like this:
./ghettoVCB.sh -f vm_backup
With parameter “-c” you can add a directory for virtual machine configuration
You’ll get a backup of virtual machines based on certain configurations located in this directory.
Parameter “-g” gives the path to a global ghettoVCB configuration file
-
With parameter “-l” the output will be written to the log file.
./ghettoVCB.sh -a -l /vmfs/volume/vmdata/ghettoVCB.log Parameter “-d” indicates the debugging level [info|debug|dryrun]
For example, let’s run a command when the archive is not saved, and a test run will be performed.
./ghettoVCB.sh -a -d dryrun
Previously created backups of virtual machines are located in the specified folder.
How to configure an NFS storage
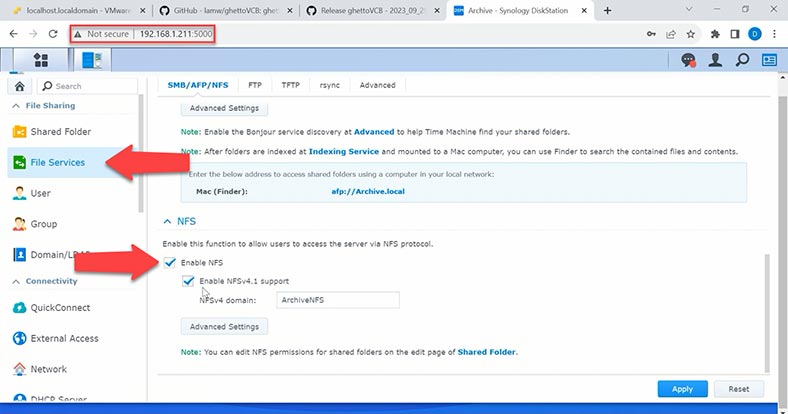
Now let’s explore how to configure NFS storage, with the example of Synology NAS.
By default, NFS is disabled for Synology NAS, so you need to turn it on first. Open the control panel – File Services – SMB/AFP/NFS tab, and scroll down to check the box next to Enable NFS and NFSv4.1.
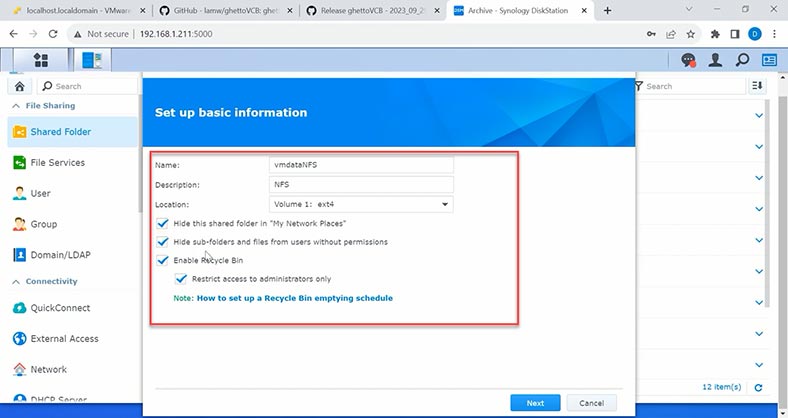
Now click on the Shared folder link and add a new folder by clicking Create. Give its name, description, check the options to hide this shared folder in My Network Places and to hide files from users without permissions, then click Next.
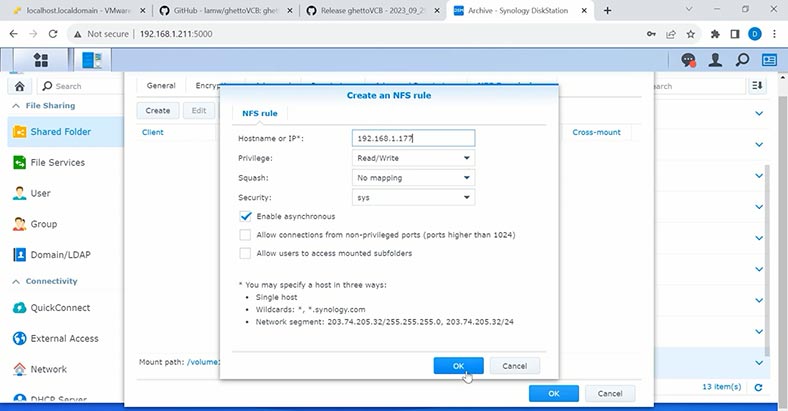
Open Permissions and allow access for your user only. Then navigate to NFS Permissions and click Create. Type your ESXi host IP address and click OK to confirm your choice.
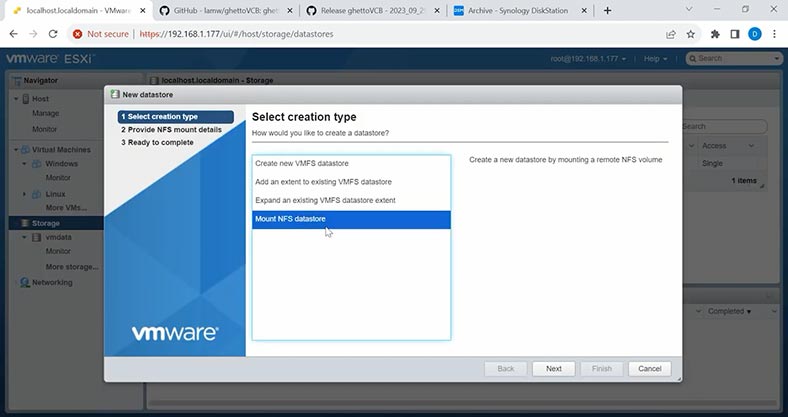
Remember the mount path - it is shown down below. All right, we have created a shared folder for backups. Now let’s proceed with host settings. Open the ESXi administration panel, go to Storage tab - New datastore. In the window that opens, choose the type – Mount NFS datastore and click Next.
Now give its name, type the storage IP address - in my case, the IP address of my Synology NAS - and give the directory which you have just remembered.
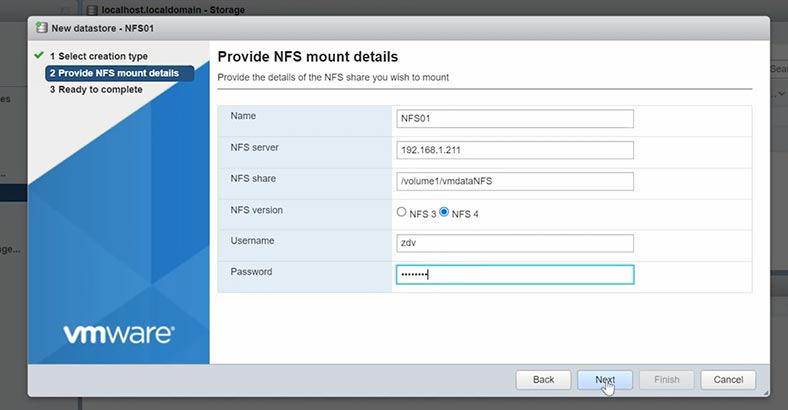
Choose NFS4, give the login and password with write permissions, click Next and Finish. After that, the new datastore will appear in this window. You will be able to configure backup to a new directory. To do it, you need to change the configuration file, and the script file, if necessary.
vi ghettoVCB.conf
Let’s add a new storage directory.
VM_BACKUP_VOLUME=/vmfs/volumes/NFS01
Enable NFS
UNMOUNT_NFS=1
Give the address of the NFS storage
NFS_SERVER=192.168.1.211
And give the directory
NFS_MOUNT=/vmdataNFS
NFS_LOCAL_NAME=backup
NFS_VM_BACKUP_DIR=Backup
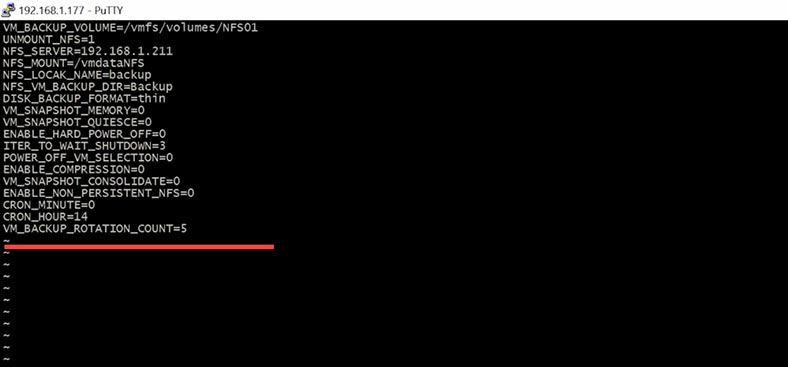
If nothing changes after you have edited the configuration file, add the settings data to the script file.
vi ghettoVCB.sh
To recover data from a backup, you need to copy files from the backup to a certain folder of your virtual machine, or register a new virtual machine from backup,
Virtual machines- Create/Register VM, Register an existing virtual machine
and give the path to the folder.
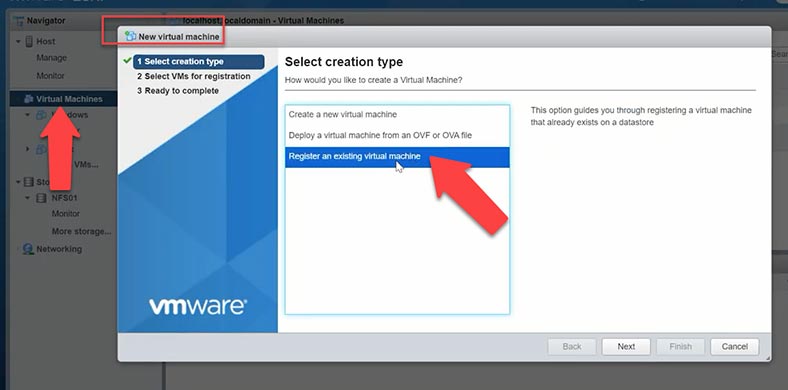
In advance, this folder should be copied to another directory, because it may be erased as new backups are created.
Recovering data with Hetman RAID Recovery
If you ever have any issues in restoring files from your backup, or a backup file is damaged or missing, you can always restore virtual machine files accidentally removed from an ESXi server as long as you have a dedicated tool – Hetman RAID Recovery.
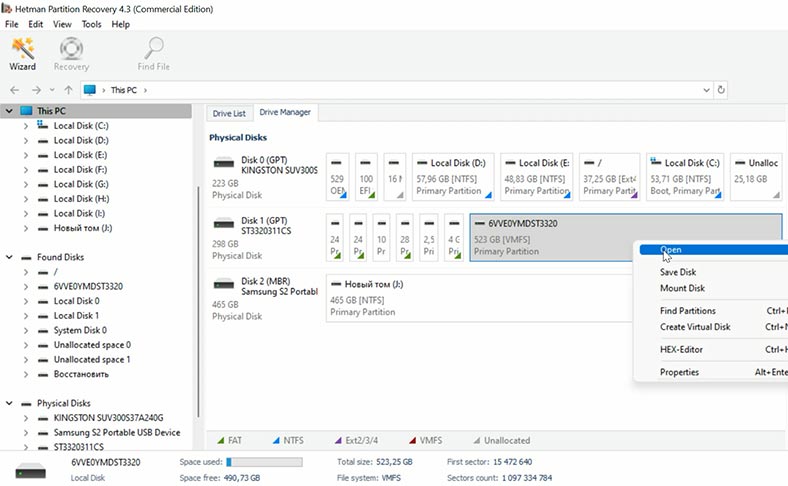
Hetman RAID Recovery will help you recover data if your RAID has crashed, if you deleted virtual machine files accidentally, or if the disks containing data have been formatted. The program will automatically rebuild the damaged array with the available hard disks and display its contents.
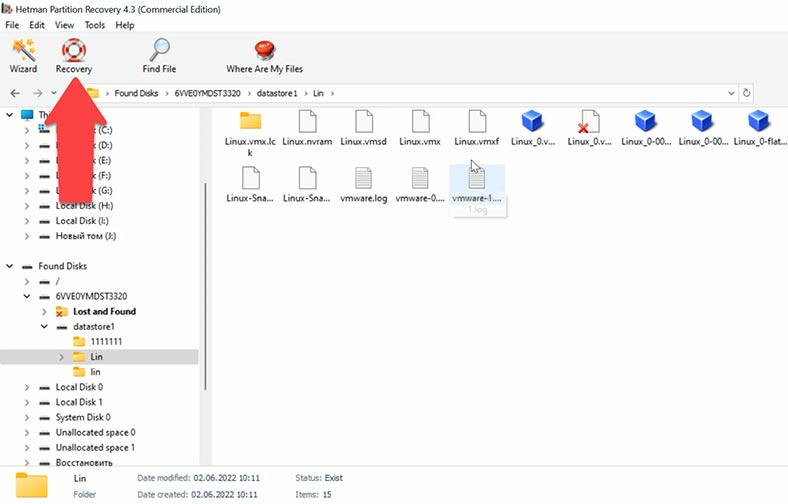
To recover your files, start the scan and wait until it’s over. After that, open the folder where the lost files were stored, and recover them.
| Program | Support for Virtual Disk Formats | Features | Interface | Platforms |
|---|---|---|---|---|
| Hetman RAID Recovery | VMDK, VHD, VHDX | Data recovery from damaged or deleted virtual disks, support for all types of file systems. | User-friendly interface with step-by-step instructions. | Windows |
| Stellar Data Recovery Technician | VMDK, VHD, VHDX | Data recovery from virtual machines, search and recovery of lost files. | Intuitive interface, customizable recovery options. | Windows |
| DiskInternals VMFS Recovery | VMDK | Data recovery from VMFS volumes on ESXi, support for RAID arrays. | Technical interface geared towards experienced users. | Windows |
| R-Studio | VMDK, VHD, VHDX | Data recovery from virtual disks, support for many file systems. | More technical interface, aimed at professionals. | Windows, macOS, Linux |
| EaseUS Data Recovery Wizard | VMDK, VHD, VHDX | Simple tool for recovering files from virtual machines. | Clear and easy-to-use interface. | Windows, macOS |
Conclusion
Summing up, we can say that setting up backup options for virtual machines and ESXi system configuration is a key element in ensuring safety and reliability of virtual infrastructure. Today we have reviewed several backup methods, including with the use of PowerCLI and a third-party script GhettoVCB. It is important to understand the process of creating backups, because it enables you to use quick recovery methods in case of data loss or failure.
Establishing robust backup options for VMware ESXi environments is imperative for ensuring data integrity and system resilience. Today, we've explored multiple backup methods, including PowerCLI for ESXi configuration backup, web interfaces for VM data backup, and third-party tools like GhettoVCB for automated backups. By understanding and implementing these backup strategies, organizations can bolster the security and reliability of their virtual infrastructures, enabling swift recovery in the event of data loss or system failures.
Additional Considerations for Backup of VMware ESXi
Importance of VM Backups
Virtual machines (VMs) store a plethora of critical data ranging from databases to web applications. The loss of such data can have severe repercussions, including business downtime, loss of customers, and legal ramifications. Regular backups are indispensable for mitigating risks associated with errors, failures, and system modifications. They facilitate quick recovery, minimizing the impact of system disruptions and ensuring continuous business operations.
Ensuring Data and System Configuration Backup
Data backup and system configuration backup are two pillars of an effective IT security strategy. Data backup involves preserving and restoring actual data stored within a system, encompassing files, databases, and multimedia content. On the other hand, system configuration backup entails saving system settings, including operating system configurations, application settings, and network parameters. Together, these backups fortify the resilience of the IT infrastructure against unforeseen events.


