Rescue Your Data Now: Comprehensive Guide to RAID-z Array Recovery
RAID-z arrays hold valuable data, but what happens when disaster strikes? Learn How to Recover Data from a RAID-z Array effortlessly in this comprehensive guide. Unlock the secrets of the ZFS file system and Network-Attached Storage with TrueNAS Core.
- ZFS: a brief description
- How to create a RAID-z2
- How to configure an FTP connection
- How to recover data from RAID-z of the first and second level
- Conclusion
- Questions and answers
- Comments
ZFS file system offers its own version of a software-based RAID known as RAID-Z. In addition to a certain performance boost, it can also fix slightest aspects of data corruption. To monitor the situation, it detects bad blocks by using checksums and then corrects logical errors immediately. This feature helps the array to maintain integrity for all of its data.
However, even the most reliable file system and equipment cannot completely guarantee your data against software and hardware failures.

How to Install and Configure TrueNAS Core 💿
ZFS: a brief description
ZFS is a open-source file system which is mostly used in FreeNAS storage systems and other solutions based on Free BSD.
The data distribution mechanism in RAID-z is similar to the conventional RAID 5, but with slight differences. It uses dynamic striping instead of fixed-width stripes.
The information about the size of each stripe is written to metadata. Due to the dynamic nature of this file system, its data can only be recovered if the metadata is not damaged.
ZFS was developed with reliability in mind, which is achieved by using various features such as copy-on-write, redundant metadata, journaling and others.
Because of the complicated structure of this file system, conventional data recovery tools are useless when it comes to restoring information from RAID-z arrays.
| Characteristic | Description |
|---|---|
| File System Type | 64-bit file system with Copy-On-Write (COW) capability |
| RAID Support | Built-in support for various RAID levels (RAID-Z1, RAID-Z2, RAID-Z3) |
| Compatibility | Support for multiple operating systems: Linux, FreeBSD, macOS |
| Backup Integration | Ability to create snapshots and replications for data protection |
| Data Protection | Built-in data integrity check using checksums |
| Compression | Support for transparent data compression (LZ4, GZIP) |
| Encryption | Support for built-in file system encryption |
| Scalability | Support for large numbers of disks and vast amounts of data |
| Caching | Efficient caching for improved performance (ARC – Adaptive Replacement Cache) |
| Self-Healing | Automatic recovery of corrupted data blocks using mirrors or parity |
However, Hetman RAID Recovery can analyze its metadata to identify the proper structure of RAID-z and then rebuilds the damaged RAID on the fly, and does it automatically.
How to create a RAID-z2
In one of our videos, you can see how to install and configure such operating system and how to create a RAID-z.
Now let’s find out how to build RAID-z2 (that is, an array of the second level).
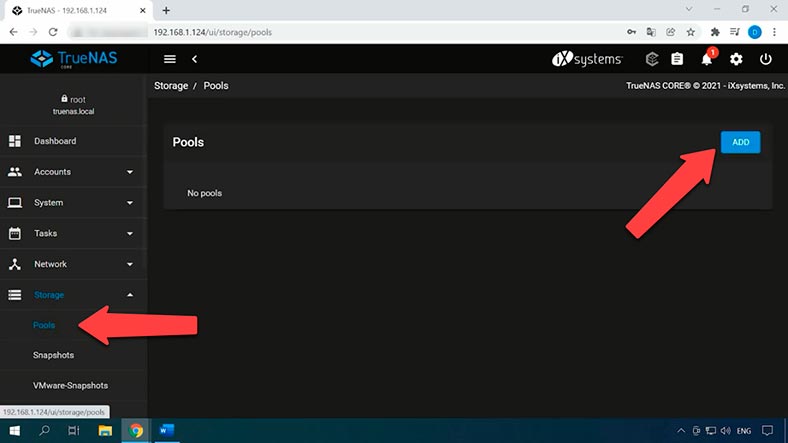
Start by accessing the TrueNAS management menu and expanding the tab “Storage” – “Pools”. Here, click the buttons “Add” and then “Create Pool”.
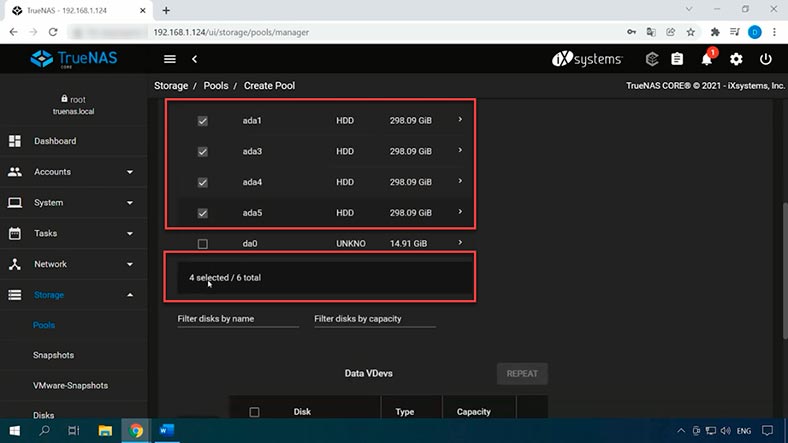
Give the pool name, and select disks – for RAID-z2 you need at least 4 disks – and then click on this arrow below to add storage devices to the list. Choose the drives here, and select the RAID level from the drop-down list, then click “Create”.
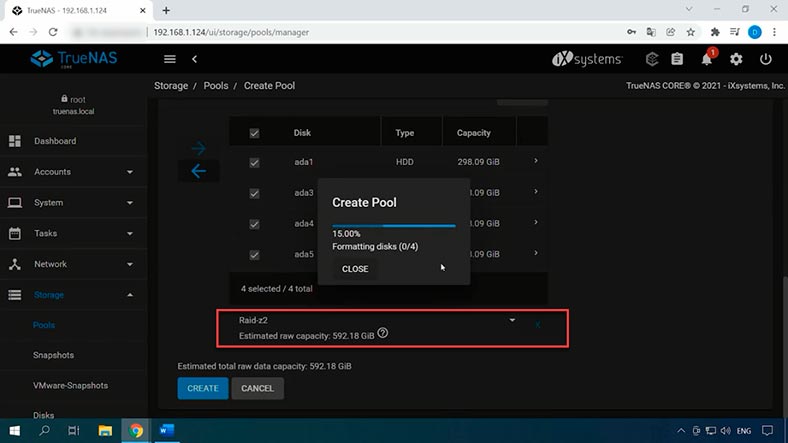
In the pop-up window saying that all data will be erased, check the box here and click “Create pool”, and it starts the process of formatting the drives and building the RAID.
How to configure an FTP connection
For example, let’s configure an FTP connection, write data to the RAID array, then imitate a situation involving loss or failure of the storage devise so that the data inside it is no longer accessible.
Let’s begin by adding a new dataset for FTP connection. Open the tab “Storage” – “Pools” – hit the three-dots button – “Add Dataset”.
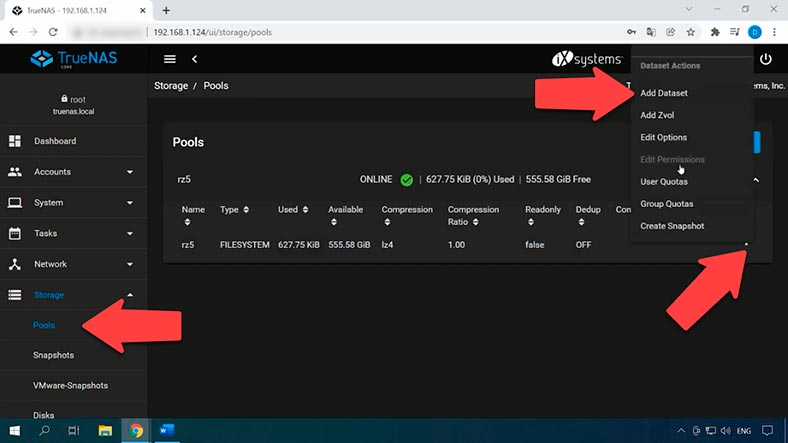
Assign a name, don’t change other settings, and click “Submit”. Create a new user for FTP: “Accounts” – “Users” – “Add”.
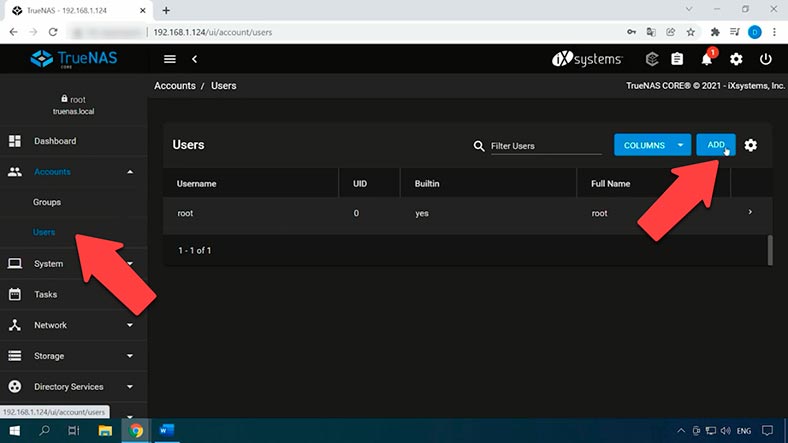
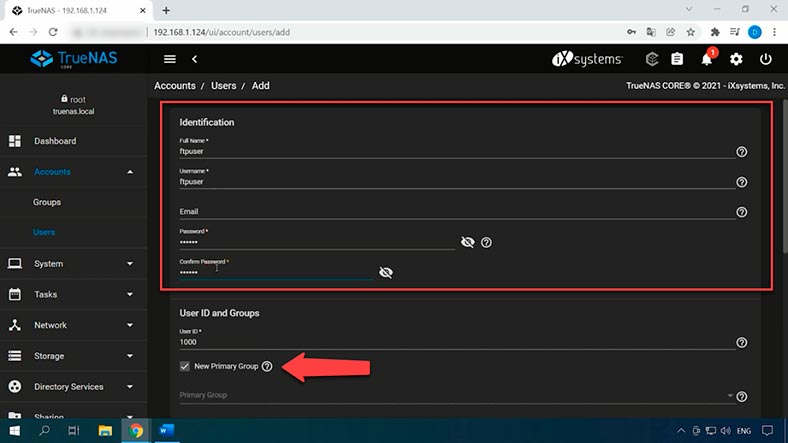
Give the name and password, uncheck the box next to “New Primary Group” and choose “ftp” from the list. Then select the directory we have created before, set the required permissions, and save the settings.
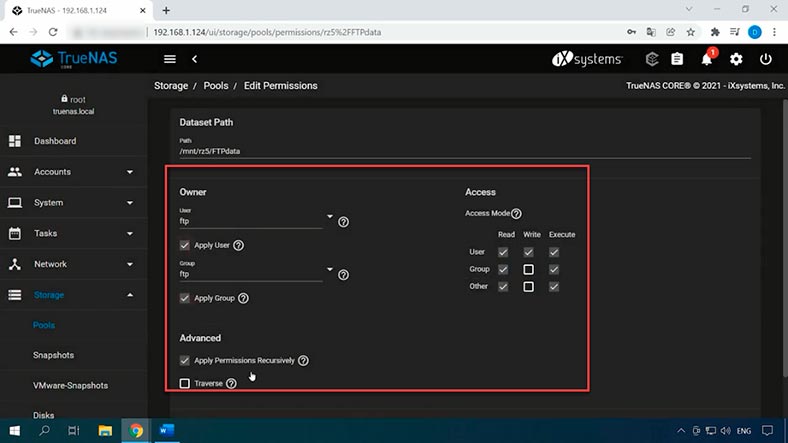
Let’s go back to the dataset we have created, and modify its permissions. Click on the three-dots button – “Edit Permission”.
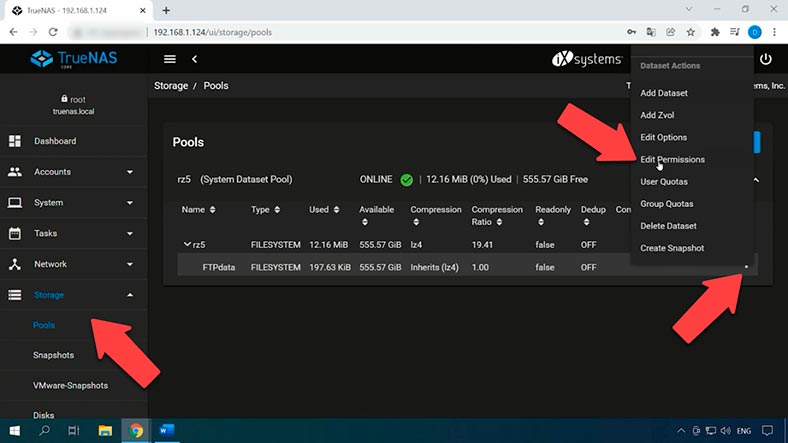
Choose the user – “ftp” and group – “Ftp”, check the box here, confirm it, then check the boxes for “Apply User” and “Apply Group”, then save the settings.
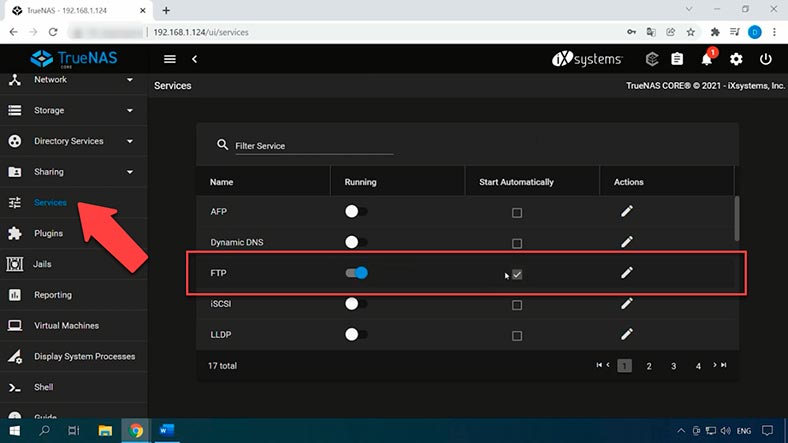
Now the last step is to enable the FTP server. Open “Services”, drag the slider to the “enabled” position, and check the box for automatic startup.
The FTP connection is configured, so let’s check access in the Explorer: in the address bar, type the FTP address of the server, and then the user’s login and password.
How to recover data from RAID-z of the first and second level
Method 1. Recovering RAID-z data

How to Recover Data from a RAID-z Array, ZFS File System, and a NAS with TrueNAS Core
Now let’s explore how to recover some information that was removed accidentally from a RAID-z array.
RAID-Z1 makes sure that every unique block of data is written, so that recovery is possible if any of the drives suffers a failure or breakdown. In this case, data is distributed across the array in the most optimal way. RAID-Z1 is very similar to RAID 5, as it uses single-parity data storage pattern, and it is designed to survive losing one of the disks in its array. But as I said before, only a few data recovery tools can handle this specific RAID type.
Hetman RAID Recovery supports the ZFS file system and RAID-z arrays of all levels. This program can automatically rebuild a RAID system created with the help of that file system. This is a comprehensive solution for NAS data recovery to help you restore your files in a number of different scenarios. This program supports most popular file systems and RAID types.
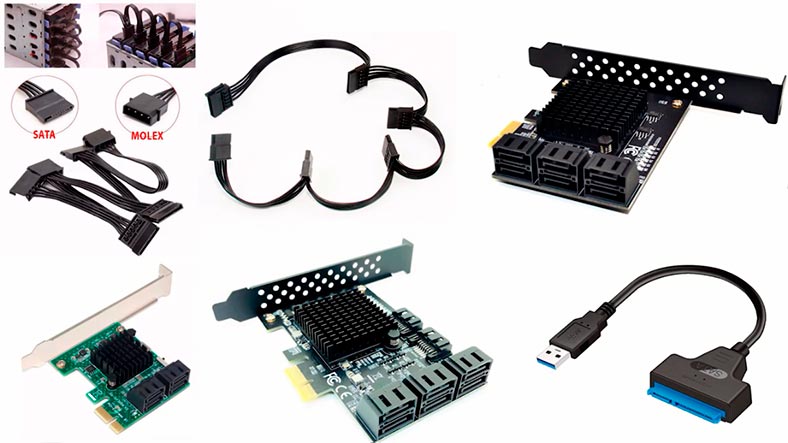
For recovery, take the disks out of the server and connect them to a Windows computer. If your motherboard doesn’t have enough ports to connect all the drives, there are all kinds of various adapters and expansion cards to fix this problem.
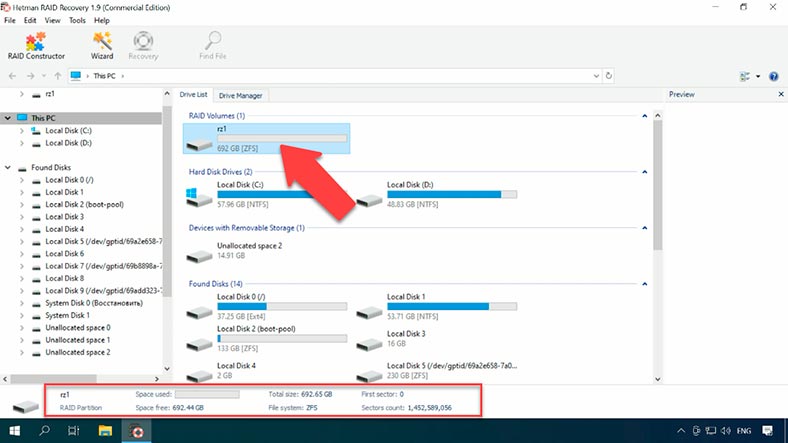
The program will scan the drives for service information automatically, and then it will rebuild the RAID system on the fly. As you can see, my RAID-z array is displayed in the Drive Manager.
To start the recovery process, analyze the drive: right-click on the array – “Open” – “Fast scan”. With Fast Scan the program didn’t manage to find the deleted files, but the files which are still on the disks are all available for recovery. The bottom line is that Fast Scan will help you get your data back in case of a hardware error or when your storage system breaks down.
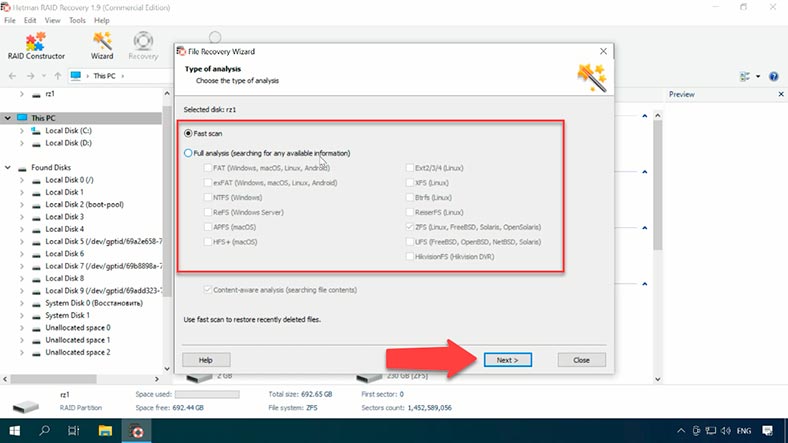
The metadata structure in ZFS file system and RAID-z is designed in such a way that the fast scan algorithm cannot find the deleted data because all information about it is erased from the journal.
That is why you need to run Full Analysis in order to find the deleted files.
Right-click on the partition, select “Analyze again” and go for “Full analysis”, choose the file system – Next – and wait until the scan is over. This process can be quite long and the actual time required to complete it depends on the size of your array.
When the scan is over, browse to the directory where the deleted files used to be and find the ones you need to recover: for your convenience, there is a feature to search for files by name. Also, you can check file contents with the preview option.
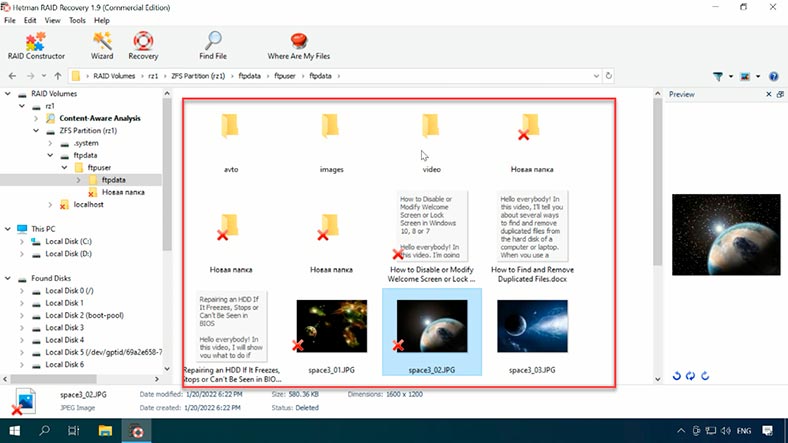
As you can see, the program managed to find all the files that have been removed from the disk. As the final step, select the ones you need and click “Recovery”; don’t forget to select where exactly the files have to be saved. We don’t recommend saving them to the same disk, so make sure you have another storage device to put your recovered data to. When the recovery process is over, you’ll find all of the files in the folder you have chosen.
Method 2. How to recover data from a RAIDz2 system (second level)
In order to recover any information, from RAID-z2 (that is, a second-level array) you also need to connect its disks to a Windows computer and then run Hetman RAID Recovery.
RAID-Z2 is more failure-resistant as it uses two parity blocks and two data blocks for every single bunch of data. It is similar to RAID 6 and it can survive even if two disks are down. In RAID-Z2, you are required to use at least four disks. So if your computer doesn’t have enough ports to connect all disks, you can easily exclude two of them from the array.
The program was able to rebuild the RAID even though two disks are missing. Right-click on the RAID and run Fast Scan. As a result, you can see the files which are still on the disks. Select the ones you need to restore and do it.
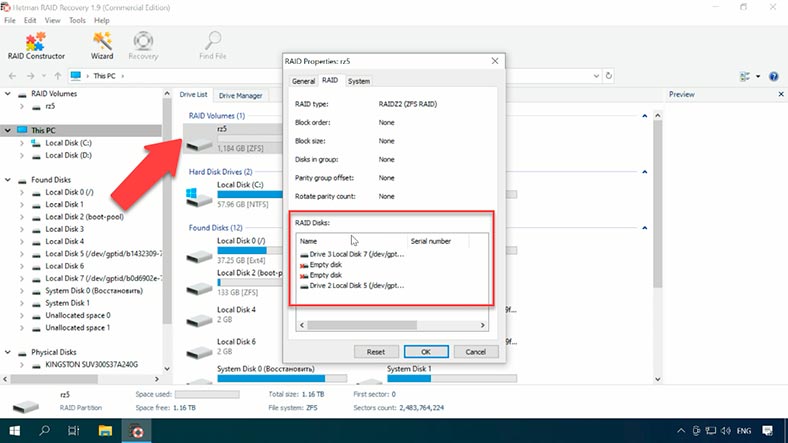
If the program failed to find certain files, they may have been erased; in this case, try “Full analysis”.
Conclusion
As a result of this testing, Hetman RAID Recovery was able to find 100% of data from a RAID-Z array based on the ZFS file system and deployed on a TrueNAS server. The program managed to recover the files in their original form, without any damage or loss of quality.
Hetman RAID Recovery will help you recover lost data if files are removed accidentally from a hard disk inside a NAS system, if a hard disk is formatted, the disk array is misconfigured, if there are any firmware issues, software errors, or in other scenarios involving loss of data, or loss of access to the network drive, or damage to the RAID volume.


If Hetman RAID Recovery does not find an existing raid configuration, try the following:
Make sure that all the drives are properly connected and recognised by your operating system.
Try opening each disc individually in Hetman RAID Recovery and check whether they contain the data of the raid array.
If you know the size of the raid array, you can try creating a new raid array in Hetman RAID Recovery with the appropriate size.
The RAID controller has no effect on the L0,L1 labels at all, only resetting the partition tables.
Maybe there is some ZDB magic that can help, but creating a RAID 0 HP Logical Drive is a pretty deliberate action.
There would be a clear warning that the data contained on the drives would be lost due to Smart Array metadata.
In general, using multiple RAID 0 Logical Drives for ZFS is a bad idea for a hardware RAID controller.
But it was a bad mistake.