Expanding RAID 5 Without Data Loss: Adding Drives on Controllers, NAS, Linux
In this tutorial, we’ll walk you through the process of adding more drives to an existing RAID 5 array without risking any data loss. Whether you’re using a hardware controller, NAS, or Linux-based system, this guide will provide you with the necessary steps to expand your storage capacity safely.
- Method 1. How to expand and existing RAID 5 based on a controller
- Method 2. How to expand RAID5 in a NAS storage device
- Method 3. How to expand MDRAID
- Method 4. How to expand a software LVMRAID
- Method 5. How to expand a btrfsRAID
- Conclusion
- Questions and answers
- Comments
When a RAID runs out of free space, it is time to consider available options to expand your storage. It means adding more drives to the array, if such option is supported by the server’s hardware; otherwise, you can rebuild the array with drives of larger capacity.
If your server has a free slot for another HDD, then you can expand the existing RAID system without losing any data at all. We’ll explore how to add a hard disk to an array based on a controller, or built on a NAS storage system (with the example of a Qnap unit), how to do it on a software Linux-based RAID created with the help of MDADM and LVM utilities, or on the array created with the means of BTRFS file system.

How to Add More Drives to an Existing RAID 5 Without Losing Data. Controller, NAS, Linux
Method 1. How to expand and existing RAID 5 based on a controller
For starters, let’s see how to add a new disk to a hardware RAID based on a dedicated controller.
Some controllers support adding new hard disks to the existing RAID 5 and 6 systems, which allows to expand the disk array in order to have more storage space for your files. In our example, we’ll be expanding a RAID 5 with 3 drives to get a RAID 5 with 4 drives.
Let’s begin with connecting the new drive to the server. After that, go to the controller’s BIOS or RAID management utility. Keep in mind, that some controllers may not support adding new drives, so it’s always a good idea to check your storage device manual for details. Keep in mind, that some controllers may not support adding new drives, so it’s always a good idea to check your storage device manual for details. All the data on the new drive will be erased. Also, we recommend creating a backup copy of important files stored on your array.
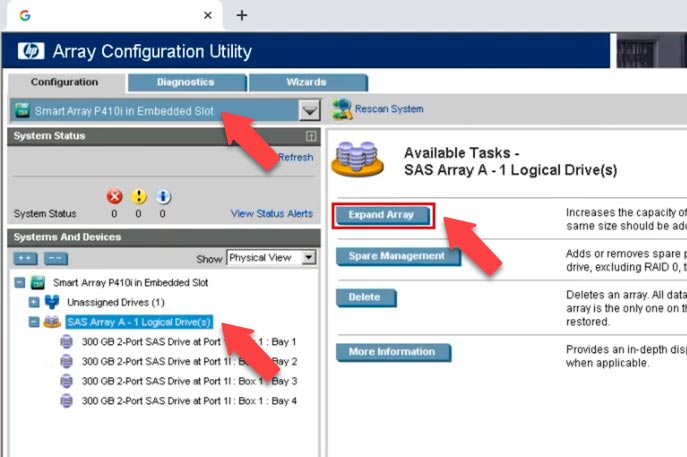
In the RAID management utility window, select the controller and then the array that needs to be expanded; look to the right to find and select the option Expand Array.
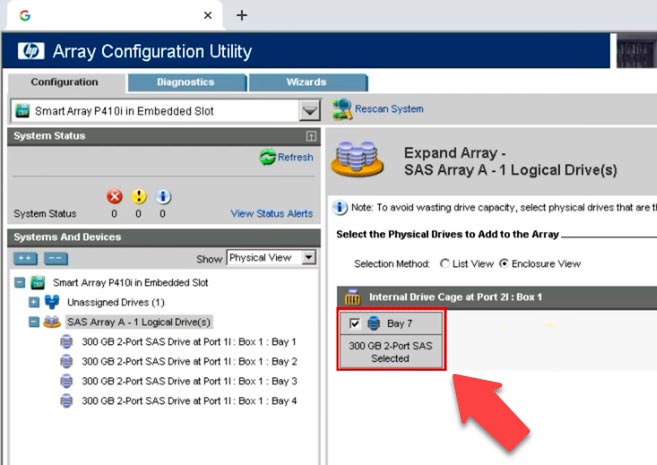
After that, choose the drive to add to the array and click Save. It starts the array expansion process, and you can see the status here.
Wait until the rebuilding is complete. When it’s over, some unused space will appear in your array, and you should add it to the logical drive. Select the logical drive you want to extend and click Extend Logical Drive on the right. Choose Maximum size here or set another value, and then click Save.
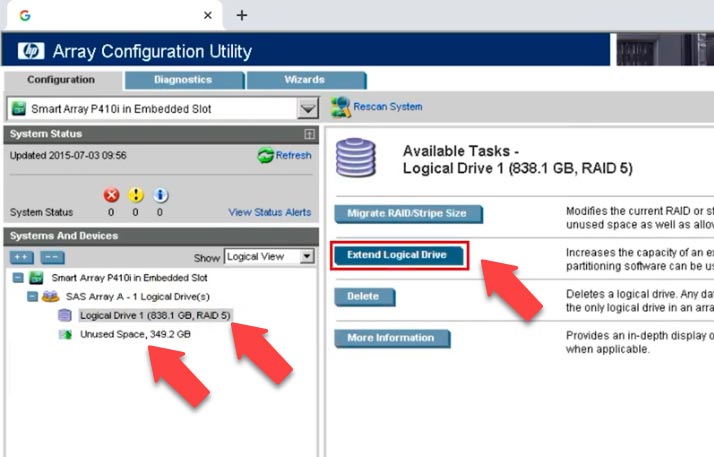
After that, the process of rebuilding the array begins. When it’s over, the array capacity will increase. Meanwhile, all your data on the array disks will be left intact.
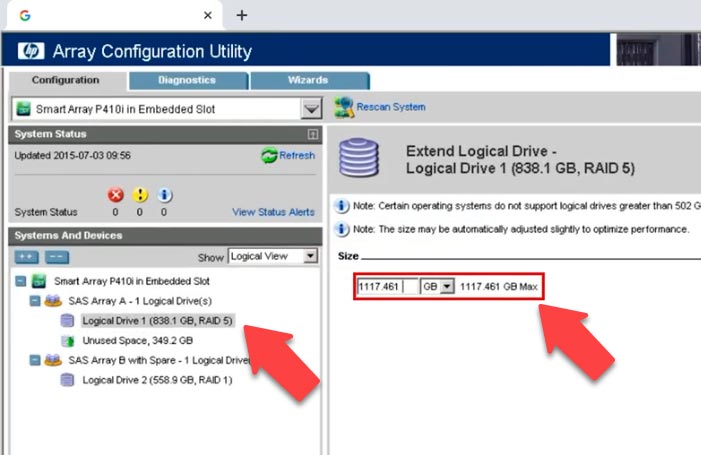
If a specific drive doesn’t appear on this list, it might be unsuitable for adding to the array. For example, its capacity could be lower than that of any other drive within the array, or the drive was not formatted for this operation. It can also belong to another disk array or was configured as a hot swap drive.
Method 2. How to expand RAID5 in a NAS storage device
Now let’s explore how it can be done with a NAS device. If your NAS storage has an empty slot for one more HDD, you can easily expand the capacity of your virtual drive by adding a new hard disk.
To do it, connect the hard disk to the NAS, boot it and open the storage management panel. After that, open the menu, and access Storage Manager – Storage Pool.
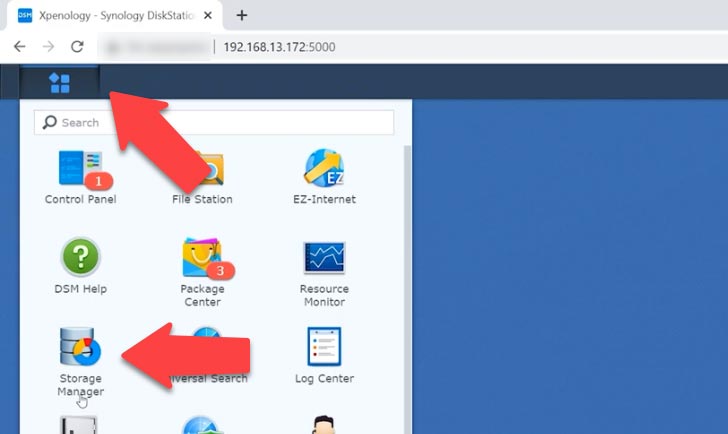
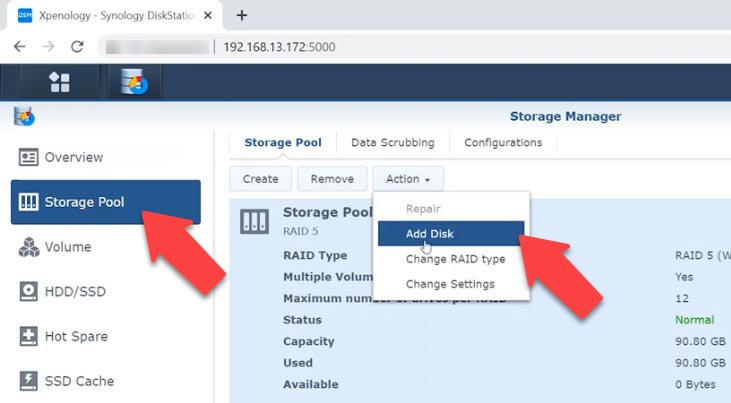
Click on the Actions button and select Add Disk from the list.
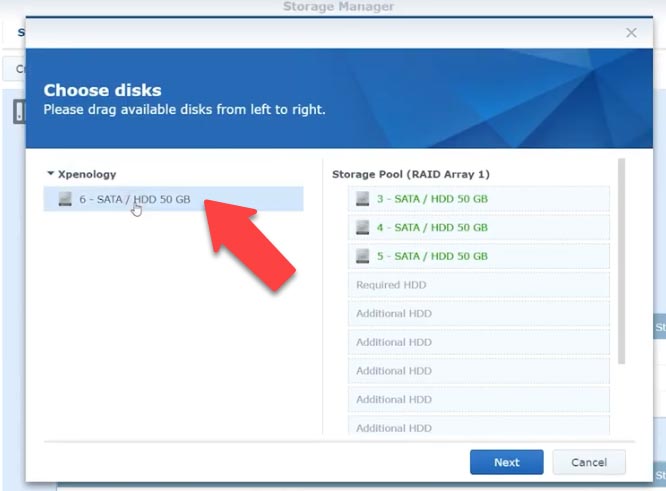
In the window that opens, add the new disk to the existing array and click Next.
When you do that, there will be a warning that all information on the disk is going to be erased. Click OK to confirm this action. At the next stage, check the properties and click Apply. It starts the initialization process, but the disk will be available even now, so you can continue working with the storage.
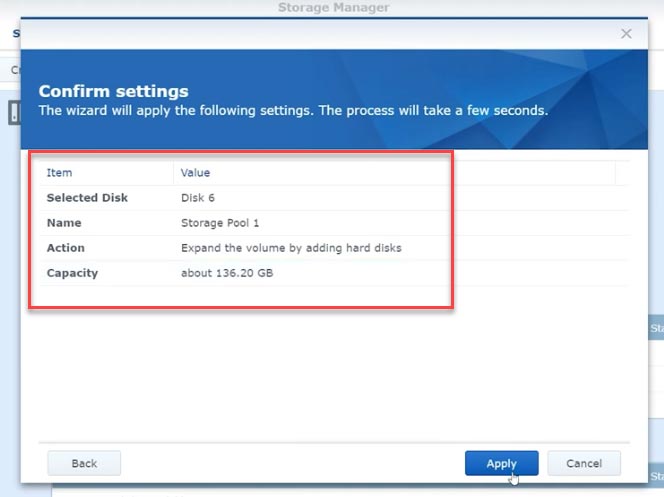
When the initialization is over, the last step is to expand the RAID. To do it, open Volume, then go to Action – Configure, and in the window that opens, set the necessary size and click OK. Wait until the expansion operation is over and check the data that was stored on the disks.
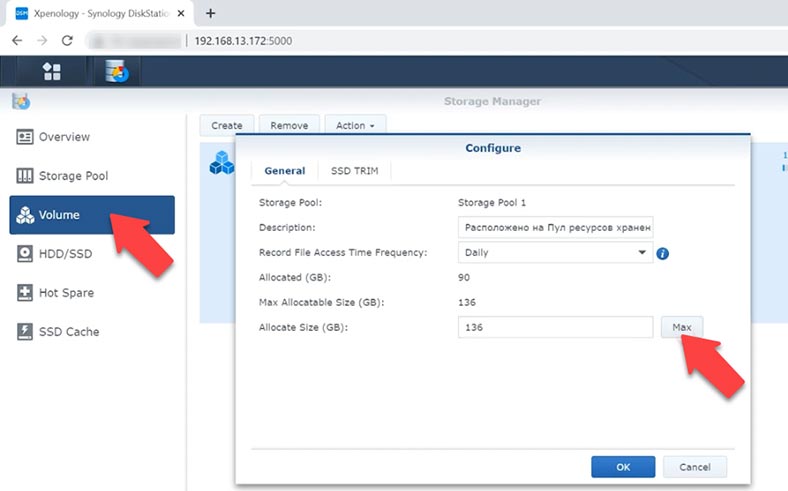
All the files are still there.
Method 3. How to expand MDRAID
Now let’s explore how to add a drive to MDRAID 5 without losing data stored on the disk array. In Linux Ubuntu, I have built a software RAID 5 consisting of three disks, using the MDADM utility. I need to add another hard disk of the same size to this array. For starters, we have to prepare a disk.
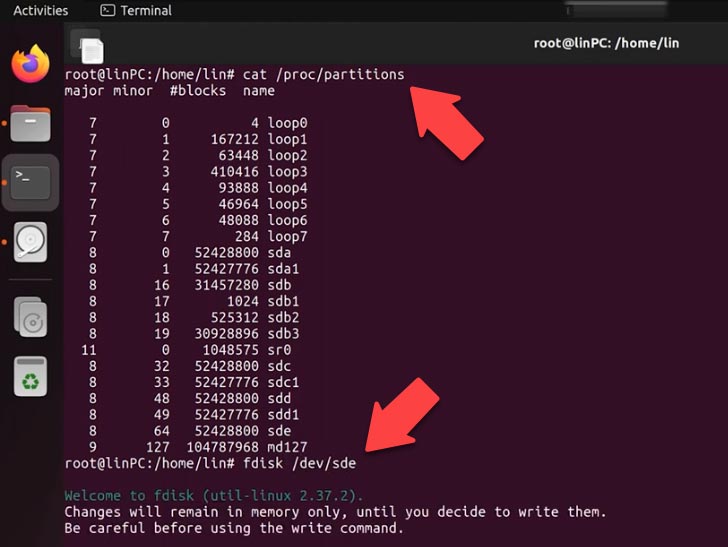
Let’s identify the disk that needs to be added, and type this command.
Cat /proc/partitions
After that, I have to create a partition on the disk.
fdisk /dev/sde
- n – new;
- p – primary;
- 1 – partition number.
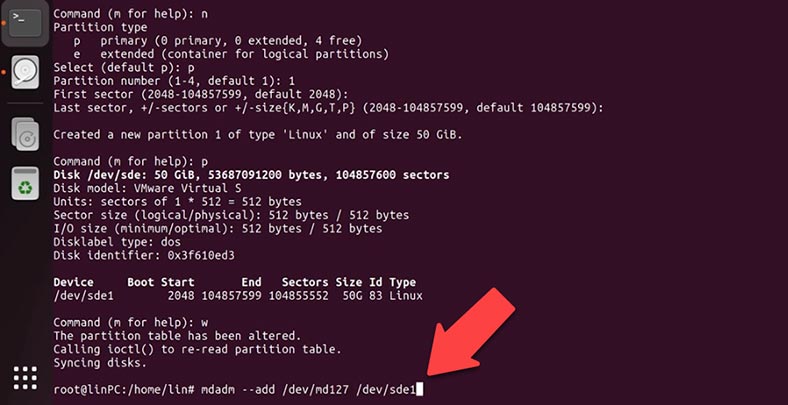
Leave other settings without changes, and press Enter twice.
W – record the changes.
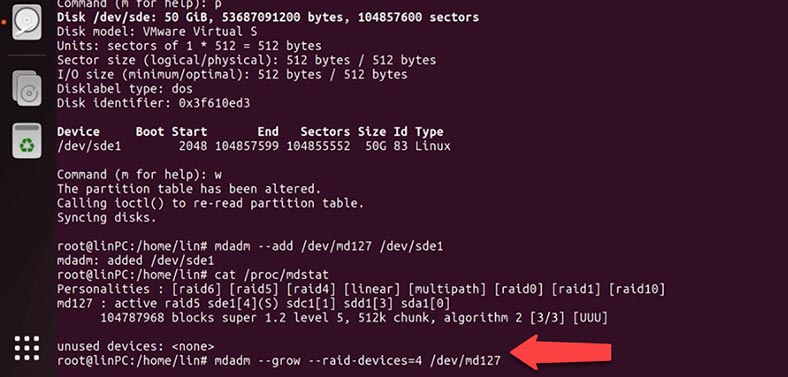
Now that the disk is partitioned, add it to the existing RAID5 array by using this command:
mdadm –add /dev/md127 /dev/sde1
Check the RAID:
cat /proc/mdstat
As a result, the disk was added as a spare device. To expand the array with this new disk, you need to type the following command:
Mdadm –grow –raid-devices=4 /dev/md127
This command tells the system that the RAID makes use of 4 hard disks. This way, the command initializes RAID rebuilding, since the information has to be spread across all the hard disks. This process takes some time so wait until it is over.
To have its status displayed, there’s a special command:
Cat /proc/mdstat
The actual reshaping progress will be shown here.
Now the RAID consists of four hard disks, but its size is still equal to 100 GB.
To be able to use the 50 GB available on RAID 5, you’ll have to change the file system size. First, run the integrity check.
e2fsck -f /dev/md127
After this operation is completed without errors, the file system can be extended. You can do it with the help of the tool called resize2fs.
resize2fs /dev/md127
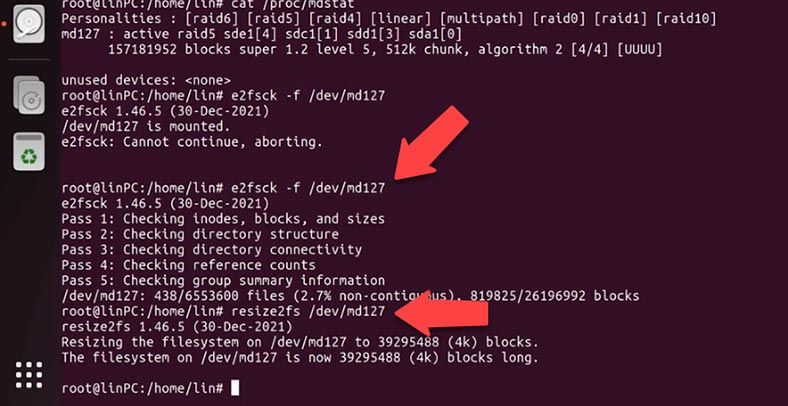
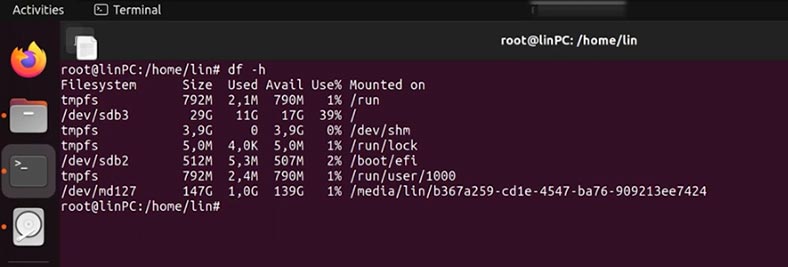
Mount the disk and check it. The partition has been extended, and all the files are still there.
Method 4. How to expand a software LVMRAID
Now let’s find out what can be done to another type of software RAID, built with the LVM utility. I have an LVM RAID 5 consisting of three hard disks, and I’d like to add one more.
For starters, it should be prepared and partitioned. I’m going to show you how to do it with the fdisk utility.
For partitioning, type the following command:
Fdisk /dev/sdd
Specify the disk name here.
- n – new;
- p – primary;
- 1 – partition number.
Leave other settings without changes, and press Enter twice.
W – record the changes.
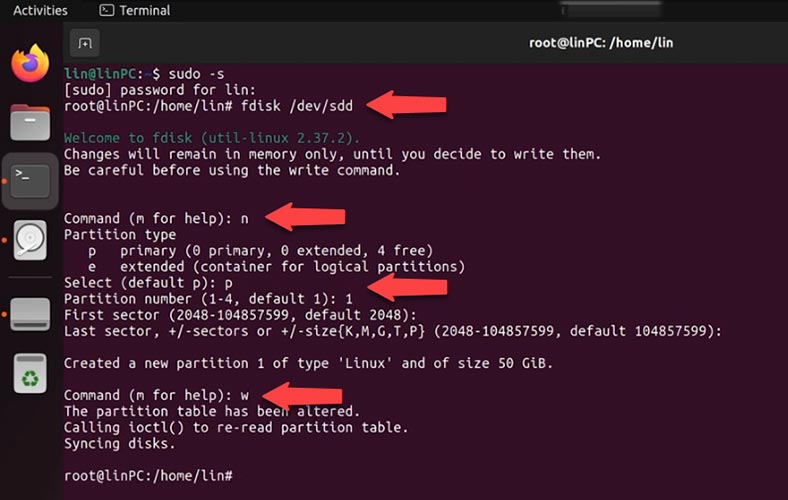
After that, create a virtual disk on this HDD by using another command:
Pvcreate /dev/sdd1
Then use this virtual disk to extend the vg1 group, with this command:
Vgextend vg1 /dev/sdd1
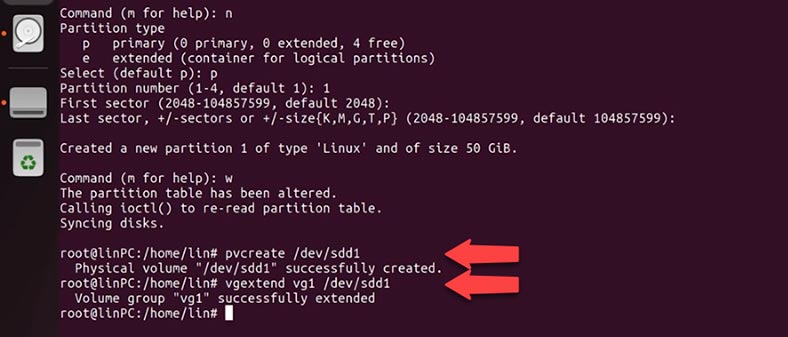
Check the properties of the virtual group.
Vgs
Finally, type the command to expand the RAID 5 logical volume:
lvconvert --stripes 3 /dev/vg1/lvr5
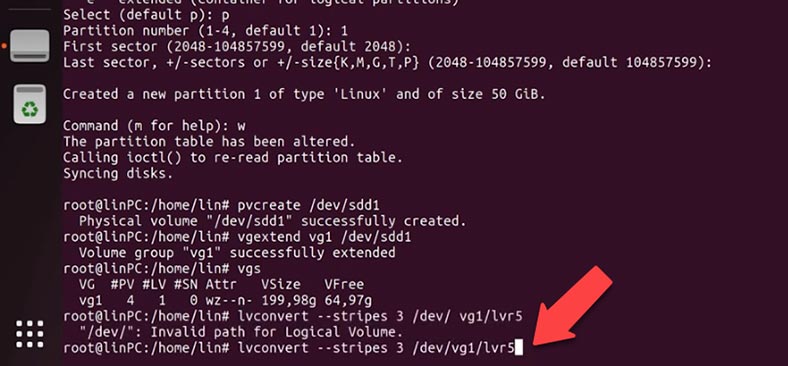
Then extend the file system on the logical volume
lvresize --extents +100%FREE --resizefs /dev/vg1/lvr5
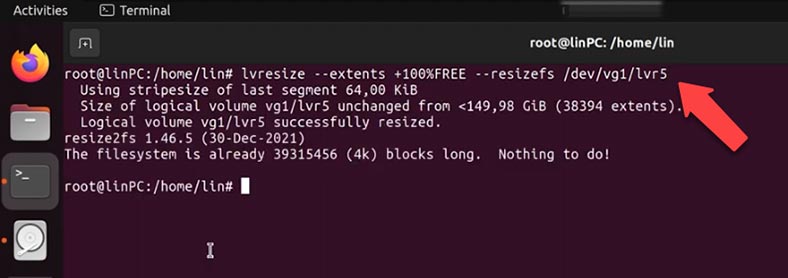
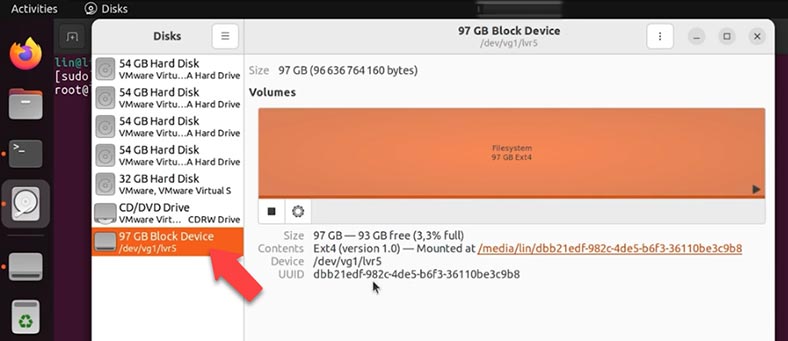
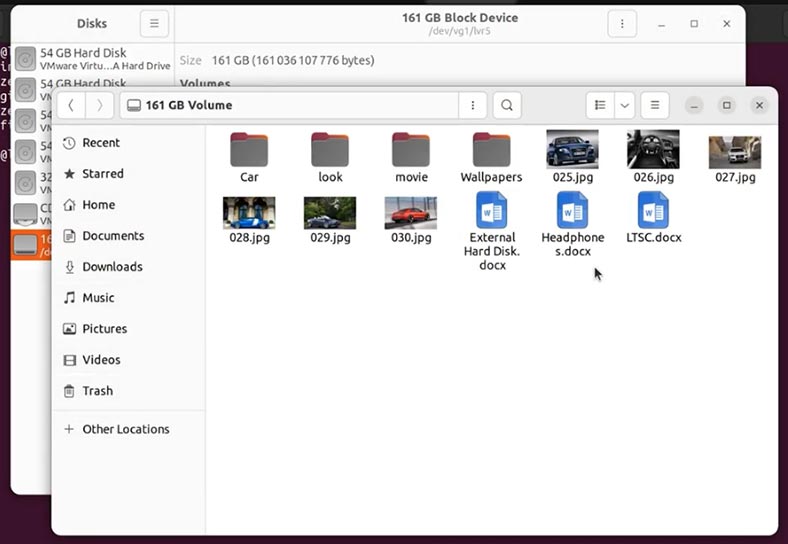
Open the disk utility and check the RAID properties. Now it consists of four disks and the files are intact.
Method 5. How to expand a btrfsRAID
Here’s one more RAID system created with the help of BTRFS file system. It consists of three hard disks, and we are going to add another hard disk of the similar size. The files stored on this RAID will not be erased.
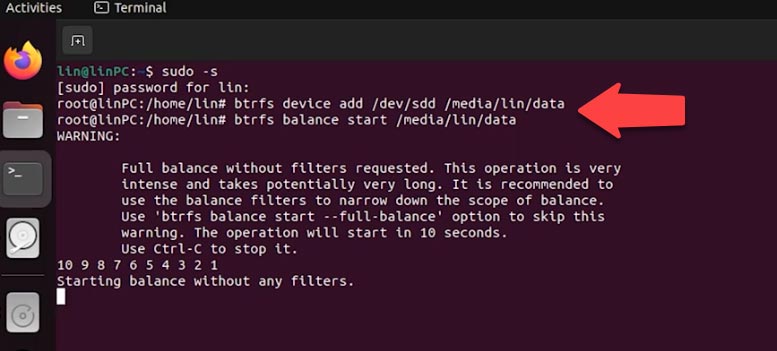
To expand the software btrfsRAID, we’ll use the command btrfs device add. To add a storage device to the mounted file system, run this command:
btrfs device add /dev/sdd /media/lin/data
After the device is added, it is recommended to balance the BTRFS file system. To do it, type this command in the terminal:
btrfs balance start /media/lin/data
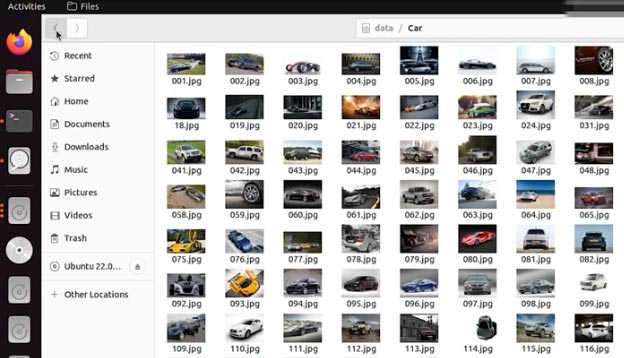
When we check the array with the disk utility, you can see that its size has increased and the files stored on the disk array have not been erased.
Conclusion
Summing up, we have just explored several ways of expanding a RAID. Following our video tutorial, you’ll be able to save the data which is stored on your RAID system. But even if your RAID has crashed, and you lost access to the files stored on that disk array, you will always be able to restore them with the help of the specialized tool - Hetman RAID Recovery. In our previous articles, we have studied in detail the process of recovering data from all RAID types mentioned in this material.
| # | Action | Description |
|---|---|---|
| 1. | Turn off NAS or RAID controller | Safely power down the NAS or RAID controller and disconnect the drives. |
| 2. | Connect drives to PC | Connect the RAID drives to a Windows PC using SATA or USB adapters. |
| 3. | Install Hetman RAID Recovery | Download and install Hetman RAID Recovery software on the Windows PC. |
| 4. | Launch the program | Open Hetman RAID Recovery and allow the software to automatically detect the RAID configuration. |
| 5. | Data scanning | Select the detected RAID array and perform a full scan to search for lost data. |
| 6. | Review and recover | Review the found files and select those you want to recover. Save them to another storage device. |
| 7. | Replace faulty drive | Replace any faulty drive with a new one if detected. |
| 8. | Data restoration | Transfer the recovered data back to the NAS. |




Yes, there are a few considerations to keep in mind when adding multiple disks to a RAID 5 array.