Recover Data from RAID 0 & RAID 5: HP P822 Controller
Need to recover data from RAID 0 and RAID 5 systems based on an HP P822 Controller? Our comprehensive guide has got you covered! Learn step-by-step instructions and expert tips for successfully salvaging your data from RAID setups on the HP P822 controller. Say goodbye to data loss worries and hello to recovered files!
- How to create a RAID 0 system in the console version of HP Array Configuration Utility
- How to create a RAID 5 system in HP Array Configuration Utility with a graphical interface
- Data Recovery from RAID on HP P822
- Questions and answers
- Comments
Array Configuration Utility (ACU for short) is a tool for configuring disk arrays built on HP Smart Array controllers. This utility lets you control and monitor the status of RAID controllers and disk arrays.
You can download the program from the official website.
| Feature | Description |
|---|---|
| Purpose | Tool for configuring RAID arrays |
| Supported RAID types | RAID 0, RAID 1, RAID 5, RAID 10 |
| User interface | Graphical interface and command line |
| Platforms | Support for Windows and Linux |
| Monitoring capabilities | Real-time array status monitoring |
| Recovery features | Ability to recover damaged arrays |
| Integration | Support for controllers from various manufacturers |
| Hot swap support | Ability to replace drives without shutting down the system |
| Supported media types | HDD, SSD |
| Logs and reports | Creation of detailed operation logs and RAID array status reports |
| Array creation and rebuild features | Available features for initial array creation and data recovery on new drives |
| Data security | Support for encryption and data protection |
| Automation | Ability to set up scripts for automating configuration processes |

How to Recover Data from RAID0 and 5 Based on HP P822 Controller. Two RAID systems on one controller
It is available in two versions – the one with a graphical interface, and the one designed for the Command Prompt.
I’ll show you how to create disk arrays with both versions of the utility as we’ll be building them on an HP P822 controller.
The disks connected to the controller can be used to build one, two or even more RAID systems of any level; the number and level of disk arrays will only be limited by how many disks you have at hand.
The only downside of this strategy is that you’re going to lose data on both RAID systems the moment your controller breaks down.
For illustration, we will create a RAID 0 for the operating system to boost read and write speed, and a RAID 5 to store backups, archives and other important information.
In this case, the failure of one array is not going to affect the work of the other one.
How to create a RAID 0 system in the console version of HP Array Configuration Utility
For starters, let’s explore how to create a RAID system with the help of the Command Prompt.
The first step is to find the utility on the HPE official website and download it.
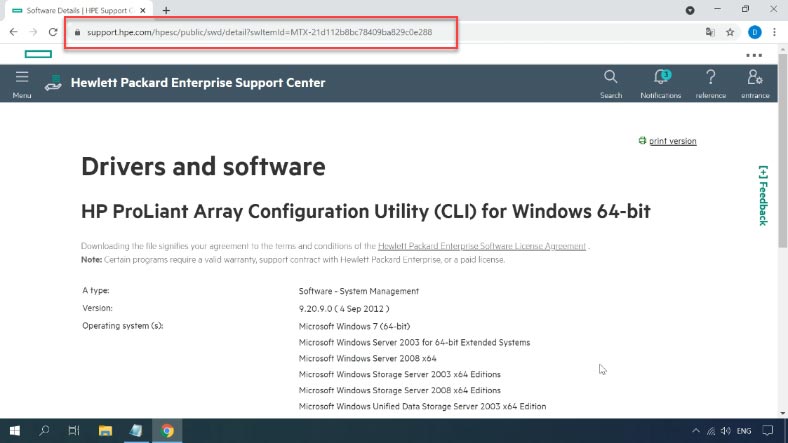
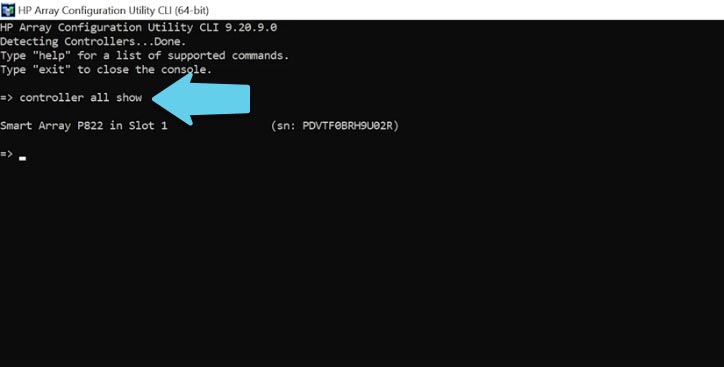
Run the utility and check the information about our controller. In order to address a specific controller to build a RAID system, you need to identify the slot to which it is connected. This can be done with the command below:
controller all show
This command addresses all controllers and displays their status. As a result, you’ll see the list of controllers and the slots where each of them belongs.
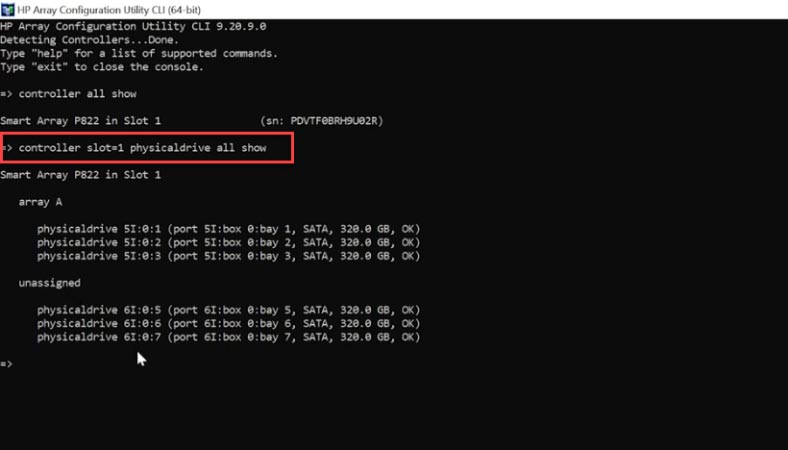
Now you need to find out what disks are connected to the controller. Here is the command to use:
controller slot=1 physicaldrive all show
This command addresses the controller in the first slot and displays all physical disks connected to it, as well as the drives united into a RAID system.
When you identify the disks that the future array will consist of, you can start building this RAID. For this purpose, command create is used:
hpacucli controller slot=1 create type=ld drives=allunassigned raid=5 size=max
hpacucli controller slot=1 create type=ld drives=1:5,1:6,1:7 raid=5 size=max
This command contains the following attributes:
Controller slot – 1.
Device type to be created: “ld” which stands for logical disk.
The disks to be included in this RAID can be presented as a list of drives, or you can select all unassigned drives.
Another part of the command is the RAID level to be created.
Finally, you specify the size of the logical disk you want to create. You can either give it in megabytes or select all available capacity, by adding “max.”
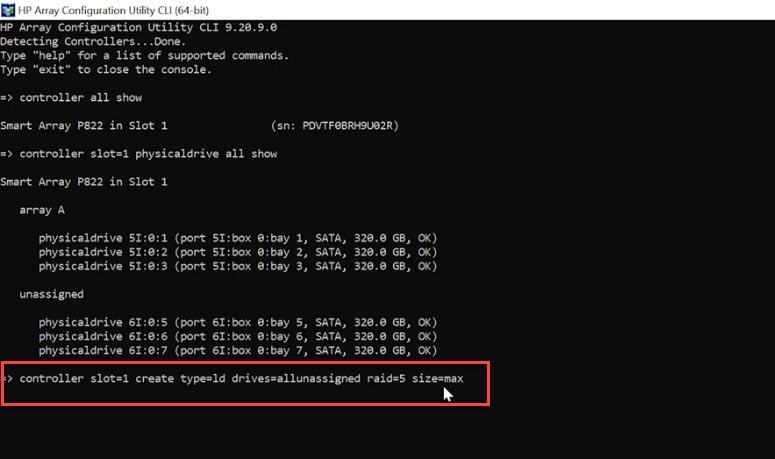
To see if this command was successful, use another one to check:
hpacucli controller slot=1 show config
As a result, you’ll get the information about all arrays created on this controller in a specific slot.
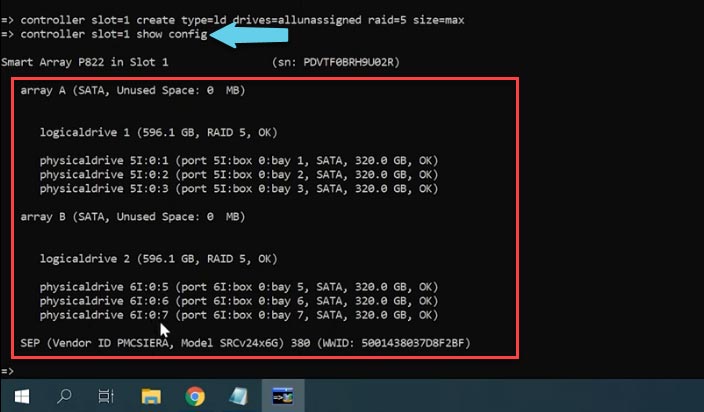
As we can see, RAID5 was created with the entire space provided by three disks. Due to peculiarities of its structure, the total capacity of a RAID 5 logical disk includes the capacities of all the physical disks except for one of them: this RAID 5 was created with 3 drives of 300 GB each, and the final capacity of the logical disk is 600 GB.
The last step is to format the new logical disk in the Disk Management.
How to create a RAID 5 system in HP Array Configuration Utility with a graphical interface
Now let’s try to create a RAID system with the same utility, but using the version with the graphical interface.
Run the utility and select the controller from this list.
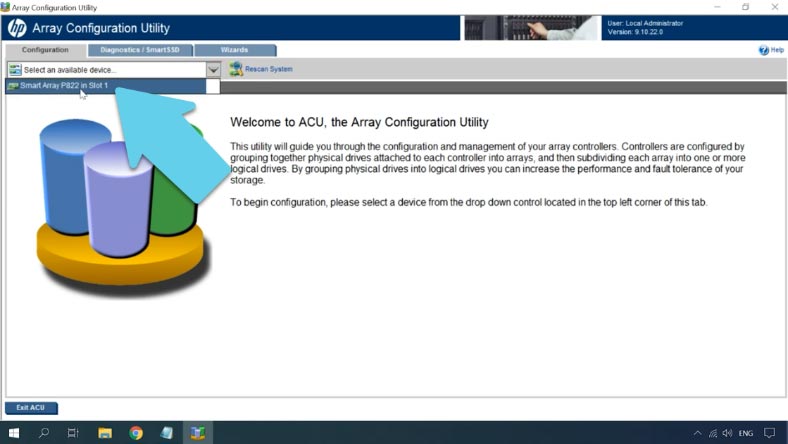
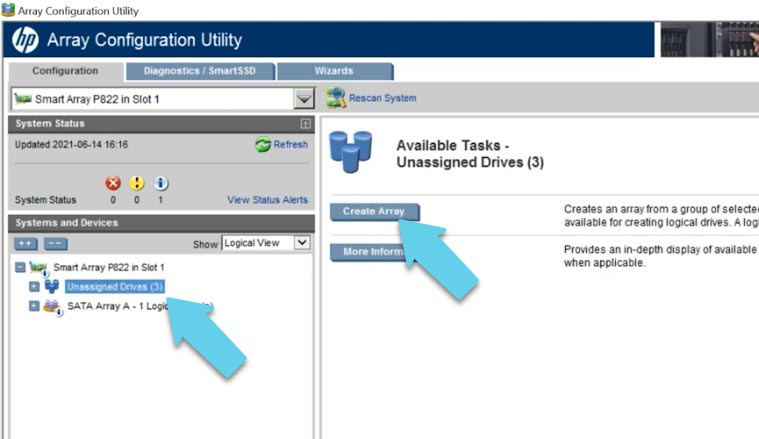
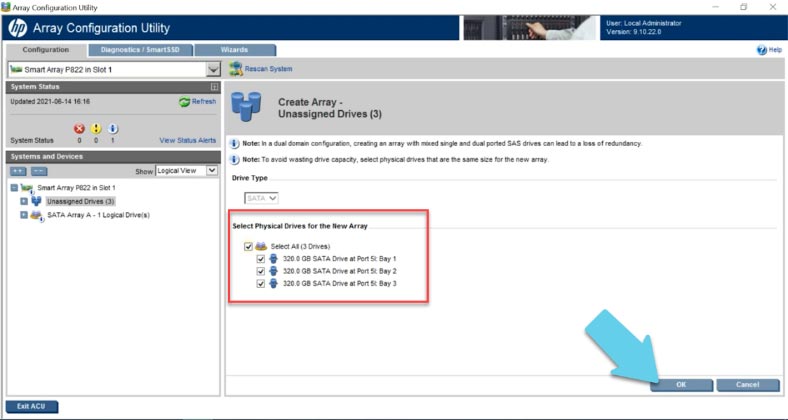
Below, click on the controller or on the unassigned disks and then click “Create Array” on the right. Select the disks that the future array will consist of, and click OK. In the next window, hit the button “Create Logical Drive.”
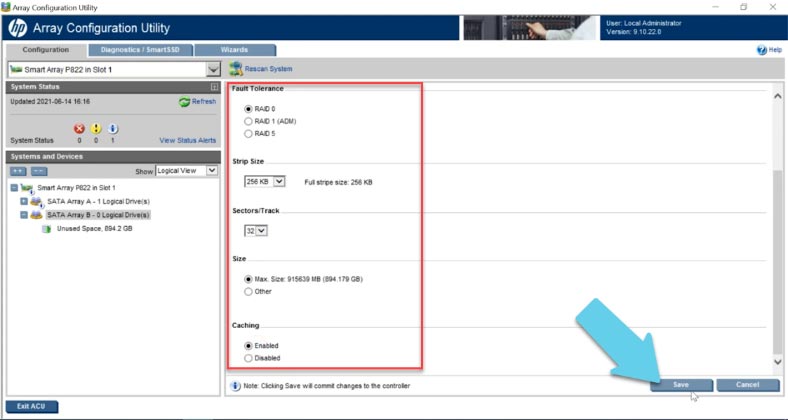
Now give the RAID level - in my case, that is 0. This RAID type lets you boost read and write speed; in theory, this speed is supposed to increase as if multiplied by the number of actual disks in the array (say, having two disks means you may get double speed), but in practice, the increase is not that high.
After that, specify block size (you can leave this setting at its default value), logical disk size (set the size you need or select all the available space), and enable or disable caching. When all settings are ready, click Save to confirm it. The RAID system is created, and you can see it on the left side of the main window. To learn more about the array, select it and click “More Information.”
Data Recovery from RAID on HP P822
Method 1. How to recover data from a RAID system
If your controller, operating system or disks suddenly fail, if the information is removed accidentally or drives are formatted by mistake, Hetman RAID Recovery is there to help you out.
If your data was removed accidentally from the disk array or the disks were formatted, run the program, scan the logical disk and recover the deleted files - they will be marked with a red cross.
Select the ones you need and click “Recovery,” then specify where you want to save them; when the recovery process is complete, you’ll find the files in the directory you have selected.
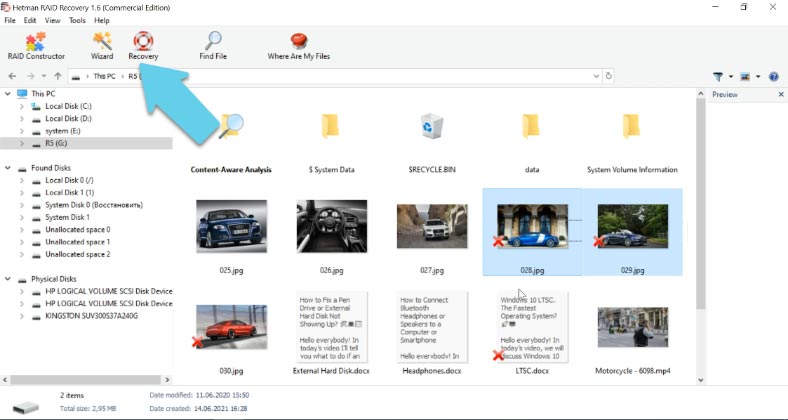
When the operating system is damaged or one of the disks within the RAID array fails, connect the disks to a Windows computer and run the recovery tool.
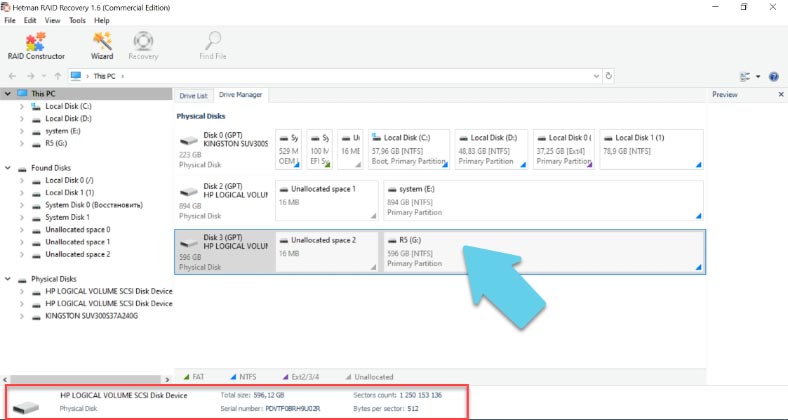
Hetman RAID Recovery will scan the disks of your RAID system automatically to read all their data and then rebuild the disk array. As you can see, the program managed to identify both RAID systems built with this controller type even though the controller itself is currently missing.
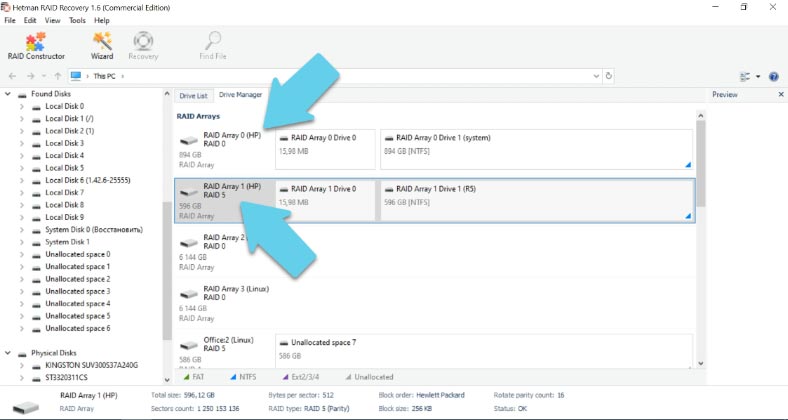
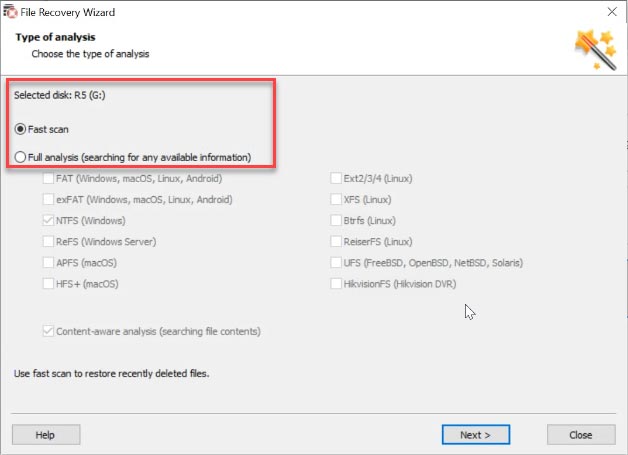
Right-click on the disk and choose “Open,” then select the scan type, click “Next,” and then “Finish” when the scan is over. You can see that the program has found all data remaining on the disk array without difficulty - even the files which were removed.
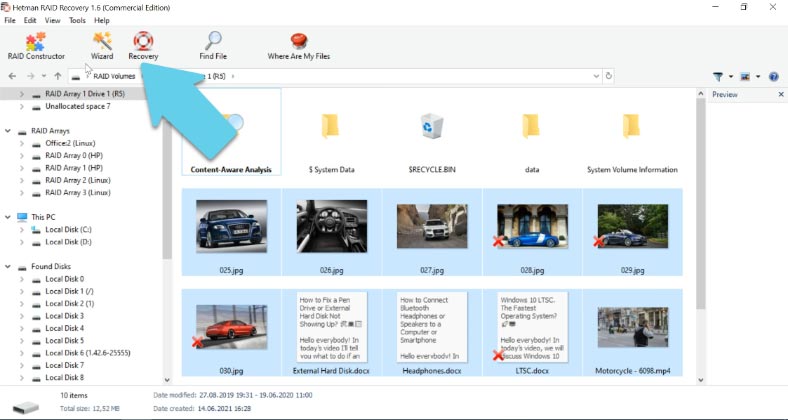
Select the ones you need and click “Recovery,” then specify where you want to save them; we don’t recommend saving data to the same disk you are recovering it from, so choose a different one.
When the path is ready, click “Recovery” again, and when the operation is over, you’ll find your files in the folder you have chosen.
Method 2. How to build a RAID system in the RAID Constructor
When a disk is damaged or service information is erased, the program may have difficulties with rebuilding the RAID automatically; however, you can do it manually if you know the properties of this damaged array.
Open RAID Constructor and select “Manual mode.”
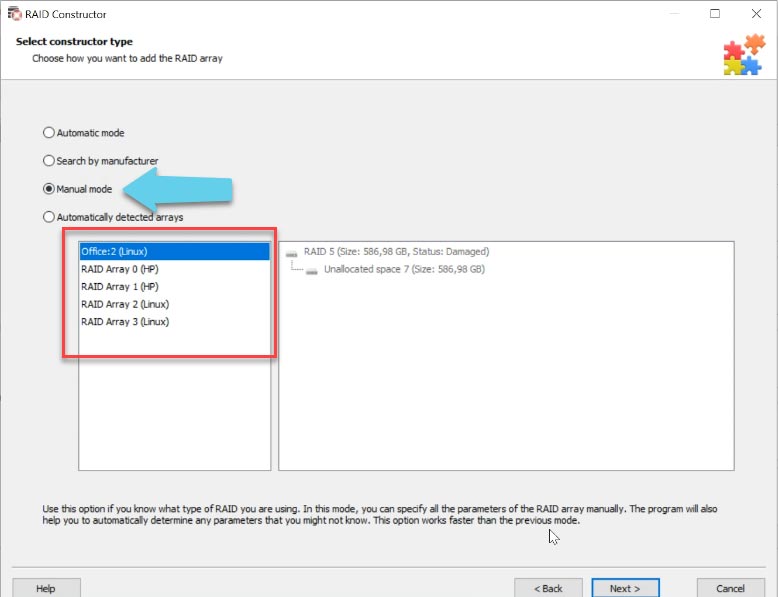
Fill in all the information you know: the RAID type, block order and size, add the disks it used to include, use the arrows to specify their order, and replace the missing disks with empty drives by clicking the “plus” button.
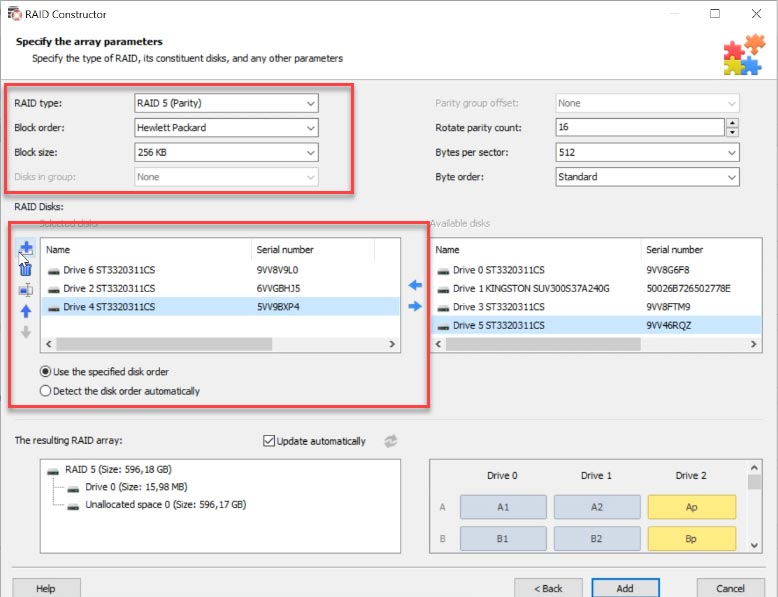
When all the properties are given, click “Add” for the RAID system to appear in the Drive Manager. Finally, run the scan and recover the information you need.


In the case of RAID 0, if one disk fails, the entire array fails.
In the case of RAID 5, only when more than one disk fails does the array become inoperable.
RAID (Redundant Array of Independent Disks) is a technology that combines multiple physical disk drive components into a single logical unit for data redundancy and performance improvement.
The different RAID levels are: