Essential Setup: Installing and Configuring Postfix Mail Server with Dovecot on Linux Ubuntu!
The ultimate guide for setting up your own email server on Linux Ubuntu! In this comprehensive tutorial, we’ll walk you through the step-by-step process of installing and configuring Postfix Mail Server with Dovecot. Whether you’re a beginner or an experienced Linux user, you’ll find everything you need to know to get your email server up and running smoothly.

- Step 1. What you need for installation
- Step 2. Set the host name and create DNS entries for the domain
- Step 3. Installing a Postfix mail server on Ubuntu
- Step 4. Testing a Postfix mail server on Ubuntu
- Step 5. Installing Dovecot IMAP and POP on Ubuntu
- Questions and answers
- Comments
Creating a mail server on Linux-based machines could be one of the most important things that every system administrator should do. If this is the first time you configure your server, you are going to face a lot of aspects that have to be considered during setup. In today’s article, we’ll discover how to perform initial configuration of a mail server, and how to install Postfix mail agent, Dovecot mail server, and how to configure them for proper operation.
Postfix is a free and open-source MTA – mail transfer agent – that can be used to route and deliver electronic mail on a Linux system.
Dovecot is a mail delivery agent created primarily with security in mind. I’ll show you how to configure it as an IMAP or POP3 server.
| Step | Stage | Description |
|---|---|---|
| 1 | Requirements for Installation | 1. Access to a server with Ubuntu.
2. Administrative rights (root access) or access through sudo.
3. A domain name or subdomain for the mail server. 4. Ability to create DNS records for your domain. |
| 2 | Set the Hostname and Create DNS Records for the Domain | 1. Set the hostname with the command:
sudo hostnamectl set-hostname mail.example.com
2. Configure DNS records for the domain: – A record: Points to your server’s IP address. – MX record: Points to the mail server’s domain name (e.g., mail.example.com). |
| 3 | Install Postfix Mail Server on Ubuntu | 1. Update the package list:
sudo apt update
2. Install Postfix: sudo apt install postfix
3. During installation, select Internet Site mode and enter the domain. 4. Modify the Postfix configuration file: sudo nano /etc/postfix/main.cf
5. Add or modify the following parameters: myhostname = mail.example.com |
| 4 | Test the Postfix Mail Server on Ubuntu | 1. Restart Postfix:
sudo systemctl restart postfix
2. Send a test email with the command: echo "Test email" | mail -s "Test" user@example.com
3. Check the Postfix log: sudo tail -f /var/log/mail.log |
| 5 | Install Dovecot IMAP and POP on Ubuntu | 1. Install Dovecot IMAP and POP3:
sudo apt install dovecot-imapd dovecot-pop3d
2. Modify the Dovecot configuration file: sudo nano /etc/dovecot/dovecot.conf
3. Add or check the following parameters: protocols = imap pop3 lmtp
4. Restart Dovecot: sudo systemctl restart dovecot |

How to Install and Configure a Postfix Mail Server with Dovecot on Linux Ubuntu
Step 1. What you need for installation
To begin the installation, you’ll need a properly configured Linux Ubuntu server with a Fully Qualified Domain Name (FQDN). On the server, you need to add a non-root user but with sudo privileges, and open corresponding ports in your network. I already have a server with the required settings, and its ports are configured properly, so the only thing left to do is to add a user and start installing mail applications.
To add a user, open the terminal by pressing the key shortcut Ctrl + Alt + T, and run this command:
adduser demo
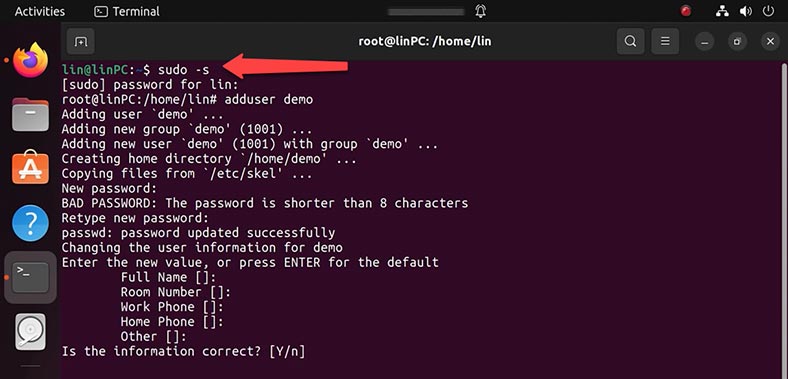
Set a new password for this user, and leave other values without changes. You can specify any additional information if you need to. Now you have a new user account with standard privileges. However, sometimes you may have to perform administrative tasks as a root user.
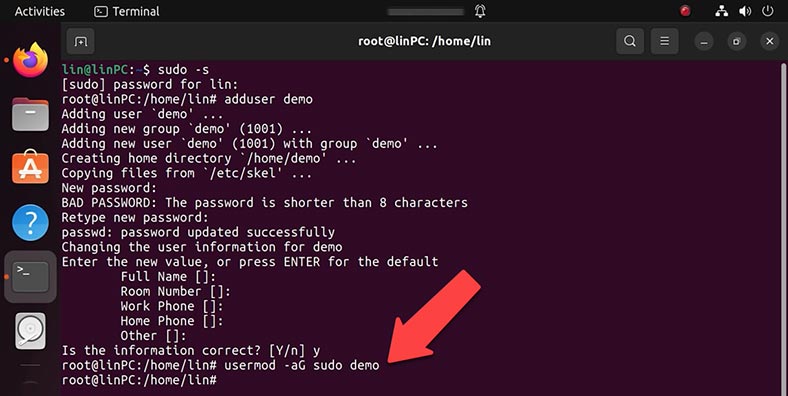
To avoid having to sign out of your regular account and then sign in to a root user account, you can configure the so-called superuser or root privileges for your regular user account. This will let you run commands with administrative privileges by just placing the word “sudo” before the command.
To add privileges, you need to add a new user into the sudo system group by running this command:
usermod -aG sudo demo
Step 2. Set the host name and create DNS entries for the domain
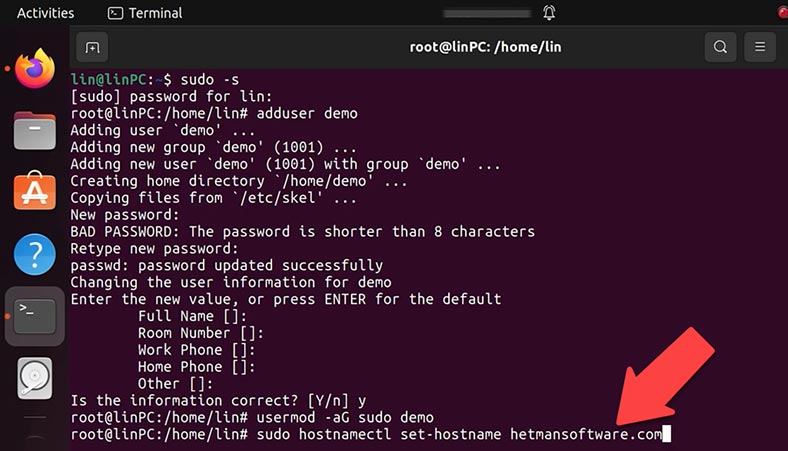
The next thing to do is to set a true domain name for your server.
For this purpose, there is a special command, hostnamectl:
sudo hostnamectl set-hostname hetmansoftware.com
After that, you need to add MX and A records for the domain in the DNS control panel. These records will show to the other mail agents that your domain is in charge of delivering electronic mail.
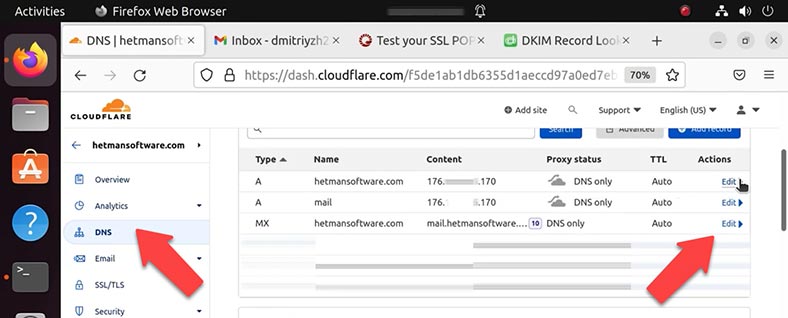
Open the DNS control panel and add these records, while specifying the public IP address of your server.
Step 3. Installing a Postfix mail server on Ubuntu
Now you can begin the installation of a Postfix mail agent.
Here is the command you need to use:
$ sudo apt-get install postfix
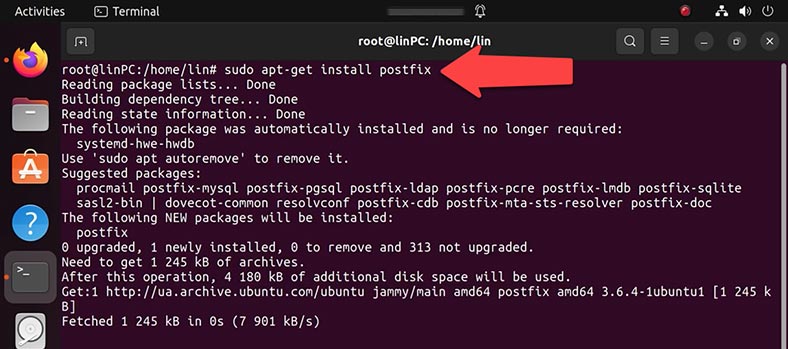
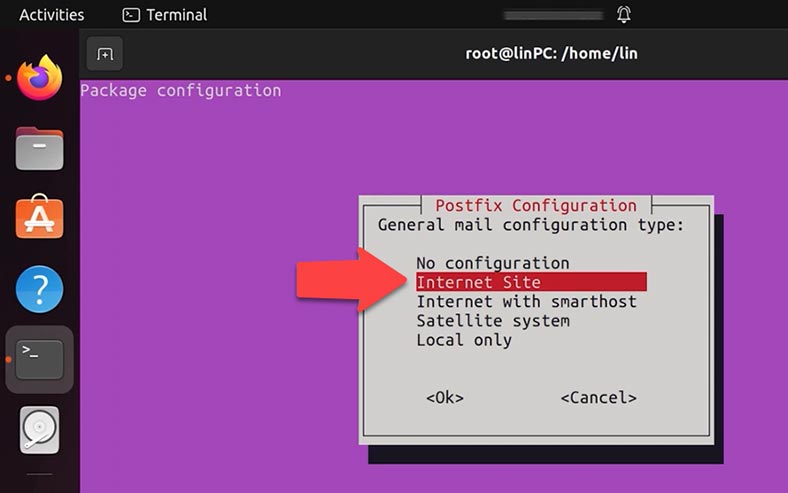
In the Postfix Configuration window that opens, click Ok. After that, the system will suggest you to choose mail configuration type: select Internet Site - Enter.
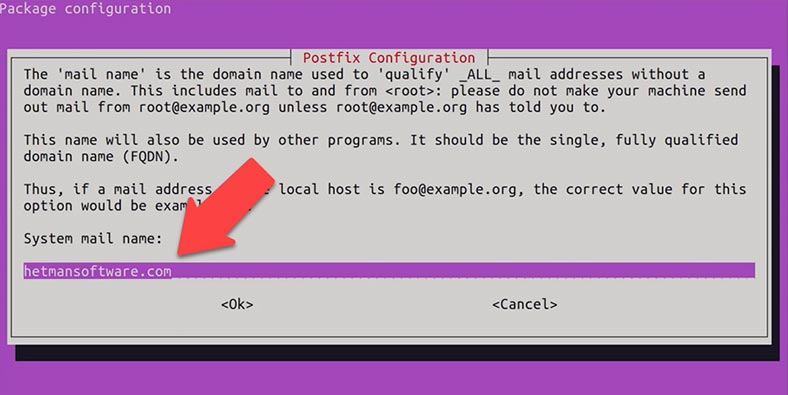
In the next window, type the domain name to be used when sending electronic mail. After Postfix is installed, it will start automatically and create a configuration file (in the location in /etc/postfix/main.cf).
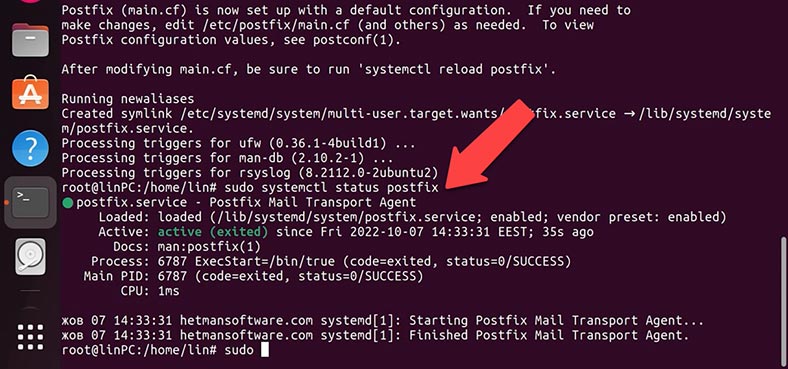
You can check Postfix version and service status by using the following commands.
$ sudo systemctl status postfix
If you need to change the configuration, type this command:
sudo dpkg-reconfigure postfix
Click ОK and select Internet Site - Enter. In the next window, type the domain name to be used when sending electronic mail. Then add the mail recipient. Specify other destinations to accept mail.
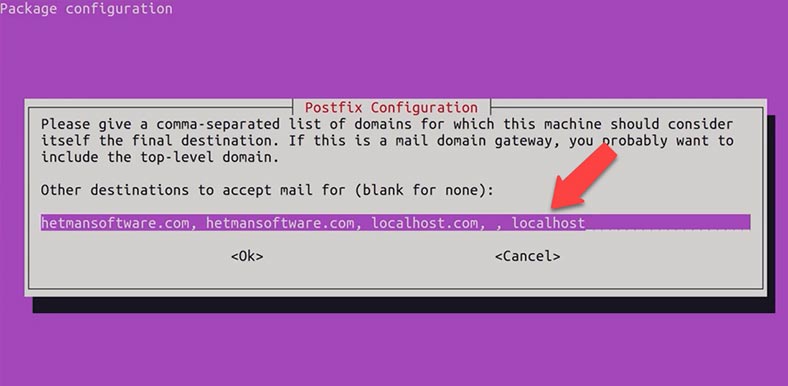
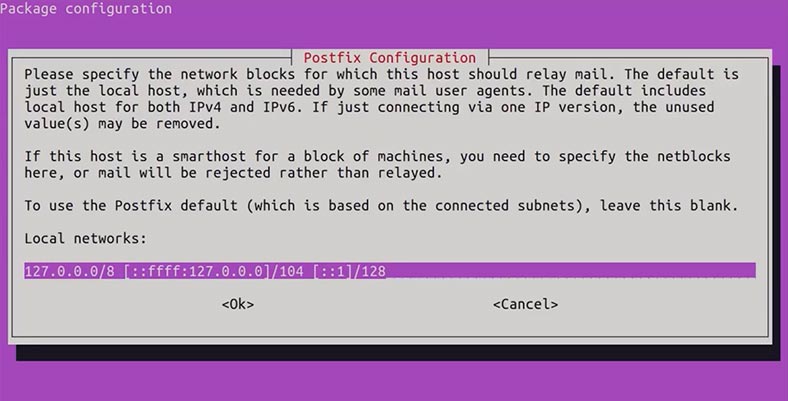
Force synchronous updates on mail queue: No. Leave local networks settings without changes.
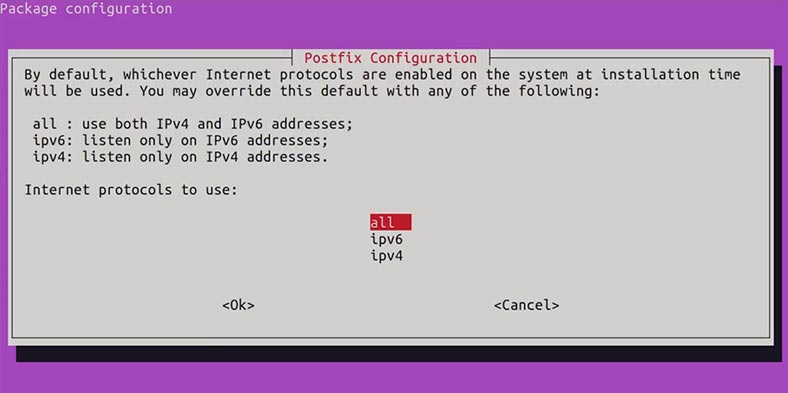
Mailbox size limit: 0. Local address extension character: + Internet protocols to use: all.
Step 4. Testing a Postfix mail server on Ubuntu
Now let’s check if your mail server is connected to port 25 by running this command:
$ telnet gmail-smtp-in.l.google.com 25
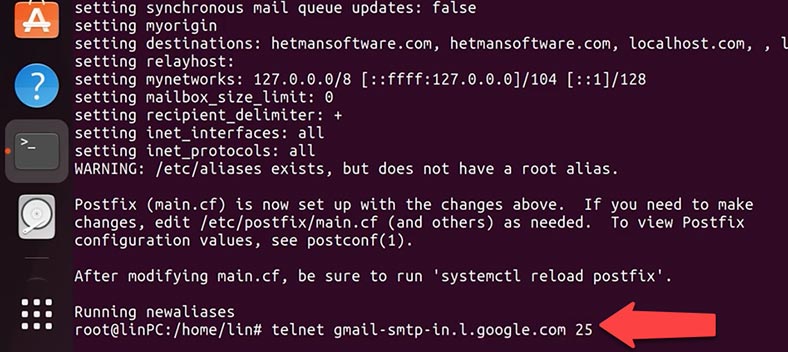
The result displayed by the system indicates that the connection has been established successfully. To close the connection, type quit.
Also, you can use a mail application to test the mail service. However, it should be installed first, so run the installation command
apt install mailutils
Here is the command to use:
/usr/sbin/sendmail dmitriyzh23@gmail.com
Specify the email address to send your mail to, subject and contents, and then press Сtrl + D to send.
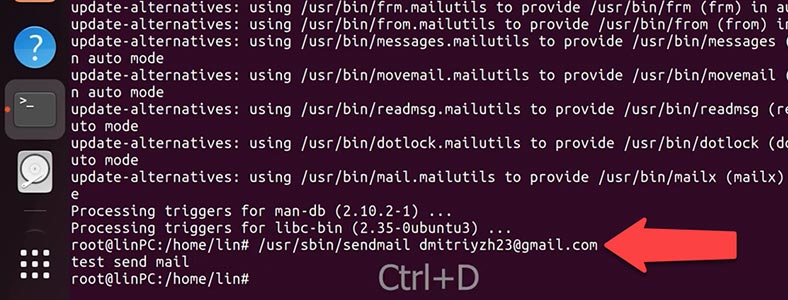
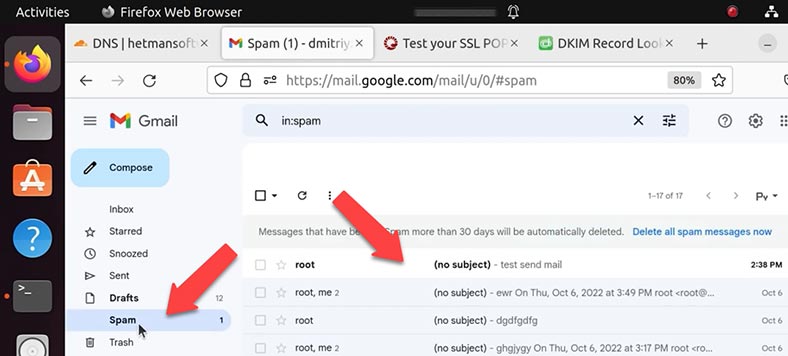
The mail service works and the email was delivered, but it ended up in the spam folder. Let’s see what settings should be changed to prevent emails from being classified as spam.
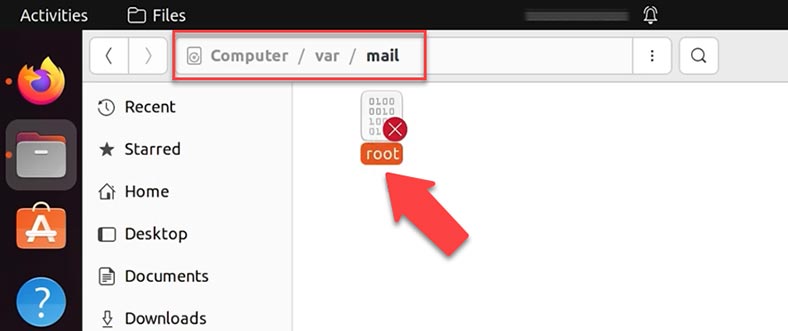
After sending the first email, the program will create a file with the user’s name in the var/mail/ folder. In this file, all incoming and outgoing mail will be recorded.
This recording format is known as mbox. To use the maildir format, which divides emails to separate files which are then moved between directories depending on the user’s actions, you need to make some changes to the configuration file.
Sudo nano /etc/postfix/main.cf
Add the line home_mailbox= Maildir/:
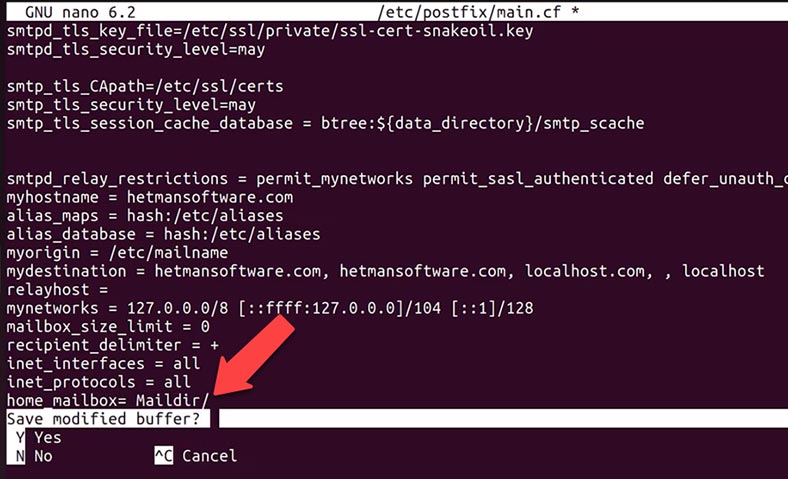
Or run the command:
sudo postconf -e 'home_mailbox= Maildir/'
In this case, mail will be stored in separate files, and can be found by this path: home/demo/Maildir/new
Step 5. Installing Dovecot IMAP and POP on Ubuntu
As a result, the mail server is running, you can send and receive mail, but it can hardly do without an opportunity to send mail by SMTP. This protocol is already supported in Postfix, but it has no authentication by default. To add authentication support, you should use Dovecot. As a bonus, you’ll get the opportunity to view your mail by POP3 and IMAP protocols. First of all, you need to install the Dovecot service itself. Here is the command to use:
sudo apt-get install dovecot-imapd dovecot-pop3d
After the installation is over, it is recommended to restart the dovecot service.
sudo systemctl restart dovecot
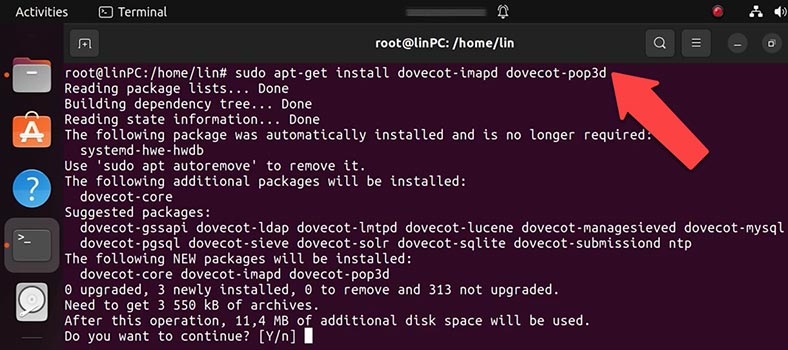
To configure Dovecot, you should edit the configuration file: /etc/dovecot/dovecot.conf. To open it, you need one more command:
nano /etc/dovecot/dovecot.conf:
You can choose which protocol to use. It could be pop3, pop3s (secure pop3), imap or imaps (secure imap). IMAPS and POP3S are more secure than conventional IMAP and POP3, since they use SSL encryption for their connections. As soon as you have chosen a protocol to use, correct the next line in the file dovecot.conf.
To open it, you need one more command:
nano /etc/dovecot/dovecot.conf:
Add or edit this line:
protocols = pop3 pop3s imap imaps
Ctrl + Х, and Yes to save - Enter.
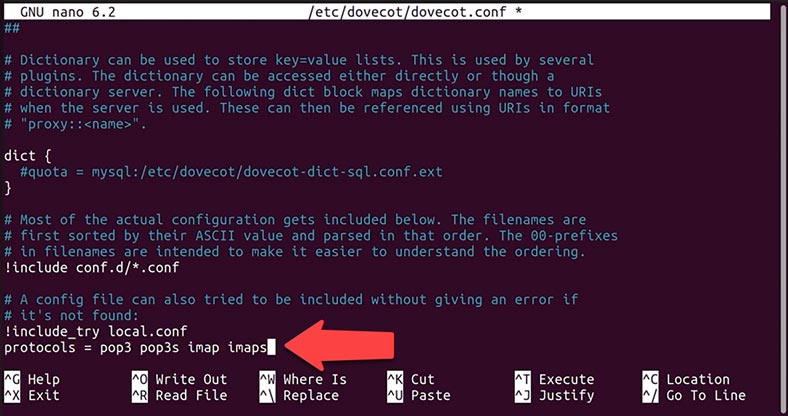
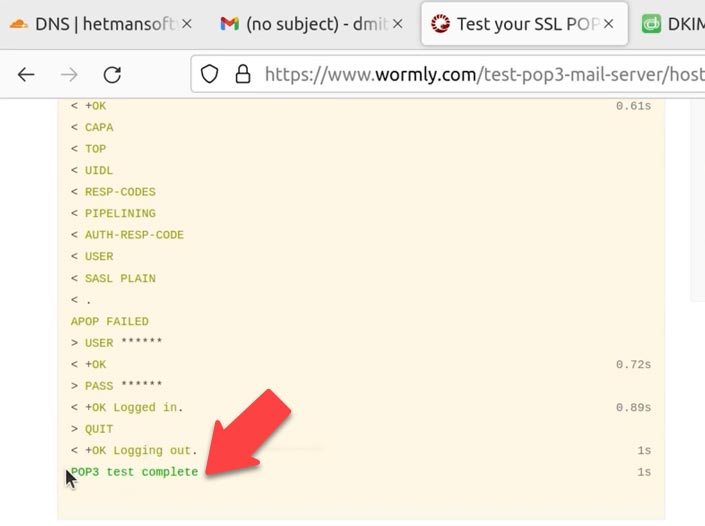
Now let’s check how POP3 works. Go to a check-up service, enter the data and click to start the test, then check the result.
Now that you have configured the mail service, you need to make sure that mail doesn’t end up in the spam folder, and for that purpose, you should add a few more DNS records. Open the DNS control panel. Add SPF, DMARC and DKIM records.
How to add a DKIM record
To have SPF and DMARC running, all you need is to add their DNS records, but for DKIM to work, it has to be installed on the server.
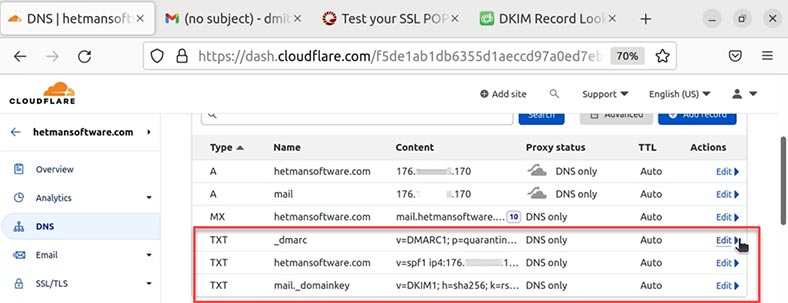
DKIM (DomainKeys Identified Mail) is an email authentication method designed to detect forged sender addresses in email (known as email spoofing). DKIM enables the user to check if an email was actually sent from the stated domain.
Here is the command you need to install the package:
apt-get install opendkim opendkim-tools
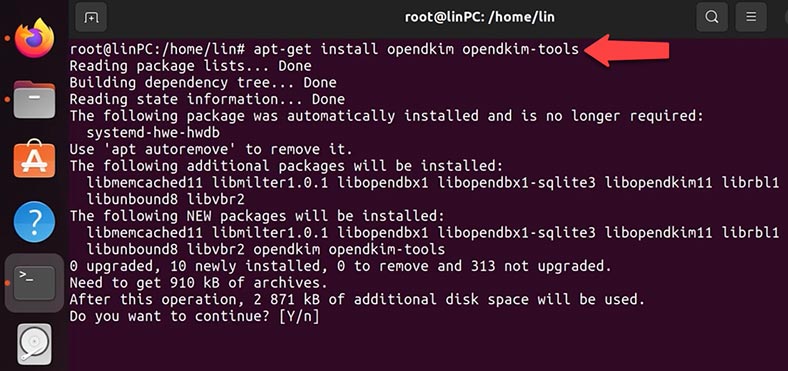
Then start it and add it to automatic startup
sudo systemctl start opendkim
sudo systemctl enable opendkim
After that, you should create a certificate with the help of opendkim-genkey
Create a directory for keys using this command:
mkdir /etc/opendkim
And use another command to generate a key:
opendkim-genkey -D /etc/opendkim/ --domain hetmansoftware.com --selector mail
Here, you need to specify your server’s domain name.

In the folder /etc/opendkim/ two files should appear, with the extensions .private (a closed key) and .txt (a txt record). Now let’s configure DNS.
View the contents of the txt file:
cat /etc/opendkim/mail.txt

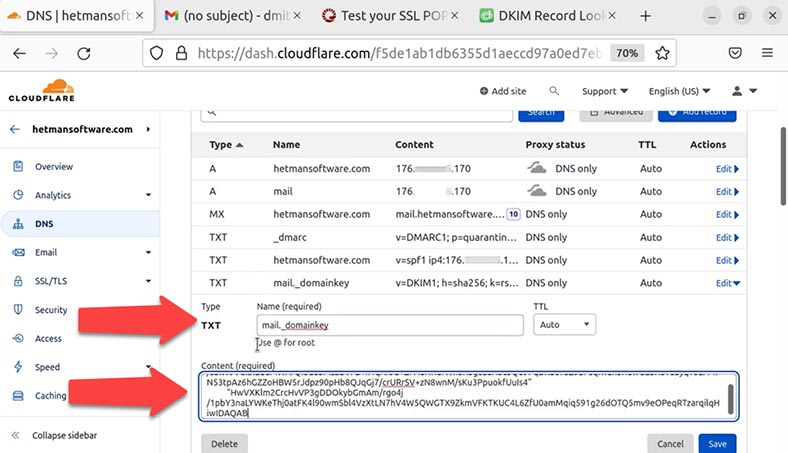
Copy the contents, switch to DNS control panel and create a TXT record:
mail._domainkey IN TXT ( "v=DKIM1; k=rsa; "
“the txt file contents”
mail - the selector name,
p= p=MIIBIjANB...IDAQAB - the shortened record of the public key.
sudo chown -R opendkim:opendkim /etc/opendkim
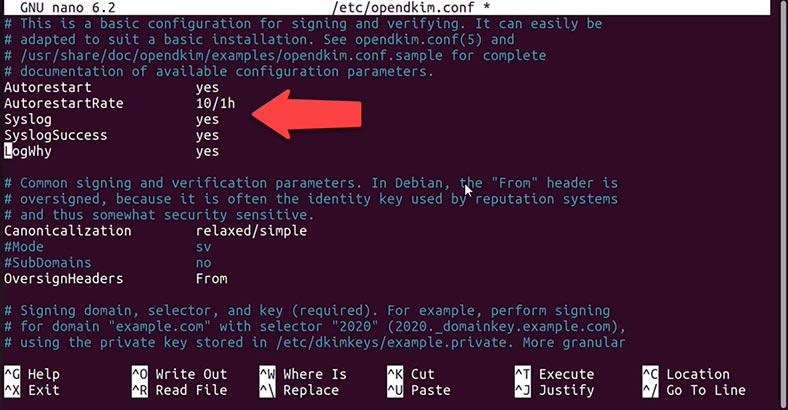
Now let’s make changes to the configuration file
sudo nano /etc/opendkim.conf
Here, you need to comment and add a few lines
AutoRestart Yes
AutoRestartRate 10/1h
Umask 002
Syslog yes
SyslogSuccess Yes
LogWhy Yes
Mode sv
Canonicalization relaxed/simple
UserID opendkim:opendkim
Socket inet:8891@localhost
PidFile /var/run/opendkim/opendkim.pid
ExternalIgnoreList refile:/etc/opendkim/TrustedHosts
InternalHosts refile:/etc/opendkim/TrustedHosts
KeyTable refile:/etc/opendkim/KeyTable
SigningTable refile:/etc/opendkim/SigningTable
SignatureAlgorithm rsa-sha256
Add your domain to trusted hosts.
sudo nano /etc/opendkim/TrustedHosts
Add the domain, Сtrl + Х, Yes, Enter:

Give the path to the key.
sudo nano /etc/opendkim/KeyTable
mail._domainkey.hetmansoftware.com hetmansoftware.com:mail:/etc/opendkim/dkim.private
Сtrl + Х, Yes, Enter

The path to the signature
sudo nano /etc/opendkim/SigningTable
*@hetmansoftware.com mail._domainkey.hetmansoftware.com
Сtrl + Х, Yes, Enter

Restart the services
sudo systemctl restart opendkim
sudo systemctl restart postfix
Now that the record is added, let’s check it. Open a DKIM checkup service in the browser.
https://dmarcian.com/dkim-inspector/
Type the domain and selector name into the fields. The service has found my DKIM record.
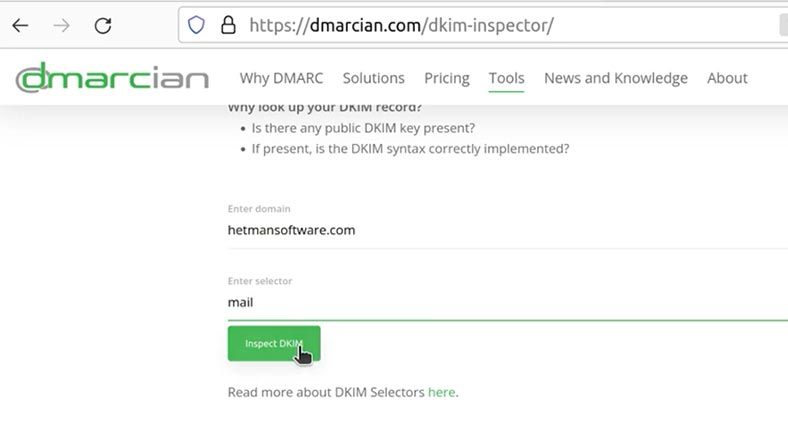
The record is added. For additional fine-tuning, adding trusted hosts, domains etc you’ll have to open the configuration file and add extra settings.
Now let’s test mail sending again.
/usr/sbin/sendmail dmitriyzh23@gmail.com
From: demo@hetmansoftware.com
Subject: test
Test send mail spf dkim dmarc
Ctrl + D
Now the email arrived, and this time it was not dumped into the spam folder. Let’s reply to this email. The mail service works properly.
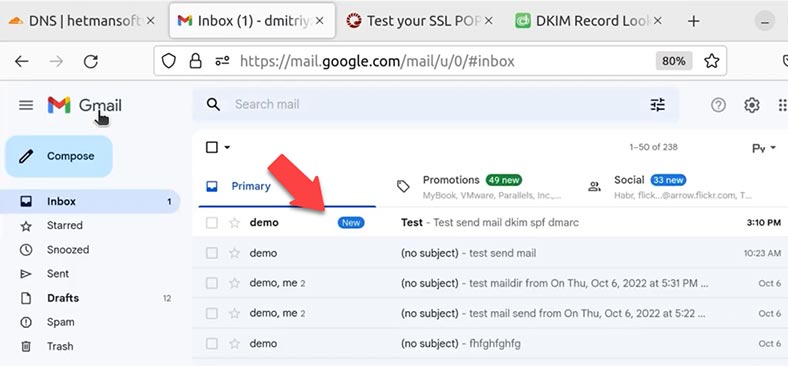
All right, so you have installed and configured Postfix and Dovecot, checked how the mail service works and added corresponding DNS records. For more convenient work, you can add a MySql storage server and a mail client - for example, Roundcube.

⚕️How to Recover Emails📧, Contacts and Profiles in Mozilla Thunderbird (2021)

How to Restore Access to Gmail, Yahoo, AOL, ICloud, Outlook Mailbox without a Login and Password 📧🔓🔑




It seems like you are experiencing issues with verifying your DKIM record due to a DNS error. The error message indicates that there is a problem resolving the TXT record for mail._domainkey.anticcrs.cm in your DNS settings.
To resolve this issue, you may need to check and correct the DNS settings for your domain. Here are some steps you can take to troubleshoot and fix the issue:
Check your DNS settings: Make sure that the DKIM record for mail._domainkey.anticcrs.cm is correctly set up in your DNS settings. You may need to double-check the record and ensure that it is entered correctly.
Verify the TXT record: Ensure that the TXT record for mail._domainkey.anticcrs.cm is properly configured in your DNS settings. You can use online DNS lookup tools to verify the existence and correctness of the TXT record.
Wait for DNS propagation: Sometimes, DNS changes may take some time to propagate across the internet. It is recommended to wait for some time and try verifying the DKIM record again.
Contact your DNS provider: If you are still facing issues, you may need to contact your DNS provider for assistance. They can help you troubleshoot and resolve any DNS-related issues affecting the verification of your DKIM record.
If your emails sent from Google Domains email service are ending up in the recipient's spam folder, it's likely due to several reasons. Here are some steps you can take to improve email deliverability and prevent your emails from being marked as spam:
Check Your Email Content: Make sure your email content is not spammy. Avoid using excessive capitalization, exclamation marks, and too many links. Ensure that your email is well-written, relevant, and free of any suspicious content.
Authenticate Your Domain: Verify your domain by setting up SPF (Sender Policy Framework), DKIM (DomainKeys Identified Mail), and DMARC (Domain-based Message Authentication, Reporting, and Conformance) records. These authentication methods help prove that your emails are legitimate and not spoofed.
Use a Reputable IP Address: If you're sending a high volume of emails, consider using a dedicated IP address. This can help maintain your sending reputation. Shared IP addresses can sometimes suffer from the actions of other users on the same IP.
Maintain a Good Sending Reputation: Avoid sending emails to purchased or outdated email lists. Ensure that your recipients have opted in to receive your emails. High bounce rates and spam complaints can negatively impact your sending reputation.
Monitor Email Bounces and Complaints: Keep an eye on bounced emails and spam complaints. Remove invalid email addresses from your list and investigate the cause of any complaints to prevent future issues.
Use Clear and Relevant Subject Lines: Misleading or clickbait subject lines can trigger spam filters. Ensure that your subject lines accurately reflect the content of your emails.
Avoid Image-Heavy Emails: Emails with too many images and minimal text can look suspicious to spam filters. Balance your email content with text and images appropriately.
Regularly Update Your Contact List: Remove inactive or disengaged subscribers from your mailing list. Keeping a clean list can improve deliverability.
Test Your Emails: Send test emails to various email providers to check how they are delivered and whether they end up in spam folders. Adjust your content and settings accordingly.
Use a Professional Email Marketing Service: Consider using a reputable email marketing service like Mailchimp, SendGrid, or Constant Contact. They often have built-in tools to improve email deliverability.
Monitor Blacklists: Check if your IP address or domain is listed on email blacklists. If you find it listed, take steps to delist it.
Engage Subscribers: Encourage recipients to add your email address to their contact list or address book. This can help ensure that your emails are not marked as spam.
Provide an Unsubscribe Option: Always include a clear and easy way for recipients to unsubscribe from your emails. This helps reduce spam complaints.
Remember that improving email deliverability is an ongoing process. It's important to regularly review and refine your email marketing practices to maintain a good sender reputation and ensure that your emails reach the inbox rather than the spam folder.
Sure! Here is how to configure your mail server to use SMTP with TLS encryption (port 587):
Username: This is usually your full email address, e.g. "example@example.com".
Password: This is the password you use to access your mail.
Outgoing mail server (SMTP server): You will need to enter the address of the outgoing mail server provided by your mail provider. Usually it is something like "smtp.example.com" or "mail.example.com". You will need to contact your ISP or check their documentation to find out the correct server settings.
SMTP port: Use port 587 to connect via TLS (Transport Layer Security). This will provide a secure, encrypted connection for sending mail. Some ISPs may also support SSL (Secure Sockets Layer) on port 465. Check the settings of your ISP for the port to be used.
Encryption Type: Set TLS (or STARTTLS) as the encryption method. This will ensure a secure connection when sending mail.
Authentication: Enable the authentication option on the mail server. This is usually done by selecting the 'Enable Authentication' option and providing your username and password.
Once you have these details, you can use them to set up a mail client or mail sending software that supports SMTP with TLS encryption. There is usually an appropriate section in the mail client settings where you can specify this data and set up a connection via TLS.