Windows 11 Troubleshooting: Fixing Non-Working Microphones with Ease
Struggling with a non-working microphone in Windows 11? Fret not! Our comprehensive guide will walk you through troubleshooting steps to get your mic working flawlessly again. Say goodbye to mic woes and enjoy crystal-clear sound on your Windows 11 system.
- Method 1. Check the mike connection
- Method 2. Change microphone privacy settings
- Method 3. Device Manager
- Method 4. Set the microphone as your default device
- Method 5. Make sure that the mike isn’t disabled
- Method 6. Run the Troubleshooter
- Method 7. Restart Windows Audio service
- Method 8. Check microphone settings in your applications
- Method 9. Install updates for Windows 11
- Conclusion
- Questions and answers
- Comments
Most of the time, mike issues are caused by hardware problems that include loss of contact, damaged cables or jacks, or connecting the mike to the wrong output. Also, there may be errors due to incompatible drivers or wrong settings. I’m going to show you some possible solutions to help you fix mike issues.
| Method | Title | Short Description |
|---|---|---|
| Method 1 | Check Microphone Connection | Ensure the microphone is properly connected to the computer. |
| Method 2 | Change Microphone Privacy Settings | Check if the program has access to the microphone in privacy settings. |
| Method 3 | Device Manager | Check if the microphone is recognized correctly in Device Manager. |
| Method 4 | Set Microphone as Default Device | Set the microphone as the default recording device in sound settings. |
| Method 5 | Check if Microphone is Muted | Make sure the microphone is not muted physically or in settings. |
| Method 6 | Troubleshoot Hardware and Devices | Use the troubleshooter to detect and fix issues. |
| Method 7 | Restart Windows 11 Audio Service | Restart the audio service to restore microphone functionality. |
| Method 8 | Check Microphone Settings in App | Check the microphone settings directly in the app you are using. |
| Method 9 | Install Windows 11 Update | Ensure you have all the latest Windows updates installed. |

🎤 The Mike Doesn’t Work in Windows 11, How to Fix It 🎤
Method 1. Check the mike connection
The first step to take is to check if the microphone works with another device. Very often, bad contact, damaged cable or broken microphone turn out to be the actual root of the problem. Examine the cable and plug for any possible damage, and connect the mike to another PC or multimedia device to check if the mike works with them.
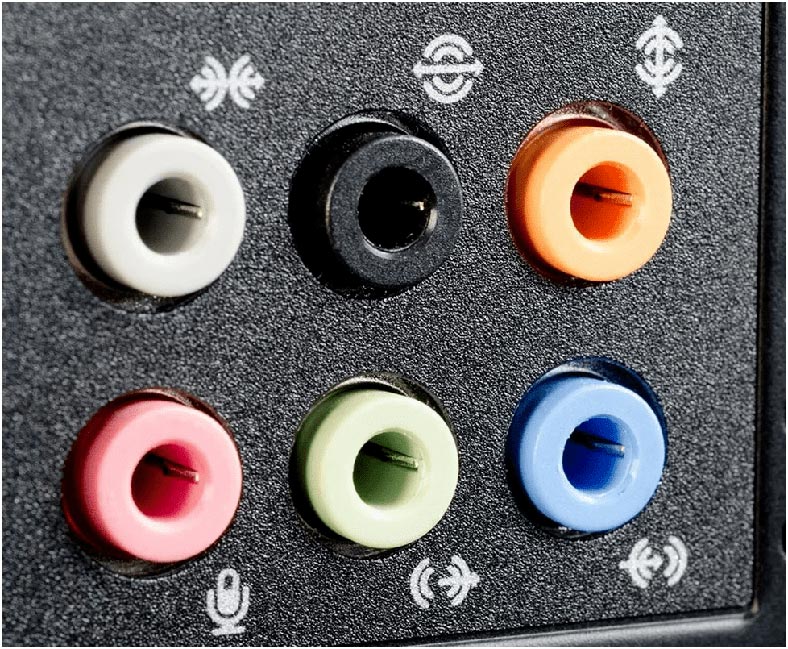
If it works fine with other devices, try to plug it again into the computer where it refused to work. Check the female jack where the mike is connected, and make sure that the plug sits tight in the jack. Also, remember to plug the mike into the proper jack. Usually, it is marked with the corresponding color, or with a microphone symbol.
Method 2. Change microphone privacy settings
Now that you know that the mike is not broken, you can deal with the settings of your operating system. The new version of this operating system features a privacy option that lets you control how apps access the mike.
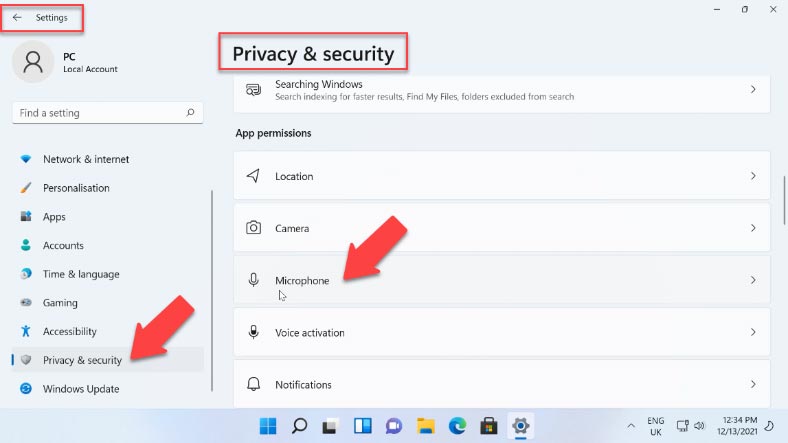
To fix privacy issues in Windows 11, open Start-Settings-Privacy; Security – Microphone.
Set the slider next to “Microphone access” to the “On” position and enable “Let apps access your microphone”.
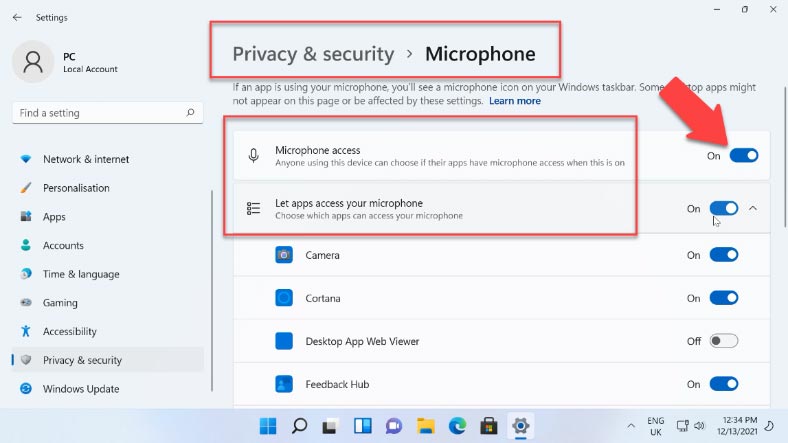
If you have mike issues in a particular app, find it on this list and enable access. Also, we recommend to enable access for Desktop App Web Viewer.
If modifying these settings didn’t solve your problem, go to System – Sound. Check your input devices – your mike should be selected.
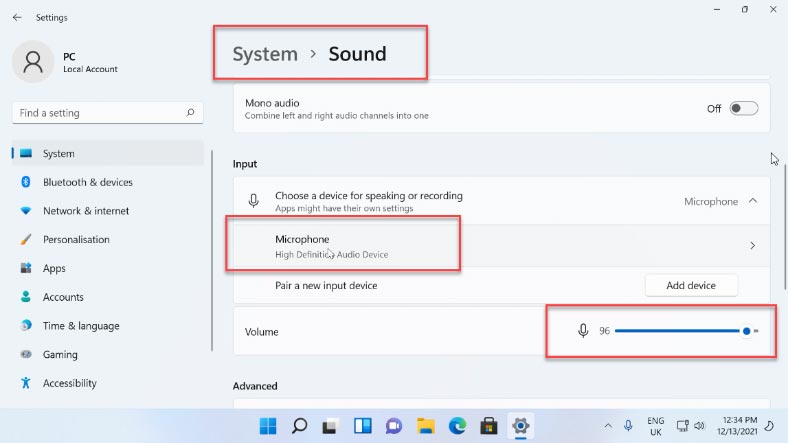
If your mike is missing from this list, look below to find “All sound devices” and click this button – “Allow apps and Windows to use this device for audio”.
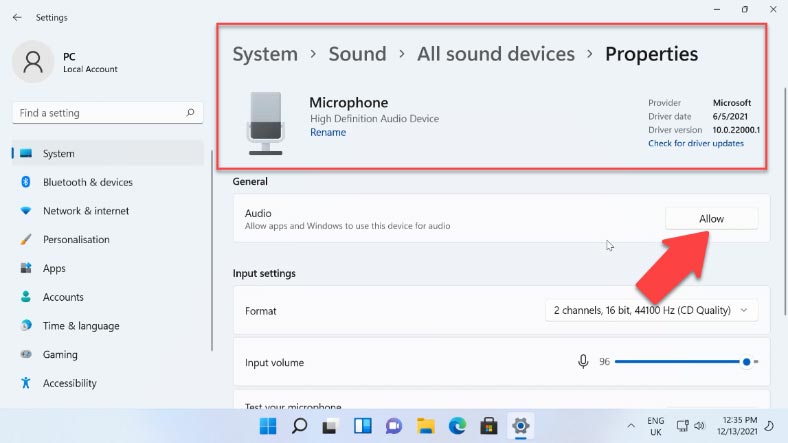
Method 3. Device Manager
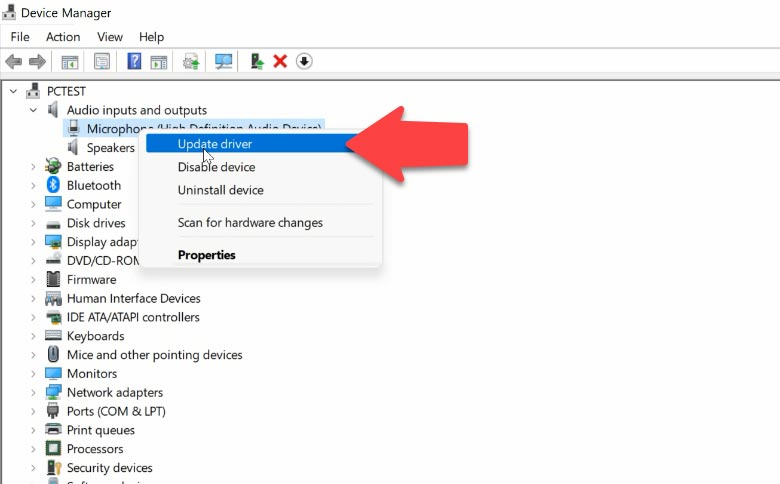
If you can’t find the mike on the list, make sure it is enabled in the Device Manager. To open it, right-click on the Start menu and choose “Device Manager”. Expand the section “Audio inputs and outputs” and check if your mike is displayed here.
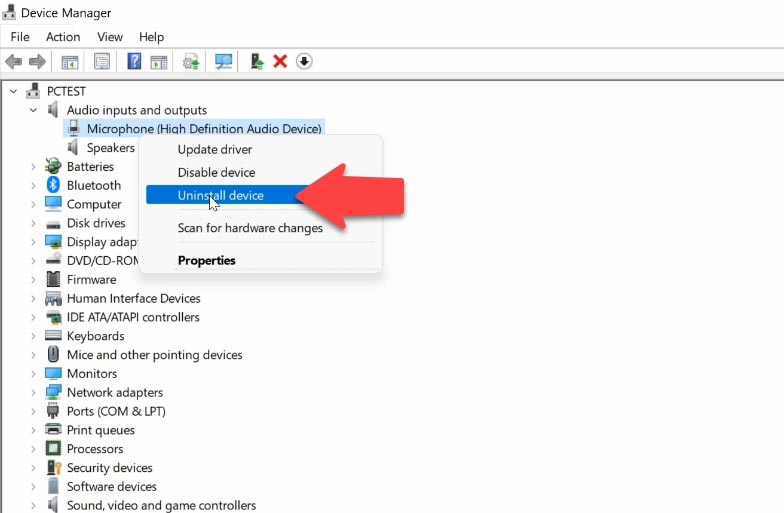
If the mike is listed but there is a yellow exclamatory mark next to it, try right-clicking on the device, selecting the option “Uninstall”, confirming this action, and then click “Action” – “Scan for hardware changes”.
If the mike is displayed with a grey arrow, right-click on the device and select “Enable” from the context menu.
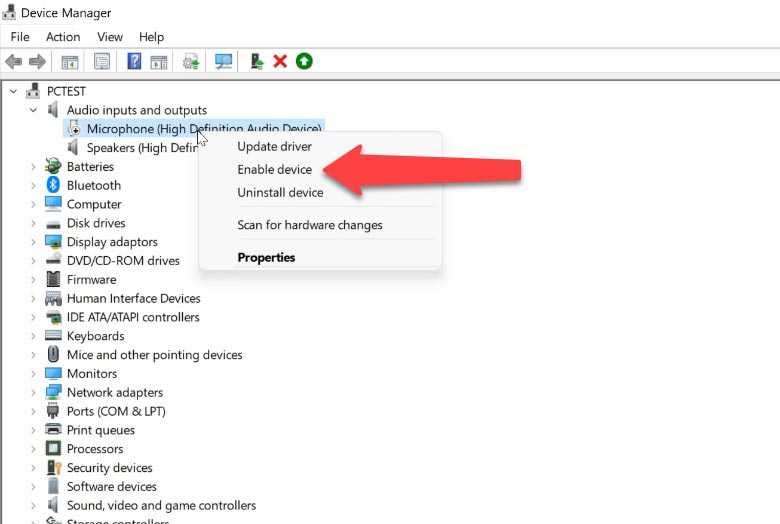
If the exclamatory mark is still there, try updating the driver. To do it, right-click on the device and select “Update driver” from the context menu. If the operating system fails to find a suitable driver, you’ll have to download the sound driver from the official website of your motherboard manufacturer and install it manually.
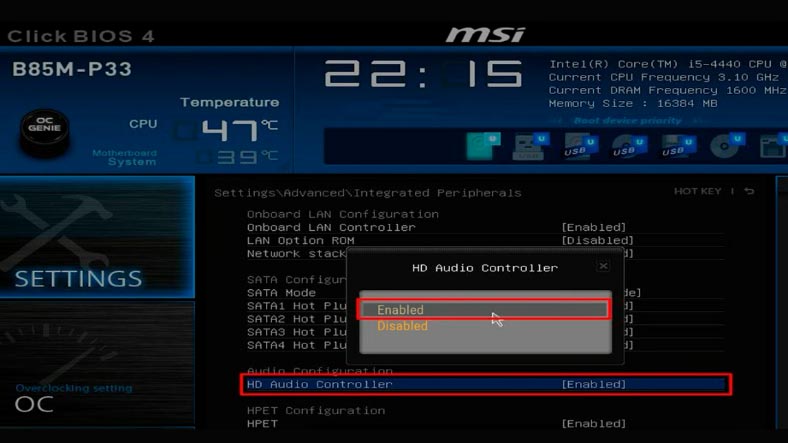
If your computer is a laptop, the microphone can be disabled in its BIOS settings. In that case, find this option in BIOS and enable the mike.
Method 4. Set the microphone as your default device
Another reason why your mike may not work is that it’s not selected as the default device in your system settings. If you connected other recording devices to the computer before, your operating system may have switched to such device.
To change it, open Settings – System – Sound – More sound settings – and jump to the tab “Recording”.
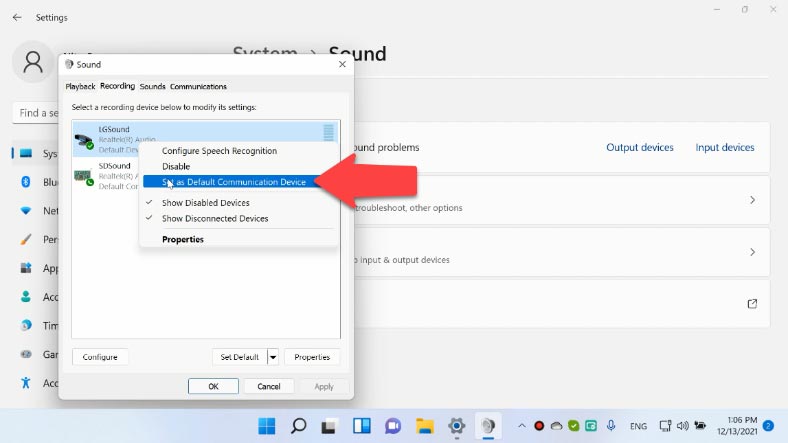
If you see two or more microphones on the list and some of them are marked green, click on the microphone which you need for all of your tasks and select the option “Set as Default Device” or “Set as Default Communication Device” – this will put the green mark only on the necessary microphone, and the operating system will use it for all tasks, including recording and communication. After that, click “Apply” and OK to save the changes.
Method 5. Make sure that the mike isn’t disabled
If you changed the volume level or tried to turn the sound off in the settings before you realized the mike doesn’t work, it’s time to check if the mike is disabled in the system settings.
Right-click on the speaker symbol in the system tray and open “Sound Settings” – “More sound settings”, then jump to the Recording tab, select the microphone and click to open “Properties”. In the window that opens, find the tab “Levels” and check if the mike is disabled: there should be no red signs saying that the mike is off. Set the volume level to 90 or 100% – click “Apply” and OK to save this setting.
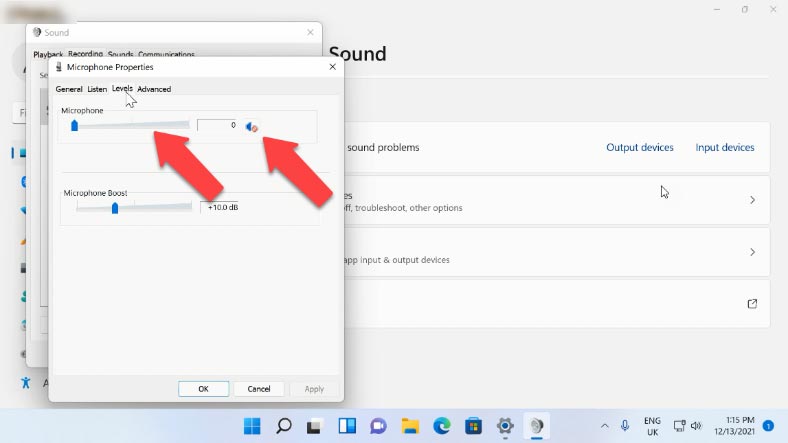
If this doesn’t help, try disabling the exclusive mode which you can find in the Advanced tab. Uncheck the box for “Give exclusive mode application priority” and the second option will be turned off as well. After that, check the mike again.
Method 6. Run the Troubleshooter
As Windows has got its own integrated tools and troubleshooters, you can try using them to fix the problem with the microphone.
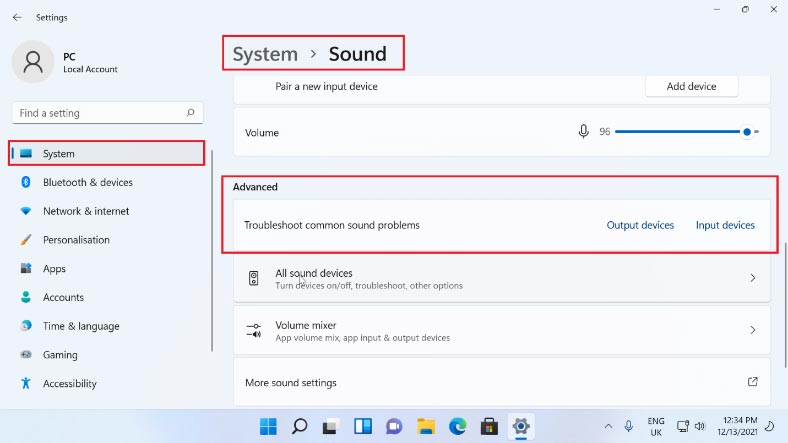
Open Settings – System – Sound – More sound settings, and click on the option “Troubleshoot common sound problems” for input devices. If a problem is detected, the utility will suggest some directions and solutions – just follow them.
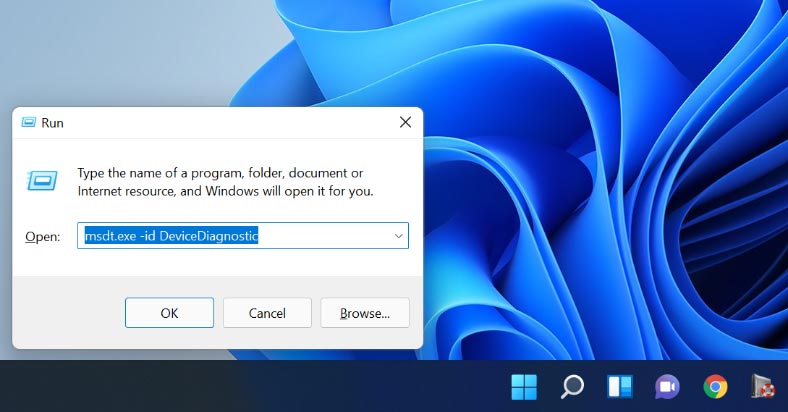
Alternatively, you can run the tool called “Troubleshoot and prevent computer problems”. To do it, open the “Run” window and type this command:
msdt.exe -id DeviceDiagnostic
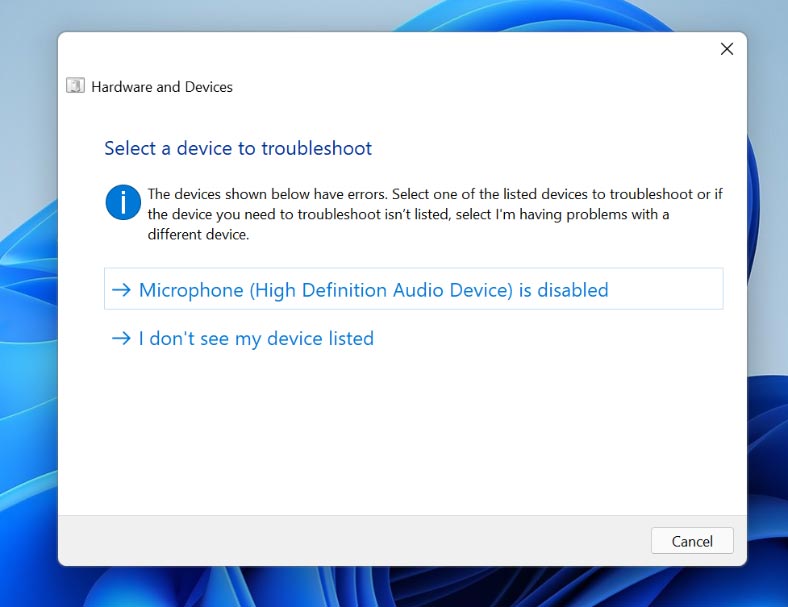
When the scan is over, the utility will show you the devices in your computer that have issues. Select the microphone from the list and click “Next”. Select to apply repairs automatically and then click “Apply this fix”. When the process is complete, restart the computer.
Method 7. Restart Windows Audio service
If there no sound yet, check if Windows Audio service is working. Such services allow applications to run, and they also manage various system resources, that is, they perform the same functions as the settings.
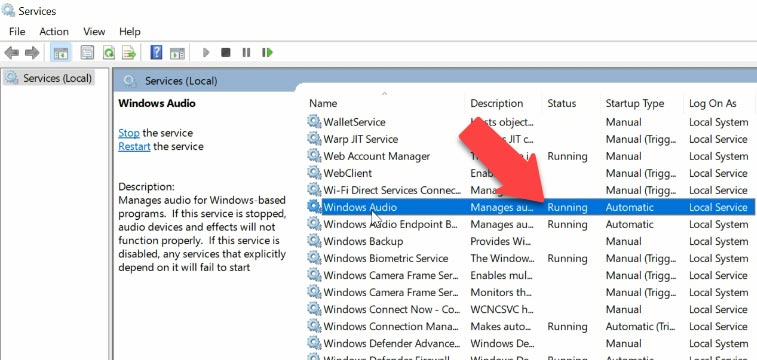
Use the search feature to find and open “Services”; look for Windows Audio and make sure that it is enabled. Right-click on it and select “Restart”. In some situations, it can help you fix the microphone problem.
Method 8. Check microphone settings in your applications
In addition to system configurations, some programs have their own mike options which are typically located in the sound settings. These settings may be different from those configured in your Windows, and they sometimes can reset to defaults. So if your mike doesn’t work in a particular program or game, try to find the corresponding setting and select the proper microphone.
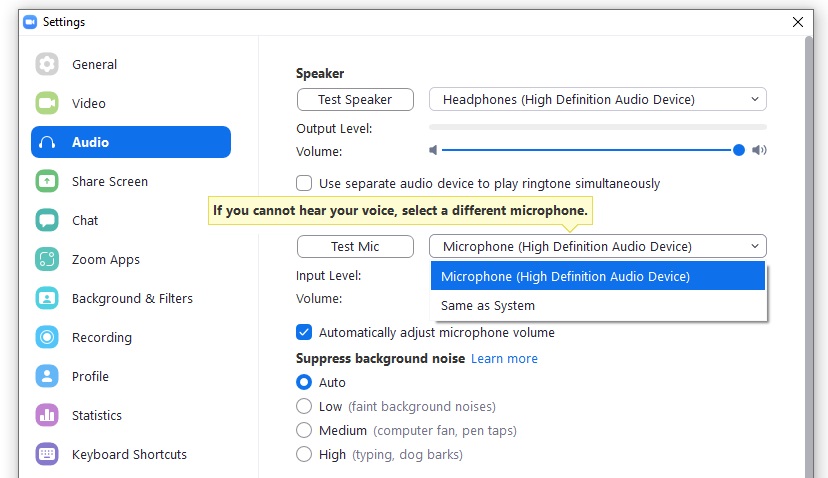
Also, don’t forget to enable access to microphone for such program.
Method 9. Install updates for Windows 11
Check if there are any new updates available for your operating system.
Microsoft provides regular updates for its operating systems, and they usually contain latest modifications, integrated tools and lots of features. It is recommended to install every update to ensure your Windows runs properly.
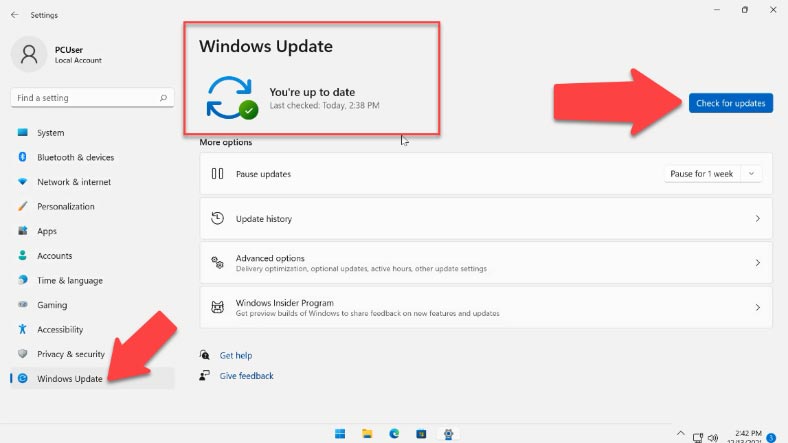
To get the latest updates, open Start – Settings – Windows Update. If there is an update waiting for you, click to download and install it, and if there is nothing to see - click to check for updates. Windows will start searching for updates. Install the ones the operating system has found, restart the computer and check if the microphone problem is still there.
If you encounter issues when using front panel connectors for your microphone, it makes sense to check if the mike works with the back panel connectors.
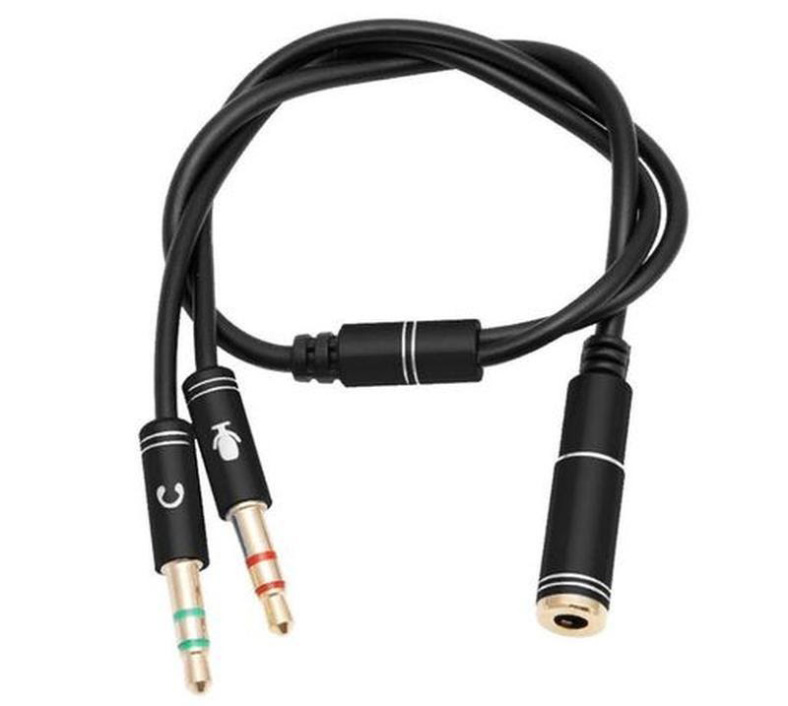
Another possible scenario is when you are connecting a new headset that has a combined jack plug for microphone and headphones to an old desktop computer or laptop. If that’s the case, you should remember that old sound cards may not be able to support the mike and headphones at the same time when the combo jack is used. However, this problem can be fixed by using various adapters.
Conclusion
The steps described in this video should solve the problem in most situations. Still, if the problem persists even when you connect another microphone, it is most likely to be caused by some Windows errors or hardware issues with the sound equipment in your computer. One of the things you can try is to reset Windows or add a new sound card to your PC.





Fix your Windows 11 headset by updating the drivers manually.
Fix Windows 11 headsets with the Troubleshooter.
Troubleshoot Windows 11 headsets with automatic driver updates.