Facing CCleaner Fallout: How to Recover Files After CCleaner?
Lost important files after using CCleaner for cleanup? In this article, we uncover the methods and techniques to recover files after using CCleaner. Our experts share valuable insights, tips, and solutions to help you retrieve those crucial files. Whether it’s accidental deletion, system cleanup, or other issues caused by CCleaner, we’ve got you covered. Learn how to rescue your valuable data!
- Introduction
- What Happens When a File is Deleted?
- Why Aren’t Deleted Files Erased at Once?
- When is it Impossible to Recover Files After CCleaner and Why?
- How Can We Recover Files After Using CCleaner?
- Conclusion
- Questions and answers
- Comments
Introduction
On the Internet, you can find lots of apps to assist you in cleaning junk files, freeing more disk space and making the process entirely automated. CCleaner is one of such apps. It helps users to remove unnecessary files created by Windows operating system and integrated utilities. This program relieves users from all the routine work in searching for and erasing data, and provides a concise report on the files it deleted and the amount of free space. However, the program may sometimes delete files which are more important than junk. Or sometimes, for a number of reasons, users may need the files which have already been removed. In this case, the question is how to recover files you lost after CCleaner erased them. In this article, we’ll show you a proper method of doing it and explain everything in detail.

How to Recover Files Deleted From Windows Recycle Bin or With Shift + Del 📁🔥⚕️
What Happens When a File is Deleted?

Programs to Clean Your Hard Disk and Registry from Junk Files in Windows 10, 8, 7 💻🔥📁
The Windows operating system monitors location of files on the hard disk with the help of certain marks. Every fie and folder on the disk have their own markers (indicators) to tell the operating system where the data of a certain file begins and ends.
When a user starts the process of deleting a file in this or another way, Windows only deletes a specific marker and notes that the sectors containing the data of the deleted file are now free and available for writing new file data there. From the point of view of the file system, the deleted file is no longer present on the hard disk, and the sectors containing its data are considered to be free.
However, until the Windows operating system has actually written new data to the sectors containing the data of the deleted file, such file is still available for recovery. A file recovery application can scan the hard disk for deleted files and recover them successfully. If the file was overwritten partially, file recovery apps can restore only a certain share of the data. It happens when a part of the sectors still containing data of the deleted file was used to write new data. In some cases, recovery apps can restore the entire file by fixing overwritten sectors with the help of deep analysis.
The process of deleting as we have described it here applies in full to any files stored on hard disk drives HDD. This process is different for files deleted from solid state drives SSD, and in the next part of the article, we’ll focus on peculiarities of deleting files from SSD.
You can read more about general principles of storing and deleting files in one of our previous articles: «Recovering Deleted Files in Windows 10, 8, 7, Vista and XP».
Why Aren’t Deleted Files Erased at Once?

How to Delete Files Without the Opportunity to Restore Them – Software Encryption 📁🚫⚕️
The answer to the question why the computer doesn’t just erase files when they are deleted is pretty simple. Deleting the file indicator and marking the space occupied by the file as free for writing new data is a quick operation, as the file indicator (marker) has a minimal size. On the contrary, erasing a file completely by overwriting its data takes much more time. For example, if you delete a file of 10 GB, the visible process of deleting is almost instant. Yet the actual deleting of the file’s contents may take several minutes – that is, almost as much time as you need to write the same 10 GB of data to your hard disk.
To improve overall performance of a desktop or laptop computer and save the user’s time, the Windows operating system doesn’t actually remove the file contents when it is deleted – except for cases when special software is used to completely erase the file contents by overwriting.
The process of deleting files from solid state drives (SSD) is a bit different. A design-specific feature of SSD disks is that they use flash memory based on a particular semiconductor technology to store user data.
All modern SSD devices support compulsory implementation of the TRIM hardware command used to notify the drive that some blocks no longer hold useful information and therefore it doesn’t have to be stored anymore. Immediately after a file is deleted, this command marks the blocks as free, and consequently, the data is erased physically; the actual time when it happens is determined by the drive’s firmware.
In fact, data cannot be overwritten in the drive’s flash cells due to peculiarities of solid-state drive operation. To write any new data, the contents of the flash memory should be cleaned first. The operating system removes files at once to boost performance of subsequent write operations. If the files were not deleted at once, it would take longer to prepare the storage device for writing new data as this process would involve cleaning the flash memory first, and only then performing the actual write operations. Application of the TRIM command allows you to clean the flash memory at once and excludes any chance of keeping odd (junk) files which prevents reduction in the drive’s performance.
However, using the TRIM command can make it much more difficult or even impossible to recover data, even with the help of specialized software.
| Parameter | Description |
|---|---|
| What is TRIM? | A command that allows the operating system to inform the SSD which data blocks are no longer in use. |
| Purpose | Improving the performance and longevity of the SSD by optimizing data writing. |
| How does it work? | When a file is deleted, the system sends a TRIM command to the SSD to mark the blocks as free. |
| Advantages |
|
| Systems supporting TRIM | Windows 7 and newer, macOS 10.6.8 and newer, some Linux distributions. |
| Disadvantages | Requires support from both the OS and the SSD. May be less effective on older systems. |
| How to activate? | Usually automatically activated on supported OS; can be checked via command line or SSD utilities. |
When is it Impossible to Recover Files After CCleaner and Why?
CCleaner is quite easy to use and can be very useful, if applied properly. It helps clean unnecessary files from the Windows operating system and other installed programs, saves hard disk space and in the long run, boost your computer’s performance.
If data is cleaned in a common way, the deleted information will be available for further recovery with a special program that we will tell you about in the next part of the article.
However, if you have some confidential personal data on your computer, for example, financial documents, registration files etc., and you are interested in erasing them entirely without a single chance for recovery, the Tools section features the utility called Drive Wiper which will erase all contents or free space in selected hard disks.
By overwriting the hard disk free space with other data, CCleaner ensures complete erasure of files that used to be stored in the corresponding sectors. You can select how many passes the app will use to overwrite data and make sure the information is gone.
In this case, the user information is removed past recovery.
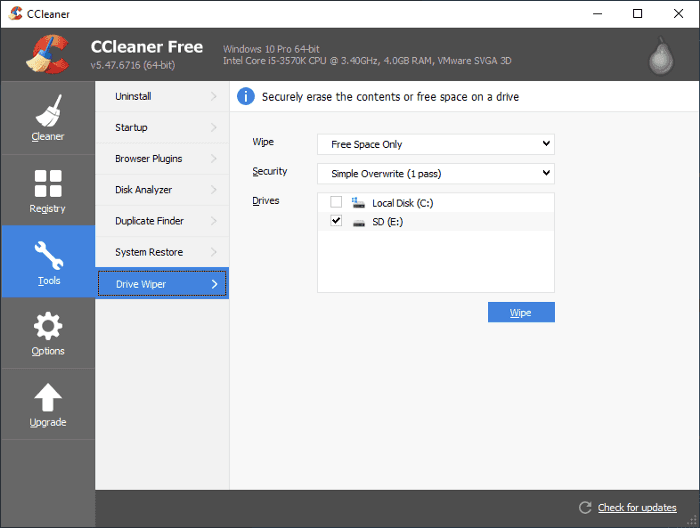
You should also be careful with CCleaner settings. If you change default settings according to your own priorities, for example, Secure file deletion, Wipe alternate data streams or Wipe cluster tips, such data will be destroyed permanently without a single chance for recovery.
How Can We Recover Files After Using CCleaner?

How to Recover Data After Resetting Windows 10, Resetting a Laptop to Factory Settings 📁🔥⚕️
If you use default settings, that is, ordinary quick delete, then professional data recovery software gives you excellent chances for success in bringing your files back.
To ensure the deleted data will be back without any problems, please pay attention to some requirements:
Recover the file as soon as possible: In the course of its work, Windows operating system permanently writes separate fragments of data to the hard disk and does so regardless of current user activity, which increases the probability for overwriting the deleted files. That is why you should start recovering deleted files immediately, because the chances for positive results are considerably higher right after the files were deleted than after some time.
Reduce using the hard disk: The best way to recover files deleted from the hard disk is to shut down the computer immediately after deleting, connect its hard disk to another computer as an extra partition, and recover the deleted files while using the other computer’s operating system (installed on the different hard disk) to install and run a corresponding file recovery utility. If you try to recover the missing files by installing the file recovery utility on the same hard disk from where you deleted the files, then the process of installation and regular operations of the hard disk may result in those files being overwritten.
Windows doesn’t have integrated tools to scan the hard disk for deleted files and restore them. However, on the Internet you can find many different programs meant to recover missing files.
Hetman Partition Recovery by Hetman Software truly deserves to be mentioned as the best software product globally recognized for its outstanding ability to find and recover deleted files on a hard disk of desktop or laptop computer.
This top-notch utility ranks among the best possible solutions in the company’s portfolio for the widest range of application, the high percentage of recovered files and impressive functionality.
Hetman Partition Recovery deals with data recovery by using a licensed innovative algorithm which is capable, in most cases, of recovering user files completely regardless of why and how they were deleted.
The program can easily restore various kinds of data:
- User files after they were accidentally deleted from all kinds of computer devices: personal computers, laptops, USB flash drives, memory cards, digital cameras etc. You can read more about possible causes of damage to memory cards, methods for fixing them and recovering their data in our article: «Recovering Data From Flash Drives And Memory Cards».
- The program restores data after formatting or deleting partitions or drives, after changes or damage to the file system – and does all of that with signature-based data search principles.
- Files deleted by emptying the Recycle Bin, deleted permanently, and deleted with the key shortcut Shift + Delete.
- Data corrupted and blocked by harmful effects of malware (viruses).
- Data after system or hardware failures, firmware errors and operating system crashes.
- It also provides you with access to information located in physically damaged, unreadable, inaccessible and non-operable hard disks. You can fully explore the methods for fixing hard disk problems and recovering data in our previous article: «How to Convert a RAW Disk Into NTFS and Restore its Data?».
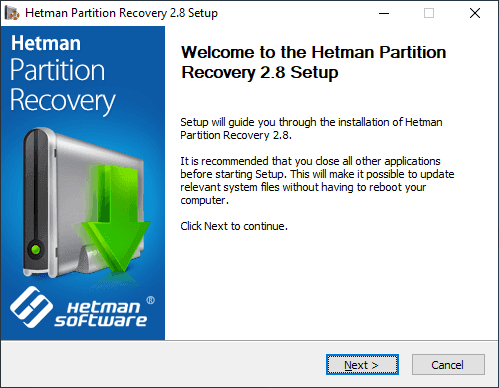
The program Hetman Partition Recovery is available for download and installation from the developer’s official website. When you start the installer, it activates the wizard to take you through several simple steps, configure the settings properly and finalize the installation.
When you launch the program, it runs initial analysis of the operating system, recognizes all connected devices and data storage media, defines the file system and detects possible damage. The program has a well-recognizable interface similar to that of Windows File Explorer, so that even users having no special knowledge in the field of file recovery can feel comfortably in the intuitive and friendly backgrounds.
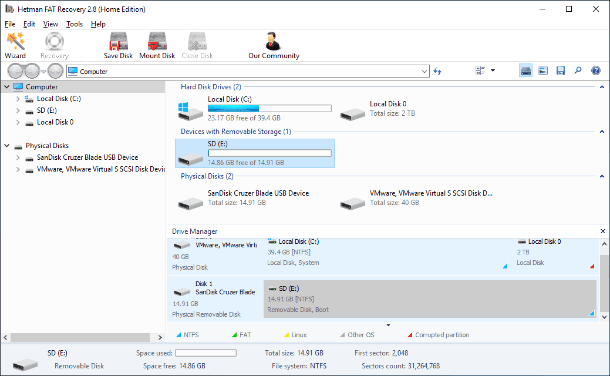
Double-clicking on the required partition or the entire physical disk will launch the recovery wizard. It offers you two types of analysis to choose from when dealing with file recovery. Fast scan is good for recovering accidentally deleted files that might have been erased a short time ago. Check the Full analysis option to search for any available information and restore the disk file system, and it doesn’t matter how much time passed since the files have been removed. It scans all kinds of file systems and runs an in-depth analysis of the disk space intended to find all kinds of files based on their contents.
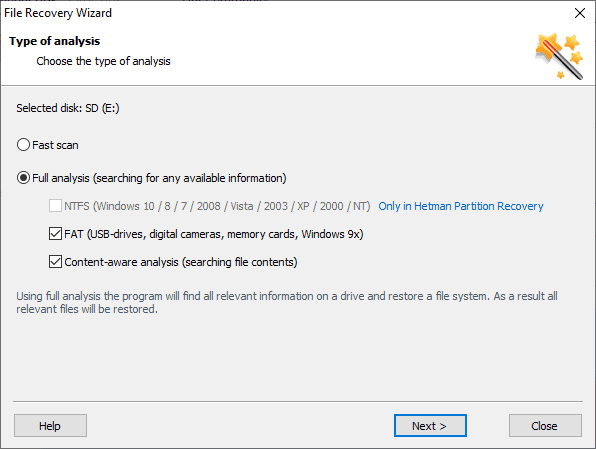
After you have chosen the analysis type that meets your particular requirements and click Next, the process of searching and recovering the deleted data will start.
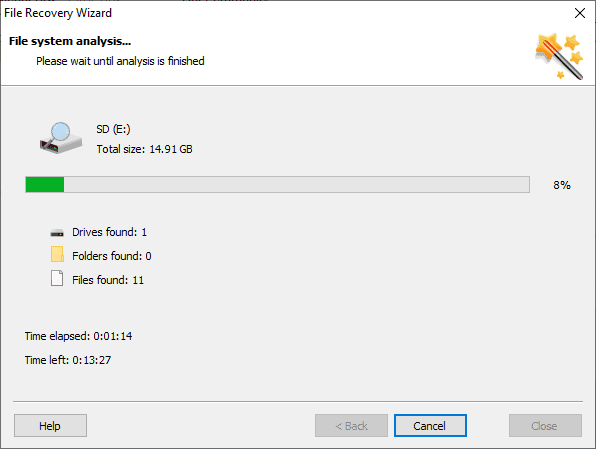
You can see the process of analysis, search and recovery in the program’s window so you can watch its progress in real-time mode. Depending on whether the files are more or less damaged, the size of the disk, analysis type and other additional circumstances, the recovery process may take from a few minutes to several hours, so you should be ready to spend that amount of time to ensure successful recovery of your data.
When the analysis of the specified partition or disk is over, you will see all recovered user files in the program’s window. Before you choose the ones you’d like to save, you can use the advanced preview function to have a closer look at the recovered files. This way, you can view the contents of any file (documents of various formats, videos, sound files etc.) and choose the ones that retained the best quality.
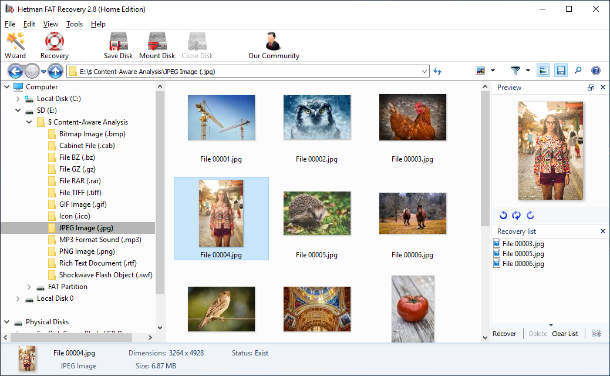
After you have selected all the files you are going to recover, click on Recovery button fashioned like a life ring which you can find on the main panel of Hetman Partition Recovery menu.
The program will launch the recovery wizard which offers four default options to save the files: upload them by FTP, create an ISO virtual image, burn them to an optical CD/DVD disc, or save them to the hard disk or any other storage device you choose.
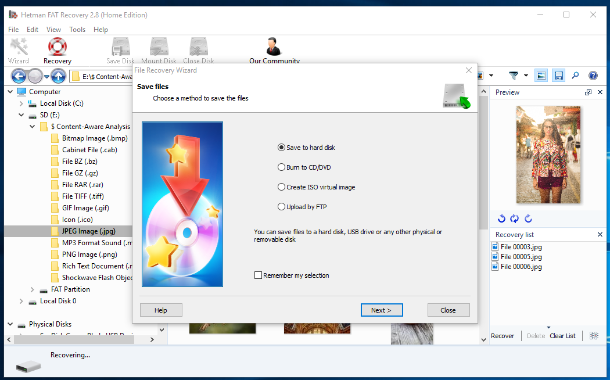
Depending on how you want to save your data, there are several additional settings to configure. For example, when creating an ISO virtual image you need to give the path and name for the future file, set the information mark, decide on the file system of this ISO image, and check other extra options. When this part is over, user files will be recovered and saved. The only thing left to do is to open the recovered files and check if they are good for further use. You can learn more about the opportunities provided by Hetman Partition Recovery, its purpose and possible ways of application by watching our video guide on YouTube: «How to Recover Deleted Files in 2018 With Hetman Partition Recovery Software».

How to Recover Deleted Files in 2020 With Hetman Partition Recovery Software 📁🔥⚕️
Conclusion
Any actions involving removal of user files require extreme caution and carefulness, especially when the actual deletion is delegated to a third-party program. You might suddenly need the files that seemed useless just a day ago and may have been erased. If there is a regular algorithm for deletion which is activated at a certain time or when a certain limit of data is reached, such situation may have undesirable consequences. What is more, it can make you lose more time and resources, especially when the missing information is really important and no backup is available. That is why you should make it a rule to back up important data in order to improve protection of important information from undesired deleting.
An important element of information security is having a professional file recovery tool, for example, Hetman Partition Recovery, which can help you at any time when you need to restore information and protect yourselves or other people from irretrievable losses.
Using several elements of protection strategy, you can always bring your files back and avoid unnecessary waste of time and money.
If you have any questions concerning file recovery after using CCleaner or you would like to share your experience with others, feel free to leave your comments below the article, and we will respond to them without fail.



Yes, use Hetman Partition Recovery to recover data after Ccleaner.