Switch to AHCI Mode in BIOS: No Windows Reinstall
Learn how to enable AHCI mode for SATA in BIOS without the need to reinstall Windows with this comprehensive guide. Discover step-by-step instructions and essential tips to seamlessly configure AHCI mode on your system. Dive deep into the BIOS settings and explore insider techniques to make the transition hassle-free. Don’t let the fear of reinstalling Windows hold you back – empower yourself with the knowledge to enable AHCI mode effortlessly!

How to Enable AHCI Mode Without Reinstalling Windows, INACCESSABLE_BOOT_DEVICE Error 💻🛠️🤔
- IDE and AHCI
- How to Find out Which Mode the Computer’s Controller is Using?
- How to Enable AHCI Mode for SATA on a Computer Where Windows is Already Installed?
- Questions and answers
- Comments
IDE and AHCI
The SATA interface can operate in two modes, IDE and AHCI:
- IDE – a compatibility mode for older equipment and software. In fact, in this mode SATA capcity is no different from its predecessor, ATA (or PATA) interface;
- AHCI – a new mode for memory devices, where a computer can use all SATA advantages, primarily higher speed of data exchange with SSD and HDD (Native Command Queuing technology, or NCQ), as well as hot swapping of hard disks. When you activate AHCI mode, it increases the speed of access to files in memory devices and improves overall performance of your computer.
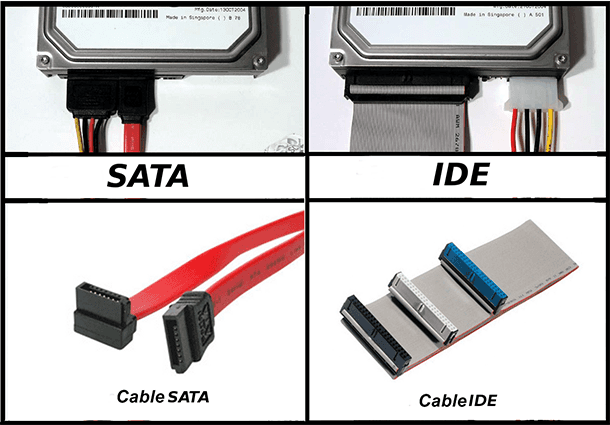
Many people can ask quite a logical question: why have IDE mode for a SATA disk, if AHCI mode is natural for it enabling this SATA disk to completely realize its potential? Moreover, many motherboard manufacturers supply products with a default option to support PATA compatibility mode – IDE.
The matter is that operation of disk controllers in AHCI mode is supported in operating systems beginning with Windows Vista. That is, if you connect a disk with Windows XP to the system with AHCI-enabled controllers, you will run into a BSOD error (“the blue screen of death”). On the other hand, any SATA disk can work in IDE mode. Without kowing it, many users will feel no difference. In this way, computer manufacturers are trying to avoid possible problems with compatibility of hardware and software.
Another important difference between IDE and AHCI concerns working with SSDs. Remember that you can’t install an operating system on an SSD in IDE mode – it requires AHCI to be enabled.
| Characteristic | IDE | AHCI |
|---|---|---|
| Full Name | Integrated Drive Electronics | Advanced Host Controller Interface |
| Performance | Lower performance due to data transfer speed limitations | Higher performance, supports high-speed data transfer |
| Feature Support | Basic data transfer functions | Supports NCQ (Native Command Queuing) and hot-swapping |
| Compatibility | Compatible with older motherboards and drives | Modern standard, compatible with new motherboards and SSDs |
| Hot Swapping | Not supported | Supported |
| NCQ (Native Command Queuing) | Not supported | Supported |
| Application | Suitable for legacy systems and devices | Recommended for modern OS and SSDs |
| Boot Speed | Slower OS and program loading | Fast OS boot and increased program performance |
How to Find out Which Mode the Computer’s Controller is Using?
It is quite possible that AHCI mode is already enabled in your PC. It can be checked in several ways:
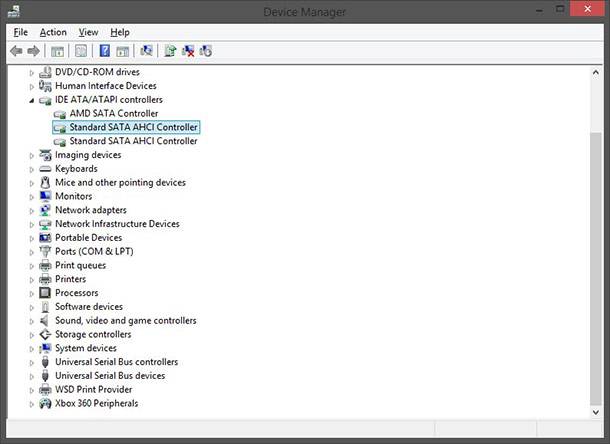
Method 1. Device Manager
- Go to Device Manager
- Open the section “IDE ATA/ATAPI controllers”
- If there is a device containing “AHCI” in its name as in our case, it means that AHCI mode is used in this computer.

Method 2. BIOS or UEFI
-
Go to BIOS or UEFI.
Go to view
How to Enter BIOS or UEFI in a Computer or Laptop and Boot from a Flash Drive or a CD, DVD 💽🛠️💻
-
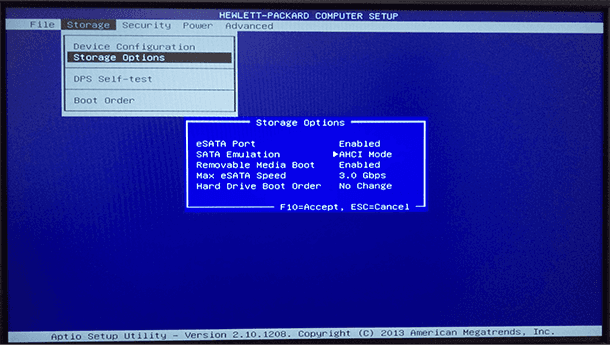
Find an item with the name «Storage options», «SATA Mode», «SATA Emulation» or anything similar.
-
If the value of such item is «AHCI» then AHCi mode is already enabled.
-
If the value says «IDE», don’t hurry to change it into «AHCI».
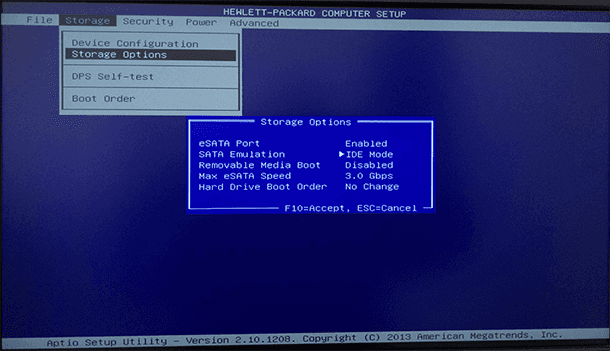
The matter us that if you just enable AHCI mode after Windows installation, you will face a BSOD error, INACCESSABLE_BOOT_DEVICE (which is known as “blue screen of death”) or your system will refuse to boot, getting stuck in a series of restarts. That is why it is recommended to enable AHCI before installing Windows.

Please take note, that in some computers, there is no BIOS option to change to AHCI mode. In this case, the problem can sometimes be fixed by updating the BIOS.

How to Update BIOS For ASUS, HP, Lenovo, MSI, Acer, Samsung, Gigabyte, Asrock, AMI, Phenix Award 💽💻🤔
How to Enable AHCI Mode for SATA on a Computer Where Windows is Already Installed?
There are several ways to enable AHCI mode for SATA on a computer where Windows is already installed, and Windows will work normally after this operation:
Method 1. Registry Editor
-
Run Registry Editor.
-
To do it, press Win + R and type in the command regedit.
-
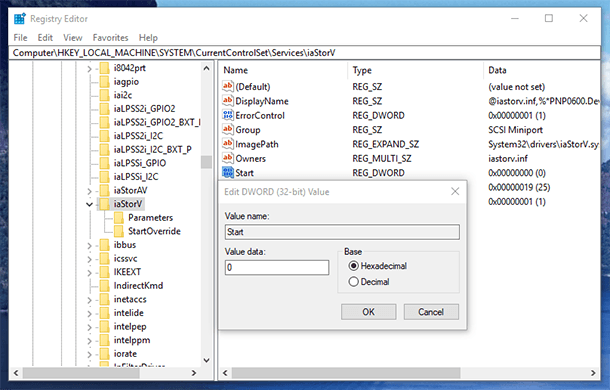
Go to the section HKEY_LOCAL_MACHINE\ SYSTEM\ CurrentControlSet\ Services\ iaStorV

-
Double-click on Start element and set its value to 0 (zero).
-
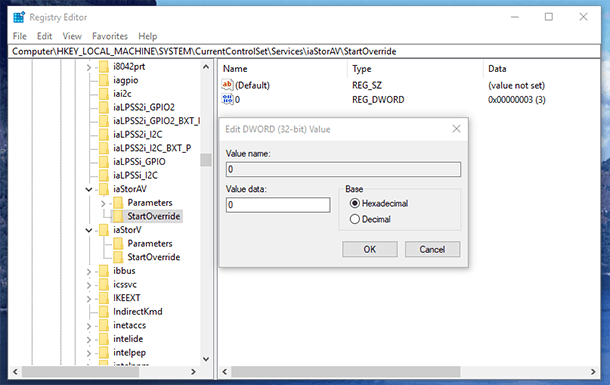
In the next section, HKEY_LOCAL_MACHINE\ SYSTEM\ CurrentControlSet\ Services\ iaStorAV\ StartOverride set the zero value for the element 0.
-
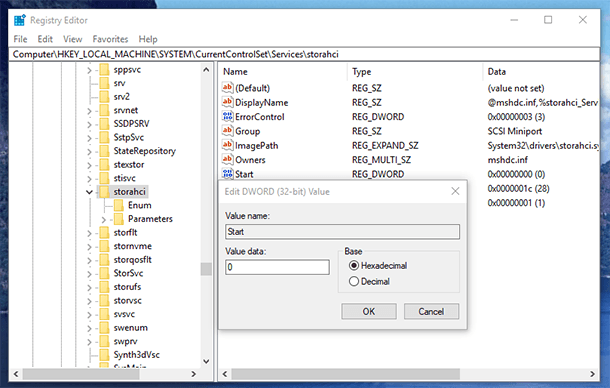
In the section HKEY_LOCAL_MACHINE\ SYSTEM\ CurrentControlSet\ Services\ storahci set the value to 0 (zero) for Start element.
-
In the subsection, HKEY_LOCAL_MACHINE\ SYSTEM\ CurrentControlSet\ Services\ storahci\ StartOverride set the zero value for the element 0.
In our case, there is nothing to see, but you will see it, if AHCI has not been enabled yet. -
Close Registry Editor.
-
Restart the computer and go to UEFI or BIOS. For the first time after the restart, it is better to boot Windows in safe mode.
All methods to boot Windows in safe mode:
Go to view
-
In UEFI or BIOS, find SATA settings to select the mode for memory devices. Switch them to AHCI, save settings and restart the computer.

-
After the restart, Windows will start installation of SATA drivers, and when it is over, it will ask you for another restart. Do it, and AHCI mode in Windows will be enabled.
If the first method didn’t work for some reason, is another way to to it. To begin with, if you have problems with booting Windows in AHCI mode, go back to IDE and restart the computer.

Method 2. Command prompt
-
Launch the Command prompt as Administrator.
-
Type in the command prompt: “bcdedit /set {current} safeboot minimal” and press Enter.
bcdedit /set {current}
-
After you see a message that the operation is successful, restart the computer.
-
Before booting your PC, enable AHCI in BIOS or UEFI using the method we have already described, and save the settings.
-
The computer will boot in safe mode and install all necessary drivers.

-
Launch the Command prompt as Administrator again and type in bcdedit /deletevalue {current} safeboot.
bcdedit /deletevalue {current} safeboot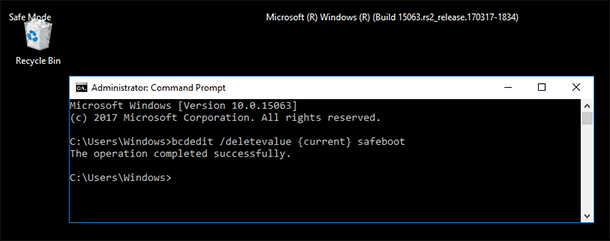
-
After the command is executed, restart the computer again. This time, Windows should boot with AHCI enabled and without any problems.
As you can see, these actions can theoretically result in unwanted consequences such as inability to start the operating system. That is why you should do it only if you know why you do it, if you can enter BIOS or UEFI, and if you are ready to fix unforeseen consequences if anything happens. For example, you may have to reinstall Windows in AHCI mode.
If accidental or hurried actions made you reinstall your operating system and lose important data, read this article to learn how to recover them: «I Reinstalled Windows! Can I Recover My Data?».

How to Recover Data After Resetting Windows 10, Resetting a Laptop to Factory Settings 📁🔥⚕️


