Problem Solved: Successfully Recovering Data from Zyxel NAS542 RAID
Need to recover data from a Zyxel NAS542 RAID? Our comprehensive guide has got you covered! Learn step-by-step instructions and expert tips for successfully salvaging your data from the NAS542 RAID system. Say goodbye to data loss worries and hello to recovered files!
- What causes data loss for NAS
- How to create a RAID array on Zyxel NAS542
- How to create a shared folder
- How to enable the Recycle Bin feature for a shared folder
- Zyxel NAS542 Data Recovery
- Questions and answers
- Comments
Zyxel is a Taiwan-based company mostly known for its network solutions for home users and small to medium businesses, and it also produces NAS devices.
Their NAS solutions are pretty reliable and are a good option for organizing a data storage system. However, even the most reliable NAS devices have a limited period of operating life, and it doesn’t matter if they are produced by Zyxel or any other well-known manufacturer. It means that after a few years in active use all storage devices tend to fail, sooner or later. Generally, most NAS systems remain usable for three to five years on average. On the other hand, there are some factors that often cause the storage system to fail long before its lifespan expires, and lose our precious data.

💿 How to Recover Data from a RAID System Based on ZyXEL NAS542 💿
What causes data loss for NAS
A network-attached storage may break down after a power failure, voltage surges, overheating, accidental formatting, reinstalling an operating system, damaging the file system (usually it affects the journal or the superblock), and as a result of mechanical issues with the hard disks or the RAID controller. Very often, data can be lost from NAS devices when users decide to update their firmware. To get your files back, you’ll need a specialized data recovery tool.
| Cause | Description |
|---|---|
| Hard drive failure | Physical or logical damage to the drives that are part of the NAS. |
| RAID controller errors | Issues with RAID controller settings or operation that lead to data loss. |
| Incorrect firmware updates | System or firmware update failures may result in data loss. |
| File system corruption | File system failure or corruption can make data inaccessible. |
| Virus attacks | Malware infections can damage or encrypt the data on the NAS. |
| Human error | Accidental file deletion or incorrect RAID array configuration. |
| Power interruptions | Sudden power outages can damage data or the file system. |
| System overload | Excessive load on the NAS can cause system failures. |
How to create a RAID array on Zyxel NAS542
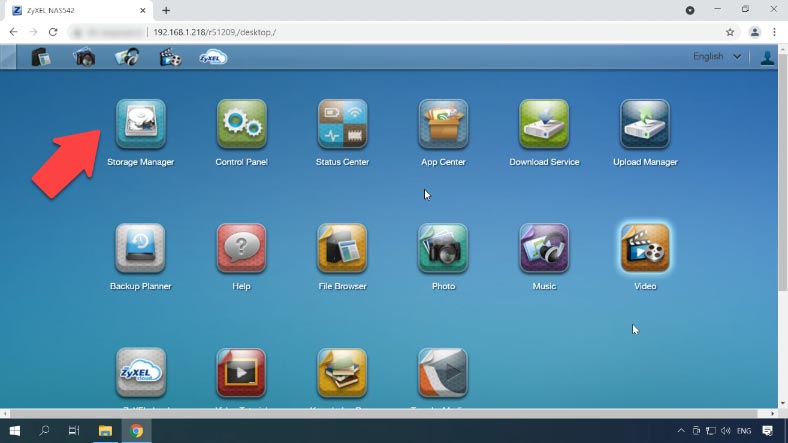
To create a RAID, open Storage Manager, expand the tab Internal Storage – choose Volume.
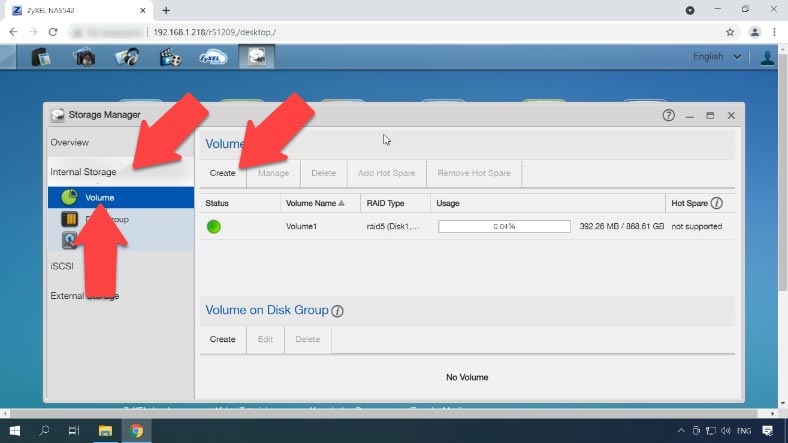
In this window, click Create.
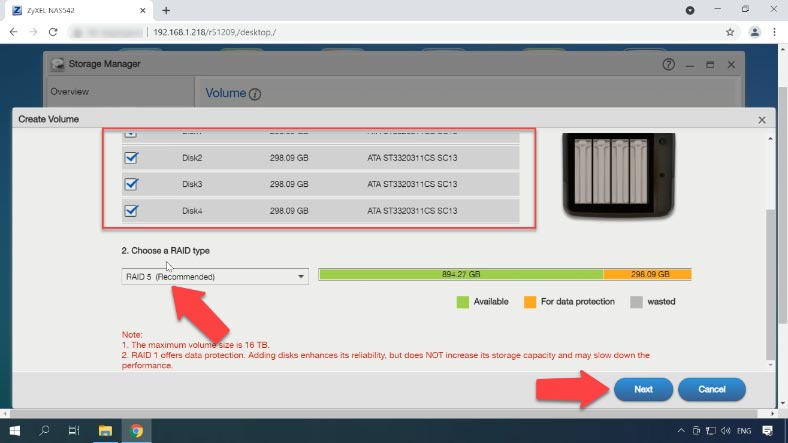
Select the disks to use for building the new array, choose the RAID type and click Next.
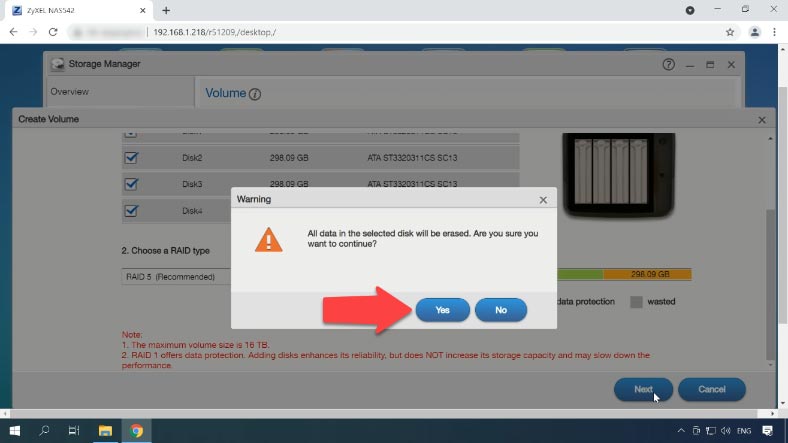
You’ll see a notification saying that in the selected disk will be erased. Hit Yes to confirm your choice.
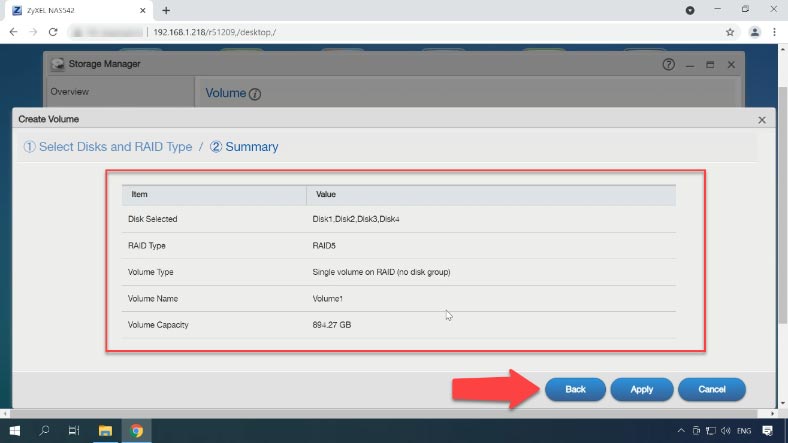
Check the properties, and if everything is correct, click Apply and wait until it’s done: it may take some time. Now the new array is created and ready to use.
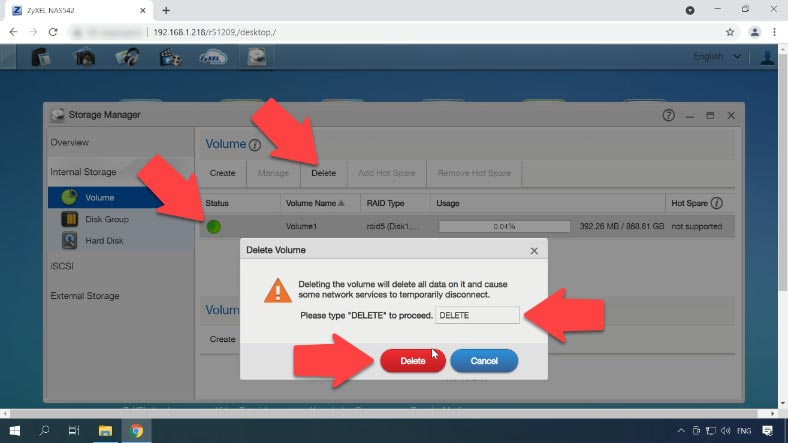
If you need to change the properties of an existing RAID, you’ll have to delete it first – and it means all the data stored in this array will be erased too.
Select the volume you need to edit and click “Delete”.To confirm this action, type DELETE in this pop-up window to make the “Delete” button active. Click Delete to continue and the volume will be removed.
How to create a shared folder
Now you can create a shared folder to provide access to the storage device.
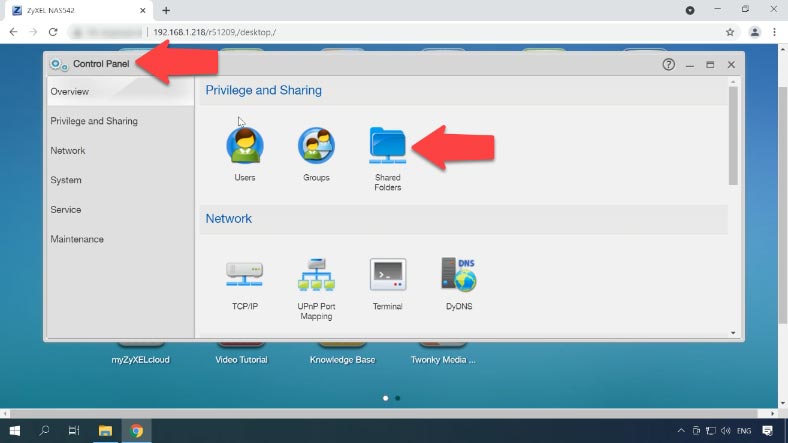
Open Control Panel – Shared Folders. By default, a certain set of shared folders is already there.
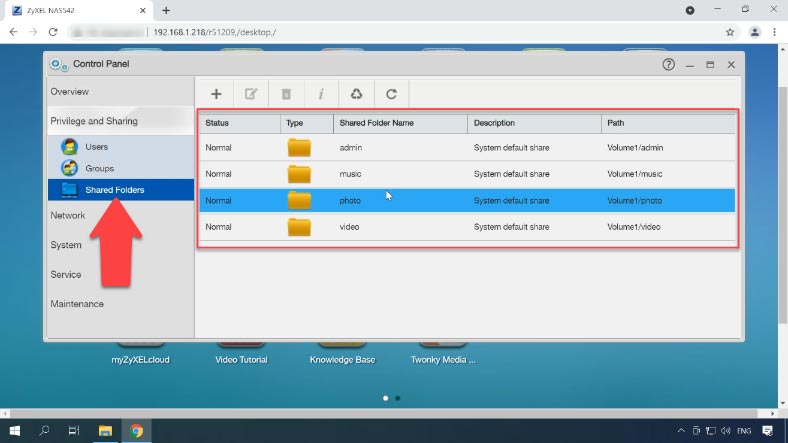
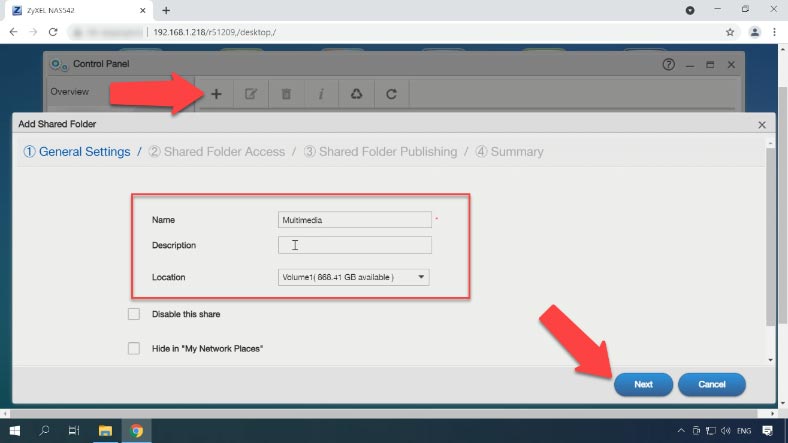
If you want to add more items, click on the plus button above, assign a name for the folder, select a directory, enable Recycle Bin and click Next.
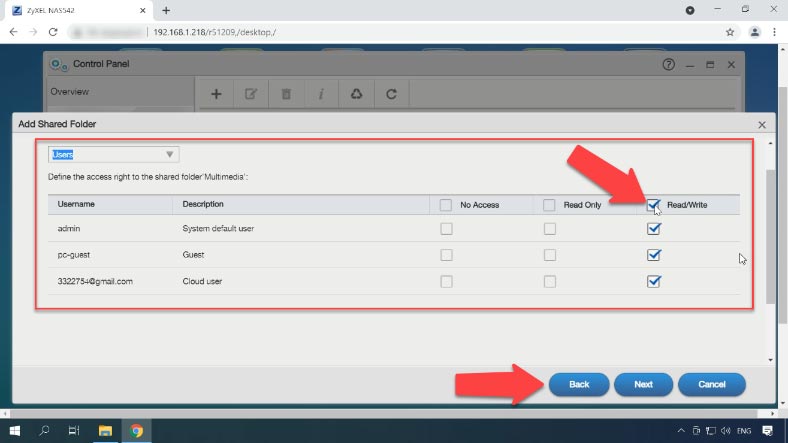
Set access permissions – Read Only or Read/Write – and go on to the next page.
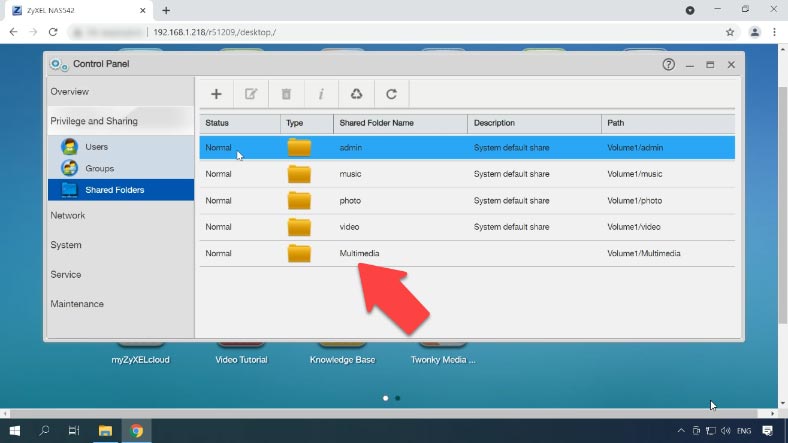
If you need to configure publishing settings, do it, and then click Next. Check the properties and click Apply.
How to enable the Recycle Bin feature for a shared folder
If your NAS works all right and the network drive can be accessed, but you accidentally deleted some data from the disk, you can try and recover it from the Recycle Bin.
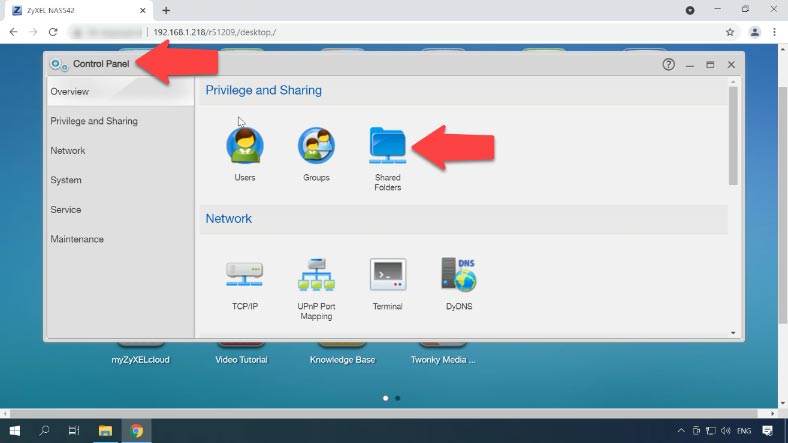
To use this feature and recover files from the Bin, it has to be enabled. To do it, open Control Panel – Shared Folders.
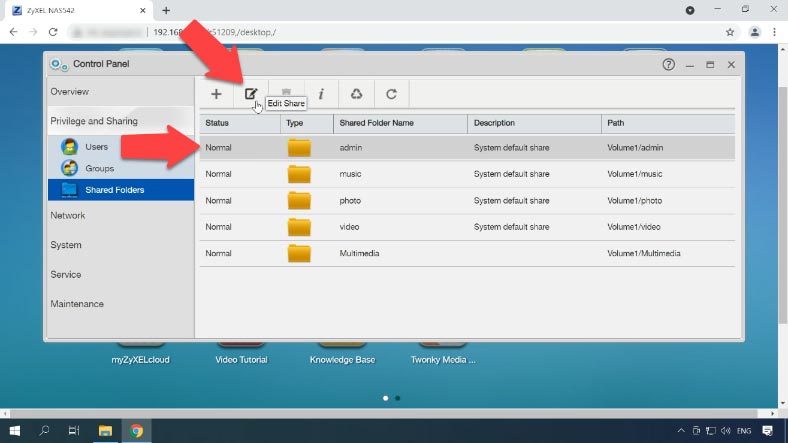
Select an item and click on Edit Share.
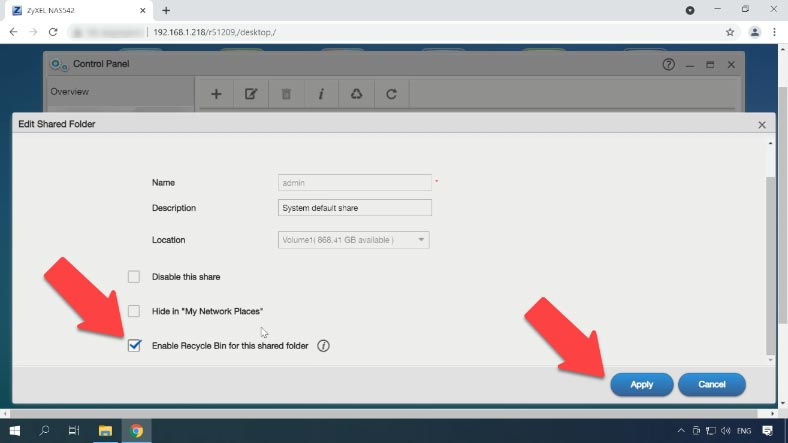
In the window that opens, check the box next to Enable recycle bin for shared folder and click Apply.
Zyxel NAS542 Data Recovery
Method 1. How to recover accidentally deleted data from the Recycle Bin
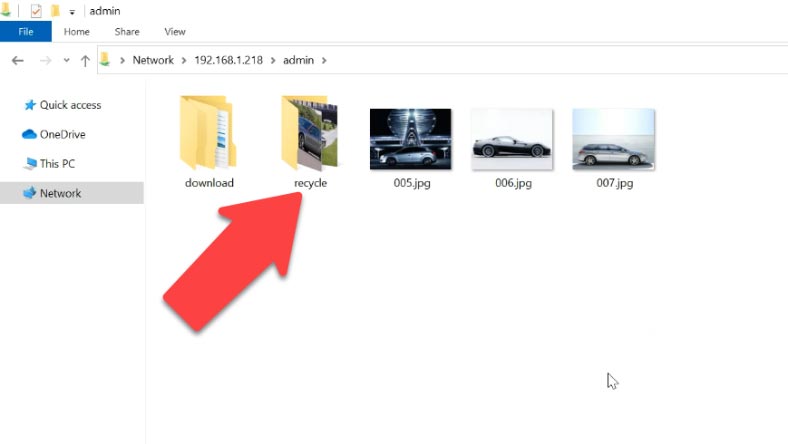
Now, when files are deleted, they will be sent to the Recycle Bin and you’ll be able to recover an accidentally removed file. Go to the directory from where you deleted the file, open the Recycle Bin folder, find that file and copy it to where you need it.
Method 2. How to recover data from a non-operable NAS
If the Network Recycle Bin was disabled at the time when files were removed, they can only be restored with a specialized data recovery tool. As the Recycle Bin was disabled in my case, it is impossible to recover data using the Bin. For such scenarios, all you need is a reliable piece of data recovery software to bring your files back without erasing them in the process.
| Name | Features |
|---|---|
| Hetman RAID Recovery | Supports all RAID levels, recovery of damaged array configurations, ability to work with NAS devices from various manufacturers. |
| UFS Explorer | Powerful tool for RAID recovery, supports a wide range of file systems, automatic configuration recognition. |
| ReclaiMe | Easy to use, specializes in RAID array recovery, recovery without complex settings. |
| R-Studio | Supports advanced RAID recovery, ability to analyze and recover data even from heavily damaged arrays. |
| Wondershare Recoverit | User-friendly interface, NAS recovery support over the network, optimized for home users. |
| Disk Drill | Intuitive interface, data recovery from various RAID types and NAS devices. |
If data is removed by accident, a hard disk is formatted, the disk array is misconfigured, or in other scenarios involving loss of data, loss of access to the network drive, or damage to a RAID system, Hetman RAID Recovery is always there to help you restore important information.
Most NAS devices are running on Linux-based operating systems, and their hard disks are formatted for Ext file system, while RAID arrays are typically built with the use of mdadm or LVM technology. When such disk arrays are connected to a Windows computer directly, you can’t read their contents without using third-party software.
However, Hetman RAID Recovery supports both of them, and in most cases it can rebuild such RAID arrays automatically. This is a comprehensive solution for NAS data recovery to help you restore your files in a number of different scenarios. This program supports most popular file systems and RAID types.
Take the disks out of the NAS device and connect them to a Windows computer. If the operating system of the computer to which you have connected the disks asks you to initialize or format them, don’t do that, because it will make recovery a lot more complicated.
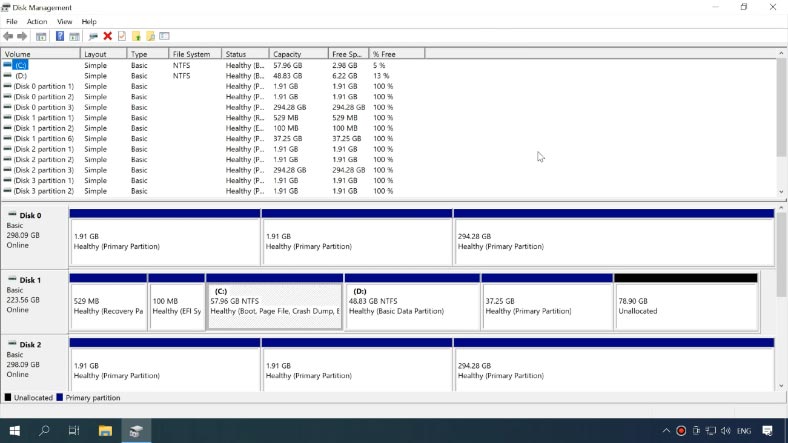
Our utility features an advanced mechanism of automatic scanning designed to identify and recover NAS data in various scenarios of data loss.
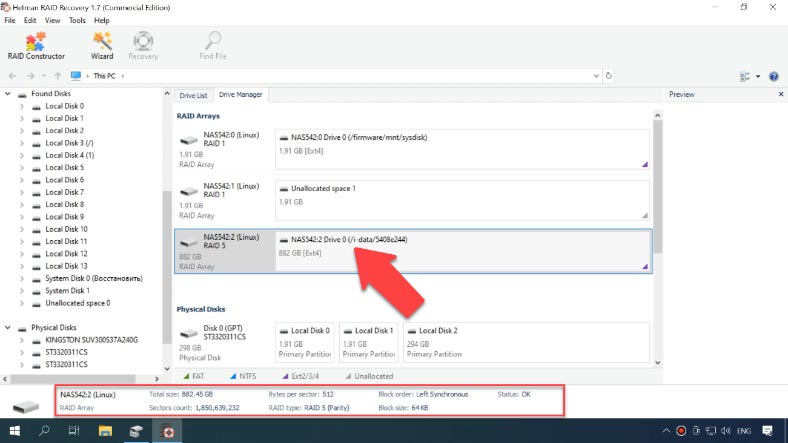
It will analyze the disks, read their service information and rebuild the damaged RAID system. Below, you can see detailed information about the array and check if the program has identified it correctly.
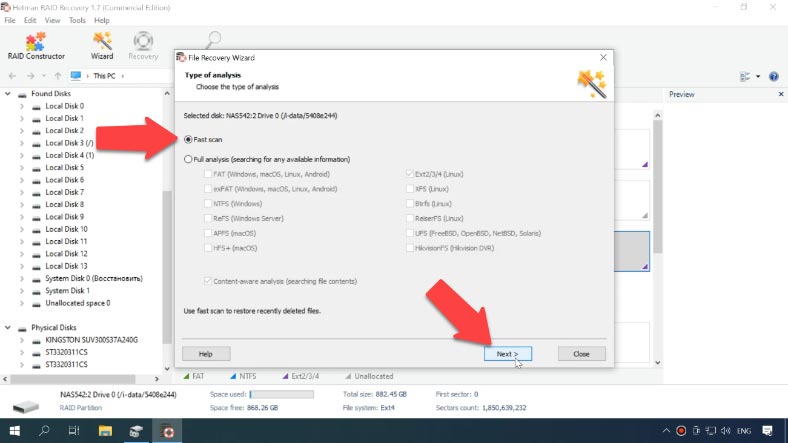
To start a scan, right-click on the disk and choose “Open”. Select the scan type and click Next to start it.
As you can see, the program has rebuilt the damaged RAID easily and found all the files stored on the network drive. If you are looking for files that have been removed, you can identify them by red crosses.
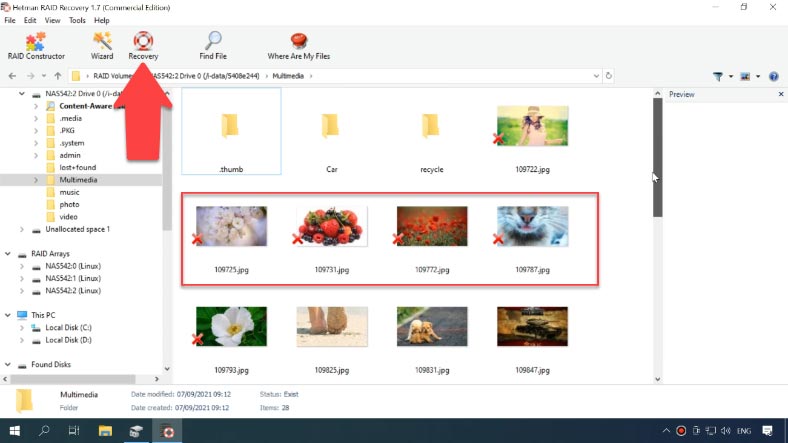
Select all the items you want to recover, click Recovery, select where you want to save them. When the recovery process is over, you’ll find all of the files in the folder you have chosen.
Method 3. How to recover data from an iSCSI disk
If files are deleted accidentally from an iSCSI disk, you don’t have to take the hard disks out of the NAS device and connect them to a computer – just run our program and scan the network drive.
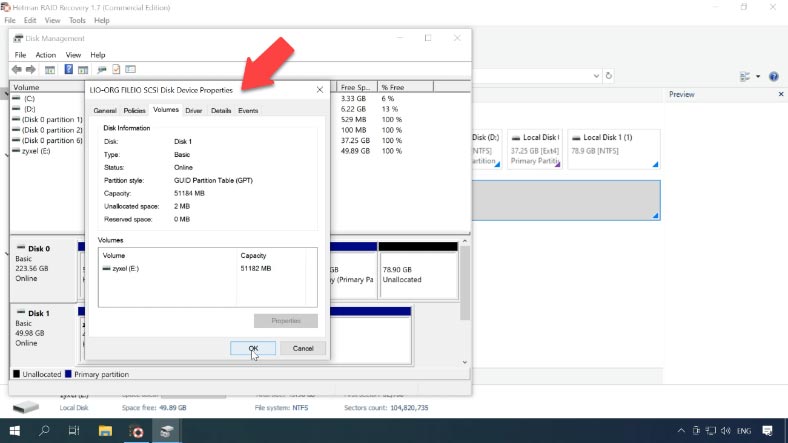
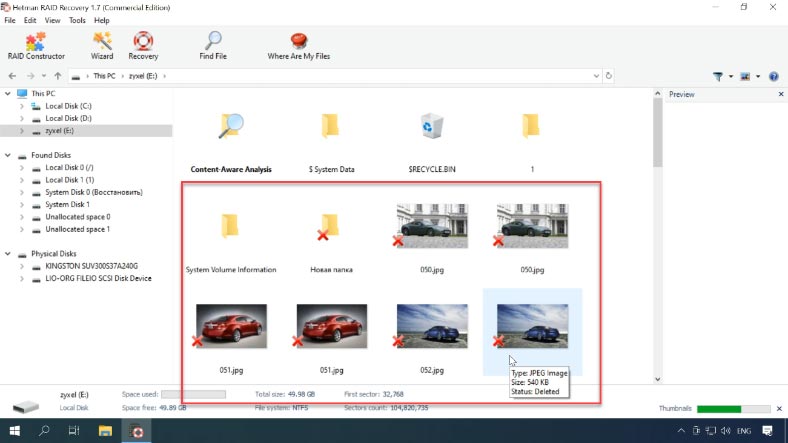
Hetman RAID Recovery identifies it as a physical one, and it means you can easily scan it and recover the accidentally removed data. Right-click on the drive – “Open”, select the scan type and wait until it’s over. As you can see, the program has found the files that have been deleted. The last step is to recover them.
Method 4. How to rebuild a damaged array manually with the RAID Constructor
If hard disks are properly functioning and healthy, Hetman RAID Recovery will rebuild damaged RAID arrays automatically. However, when a disk is damaged or service information is erased, the program may have difficulty in automating the rebuild process. If the program failed to rebuild the array but you know its properties, you can perform this operation manually, with the help of the RAID Constructor.
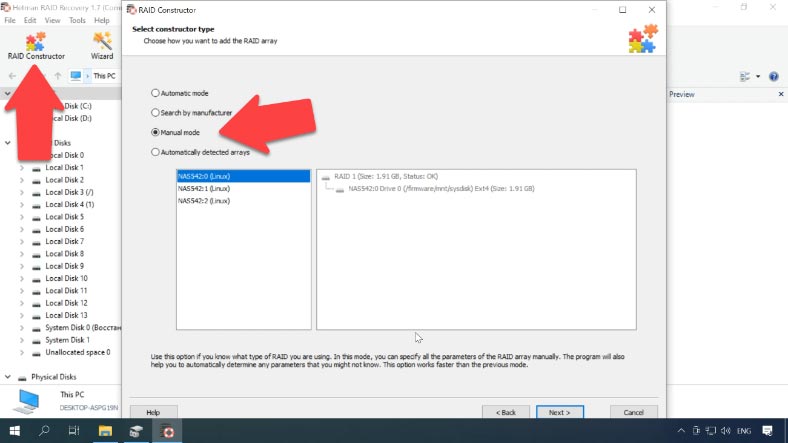
To do it, open the RAID Constructor, and select the option Manual mode.
In the next window, fill in all the RAID properties you know: the RAID type, block order and size, add the disks it used to include, use the arrows to specify their order, and replace the missing disks with empty drives by clicking the “plus” button. Also, you can specify the offset that helps to locate the beginning of the disk. Sometimes, the program may have difficulty in identifying it automatically, so you’ll have to enter the offset value manually.
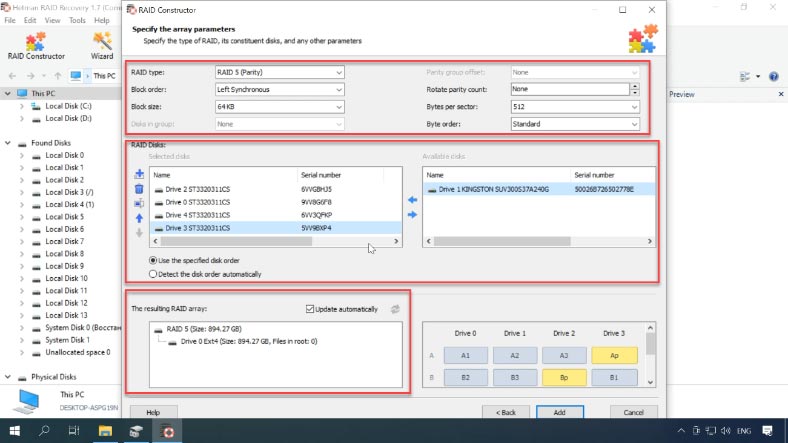
Usually, if you give correct properties, the newly built RAID system has at least one partition. Expand it to check for the folders that you need. If the folders you are looking for are displayed, then you have built this RAID properly. When you specify all the properties you know, click Add and the manually rebuilt array will appear in the Drive Manager.
To have the data recovered, the last step is to scan the array, find the files you want to restore, select them, and recover to the folder you choose.


This may happen if the device does not have the correct IP address or cannot contact findme for other reasons. One way to access NAS is through the NAS Starter Utility.
1. Download and run the NAS Starter Utility :
2.Click "NAS Seeker" and select your NAS, confirm the connection with the "Connect" button:
3. Click on "DeskTop":
4. Enter your administrator credentials (admin/1234 by default)
Check the status of the motherboard
Turn off the Synology NAS.
Remove all connected external devices 1 and installed drives 2.
Turn on the Synology NAS.
Check the status of the power LED.
Power LED is blinking steadily : If the power button remains unresponsive or the power LED keeps blinking for over 20 minutes, the motherboard or power supply may be faulty or damaged.
Power LED lights up steadily and beeps : If the beeping sound is heard for three minutes and the power LED remains lit steadily, it means that the motherboard is working, but the hard drives or connected external devices 1 may be the cause.
Checking the Status of Connected External Devices
If the motherboard and drives work fine, the problem may be related to the connected external devices. Turn off your Synology NAS. Connect the external devices one by one. Turn on your Synology NAS. Check the status of the power LED.
If the power LED has been blinking for over 20 minutes, there is a problem with the connected external devices. Contact your local retailer or distributor where you purchased the product for assistance.