How to Free Some Disk Space on a Mac Computer
As long as the system drive is about 80% full, you Mac will slow down considerably. There are numbers of third-party utilities to clean unnecessary files automatically, but quite often they are commercial. In today’s article, I’ll show you how to clean your Mac’s system drive manually.
- Method 1. How to find and remove big files quickly
- Method 2. How to check disk size on Mac
- Method 3. Clean junk files
- Method 4. How to clean browser cache
- Method 5. Remove media files
- Method 6. Optimize your storage
- Method 7. Empty Bin automatically
- Method 8.Uninstall unnecessary apps
- Method 9. Delete iPhone backups
- Method 10. How to free up some space on a Mac disk by compression
- Method 11. Duplicate files
- How to recover files accidentally deleted from your Mac
- Conclusion
- Questions and answers
- Comments
The amount of free space on a Mac system drive may affect its performance a lot. Over time, it decreases, and your computer starts to become sluggish. However, there are certain ways to fix the problem.

How to Free Some Space on MacOS System Drive
Method 1. How to find and remove big files quickly
The first method to gain more disk space is to remove unnecessary files.
Often users download big files from the Internet, and over time they tend to forget about the files they don’t use anymore. If this is your case, the first step should be to clean the downloads folder. Here’s how you search for big files.
Use the search feature to find and remove files quickly:
-
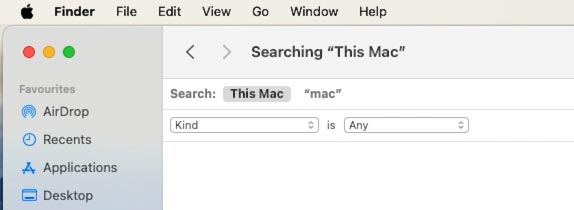
Open Finder and go to the home folder (Shift + Сommand + H). Then press the key shortcut Cmnd + F to open the search window.
-
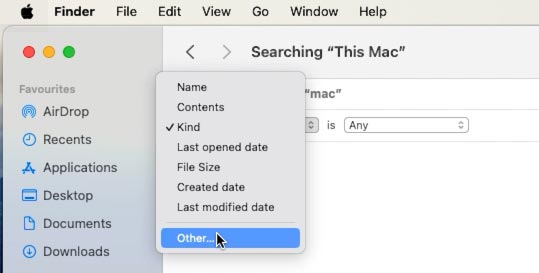
Click on the first drop-down list and choose Other.
-
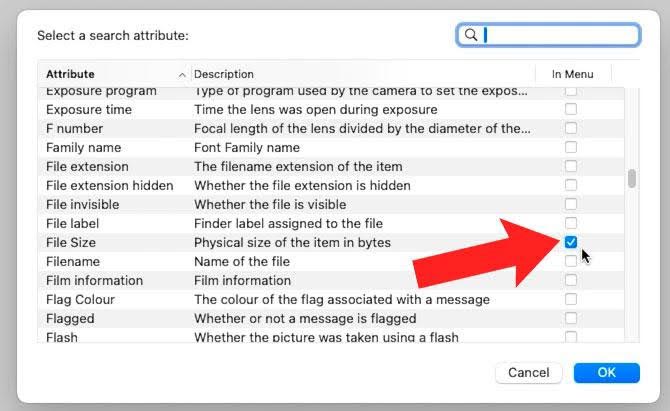
Check the box next to File Size.
-
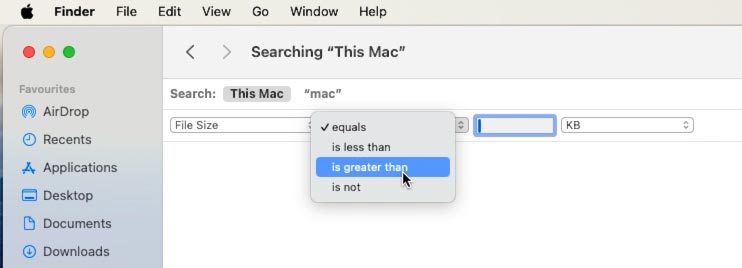
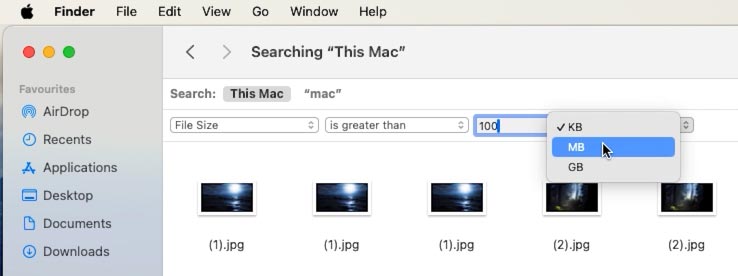
In the next drop-down list, choose Is greater than. Change the file size to 100 MB.
-
Now select everything you don’t need any more and click Move to Bin.
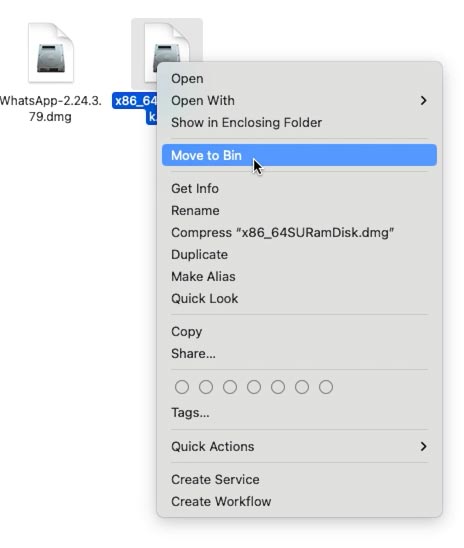
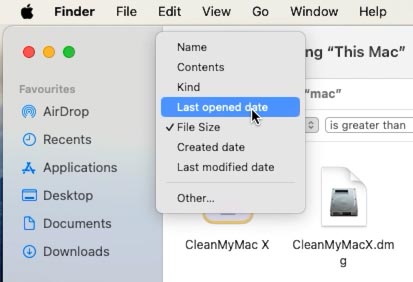
In the same way, you can remove any files you have not used for a long time:
-
Instead of searching for file size, choose Last opened date.
-
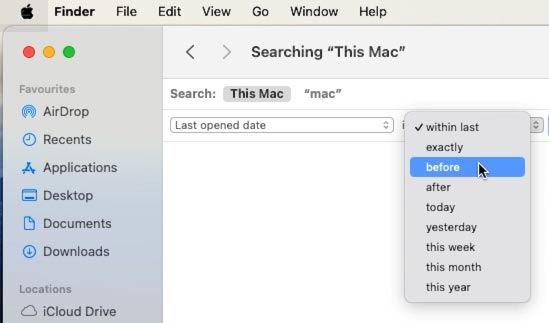
Now select Before and change the date to a year ago.
-
Delete unnecessary files.
In the same way, you can clean the Desktop.
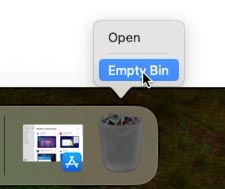
After everything was removed, empty the Bin (right-click – Empty Bin).
Method 2. How to check disk size on Mac
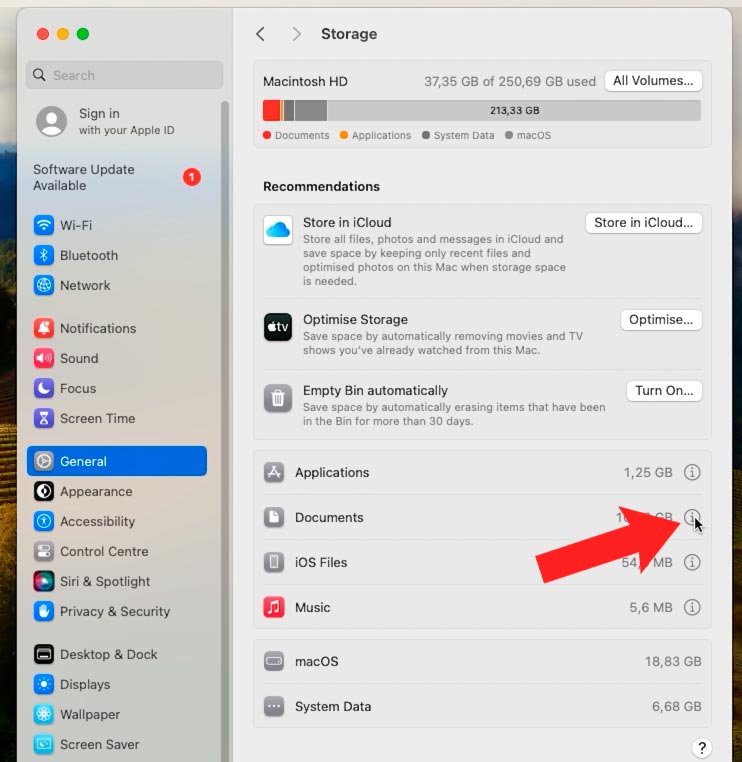
If you did step one, but didn’t gain much space, check the storage data: System Settings – General – Storage.
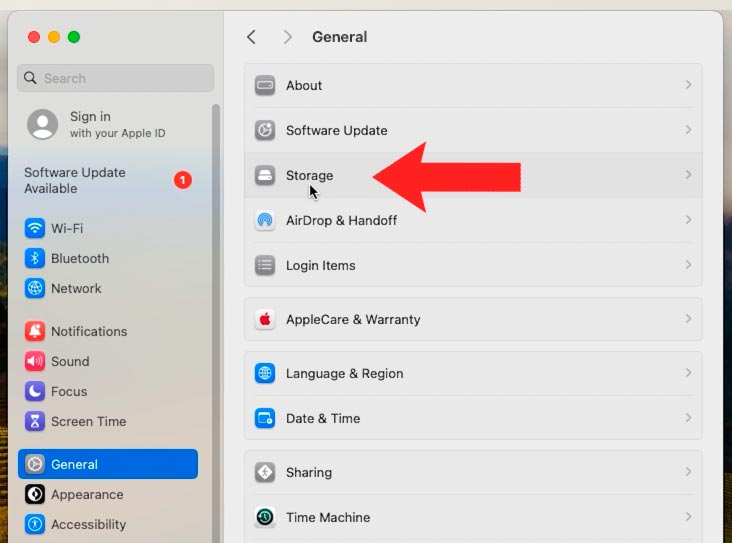
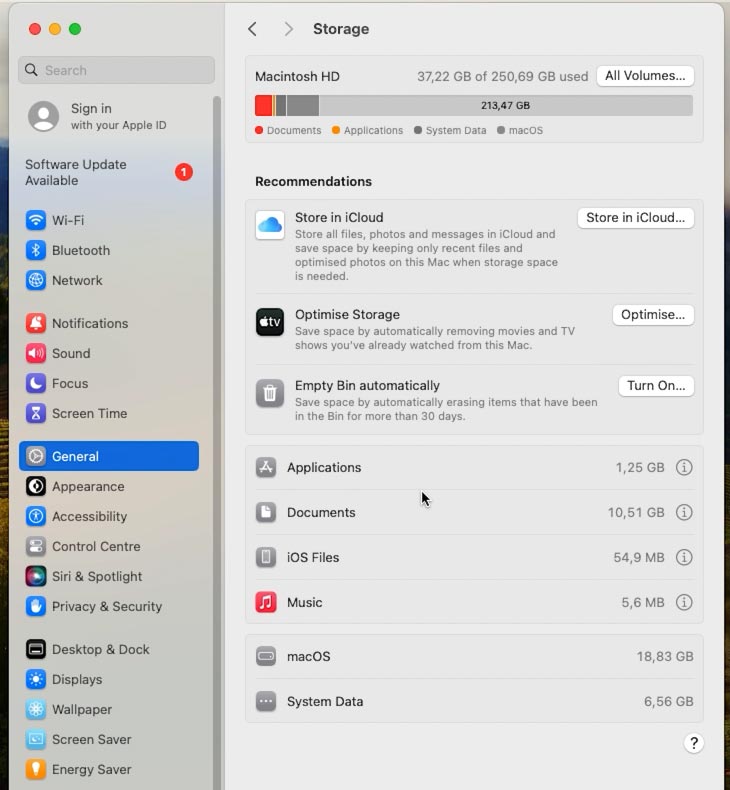
Looking at the categories, you can see what’s taking up most space on your system drive.
You can see what’s taking up most space on your system drive (Documents, Downloads and Unsupported apps). From this menu, you can safely remove the stuff you don’t need anymore. Just select a file and click Delete. Then confirm the action by clicking Delete one more time.
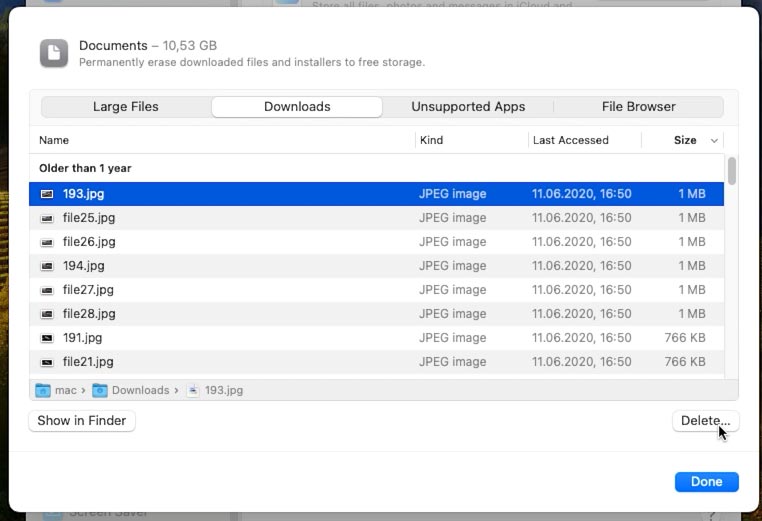
To view a file, double-click on it to open it in Finder, or click Show in Finder.
To remove a file from Finder, right-click on it and choose Move to Bin. To remove a file without using the Bin – press the key shortcut Cmnd + Alt + Delete.
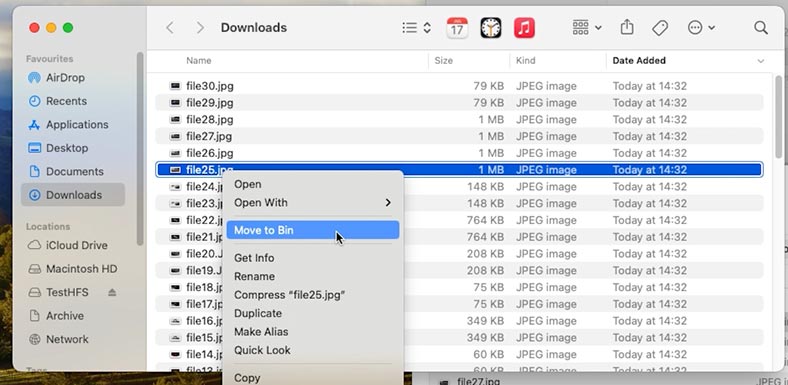
When files end up in the Bin, they will still take up disk space, so the Bin should be emptied regularly.
To do it, right-click on the Bin and select Empty Bin.
Be careful, though: when it’s emptied, all files in the Bin will be erased, and they can’t be recovered unless you use a specialized software tool.
Also, this menu shows you how much disk space is occupied by music, apps, iOS files, the operating system and its system data.
To view a particular category, click on the i button. This is where you can decide which items you don’t need so they can be removed to free up disk space.
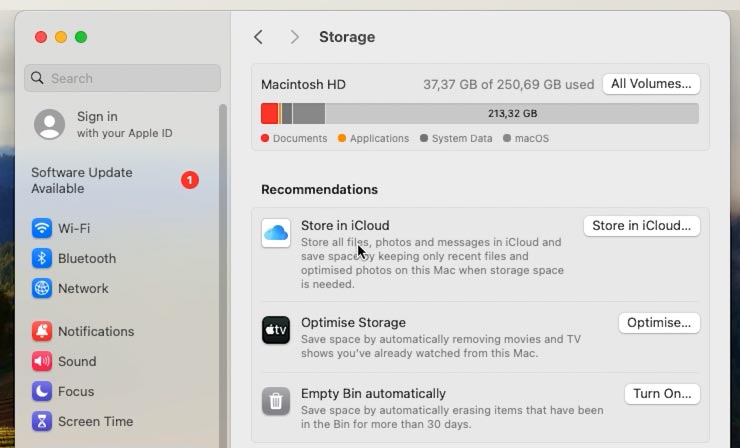
In addition, when the system drive is almost full, Apple will offer a few ways to save disk space. If there are any recommendations to reduce the used storage space, you will see them here under the histogram. These may include Store in iCloud, Optimize Storage, and Empty Bin automatically.
As you can see, system files can’t be cleaned, but some part of unnecessary files – the so-called junk files – are just among system files, though.
Method 3. Clean junk files
Some users claim that such junk files can slow down a Mac. Obsolete files, browser cache, app localizations, and old backups.
Removing system junk files manually is a long process since all files need to be found first. All you can do manually is removing old Time Machine backups or clean browser cache in the settings.
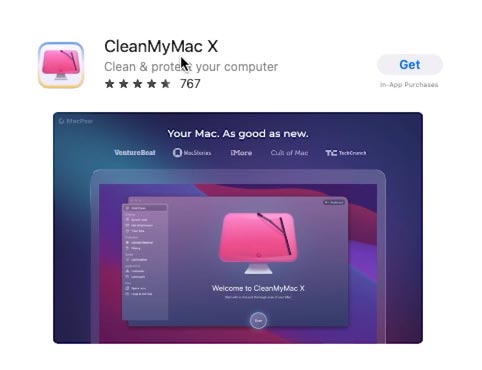
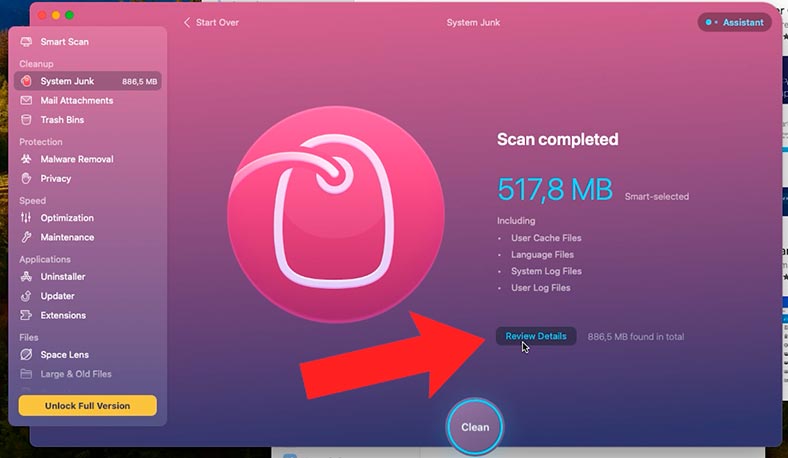
However, you can use a free utility – CleanMyMac X – to assist you. Download it from Appstore to your Mac.
Then go to the tab System Junk on the side panel.
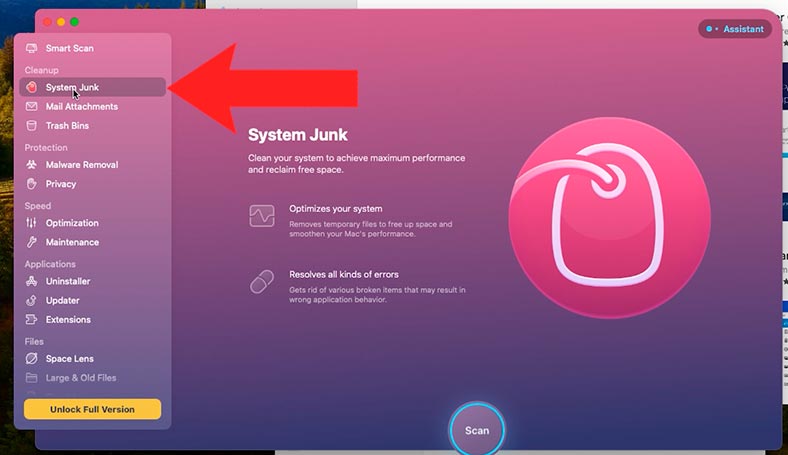
After you start the scan, click Review Details to see what the app has found, and then hit Clean.
If you don’t feel like using any third-party apps, let’s see how to clean various stuff manually.
Method 4. How to clean browser cache
When you use Internet actively, the system drive gets filled with all kinds of temporary files. These include browsing history and links to websites you have visited.
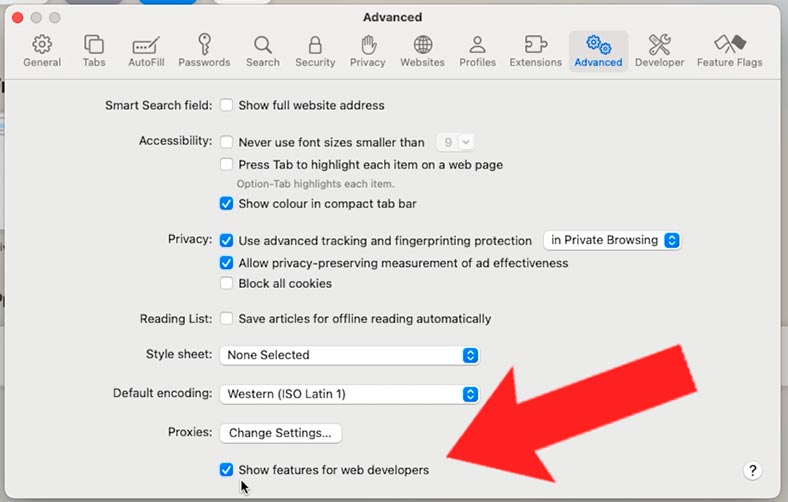
In your Safari browser, open Settings and go to the Advanced tab.
Check the box next to Show features for web developers.
After that, go to Develop menu and choose Empty Caches.
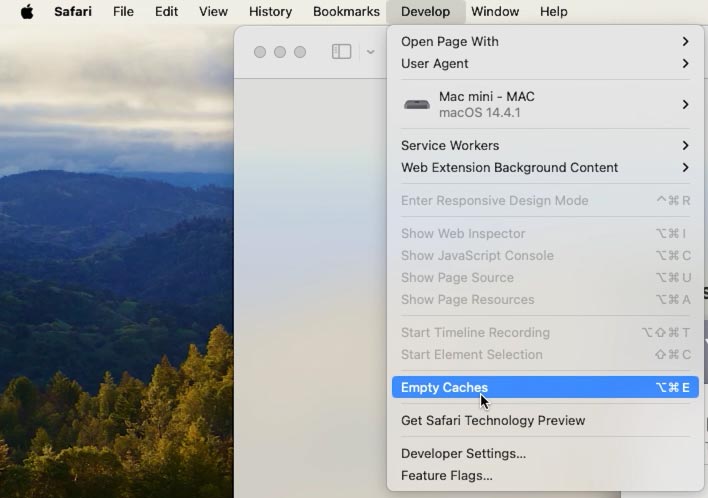
This is how you can remove unnecessary browser files and free up some disk space on your system drive.
Method 5. Remove media files
Users often keep various photos and videos on their Mac, which quickly fills the disk to the brim and creates a disk space problem. In this case, the best way out is to store them in iCloud or on an external drive.
To move your photos to iCloud, open the main Apple menu – About This Mac – More Info – Storage Settings.
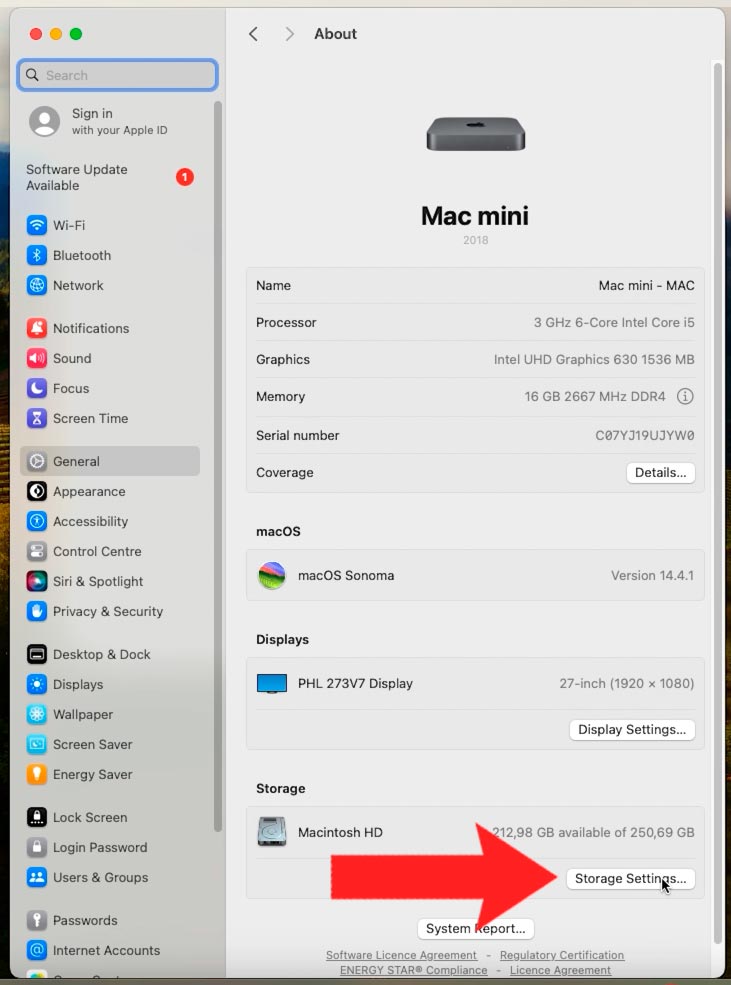
Click Store in iCloud and choose what exactly should go there. After that, hit Store in iCloud one more time.
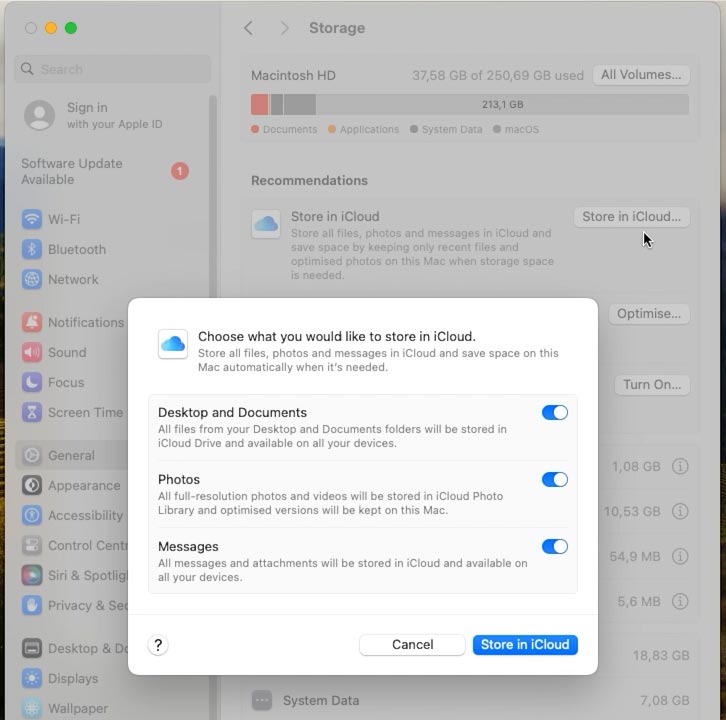
The free iCloud plan lets you store up to 5 GB of data. If you have more stuff, you can keep it on a removable drive.
To move files to an external storage device, open Finder – Go – Home.
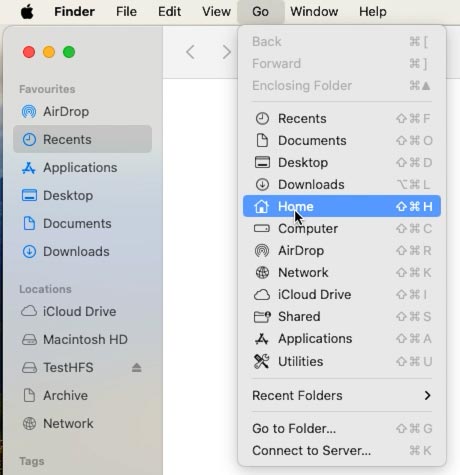
Let’s select a folder – for example, Pictures – and copy it to your external drive.
After that, you’ll be able to remove it from your system drive to free disk space.
Method 6. Optimize your storage
Now let’s get back to system recommendations and optimize the storage. If you enable this option, it will prevent the disk from being clogged with junk files.
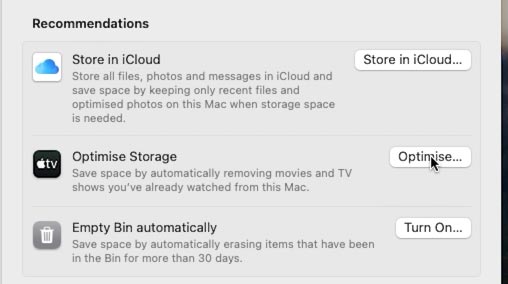
To get things started, hit Optimize in the storage settings.
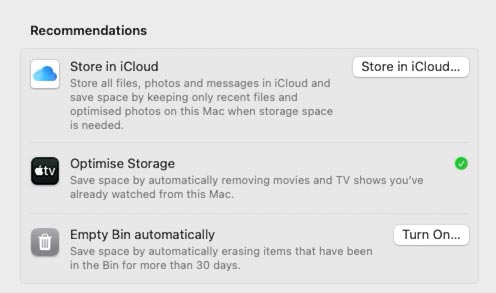
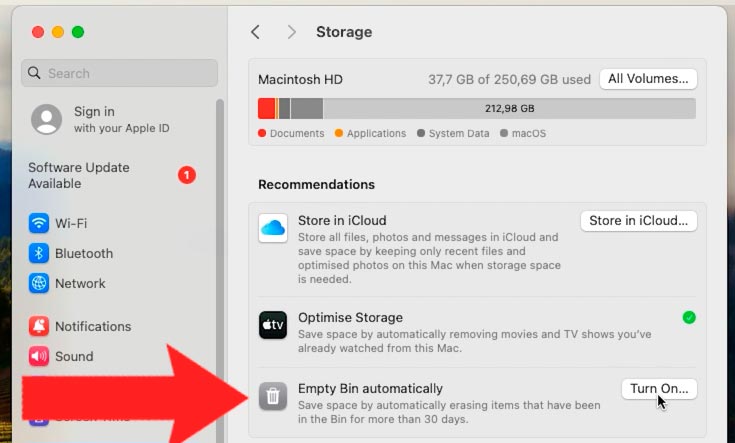
Method 7. Empty Bin automatically
When files are sent to the Bin, they accumulate there, and unless you remove them from time to time, their total size can become immense. If you don’t remember to empty the Bin regularly, you can have it emptied automatically.
Click Turn On to make sure that all items that have been in the Bin for more than 30 days will be deleted automatically.
Method 8.Uninstall unnecessary apps
One more method to free some disk space is to remove the apps you don’t use and their remaining files.
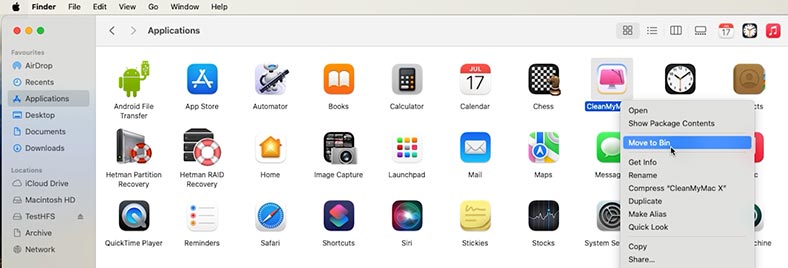
To delete an app, open Finder – Applications.
Right-click on an item you want to delete – Move to Bin. It will be uninstalled. To have all disk space back, empty the Bin.
Some macOS apps have application setting and support files which can exist in various locations across your Mac. These can only be cleaned with third-party utilities.
Method 9. Delete iPhone backups
If you store iPhone backups on your Mac, you can free some disk space by removing older items.
Open Finder – Go – Go to folder.
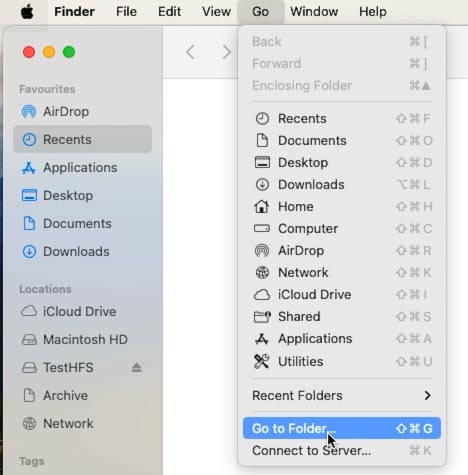
Insert this path:
~/Library/Application Support/MobileSync/Backup
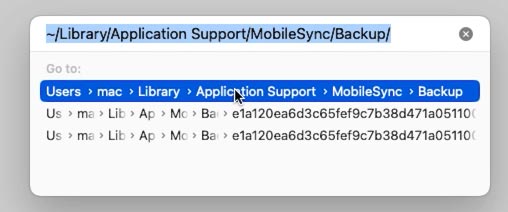
Hit the Return key, then send the folders to the Bin.
Method 10. How to free up some space on a Mac disk by compression
Open Finder and go to the folder containing the files that can be compressed. For example, the Documents directory.
Now hold down the Command key and select the folder you need, then choose Compress.
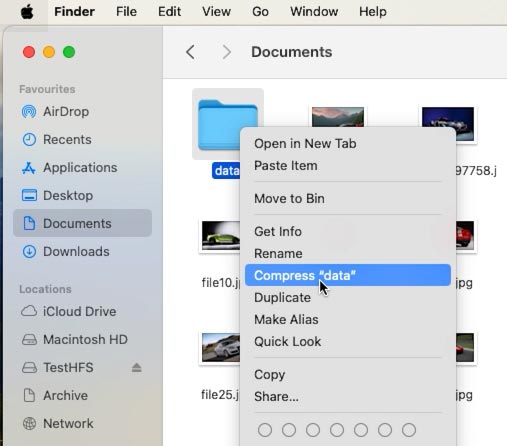
While you’re doing that, the source folder is not affected, and as soon as the files are compressed into an archive, you can delete the source folder. When you’re finished with that, this archive can be moved to an external drive to save even more disk space.
Method 11. Duplicate files
One more way to clean the disk is to search for duplicate files.
There are several reasons why so many duplicate files appear. This way or another, but they can occupy pretty much disk space.
To find them quickly, you will have to use third-party apps. However, some files can be located manually.
For example, in the Photos app, duplicate images can be found easily:
-
Open the app, find and select one by one the photos you want to remove. Then right-click on them - Delete.
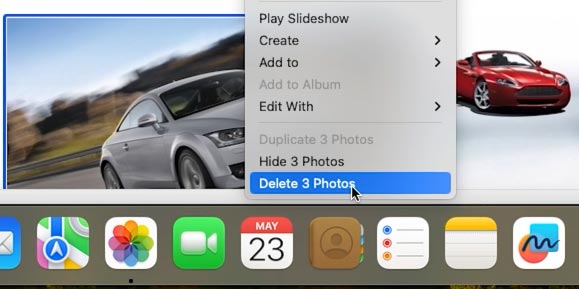
-
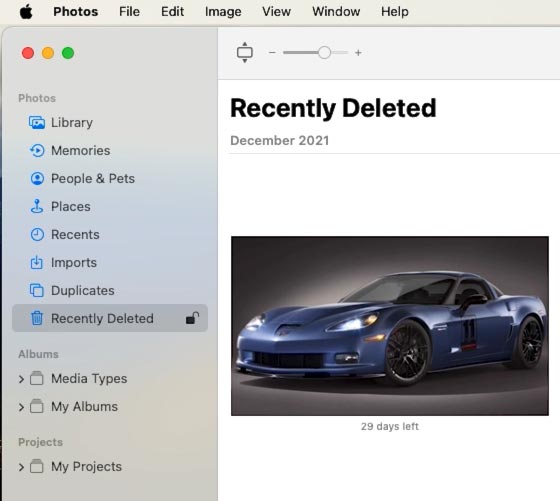
Deleted photos will be moved to the folder with the name Recently Deleted.
-
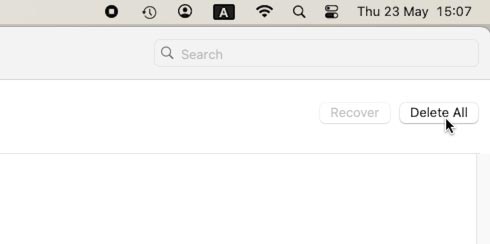
To remove the photos completely, go to the Photos folder, scroll down and select Recently Deleted - then click Delete All.
Search duplicate files on Mac with Finder
You can also find duplicate files in your system by using the Smart Folders feature in Finder.
-
Open the Finder app.
-
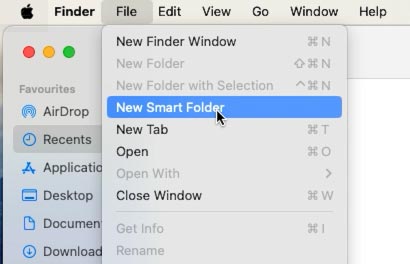
In the menu, choose File - New Smart Folder.
-
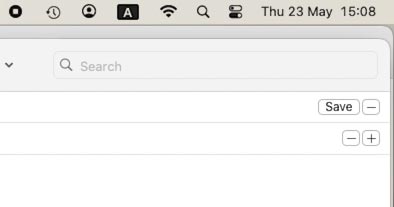
In the right upper corner, click on the + button.
-
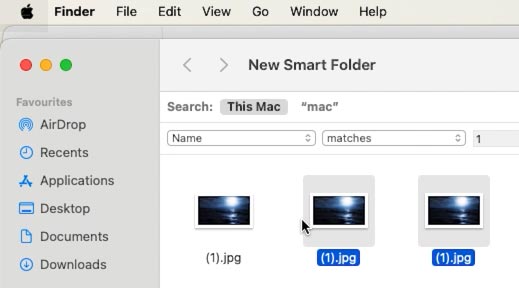
Duplicate files will be displayed in the search by name mode. Review them and delete any duplicates.
Search duplicate files on Mac with Terminal
Also, you can find duplicate files with the help of the Terminal. This method is quite effective, but some files can be skipped.
-
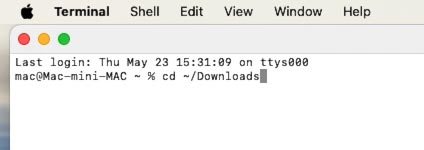
Open the Terminal. For illustration, let's scan the Downloads folder.
-
Type the command:
cd ~/downloadsit makes the app go to the required directory where it will search for duplicates.
-
Then type:
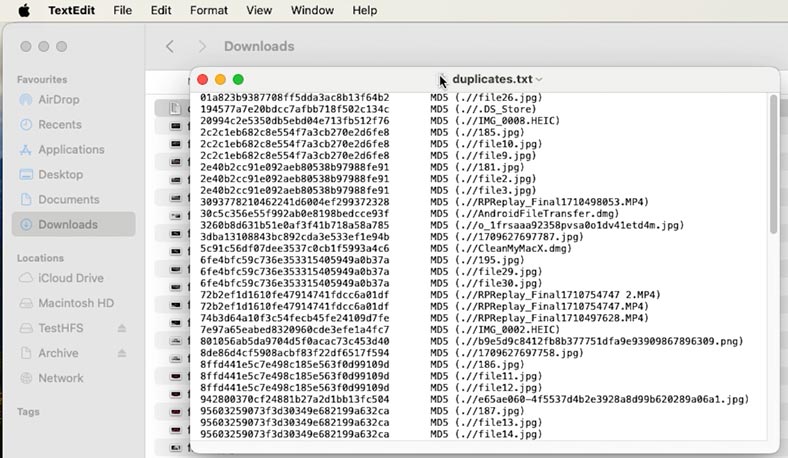
find ./ -type f -exec md5 {} \; | awk -F '=' '{print $2 "\t" $1}' | sort | tee duplicates.txt
-
As a result, a .txt file will be created and then saved to the same directory where we searched for duplicate files. Check the files for duplicates and remove them.
How to recover files accidentally deleted from your Mac
If you lost some important data while cleaning the disk, a special data recovery tool - Hetman Partition Recovery - will be there for you. Use it to bring back any files accidentally deleted from your Mac.
| Step | Action | Description |
|---|---|---|
| 1 | Install the program | Download and install Hetman Partition Recovery. |
| 2 | Connect the drive | Connect the macOS drive to the computer via USB, SATA, or another interface. |
| 3 | Scan | Run the program and select the drive, then perform a deep or quick scan to find deleted data. |
| 4 | Data preview | After scanning, check the found files in the program's convenient interface. |
| 5 | Data recovery | Select the necessary files and save them to another drive to avoid data overwriting. |
| 6 | File systems | The program supports data recovery from macOS file systems, including APFS and HFS+. |
Conclusion
Summing up, now you know several effective ways to gain more free space on a Mac computer. Check for unnecessary files and remove them regularly, clean the cache and old backups, and remember to use integrated macOS tools to optimize your storage. Taking a few simple steps to ensure there’s enough free disk space will help your computer work faster and more efficiently.


