Windows Cannot Find Hard Disk: Troubleshooting Guide
Is Your Computer Unable to Detect the Hard Disk? Struggling with a “Hard Disk Not Found” error on your Windows 10, 8, or 7 computer? In this essential tutorial, we’ll provide you with troubleshooting tips to resolve this issue quickly. From checking hardware connections to updating device drivers, we’ll cover everything you need to know to get your hard disk recognized by Windows again. Whether you’re a novice or an experienced user, these step-by-step instructions will help you diagnose and fix the problem in no time.
- Option 1. A Local Disk is not Displayed in This PC Folder
- Option 2. The Computer Can’t See a New Hard Disk
- Option 3. How to Recover Data from a Disk Which is not Displayed
- Questions and answers
- Comments

Windows 10 Can't See a Hard Disk - How to Connect One? 💻⚙️🗄️
Option 1. A Local Disk is not Displayed in This PC Folder
Sometimes you can face a situation when a hard disk is physically available for the computer, but one of its logical disks or partitions has disappeared and is not displayed anymore. For example, you used to have disk C and disk D in your computer, and suddenly, disk D is no longer shown in This PC folder.
In order to fix the problem and make disk D visible in This PC folder again:
-
Right-click on the Start menu and select Disk Management.

A Disk Letter has not Been Assigned
If you have a missing partition on your hard disk, check if there are any unallocated areas there, or an area which is allocated already but it doesn’t have any drive letter. Sometimes the disk contains some data but there is no letter assigned to it.
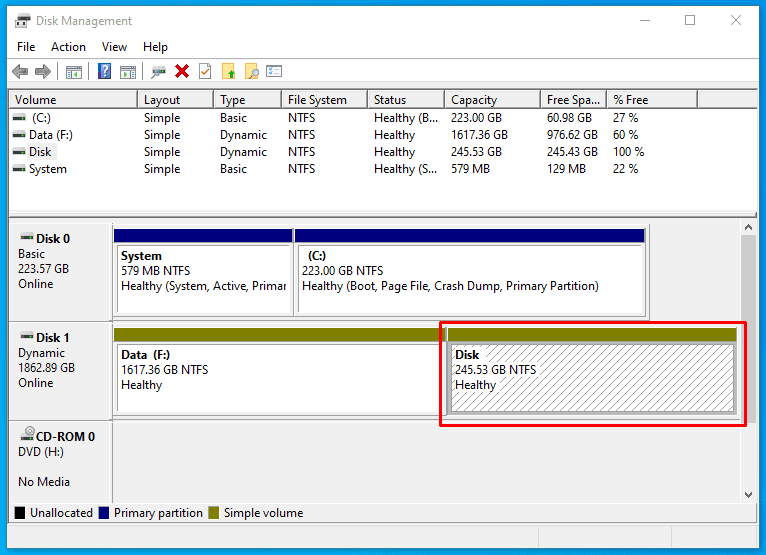
So do not hurry to take any action to avoid losing this data.
At first, make sure that this area is not Unallocated but it is, for example, an NTFS disk. In this case, you just need to assign a drive letter.
To do it:
-
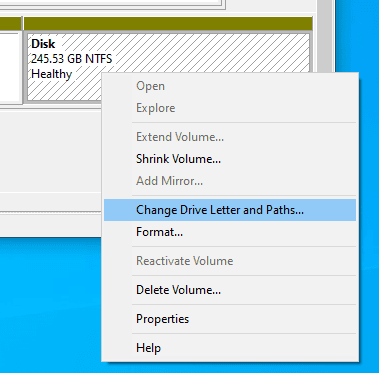
To do it, right-click on this area. In the menu, there should be a line saying Change drive letter or path.
-
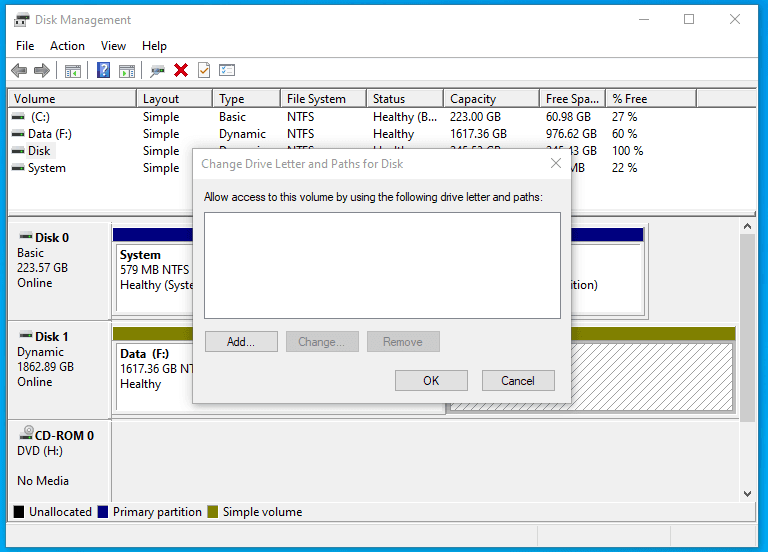
Click Add.
-
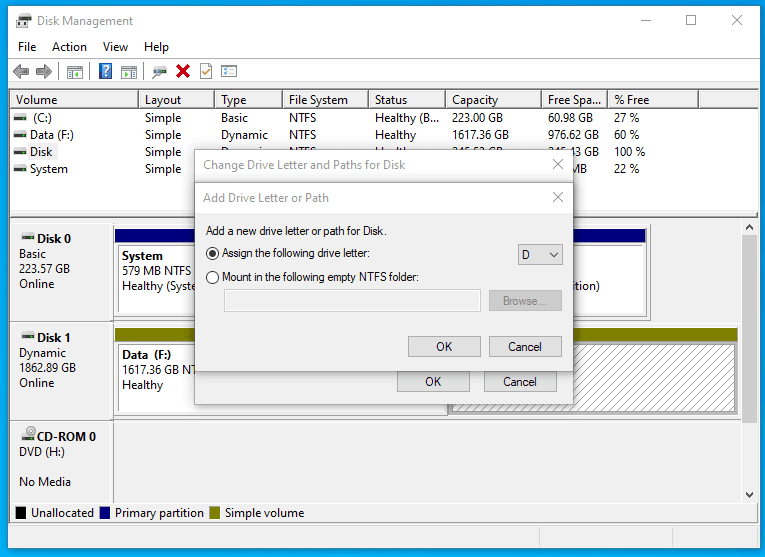
Choose the drive letter. In this case, that is disk D. Click Ok.
-
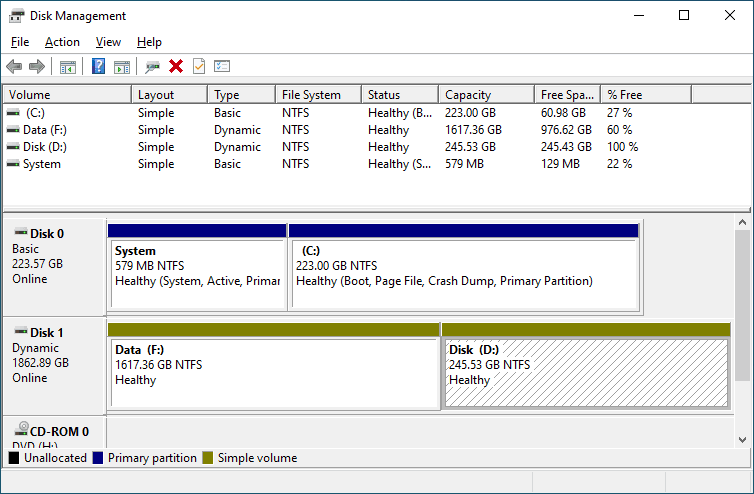
As a result, the disk will be displayed in the Windows Explorer, and this time it will have a drive letter.
An Unallocated Area on a Disk (Unallocated)
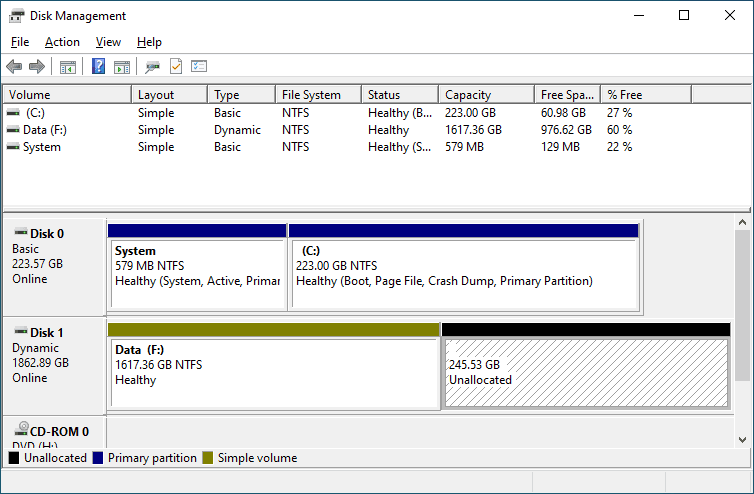
If you open the Disk Management tool only to find that the disk not displayed in This PC folder is described as unallocated space – Unallocated, here is what you should to put things right:
-
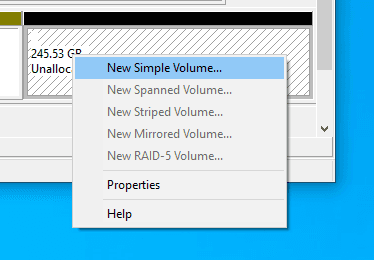
Right-click on that unallocated area and select New Simple Volume.
-
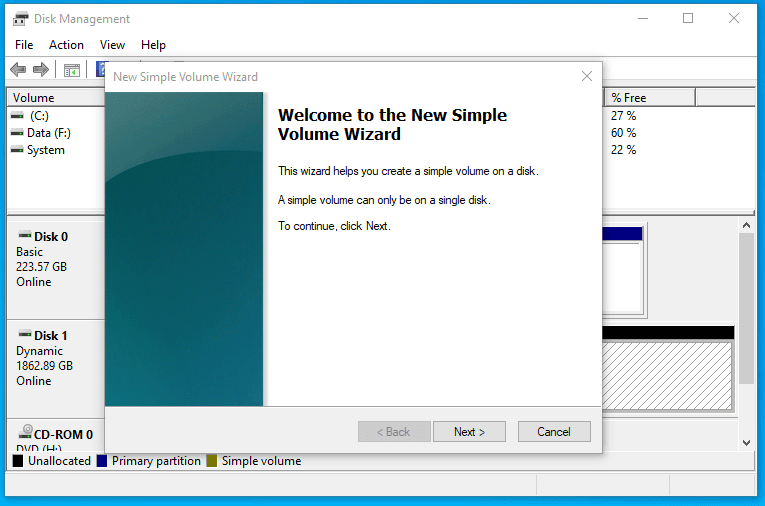
It starts the New Simple Volume Wizard directions. Create a volume by following the step-by-step procedure.
-
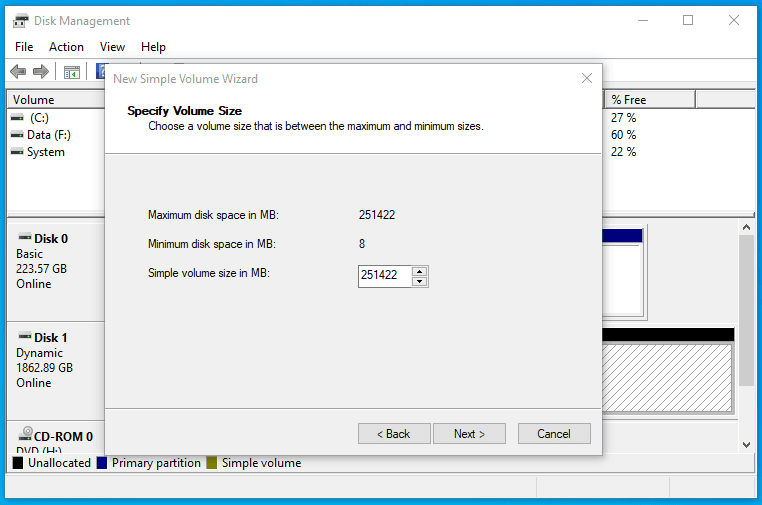
Set the volume size; by default, all available size of the unallocated area is selected.
-
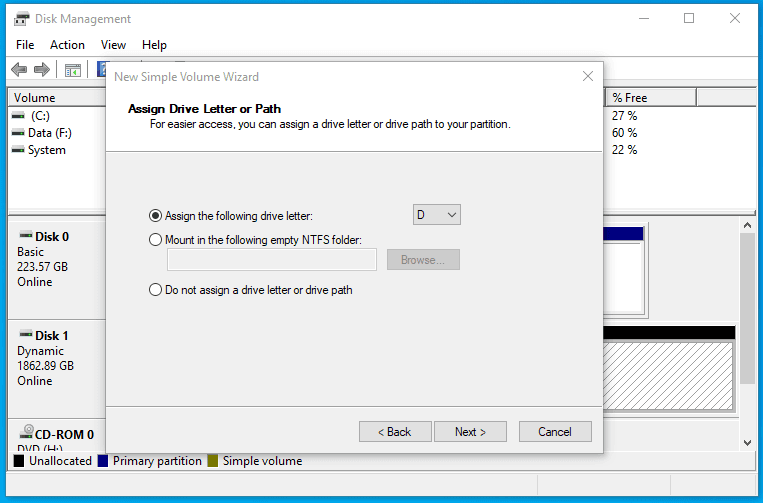
Assign the drive letter. In my case, I leave the default letter D as it is, but you can choose any from the list.
-
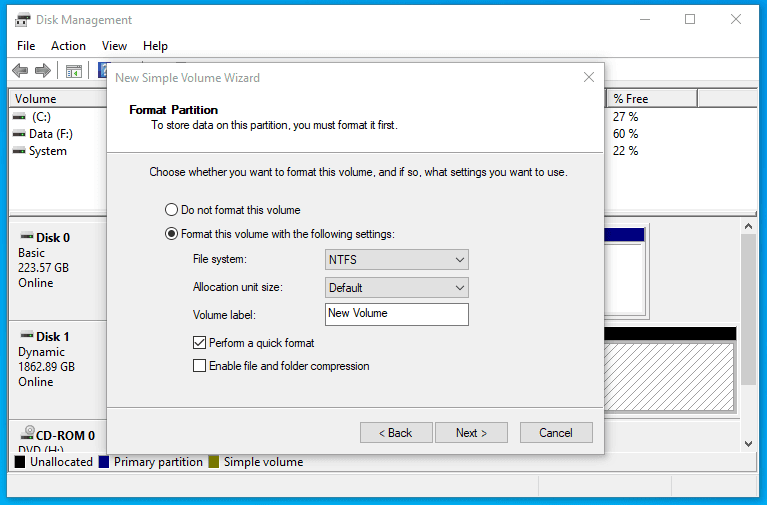
Also, I don’t change format settings. For modern versions of Windows, NTFS is the optimal choice.
-
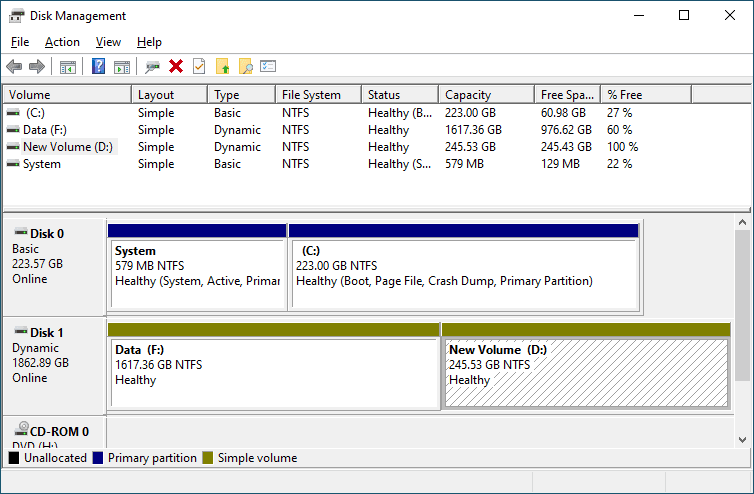
After clicking Finish, wait a little. Disk D appears in the Windows Explorer.
Option 2. The Computer Can’t See a New Hard Disk
If you installed a new hard disk into your computer as a way to add more storage space, and it is not displayed in This PC folder, that’s a different situation. If that is your case, check if the disk is initialized.
To do it, start the Disk Management tool and check if the operating system can see any uninitialized disks.
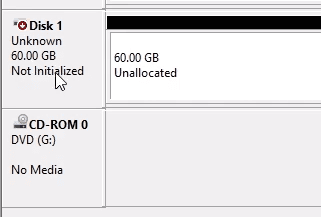
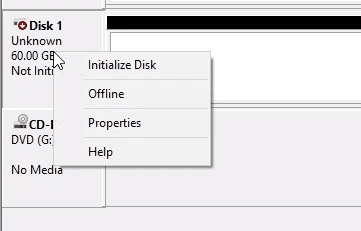
If there is one, most likely this is the disk that the computer cannot recognize. Then, right-click on the uninitialized disk and select Initialize Disk.
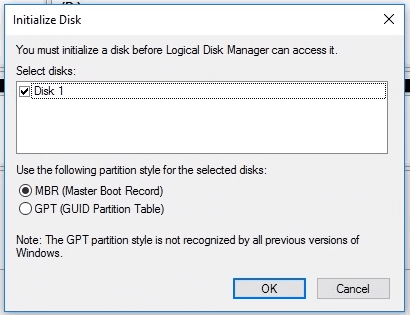
In the Initialize Disk menu, select partition style: either MBR or GPT. I’d recommend choosing GPT if you have a modern computer with UEFI; If your computer doesn’t support UEFI or you don’t know it for sure, then choose MBR and click Ok.
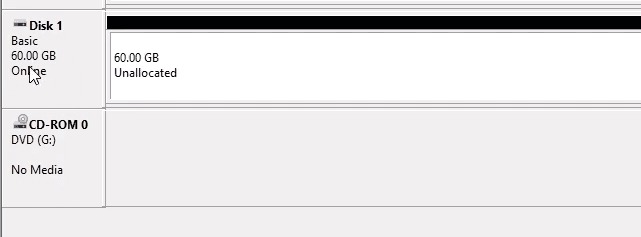
As a result, the disk will be initialized but it will remain invisible for the Windows Explorer as it still has unallocated space on it.
To do it, right-click on this unallocated space and select New Simple Volume.
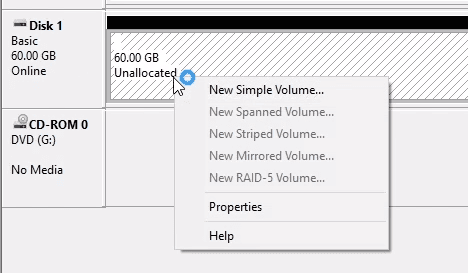
After that, do the same things as in the previous example with creating a new simple volume in an unallocated area of the disk. As a result, you will get a new disk displayed in the Windows Explorer.
Option 3. How to Recover Data from a Disk Which is not Displayed
Well, things seem to be quite clear with uninitialized disks – usually, initialization is required for disks fresh from the shop that never had any data on them. But what should you do in case the disk contained some important data, but for some unknown reason, its drive letter disappeared or it developed an unallocated area?

How to Recover Data from an Unallocated Area in a Hard Disk, USB Pen Drive or Memory Card 👨🔧🛠️🖥️

How to Recover Data After Formatting, Deleting or Creating Partitions in 2020 📁🔥⚕️
Actually, data is not supposed to be lost if you change or assign a drive letter. That is, if you assign a letter to a disk that used to be “invisible” for the operating system, you should find its data intact.
Yet in case with an unallocated area, all data will be lost as soon as you create a new simple volume there. All you will get is a clean – and formatted – disk.
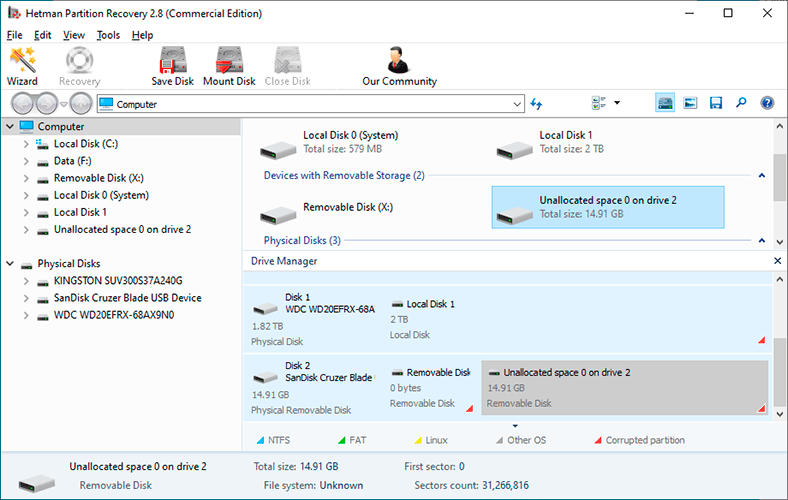
If the unallocated area used to contain a disk with important data on it, you can still restore the information with the help of data recovery software – Hetman Partition Recovery.
To do it, start the program and scan the unallocated area. It will be shown as Unallocated.
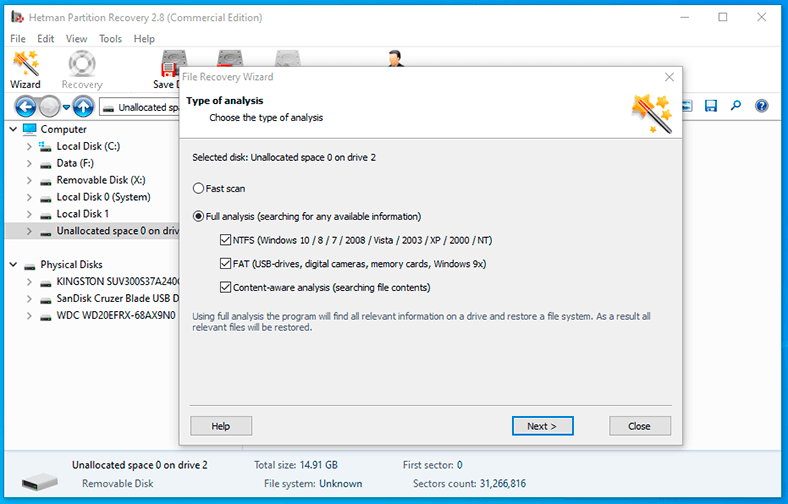
Use Full analysis to scan it for data. This is an important part.
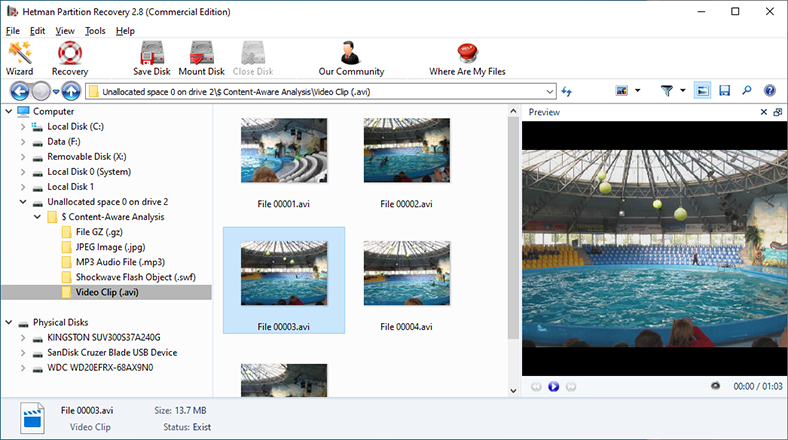
The program will show the files stored on the disk that used to exist in this unallocated area. All detected files can be restored.
If you have any questions on what to do if the computer can’t find a hard disk and how to recover data from such disk, let us know by posting a comment, and we will gladly share useful tips and tricks with you.


