Test and Repair Hard Disk with Free Tool Victoria: Tutorial
Unlock the Power of Hard Disk Testing and Repair with Victoria! Want to ensure your hard disk is in good health or repair any issues it may have? Look no further than Victoria, a powerful free tool for hard disk testing and repair. In this comprehensive tutorial, we’ll show you step-by-step how to master hard disk testing and repair using Victoria in Windows 10. Whether you’re a beginner or an experienced user, the process is straightforward and easy to follow. From analyzing disk health to repairing bad sectors, Victoria has got you covered. Watch now and take control of your hard disk’s health with Victoria!

👨💻 How to Use Victoria to Test and Fix Your Hard Disk in 2021 🛠️
We can’t imagine a modern computer without some kind of a hard disk. This is where all user data is stored and all software components are installed. As all things in this world, a hard disk has a certain resource that can be exhausted one day, and it is so far one of the least reliable parts in a computer that is too prone to damage. One of the main indicators suggesting that a hard disk is worn out or damaged is the presence of bad sectors.
Keep in mind, though, that the tool we are using today can only repair the sectors damaged at the software level. Any sectors damaged physically can only be blocked, but never restored.
Victoria is a free tool available for download and use by anyone. The program’s official website: https://hdd.by/victoria/. Also, it is available for download from many file-sharing services.
In order to test a hard disk for surface defects and bad sectors, and then repair them you with Victoria:
-
Download the tool and run it as Administrator.
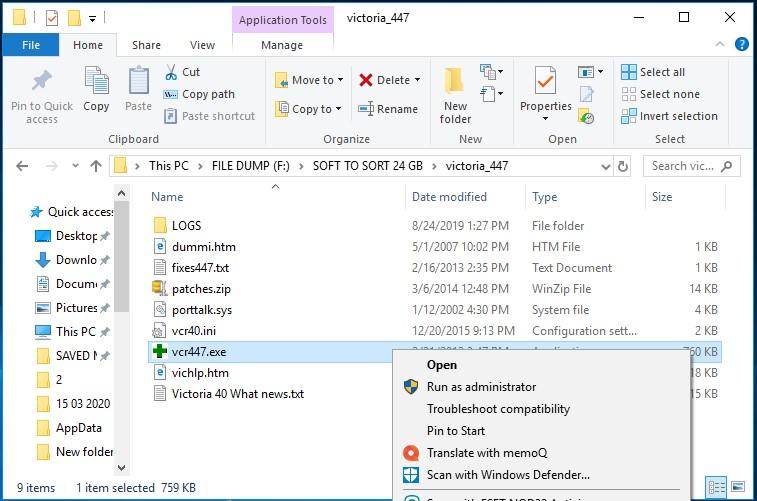
No installation is required. Just open its folder and start the file vcr447.exe.
-
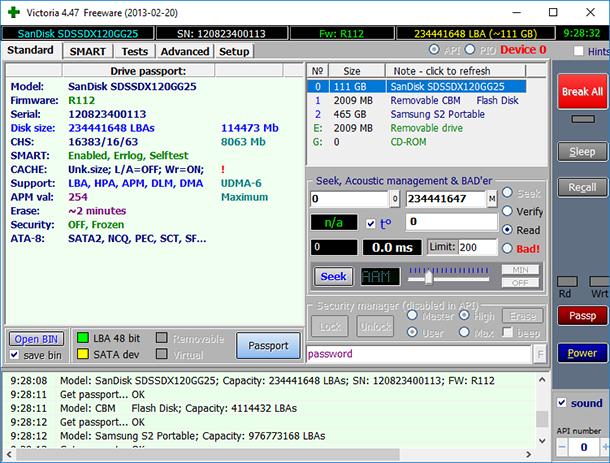
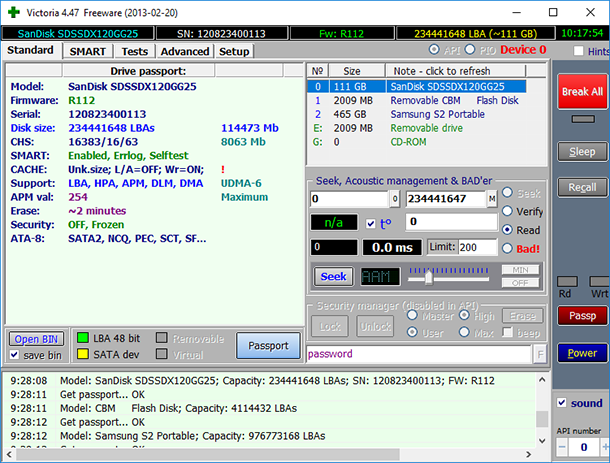
In the Standard tab that opens, we can see the list of all drives connected to this computer, and information on them.
It includes drive name and model, firmware version, the number of clusters, drive capacity and the motherboard connector the drive is using.
-
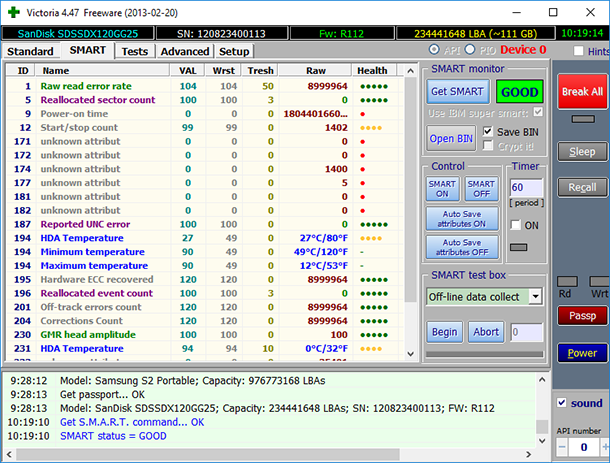
Another tab, SMART, shows the drive status, namely its current SMART values. To see them, click on Get SMART and Victoria will show the current drive status in the right window. In the picture below, this is the green window saying GOOD.
Please note that SMART is not supported for USB drives.
The window in the left shows the list of attributes with their values. The most important values are those shown in Tresh and RAW columns. Tresh is the value that an attribute has to reach to be recognized as critical. RAW is the most important indicator for evaluation of the drive condition. It contains real values directly telling you about the disk health.
There are many SMART attributes, and all of them are important. However, the following items will be most important for quick evaluation of a disk condition:
- 1 – frequency of read errors. There are many of them in the screenshot, but it’s not critical because this number coincides with the attribute
- 195 – the number of errors that have been fixed with hardware means.
- 5 – the number of sectors reallocated by the hard drive to a reserved area. In our case, there are none – 0.
- 187 – the number of sectors to be reallocated in the future. There are also none – 0.
- 196 – the number of reallocation operations. None.
If values in these attributes were higher than zero, or if they were not corrected with hardware means in time, it would indicate there are problems with the drive. The disk we are testing is knowingly in a good condition, and it is only used as an example to illustrate main features that Victoria has to offer.
-
Now let us move to the most important tab Tests which actually checks the disk for bad sectors.
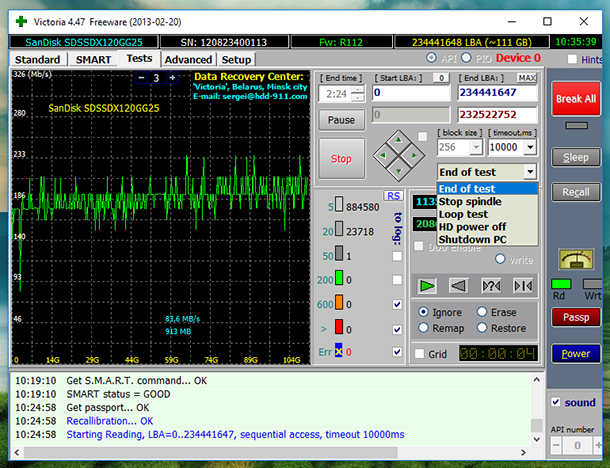
This is where you can set the beginning and the end of the tested area, which is by default set to cover the entire drive: these are fields Start LBA – End LBA. You can also choose what the program does after the test (see the End of Test pop-up menu), choose a test type and so on. For a simple test, leave everything as it is.
The principle is like this: the drive is divided into sectors having similar length, and the program sends a request to every sector. The longer time it takes for a sector to respond, the more likely it is to fail. This problem can be caused by both physical wear of the hard drive and wrong use. Bad sectors can be hidden by replacing them with good sectors from the drive’s reserved area.
Before the test begins, choose of the options: Ignore, Remap, Erase, Restore.
- In the Ignore mode, the program analyses and represents information. At the moment, we started testing in this mode.
- In the Remap (reassign) mode, the program replaces damaged or broken sectors with good sectors from the drive’s reserved area;
- With the help of Restore mode, you can try restoring the sectors damaged at the software level;
- In the Erase mode, the program tries to write data into the damaged sector and use it further. This mode is recommended to experienced users only, because using it in the wrong way can damage the disk and cause a data loss.
As you can see, Victoria analyses the drive and shows the number of sectors in categories depending on their response time. This information is also shown graphically in the left window.
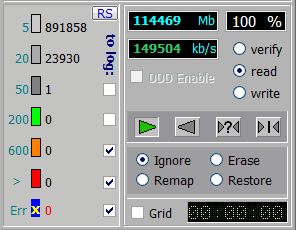
The sectors shown in orange are supposed to have problems, while red or blue ones are damaged, i.e. broken sectors. Green sectors have a certain response delay but they don’t need correction yet.
If the testing is over and it shows some damaged sectors, you can do the following to restore them:
- You can go over the drive in the Remap mode.
- If there are any bad sectors left after this operation, the drive can be tested again, this time in the Restore mode.
To do it, choose the necessary mode and click the Start button again to begin.
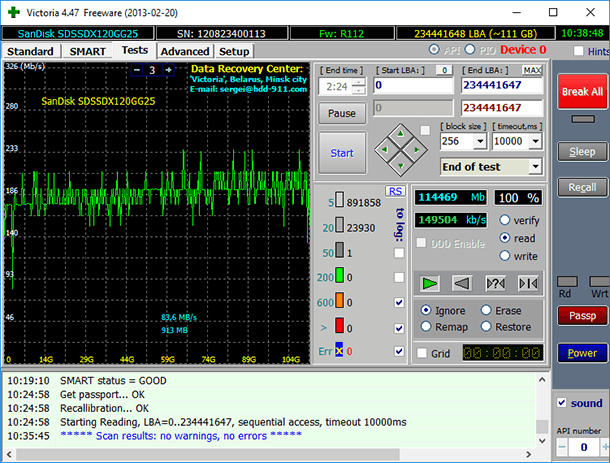
You should understand that Victoria is a very useful utility but it cannot eliminate all problems with your hard drive; its task is to test a working drive without physical damage and fix bad sectors at the software level. Victoria cannot fix a worn-out or physically damaged drive.
You can use Hetman Partition Recovery to recover data lost because of bad or damaged sectors in your hard drive.
| Parameter | Description |
|---|---|
| Name | Hetman Partition Recovery |
| Purpose | Recovery of deleted, damaged, and inaccessible data from hard drives, SSDs, memory cards, and USB drives. |
| Supported File Systems | FAT/exFAT, NTFS/ReFS, APFS/HFS+, Ext2/3/4, ReiserFS, XFS/UFS/ZFS, Btrfs, VMFS, HikvisionFS. |
| Operating Systems | Windows, macOS, Linux |
| Device Types | Hard drives, SSDs, memory cards (SD, microSD), USB drives, virtual disks, and virtual machine disks. |
| Additional Features | – Recovery of deleted partitions – Disk image creation – Data recovery from disk images – File preview before saving |
| File Formats | Documents, photos, videos, archives, emails, and other file types |
| Ease of Use | Step-by-step recovery wizard with an intuitive interface |
| License | Trial version with file saving restrictions |
| Interface Languages | Multilingual support |

💾 How to Recover Data After Formatting a Hard Disk, USB Drive or a Memory Card 💾


Victoria is a powerful HDD information and diagnostic utility that can be used to test, monitor, and repair hard drives. When it comes to bad sectors, Victoria can mark them as bad in the drive’s firmware, effectively remapping them so that they are no longer used by the system. This remapping is done at the hardware level and is usually permanent unless the drive encounters further issues. However, it’s important to note that the effectiveness of bad sector remapping can vary depending on the severity of the issue and the overall health of the drive. It’s always recommended to back up your data before attempting any repairs or modifications to your hard drive.
The “Remap” option in Hetman Partition Recovery is used to scan for bad sectors on a hard drive and re-allocate them. If you move the drive to another system after running the scan, the bad sectors will still be marked and re-allocated on the drive.
As for the “Ignore” option, it is not necessary to perform a full scan with this option before using the “Remap” option. You can directly use the “Remap” option to scan for and re-allocate bad sectors on the drive.
Ciao! La funzione "READ/REMAP" di un dispositivo di archiviazione, come un disco rigido o un SSD, non è qualcosa che puoi avviare manualmente, ma è un processo interno gestito dal dispositivo stesso per gestire i settori danneggiati.
Quando un settore di un disco rigido o di un SSD diventa danneggiato o instabile, il dispositivo cerca di leggere i dati da quel settore e, se riesce a farlo con successo, li sposta in un settore sano. In questo modo, i dati vengono "rimappati" da un settore difettoso a uno funzionante, e i dati danneggiati vengono isolati per evitare ulteriori problemi.
In teoria, questo processo dovrebbe evitare la perdita di dati, poiché i dati originali vengono copiati in un settore sano prima che il settore danneggiato possa peggiorare ulteriormente. Tuttavia, non è garantito al 100% che tutti i dati siano recuperati in modo completo, e ci potrebbe essere un leggero rischio di perdita di dati se il settore danneggiato conteneva informazioni crittografiche o parti di file importanti.
Quando un disco rigido o un SSD inizia a dover rimappare frequentemente settori danneggiati, può essere un segnale di problemi più gravi con il dispositivo, e sarebbe una buona idea fare un backup completo dei dati importanti e considerare la sostituzione del dispositivo per evitare futuri rischi di perdita di dati.
It sounds like you're dealing with a complex and potentially critical issue involving disk errors, timeout errors, and access denied errors when trying to remap sectors using the Victoria537 tool. It's important to handle disk issues with care, as they can lead to data loss if not managed properly. Here are some steps and suggestions you can consider:
Backup Your Data: Before attempting any repairs or changes, it's essential to back up your important data. This is especially important if your disk is showing signs of errors. You don't want to risk losing data during the troubleshooting process.
Check Hardware Connections: Make sure that all cables and connections between your disk drive and the motherboard are secure. Sometimes, loose connections can cause communication errors that lead to timeout issues.
Run Hardware Diagnostics: Most hard drive manufacturers provide diagnostic tools that can help identify hardware issues. These tools often offer more advanced testing than third-party tools like Victoria. You can find these tools on the manufacturer's website.
Run CHKDSK: If you're using a Windows system, run the built-in CHKDSK utility. Open a Command Prompt with administrator privileges and run: chkdsk /f /r. This will scan and attempt to repair any file system and disk errors.
Run SMART Tests: SMART (Self-Monitoring, Analysis and Reporting Technology) tests can provide insight into the health of your disk. There are various tools that can read and interpret SMART data. Some disk manufacturers offer their own tools for this purpose.
Run Victoria537 as Administrator: If you're encountering "Access Denied" errors, try running Victoria537 with administrator privileges. Right-click on the program executable and select "Run as administrator".
Disable Security Software: Sometimes security software can interfere with low-level disk operations. Temporarily disable any security software you have installed and see if that resolves the access denied issue.
Disable Write Protection: If you're encountering write errors when trying to save changes, it could be related to write protection. Check if your disk has a physical write protection switch (on some external drives), or look into your system's BIOS settings to ensure there are no write protection options enabled.
Consider Professional Help: If you're not comfortable performing these troubleshooting steps yourself, or if the issue seems severe, consider seeking help from professional data recovery services or IT specialists.
Contact Victoria Support: If you're following the instructions provided by Victoria's support site and still facing issues, it might be worth reaching out to their support team for more specific guidance tailored to your situation.
Remember that any action taken should be cautious, especially when dealing with disk issues that involve critical data. If possible, seek professional assistance to avoid exacerbating the problem.