How To Safely Recover Data From Windows Server 2019: Backup, Restore, Reset Techniques
Unlock the Power of Data Recovery on Windows Server 2019! If you’re managing a Windows Server 2019 and are concerned about data loss, this article is your go-to resource. We’ll dive into the best practices for backing up, restoring, and resetting your server to ensure data integrity and security. Whether you’re preparing for potential data loss or recovering from a disaster, our step-by-step guide will equip you with the necessary skills to manage your data effectively. Learn how to leverage built-in tools and external software for comprehensive data protection on your server today!
- How to set up and configure backup for Windows Server
- How to create a backup of Windows Server
- Configure scheduled backup in Windows Server
- How to restore Windows Server from backup
- Restoring a crashed system
- Recovering lost information from Windows Server with a third-party tool
- Questions and answers
- Comments
When files are deleted in Windows Server OS, they don’t disappear from the hard disk – they can still be restored from the Recycle Bin, if they were not removed without using the Recycle Bin. Even if the files were deleted permanently from the Recycle Bin, there is still a good chance to recover them. In Windows, files never disappear; the space they take up on the hard disk (or any other media) is then marked as free for writing new data there.
You can either recover the information or restore operability and previous state of the operating system from a backup. If there is no backup to rely on, use a specialized recovery tool.

🗄️ How to Configure Data Backup, Create a Backup Copy and Restore Windows Server 🗄️
How to set up and configure backup for Windows Server
Backing up Windows Server is an important part of everyday server management. Backup copies enable recovery after crashes when data may be lost.
By default, the backup feature is not installed for the server version of Windows.
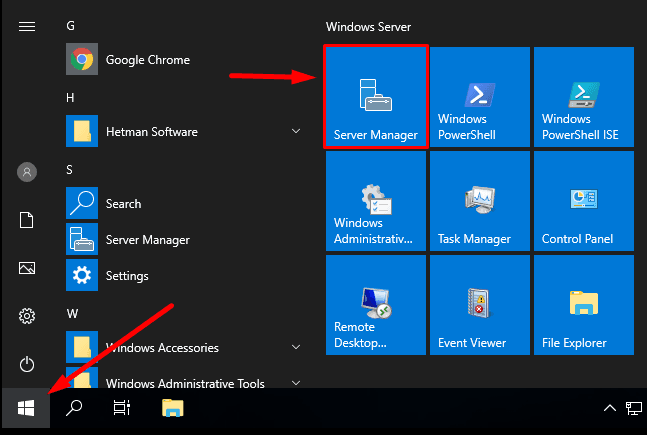
To add it, open the Start menu, find and launch Server Manager.
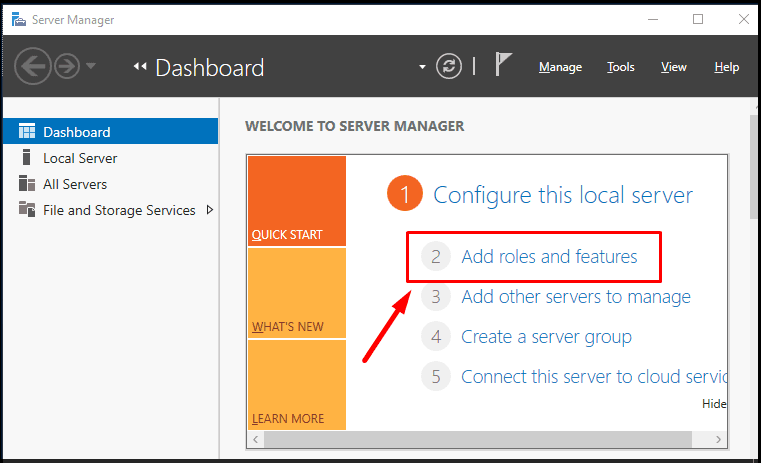
In the Manager, click Add roles and features.
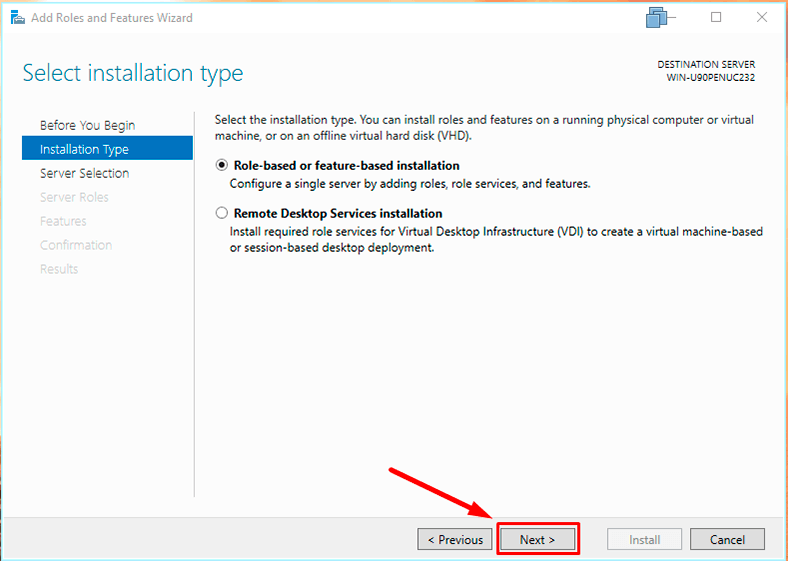
Click Next
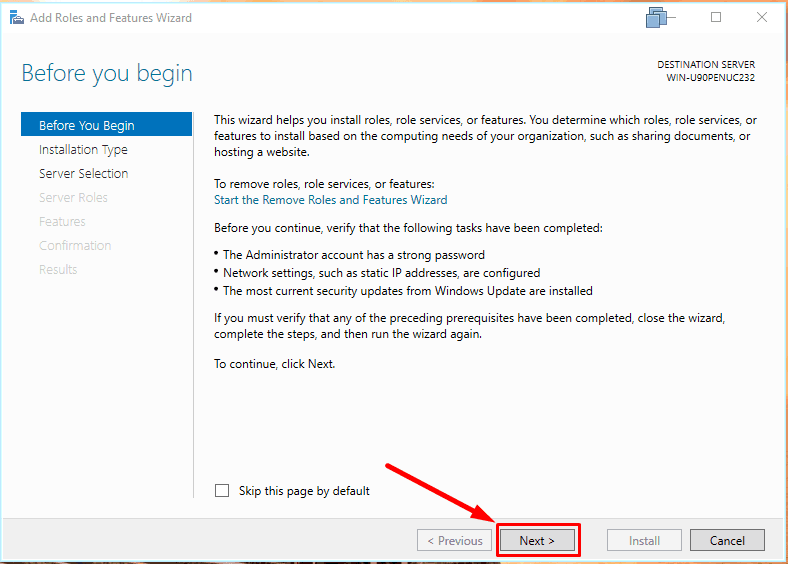
Don’t change the installation type –
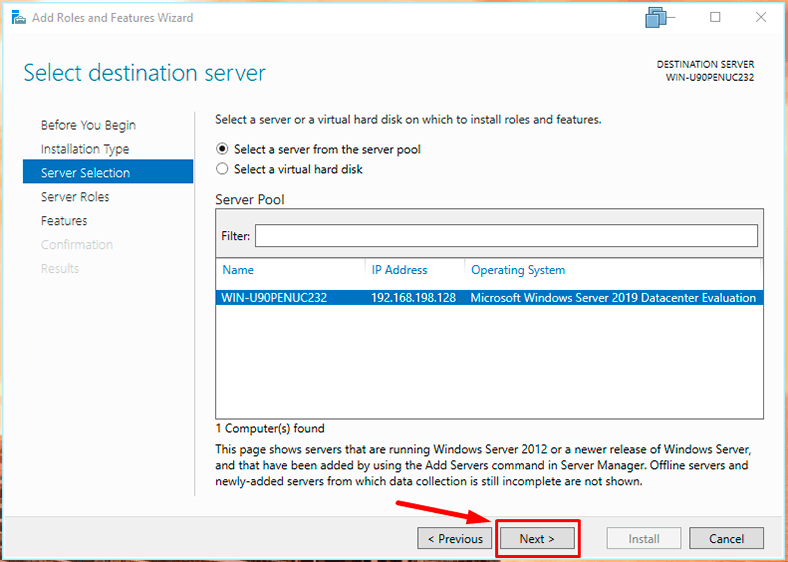
In the server choosing tab, no changes.
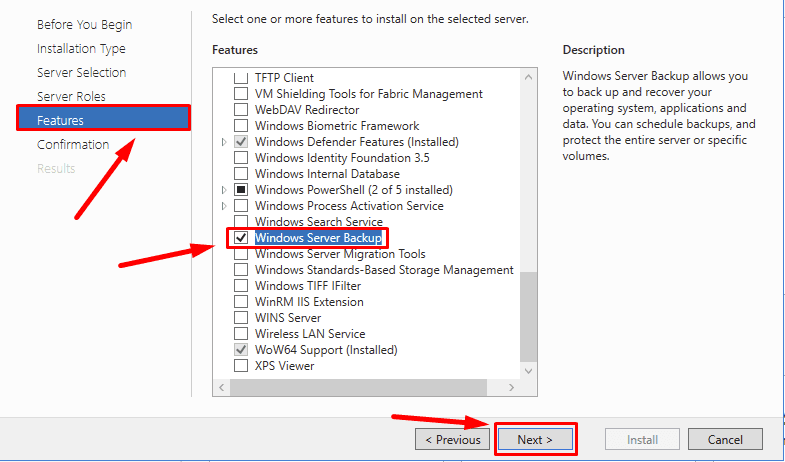
Move on to the elements. Scan the list for Windows Server Backup, check its box and click Next,
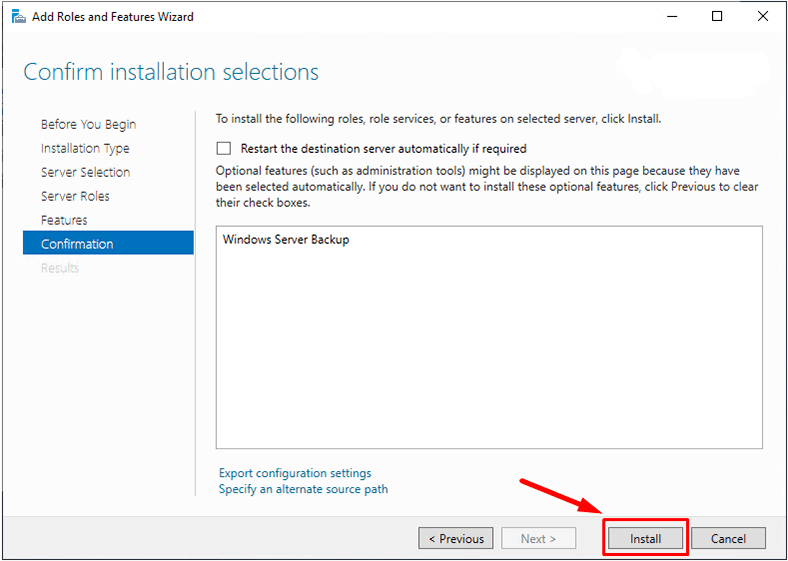
and then Install.
When the installation is over, click Close.
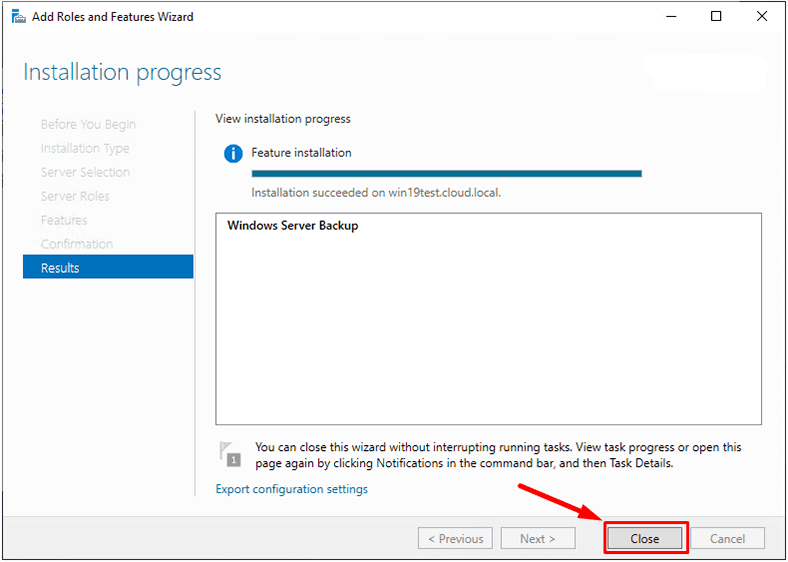
Now that Windows Server Backup has been installed successfully,
you can access its backup features.
How to create a backup of Windows Server
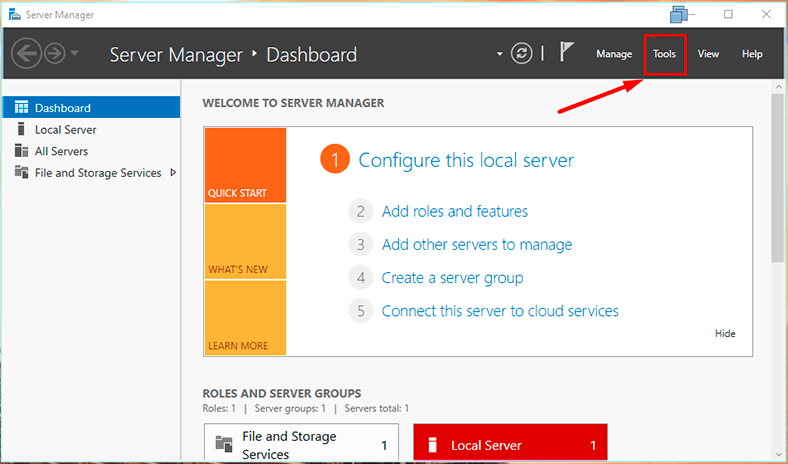
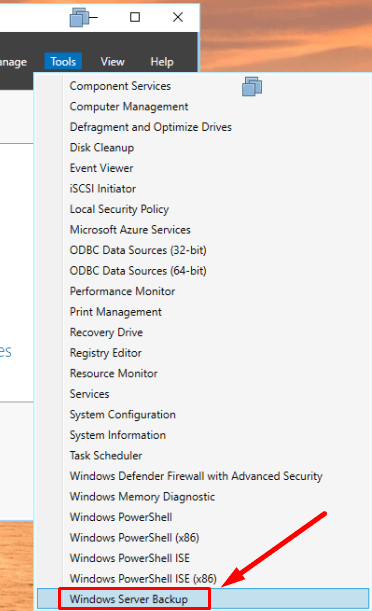
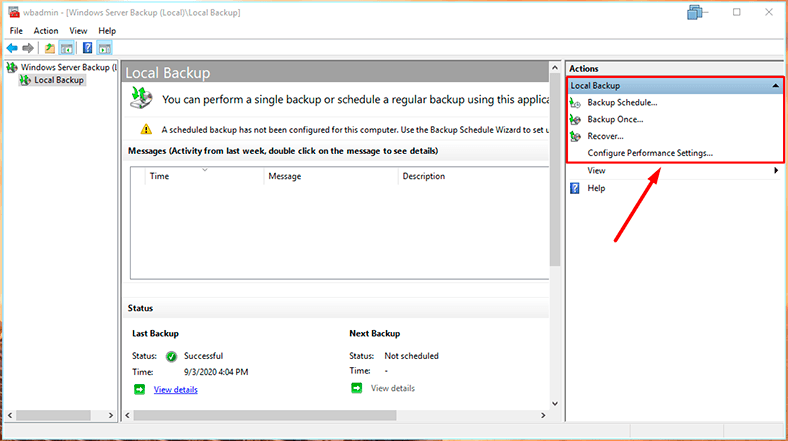
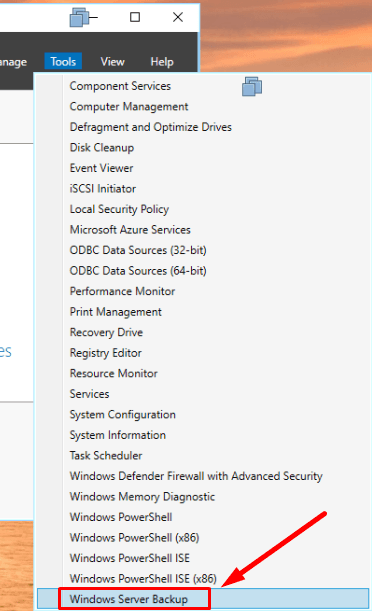
In order to create a backup or configure scheduled backup, open Server Manager – Tools – Windows Server Backup.
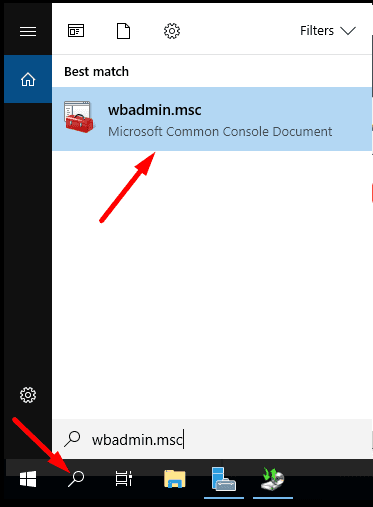
For quick launch, type wbadmin.msc in the search field.
wbadmin.msc
The following features are available:
- Backup Schedule,
- Backup Once,
- Recover,
- and Configure Performance Settings.
Configure scheduled backup in Windows Server
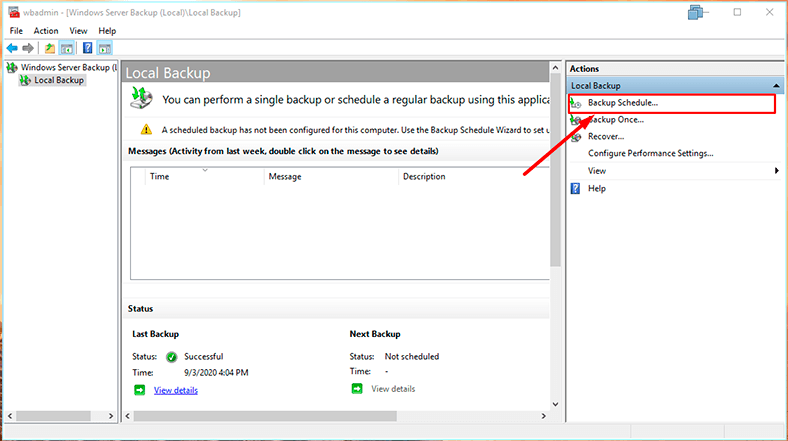
To configure automatic backup on schedule, open Backup Schedule.
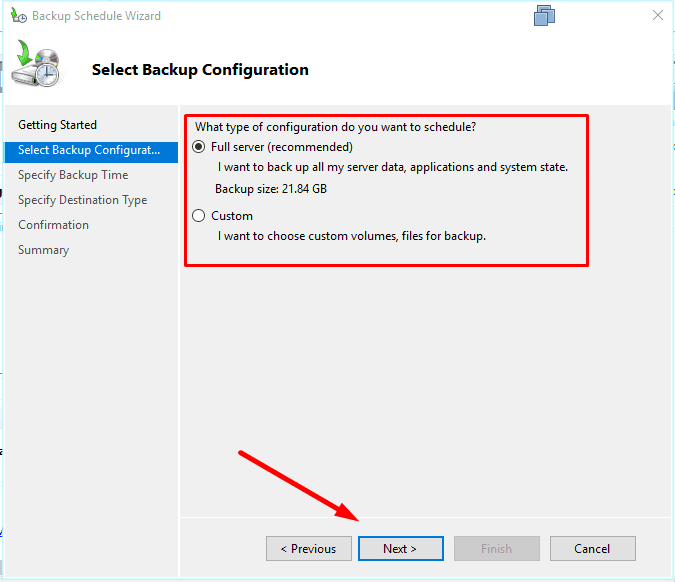
When selecting backup configuration, specify backup type - Full server (back up all server data, applications and system state) or Custom (if you want to select a certain volume or files to be backed up).
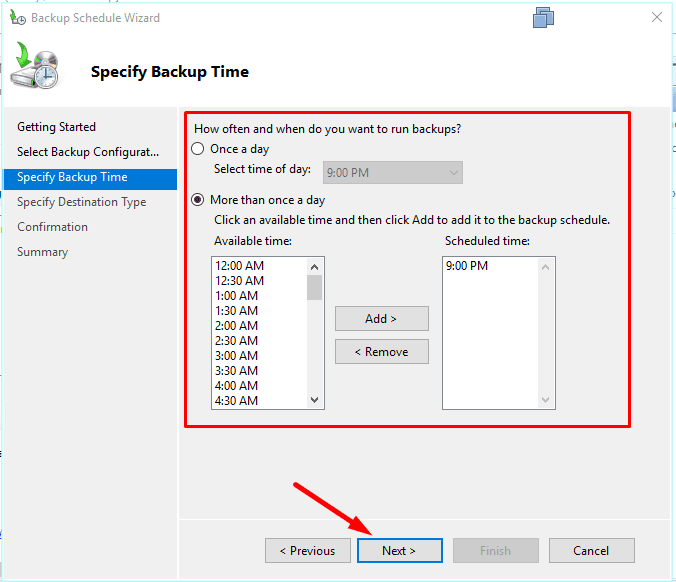
Choose backup time and how often you want it to run.
Select destination for backups, and one of the options is to save them to a network folder.
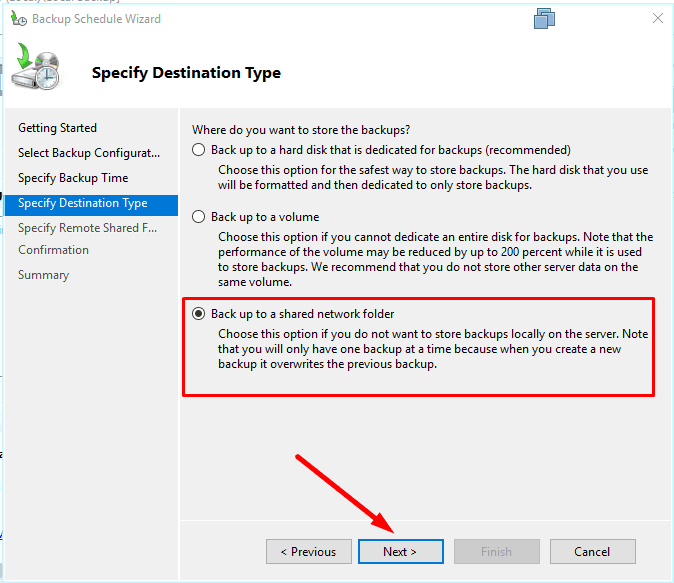
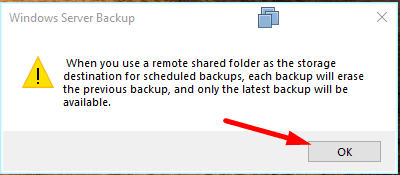
When choosing this specific option, you can see a note that you will only have one backup at a time.
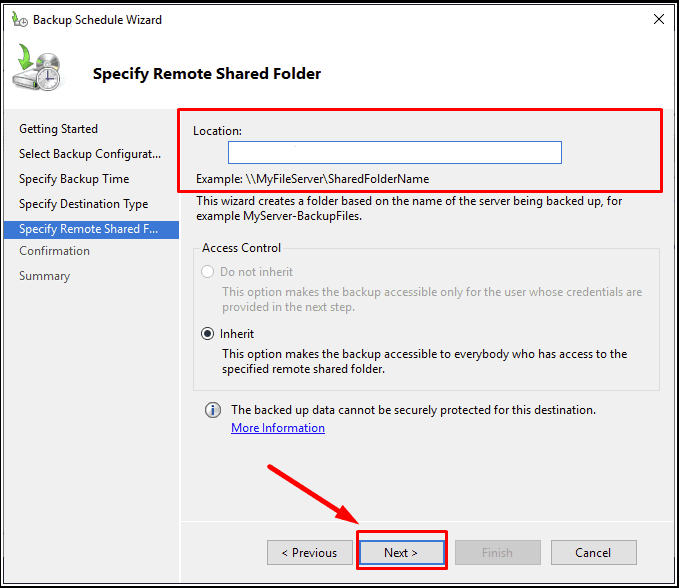
Give the network path and click Next.
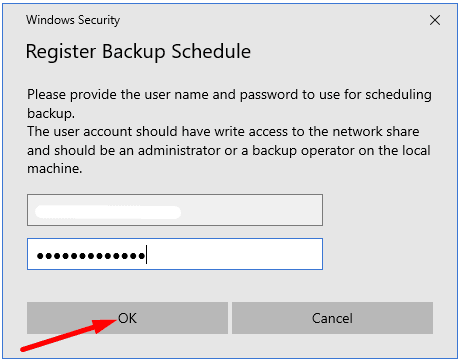
After that, you’ll be asked to give your account details to enable the scheduled backup.
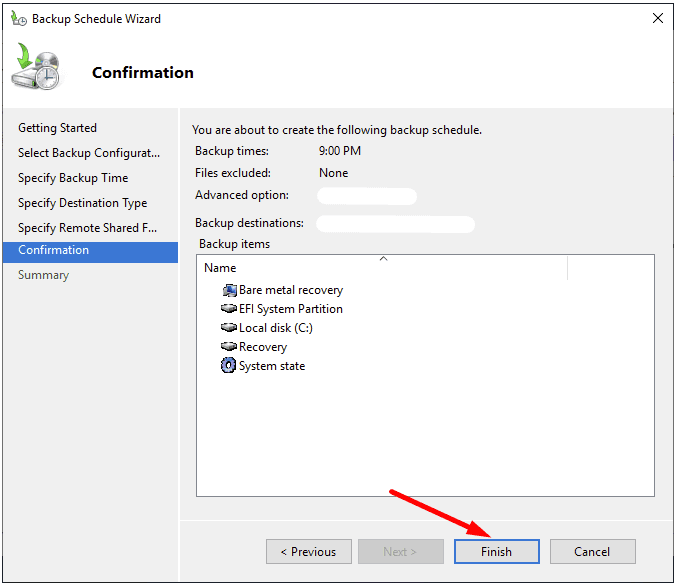
Finish.
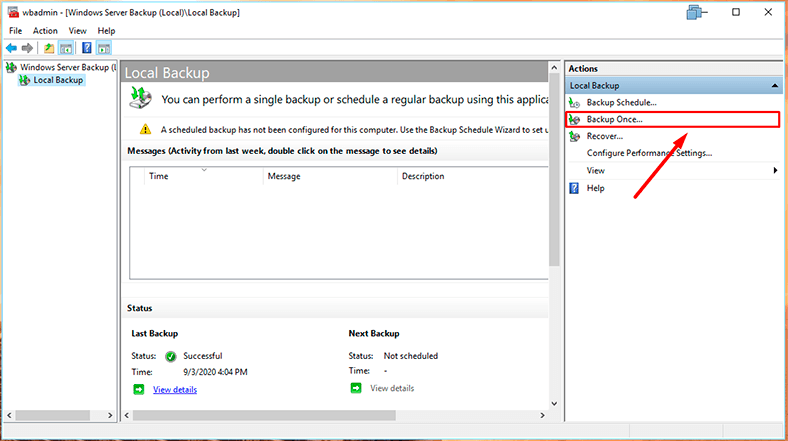
If you only need one copy, select Backup Once.
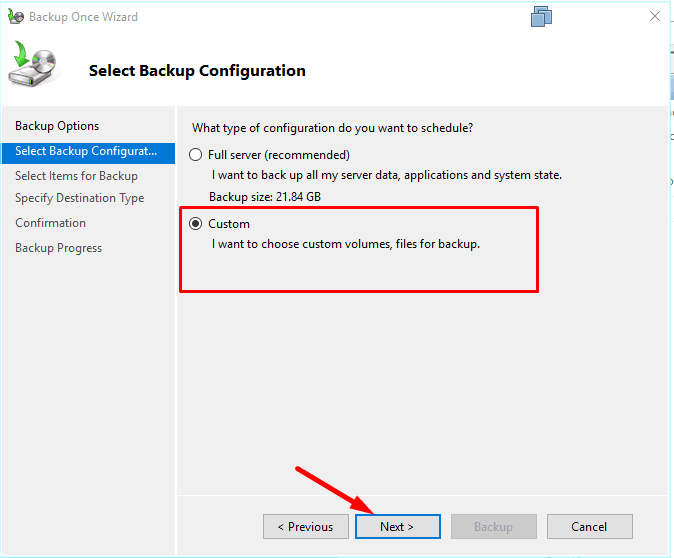
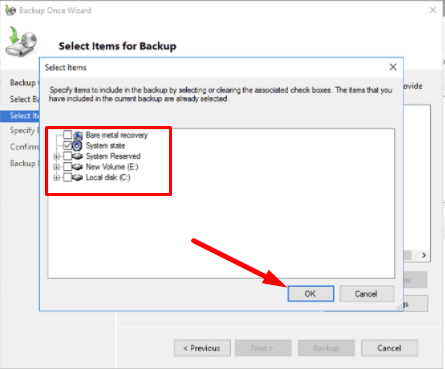
Select Custom if you want to choose a specific folder or files.
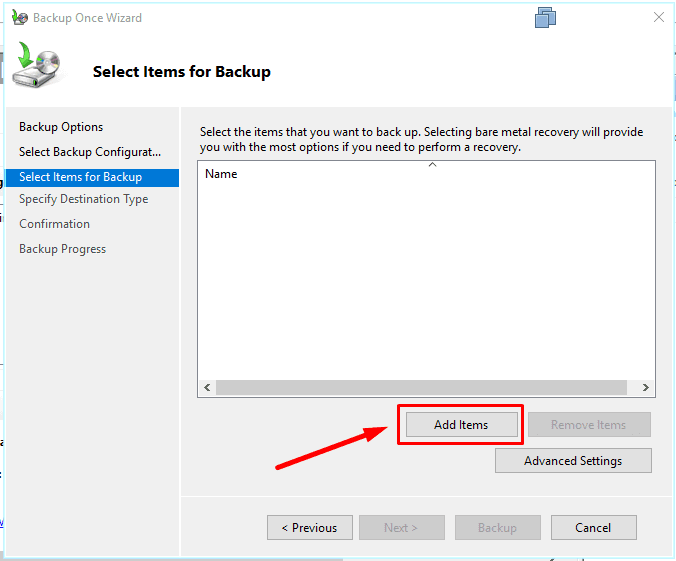
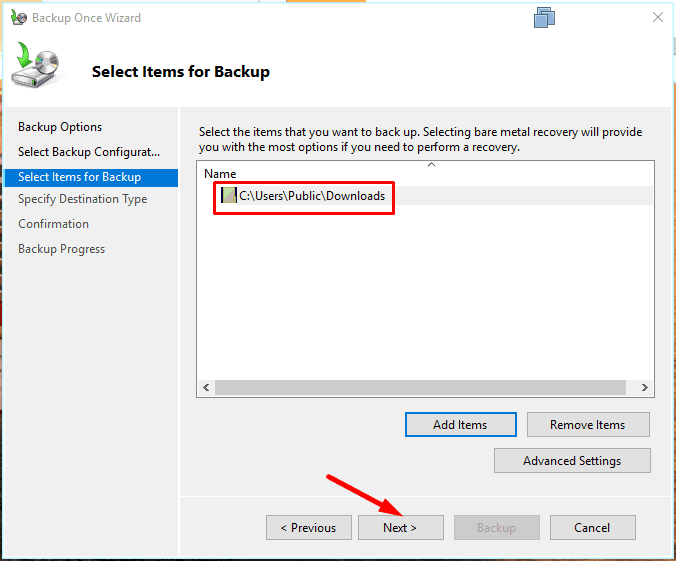
Add items to be backed up.
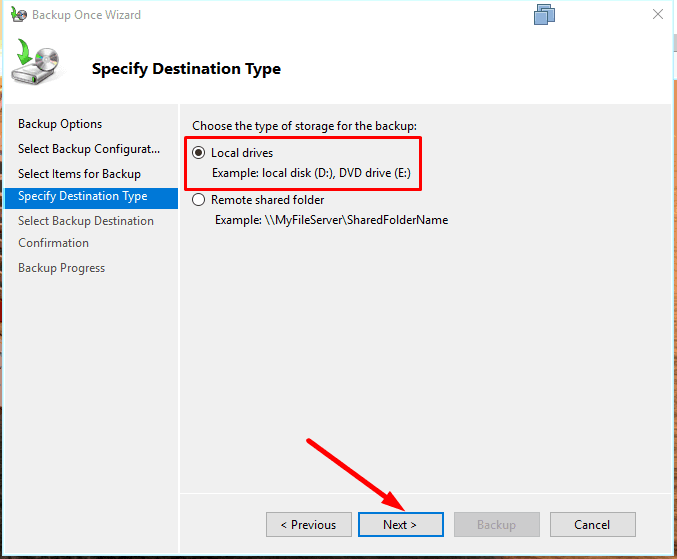
Specify where the backup file should be stored,
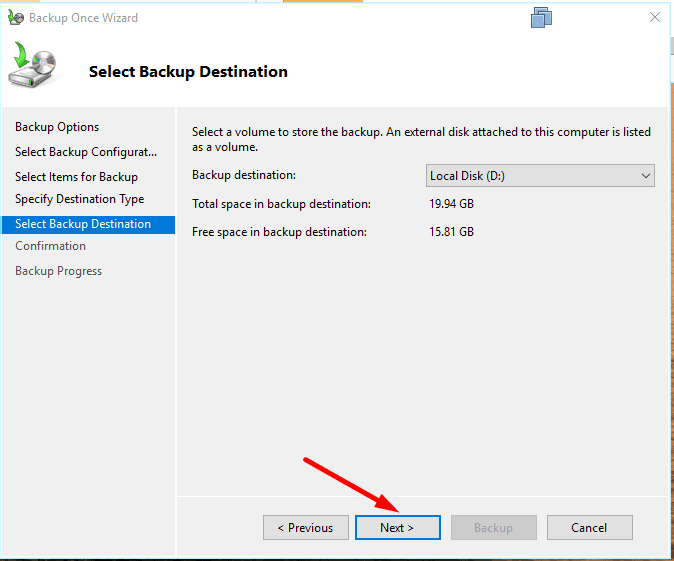
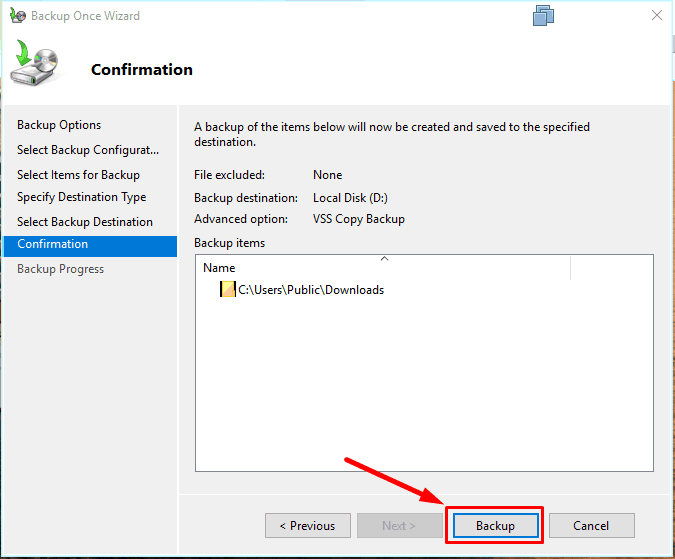
and hit Backup to start.
How to restore Windows Server from backup
Now that the backup is ready, let’s explore the scenario when you need to restore Windows Server.
In different cases with the operating system crashing, having a backup will save you a lot of time if compared with having to reinstall and reconfigure the whole thing.
In order to restore Windows Server to a previous state, open Server Manager –
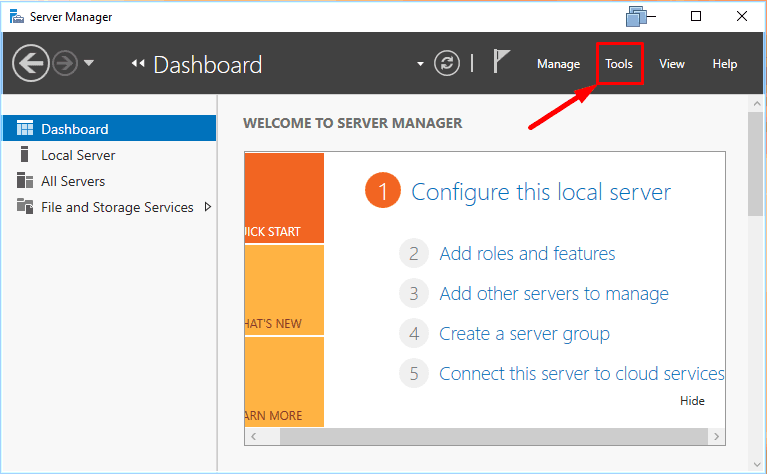
Tools – Windows Server Backup.
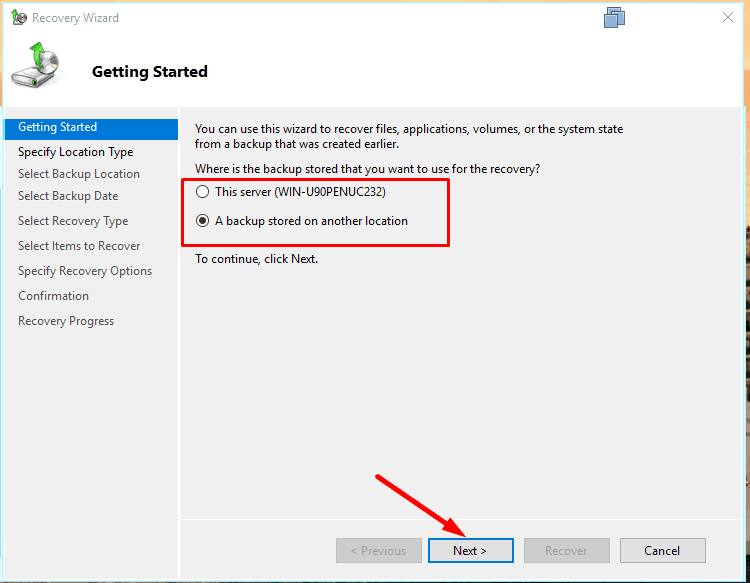
When you open Recover
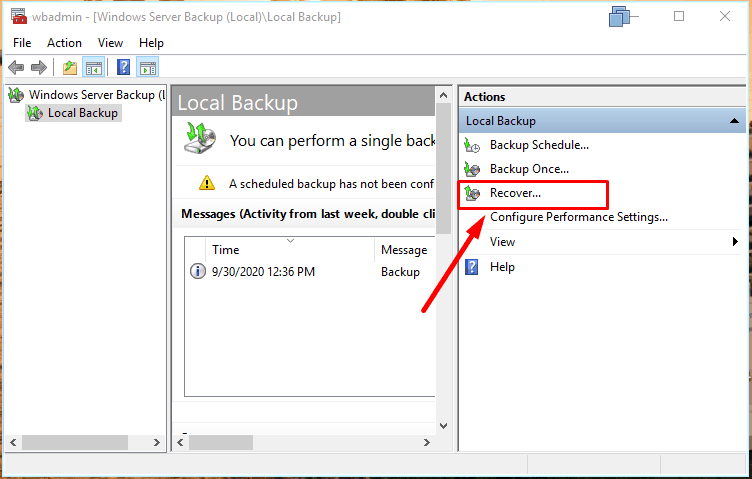
you’ll be asked to select the backup location:
This server or A backup stored in another location.
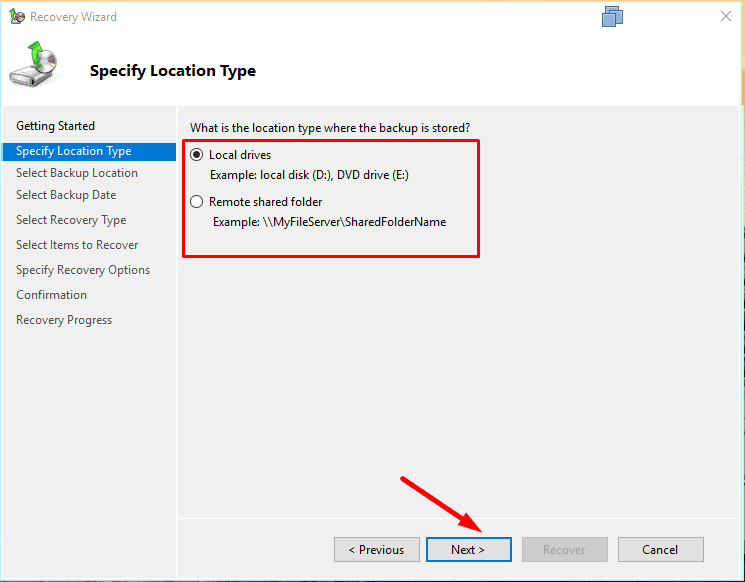
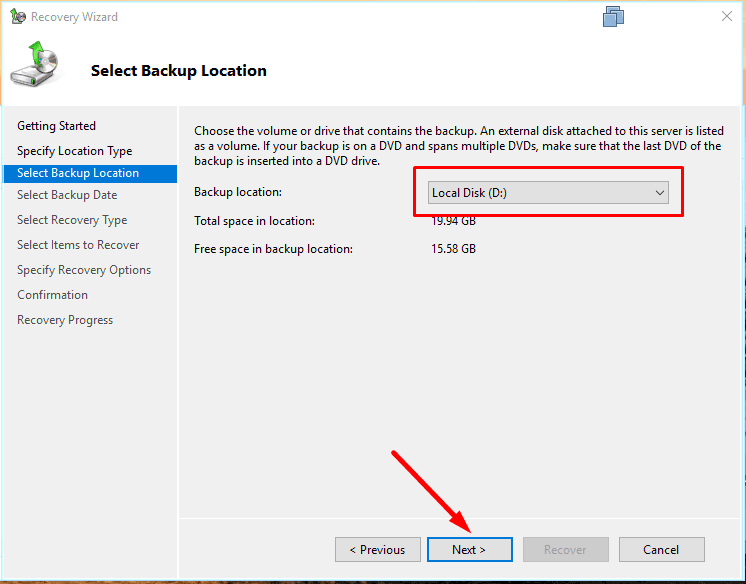
Specify the network folder or local disk where the backup is stored.
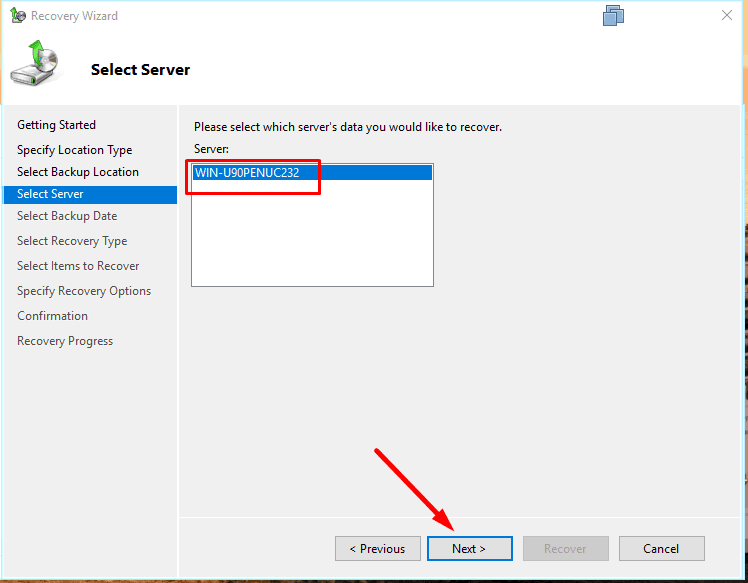
Select the data from which server should be recovered – Next.
Select a backup available for recovery.
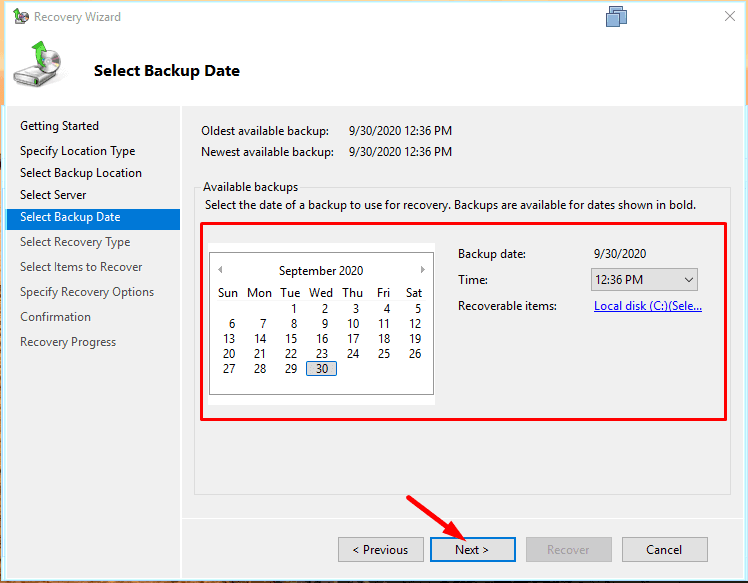
Select what should be recovered,
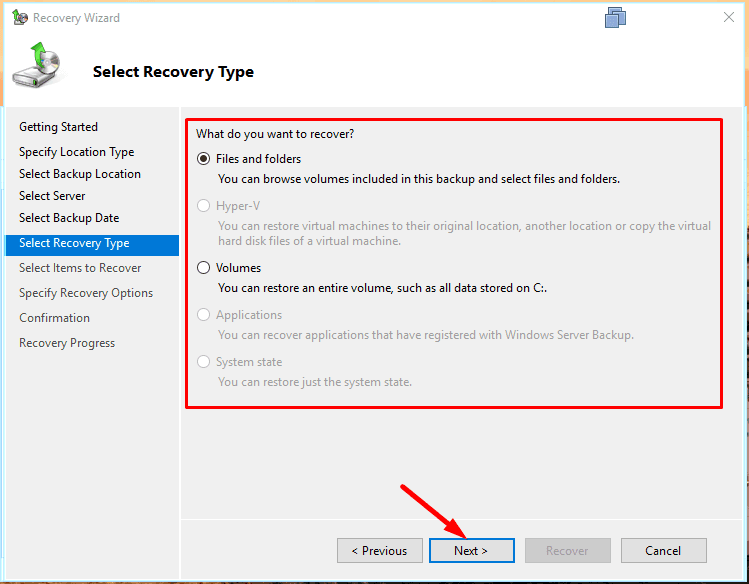
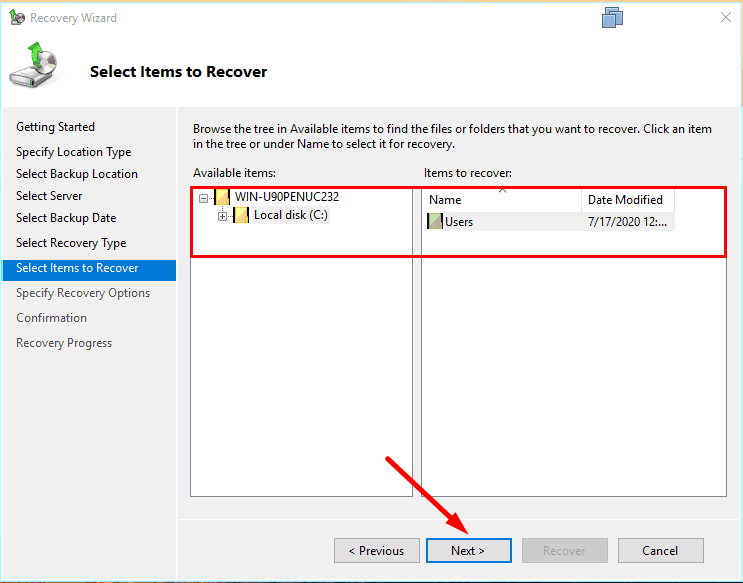
and specify the folder for recovery – Next.
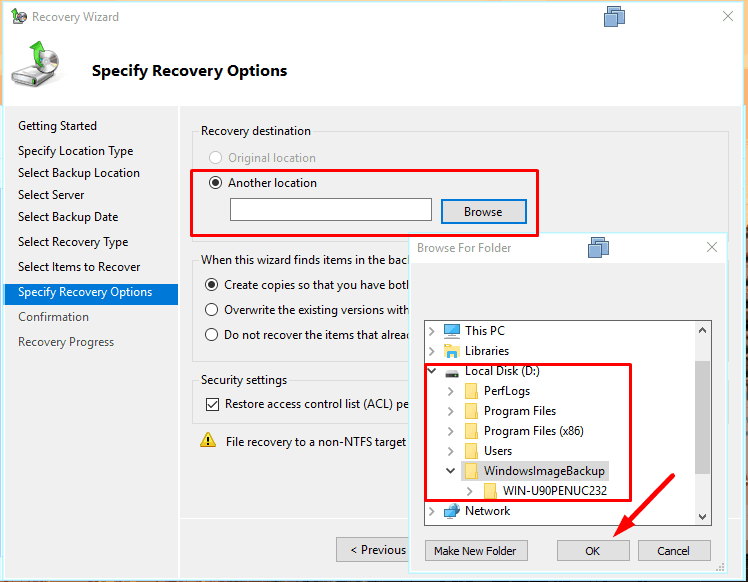
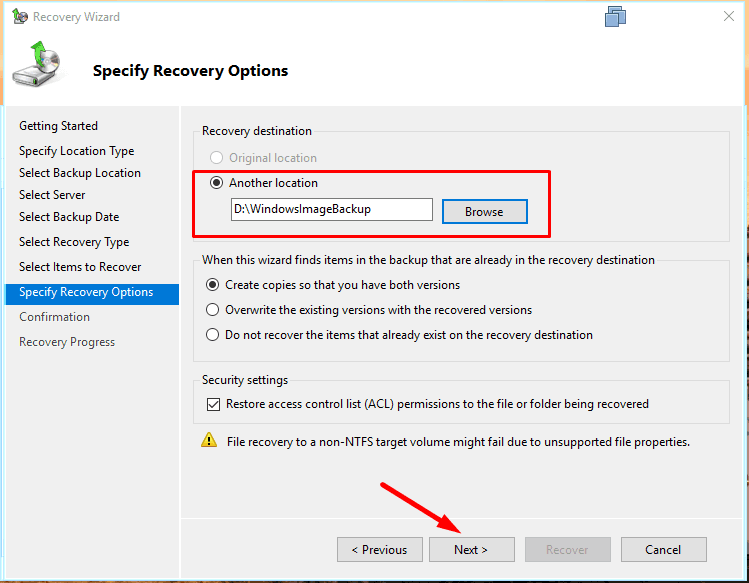
To start the process, hit Recover.
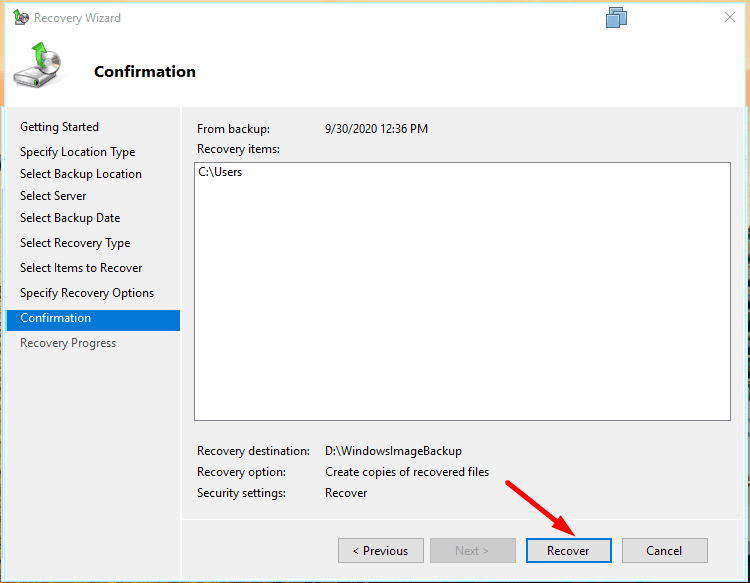
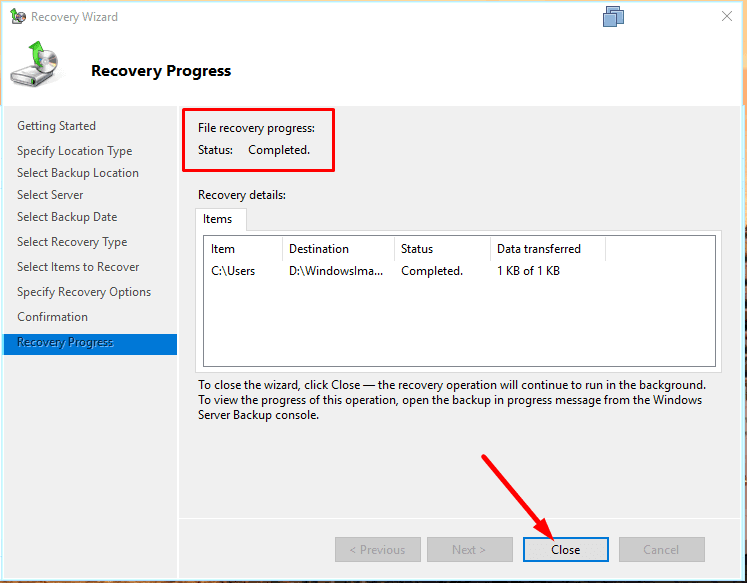
The system will calculate how many files are to be recovered, and the process will start.
When it’s done, click Close.
Restoring a crashed system
If you have a recovery drive, you can use it to bring your operating system back to normal.
To do it, start by booting with an installation disk or USB drive.

In the installation window, click on Repair your computer.

Then select Troubleshoot.
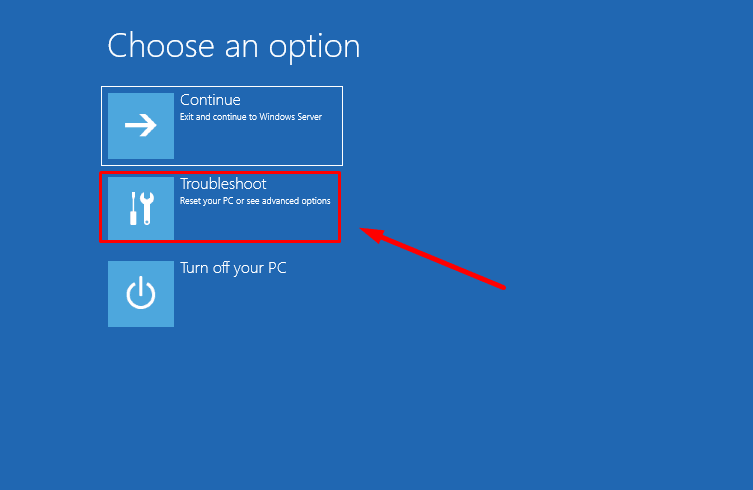
After that, System Image Recovery.
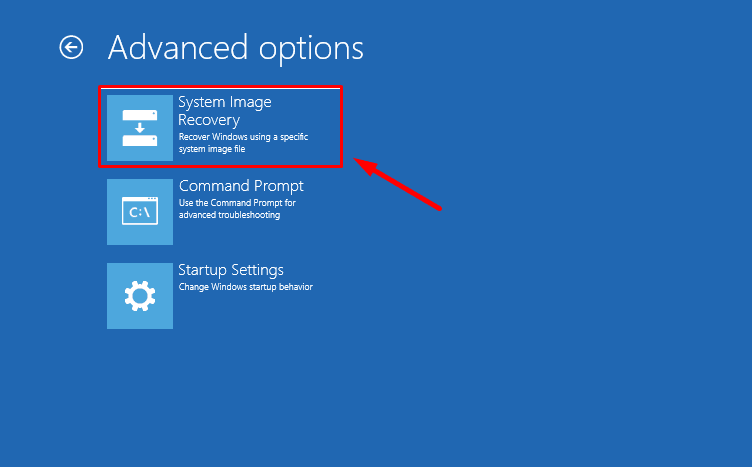
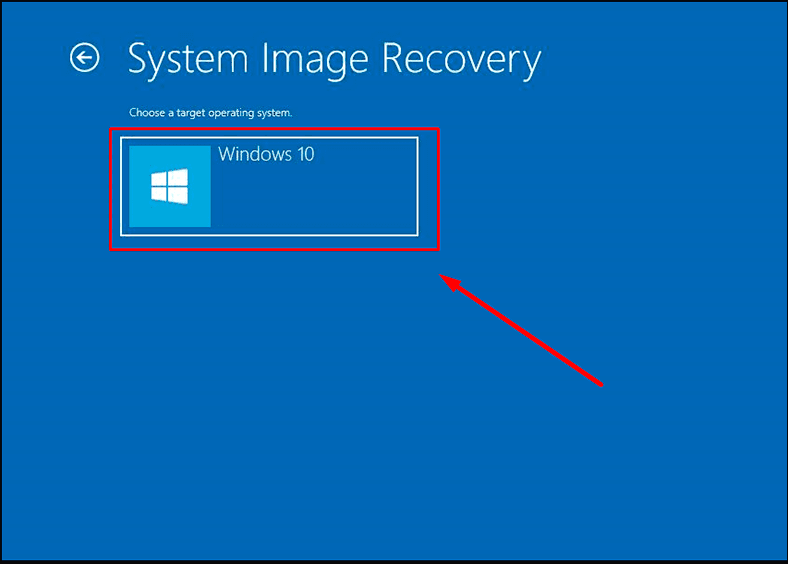
Select the operating system.
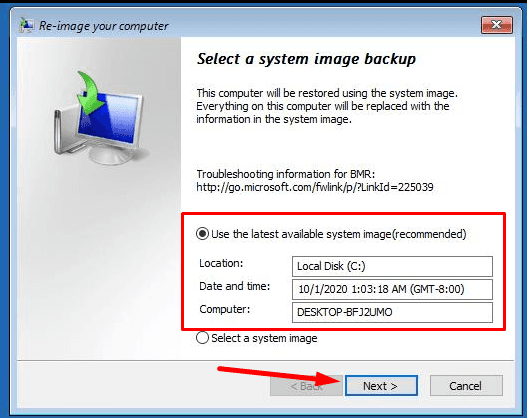
After that, the corresponding window will open - Re-image your computer. Choose the image file and click Next.
You may leave the box to Format and repartition disks checked - as it is.
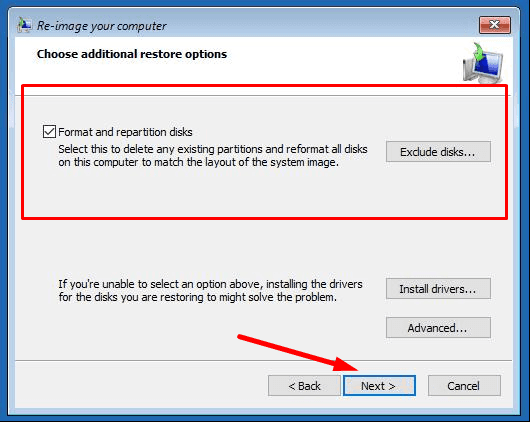
Ready.
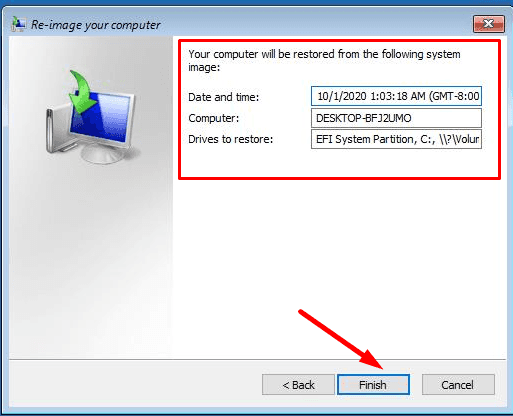
Confirm restoring the computer from the image. Wait until the process is over.
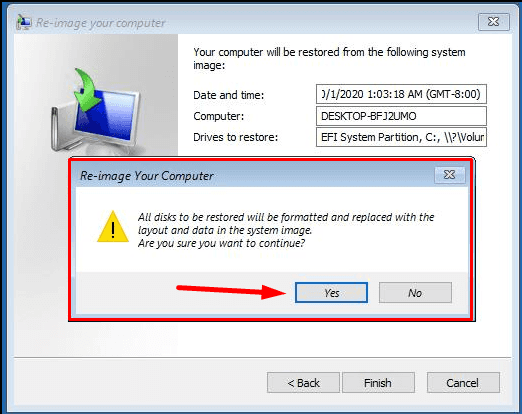
After the restart, the server will be restored to the state recorded in the last backup.
Recovering lost information from Windows Server with a third-party tool
If certain information is lost because your Windows Server operating system crashed, and there is no backup to restore it from, use a third-party data recovery tool.
With virtually tons of data recovery tools offered on the Internet, we recommend using our product Hetman Partition Recovery. When it comes to recovering files after reinstalling an operating system, you can rest assured that Hetman Partition Recovery will do the job perfectly.
It will scan the hard disk or external storage device, find the lost data and help you recover it in a simple and efficient way.
Here is what you do to get your data back:
Step 1. Connect your disk to another computer with a Windows operating system, download and install Hetman Partition Recovery.
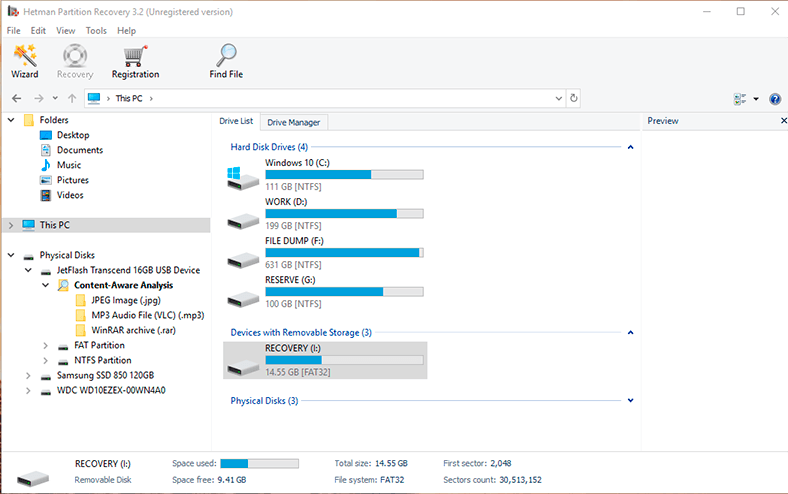
Remember to immediately stop using the hard disk where the important information used to be stored; also, we don’t recommend reinstalling the operating system, because it can overwrite the data and it will be lost beyond recovery.
Step 2. In the Drive Manager, select the storage device, right-click on it and choose Open.
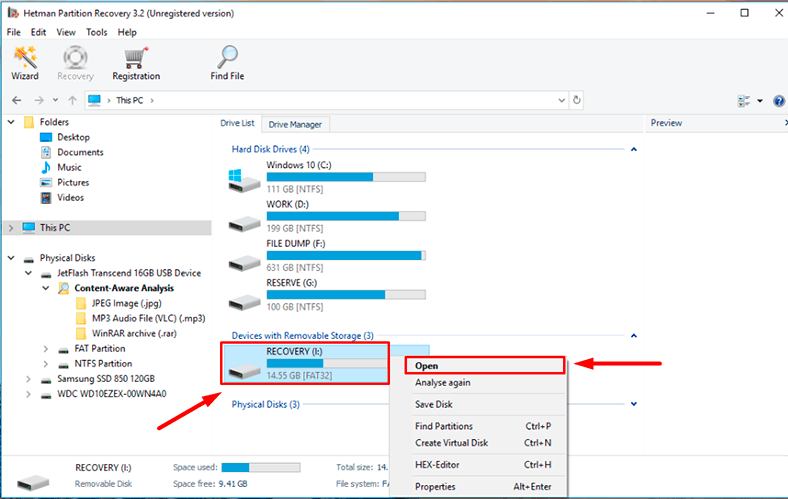
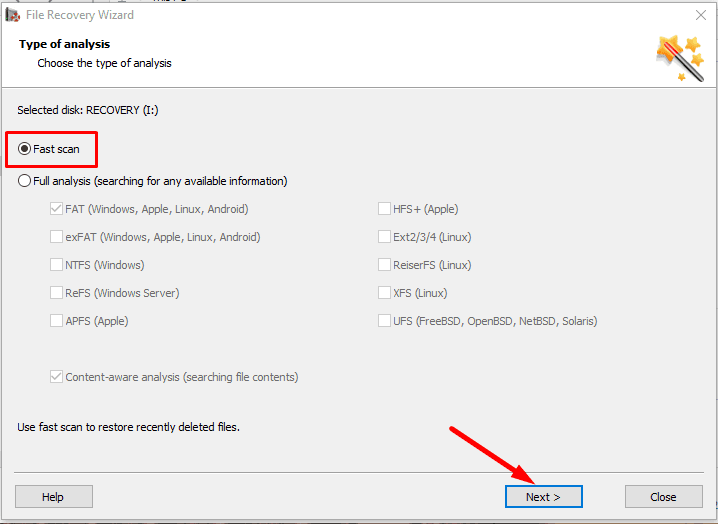
At first, try Fast scan - it will take less time.
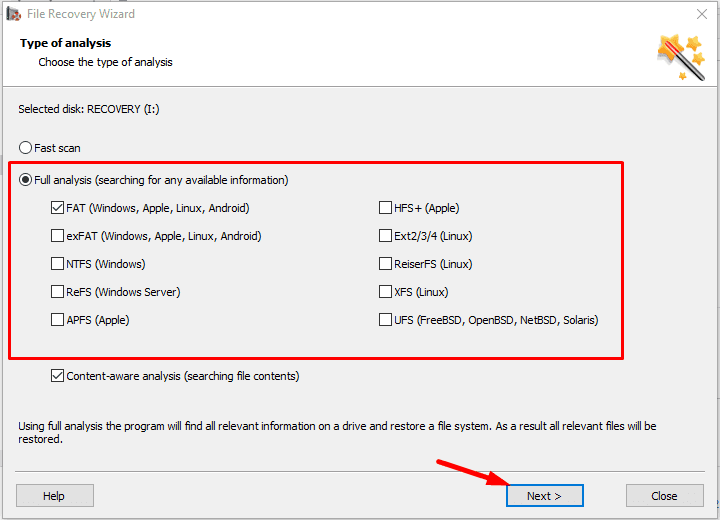
If the fast scan doesn’t help to find the deleted data, then go for Full analysis.
Step 3. The file recovery wizard will scan the selected volume immediately and display the scan results in the right side of the program’s window.

Step 4. When the scan is over, all you need to do is to select the deleted files you want to restore and then click Recovery.
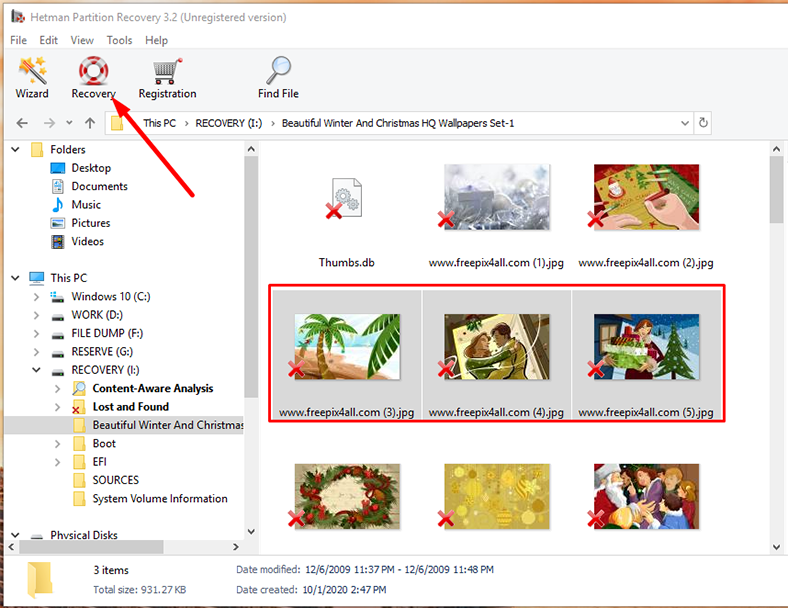
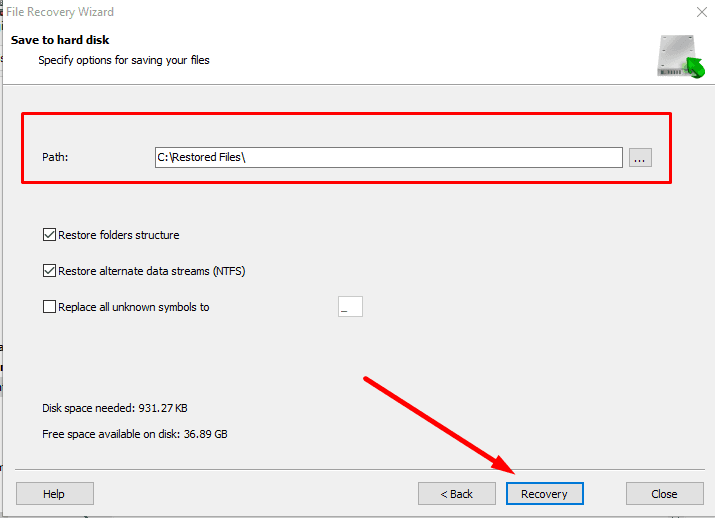
Specify where to save the data and click the same button again to start recovering.
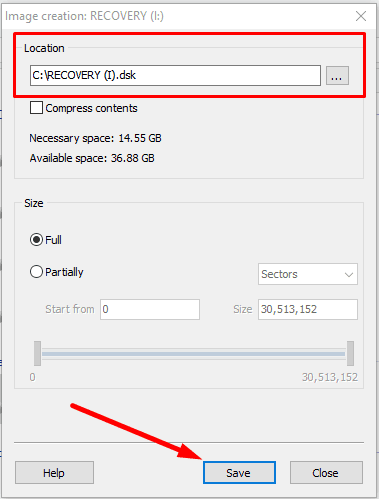
Also, this program can create a disk image and the conduct all recovery operations with this image which increases your chances to restore the deleted information successfully,
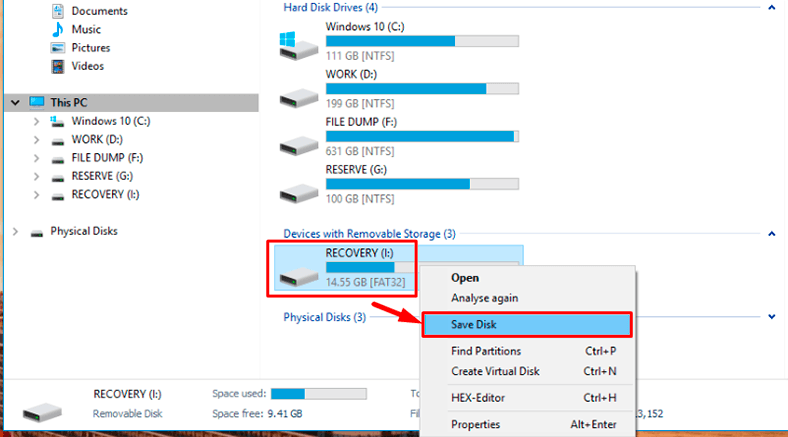
because multiple rounds of scanning may result in data overwriting.
There are many factors that may affect the work of your server and put it out of action. After recovery, important information may be lost, entirely or partially, or certain system preferences could be reset, etc. However, now you know how to restore operability of the Windows Server operating system, and you’ll be able to bring the lost data back.






"Restoring data using a bootable disk on Windows Server 2019 involves the following high-level steps:
Create a bootable disk, such as a USB drive or DVD, that contains a Windows Server 2019 installation image or a recovery environment.
Boot the affected server from the bootable disk and follow the prompts to access the recovery environment or launch the installation process.
Choose the option to restore data or access a backup and restore tool, such as Windows Server Backup or a third-party solution.
Identify the backup source and scope of the restore, such as which files or directories need to be restored, and whether any security permissions or other attributes need to be preserved.
Initiate the restore process and monitor the progress.
Once the restore is complete, verify that the restored data is accessible and functioning correctly."
"Recovering data on Windows Server 2019 after a virus attack involves the following high-level steps:
Isolate the affected server and disconnect it from the network to prevent further spread of the virus.
Determine the scope and severity of the attack, such as which files and directories are affected, and whether any system components have been compromised.
Identify a clean backup of the affected data, preferably one that was taken before the virus attack occurred.
Restore the clean backup using a backup and restore solution that supports data recovery, such as Windows Server Backup or a third-party backup tool.
Scan the restored data for any remaining viruses or malware using an up-to-date antivirus software.
Once the scan is complete and any remaining threats have been removed, reconnect the server to the network and verify that the restored data is accessible and functioning correctly."
"Restoring a SQL Server database on Windows Server 2019 involves the following high-level steps:
Identify the backup source for the SQL Server database, such as a backup tape, disk, or cloud storage.
Determine the scope of the restore, such as which database(s) need to be restored, and whether any log or differential backups need to be restored along with the full backup.
Initiate the restore process using SQL Server Management Studio or a command-line tool such as sqlcmd.
Monitor the restore progress and address any errors or warnings that may arise.
Once the restore is complete, verify that the restored database is accessible and functioning correctly."
"Restoring the NTFS file system on Windows Server 2019 involves the following high-level steps:
Identify the backup source for the NTFS file system, such as a backup tape, disk, or cloud storage.
Determine the scope of the restore, such as which files or directories need to be restored, and whether any security permissions or other attributes need to be preserved.
Initiate the restore process using a backup and restore solution that supports NTFS file system restores, such as Windows Server Backup or a third-party backup tool.
Monitor the restore progress and address any errors or warnings that may arise.
Once the restore is complete, verify that the restored files are accessible and functioning correctly.
Detailed steps for restoring the NTFS file system on Windows Server 2019 can vary depending on the backup and restore solution being used, as well as the specific circumstances of the restore, so it's important to consult the documentation for the backup and restore tool or seek the guidance of a qualified IT professional."
"Restoring Active Directory on Windows Server 2019 involves the following high-level steps:
Boot the server into Directory Services Restore Mode (DSRM).
Use the command-line tool ""ntdsutil"" to perform an authoritative restore of the Active Directory database.
Restore any other necessary components such as the system state, group policies, and DNS records.
Reboot the server normally.
Detailed steps for restoring Active Directory on Windows Server 2019 can vary depending on the backup and restore solution being used, as well as the specific circumstances of the restore, so it's important to consult Microsoft's official documentation or seek the guidance of a qualified IT professional."