Citrix Hypervisor XenServer Data Recovery: Key Considerations and Solutions
In this tutorial, we’ll guide you through the process of recovering data from a virtual machine running on Citrix Hypervisor XenServer. Whether you’ve experienced accidental deletion, disk corruption, or other data loss scenarios, we’ll show you step-by-step how to retrieve your valuable data with ease.
- What you need to install Citrix hypervisor
- How to install Citrix hypervisor 8.2
- How to connect a local repository
- How to create a virtual machine
- How to take a snapshot
- How to load a snapshot
- How to recover data from a virtual machine
- Questions and answers
- Comments
Citrix Hypervisor (XenServer) is a virtualization platform based on a special version of Linux and developed by the company called Citrix Systems. With this platform, you can run a number of virtual machines on a single physical server. This hypervisor lets you create virtual machines, take snapshots of their disks, and manage virtual machine workloads. Just like other virtualization products, it’s by no means perfect, and sometimes there may be failures or errors resulting in loss of data. If that’s the case, there’s a question to answer: how to recover the data?

How to Recover Data of a Citrix Hypervisor XenServer Virtual Machine
What you need to install Citrix hypervisor
For starters, let’s explore how to install this hypervisor. There are a few things to be checked before installing XenServer version 8.
It requires a 64-bit Intel VT or AMD-V processor based on x86 architecture.
If you plan to run Windows virtual machines, you need to enable hardware virtualization technologies – Intel VT or AMD-V in BIOS.
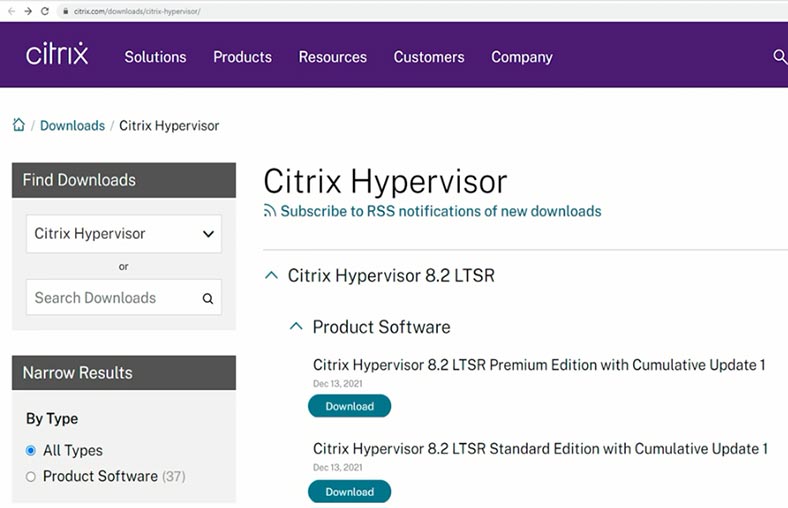
Also, you need to download an installation ISO image from the Citrix website before you can install the Xen hypervisor. To do it, go to the Citrix download page. From the drop-down menu, select Citrix Hypervisor (XenServer), and the choose the latest version, 8.2 LTSR. You need to register before you can download anything.
How to install Citrix hypervisor 8.2
Add the ISO image to your server with the remote management console such as IMM, iLO etc, or create a bootable USB drive.
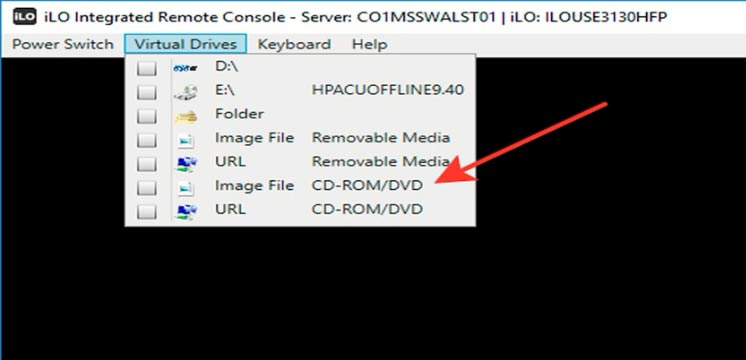
To begin the installation, start the server and boot from the USB drive. In the GRUB boot menu, choose Install.
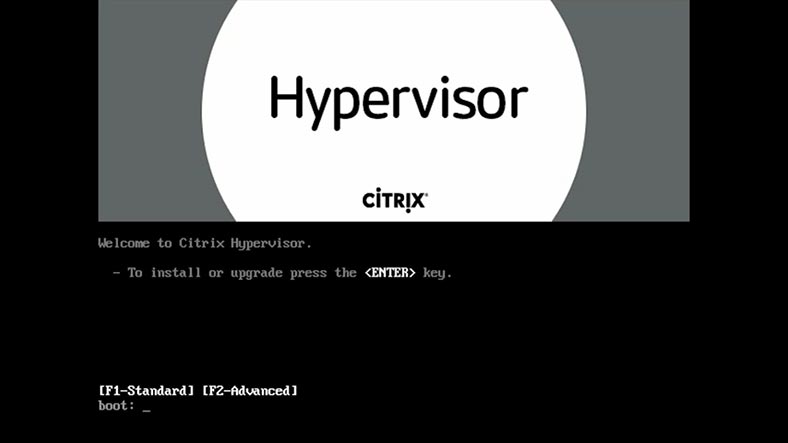
At the first stage, choose the keyboard layout to be used and click OK. At the next step, press F9 if you need to download a special device driver, or click OK to continue if you don’t need it. Accept the license agreement – Accept EULA.
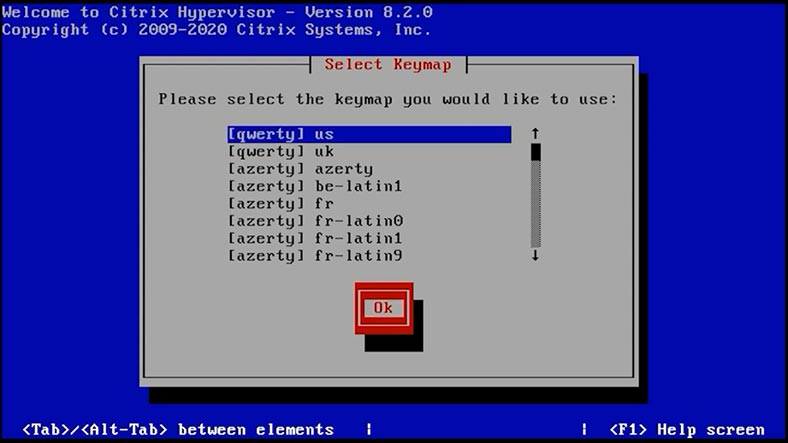
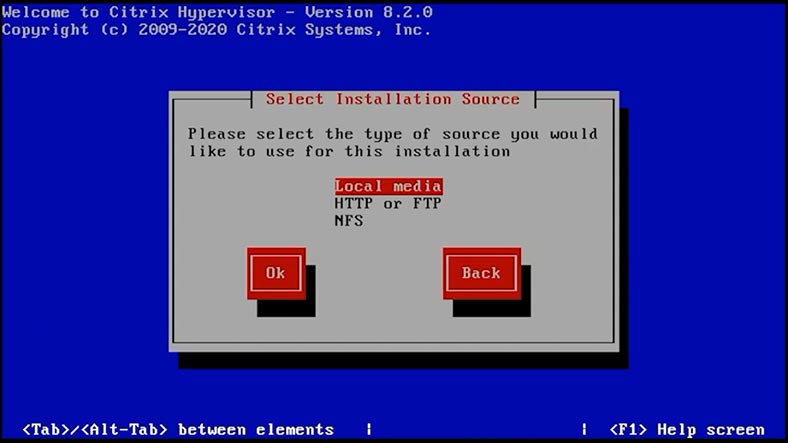
Then choose the disk where you want to install Citrix Hypervisor (XenServer). As I install it from a local disk, I choose “Local media” from the list of sources and click OK to continue.
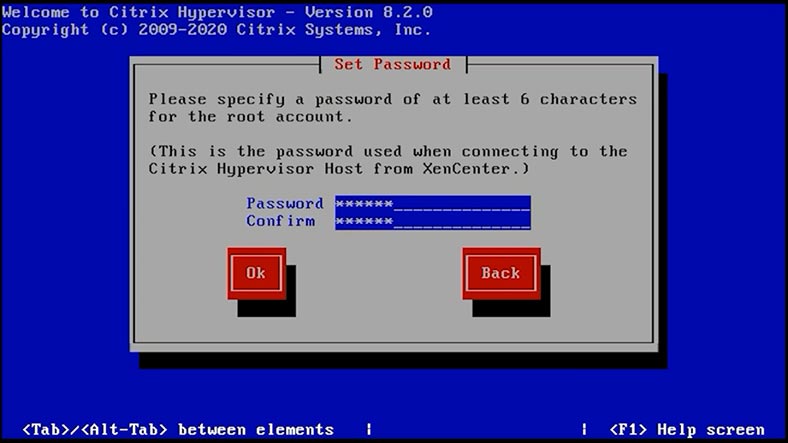
When installing from CD/DVD, it is recommended to check the disk; otherwise, skip the check by clicking ОК. Set the password for the root account, type it again to confirm, and click OK.
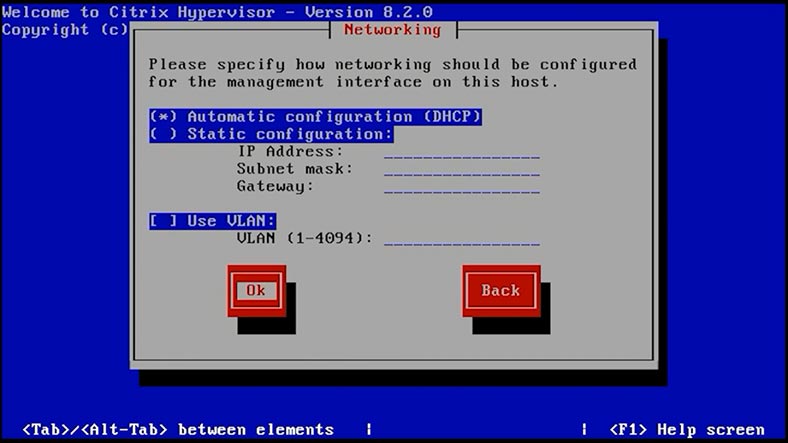
At the next step, you need to configure network parameters, set the automatic or static IP address, add a subnet and gateway – and finally click OK.
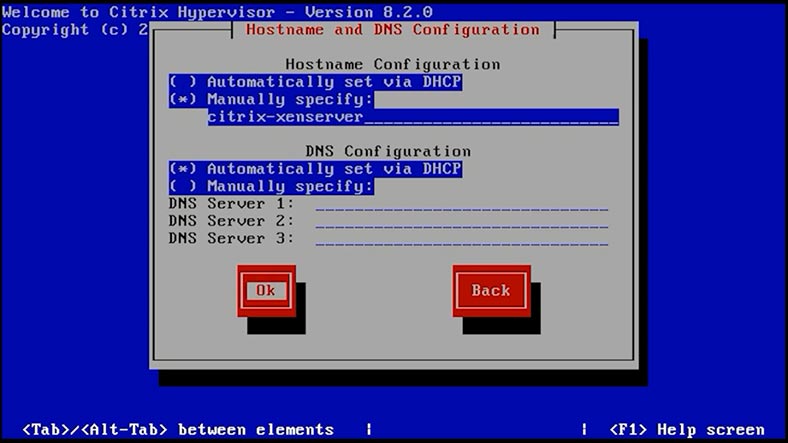
After that, set the host name and configure the DNS server – and click OK when you’re done. Select location – click OK, and city – click OK again.
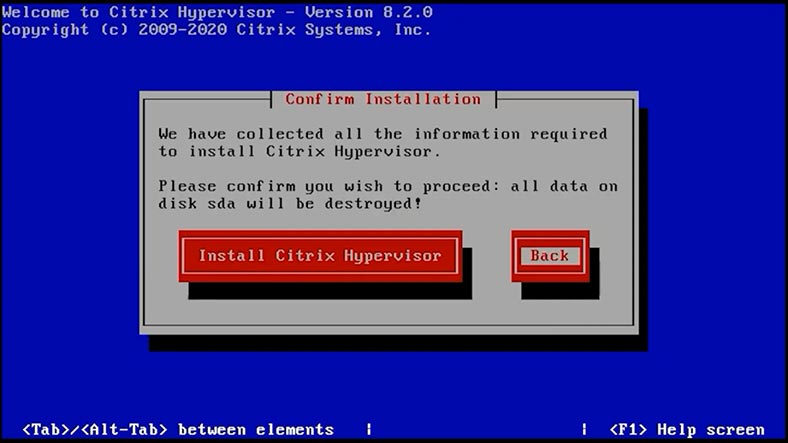
To synchronize time, select NTP and click OK to continue. Finally, it’s time to hit the button “Install Citrix Hypervisor” to begin the installation. All the data on the disk will be removed.
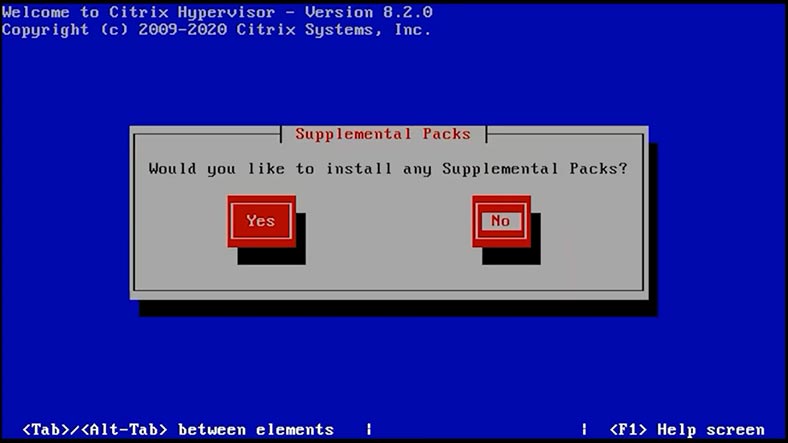
At the end of this process, you’ll be offered to install supplemental packs if necessary. If you don’t need them, click No to complete the installation. Now that it’s over, remove the installation media and press Enter to reboot.
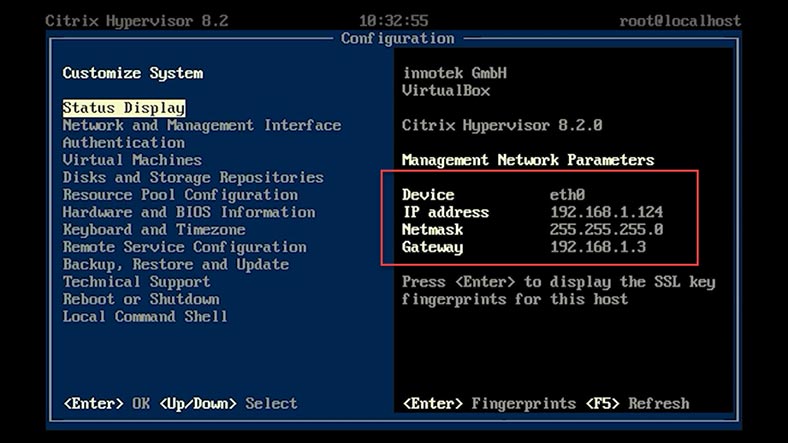
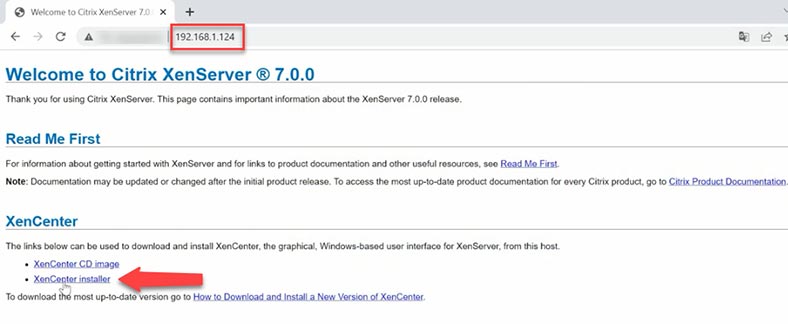
When the server has booted, you can connect to it from the client PC. To do it, enter the server’s IP address in the browser: you can find this address in the hypervisor window.
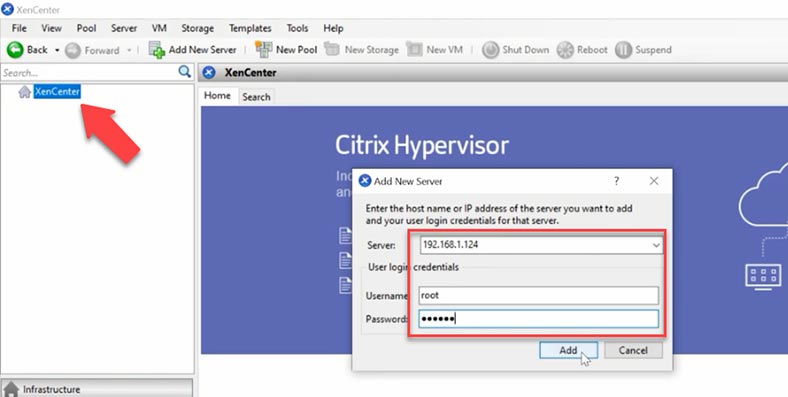
To manage the server, download and install XenCenter by following the link. Start the utility and add the server. Right-click on XenCenter and choose “Add.”
Type the server’s IP address, administrator’s name and password, and click “Add.” Then, right-click on the server and choose “Connect.” Now that you have connected to the server, you can create virtual machines, manage the host network and its storage and do many other things.
How to connect a local repository
To install an operating system for the virtual machine, you will need an installation disk or ISO file. I’ll be using an ISO image. For this purpose, you need to create a repository where ISO images of operating systems will be stored.
To do that, connect to the server by SSH and create a local folder there by running this command:
mkdir -p /var/opt/xen/ISO_Storage
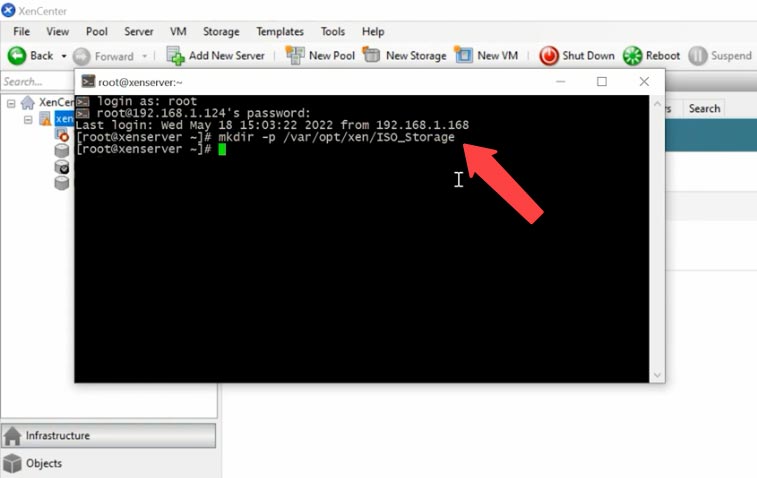
After that, create a repository with the Store Manager (SR), using another command:
xe sr-create name-label=LocalISO type=iso device-config:location=/var/opt/xen/ISO_Storage device-config:legacy_mode=true content-type=iso
where name-label=LocalISO is the repository name
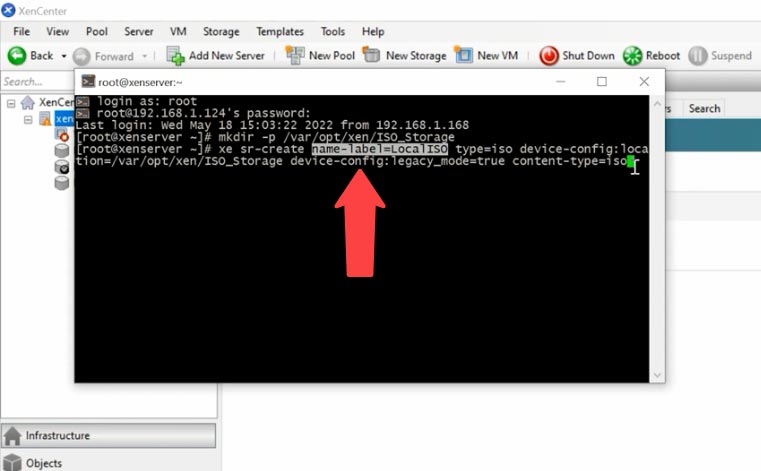
When this command is performed, a new storage will appear in the GUI (graphical user interface) window. To upload images to the server, connect to it by sftp and copy the image to this folder:
/var/opt/xen/ISO_Storage
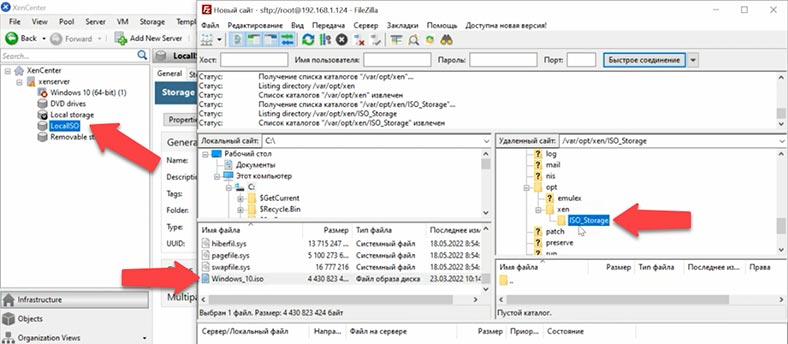
To activate images, you should browse to LocalISO - Storage, and hit the “Rescan” button. After that, the image will appear on the list.
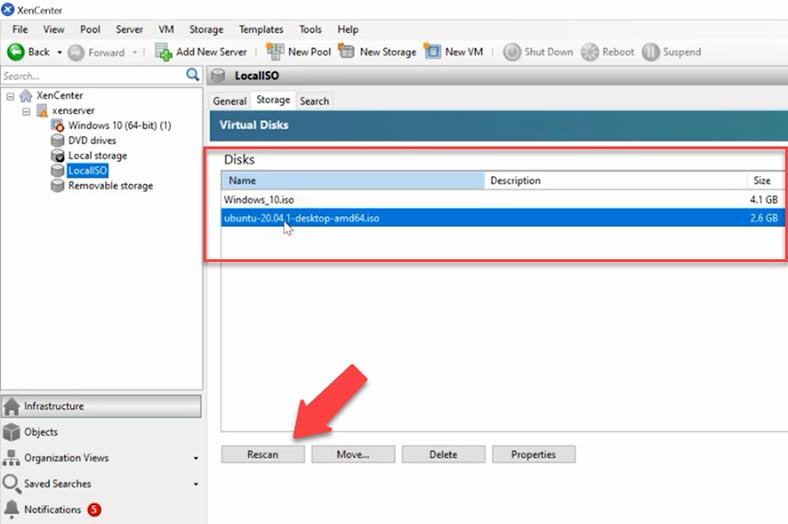
Also, every item initialized in the local repository will be added to the boot list of the virtual machine. Now you can select an uploaded image and install it onto a new virtual machine.
How to create a virtual machine
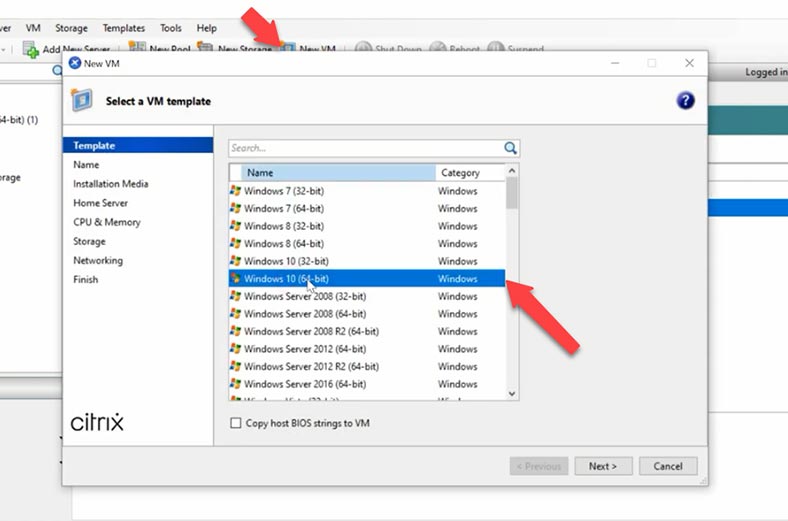
To create a virtual machine in XenCenter, go to the tab New VM. Select an operating system you’d like to install and click Next.
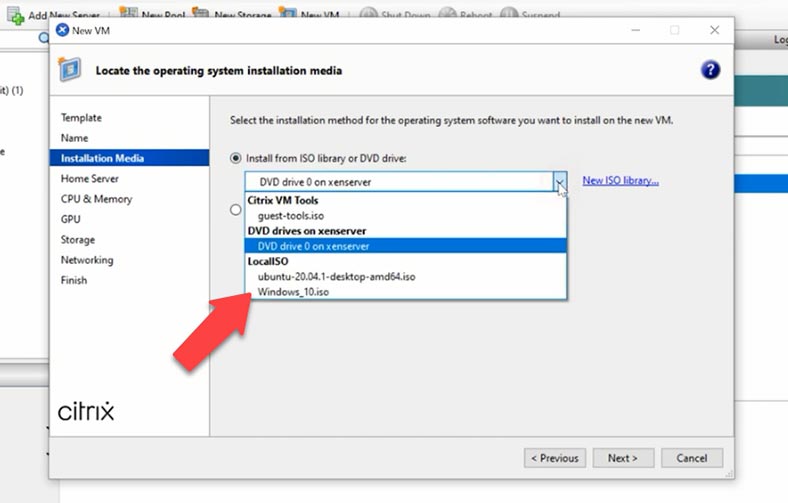
Give a name for this new virtual machine - Next. Select installation media, an ISO image from the repository you have created earlier - Next.
Select the server where you would like to create a virtual machine - click Next. Choose the number of processors and amount of memory to be allocated to this virtual machine - Next.
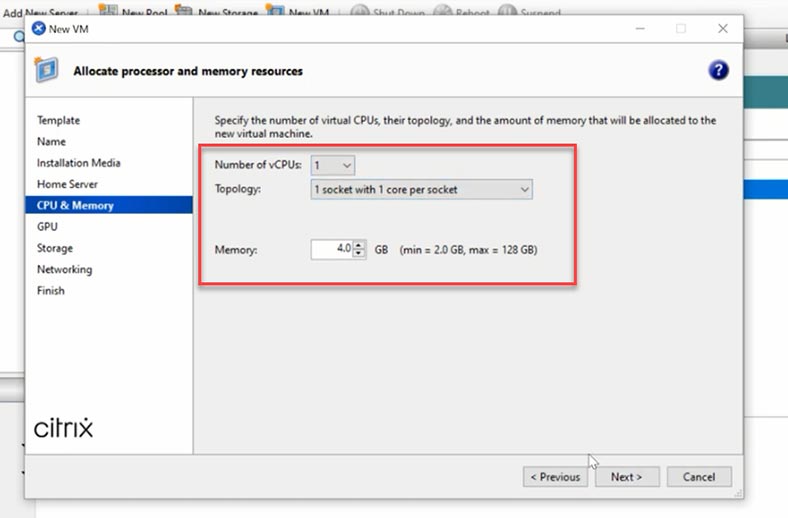
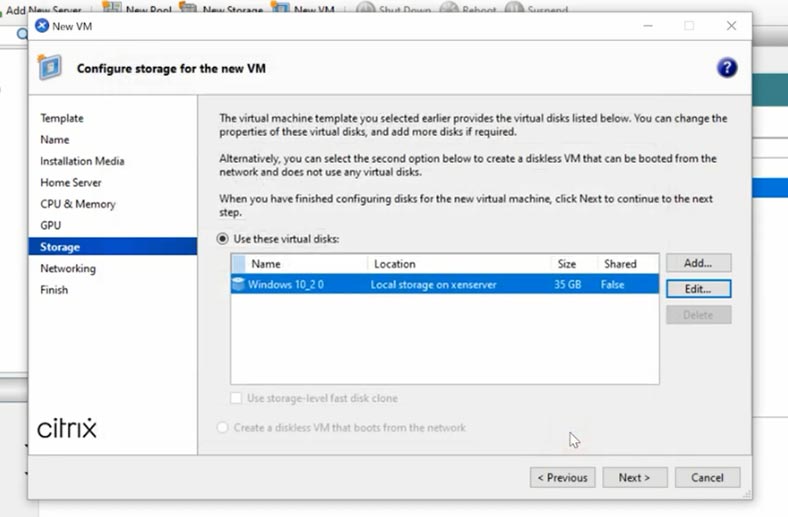
After that, set the preferred storage size and click Next; if necessary, add one more network interface, click Next, and finally click “Create Now” to have the machine created.
The virtual machine will appear on this list. When it happens, the machine will start automatically, and the installation of the operating system will begin. When you’re through will all typical stages of installation, the virtual machine will be ready to use.
How to take a snapshot
The Xen hypervisor lets you take snapshots of your virtual machine.
To create and manage snapshots you need quiet a lot of free space (in fact, more than twice the size of your virtual machine). If it happened so that you created a virtual machine on a storage device with a smaller free space reserve than required, and then decided to take a snapshot, it will occupy all the free space available.
When you try to remove it, the snapshot will be gone, but you won’t get any free space back. A snapshot captures the state of a virtual machine at the specific date and time when the snapshot was taken. Such snapshots will help you recover accidentally removed files or system settings that existed at the time when the snapshot was taken.
To create a snapshot, select a virtual machine, go to the Snapshots tab and click “Take Snapshot.” Give the snapshot name, add a description if necessary, and click “Take Snapshot.”
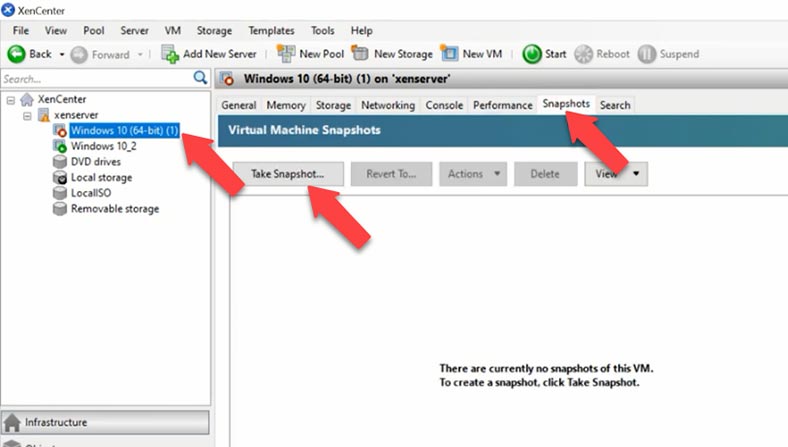
The snapshot will appear on this list.
How to load a snapshot
To go back to a specific system snapshot, select it from this list and click “Revert To.”
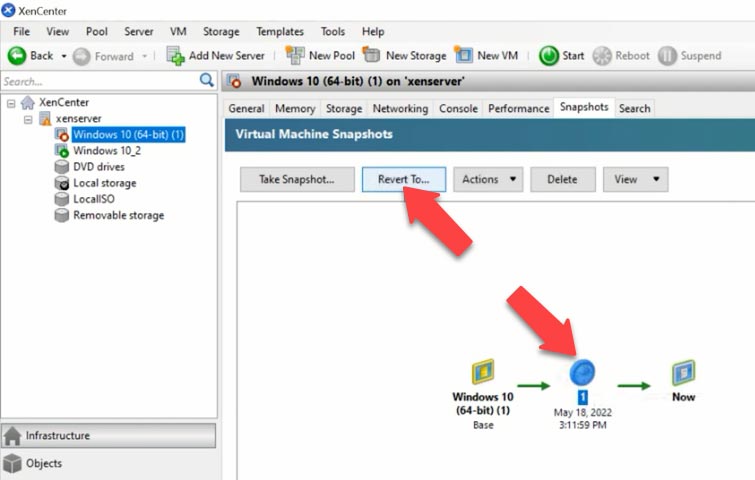
Check this box if you need a snapshot of the current state of your virtual machine, and click Yes. After that, the operating system will roll back to its previous state. You can find the specific snapshot you need by checking its date and time.
How to recover data from a virtual machine
If the virtual machine refuses to boot or displays an error that can’t be fixed; or if there is a server error - in any of these cases you can safely use Hetman Partition Recovery to bring your data back. It supports data recovery from virtual disks of various hypervisors including Citrix Xen.
By default, Citrix XenServer uses LVM storage for storing its virtual machines. This storage method has quite a lot of advantages if compared with VHD files, but sometimes you need to use the file-based storage mode like in VMware ESX, and it may also create additional difficulties for the recovery process.
When the physical disk containing virtual machine files is connected to the computer, Hetman Partition Recovery will display all the virtual machine disks.
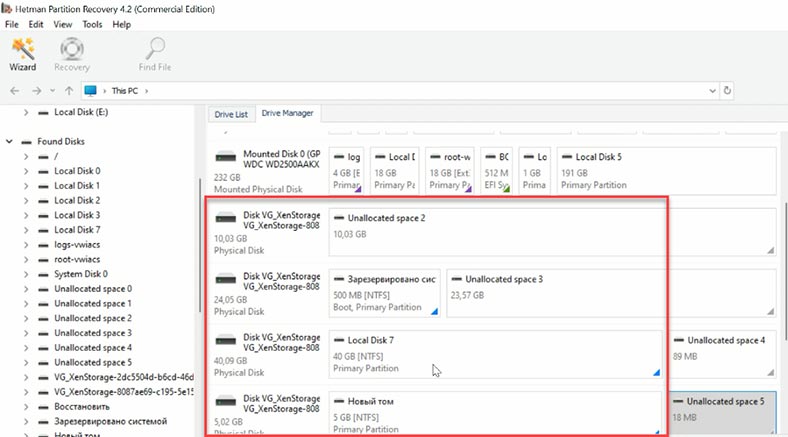
To see which virtual disks belong to a specific virtual machine, you should run some commands on the server to find the UUID (Universal Unique Identifier) of the virtual machine, the UUID of its disk, and the UUID SR (Universal Unique Identifier of the Storage Repository).
To do that, connect to the server by SSH and type the first command:
xe vm-list
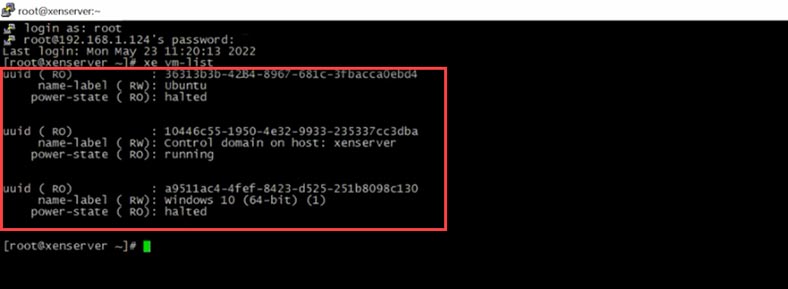
As a result, you’ve found the virtual machine UUID; now you can use this identifier to view the connected disks, with the help of this command:
xe vm-disk-list uuid=a9511ac4-4fef-8423-d525-251b8098c130
The last element is the virtual machine UUID.
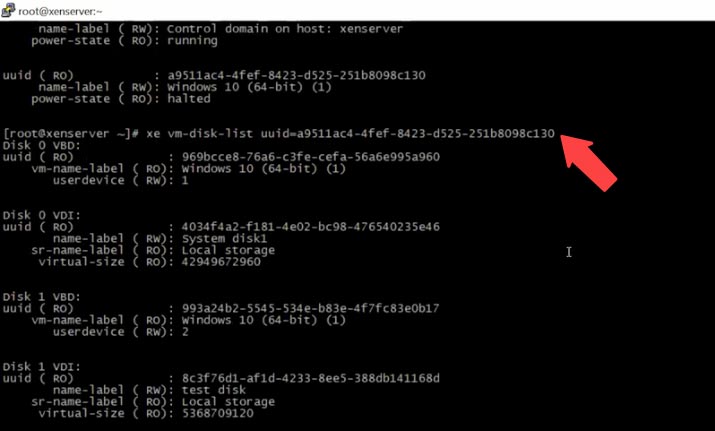
As a result, you get the virtual disk UUID, which, in its turn, can be used to find the storage repository UUID.
xe sr-list name-label=Local\ storage

Now that we have the repository identifier, it’s easy to understand to which virtual machine specific disks belong, and you’ll be able to identify those disks in the data recovery utility.
8087ae69-c195-5e15-8f7f-9ce1558d5cc9.VHD
Connect the server’s disks to a Windows computer, download, install and run the data recovery tool.
Hetman Partition Recovery will display all virtual machine disks in the Drive Manager. Choose the disk where the required files used to be stored, right-click on it and select Open. Select the scan type - “Fast scan.” If the “Fast scan” can’t find the required files, then go for “Full analysis.” Right-click on the disk - “Analyze again” - “Full analysis” - and specify the file system for this disk - then click Next.
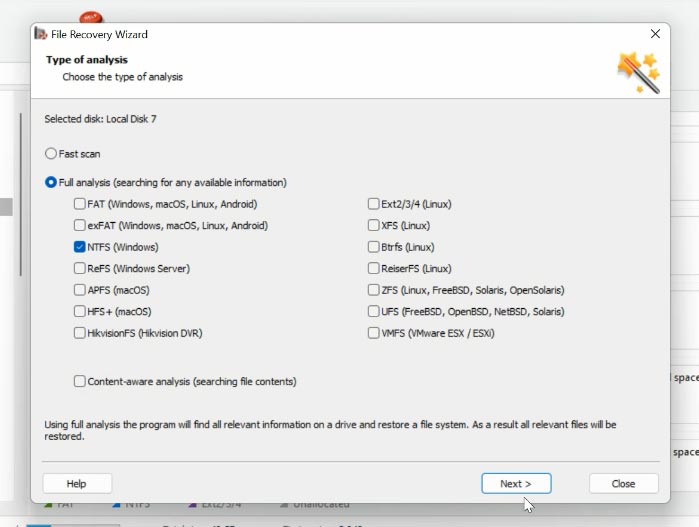
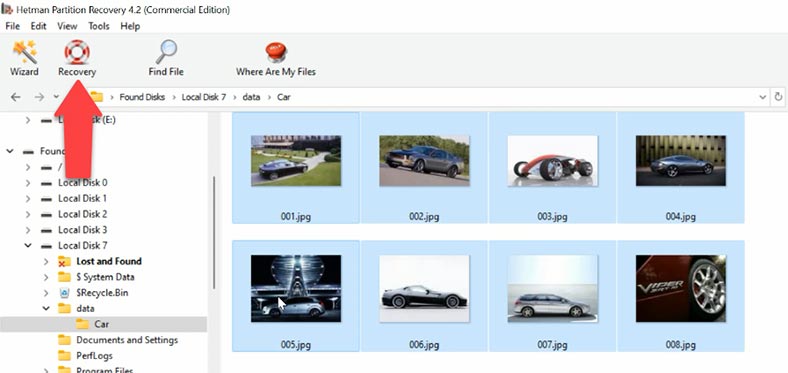
Find the folder where the files were stored, select the files you want to restore, click “Recovery,” specify the disk and folder where you’d like to save the files, and click “Recovery” again. When the entire process is over, you will find the recovered files in the folder you have chosen.
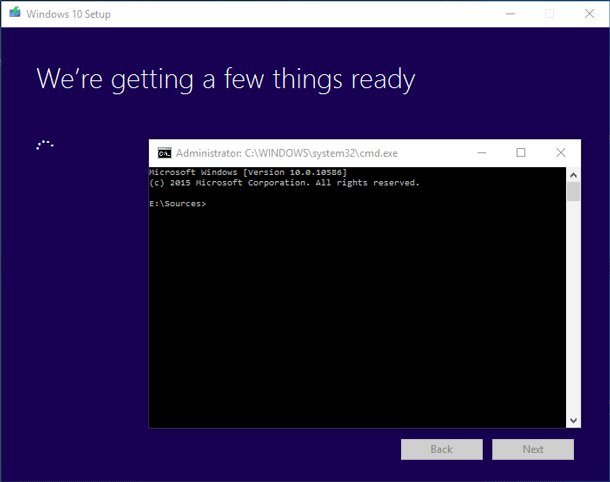
If the XenServer storage was based on a RAID system, you will need to use Hetman RAID Recovery. This program will automatically build the RAID with the available disks, and all you have to do is to run the scan, wait for the results and recover the information.
Hetman RAID Recovery supports the majority of most popular RAID types. To make your lives easier, our program features the option to search for files by their names. Also, you’ll be able to preview the file contents to make sure that this is the one you need.
| Characteristic | Description |
|---|---|
| Type of program | Data recovery software for RAID arrays |
| Supported RAID levels | RAID 0, RAID 1, RAID 4, RAID 5, RAID 6, RAID 10, JBOD |
| Supported disk types | HDD, SSD, USB drives, memory cards |
| Supported file systems | NTFS, FAT, exFAT, ReFS, HFS+, APFS, Ext2/3/4, Btrfs, XFS |
| OS compatibility | Windows, MacOS, Linux |
| Recovery after deletion | Yes |
| Recovery after formatting | Yes |
| Recovery after RAID failure | Yes |
| Data preview mode | Yes, allows you to preview files before recovery |
| Disk scanning | Deep and fast scanning |
| User interface | Simple, user-friendly |
| RAW disk support | Yes |
| Additional features | Disk image support, saving scan results |
| Price | Depends on the license: personal, business, or corporate version |
| Technical support | Available via email and online consultations |


Open the general settings of the virtual machine. In Windows or Linux, open the Settings tab and click General.
In Windows, select VMRC > Management > Virtual Machine Settings.
In macOS, select Virtual Machine > Settings.
In Linux, select Virtual Machine > Virtual Machine Settings.
Open the New Storage Repository wizard: click New Storage in the toolbar.
In the "ISO Library" section, select NFS ISO or Windows file sharing (SMB/CIFS) as the repository type , then click "Next" .
On the Name page, enter a name for the new SR. By default, the wizard creates a description of the SR. This description includes brief information about the configuration options you select as you work through the wizard.
To enter your own description, uncheck the "Automatically create description" box and enter a "Description" field. Click Next to continue. On the "Location" page, enter the details of the ISO target location: Sharename : for example, server:/path(NFS) or \\server\sharename(SMB/CIFS), where server is the DNS name or IP address of the server and sharename or path is the name of a folder or file.
Use another username (SR SMB only): if you want to connect to the SMB server using another username, check this box and then enter the username and password to login. NFS version (SR NFS only): select the NFS version used by SR.
Good afternoon! In order to fully answer your question, you need more information.
1) What are you going to use virtualization for? For production, for development?
2) Will you need to delegate access to virtual machines? If so, to whom and how much?
3) How many physical servers will be dedicated to virtualization? Are there plans for a cluster? If so, is a disk shelf planned?
4) How many virtual machines will there be?
5) Do you plan to take the disk shelf to iSCSI for Live Migration?
6) Do you plan to use device proxying in the guest machines
Initially, it is advisable to check whether your computer has virtualization support. If not, you run the risk of wasting your time trying to activate it through UEFI.
In UEFI, enabling this option is done in exactly the same way as in BIOS. Usually, these options are found in the Advanced menu or in the Security section.
They also have different names, but, as a rule, they are something like Processor or BIOS Chipset (although other names may occur).
In the above sections, there is a special line Virtualization Technology. When you enter the corresponding menu, you will see two available options: Enabled and Disabled.