Windows Storage Spaces RAID Recovery: Parity, Striping, Mirror, Composite
Are you looking to upgrade your LV or MD RAID1/0 setup to RAID5 without risking data loss? Look no further! In this article, we walk you through the step-by-step process of converting LV or MD RAID1/0 configurations into RAID5 seamlessly. From understanding the prerequisites to executing the conversion safely, we provide practical tips and expert guidance to ensure a smooth transition while preserving your valuable data intact. Whether you’re a sysadmin or a tech enthusiast, this article equips you with the knowledge and tools to upgrade your RAID setup with confidence.
- Case 1. Reinstalling Windows Server or Encountering a Hardware Error
- Case 2. When One of The Disks is Down
- Conclusion
- Questions and answers
- Comments
Windows Server features an integrated technology to let you create a hardware RAID system and protect your files from accidental loss. This function is used to keep your data intact in case one or several disks fail, depending on the array configuration. Unfortunately, issues related to data loss in Windows Server systems do not always boil down to a mere disk failure: other possible causes may include software errors, incorrect settings, damaged metadata, accidental formatting or removing files and so on. All these things may cause a loss of important information, and leave the poor user wondering how to extract or recover files from such a faulty array.
| Characteristic | Description |
|---|---|
| Purpose | Combining physical disks into virtual drives to improve data reliability and storage efficiency. |
| Types of Storage Pools | Simple, mirrored, and parity. |
| Mirrored Space | Provides high storage reliability by duplicating data across different disks, suitable for data loss prevention. |
| Simple Space | Combines disks without data duplication, intended for storing data where recovery in case of failure is not critical. |
| Parity Space | Balances storage and reliability, allowing data recovery in case of one disk failure. |
| SSD and HDD Support | Allows combining SSD and HDD into a pool for hybrid storage, improving performance by using SSD for caching. |
| Support for Different Parity Levels | Enables choice of parity levels (single and dual-parity) to ensure data reliability according to organizational needs. |
| Automatic Space Management | Automatic expansion and balancing of available space across disks. |
| Monitoring and Recovery | Disk status monitoring and automatic recovery of corrupted data upon error detection. |

💽 Recovering RAID Volumes in Windows Storage Spaces (Parity, Striped, Mirrored, Composite) 💽
To have your data back, you have to use specialized data recovery software that supports this specific RAID type. Hetman RAID Recovery supports almost all known sorts of RAID systems, and it will help you recover any lost files without effort. It works perfectly with all popular file systems, fixing errors in the logical structure of hard disks and displaying disk contents.
Case 1. Reinstalling Windows Server or Encountering a Hardware Error
Errors in the work of the operating system (like those you may encounter during the update process) can cause a critical error, which may leave your system stranded and unable to boot again. If that’s the case, the easiest way out is to reinstall your operating system. But what should you do with the RAID 5 system and all the information that is still inside it?
After the operating system is reinstalled, it may have issues in recognizing the disks, and display them in the Disk Management as ”foreign”.
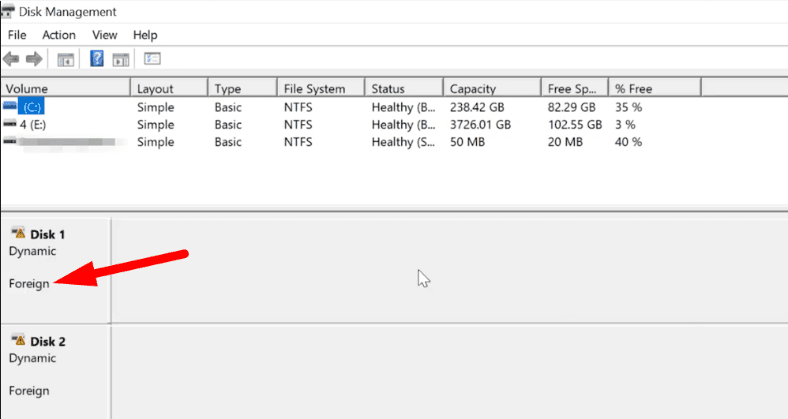
Try importing them first. Right-click on the disk icon, then choose Import foreign disks.
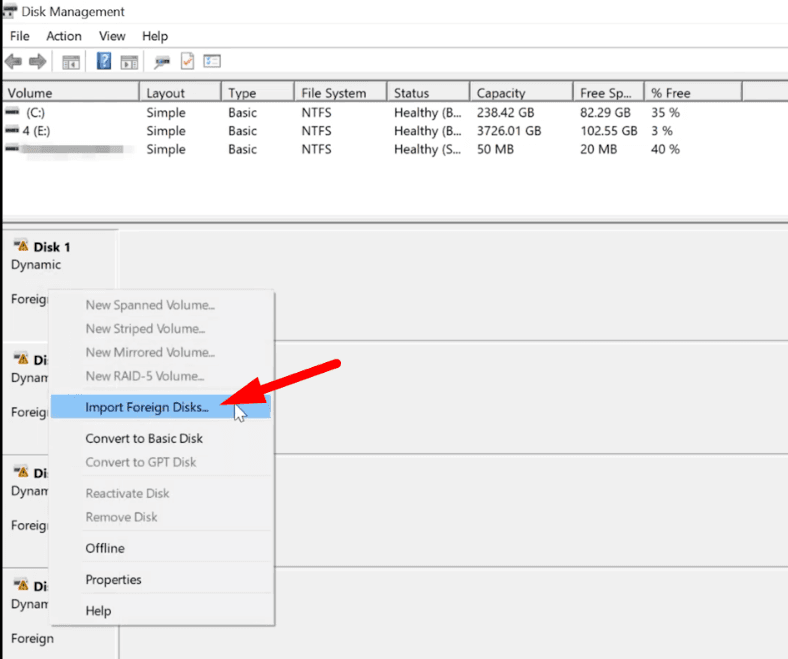
Specify the group and click OK.
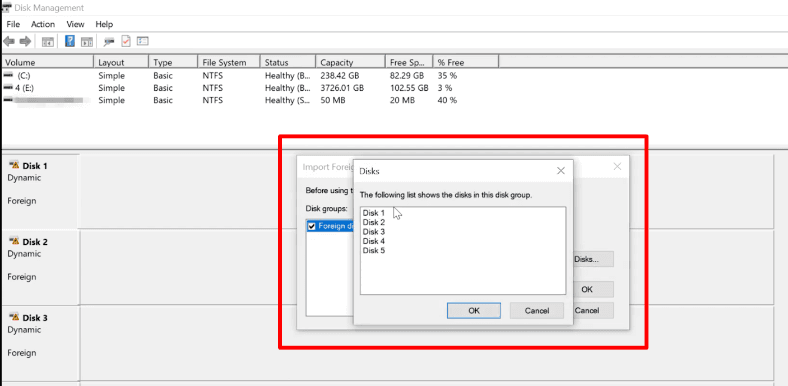
In the next window, the system will list the volumes it has found on the disks, so click OK to confirm it. After that, all disks will appear in File Explorer.
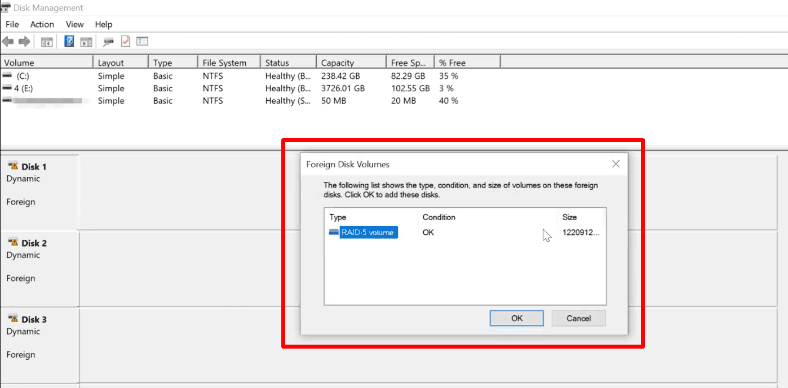
There could be situations when the import operation fails and some arrays remain inaccessible – just like this RAID 5 system.
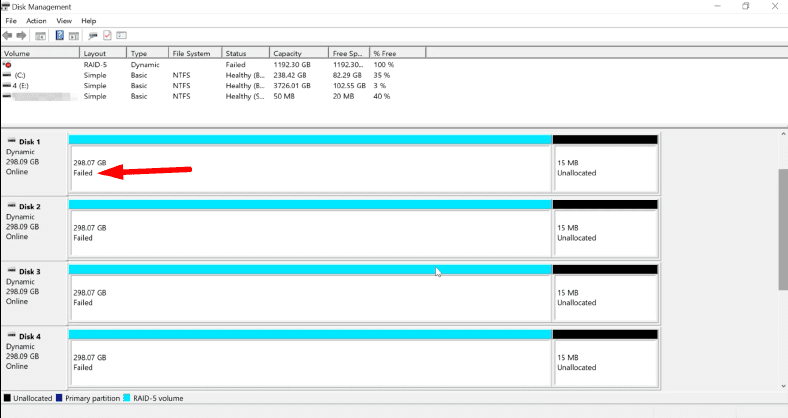
One more scenario is when a hardware failure or another emergency damaged a part of metadata, or there is a never-ending process of resynching which makes the disk unavailable for read and write operations. Similar things occur when you accidentally remove a part of the data or format the disk.
This is when Hetman RAID Recovery comes to the rescue. It will scan the selected disks automatically and display all the data it can identify. Now that the program displays correct array properties, Al you have to do is to scan the logical volume and recover the information.
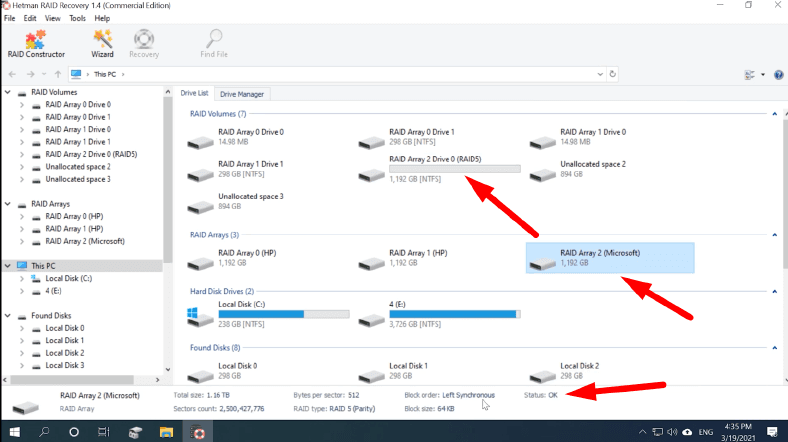
Right-click on the volume icon, choose Fast scan.
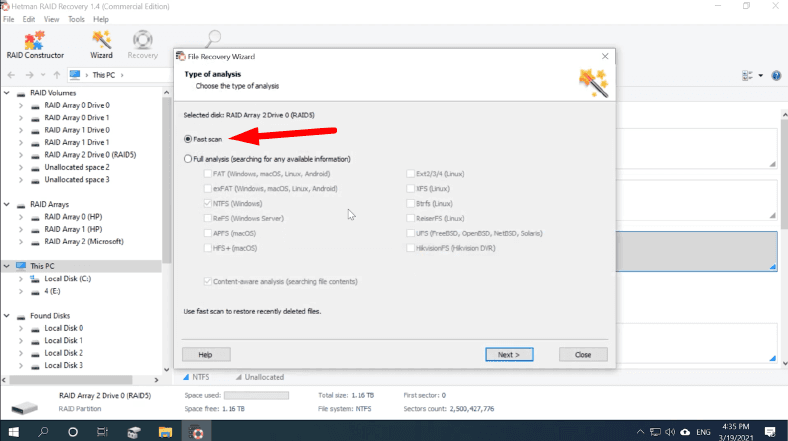
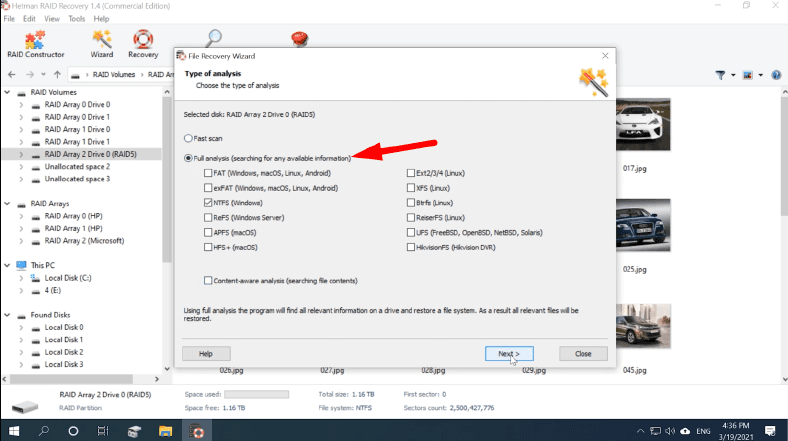
Check the scan results, and if the utility hasn’t found the data you need, run “Full analysis” instead.
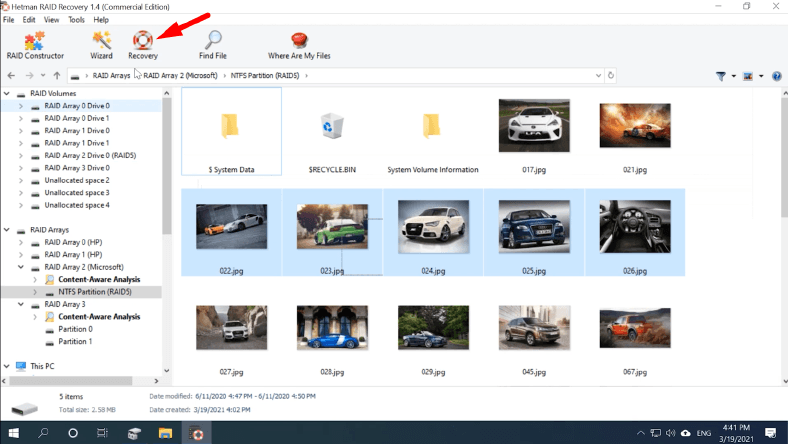
After the scan is over, select the files you want to restore and click ”Recovery”. Give the path to the directory where to save them, and make sure this is the different disk from the one you are recovering from (it can be a memory stick or network drive as well), and click ”Recovery” again.
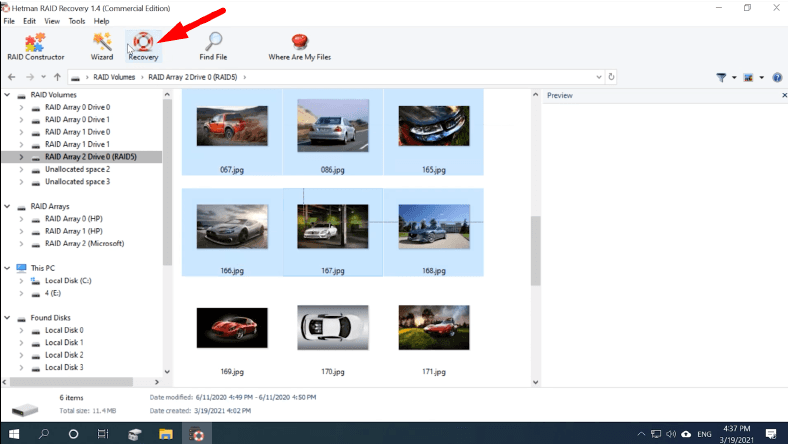
When the saving process is over, you’ll find all the files in the directory you have selected before.
Case 2. When One of The Disks is Down
If one or several disks are damaged and Hetman RAID Recovery is unable to identify accurately your RAID 5 properties, there is the integrated RAID Constructor to help you.
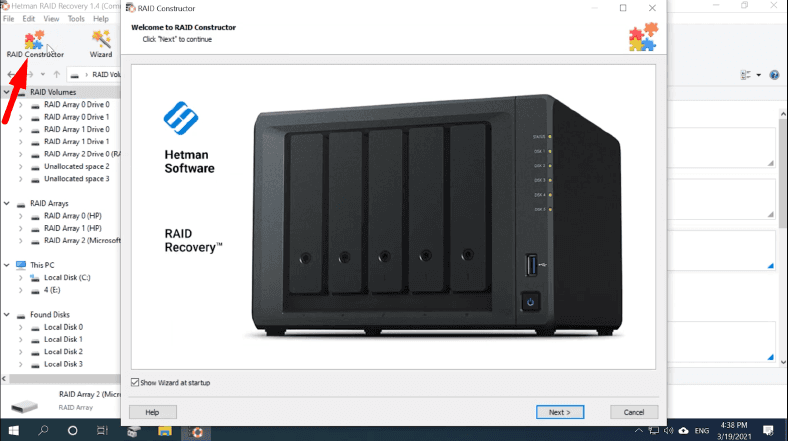
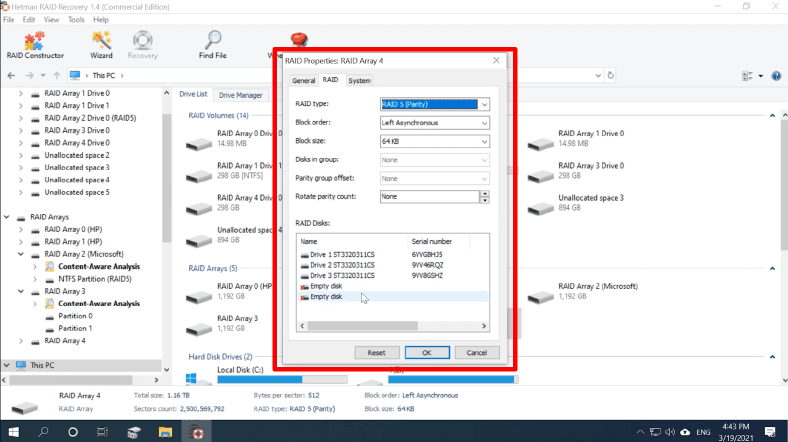
Select Manual Mode – click “Next,” and specify the properties used when creating this RAID 5. Give the array type, its size, order of blocks, and select the drives that were included into the array, and make sure you specify the order in which they were arranged.
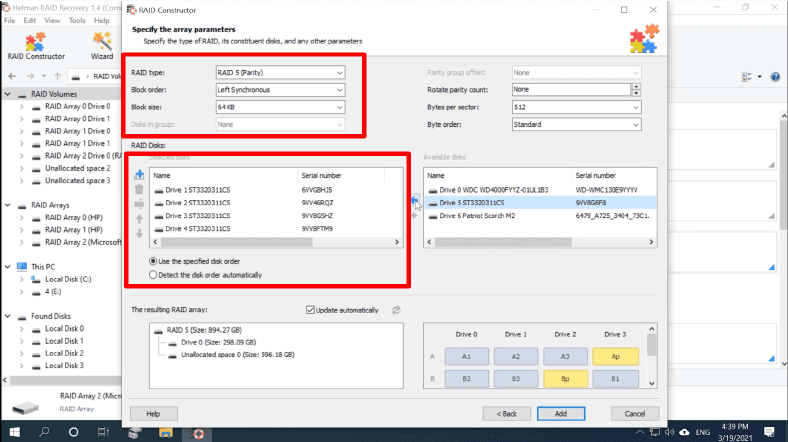
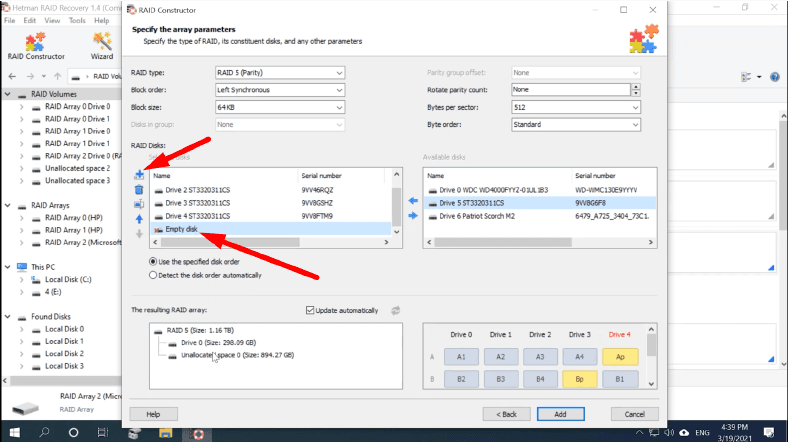
Fill the missing positions with empty drives by clicking on the plus button.
After you’ve filled in all the properties you know, click “Next.” Now the rebuilt array will be displayed in the Drive Manager.
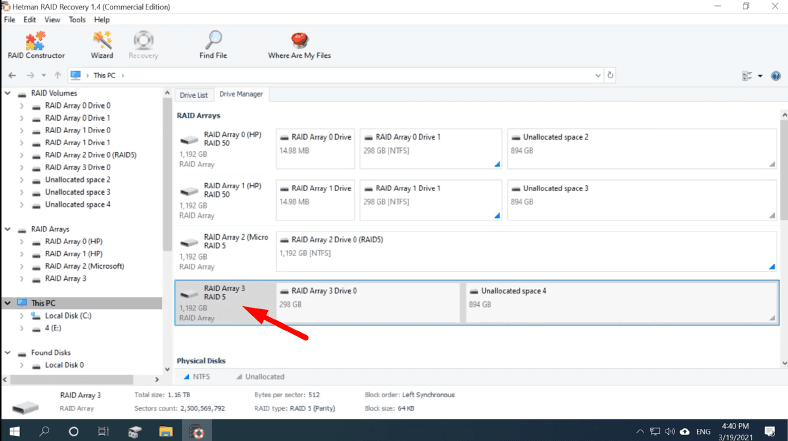
Right-click on the icon to start the scan. After that, follow the steps described above: select the files and folders to be recovered, and click “Recovery”.
Even if several disks within this RAID5 are damaged, the program is still capable of recovering its data. There is one thing to be considered, though: losing more than one disk is critical for this RAID type, and that is why some data can be damaged.
In fact, the maximal number of disks that can be missing is determined by the types of resiliency supported by Storage Spaces RAID, and they are as follows:
- Simple resiliency (stripe) require all disks to be available,
- Two-way mirror and parity types can compensate the absence of one disk,
- Three-way mirror types can keep on working even if they lose two disks at the same time.
Conclusion
If more disks are missing than the storage configuration can handle, the files can be damaged or inaccessible due to lack of redundancy data. In this case, recovering all and every lost file is very difficult. Your best precaution against massive data loss is to back up important data regularly, so keep that in mind.


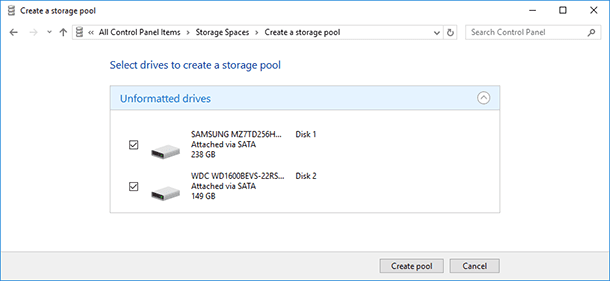
The information about availability of every storage space is only available at the cluster node, where the cluster resource for the storage space is in an operable condition. Use the high-availability (failover) cluster management to find out which node has online resources for a storage space. After that, use the Storage pool section of the File and Storage Services role in the Server Manager to view the status of a corresponding storage space.
You can also use the cmdlet Get-VirtualDisk on a node with online cluster resource to get the properties of a storage space. The failover state of a storage space is displayed in the storage space properties. To view the operational state of a disk pool, use the cmdlet Get-StoragePool at the cluster node, where the cluster resource for the storage space is in an operable condition.
Storage spaces record the information about pools and storage spaces on physical disks that make up the disk pool. This way, your pool and storage spaces are preserved when the whole disk pool and its physical disks are moved from one computer to another.
Windows Server 2012 starts the storage, which can potentially be used together with the cluster, in a safe mode. For storage spaces, it means that when Windows gets connected to the disk pool for the first time, the pool is started as read-only, and the storage spaces are started as disabled. In order to access your data, you need to set up the disk pool for read and write operations, and then connect the storage spaces.