Create RAID60 with IBM ServeRAID M5016 or LSI 9265-8i: Data Recovery
Ready to create RAID60 with IBM ServeRAID M5016 or LSI 9265-8i Controller? Our comprehensive guide has got you covered! Learn step-by-step instructions and expert tips for setting up RAID60 with your IBM or LSI controller. Say hello to enhanced data protection and storage performance!
- Method 1. How to create RAID60 with 8 disks in LSA (LSI Storage Authority Software)
- Method 2. How to create RAID 6 with the help of storCLI utility
- Method 3. How to create RAID60 with the controller’s webBIOS
- Data Recovery. How to recover data from RAID60
- Conclusion
- Questions and answers
- Comments
RAID 60, also known as RAID 6+0, is a disk array that unites several groups of disks and combines the double parity of RAID 6 with the striping of RAID 0. You need at least 8 disks to build this array type.
As to reliability, RAID 60 has much to offer as this array type provides you with double redundancy, and can survive losing two disks in each group. However, it is still possible to lose data even from this kind of disk array.
| Characteristic | Description |
|---|---|
| Array Type | Combination of RAID 6 and RAID 0 (double mirroring and striping). |
| Number of Disks | Minimum 8 disks (RAID 6 in each group, plus multiple RAID 0 groups). |
| Reliability | High reliability due to dual redundancy (can tolerate loss of up to 2 disks in each RAID 6 group). |
| Performance | High performance thanks to parallel operation of multiple RAID 6 groups. |
| Scalability | Scales well by adding new disk groups. |
| Advantages | Provides a balance between performance and reliability for large data arrays. |
| Disadvantages | High cost and complexity due to the large number of disks and configuration difficulties. |

💿 RAID60 Based on IBM ServeRAID M5016 or LSI 9265-8i Controller. Recovering Data from RAID60 💿
Method 1. How to create RAID60 with 8 disks in LSA (LSI Storage Authority Software)
The abbreviation LSA stands for LSI Storage Authority Software – a web application that allows you to monitor and fix problems with disk storage systems as well as create and manage various RAID configurations based on LSI/Avago controllers.
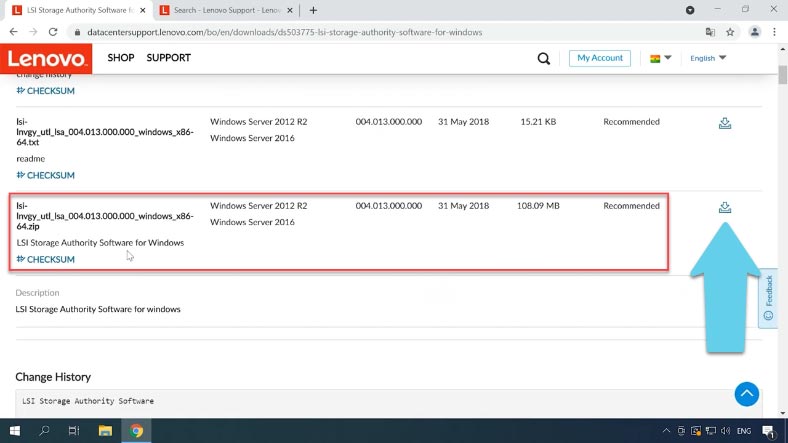
To download the latest version of the program, visit the official website. Open the Downloads tab and get the version for the operating system you are using, i choose a version for Windows.
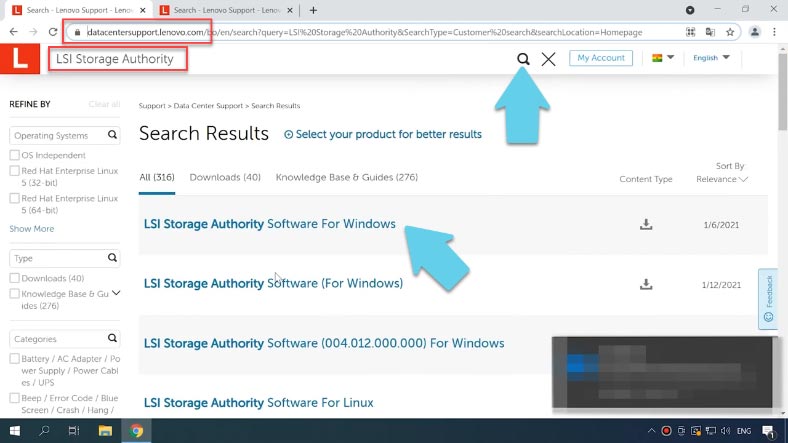
Click the download icon next to the .zip archive. Extract the files to any convenient directory and start the installation. You don’t have to fill in the customer information.
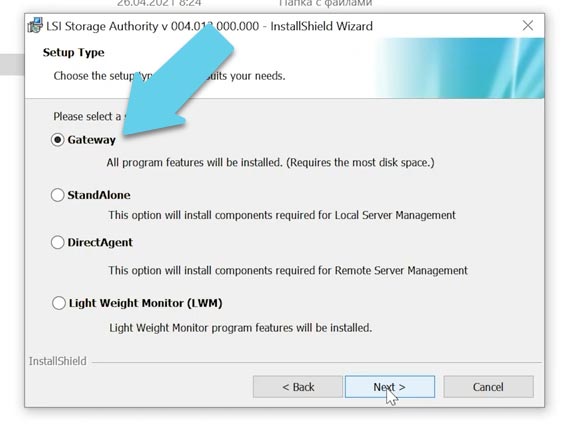
Now you are suggested to select a setup type, and you have several options to choose from: select Gateway to have all program features installed.
You can change the ports if necessary, but I leave them at default settings. Now it’s time to configure some properties.
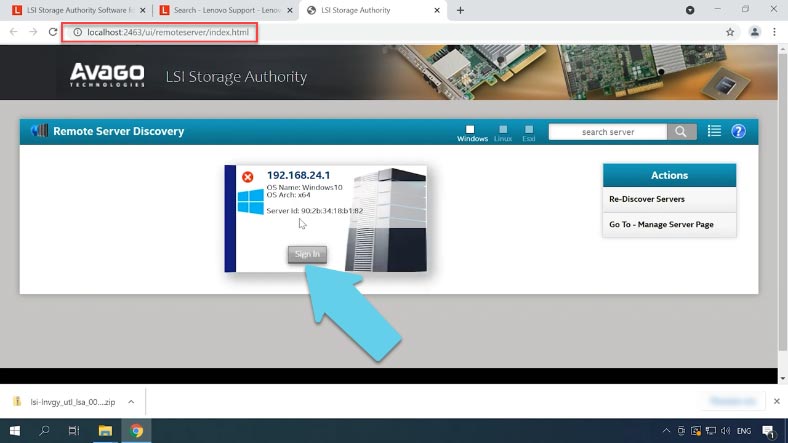
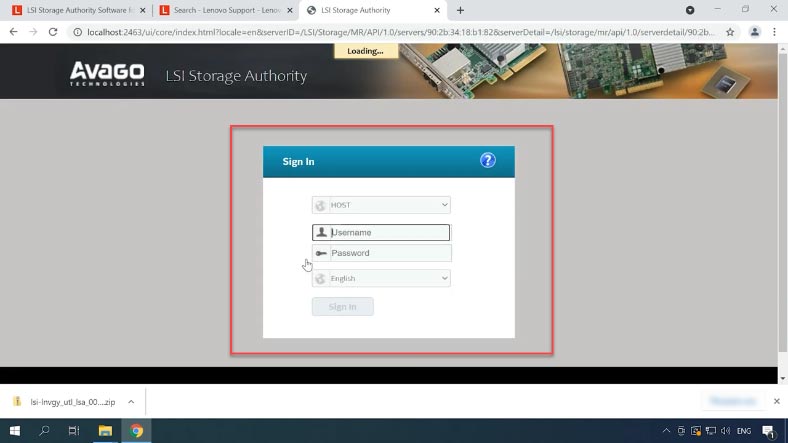
When the installation is complete, the program’s shortcut will appear on your desktop. When you start the program, it will open in the browser. Click “Sign in” here, and give the login and password to your Windows account.
Type the login in Latin letters to avoid any issues.
After sign-in, you’ll see the controller management screen. In the field Select controller choose the controller to use.
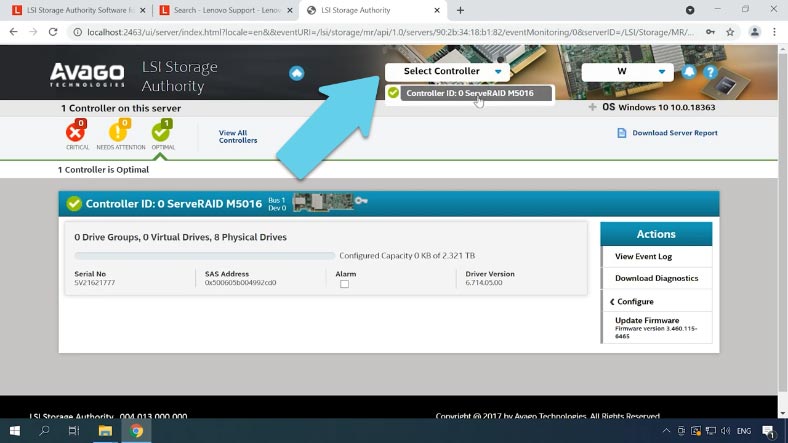
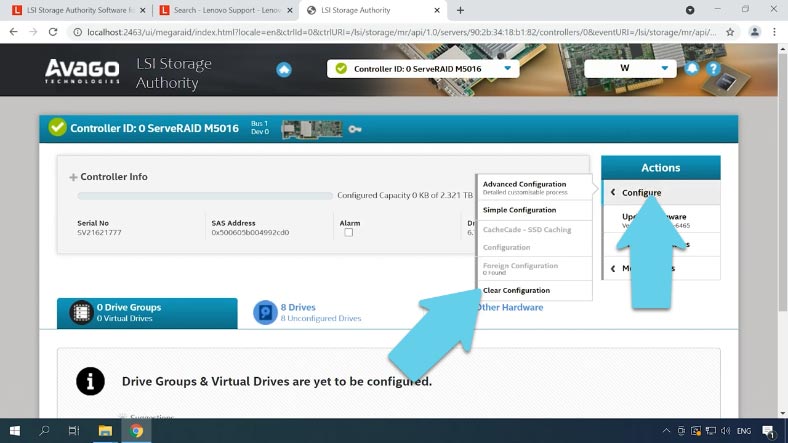
To create a new array, open the Configure option. If you already have a previously built RAID, delete it by clearing the configuration – just click on the Clear Configure button, check the confirmation box and click “Yes”.
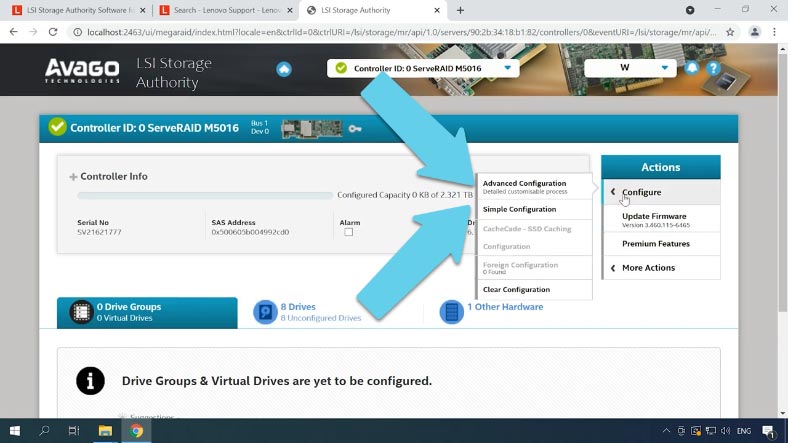
Then click “Configure” again and select the configuration method: Advanced – where you can specify all additional settings, or Simple– where some things will be set to default. I choose the first option.
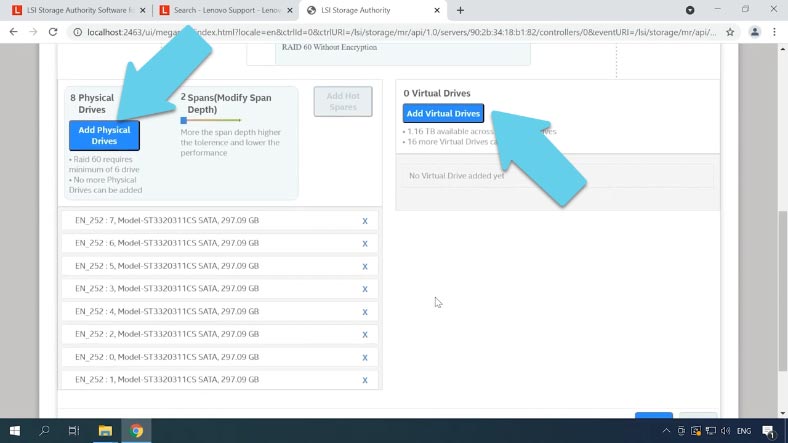
In the next tab, specify the RAID level, then add the drives it is going to consist of, and add a virtual drive.
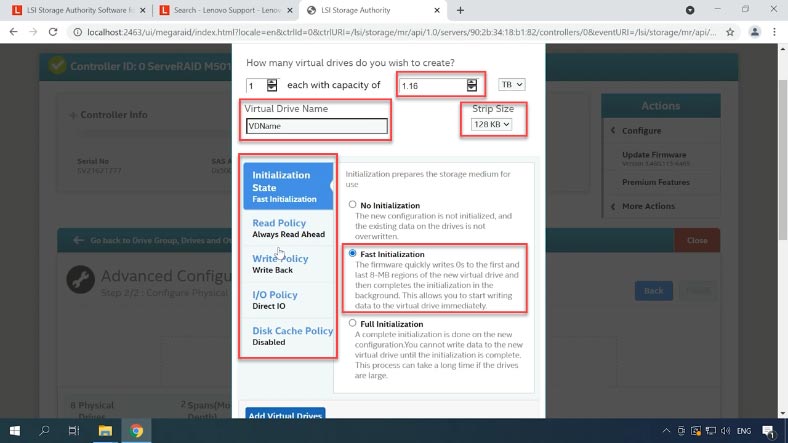
Specify the capacity, name and strip size, then select the initialization method, read and write policy, cache policy and other settings. Then click the button “Add Virtual Drive” and “Finish” to complete the process. After some time, the RAID will be created.
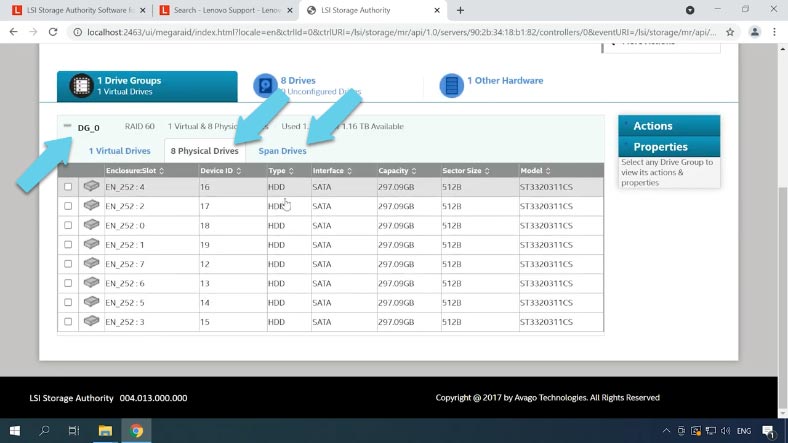
In the tabs, you can see its information, disk status and so on.
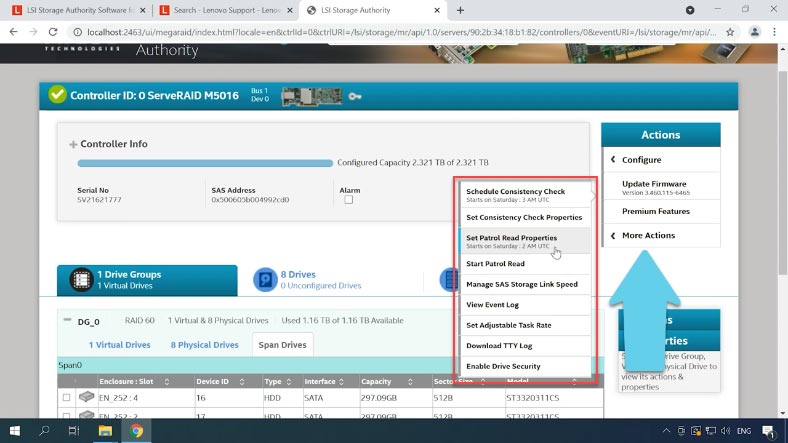
When you click “More Actions,” you’ll be able to schedule a consistency check, configure notifications, add hot swap disks and do many other things.
Method 2. How to create RAID 6 with the help of storCLI utility
Another way to create a disk array on this type of controller is by using the console-based utility StorCLI.
StorCLI is a command prompt tool that lets you change any settings for LSI/Avago RAID controllers – that is, you can use it for the same things as the LSA utility: Create, modify and manage RAID systems.
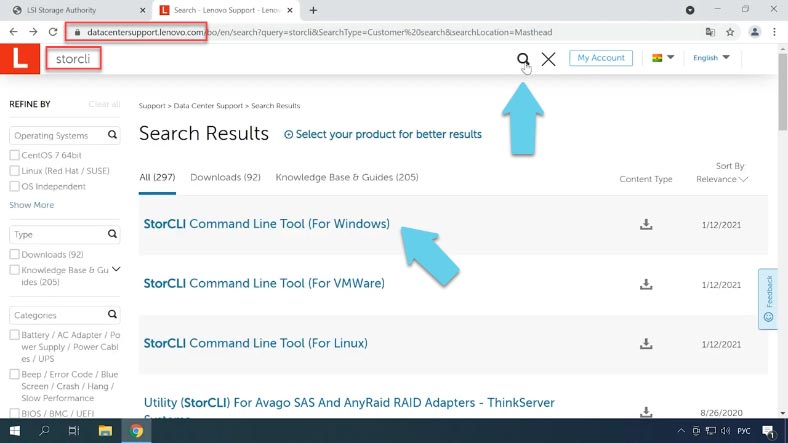
The program can be downloaded from the official website – just type the name in the search field and download the version you need.
Extract the files from the archive. To start the program, open the Command Prompt as administrator and go to the folder containing the program: do it by typing “cd” and copying the path to the directory that contains the necessary version of this utility.
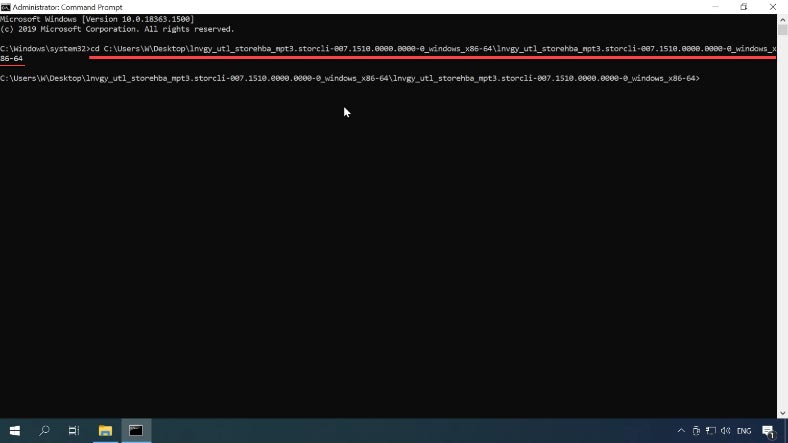
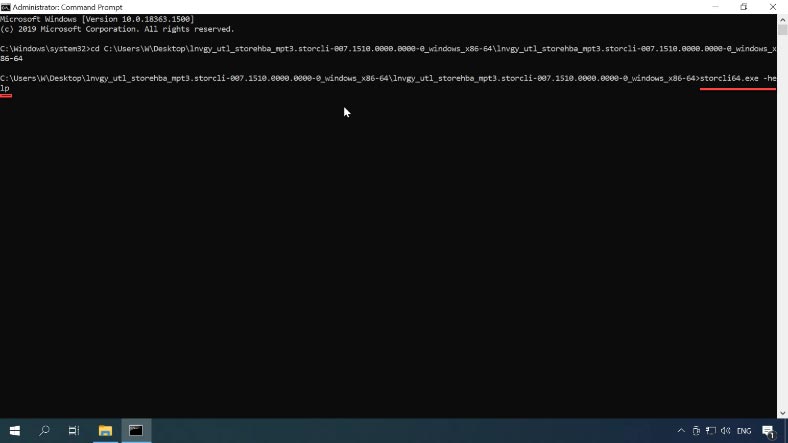
Run the help command to check how the program works:
storcli64.exe –help
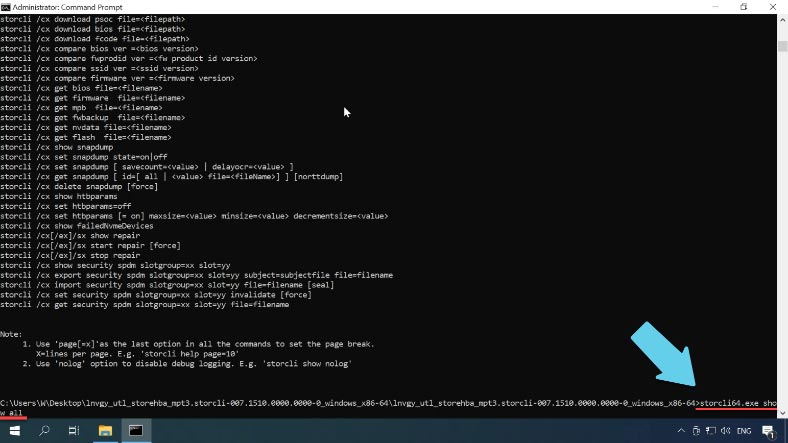
Now we need to make sure that the program can recognize the controller; to display the controller information type the following command:
storcli64.exe show all
Now, we can view the list of disks connected to this controller, and all you need is one command:
storcli64.exe /c0 /eall /sall show
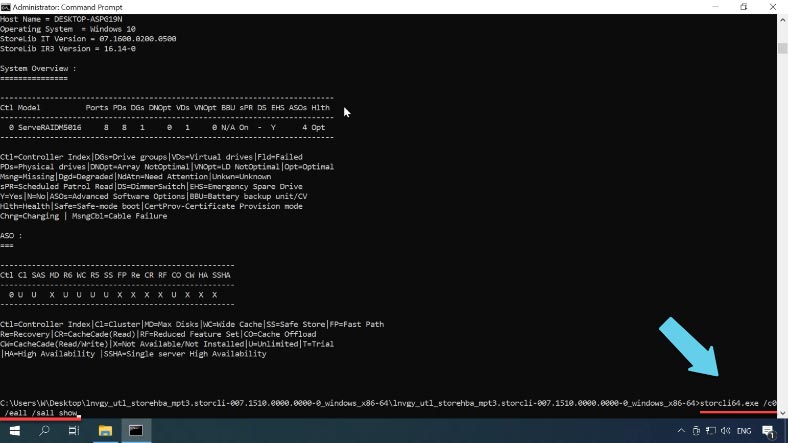
Wich displays their status here.
To make sure they aren’t united into a RAID system, run one more command:
storcli64.exe /c0 /vall show
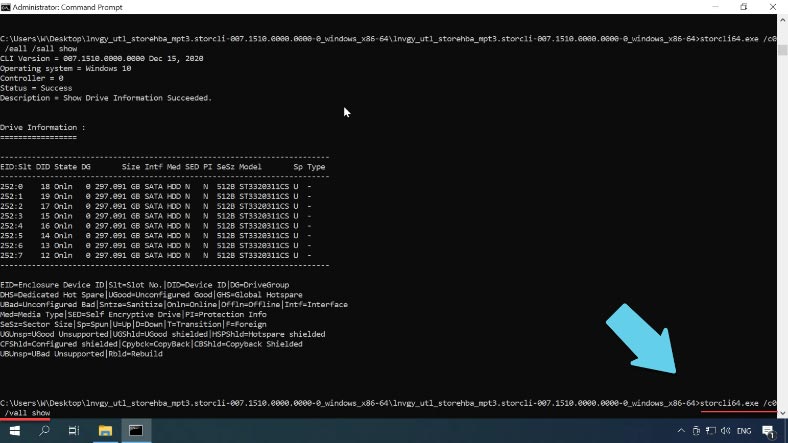
It displays the information about virtual disks.
If you add the element “all” at the end of the command, you will see more detailed information, such as the composition of the virtual drive, cache settings, strip size etc.
storcli64.exe /c0 /vall show all
To remove a virtual disk, type this command:
storcli64.exe /c0 /v60 del force
where v60 is the name of the virtual disk.
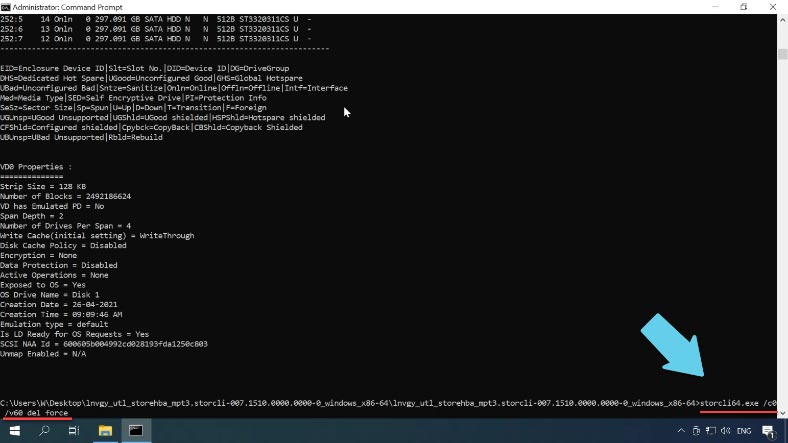
To make sure that the RAID system has been removed, run the command to display virtual disks one more time:
storcli64.exe /c0 /vall show
Now that the array which we don’t need is removed, let’s start building a RAID60 system.
To set the ball rolling, type this command:
storcli64.exe /c0 add vd r60 Size=all name=RAID60 drives=252: 0-7pdperarray=4 pdcache=on direct wt nora strip=128
or
storcli64.exe /c0 add vd r60 Size=all name=RAID60 drives=252: 0-7 pdperarray=4
Where:
- vd is the virtual disk to be created;
- r sets the array level;
- size sets the space to be used, and I selected all the free space;
- name is used to assign a name to this array;
- drives indicates the drives to be used in building this RAID system, and in my case, it is from 0 to 7, a total of 8 drives;
- pdperarray determines the number of physical disks per one array; in my case with RAID60, I set two groups of 4 disks each.
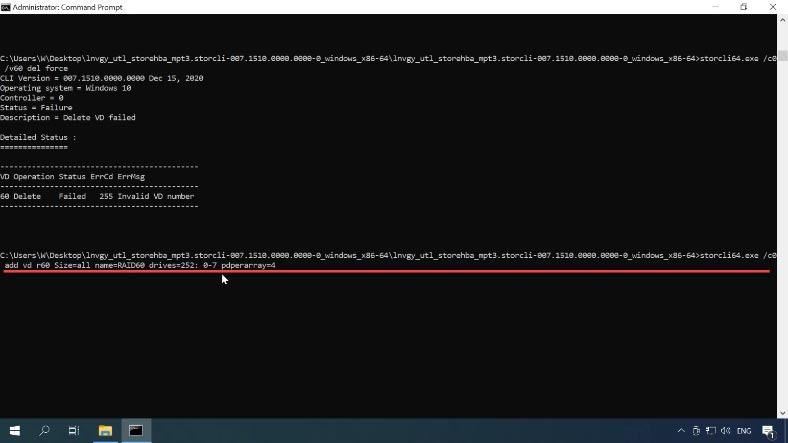
This information is sufficient to create the array. You can add some advanced settings if necessary:
- Enable write caching for the disks – pdcache (and specify on/off).
- WT read and write policy, NRA, strip size and so on, otherwise these advanced settings will have default options.
Now check the information on the virtual disk: as you can see, the array has been created successfully, and you can use the previously described utility to manage it.
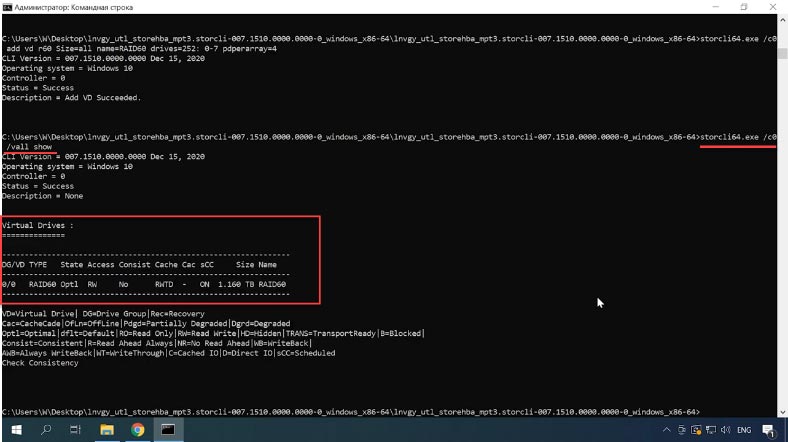
Method 3. How to create RAID60 with the controller’s webBIOS
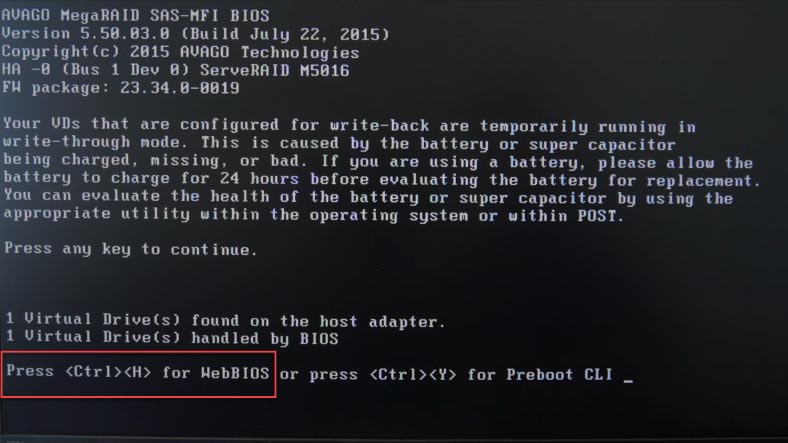
One more way to build a RAID system on an LSI controller involves using the controller’s webBIOS. To access it, press the corresponding key shortcut while the computer is booting: in my case, this is Ctrl + H. If this operation doesn’t boot webBIOS, but the operating system is booting instead, then try again, but before that, disable the boot disk in the BIOS of your motherboard.
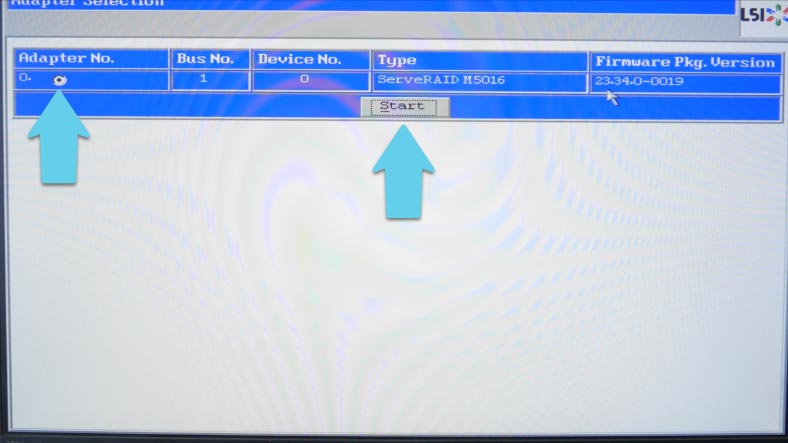
The first screen will show you the list of detected controllers (if you have more than one), select the controller you want to use and click "Start".
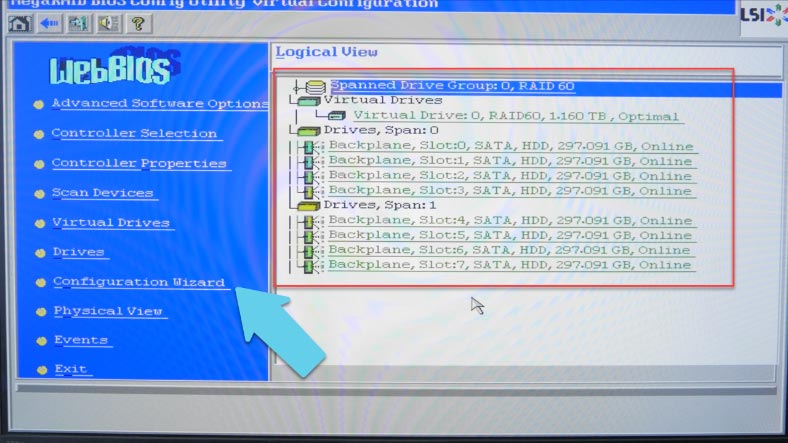
In the next window, you’ll see all drives connected to the controller. To build a RAID system, open the line Configuration Wizard.
If you used to have an array made of these drives, the system will warn you that it is going to be lost
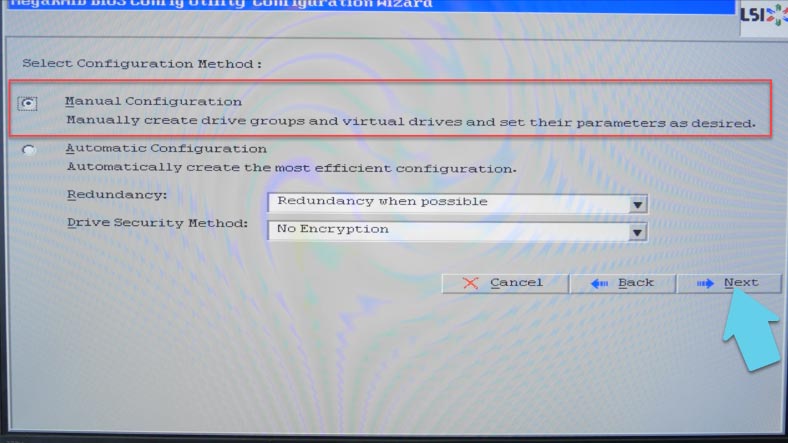
Click “Yes” to confirm. Now choose “Manual configuration” and click “Next”.
At the next stage, select the drives for the future array, and click “Add to Array”.
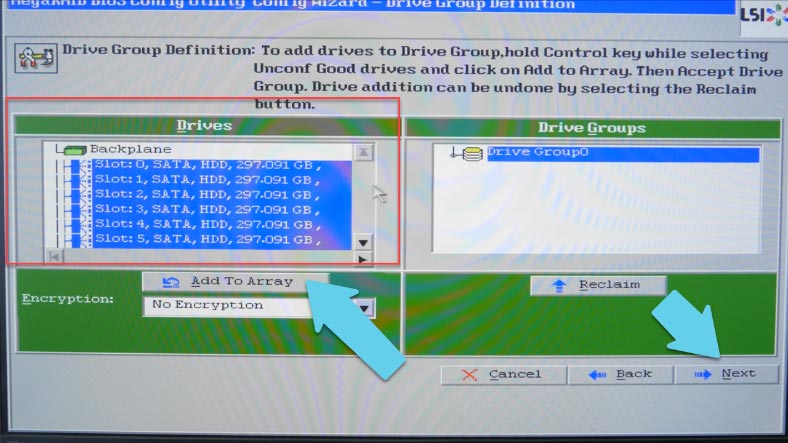
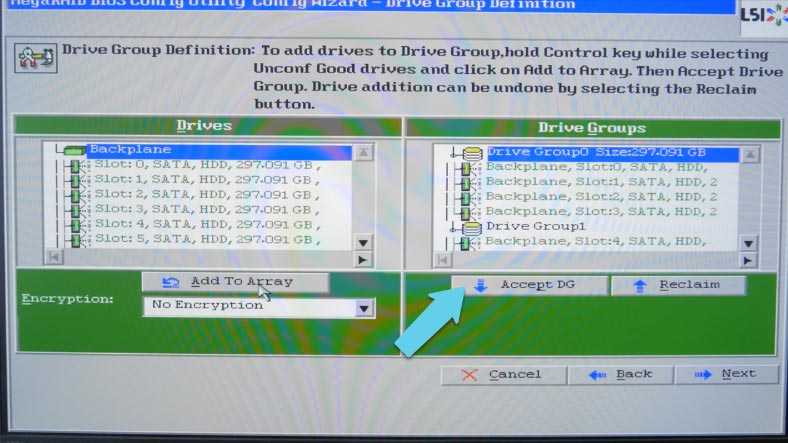
If you select all drives and add them into a group, you’ll be able to create RAID 6, 5, 1 or 0. In order to have RAID 10, 50 or 60 you have to create several groups of drives, as such array types are based on using groups of drives rather than individual drives. In my case, the plan is to create a RAID 60 system consisting of 8 drives, so I select the first 4 drives, and then click Add and Accept DG (DG stands for Drive Group). After that, I select the remaining 4 drives, click Add and Accept DG, then click “Next.”
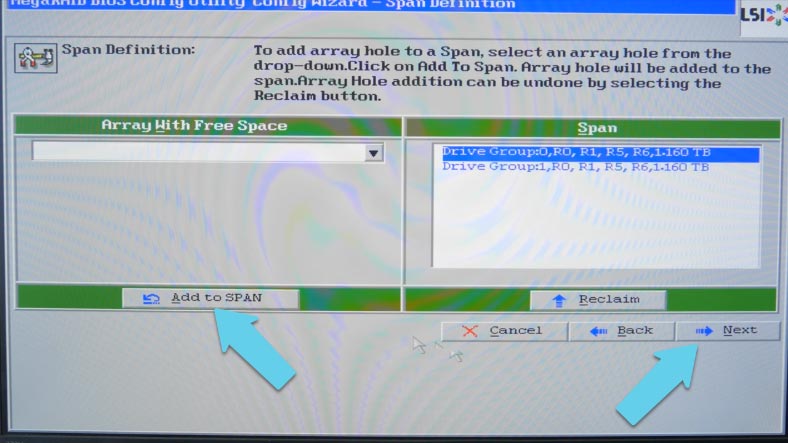
In the next window, click “Add to SPAN,” add the drive groups we have just created, and click “Next” to continue.
Now you can see what RAID levels are available: 60, 50, 10 and 00, so select the necessary one from this list.
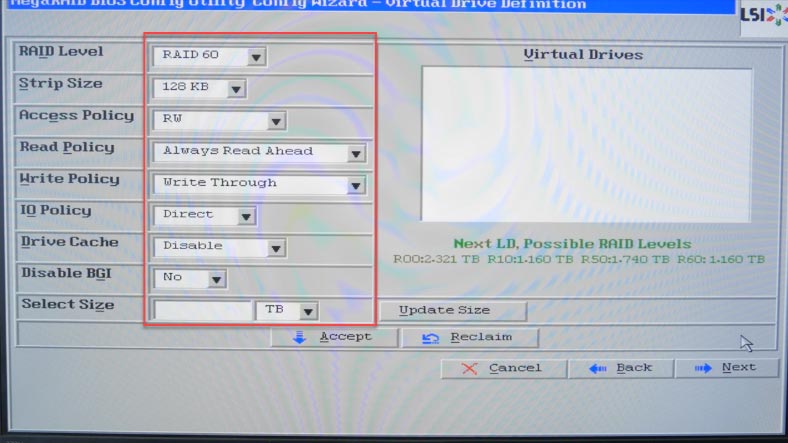
If necessary, you can modify other settings, such as strip size, read and write policy, and so on. In the end, set the size of the future array - I select all available capacity. Then click “Accept” to confirm your decision, and then “Yes”. Click “Next”, then “Accept” again, and then “Yes” to save the configuration.
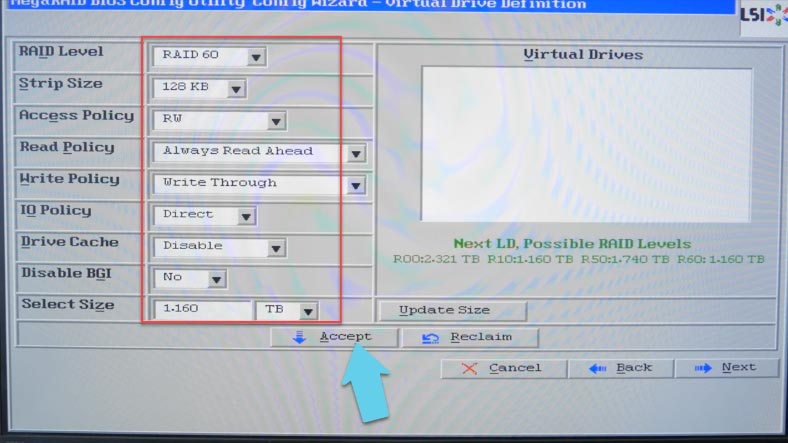
The program will warn you that all data will be lost, and ask you to confirm the start of initialization. Click “Yes” to agree. Go back to the main menu and restart the computer. If you want to boot from this device, don’t forget to check the box next to “Set Boot Drive”.
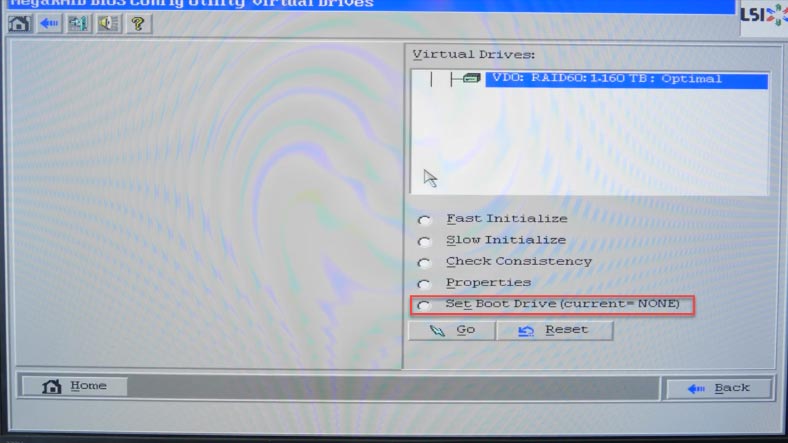
If the whole system is supposed to boot from another disk which was disabled before starting the controller’s web BIOS, open the BIOS of your motherboard and enable that disk again.
After the operating system boots, you should format the array in the Disk Management, so that it will appear in Windows Explorer. Create a new volume and wait until the format operation is complete. Now it is displayed in the Explorer window properly.
Data Recovery. How to recover data from RAID60
If you accidentally deleted information from your RAID array, lost data because of wrong configuration, or if your controller, hard disk or any other equipment broke down, and now you cannot copy your information, then use a specialized tool to recover data from RAID systems.
Hetman RAID Recovery will help you bring back the lost data from damaged disk arrays. Working with the storage system, it reads all the information about the controller, the motherboard, or the software used to create a disk array, and then rebuilds the damaged RAID to let you copy the remaining data.
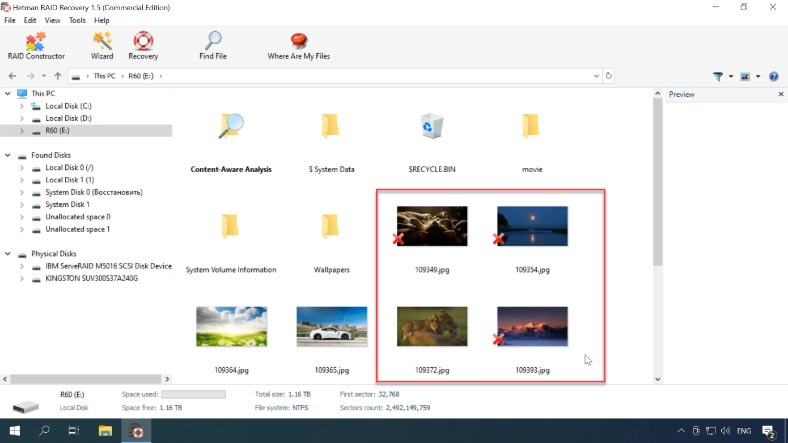
If you accidentally removed any data from a RAID system, just run this program, scan the drive, and then recover the files you need. Removed elements are marked with a red cross.
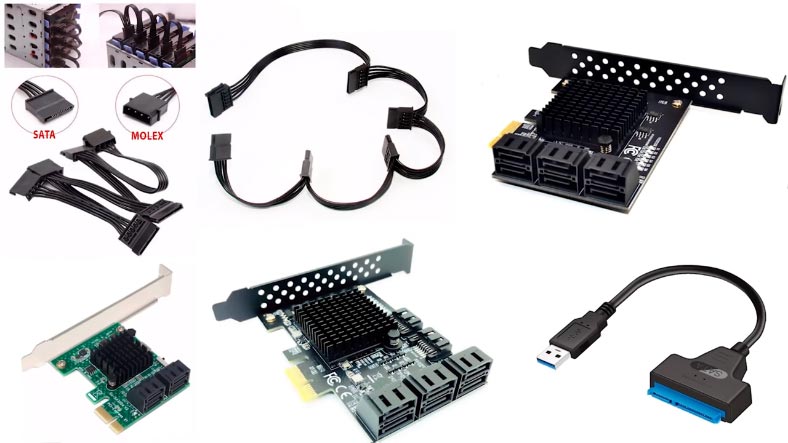
If your problem is caused by a controller failure, you’ll have to connect the disks directly to the motherboard and launch the program. If you have a number of drives to connect, you may have difficulties with having less SATA ports and power connectors than you need. This can be fixed with special cards and cables that help you increase the number of ports and connectors.
If you cannot connect all the drives but you have enough free space, you can copy images of the drives, mount them in the program and then recover the data from these images. As you can guess, our program supports such operations as well.
All you need to use this method is one free SATA port and a hard disk power connector. Connect one of the drives, boot the operating system and start the program.
Open the Tools tab - click Save Disk, specify where to save it, click Save, and remember that we need all of its size, so make sure that the option “Full” is selected.
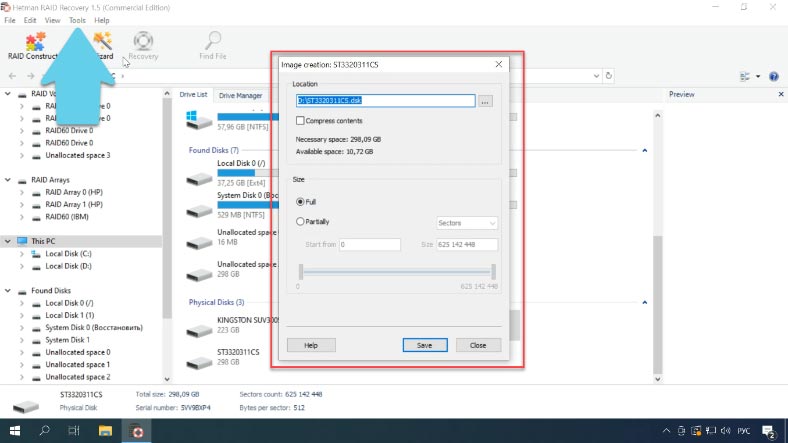
When the save operation is complete, repeat the procedure for each of the drives that your array consisted of. When all the images are saved, upload them to the program.
To mount a disk image, open the Tools tab - select Mount Disk - specify the path to the image file, select it and click “Open”. The disk will appear in the program. This way, you can have all disks mounted.
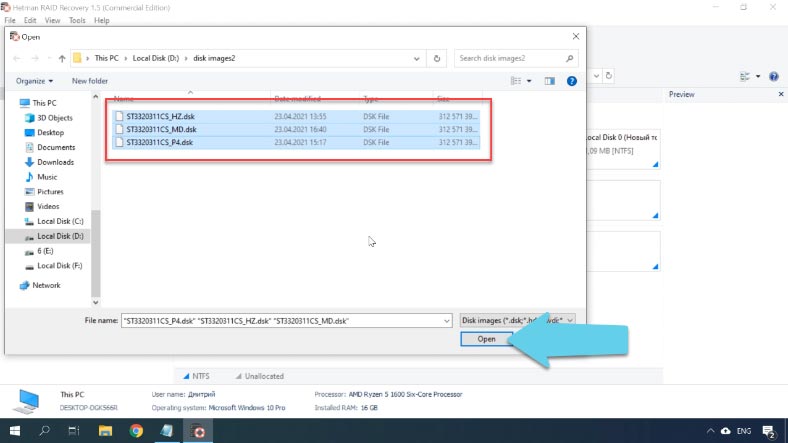
However, in the case with mounted disks the program may fail to build the damaged RAID automatically, so then you’ll have to use the RAID Constructor.
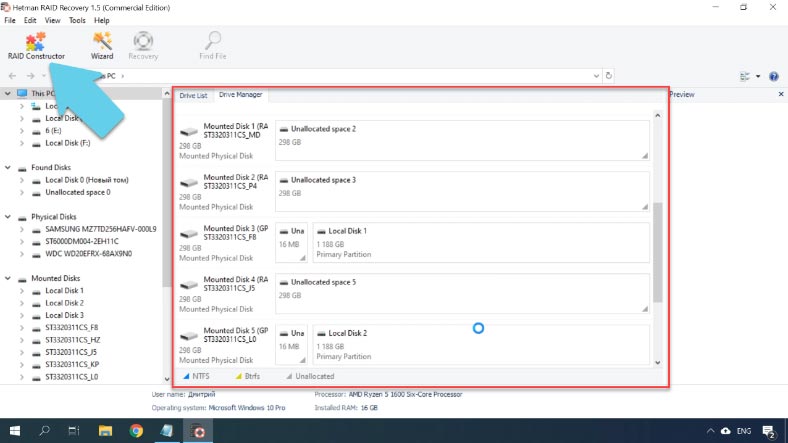
Start the RAID Constructor, click Next, select Manual mode, and click Next again. Now you have to specify all the information about this RAID system.
Select its type, specify the block order and size, and give the number of drive groups if your RAID consisted of more than one group. Then add the drives and specify their order, while replacing damaged drives with empty drives. When you specify all the properties you know, click Add and the array will appear in the Drive Manager.
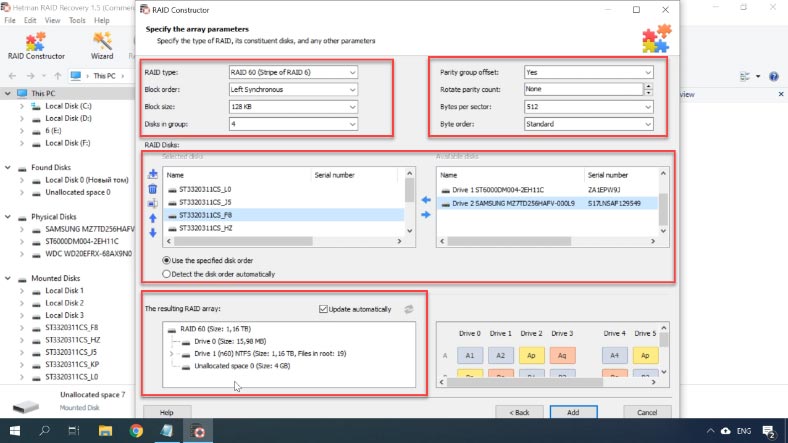
Now the program can recognize the RAID system, its capacity and other information. Now all you have to do is to scan it and recover data.
Right-click on the array, select Open and start with a Fast scan, if the program failed to find the necessary files, run Full analysis instead. Now the program has found all the data still remaining on this RAID.
Select the files to be restored, click Recovery, choose where to save them, then click Recovery again. When the entire process is over, you will find the recovered files in the folder you have chosen.
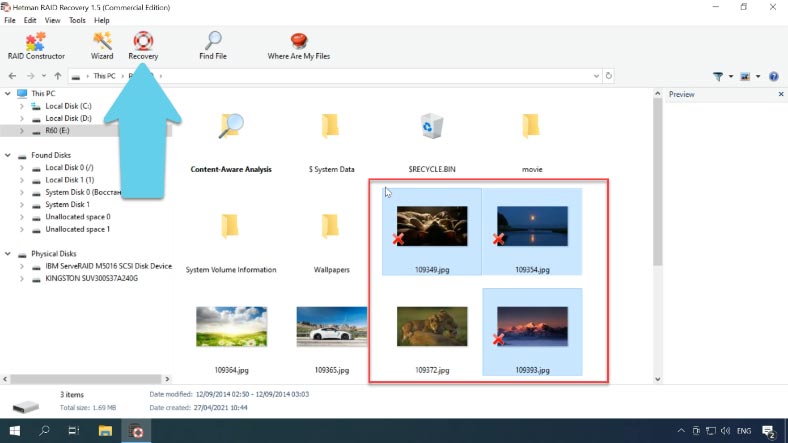
The program can display the data even if several disks are missing. This is RAID60, so the files will remain intact even if two disks in each group are down.
Conclusion
Usually, RAID60 servers are extremely reliable and offer you convenient backup options. However, just as with any RAID configuration, you can’t totally exclude the chances for data loss. A hardware failure, a controller error, software glitches and so on - all of them may result in losing important information. But if you choose the right utility for recovery, you’ll be able to restore the lost data quickly and safely, to save your time for searching and recovering the files.


