Recycle Bin File Recovery: Can You Recover Files After Emptying the Recycle Bin?
Lost important files after accidentally deleting and emptying the Recycle Bin? In this article, we uncover the methods to recover files after deleting and emptying the Recycle Bin. Our experts share valuable insights, tips, and solutions to help you retrieve those crucial files. Whether it’s documents, photos, videos, or other data, we’ve got you covered. Learn how to rescue your valuable data!
How can I get the files back from the Windows Recycle Bin? I accidentally deleted some files and want to bring them back, what should I do? Can I recover my files deleted permanently? Quite often, users delete their files by mistake and wonder how to restore them from the Windows Recycle Bin, and what to do if the files are no longer there. In this article, we will try to answer such questions and offer possible ways to recover deleted data.
- What is the Recycle Bin in Windows?
- How to Configure the Recycle Bin?
- Different Ways to Delete Files and the Recycle Bin
- Three Methods to Recover Deleted Files from the Recycle Bin
- Conclusion
- Questions and answers
- Comments
What is the Recycle Bin in Windows?
To understand the possible ways of restoring files from the Windows Recycle Bin or after it is emptied, we should first have a look at the notion of such Recycle Bin.
As an operating system tool, the Windows Recycle Bin is an element of the graphical interface that represents a system-allocated area of the disk space reserved by the operating system to delete and temporarily store deleted user data before such data is permanently erased. It can have various internal settings to manage the reserved space and the ways of storing data.
In all versions of this operating system, the Windows Recycle Bin is located in the main root directory and is a hidden system folder which prevent access by inexperienced users and saves them from actions that could bring undesired consequences.
After files are deleted, they are moved to the area occupied by the Windows Recycle Bin and are kept there until certain conditions are met. Also, deleted files can be restored or erased completely depending on the properties configuration.
The Windows Recycle Bin offers a safe temporary storage for all deleted files and folders. When you delete an element from the hard disk of a desktop or laptop computer, the Windows operating system places it into the Recycle Bin and its icon type changes from empty to full.
If you have several hard disks, partitions, or an external hard disk connected to your computer, each of them will have its own bin, $ Recycle.Bin, and settings. Removable disks such as USB drives and memory cards do not have Windows Recycle Bin. That’s why files deleted from removable data storage devices are deleted permanently at once.
The Windows Recycle Bin will store the deleted files until the disk space occupied by them reaches the maximal limit set for the Windows Recycle Bin. When it happens, the Windows Recycle Bin will automatically remove the old (previously deleted) files from there to free some space for new files deleted only recently.
If you use keeping all your deleted files in the Windows Recycle Bin as a protective measure, you can increase the maximal size of the disk space reserved for its needs, and set your own limit to how much disk space the Recycle Bin is allowed to take.
We will go into detail of the Windows Recycle Bin settings in the next part of this article.
| Characteristic | Description |
|---|---|
| Purpose | Temporary storage of deleted files until their final removal from the system |
| Capacity | Up to 10% of each drive’s total capacity or a user-defined size |
| Recovery capability | Files can be restored to their original location unless they were permanently deleted |
| Permanent deletion | Files can be permanently deleted manually or automatically when the Recycle Bin is full |
| Support for various data types | Ability to delete and store any files except system and critical files |
| Settings | The user can configure the Recycle Bin’s size or select the option “Do not move files to the Recycle Bin” |
| Permanent deletion bypassing Recycle Bin | Ability to delete files without moving them to the Recycle Bin by using the Shift + Delete combination |

🧺 How to Recover Files and Folders After Sending Them to the Recycle Bin and Deleting? (Windows 11)
How to Configure the Recycle Bin?
Configuring internal option of the Windows Recycle Bin is quite easy and doesn’t take much time. It is mostly reduced to configuring the two options: setting the maximal size of the disk space allocated to manage deleted files, and dealing with the instant delete option.
Usually the Windows Recycle Bin has a desktop shortcut created when the operating system was installed. To access the settings window, click on the Windows Recycle Bin shortcut and open the context menu. From the list of possible actions, select Properties.

If there is no shortcut for the Windows Recycle Bin on the desktop (you might have changed settings when installing the operating system), then follow this sequence of actions to have the shortcut displayed again. It can be done in several ways. For example, right-click on an empty area on the desktop and open a context menu, then select Personalize from the list.
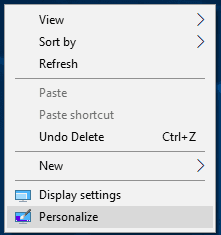
Settings, the main app for all options of the operating system will open in the Personalization page. In the left panel, go to the Themes section, and in the right panel, use the scroll bar to go down the page and find the section Related settings. Now click on the text link Desktop icon settings.
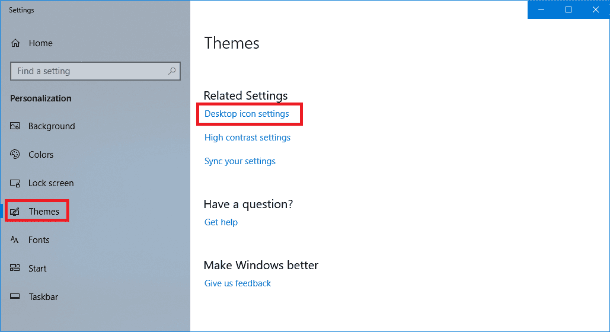
The corresponding settings window will open; in the section Desktop Icons check the box next to Recycle Bin to make the Windows Recycle Bin icon be displayed on the desktop. Then click Apply and OK to save the changes you have made.
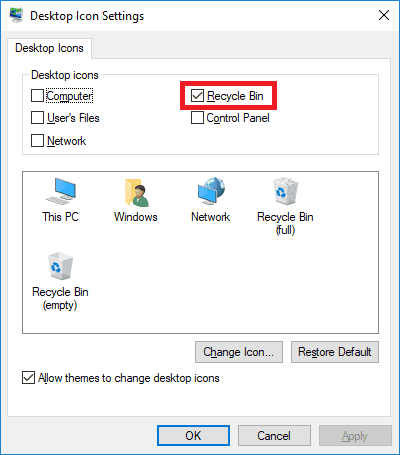
In the window Recycle Bin Properties choose the location of the Windows Recycle Bin (for example, Local Disk С:) for which you want to change the maximal size.
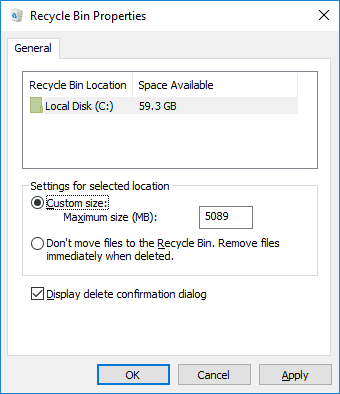
In the section Settings for selected location check the option next to the cell Custom size: Maximum size (MB): In the corresponding cell, enter the value for the amount of disk space (1024 MB = 1 GB) you would like to allocate for the needs of the Recycle Bin. Then click Apply and OK to save the changes you have made to the size of the Windows Recycle Bin.
Note: Usually the maximal default size of the storage space for the Windows Recycle Bin should be about 5 percent of the disk free space.
You can change the maximal size for the Windows Recycle Bin for all local disks shown in the properties window. Select the necessary disk and repeat the procedure to change the storage space size.
If for some reason you are not going to set the final size for the Windows Recycle Bin or you want to disable it (for example, you lack free disk space to keep user files), you can enable the function of deleting files permanently.
To do it, in the window Recycle Bin Properties in the section Settings for selected location and check the option Don’t move files to the Recycle Bin. Remove files immediately when deleted. Then click Apply and ОК for the changes to take effect.
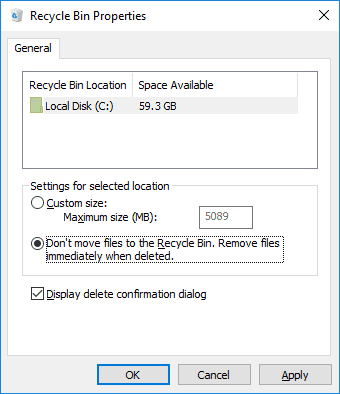
Now all files and folders you delete will miss the reserved storage space of the Windows Recycle Bin and will be erased immediately.
It means that recovering them with integrated functions of the Recycle Bin (this is what we’ll be talking about in a moment) is no longer possible.
Different Ways to Delete Files and the Recycle Bin
In the Windows operating system, there are two ways to delete files: ordinary and permanent.
In the first case, a user deletes files using the Delete button on the keyboard, or from the Windows File Explorer using the context menu. If the Windows Recycle Bin is configured to store deleted files and has a certain reserved size, then all files are moved to the Bin after they are deleted. That is why the user can always rely on integrated functions of the Windows Recycle Bin if some files were deleted by mistake or if the user decides to restore them.
In the second case, when the user deletes files in another way (for example, with the key shortcut Shift + Delete or if the option to destroy files immediately after deleting is enabled in the Windows Recycle Bin properties etc), such files are erased at once. They will not be displayed in the Windows Recycle Bin and restoring them will make you use special third-party software.
You can read more about the two ways of deleting files (ordinary and permanent) in our previous article: «Files sent to The Recycle Bin: How to View, Restore or Delete Them Permanently».
Three Methods to Recover Deleted Files from the Recycle Bin

🔥 How to Recover Files Deleted From Windows Recycle Bin or With Shift + Del in 2021 ⚕️
As we have already said in our article, various methods can be used to restore files depending on how they were deleted. We will focus on the three main ways to restore deleted files that you can use as you think fit.
- Restoring deleted files from the Windows Recycle Bin to their original location.
- Recovering deleted files with freeware.
- Recovering files deleted permanently from the Windows Recycle Bin with the powerful software tool, Hetman Partition Recovery.
Below, we will describe each method and point out the possible reasons to influence your choice in every case.
Method 1. Restoring Deleted Files from the Recycle Bin to Their Original Location.
This method to restore deleted files is good if the user prefers ordinary deletion of files and folders, and the fixed size option is enabled for the Windows Recycle Bin.
Open the Windows Recycle Bin by double-clicking on its desktop icon. Otherwise, right-click on it and open a context menu. From the list of possible actions, select Open.

Select the files you’d like to restore from the list of deleted files and folders, using standard object selection methods. Right-click on the selected files and open the context menu. From the list of available actions, select the section Restore. The selected files will immediately be returned to their previous location where they were right before being deleted.
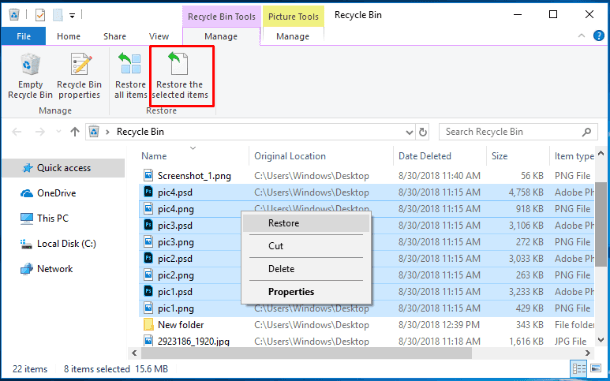
To achieve the same result, after selecting the files click on Restore the selected items button which you can find in the Recycle Bin tools tab.
If you are interested in restoring all deleted elements, click on the button Restore all items to return all deleted data to its previous location before being deleted.
Now go to the location of the restored files and folders, and open every one of them to make sure they are working properly.
Method 2. Recovering Deleted Files with Freeware.
When deleting files and folders permanently, and deleting data from USB drives and memory cards, they are erased permanently at once without getting to the Windows Recycle Bin, and recovering them with the previous method is impossible. In this case, users will have to apply other methods for data recovery. One of the possible options to restore such files is described below.

⚕️ Recovering Data from SSD After File Deletion or Disk Formatting in 2021
On the Internet, you can use search engines or consult specialized forums to find offers for free data recovery software.
Their main advantage is that they are ready to use right after the installation and they don’t make users spend a single cent.
Nevertheless, free software has a number of limitations that affect heavily the final result when recovering deleted files.
| Software Name | Operating System | Main Features | Free Version Limitations |
|---|---|---|---|
| Recuva | Windows | File recovery, data wiping, support for various file formats | The free version does not support recovery from virtual disks |
| PhotoRec | Windows, macOS, Linux | Data recovery from hard drives, CD-ROMs, and digital cameras | Command-line interface, no graphical interface |
| TestDisk | Windows, macOS, Linux | Disk partition recovery, boot sector restoration | Complex for beginners, lacks graphical interface |
Such programs can have certain limitations, or even a set of restrictions. For example, their functionality is reduced, and they miss most important functions when compared to other similar software. Moreover, free apps have strict limitations for the number of files or the total amount of data they can recover, and the percentage of recovered files good for further use is quite low, so their developers do not guarantee successful recovery of deleted files in every case.
That’s why if your goal is to recover one or several small files, you can try using freeware. However, if you’re going to recover large files or quite a long period of time has passed since you deleted the files, you should use the other method presented in the next part of the article.
Method 3. Powerful Data Recovery Software Tool
If you failed to restore files from the Windows Recycle Bin with the standard method, and freeware apps don’t give you the desired results, it’s time to choose a professional solution to recover deleted data.
There is no doubt that one of the most popular offers is Hetman Partition Recovery by Hetman Software.
The program easily recovers deleted data from various media – internal and external hard disks, USB drives, memory cards and other devices.
Using the deep analysis function, Hetman Partition Recovery finds all previously created disk partitions and recovers deleted data, presenting it to the user for further operations. With support for all main file systems used in the Windows operating system, the application corrects any mistakes in the hard disk logical structure and restores deleted contents even from inaccessible and damaged partitions regardless of the causes for data loss.
Hetman Partition Recovery is classified as shareware, i.e. the users are offered the entire powerful functionality of the program, they can recover deleted files and view contents of every one to make sure they are healthy and good for further use. The preview function allows you to see the contents of text documents, tables, databases, display all kinds of image formats, listen to sound files and even watch video files etc. Only after you have realized the files you were looking for are available and healthy after the recovery operations, you are offered to buy the key and save your data. The program has no extra limitations and may come in handy for many other days to come.
Download the installation file for Hetman Partition Recovery from the company’s official website and launch it. You will see the window of its step-by-step installation wizard, and following its directions you will easily install the application to your desktop or laptop computer.
Note: Make sure you install the program on the disk which doesn’t contain the data you are going to recover: this simple precaution will exclude the possibility of accidentally overwriting the lost data with the program’s files.
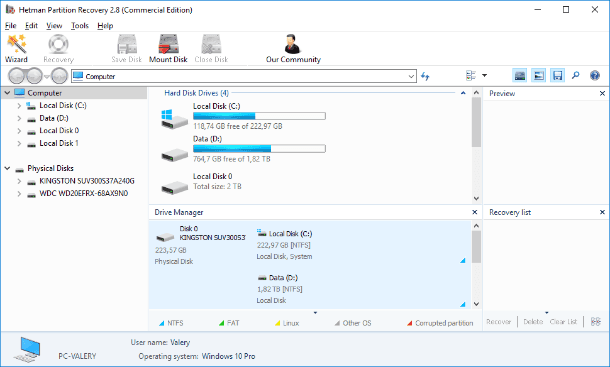
When the installation is over, run Hetman Partition Recovery. The program will scan the system for the first time and identify all data storage devices connected to the computer. The program interface is similar to that of the Windows operating system which eliminates any difficulties when using it.
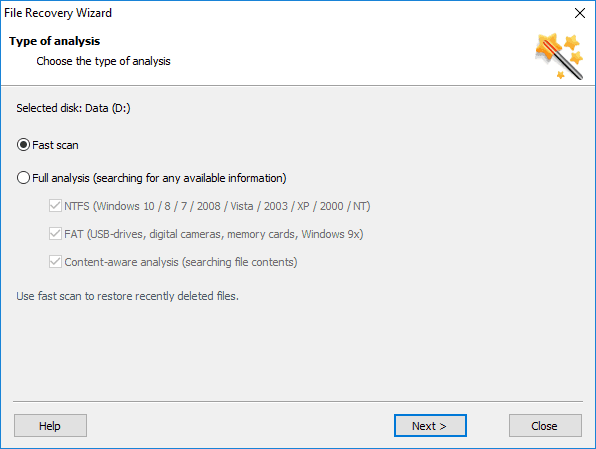
In the main window, select the partition where your deleted data used to be, and double-click on it. The program will launch the file recovery wizard and offer you to decide on the type of analysis to be used for search and recovery of the deleted files. You can choose between the two options, Fast scan or Full analysis. The first one is good for recovering files deleted just recently. With full analysis, the program will look for any information available and restore the file system of the selected partition. As a result, all files available for recovery will be brought back. Check the option you prefer and click Next to continue.
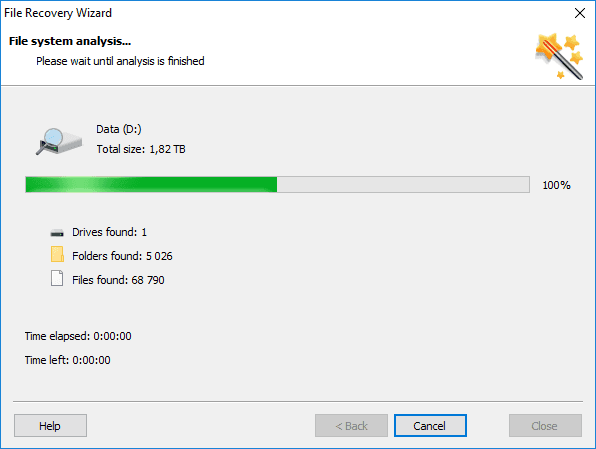
Depending on the selected option, the size of the disk and other additional settings, partition analysis may take from a few minutes to several hours. The process will be displayed in real-time mode so the user can watch the progress as it goes.
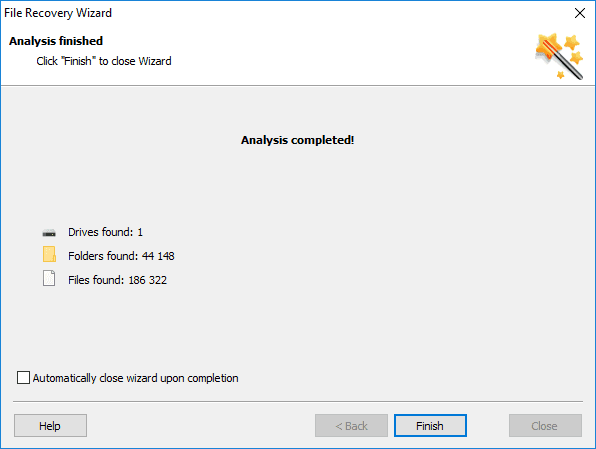
When the analysis is over, click the Finish button to see the window containing recovered files.
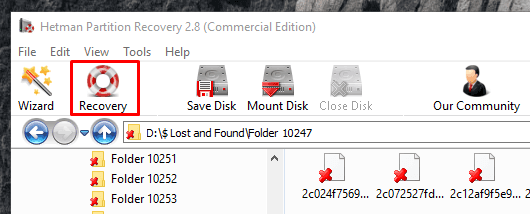
Find the files and folders you need, then click the Recovery button in the main ribbon.
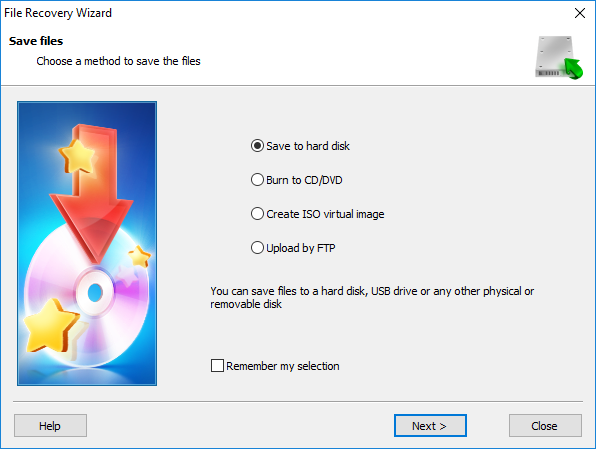
The wizard will let you choose what to do with the recovered files, with from the following variants available: to save files to the computer’s hard disk, burn them to a CD/DVD, create an ISO virtual image or upload data by FTP. Check one of the methods by setting the indicator next to it, and click Next to continue to the following page.
After that, you have to specify additional options for saving the files: for example, choose the folder where you want to save them. You can specify your own folder or stick to the default choice. Additionally, you can restore folders structure (where the files are located) to have them displayed in the same folders where they used to be before being deleted etc.
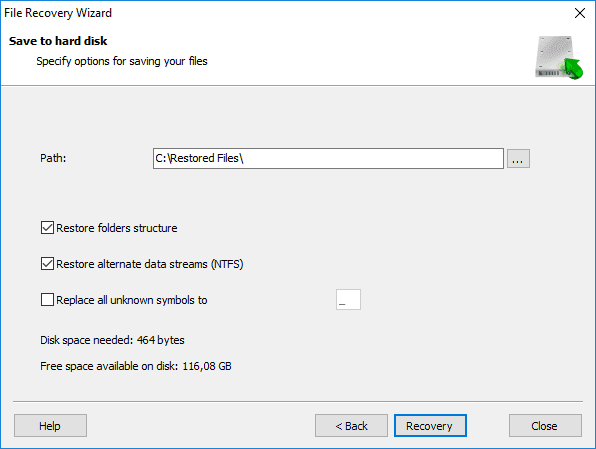
Finally, click Recovery and save your files in accordance with the settings you have specified before.
Check the saved files to make sure they are completely healthy and ready for use.
Find a full review of all functionality offered by the data recovery utility Hetman Partition Recovery in our video guide on YouTube: «How to Recover Deleted Files in 2018 With Hetman Partition Recovery Software».

🔥 How to Recover Deleted Files With Hetman Partition Recovery Software in 2021 ⚕️
Conclusion
Developers of the Windows operating system did their best to save the users from accidental mistakes and, as a consequence, from deleting files which might be very important for the users. For this purpose, they implemented a certain mechanism for control over deleted elements by introducing the Windows Recycle Bin as a buffer area before a file is finally erased from the system memory. Thanks to its internal settings, the Windows Recycle Bin can contain huge volumes of data and store it for a long time until the user is confident of their actions and empties the Bin thus erasing the data permanently.
Performing various actions in the Windows operating system, users can be sure that their files, even after deleting, will be available for recovery with internal functions of the Windows Recycle Bin – provided the Bin is configured correctly.
However, if the user files were erased after a long time or for some other reason, even then users can bring the files back with the powerful third-party data recovery software, Hetman Partition Recovery.
Using the file recovery methods that we have described in this article, users can be sure their efforts will never be wasted because of a stupid mistake or careless deletion. Any data can be recovered easily, and almost entirely.
You can learn more about methods for recovery of accidentally deleted files with integrated tools of the Windows operating system or with third-party file recovery solutions in our YouTube channel by watching the video review «Restoring a Deleted Folder from Recycle Bin, Archive or with Specialized Software».

⚕️ Restoring a Deleted Folder from Recycle Bin, Archive or with Data Recovery Software in 2021 👨💻
If you have any questions about the way for restoring files from the Windows Recycle Bin, or you have more knowledge in this area and would like to share it, leave a comment. We will respond to each one for sure.


