How to Recover Lost Data on Windows, macOS and Linux
Learn how to recover deleted, formatted, lost, damaged, and encrypted data with Partition Recovery™. This guide covers the complete recovery process: selecting the affected storage device, choosing the appropriate scan method, finding deleted files and lost or damaged partitions, previewing recoverable data, and safely saving the recovered files to another storage device.
The program can analyze HDDs, SSDs, USB drives, memory cards, physical and logical partitions, disk images, and remote block devices connected over SSH. It can recover files deleted normally or permanently, find data after formatting, analyze deleted, lost, RAW, corrupted, or inaccessible partitions, and work with supported encrypted volumes and encrypted files. The original storage is analyzed without rebuilding or modifying its file system, allowing you to scan the storage and preview recoverable files before purchasing the software. To begin, download and install Partition Recovery™ on the Windows, Linux, or macOS computer you will use to access and analyze the affected storage.
Select and Prepare the Storage Source
Choose the storage source that contains the lost data, verify its structure and condition, unlock it if necessary, or create a disk image before starting the analysis.

Select a Physical Disk or Partition
When Partition Recovery™ starts, it automatically detects the storage devices available on the computer and displays their current structure in the main window. Physical disks are shown together with their partitions and unallocated areas, while detected volumes are also available in the folder tree on the left.

How to recover video files from Hikvision DS-7608ni NVR with HikvisionFS file system
When you select a physical disk, the information panel can display its model, serial number, firmware, capacity, partition table, sector count, disk geometry, and other available hardware parameters. For supported drives, Partition Recovery™ can also read S.M.A.R.T. information, including temperature, operating hours, health indicators, and other diagnostic attributes.
When you select a logical partition, the program displays information such as its file system, total and free space, first sector, number of sectors, cluster parameters, and the physical disk on which the volume is located.
If the required partition is present and recognized correctly, select it for further analysis. If the partition has been deleted, lost, or is no longer visible in the current disk layout, select the physical disk instead. Searching for deleted and lost partitions is covered in the analysis step.
Logical Volumes and Complex Storage
Partition Recovery™ automatically detects supported logical storage structures and displays the volumes available for recovery as separate storage sources. This includes Linux LVM and LVM Thin Pool configurations, where the program can identify logical volumes without requiring you to manually reconstruct the logical storage configuration.
How to Recover Data from Proxmox: LVM, VM Disks, Ext4, and XFS
Detected logical volumes appear in the storage tree and in the main device view together with their available file system, size, layout, and other technical information. Select the required logical volume or partition and work with it in the same way as with a conventional disk or volume.
Identify and Unlock Encrypted Volumes
Partition Recovery™ automatically identifies supported encrypted volumes and displays them together with the other partitions on the selected storage device. The information panel shows the detected encryption technology and the current lock status of the volume.
BitLocker Recovery: Deleted Files, Lost Partitions, and Damaged Drives
For supported encrypted volumes, the program can display information such as the file system, volume size, encryption type, lock status, and available recovery identifiers. This includes technologies such as BitLocker, LUKS, FileVault, and other supported encryption formats.
If the volume is locked, select it and click Unlock. Provide the required password, recovery key, or other available credentials. After the volume is successfully unlocked, it becomes available for further analysis and data recovery.
Use a Fast and Stable Connection
Data recovery can require reading a large amount of data from the source device. During a Full Analysis, Partition Recovery™ may scan the entire addressable surface of a disk or partition, so the speed and stability of the connection can have a significant effect on the total recovery time.
Whenever possible, use the fastest reliable connection available. Prefer direct SATA, SAS, NVMe, or high-speed USB connections and avoid unnecessary bottlenecks such as slow USB adapters, card readers, hubs, or low-bandwidth network connections. When accessing storage over SSH, a slow or unstable network can considerably increase the time required to scan large disks.
This is especially important for multi-terabyte drives and damaged storage, where the device may need to remain connected and readable for many hours. A fast, stable connection reduces scan time and lowers the risk of interruptions during analysis.
Create a Disk Image
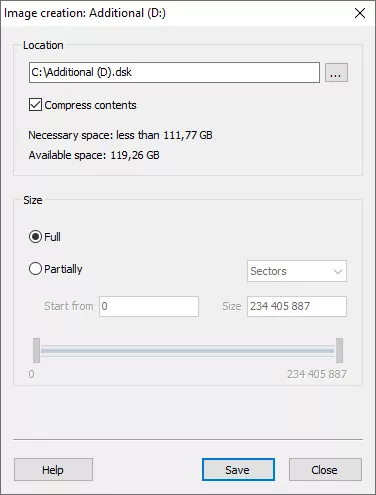
Before scanning the original storage, you can create a disk image and perform the subsequent analysis on the copy instead of repeatedly accessing the original device. To create an image, select the physical disk or partition and choose Tools – Save Disk.
You can copy the entire storage device or specify the starting offset and size when only a particular area needs to be preserved. Compression can also be enabled to reduce the amount of storage space required for the resulting image. Save the image to a different physical storage device with enough free space.
A disk image is a sector-by-sector copy of the selected disk or partition. It is especially useful when working with unstable, damaged, or failing drives that are still readable, because subsequent scanning and recovery can be performed from the image instead of repeatedly accessing the original device and placing additional load on it.
Connect or Mount a Storage Source
Mount an existing disk image or virtual machine storage, or connect to a remote computer or server over SSH when the source you need to analyze is not available as a directly connected local disk. After it is added, the storage appears under Mounted Disks and can be selected for analysis like any other available source.

Mount Standard, Forensic and Apple Disk Images
To open an existing disk image, click Mount Disk on the toolbar or select Tools – Mount Disk. Choose the corresponding image type and specify the file or folder that contains the image.
How to Open DMG, Sparseimage, Sparsebundle & CDR Images on Windows and Linux
Partition Recovery™ supports several disk image families:
- Standard disk images: RAW and DriveImage XML.
- Forensic disk images: EnCase / EWF, AFF, AFD, AFM and AFF4.
- Apple disk images: DMG, CDR, TOAST, ISO, ASIF, SparseBundle and SparseImage.
The mounting method depends on the image format. A source may be stored as a single file, a multipart image, or a directory-based image.
For multipart EWF images such as E01, S01 and Ex01, select the first segment. Partition Recovery™ automatically locates the remaining parts and combines them into a single disk. DriveImage XML images can also consist of multiple files: select the XML descriptor and the associated data parts are detected automatically.
For directory-based formats such as AFD and AFF4 folders, select the corresponding directory. For AFM, the program reads the metadata file together with its associated RAW data.
Apple disk images can also contain multiple components. SparseBundle stores its data in separate band files, while segmented DMG / UDIF images may consist of several related parts. Select the main image or first segment, and the remaining components are detected and assembled automatically.
Partition Recovery™ also supports compressed and encrypted variants of DriveImage XML, forensic, and Apple disk images. If an image is encrypted, provide the required password or key when prompted. The program then opens the resulting storage structure for further analysis.
Mount Virtual Machine Disks and Snapshots
Partition Recovery™ can open virtual disks used by the main virtualization technologies, including VMware VMDK, Hyper-V VHD/VHDX, VirtualBox VDI, Parallels HDD/HDS, and QEMU/KVM QCOW/QCOW2 and RAW-based storage. The same disk technologies are also used by server virtualization platforms such as VMware ESXi and Proxmox.

When the complete virtual machine folder is available, select the folder that contains the VM files. The program examines its contents and automatically identifies the virtual disks, auxiliary files, differencing disks and snapshots that belong to the virtual machine. If only an individual virtual disk is available, select the corresponding disk file directly.
Recovering virtual machines created in Proxmox VE (*.RAW, .VMDK, .qcow2)
Partition Recovery™ determines the virtual disk format, provisioning type and relationships between related files automatically. It can recognize fixed and dynamically allocated disks, thin and thick storage, split disks, differencing disks and snapshot chains.
The program supports both internal and external snapshots. Internal snapshots are stored inside the virtual disk image itself when the format supports this feature, for example in QCOW2. The program reads the snapshot metadata from the image and identifies the available disk states.
External snapshots are stored as separate differencing or overlay files linked to a base virtual disk. This model is used by technologies such as VMware snapshot delta disks, Hyper-V AVHDX differencing disks and QEMU/KVM external QCOW2 overlays.
When several files form a snapshot or differencing chain, Partition Recovery™ automatically determines their parent-child relationships, follows the chain back to the base disk, and reconstructs the available snapshot states as complete virtual disks ready for analysis.
For example, a Hyper-V virtual machine may contain a base VHDX disk and several related AVHDX files representing successive snapshots. The program reconstructs the chain and lets you select the required active or snapshot state instead of working with individual differencing files.
Split virtual disks are also assembled automatically. For example, a VMware VMDK descriptor and its related extent files are combined and treated as a single virtual disk. Detailed recovery procedures for individual virtualization technologies and complex snapshot chains are covered in separate guides.
Connect to a Remote Disk over SSH
If the required storage is installed in another computer, server, NAS or virtualization host, you can access it remotely without physically removing or reconnecting the disks. Select Tools – Connect via SSH.

Enter the remote host address and SSH port, then select an authentication method. Partition Recovery™ supports Password, Private key file, Private key text and SSH agent authentication.
The remote account must have permission to read the storage devices you want to analyze. Administrator on Windows, root on Unix-like systems, or an account with equivalent disk-access privileges is recommended when direct access to physical disks is required.
SSH can be used with Windows, Linux and macOS, as well as other SSH-enabled operating systems and storage platforms, including NAS devices, servers and virtualization hosts.
After the connection is established, the program queries the remote system and displays the disks and volumes available for access. Select the required sources individually, or use the available commands to select all physical disks or all volumes.
After you select the required disks or volumes, Partition Recovery™ reads the available storage information and prepares the selected sources for analysis. Depending on the number and size of the devices, their configuration and the network connection speed, this operation may take some time.
Access Mounted Storage
After a disk image, virtual machine disk, snapshot, or remote storage device is successfully added, it appears under Mounted Disks. Partition Recovery™ detects its available disk layout, partitions, file systems and unallocated areas and displays them in the main window. From this point, the mounted source can be handled in the same way as a directly connected physical disk or volume. Continue to the next step to scan and analyze the selected storage.
Scan and Analyze the Storage
Choose between Fast Scan and Full Analysis to examine the selected storage, recover files from current or damaged file systems, search the disk surface for lost structures and metadata, and use content-aware analysis when file-system information is no longer available. Encrypted volumes and files can be unlocked during recovery, and completed analysis results can be saved and reopened later without scanning the storage again.

Start the Analysis
To analyze a storage source that has not been scanned yet, double-click the required physical disk, partition, mounted image, virtual machine disk, snapshot, or remote disk. The File Recovery Wizard opens and lets you choose between Fast Scan and Full Analysis.
After a source has already been analyzed, double-clicking it opens the existing analysis results instead of starting a new scan. To scan the source again with different settings, right-click it and select Analyze again.
The same analysis methods are available for directly connected physical storage, mounted disk images, virtual machine disks and snapshots, and storage connected remotely over SSH.
Fast Scan
Fast Scan analyzes the current storage structure and available file-system metadata without performing a sector-by-sector search across the entire selected area.
When a physical disk is selected, Partition Recovery™ identifies all currently available volumes and supported storage structures on the disk and analyzes the file systems found on them. For each detected file system, the program reads its current metadata, file tables, directory structures, allocation information, and other available records to locate both existing and deleted files.
Because Fast Scan relies primarily on the current storage and file-system structures, it is usually much faster than Full Analysis and is the preferred first scan when the existing partition and file system are still intact and readable. This includes common cases of deleted files and folders where the file-system metadata has not been significantly damaged.
If Fast Scan does not find the required data, or if the storage has been formatted, repartitioned, damaged, or appears as RAW or inaccessible, run Full Analysis.
Full Analysis
Full Analysis performs the same initial examination as Fast Scan and then continues with a sector-by-sector scan of the selected storage area. This allows Partition Recovery™ to search beyond the file-system structures that are currently visible.
Before starting the scan, select the file-system types that should be searched for. Only the file systems selected here will be included in this stage of Full Analysis, so enable the file-system types that may have been used on the storage device.
During the full scan, the program searches the selected area for partitions, file-system structures, file tables, metadata, journals, backup and redundant structures, and previous metadata states. Many file systems keep important structural information in more than one location, including backup partition tables, alternate or mirrored headers, backup superblocks, secondary metadata structures, journals, and copy-on-write metadata generations.
These additional structures can remain available even when the primary file-system metadata has been deleted, overwritten, or damaged. Partition Recovery™ analyzes the discovered fragments and uses the available metadata to reconstruct as much of the original storage structure as possible.
The results can include reconstructed disks, partitions, file systems, containers, folders, and files. Instead of presenting all discovered data as a single flat list, the program uses the recovered structural information to recreate available directory and storage relationships whenever possible.
Full Analysis reads significantly more data than Fast Scan and can therefore take considerably longer, especially when scanning large disks, disk images, virtual storage, or remote devices over SSH.
Content-Aware Analysis
During Full Analysis, you can also enable Content-aware analysis to search for files by their known content signatures. This method scans the entire selected area independently of the file-system metadata and looks for recognizable file structures directly in the stored data.
Signature-based recovery is useful when the original file-system records have been severely damaged or lost. It can identify recoverable documents, images, archives, videos and other supported file types even when their original directory entries are no longer available.
Because this method does not rely on the original file-system metadata, files found only by content signatures may not retain their original file names, folder paths, timestamps, or other metadata.
Unlock Encrypted Volumes and Files
Encrypted storage may also be discovered during analysis, including volumes that were previously hidden by partition loss, formatting, or file-system damage. When Partition Recovery™ identifies a supported encrypted volume, it requests the decryption information required to access its contents.
- BitLocker: password, 48-digit recovery password, or startup key file.
- LUKS: password or key file.
- FileVault: password or recovery key.
After the required decryption data is provided, the program can access the unlocked file system and include its files and folders in the recovery results.
Encryption may also be applied to individual files or folders rather than to the entire volume. Partition Recovery™ can detect supported encrypted files and request the corresponding decryption information when required.
For Windows EFS, you can provide an EFS certificate in PFX or P12 format or import available EFS certificates from the current Windows system. For Linux fscrypt, the program supports the corresponding password, key file, or other available key data required to access protected files and directories.
Decryption information can be added when encrypted data is detected during analysis or later while reviewing the recovery results.
Save and Load Analysis Results
You do not need to repeat a completed scan every time you reopen Partition Recovery™. The program can save the current analysis results and load them again later.

The program stores the analysis information for all disks in the current storage configuration in a single results file. This includes directly connected physical disks as well as mounted disk images, virtual machine disks and snapshot states, and storage accessed over SSH.
Information required to unlock encrypted volumes and files is also saved with the analysis results in encrypted form, so it can be restored together with the recovery session when the results file is loaded again.
To load the saved results correctly, all storage sources that were present when the results were saved must be available again in the same configuration. Connect the required physical disks, mount the same disk images, virtual machine disks and snapshots, and reconnect the corresponding remote storage before loading the results file.
Saving the results is intended for reopening a completed analysis without scanning the storage again. It does not resume an interrupted Full Analysis from the point where scanning was stopped.
Find Deleted or Lost Partitions
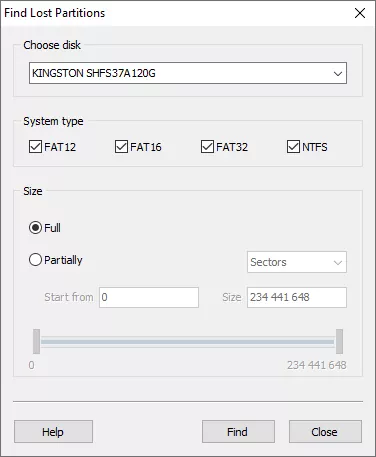
If the required partition is no longer present in the current disk layout, use the dedicated partition search to locate it before running file recovery analysis. Select the physical disk and choose Tools – Find Partitions.
Select the file-system types that were used on the missing partition. You can search the entire physical disk or limit the search to a specific range by defining the starting position and size.
This tool searches the selected disk area specifically for partition and file-system signatures. It is separate from the automatic detection of complex logical storage structures performed by the main analysis engine.
Partitions discovered by the search are added to the main storage tree and become available as separate sources. You can then select the required partition and run Fast Scan or Full Analysis on it.
Find, Preview and Recover Files
Review the analysis results, locate the required files in the reconstructed folder structure, $Lost and Found, or Content-Aware Analysis, use search and filters when necessary, preview recoverable files before purchasing the software, and save the selected data safely to another storage location.
Review the Analysis Results
After the analysis is complete, Partition Recovery™ displays the reconstructed storage and file-system structure in the main window. Each analyzed source has one current analysis result, containing the partitions, file systems, folders and files discovered during the scan.
Start by browsing the reconstructed file-system tree and checking the original folders where the missing data was stored. When the available metadata is sufficient, the program restores the original directory structure, file names and other available file-system information.
Files and folders whose metadata was recovered but which could not be reliably linked back to their original location are placed in $Lost and Found. These objects may retain useful file-system information even though their original parent folder can no longer be determined.
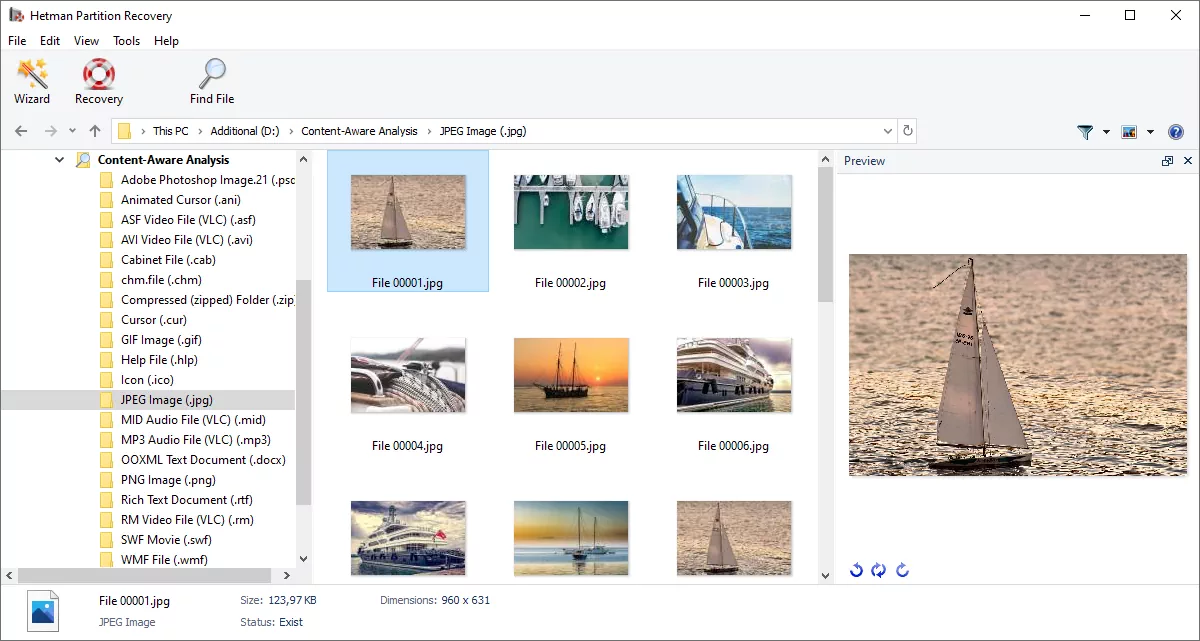
Files recovered by signature search are placed under Content-Aware Analysis and grouped by file type. Because this recovery method does not depend on the original file-system metadata, such files may receive generated names such as File 00008.jpg and may not retain their original folder paths, names or timestamps.
Deleted files and folders are marked with a red cross, while the names of detected encrypted files are shown in green, helping you distinguish their status while reviewing the results.
Find the Required Files
Start with the reconstructed folder tree and check the original location of the missing files. If the required data is not there, check $Lost and Found and then Content-Aware Analysis. You can also use Find File when you know the file name or other characteristics of the missing data.
The search tool can find files by a full file name or part of a file name and supports case-sensitive and whole-word matching. Advanced options allow hidden and system files to be included in the search and let you narrow the results by file size or date.
The Filter menu can separately show existing or deleted files and limit the displayed results to categories such as archives, audio files, databases, documents, images or video files.
You can also sort the results by name, type, size, status, modification date or creation date in ascending or descending order. Combining search, filtering and sorting is useful when an analyzed disk contains a large number of existing and deleted files.
Preview Files Before Recovery
Select a supported file to inspect its contents in the Preview panel. Preview allows you to verify the actual contents of recoverable files before saving them, including supported images, videos, documents, music, archives and other previewable file formats.
For supported files, the program can display the recovered content together with available information such as dimensions, size, duration and other properties. A full-screen preview is also available for supported files when a larger view is required.
You can scan the storage, browse the recovery results and preview recoverable files before purchasing a license. A license is required when you are ready to save the recovered data. After activation, the existing analysis results remain available, so the storage does not need to be scanned again.
Select Files and Folders
Select the files and folders that you want to restore. Multiple items can be selected at the same time. When you select a folder, its contents and nested subfolders are included in the recovery automatically.
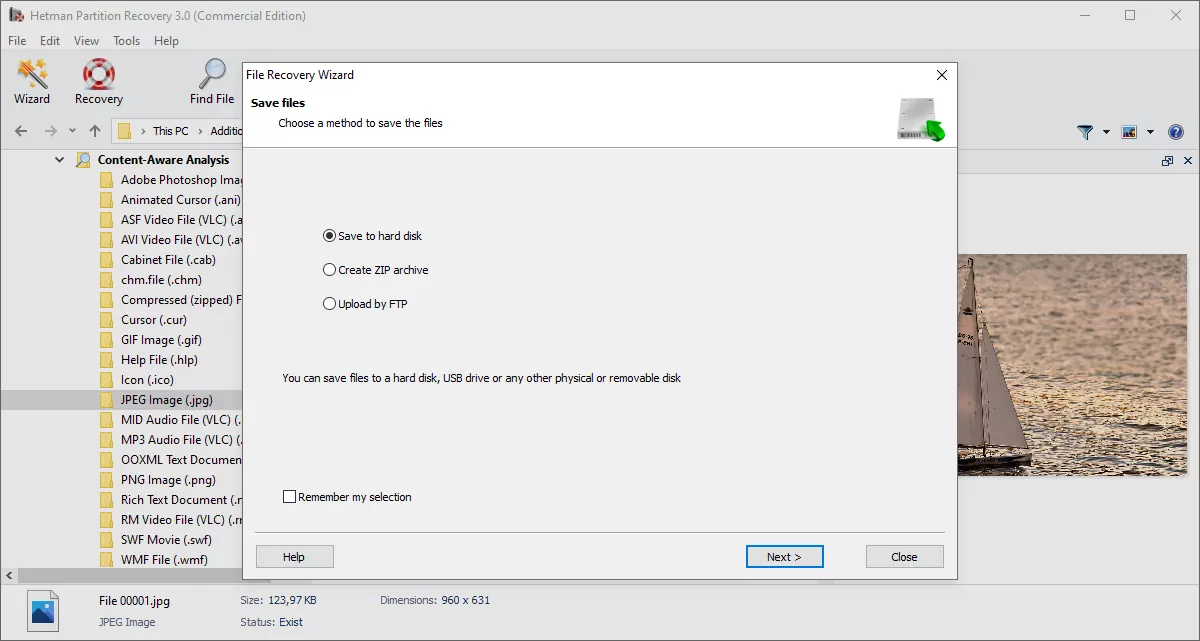
After selecting the required data, click Recovery on the toolbar or use the corresponding command from the context menu. The File Recovery Wizard opens and lets you choose how the recovered files should be saved.
Recover and Save the Data Safely
The File Recovery Wizard provides three methods for saving recovered data:
- Save to hard disk – save the recovered files to any path available to the operating system, including another internal or external disk, removable storage, or an accessible network location.
- Create ZIP archive – save the selected files and folders directly to a ZIP archive.
- Upload by FTP – transfer the recovered data to an FTP server.
When saving to a disk or another available path, you can enable Restore folders structure to preserve the recovered directory hierarchy. For NTFS data, the wizard can also restore alternate data streams. Unknown symbols in recovered file and folder names can be replaced with a specified character.
The wizard displays both the disk space required for the selected data and the free space available at the destination, allowing you to verify that enough storage space is available before starting recovery.
When creating a ZIP archive, the recovered folder structure can also be preserved. You can choose the compression level, split the archive into multiple volumes, and protect the archive with a password.
Do not save recovered files back to the same physical disk from which they are being recovered. Writing new data to the source storage can overwrite deleted files and file-system structures that may still be recoverable. Partition Recovery™ displays a warning if you select the source physical disk as the recovery destination.
Whenever possible, save the recovered data to another physical HDD or SSD, an external drive, or a network storage location with enough free space for all selected files.
Quick Start
Watch this quick-start video to see the complete recovery workflow in action. Learn how to select the affected storage, choose the appropriate analysis method, find and preview recoverable files, and save the data safely with Partition Recovery™.
-
When should I use RAID Recovery™ instead of Partition Recovery™?
Use RAID Recovery™ when the lost data depends on multiple physical disks and the RAID or multi-disk storage configuration must be reconstructed.
Typical cases include a failed or degraded RAID, a deleted or damaged RAID configuration, missing member disks, incorrect disk order, or inaccessible NAS, DAS or server storage.
If a healthy RAID controller or operating system already presents the array as a normal complete logical disk, Partition Recovery™ can analyze that logical disk. If the array structure must first be reconstructed from its member disks, use RAID Recovery™.
-
What should I do immediately after deleting files, formatting a drive or losing a partition?
Stop using the affected storage as soon as possible. Do not copy new files to it, format or initialize it, create new partitions, reinstall the operating system, or run repair utilities such as CHKDSK or fsck before the data has been recovered.
Any write operation can overwrite deleted file data or file-system metadata that may still be recoverable. For the same reason, do not install Partition Recovery™ on the physical disk you need to recover.
Install the software on another physical disk or use another computer to analyze the affected storage. Installing software on the source disk writes new data and may overwrite recoverable files or metadata. Using another partition on the same physical disk does not eliminate this risk.
-
What should I do if the drive is not detected by the operating system or BIOS/UEFI?
First check the power supply, cables, adapter and storage controller. Do not initialize, format or create a new volume merely to make the disk appear in the operating system. Data recovery software requires readable access to the storage device. If the disk is not detected at the hardware level, repeatedly disconnects, or cannot be read reliably, hardware diagnostics or a professional data recovery service may be required.
-
Can deleted files be recovered from an SSD after TRIM?
It depends on whether TRIM has been issued and processed by the SSD. If the SSD controller has already erased or made the released blocks inaccessible, the original contents of those blocks cannot be recovered by a software scan. Recovery may still be possible when TRIM was not executed or when the required data remains in readable blocks. Scanning the drive and checking file previews is the practical way to determine what data is still available.
-
When should I stop using software recovery and contact a professional data recovery service?
Stop repeatedly scanning or powering the device if it makes unusual mechanical noises, fails to spin up, disappears during access, overheats, produces severe read errors, or is not detected reliably by the computer. Software recovery is intended for storage that can still be read. Continued use of a physically failing device can make its condition worse.