Linksys NSS4000 NAS RAID Data Recovery Made Easy: Effortless Solutions for Users
Struggling to recover data from your non-operable Linksys NSS4000 NAS RAID system? Don’t worry, we’ve got you covered! Our comprehensive guide will walk you through expert strategies and techniques to successfully retrieve your valuable data. Say goodbye to data loss worries and reclaim your files with ease!
- How to create a RAID
- How to add a new volume
- How to add a user
- How to add a shared folder
- Recovering data from Linksys NSS4000
- Questions and answers
- Comments
Network-attached storage devices were developed to back up data from computers. With huge amounts of information created for various purposes nowadays, such devices can also be used as the main storage option. Whenever a NAS system breaks down, there is a risk that users may lose access to all of the data they store within such device.
Although network-attached storage devices are pretty reliable in terms of ensuring data security, and the use of RAID principle in creating such storage systems reduces the chance of data loss, nobody can promise that you will get a 100% guaranteed protection.
Just as any mechanical device, a NAS may break down one day, making you lose all your data the moment you no longer have access to the disk array inside it. Luckily, when a NAS device breaks down, the data remains intact… but inaccessible, unless you have a proper third-party software tool to use.
| Name | Features |
|---|---|
| Hetman RAID Recovery | Supports all RAID levels, recovery of damaged array configurations, ability to work with NAS devices from various manufacturers. |
| UFS Explorer | Powerful tool for RAID recovery, supports a wide range of file systems, automatic configuration recognition. |
| ReclaiMe | Easy to use, specializes in RAID array recovery, recovery without complex settings. |
| R-Studio | Supports advanced RAID recovery, ability to analyze and recover data even from heavily damaged arrays. |
| Wondershare Recoverit | User-friendly interface, NAS recovery support over the network, optimized for home users. |
| Disk Drill | Intuitive interface, data recovery from various RAID types and NAS devices. |

How to Recover Data from a RAID System Based on a Non-Operable Linksys NSS4000 NAS
How to create a RAID
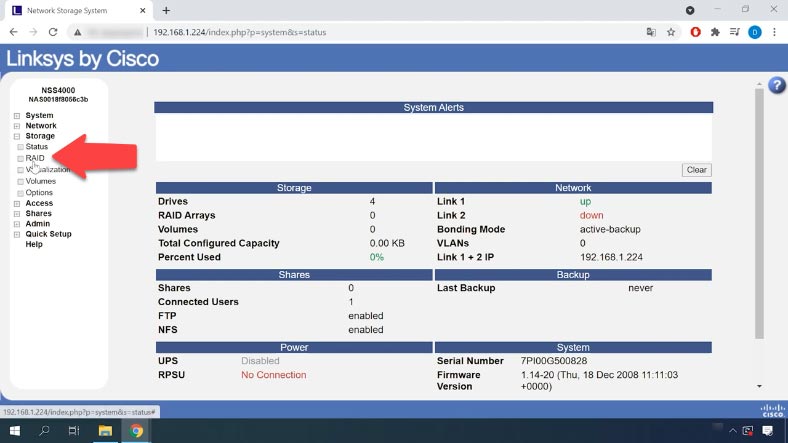
For starters, let’s explore how to build a RAID system on this specific Linksys NAS device. In the NAS manager menu, open “Storage” – “RAID”.
On the right, you will see the list of all drives connected to this device. Select the drives you want to use in building your RAID system. From the list below, choose the RAID level and click “Add”.
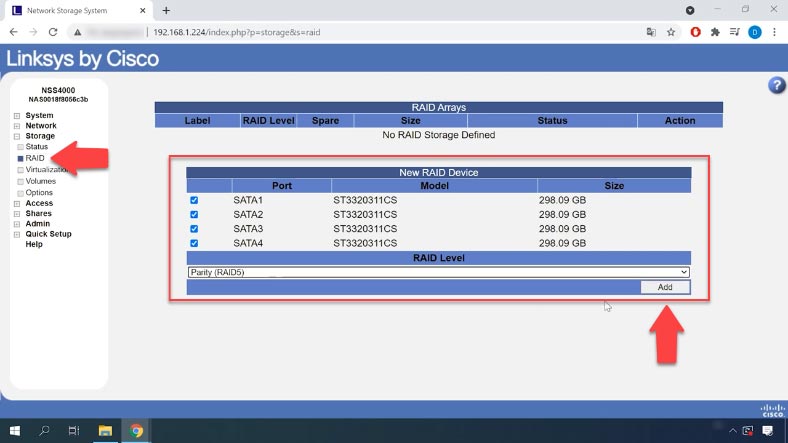
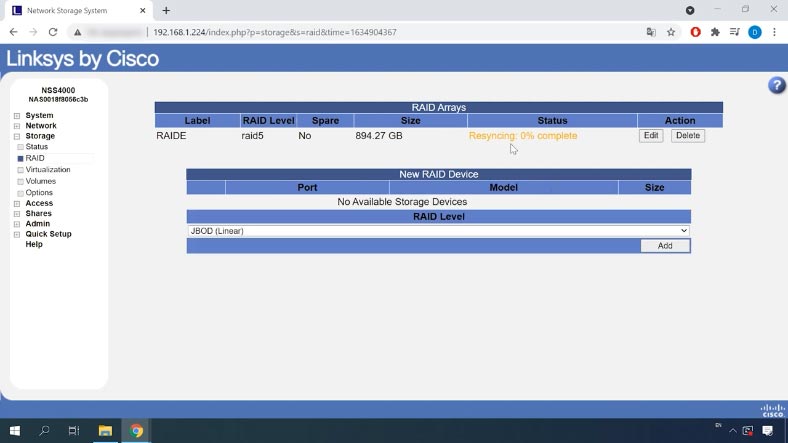
A warning appears, saying that all data on the selected devices will be removed. Click OK to continue. The time required to create a RAID system may vary depending on the total capacity of the drives and the RAID level that you have selected. You can monitor the RAID building progress by checking its “Status” column here.
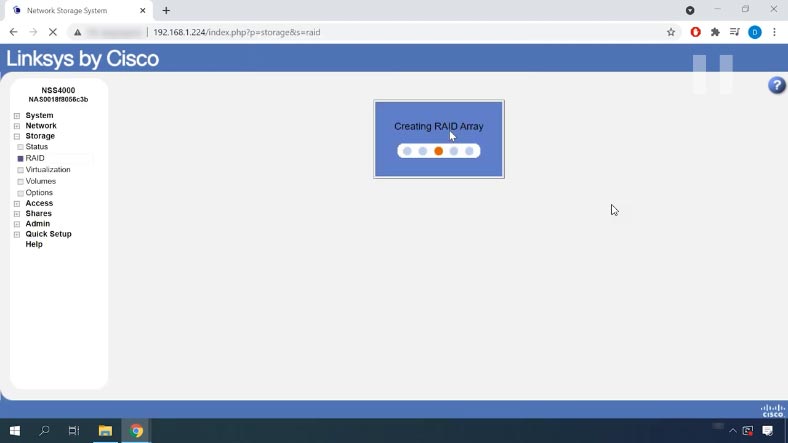
When the process is complete, it will appear in the RAID Arrays table. The drives used to build this array will not be available for creating another array, even if you want to do it later.
How to add a new volume
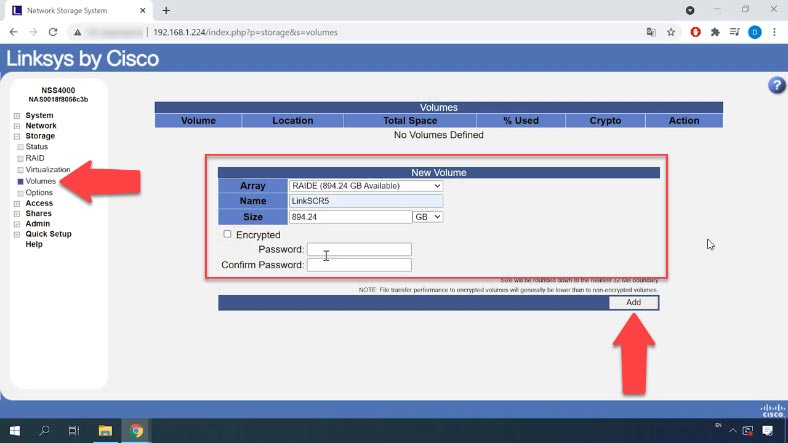
While the RAID is being created, you can add a new volume. Jump to the “Volumes” tab. From the drop-down menu, select the array where the new volume should be located, give the name and size, and set the access password if necessary. When all the properties are given, click “Add”. That’s all, the volume is created.
How to add a user
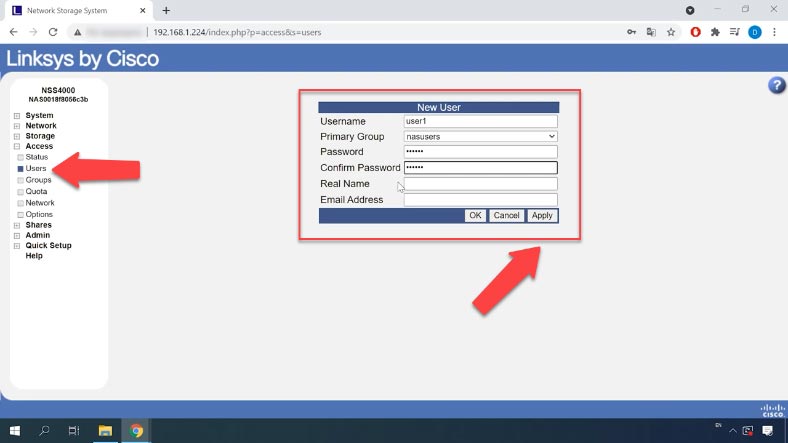
Now you can add a new user and configure permissions. To add a new user, go to the tab “Access” – “Users”.
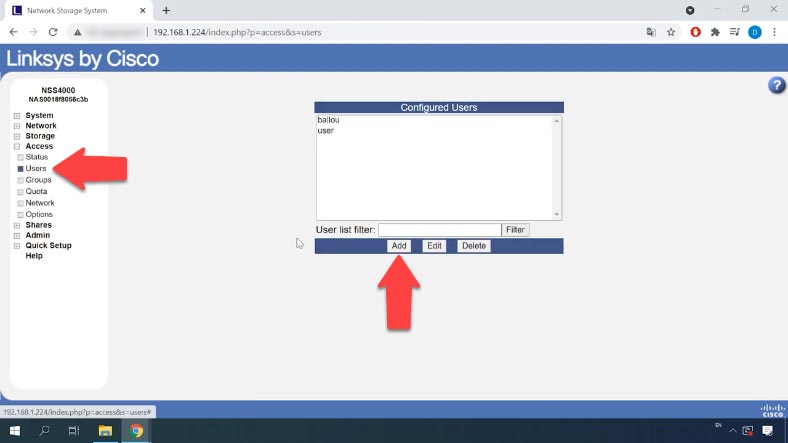
Click “Add” here; in the new window that opens, give the new username and group, set the password, and then type it again in the “Confirm Password” field. If necessary, add the full user’s name and email address – these two fields are optional. Now click OK and Apply. The new user has been added.
To continue with other settings, you have to wait until the resyncing process is complete. By default, the RAID array is created with the XFS file system, and you can’t change it into another file system you prefer.
| Characteristic | Description |
|---|---|
| File system | XFS |
| Type | Journaling file system |
| Large file support | Supports files up to 8 EB (exabytes) |
| Access speed | High access speed, especially for large files |
| Fragmentation | Minimal fragmentation due to efficient space organization |
| Journaling | Full journaling for data recovery after a crash |
| Integration with LVM | Supports logical volumes (LVM) for better disk space management |
| Snapshot support | Does not support standard snapshot function (requires additional tools) |
| Usage | Commonly used on servers and large systems to handle large data volumes |
| Compatibility | Supported by Linux, not supported by Windows or macOS |
How to add a shared folder
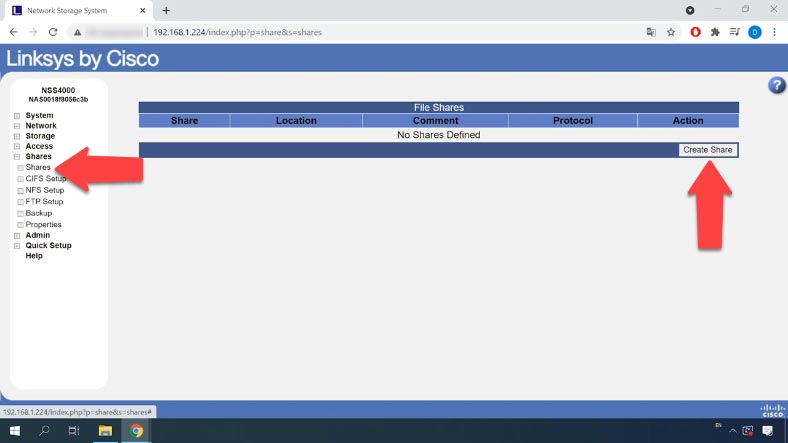
When the resyncing process is over, the option to configure shared folders will become available. Open the tab “Shares” and click “Create Share”.
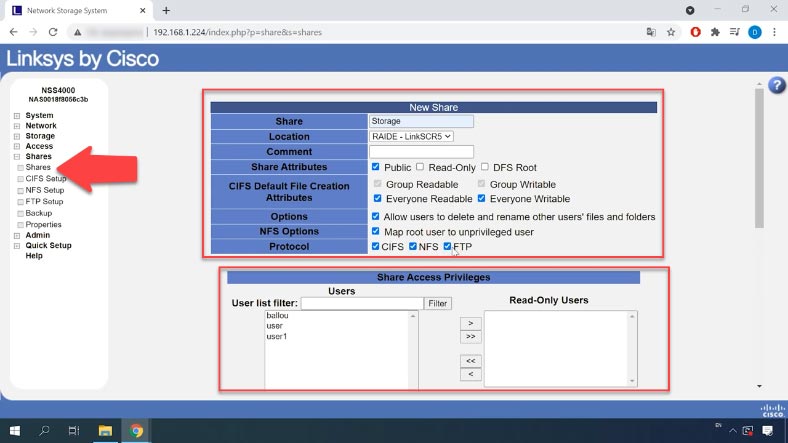
Give it a name, find an available location, and check the corresponding boxes for access permission rights, then enable network protocols. Add the users whom you want to assign certain permissions.
After the volume is created, you can access the disk array and check if it works properly by writing some data to the array. Connect to it by FTP or in any other way.
Recovering data from Linksys NSS4000
Method 1. How to recover data from a damaged RAID system
If you lose access to data stored on a network-attached device as a result of a hardware error, a controller failure or other hardware issues, the data on the disks remains intact and can be handled with specialized data recovery tools.
To retrieve the data from the disks, you can try using any of Linux operating systems. For most NAS servers, Linux is their natural environment as they are formatted in one of the file systems supported by Linux.
However, if you know little about this operating system, we don’t recommend trying this method: a single mistake in commands may erase all information on the hard disks.
The best solution would be to use a specialized tool for recovering data from network-attached storage systems – and this is Hetman RAID Recovery. It supports most popular file systems, technologies and RAID types, and in most cases it will be able to rebuild the damaged RAID automatically, even if the controller is missing.
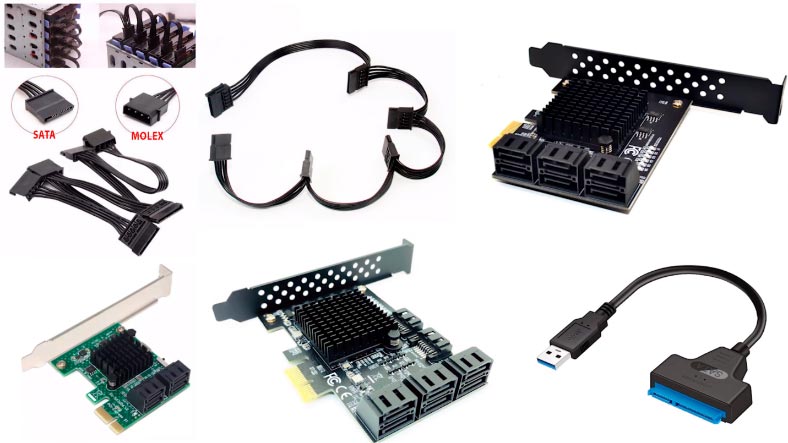
Before you proceed, make sure you have enough data cables to connect all the drives. If your motherboard has less SATA ports than necessary, you can use all kinds of adapters and expansion cards. Also, you will need a hard drive with the capacity equal or exceeding the amount of the information you are going to recover: you can use external hard disks, another network-attached storage, or other storage devices.
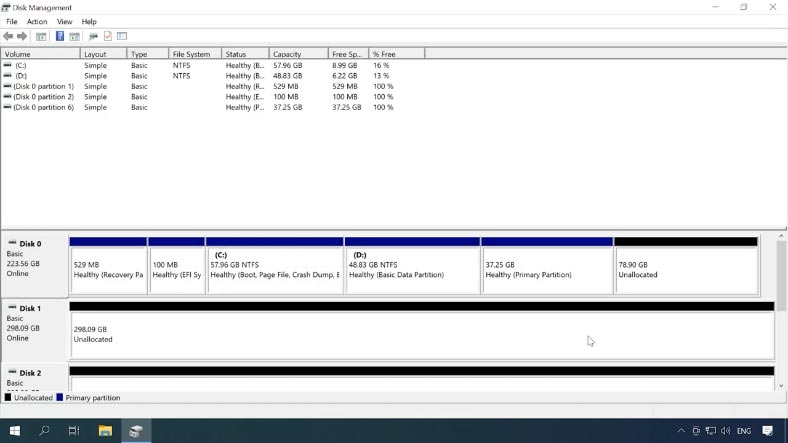
Take the disks out of the NAS device and connect them to a Windows computer. When the operating system has booted, open Disk Management and check if the added disks are recognized. Windows may suggest to initialize or format the drives to be able to access them. Remember to never agree to either operation, because it can erase the remaining information completely.
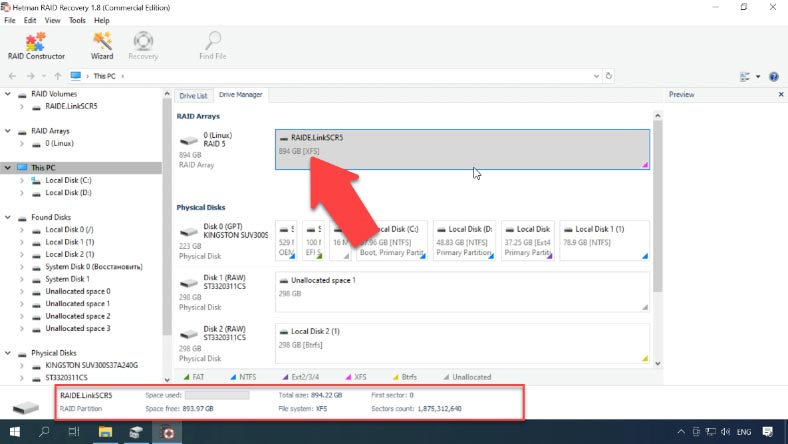
Download and run the program; Hetman RAID Recovery will automatically rebuild the damaged RAID system with the available disks. You will see the disk array in the Drive Manager, and the detailed information on your RAID system below. This volume is based on XFS file system. To access the volume contents, you need to scan it first.
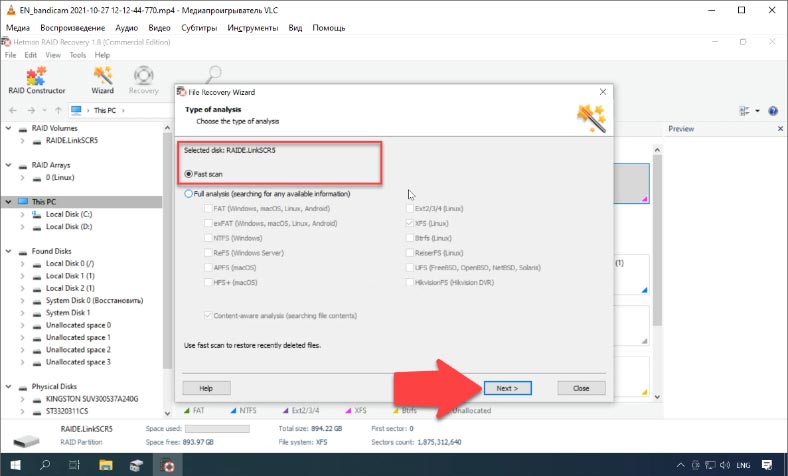
Right-click on the array and choose “Open”. Choose the scan type to run, and click “Next” to start searching for lost files. Wait for the process to be over, and then switch to search results by clicking “Finish”.
The program displays all the files that have been written to the disk array, and their contents can be checked with the Preview feature.
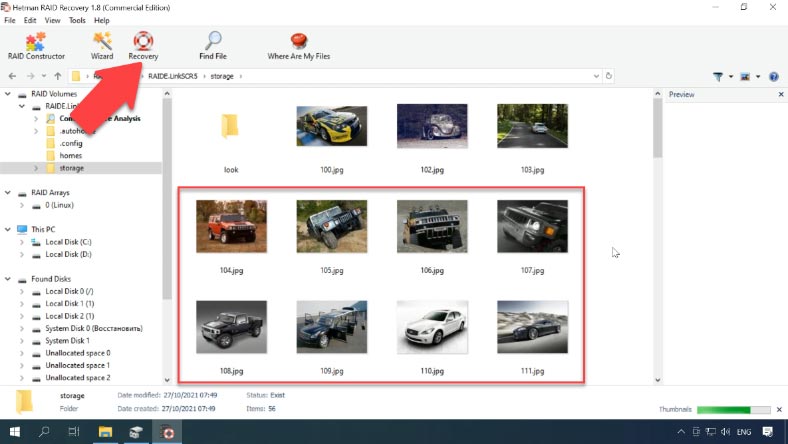
To recover files, select the ones you want to recover and click “Recovery”, choose the disk where to save them and specify the directory, then click “Recovery” and “Finish”. After that, follow the path you have chosen and check if the recovered files are there.
Method 2. How to rebuild the array with the RAID Constructor
Even if the program failed to recognize and rebuild your disk array automatically, you can still use the RAID Constructor. However, it requires you to know all the information about this specific disk array.
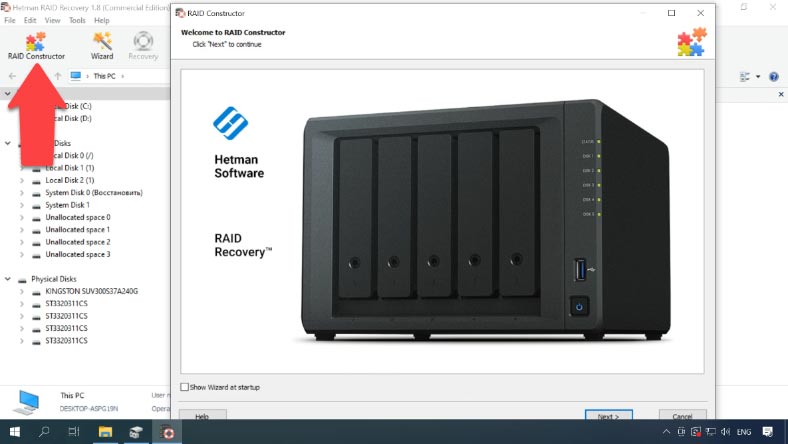
Select “Manual mode” and click “Next”, then select the RAID type, the block size and order, select the disks in the array and specify their order using the Up and Down arrow buttons; use the plus button to add empty disks instead of any disks that are shown as missing.
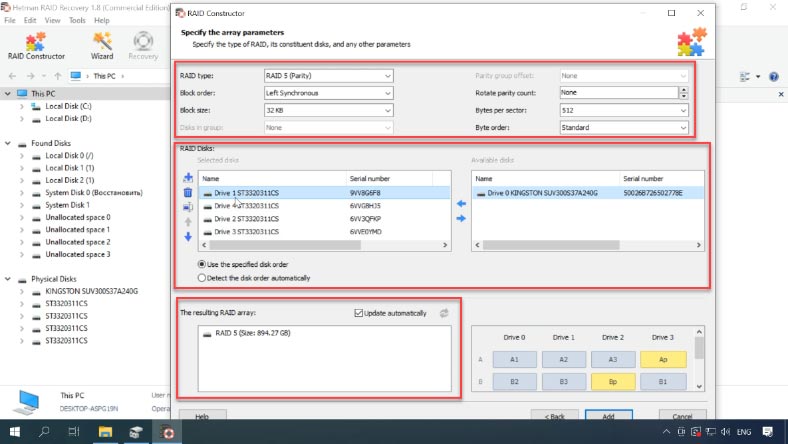
If you get the properties right, the RAID system will be displayed as having at least one partition: expand it and check if the files are there.
When all the properties are given, click “Add”. After that, the RAID system will appear in the Drive Manager. Now the final step is to scan it and recover your data.


