Google Chrome Data Recovery: Bookmarks and History
Learn how to retrieve your valuable data in Google Chrome with ease in this comprehensive guide. Whether you’ve accidentally deleted bookmarks, lost browsing history, or need to recover important web pages, this tutorial covers everything you need to know. Dive deep into step-by-step instructions and essential tips for recovering bookmarks and history in Google Chrome.
- Data Synchronization
- Reinstalling The Browser
- Reset Browser Settings
- Recovering Browser Data Files Which Have Been Deleted
- Questions and answers
- Comments

How to View Browsing History for Google Chrome, Mozilla Firefox, Opera, Edge, Internet Explorer 🌐⏳💻

How to View User’s Logins and Passwords Saved in a Browser for Facebook, Twitter, Instagram 🕵️🔍🔐
Data Synchronization
If you are going to uninstall Google Chrome in order to eliminate errors but you are afraid you won’t be able to recover bookmarks and other important data, use the function of synchronization with Google server. Create a Google account, and then use it to proceed with authorization in Chrome settings and choose what information about the browser you want to sent to the server, so that it can be recovered automatically after you install the application again.
-
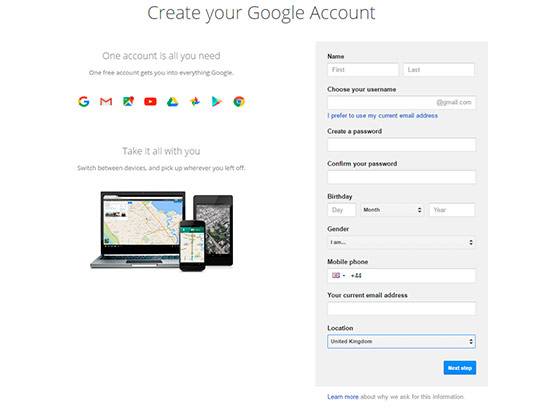
Go to google.com and create a Google account. Enter your personal data and digits from the picture, and then click on «Next step».
-
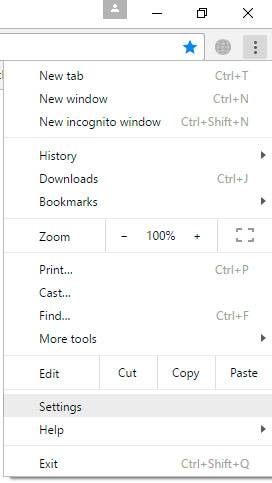
Start Google Chrome and open the Customize and Control menu. Go to the browser settings.
-
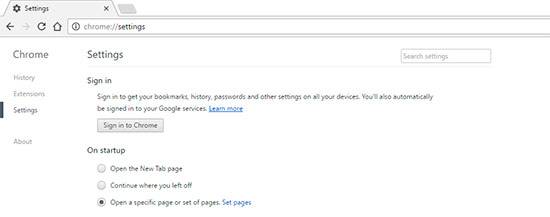
Above, there is a field «Sign in». Click on «Sign in to Chrome».
-
The authorization window will appear. In order to sign in, enter your Gmail address and your password.
-
After successful authorization, the window «Advanced sync settings» will appear. You can choose to synchronize all information about the way your browser works or select specific components such as bookmarks, password, history etc.
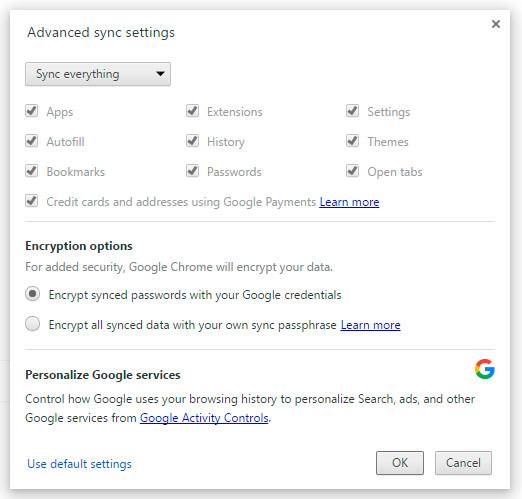
If necessary, you can modify synchronization settings: go to Google Chrome settings and click on «Advanced sync settings». Select what data should be sent automatically to the server so that they can be recovered later.
Reinstalling The Browser
After synchronization with the server has been completed, you can relax and reinstall Chrome without worrying about safety of your data. First, uninstall the browser from your computer:
- Open Control Panel and go to «Uninstall or change a program».
- Find Google Chrome in the list, highlight it and click Uninstall.
- Uncheck the box «Also delete your browsing data?»
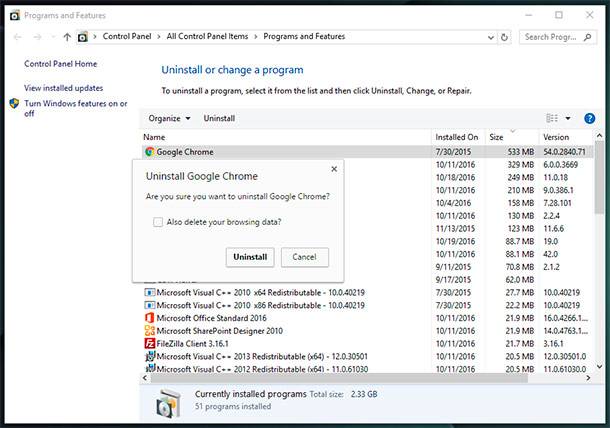
After the browser is uninstalled you can go to Chrome website and download the latest version. Install the browser and go to its settings. Sign in by using your Google account. Synchronized data from the old browser will be transmitted automatically to the new version of Google Chrome. This is the easiest way to recover all information that requires no additional actions, so make sure you are using synchronization feature in Chrome to keep your important bookmarks.
Instead of synchronization, you can use another way as well: among hidden files, find the user file of your browser and copy ts contents to another location. After uninstalling Google Chrome you should replace the contents of the new directory with files from the old folder.
In Windows 10 such folder can be found here:
C:\Users\UserName\AppData\Local\Google\Chrome\User Data\Default
C:/Users/UserName/AppData/Local/Google/Chrome/User Data/Default
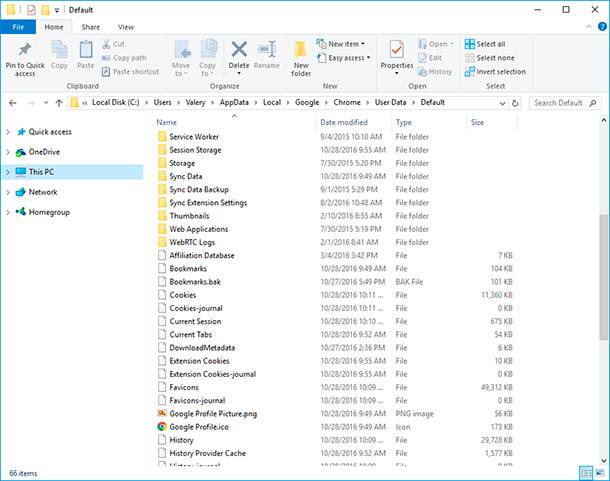
These files are used to keep history and passwords, so you won’t lose anything but synchronization is much more convenient than such copying.
Reset Browser Settings
Normal operation of Google Chrome can also be restored without extreme measures like reinstalling the program. In some cases, errors can be eliminated by just resetting the browser settings:
-
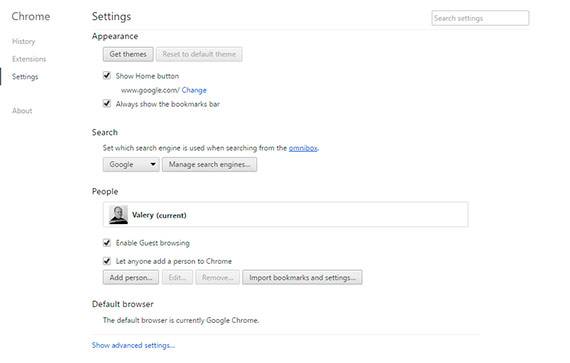
Start the application and go to the settings menu.
-
Click on «Show advanced settings».
-
Scroll down till the end and click on «Reset settings».
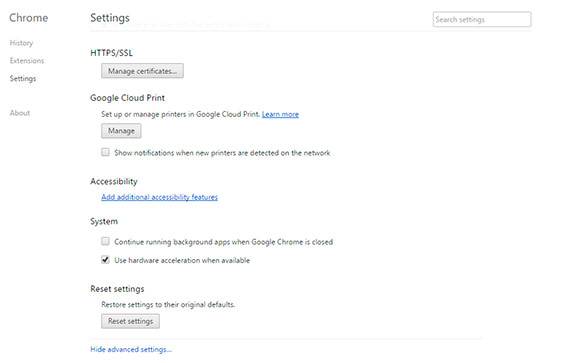
After resetting, installed extensions will be disabled, and temporary files will be deleted. History, bookmarks and saved passwords will be stored in the browser so you won’t need to synchronize with Google server to have them back.
Recovering Browser Data Files Which Have Been Deleted
If you are reading this article after you have reset Chrome or reinstalled the browser, its data can still be recovered. For this purpose, start Hetman Partition Recovery and use it to recover data files of the old browser. After scanning drive C where Google Chrome is installed, use our software go to the abovementioned folder where browser data is kept and restore it:
C:\Users\UserName\AppData\Local\Google\Chrome\User Data\Default
C:/Users/UserName/AppData/Local/Google/Chrome/User Data/Default
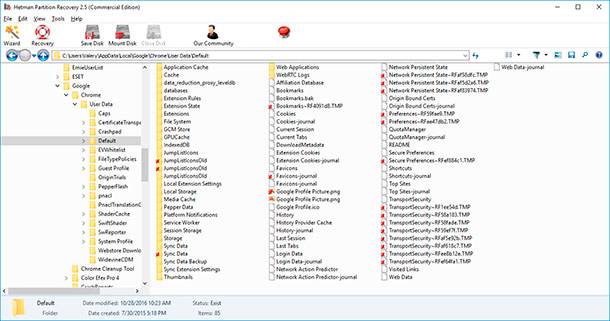
After that, just replace the recovered files in Default folder of the reinstalled browser by the files of the old browser which have been recovered with Hetman Partition Recovery.




To backup your Chrome history, open Chrome and type chrome://history in the address bar. Then click the three vertical dots in the upper right corner and select Export History. Choose a location to save the file, then click Save.