How to Fix Browser Proxy Server Connection Error
Learn how to fix the browser proxy server connection error with our essential guide. If you’re encountering issues with accessing websites and receiving proxy server connection errors, it’s crucial to understand how to troubleshoot and resolve this issue effectively. In this comprehensive tutorial, we’ll walk you through step-by-step instructions and expert techniques to help you successfully fix the browser proxy server connection error. From adjusting proxy settings to checking network configurations, you’ll learn everything you need to know to ensure successful error resolution. Don’t let proxy server connection errors hinder your browsing experience—watch our guide and get back online today.

- Step 1. Viruses
- Step 2. Configure the proxy server in your browser
- Step 3. Open the registry editor for AppInit_DLLs
- Step 4. Check the Hosts file
- Step 5. DNS Server
- Step 6. Clear the DNS cache
- Questions and answers
- Comments
This tutorial will be suitable for all popular web browsers: Google Chrome, Mozilla Firefox, Opera, Microsoft Edge and Internet Explorer.

Internet Browsers Won’t Open Webpages: How to Fix Proxy Server Errors 🌐🚫💻
Step 1. Viruses
First of all, your computer should be checked for malware, adware, and other unwanted programs. Too often, they prevent your browser from working properly and opening websites when you need it.
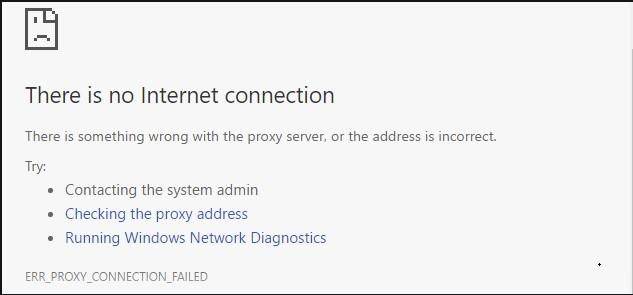
You can check the computer for viruses with one of the many popular antivirus products. They are so numerous that it is hardly a good idea to mention all of them. However, you are welcome to watch one of our videos about getting rid of viruses, Trojans and adware.
Step 2. Configure the proxy server in your browser
If you removed all viruses and unwanted software but your browser is still playing tricks with you by refusing to open any websites, it’s time to check local network settings for your computer. Here is how you do it:
-
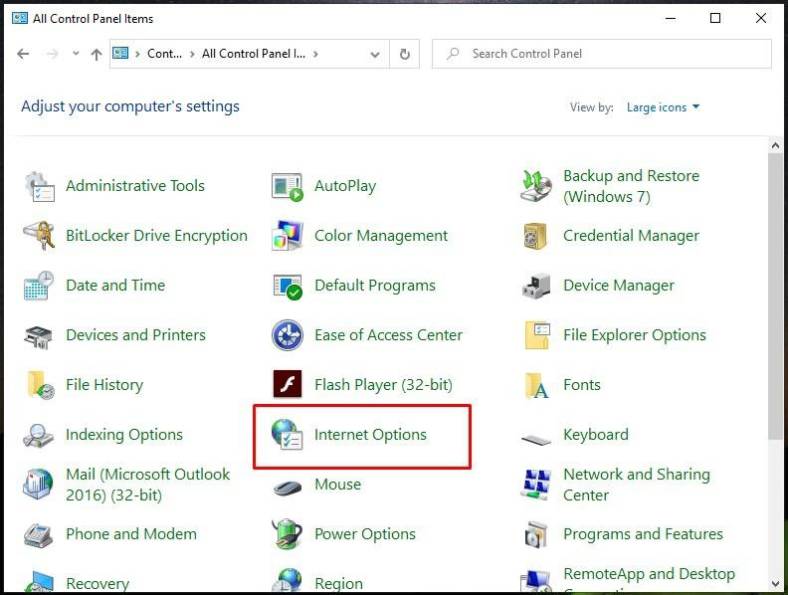
Go to Control Panel – Internet Options (in Windows 7, this item has the same name).
-
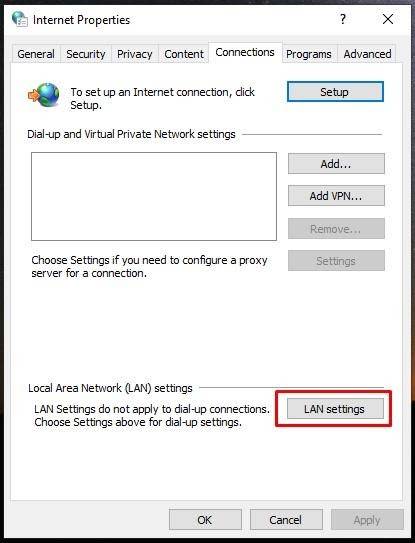
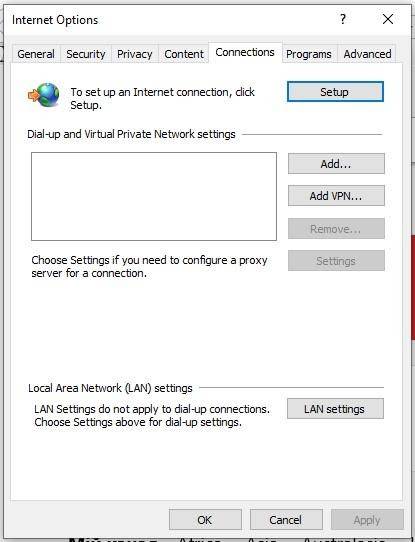
In the tab Connections click LAN settings. If you have the checked box next to Use a proxy service for your LAN…, uncheck it and check the box next to Automatically detect settings instead.
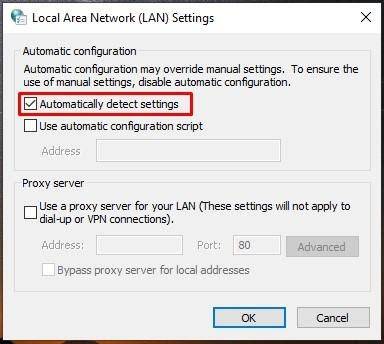
You can also open the proxy server settings menu from the browser. For Google Chrome, Opera and Yandex Browser the steps are similar:
-
go to Menu / Settings / Advanced,

-
and click on Change proxy settings. Then follow the steps I have shown before.
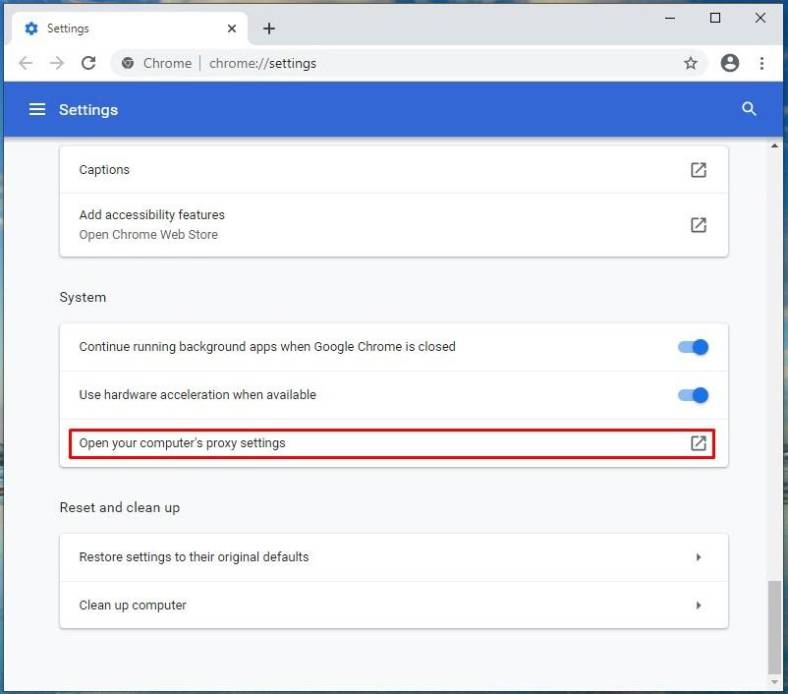
In Mozilla Firefox:
-
go to Menu – Options – General – Network Settings – Settings.
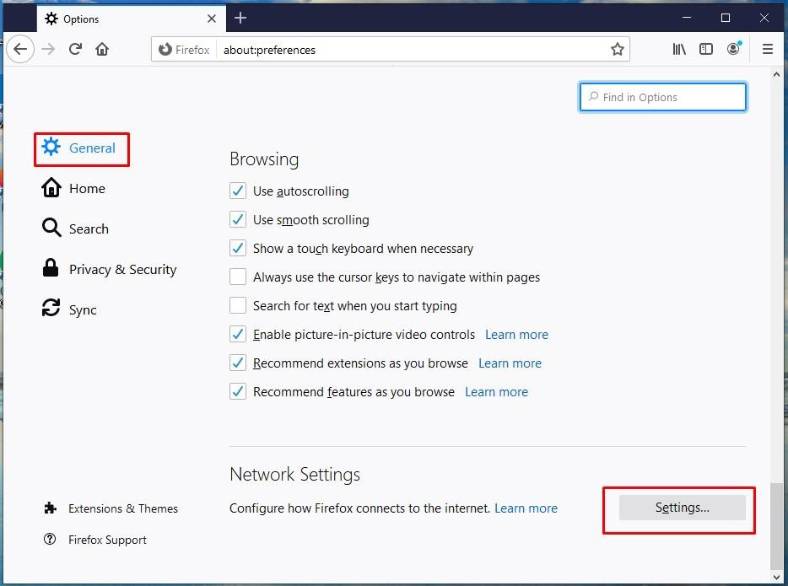
-
When the menu Connection Settings opens, select Use system proxy settings.
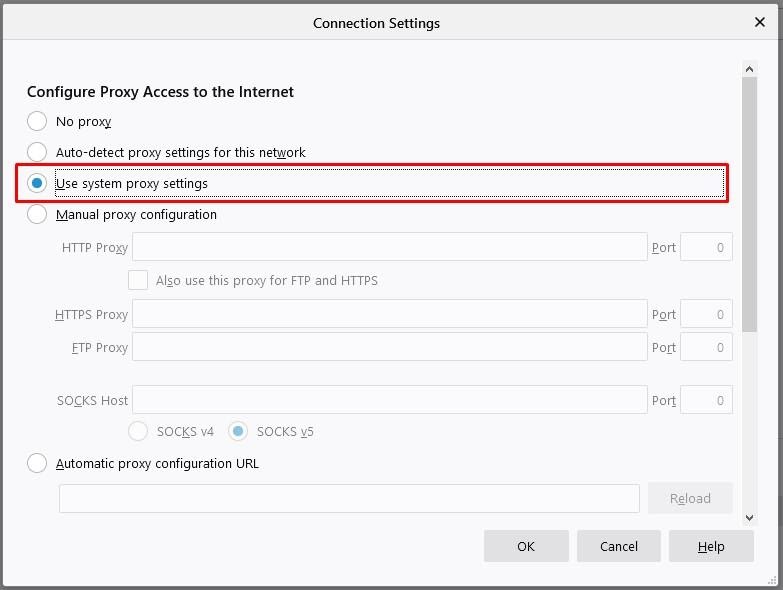
In Internet Explorer, go to Service/ Browser Properties.
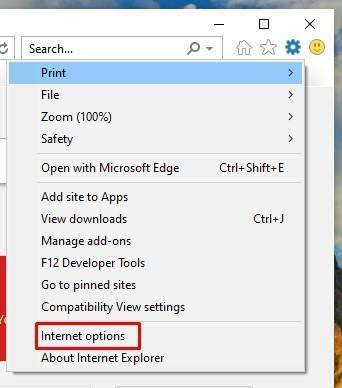
Then follow the instructions above.
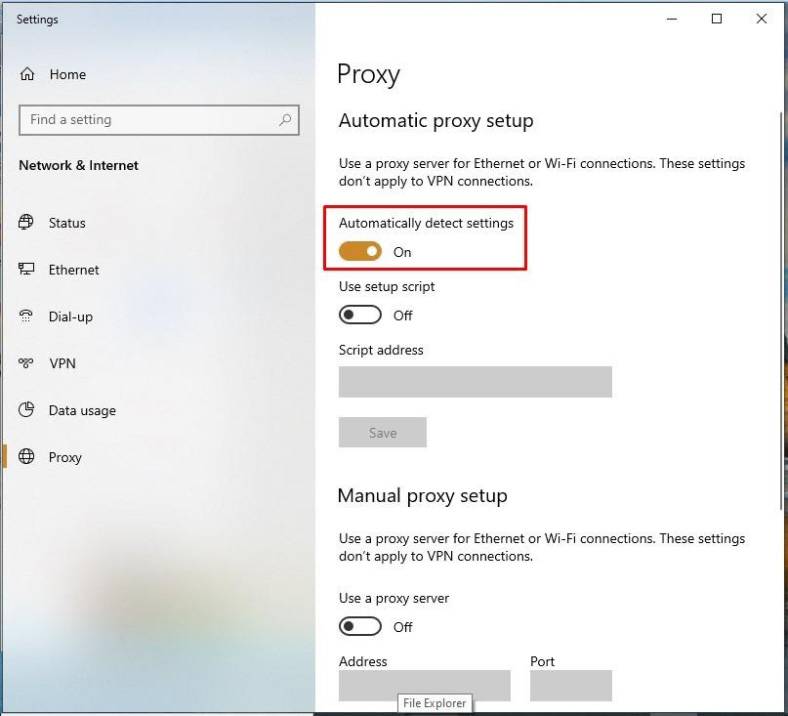
In Microsoft Edge, go to Menu / Settings / Advanced and click on Open proxy settings.

If manual proxy setup is enabled, turn it off and then go to the tab Automatic proxy setup to activate Automatically detect settings.
Step 3. Open the registry editor for AppInit_DLLs
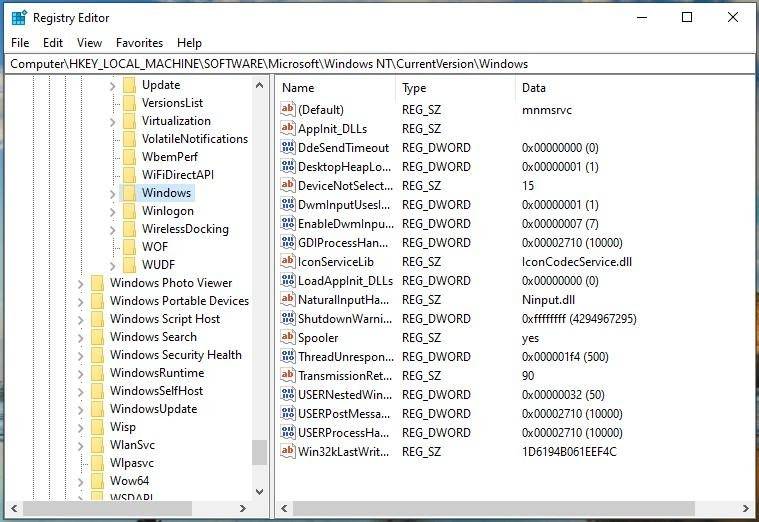
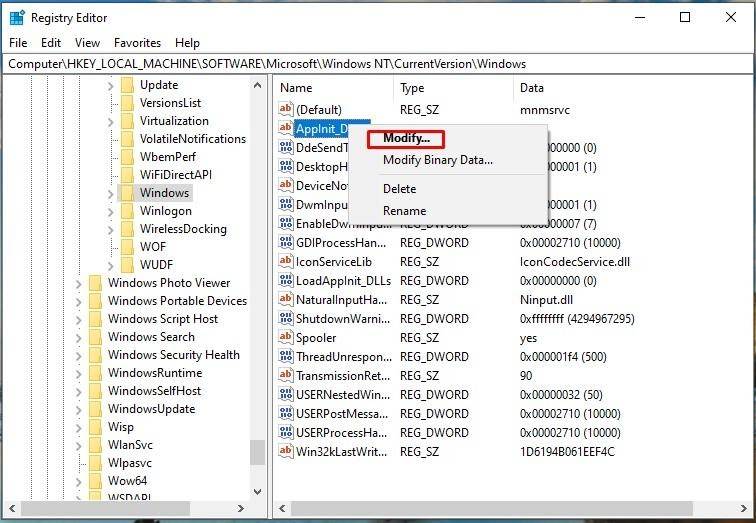
If the browser won’t open websites even after proxy setup operations, you should check the entry AppInit_DLLs in the registry editor. Here is how you do it:
-
Run Registry Editor.

-
Go to HKEY_LOCAL_MACHINE\SOFTWARE\Microsoft\Windows NT\CurrentVersion\Windows\.
-
Right-click on the entry AppInit_DLLs and click Modify.
-
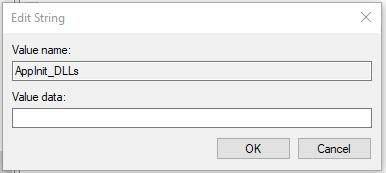
If in the Value line you can see the path to any .dll file (for example, C:\filename.dll), it should be deleted. Before that, copy the path to that file, clear the line and click ОK.
-
Then paste this path to the file explorer, enable the option Show hidden files and delete this file as well as any other suspicious .exe files which are in the found folder.
Once again, go to the Registry Editor, find the entry AppInit_DLLs in the section HKEY_CURRENT_USER\SOFTWARE\Microsoft\Windows NT\CurrentVersion\Windows\, and repeat the steps I have described above, then restart the computer.
Step 4. Check the Hosts file
The next step should be checking the file Hosts. It can be found by following this path – C:\Windows\System32\drivers\etc.
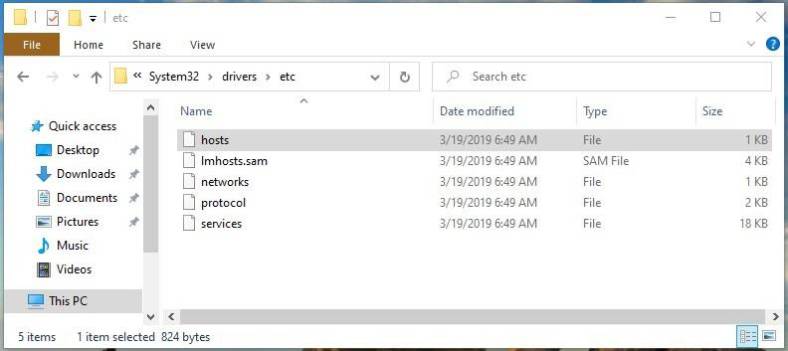
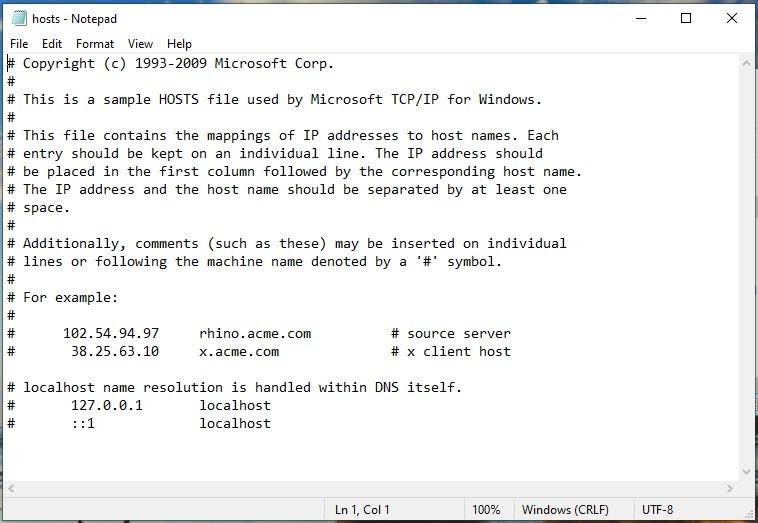
Open it with Notepad and read the values. If the last line #::1 localhost is followed by other lines with IP addresses – delete them, save changes in Notepad and restart the computer.
Step 5. DNS Server
If your browser still won’t open any websites, there may be a problem with the DNS server. To check this server, here’s what you do:
Go to Network and Sharing Center, and click on the connection name next to the line Connections.
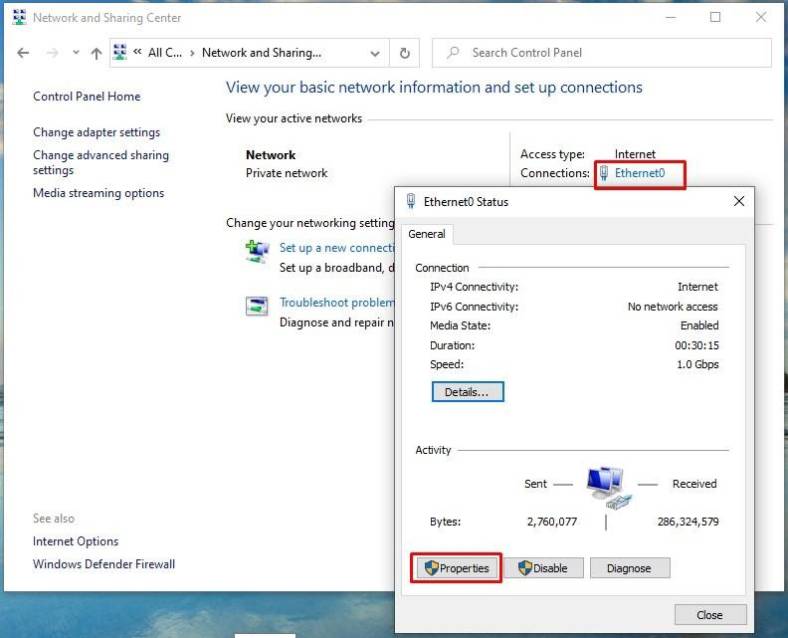
Choose Properties and click on IP version 4 / Properties.
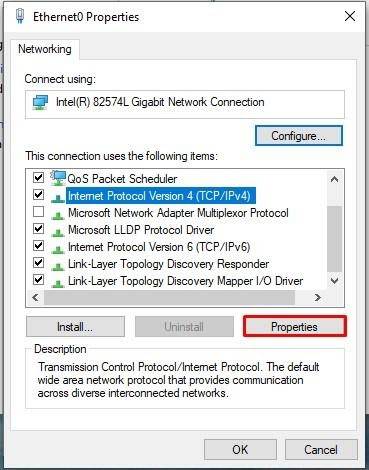
Select Use the following DNS server addresses and enter these values:
- preferred DNS server – 8.8.8.8;
- alternate DNS server – 8.8.4.4;
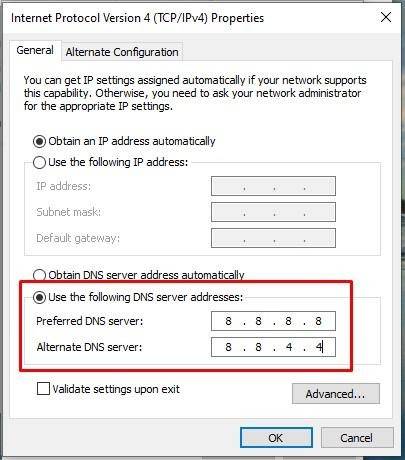
After that, try opening any webpage with your browser.
Step 6. Clear the DNS cache
If nothing helps, try clearing the DNS cache. Here is how you do it:
-
aunch the Command prompt as Administrator and type the following command: ipconfig /flushdns. This command will clear the DNS cache.
ipconfig /flushdns
-
Then enter the command route -f. This command will clear the route table from all gateway entries.
route -f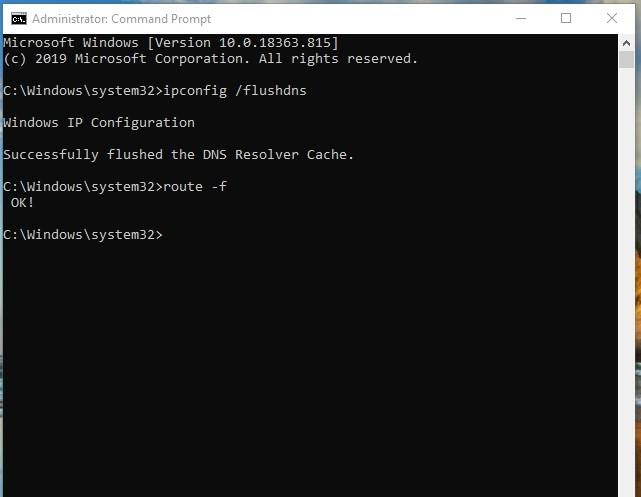
-
When you see the Ok message, close the Command Prompt and restart the computer.
The steps we have described in this article should help you fix the problem with your browser. Yet if none of the methods worked for you, post a comment to let us know, and we can try to find an individual approach to your case.


