Recover Files from RAID 6: Controller Issue or Disk Failure
Learn how to recover files from RAID 6 after a controller issue or disk failure with our essential guide. If you’ve encountered data loss on your RAID 6 array due to a controller malfunction or disk failures, it’s crucial to understand the steps for successful data recovery in such critical situations. In this comprehensive tutorial, we’ll walk you through step-by-step instructions and expert techniques to help you retrieve files from RAID 6 after a controller issue or disk failure. From assessing the extent of the damage to implementing recovery strategies, you’ll learn everything you need to know to ensure successful data retrieval. Don’t let RAID 6 failures lead to permanent data loss—watch our guide and reclaim your valuable files today.
- Introduction
- How to build a RAID 6
- How to replace a hard disk in RAID 6
- How to recover files from RAID 6
- Conclusion
- Questions and answers
- Comments
Introduction
RAID systems are among the most reliable and best-performing storage solutions, but even they are not immune to damage and failures. The whole system stops working when one of the physical storage devices breaks down, when the file structure suffers from failures, or when the controller no longer works properly. Even a disk array based on the most expensive hardware can fail or break down – it’s only a matter of time. That is why it is always a good idea to back up all mission-critical files from time to time – unless you want to be forced to use the big guns, that is, specialized data recovery software.

How to Recover RAID 6 Data After Three Disks Fail, the Controller Breaks Down, or the Array Rebuilt
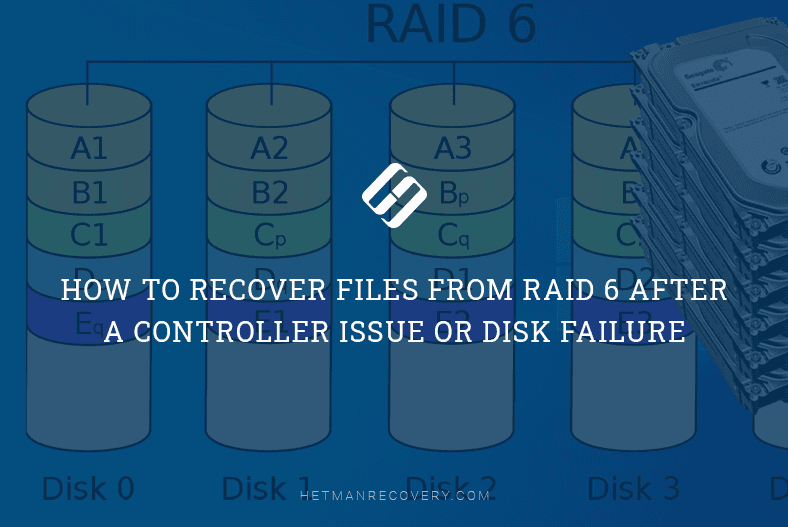
RAID 6 is the redundant array of independent disks which features a high degree of tolerance against loss of information. This configuration type requires at least four disks and it uses striping with dual parity. For building the array, we’ll be using SAS RAID controller Adaptec 6805T and six hard disks, and all the tests will be conducted with this hardware configuration.
| Characteristic | RAID 6 |
|---|---|
| Data Distribution Type | Double parity with two independent parity bits |
| Minimum Number of Disks | 4 |
| Redundancy | Yes, thanks to two parity bits |
| Failure Tolerance | Can withstand up to two simultaneous disk failures |
| Write Performance | Low due to double parity calculation |
| Read Performance | High, similar to RAID 5 |
| Usable Capacity | (N-2) * capacity of the smallest disk |
| Ideal Use Case | Systems requiring high fault tolerance, like archives, database servers, file servers |
| Recovery Time | Complex and lengthy due to parity reconstruction |
| Cost | High due to the need for more disks |
There are two ways to build the storage system: with the help of BIOS or with the specialized software supplied by the controller vendor, and we’ll explore both.
How to build a RAID 6
How to build a RAID 6 with the help of BIOS
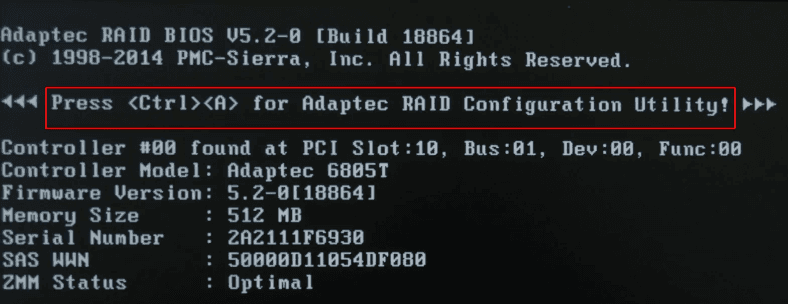
Boot the computer as always, and press the key shortcut Ctrl + A to access BIOS.
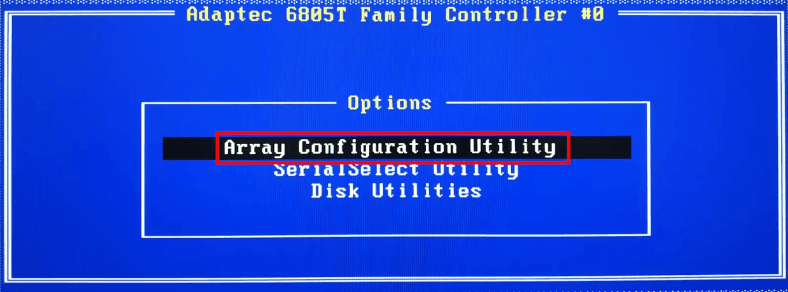
Go to Array Configuration Utility.
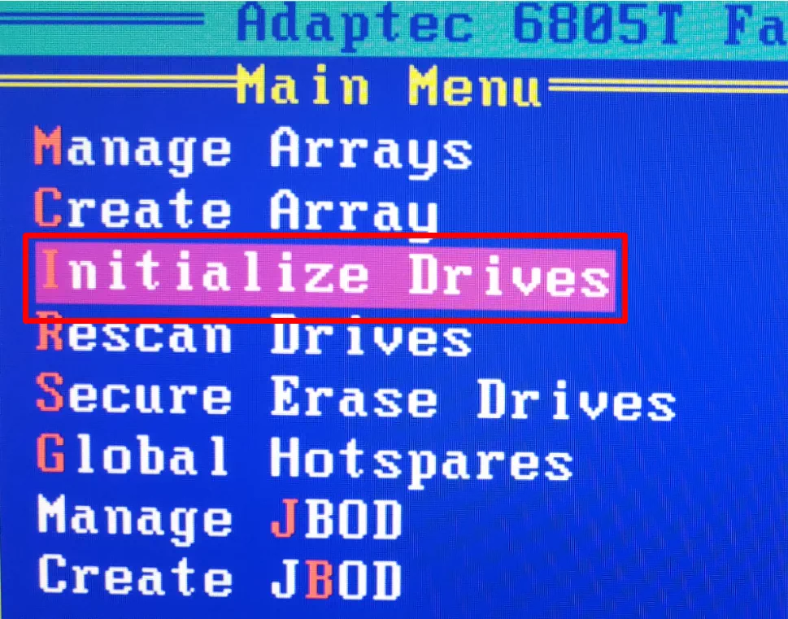
The next step is initialization; do it by jumping to the line Initialize Drives, press Enter.
Use the Space or Insert key to select the drives which would make up your storage system, and press Enter to confirm the action.
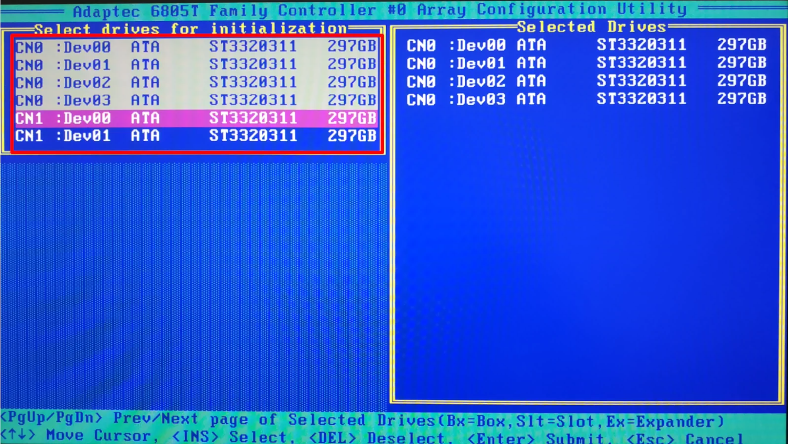
The system reacts with the warning that all drives to be initialized will be erased. Enter Yes, the operation will be confirmed.

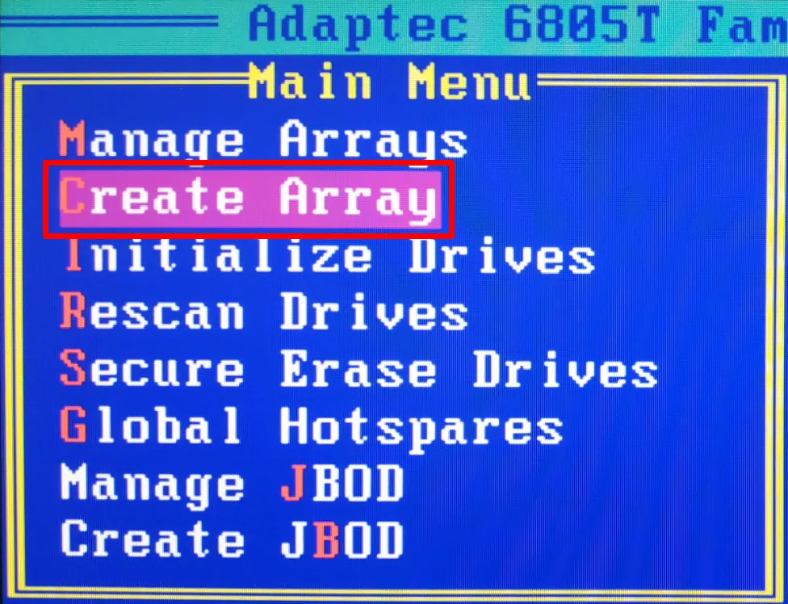
Wait until the process is over, and then start building the array. Select the line Create Array.
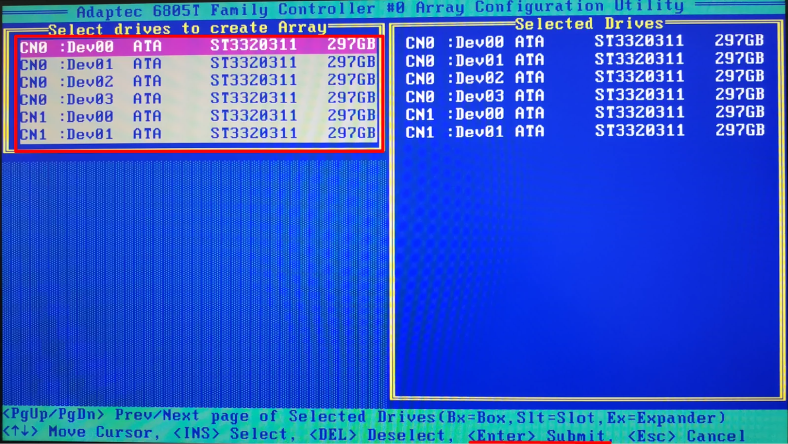
Select the drives you need to combine into a storage system, and press Enter.
In the new window, specify the following: name, type, block size, capacity, and some extra properties.
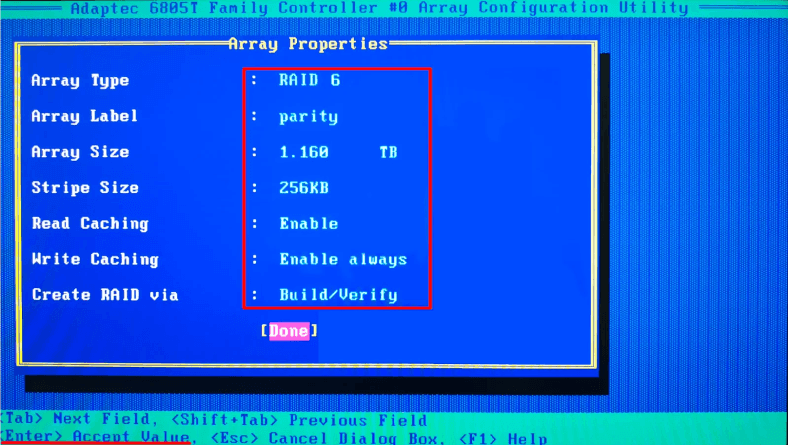
An important note: These details must be memorized or written down, because you’ll need them when you start recovering the array data. When proper values are selected, press Enter to confirm.
Build a RAID with the help of Adaptec Storage Manager
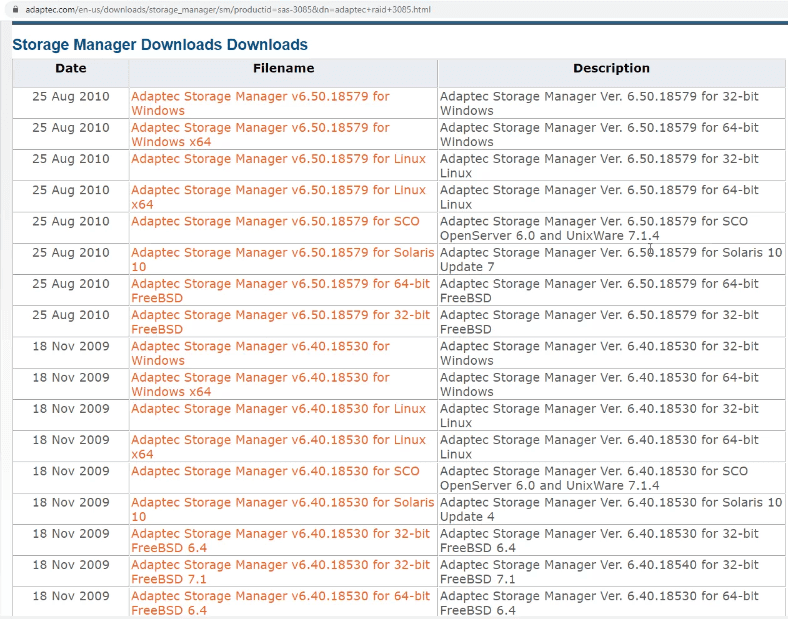
We’ll be using specialized software – Adaptec Storage Manager, which can be downloaded from the official website of the adapter’s vendor. Go to the website, select the necessary version depending on the type of your operating system, download and install it.
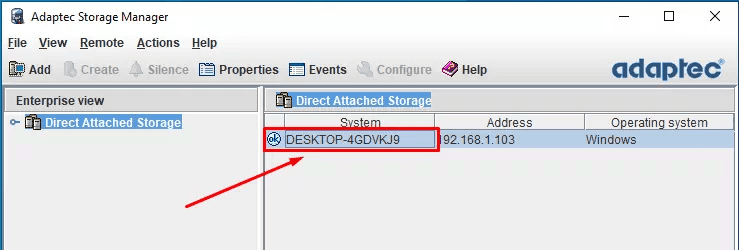
Start the utility, and click on the computer’s name in the main window of the program.
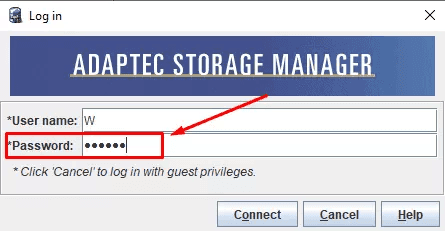
Enter the registration data and password to your account.
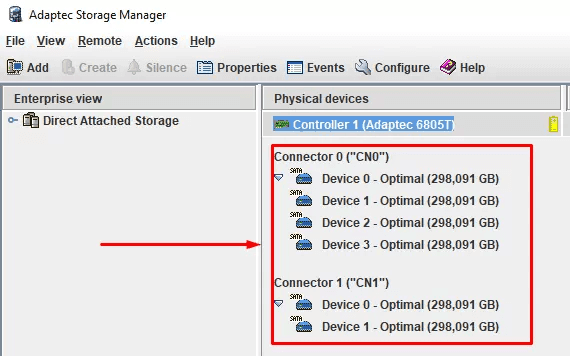
Now your controller should appear in this window.
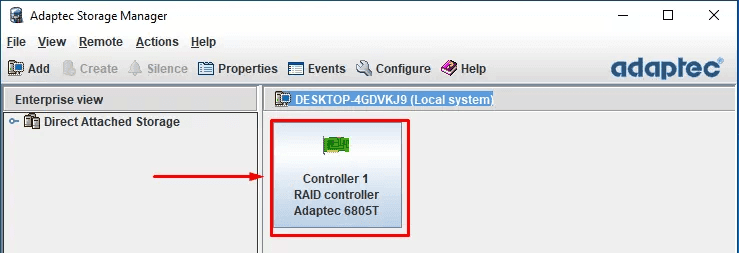
Click on its icon to see the list of connected drives.
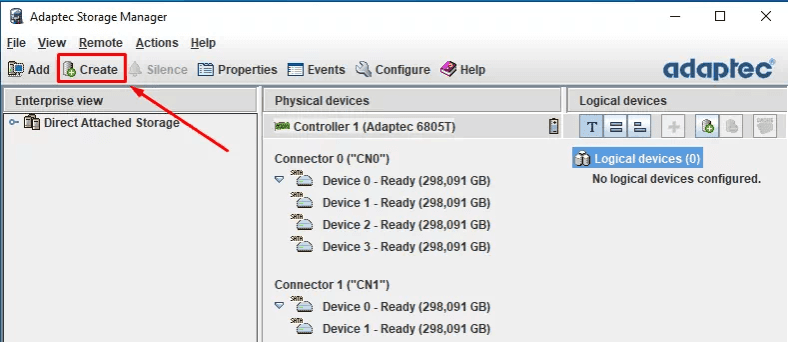
To build an array, click Create.
In the next window, choose between Express or Custom configuration options.
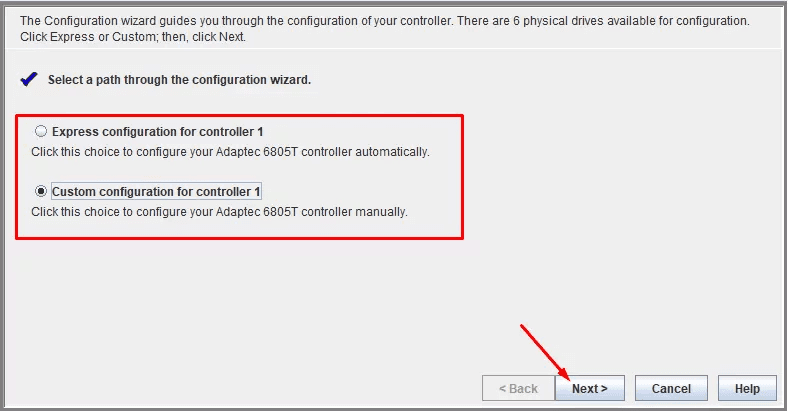
The first mode is automatic, and the utility will offer you the most suitable array type for your set of disks.
In the second mode, you can select the configuration manually. In our case, we select the Custom option.
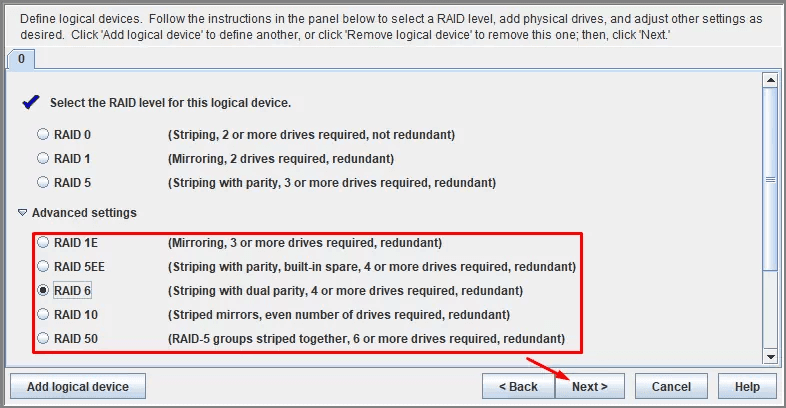
In the next window, select the array type. If you don’t see the one you need on this list, click Advanced Settings to find more options.
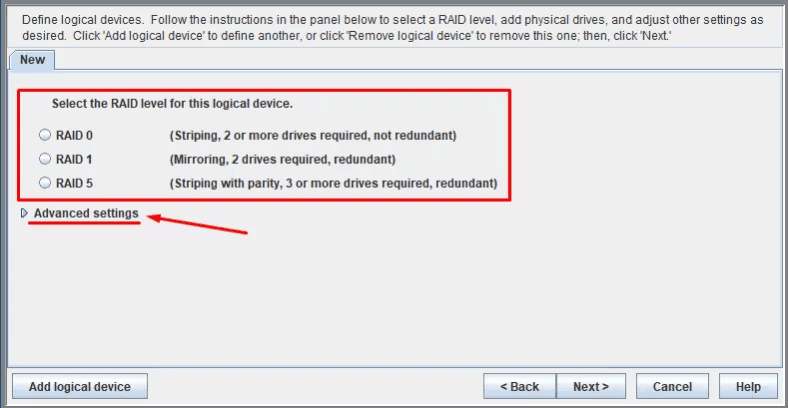
Select the RAID type you want -in our case, it’s RAID 6 – then click Next.
In the next window, fill in the field Name.
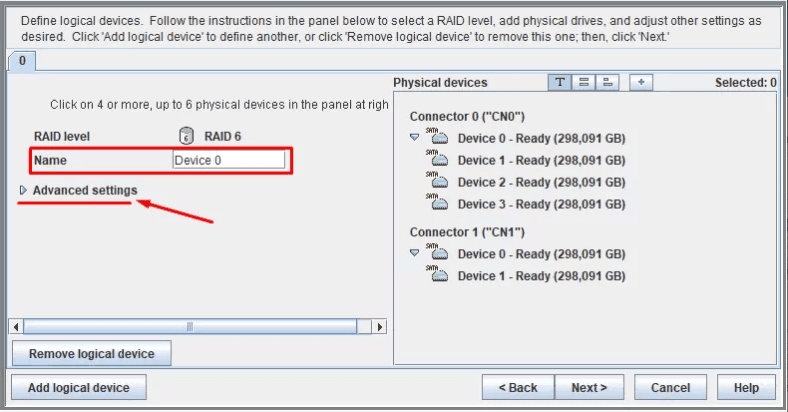
Click Next, type in\modify other properties, or leave them at their default values.
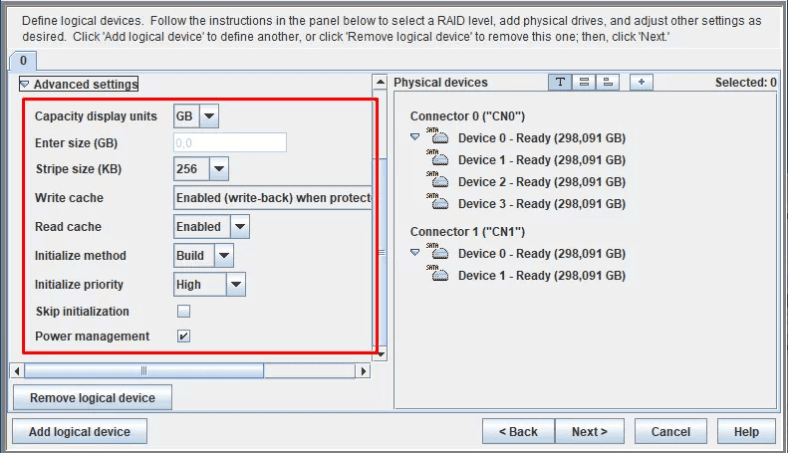
All the properties should be written down or memorized, because you will need them when the time for data recovery comes.
After that, select all drives to be included into this RAID, and click Next.
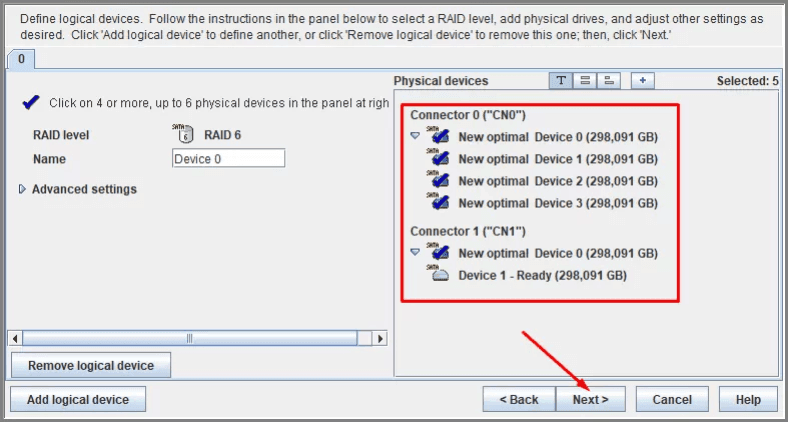
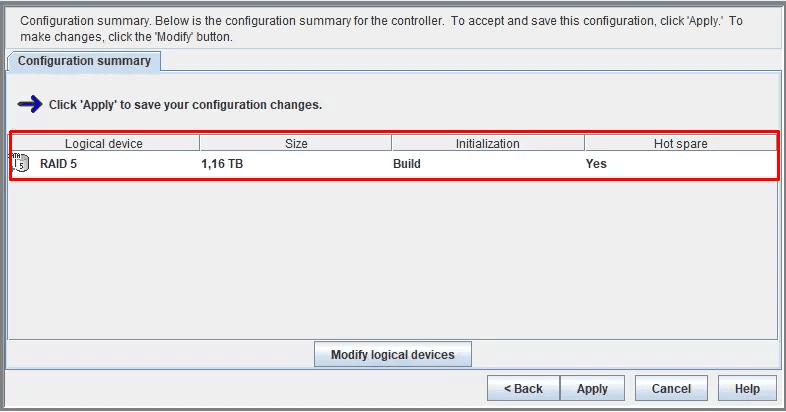
Click Apply to save the configuration, and then Yes.
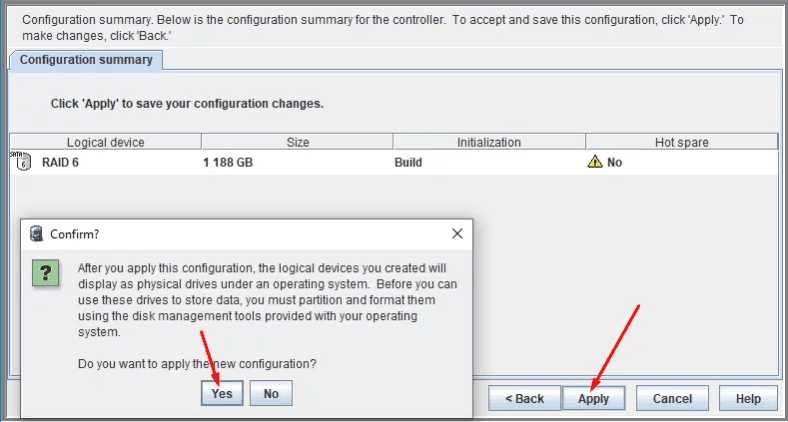
The untility will start building the array immediately.
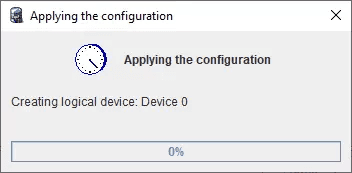
This is the stage that suggests waiting – it could be for twenty minutes, or even for several hours.
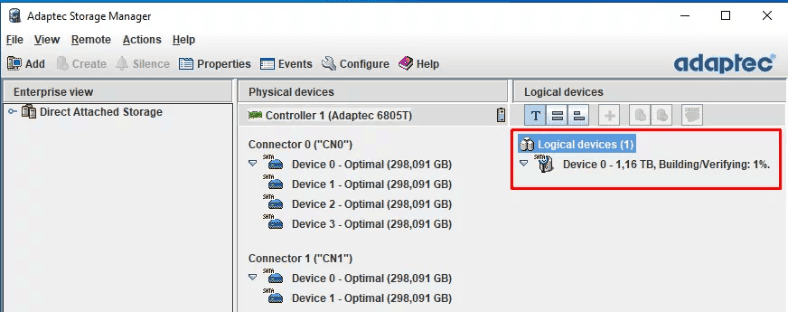
Now it can be used – as soon as you take the last step in Disk Management.
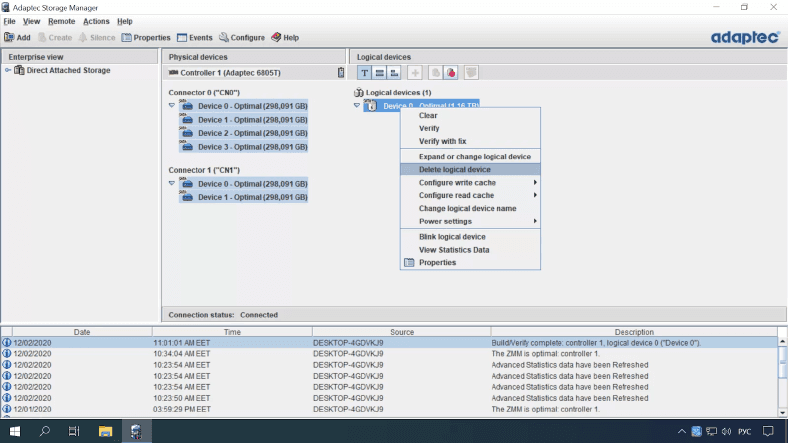
This utility can also be used to look up array properties and status, remove it or rebuild it, if necessary.
How to replace a hard disk in RAID 6
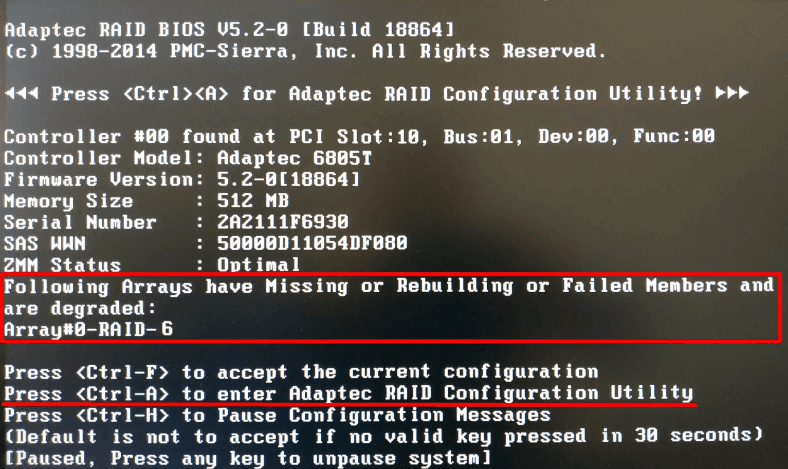
The technology used in RAID 6 is designed with improved fault tolerance in mind. It is built in such a way that it can work properly even if one or several physical disks are out of order. So after one or two physical storage devices break down, this RAID type will remain operable. While the computer is booting, you will see a system warning that says “Following Arrays have Missing or Rebuilding or Failed Members and are degraded” and the name.
An important note: Before you start doing anything to repair the array, make sure you have backed up all your important files. That is important, because in the process of rebuilding the array, you may face some unexpected things like one more drive breaking down, a hardware failure in any other device or a software failure in the rebuilding process, and any of these may result in losing your files for good.
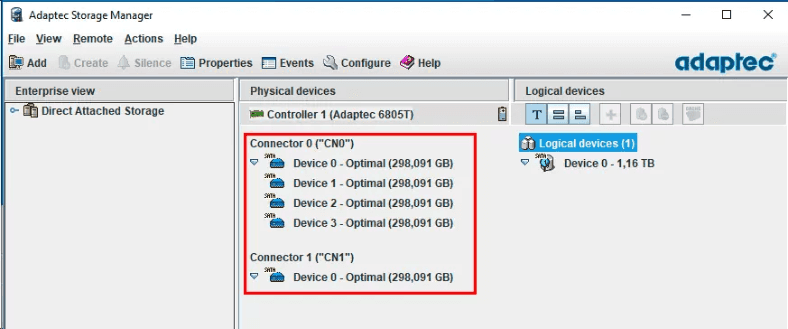
To find out which disk is out of order, use Adaptec Storage Manager.
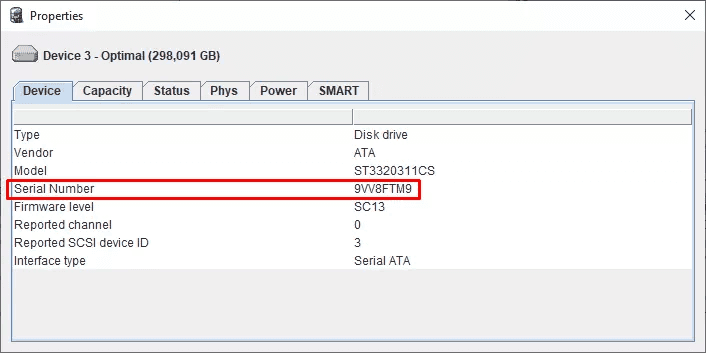
In order to see which drives are still OK, right-click on each of them and jump to open their Properties.
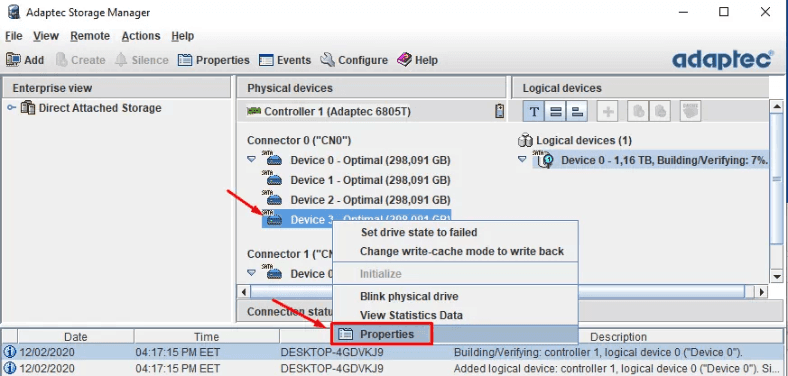
Find the line Serial Number for a particular HDD.
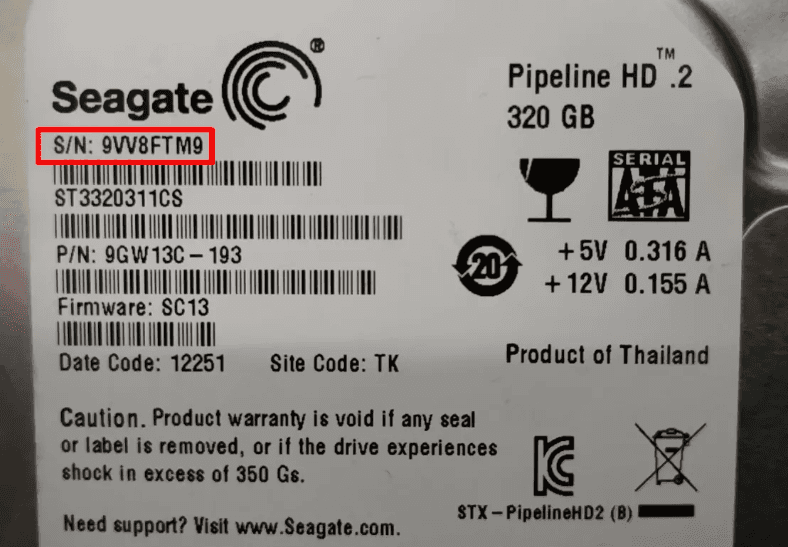
This is the same serial number as printed on the special sticker you can find on the physical disk.
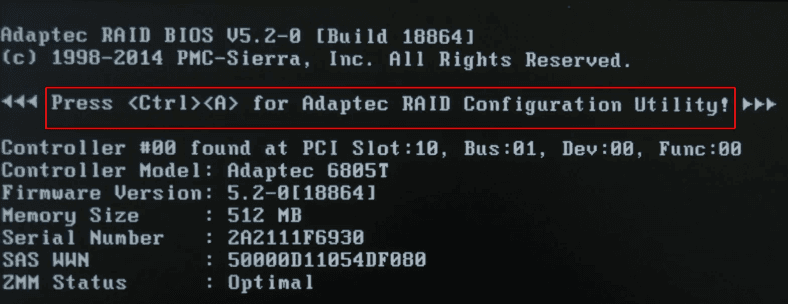
When you find the drives which are no longer operable, all you can do is to replace them with new ones and rebuild your RAID 6. Now replace the old disks, connect the new disks, restart the computer, and after initialization, press the key shortcut Ctrl + A.
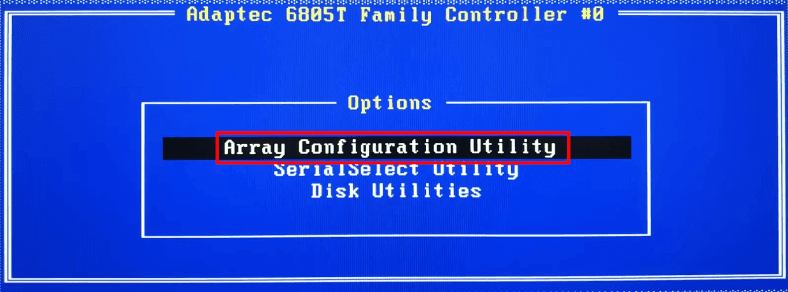
In the controller’s menu, jump to Array Configuration Utility.
Now select the line Initialize Drives.
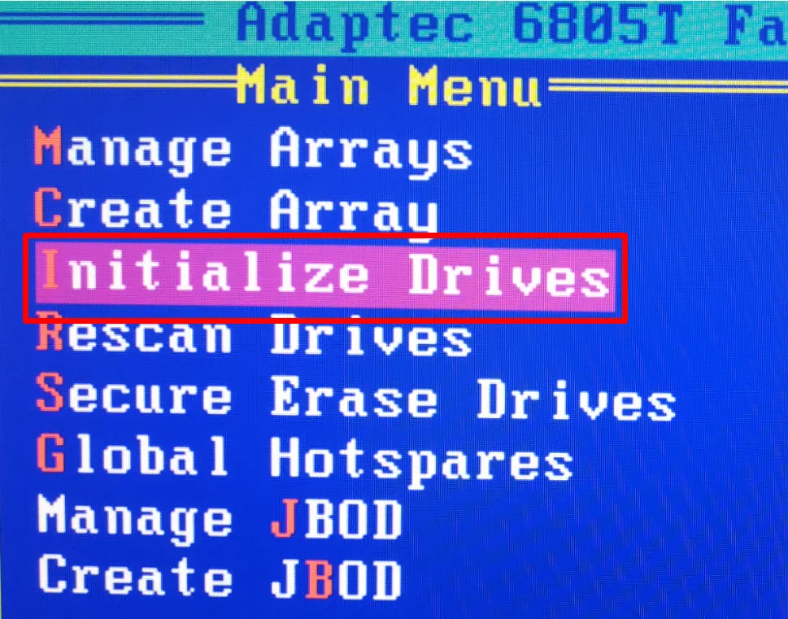
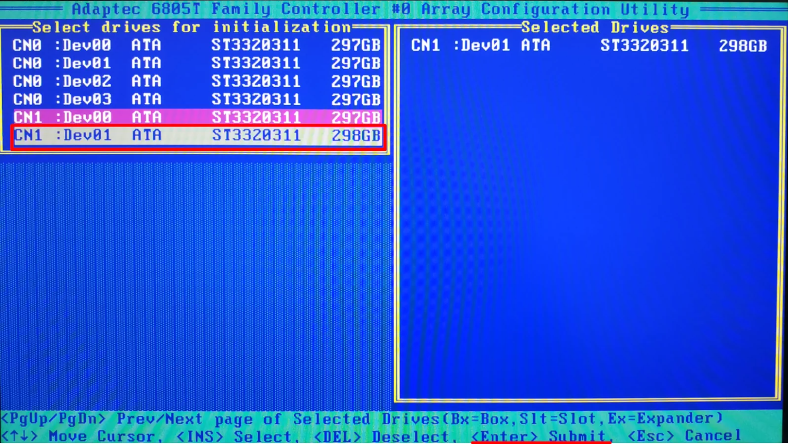
The new drives need to be initialized. Press the Insert key to select them, and then Enter – to confirm the operation.
Now add the new disks to the array by jumping to the line Manage Arrays.
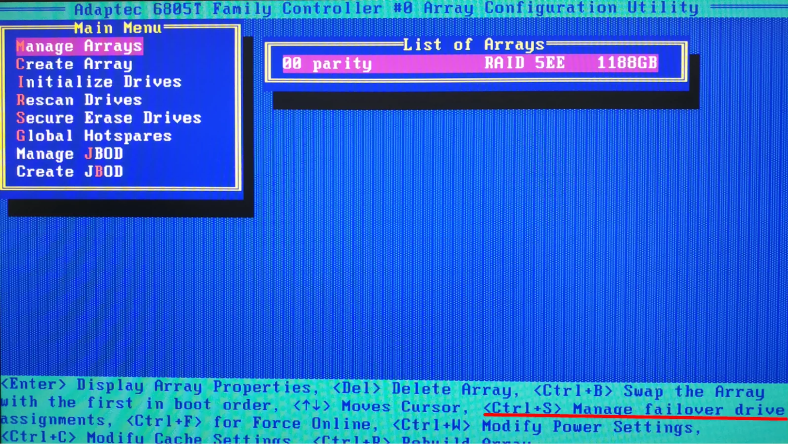
Press the key shortcut Ctrl + S, to open the management window.
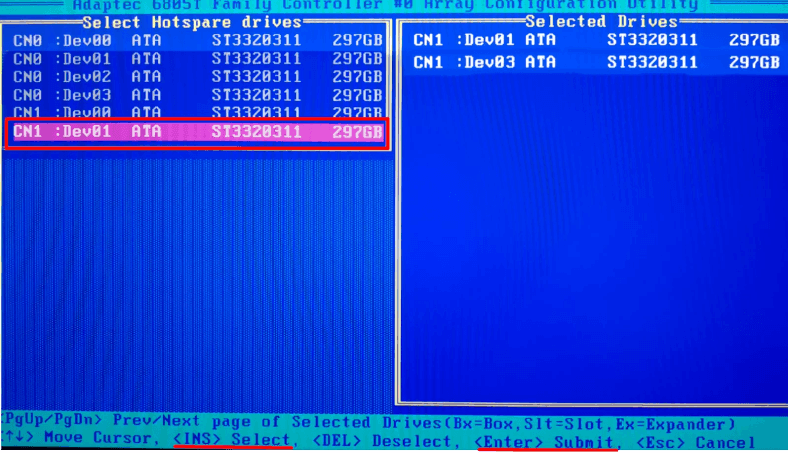
Use the Space key to select all the physical disks you need, then press Enter -> Yes to confirm your actions. The process of building the array starts at once.
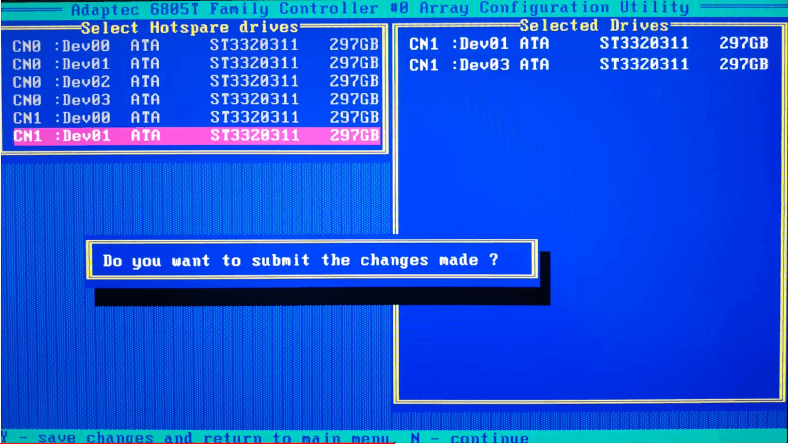
Now you can boot the server in an ordinary mode and continue your work; the entire process of building the disk array is a long story and it can take a lot of time.
Even when three physical disks break down, or the controller fails, you can still recover the data stored on such disks! We will use Hetman RAID Recovery.
It will help you find the information from damaged arrays or physical disks included into such arrays. First of all, it will detect the technical data: controller model, software, motherboard. After that, it will rebuild the array, so all you have to do is to save the data.
How to recover files from RAID 6
Method 1. How to recover files after a RAID controller fails
When the controller is broken, data from the disks can’t be read in the ordinary way. If you connect the disks directly to the motherboard, Windows will display a notification saying that the disks need to be formatted.
In this situation, you can either replace the controller with a similar one of the same series (but there is no guarantee that the array can be restored back to all of its functionality) or use specialized software tools capable of restoring your RAID and preserving all of its data.
On a computer running a Windows OS, connect the healthy disks directly to the motherboard. The operating system will identify them as damaged – RAW. And suggest to initialize them, if you open Disk Management.
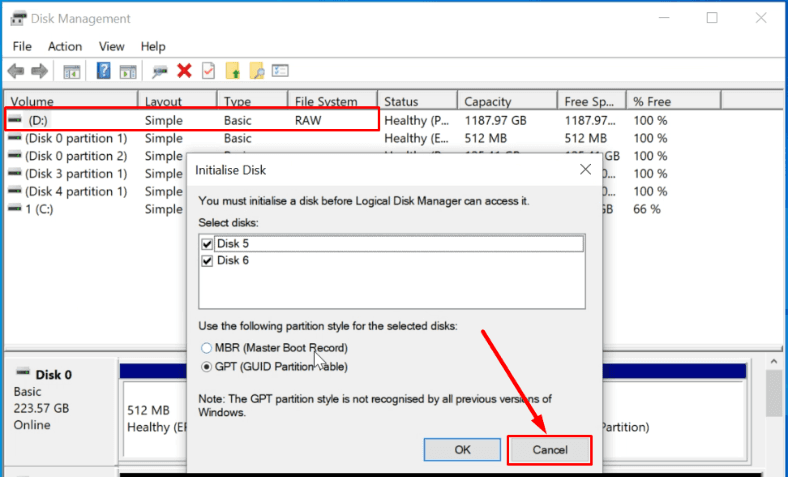
Similarly, if you open them in the Explorer, you’ll be suggested to format them.

An important note: Hit Cancel everywhere, or all the information will be erased, and you won’t be able to rebuild the array.
You can download Hetman RAID Recovery from the official website, and then install it as administrator. Every disk within the array keeps all service data: the disks included into the array, the order of connection to the controller, how blocks are written, RAID type, number of groups, capacity.
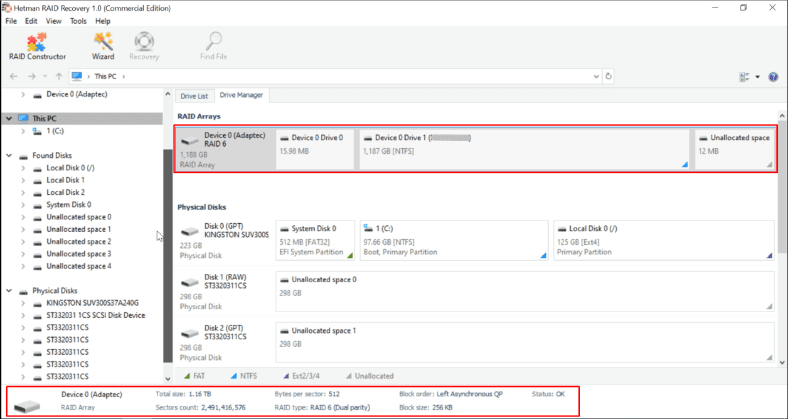
Right after the program starts, it runs an automatic search and initializes all storage devices connected to this computer. Having selected the required data from the operating system and connected disks, Hetman RAID Recovery will add automatically built RAID arrays to the list. It will rebuild the array on the fly, if the disks within it are healthy, and then you will only have to scan the volumes and save the information.
Open the Drive Manager tab in the utility, find the field RAID right-click on it and select Open.
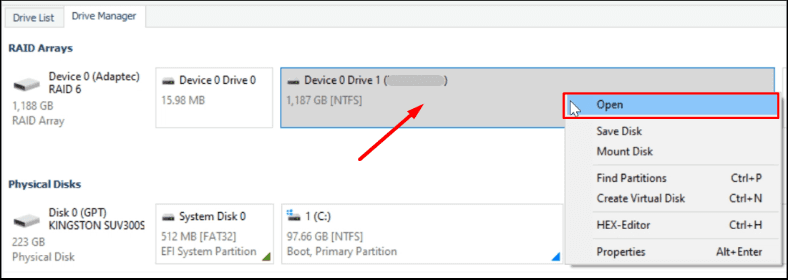
Let’s run a Fast scan first, and if the internal structure of the disks is still undamaged, it will be enough for the program to find the files you need.
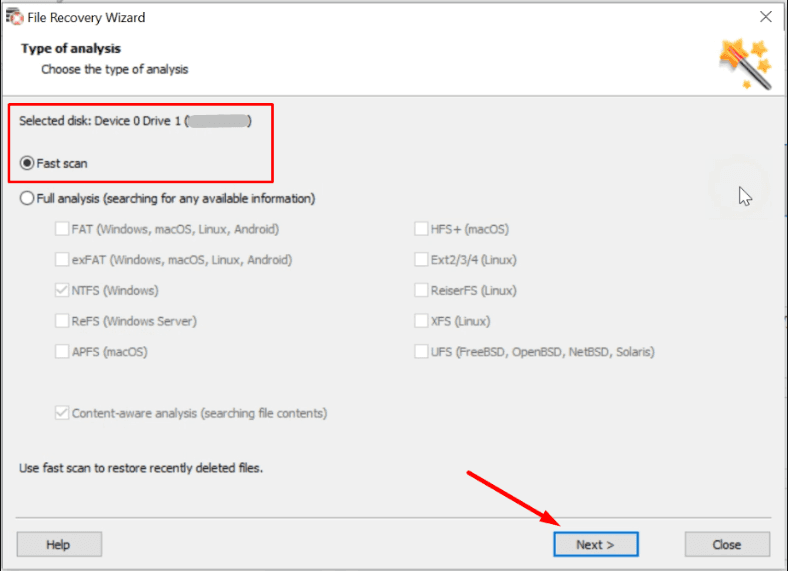
After the fast scan, open the disk to look for the data you need: if the program hasn’t managed to find it, run Full analysis. When the analysis is over, you will see the detected files in the right side of the window.
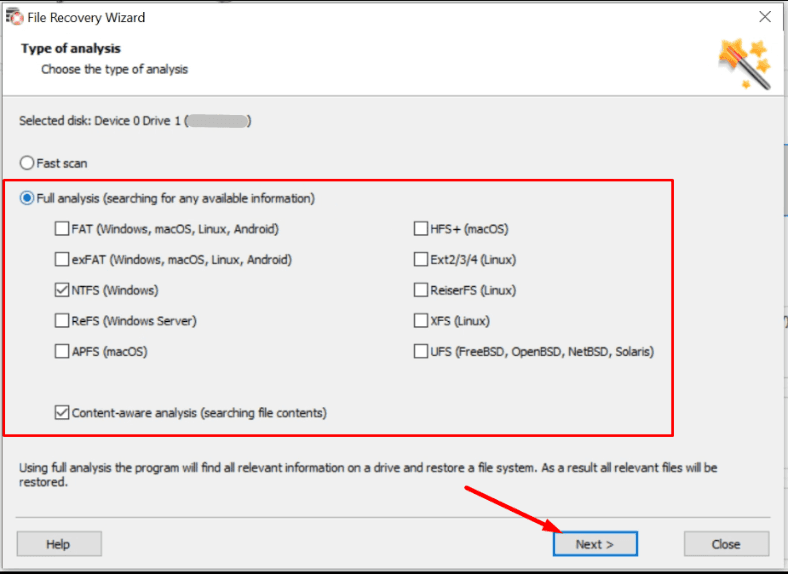
As a result, Hetman RAID Recovery rebuilt the array easily and managed to find all the data.
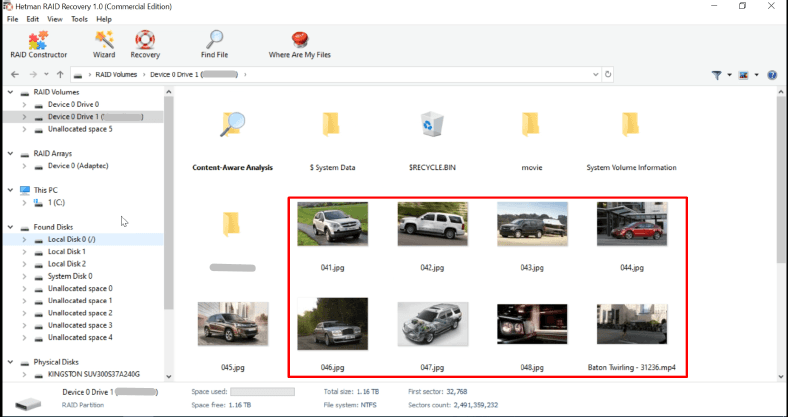
Back up the most important files, and then just replace the controller with the most suitable one.
Method 2. How to recover files with a dead RAID controller and two faulty disks?
Now let’s imagine a situation when the controller no longer works properly, and two disks do not respond at all. Thanks to the RAID 6 technology, even with two drives down your array is still operable. However, when the controller fails, you have to use additional software tools to access the files on the disks.
Just as before, we connected six disks to the computer. The program has identified the array type automatically.
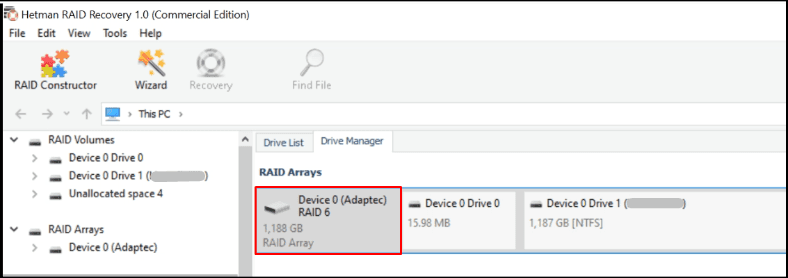
Two of the disks don’t respond, but correct data on the array is displayed.

Right-click on the corresponding line, then click Open, and start the scan wizard.
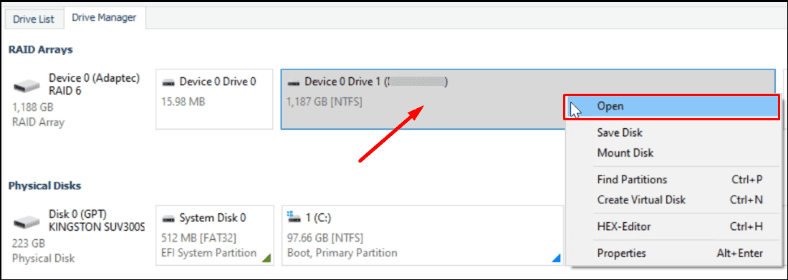
Run Fast scan first, and if the program displays all the necessary files, then you don’t have to run Full analysis.
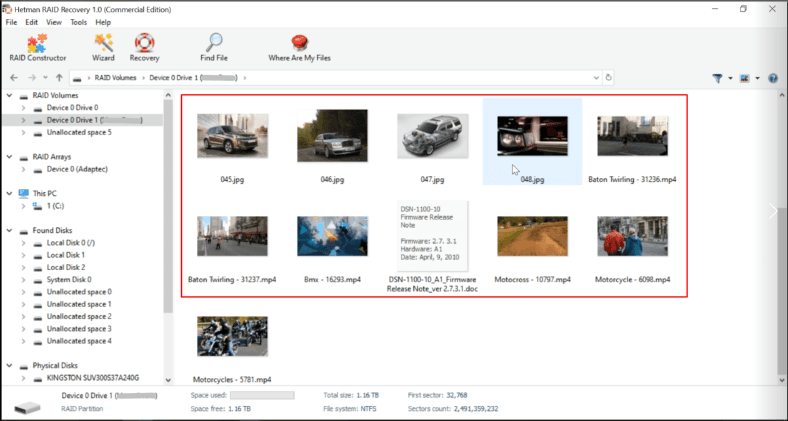
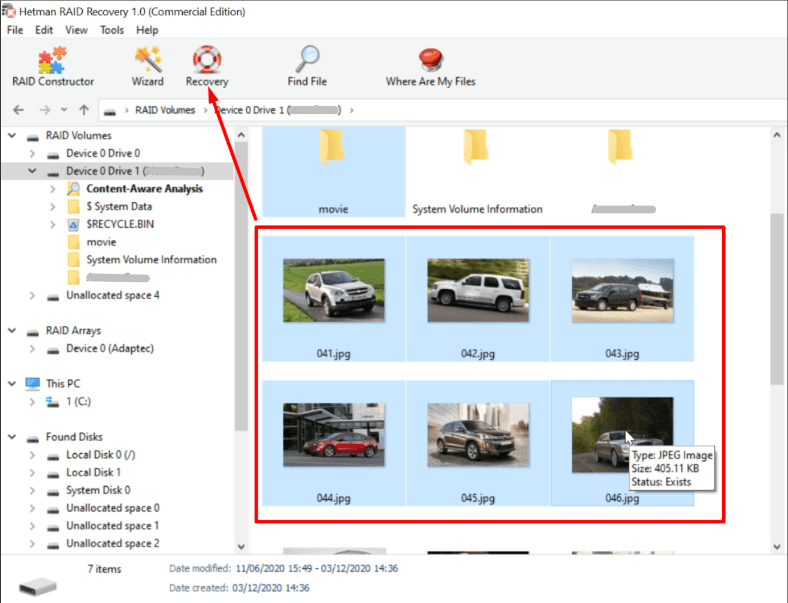
Select all the files you need and click Recovery.
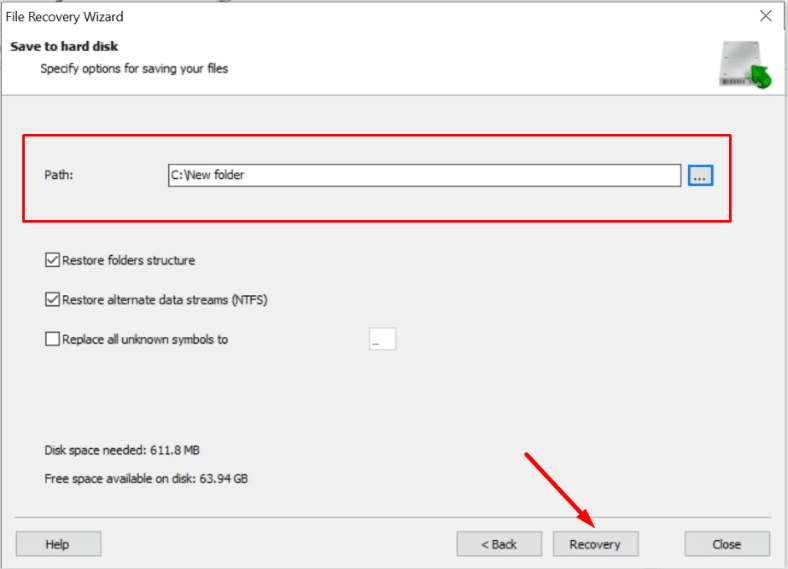
Choose a directory on another disk where the recovered data should be saved, and click Recovery.
Method 3. How to recover a RAID system missing a controller and three disks out of six?
Let’s explore a case when the controller refused to work properly, while three of the disks within the array are damaged. RAID 6 architecture cannot ensure proper operation in this scenario. Even if the controller is OK, the information will still be inaccessible. Even though you replace faulty disks and try to rebuild the array, the data will be lost completely.
Let’s start by connecting the three healthy disks to the motherboard. If you can’t identify which disks are out of order, and which are not, then connect them all. Even in this situation, Hetman RAID Recovery will be able to recognize the RAID type automatically, based on the additional information.
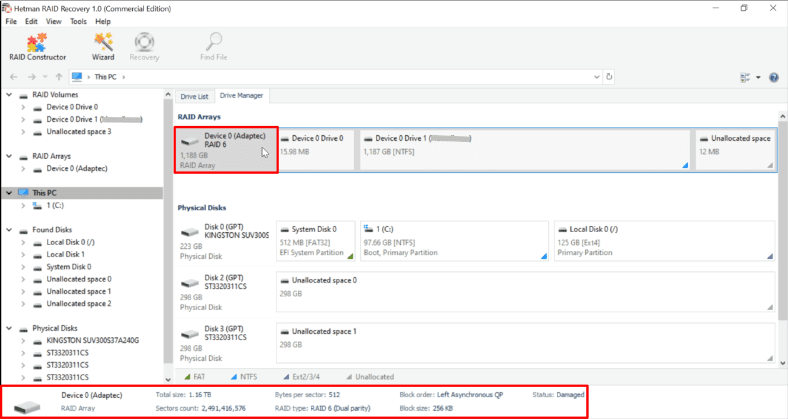
If the program can’t recognize it automatically, and it doesn’t add it to the list of devices, then you should add the integrated RAID Constructor.
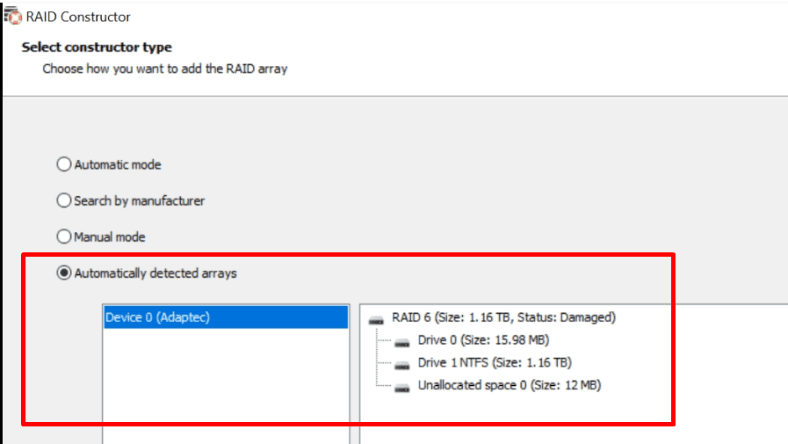
Remember I told you to memorize or write down the properties when this array was created? It is now that we need this information for building the array manually.
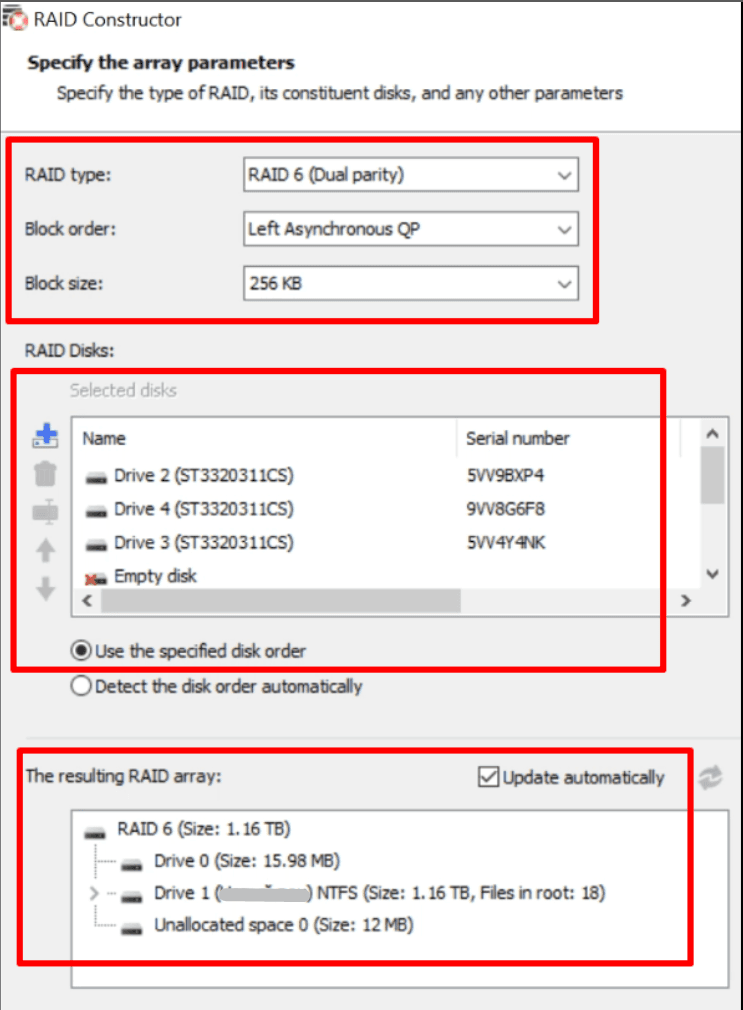
When the program recognizes the RAID type automatically, make sure that all the properties are displayed correctly. The amount of data available for recovery depends largely on this information. After checking the properties and correcting them if necessary, click Add to start scanning.
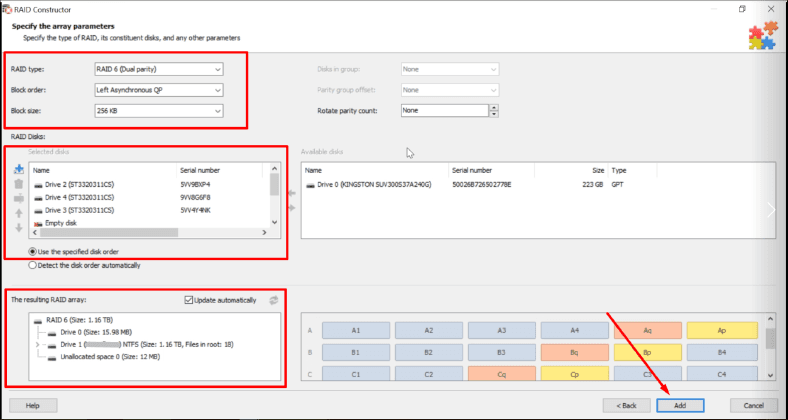
In our case, the program has found the necessary files, but some of them are damaged.
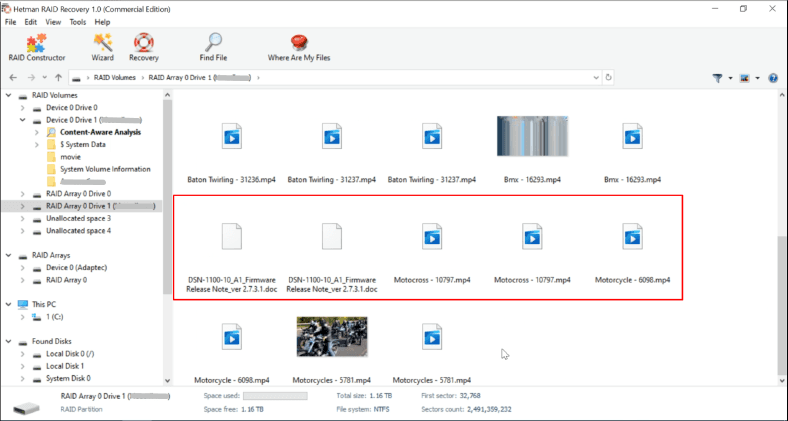
It’s recommended to run Full analysis, so that the utility finds more information and it improves your chances to find the files which are still intact.
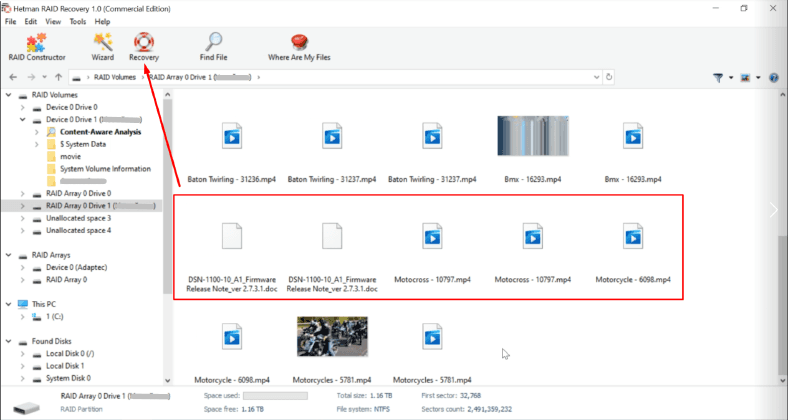
The other steps are simple: check Preview, select the necessary files, and click Recovery.
Select a directory to save the files to, and make sure it’s located on a different physical disk.
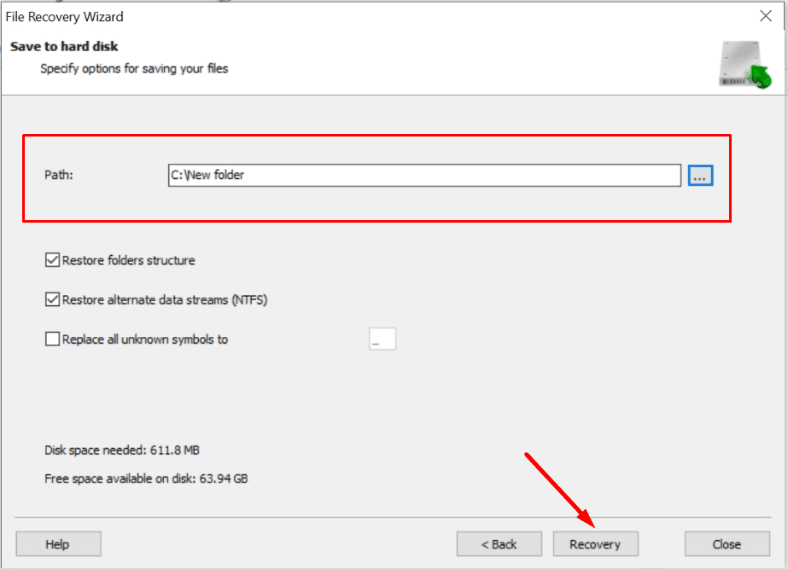
When the process is over, all the files will be put into the directory you have selected.
Conclusion
At the moment, RAID 6 is one of the most reliable types of architecture in terms of ensuring data integrity. What is more, there are very little chances of three hard disks failing at the same time. If one of the disks breaks down, replacing it and rebuilding the array is a matter of several hours, and even with two disks down, the situation is not so bad. However, when the controller fails and there is no healthy disk to replace the bad one, you don’t seem to have a reliable way of accessing your data except by using specialized software. Our program has coped with the task perfectly. It was able to rebuild the array even when three disks were out of order. It also managed to recover files in spite of the damaged controller and two hard disks that failed completely. Even more, it found a way to extract a part of the files when three disks out of six became inaccessible.


RAID 6 does not protect you against errors... RAID 6, as well as RAID 5, relies on hard disks to return correct data or report a read error.
I agree to RAID 5 made of 6 hard disks on condition that you monitor the disks regularly, that is, run automatic scheduled RAID tests and SMART self-testing, and receive instant notification to your email if there are any issues - and if you have any doubts concerning the disk condition, you should replace it (by using mdadm --replace or its equivalent that doesn’t affect redundancy).
The problem with hard disks is that they fail quietly, and you don’t know that a sector X is bad until you try to read some data from there.