Lost Data: How to Recover Files Deleted Without Using the Recycle Bin?
Deleted important files without sending them to the Recycle Bin? In this article, we uncover the methods and techniques to recover files deleted without using the Recycle Bin. Our experts share valuable insights, tips, and solutions to help you retrieve those lost files. Whether it’s accidental deletion or intentional bypassing of the Recycle Bin, we’ve got you covered.

- The Windows Recycle Bin and Different Ways to Delete Files
- Why is File Recovery Possible in a Windows Operating System?
- How to Recover Files Deleted Without Using the Recycle Bin
- Conclusion
- Questions and answers
- Comments
It is not always possible to recover user data with Windows integrated tools. Files deleted in a particular way or under certain conditions can be inaccessible when you use standards tools that come with your operating system. If that is the case, you will have to use third-party recovery solutions. In this article, we will try to describe the main ways to recover files deleted without using the Windows Recycle Bin.

🧺 How to Recover Files and Folders After Sending Them to the Recycle Bin and Deleting? (Windows 11)
The Windows Recycle Bin and Different Ways to Delete Files
The Windows Recycle Bin was featured in the earliest versions of Windows operating systems, and it is still there, being a standard preinstalled system safety tool. It is a special reserved area of the storage space allocated by the system for temporary keeping removed user data. Its main purpose is to ensure safe-keeping and integrity of all data moved to the Windows Recycle Bin with certain settings, and enable safe recovery for files which have been deleted accidentally or by mistake.
User files end up in the Recycle Bin after certain actions and on certain conditions. A single file or a group of previously selected files are sent to the Windows Recycle Bin if one of the common ways of deleting is used:
- You right-click on the selected files, and choose Delete from the context menu;
- After selecting files, you press the Delete button on the keyboard.
In both cases, Windows security service will show you a warning message asking to confirm the action, and only then will it launch the process of deleting files.
It should be noted specially, that the specified ways of deleting a file with moving it to the Windows Recycle Bin are only implemented for operations involving internal or external hard disks (HDD). For all other kinds of computer devices, files are removed directly and irreversibly, without an interim stage of putting the deleted files to the Windows Recycle Bin. This is related to design peculiarities of memory devices and the technologies involved (for example, solid-state drives boost read operations with the TRIM function which cleans memory cells from the contents of a deleted file immediately after such file is deleted).
After files are moved to the Windows Recycle Bin they become available for recovery with the integrated functions of this tool.
However, files are often deleted without using the Windows Recycle Bin and here are the main reasons why it happens that way:
- the Windows Recycle Bin is configured to destroy files as soon as they are deleted;
- the files were removed irreversibly with the key shortcut Shift + Delete, or with holding down the Shift button when selecting the Delete line in the context menu;
- the files were deleted from storage media devices that don’t support moving files to the Windows Recycle Bin, for example, USB drives or memory cards of various formats, and so on;
- the Windows Recycle Bin was emptied deliberately;
- the amount of data exceeds the maximum size of the temporary storage specified in the settings of the Windows Recycle Bin, and it triggers automatic removal of the files previously sent to the Windows Recycle Bin;
- effects of various malware (viruses) that may delete important user data and so on.
In such cases, you cannot recover the deleted files with the Windows Recycle Bin, so it is time for other methods.
You can learn more about methods for recovery of accidentally deleted files or folders from a Windows device on our YouTube channel by watching the video guide “Restoring a Deleted Folder from Recycle Bin, Archive or with Specialized Software”.

⚕️ Restoring a Deleted Folder from Recycle Bin, Archive or with Data Recovery Software in 2021 👨💻
Why is File Recovery Possible in a Windows Operating System?
Based on the things above, we can make a conclusion that files can be deleted for a number of reasons and in a number of ways. Anyway, the process of deleting files suggests their possible recovery, with some rare exceptions (for example, in most cases you can’t recover files deleted from an SSD). Visit our channel to watch an introductory video about recovering data from solid-state drives and when it is possible: “Recovering Data from an SSD After File Deletion or Disk Formatting”.

⚕️ Recovering Data from SSD After File Deletion or Disk Formatting in 2021
However, it would be wrong to state that when files are deleted, they are removed completely from the hard disk.
When files are deleted in a common way, they are moved to the Windows Recycle Bin and remain there until it is emptied in one way or another. If the deleted files are in the Windows Recycle Bin, you can recover them easily with the tool’s integrated functions.
When deleted irreversibly, the files are never placed into the Windows Recycle Bin though they still exist physically on the hard disk – but in the form hidden from the operating system. When a file is deleted, only the information indicating the file location, size and other settings disappears, while the file contents are still on the hard disk.
The operating system uses a clearly structured table to allocate files and create a catalogue which is made up of indexes specifying the place of every file in the hard disk. When such an index is deleted, the corresponding file becomes invisible for the operating system, and the disk space occupied by the file is marked as being free. It means that this disk space does not contain any data and is available for writing new information at any time. After the space without indexes is overwritten, recovering the deleted files which used to be there before saving the new data will become quite a challenge. To cut the long story short, the longer the free disk space exists after indexes were removed, the higher are the chances for that space to be overwritten – which means losing the previously written data. So the shorter is the period of time between the moment of deleting files and beginning recovery actions, the higher are the chances for successful recovery.
That is why you should start working on file recovery immediately after the files were deleted.
The deleted files which you cannot see in the Windows Recycle Bin can be recovered either with the utilities integrated into the Windows operating system or with third-party file recovery software. Now let’s analyze every method in detail.
How to Recover Files Deleted Without Using the Recycle Bin
Method 1. File Recovery with Windows Backup
File recovery with Windows backup is possible if there is a backup which you saved previously. There are several simple actions to take for recovering deleted files. You can open the window of the application to help you recover files from a Windows backup by going to the Control Panel or Settings. As Microsoft developers are trying to move the main settings of the Windows operating system to the application of the same name, Settings, to make things more convenient for users, that is where we go to show you the first method.
Open the Settings app in any way you prefer, for example, by pressing the key shortcut Windows + I. In the application window, drag the slider down and select the section Update and Security.

In the left panel of the new window, go to the tab Backup. In the right panel, find the section Looking for an older backup? and click on the hyperlink Go to Backup and Restore (Windows 7).
In the next window, scroll down to the Restore section and click on Restore my files.
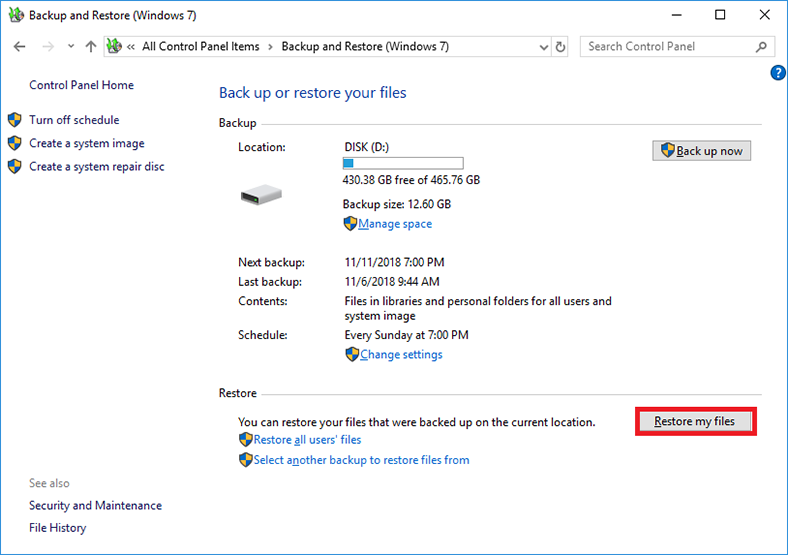
It will start a step-by-step file recovery tool working with a Windows backup. In the new window, click on Browse for files or Browse for folders and add to the main panel the list of files you are going to recover.

As soon as you have chosen the necessary files, click Next to move to advanced settings.

Then, specify the directory where to save the files after recovery. You can choose to save them to their original location or give new path by checking the corresponding option. When you’ve done that, click Restore, and all selected files and folders will be recovered and saved in accordance with the settings you have chosen.

Method 2. File Recovery from Previous Versions
This tool of the Windows operating system to recover user files from previous versions can be launched from Windows File Explorer and it only takes a few steps to use it.
Open the File Explorer – for example, by double-clicking the shortcut on your desktop, and go to the folder where the deleted file used to be. Then right-click on the folder to open the context menu; from the list of available actions, select Restore previous versions.
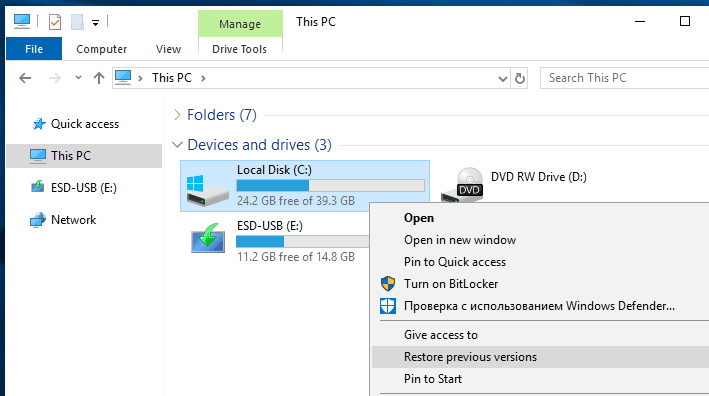
In the Properties window of the selected folder, you will see the previously saved versions. Choose the version you need and restore it.
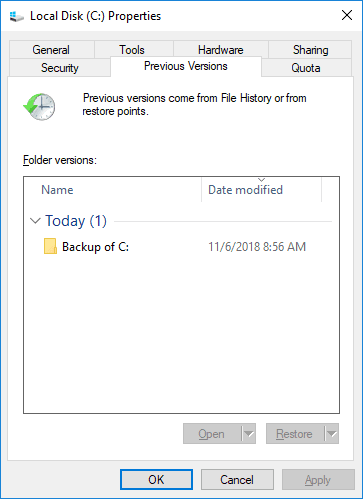
Method 3. File Recovery with File History
The File History tool lets you restore permanently deleted files on condition that the File History backup function was enabled in the Windows operating system on this particular device, and the folders containing deleted files were selected for backup.
Use the previously described method to open the Settings app, go to Update and Security and find the Backup tab in the left panel. In the right panel, make sure that the slider Automatically back up my files in the section Backup using File History is set to On position. Then click on the hyperlink More options below the backup slider.
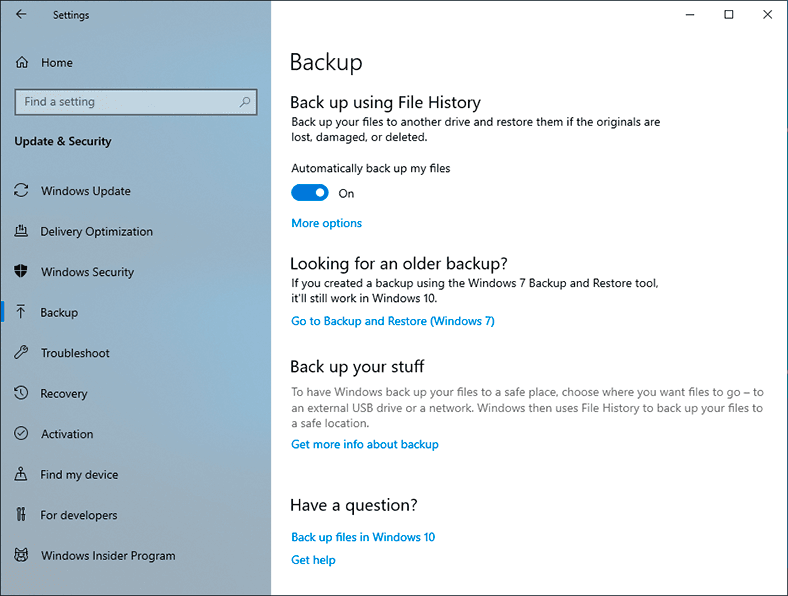
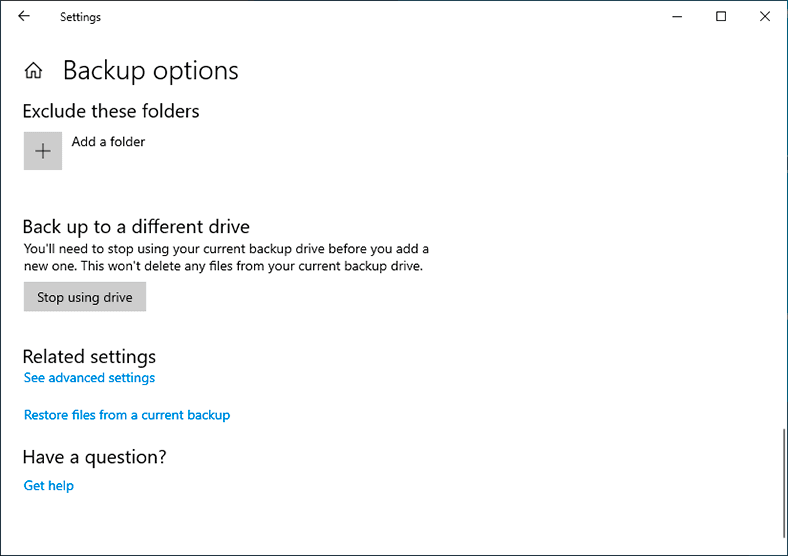
In the Backup options window that opens, scroll down to Related Settings and click on the hyperlink Restore files from a current backup.
After you click on the link, you will see the window of the File History tool with all previously saved backups of the folders selected for backup as of the certain date. Using the navigation buttons at the bottom of the window to move from one backup window to another, you can find a specific backup date and use it to restore the deleted files. After you have selected the necessary files, click on Restore to original location button, placed between the navigation buttons and fashioned like a white rounded arrow on the green background.
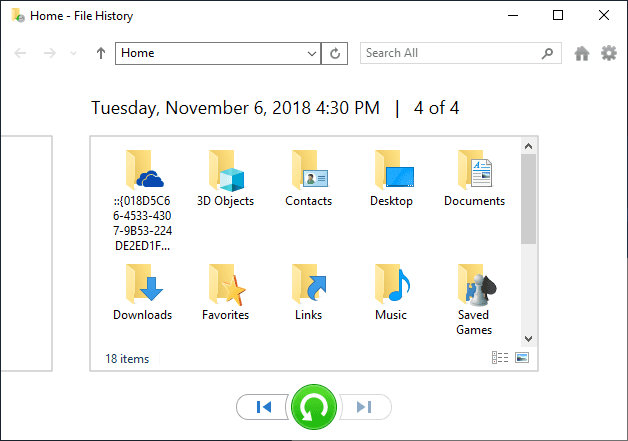
It will start the file recovery process from the specified backup copy with the use of File History; when the process is over, all files will be saved to their original locations where they were stored before being deleted.
You can learn more about using File History to backup and restore data in Windows 10 by visiting our channel and watching the video guide “How to Set Up and Configure File History in Windows 10 and 8”

How to Set Up and Configure File History in Windows 10, 8 📝📁💻
Method 4. Recover Deleted Files with Specialized Data Recovery Software
One of the best ways for effective recovery of files deleted without using the Windows Recycle Bin involves specialized data recovery software. At the moment, you can find lots of various programs by all kinds of developers – and all of them promising to help you recover deleted files. They differ by their functionality, integrated tools, opportunities and friendliness of their interface, the scope of use and many other peculiarities. However, the most important aspect to consider when choosing software for restoring deleted files is the number of file formats that this or another tool supports, and the rate of successful recovery it can guarantee.
The list of file recovery programs can be quite long but the leading position rightfully belongs to Hetman Partition Recovery by Hetman Software.
| Position | Software | Description | Key Features |
|---|---|---|---|
| 1 | Hetman Partition Recovery | Software for recovering deleted files from the Recycle Bin and damaged disks. Supports all major file systems. | Deep analysis, support for various file formats, user-friendly interface, support for Windows, Linux, MacOS file systems, data recovery from virtual machines |
| 2 | Recuva | Free software for recovering deleted files from hard drives, USB, and memory cards. | Free tool, quick scan, limited file system support |
| 3 | EaseUS Data Recovery Wizard | Software for recovering data from deleted partitions and Recycle Bin. Supports various types of devices. | User-friendly interface, recovery from memory cards, support for over 1000 file types |
| 4 | Disk Drill | Powerful tool for recovering files from the Recycle Bin, external, and internal drives. | Detailed file preview, intuitive interface, multi-format support |
| 5 | R-Studio | Software for professional data recovery from damaged partitions and RAID arrays. | RAID support, flexible scan options, network device recovery capability |

🔥 How to Recover Deleted Files With Hetman Partition Recovery Software in 2021 ⚕️
It functionality lets it handle easily all kinds of tasks. The innovative search algorithm allows Hetman Partition Recovery to find and restore completely the vast majority of files in almost any case.
This program has earned a good reputation in restoring files deleted accidentally or by mistake from all kinds of storage devices: hard disks (HDD), USB flash drives, all kinds of memory cards and other similar devices. If files are lost after formatting, deleting a partition or an entire disk, modifying or damaging the file system, the program will use a special low-level signature-based search algorithm to detect and restore all deleted files. Even system errors, hardware or software failures, or logical errors and absence of any access to the disk will not stop Hetman Partition Recovery from doing its job properly, and restoring all the user information it was able to find.
To restore files deleted without using the Windows Recycle Bin you need to take a few simple steps as shown below.
Download the installer from the official website of Hetman Software and install the program to your computer.
Note: An important condition to make it possible to recover the files deleted without using the Windows Recycle Bin is to install Hetman Partition Recovery to the disk other than the one from which the files were deleted; it should be done this way to prevent the files from being overwritten as it will make the recovery process more complicated.
After you find your way through a few simple settings (for example, by giving the path for installation of the program), the step-by-step wizard will install Hetman Partition Recovery to your computer.
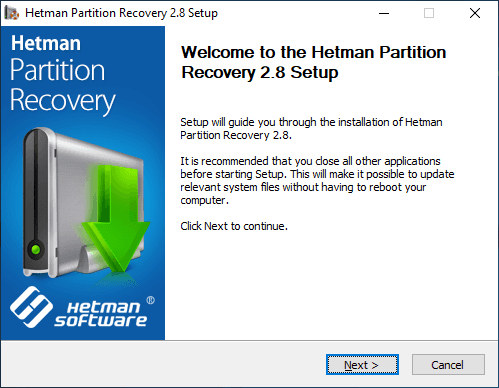
When the installation wizard does the job, start the program, for example, by double-clicking on the desktop shortcut. When started for the first time, the program will run a preliminary scan to detect all storage devices connected to your computer – both internal and external. All the found and identified storage devices will be shown in the program’s main window which is designed to look as similar as possible (both visually and functionally) to the standard Windows File Explorer interface to make the program more user-friendly and comprehensive even for beginners.
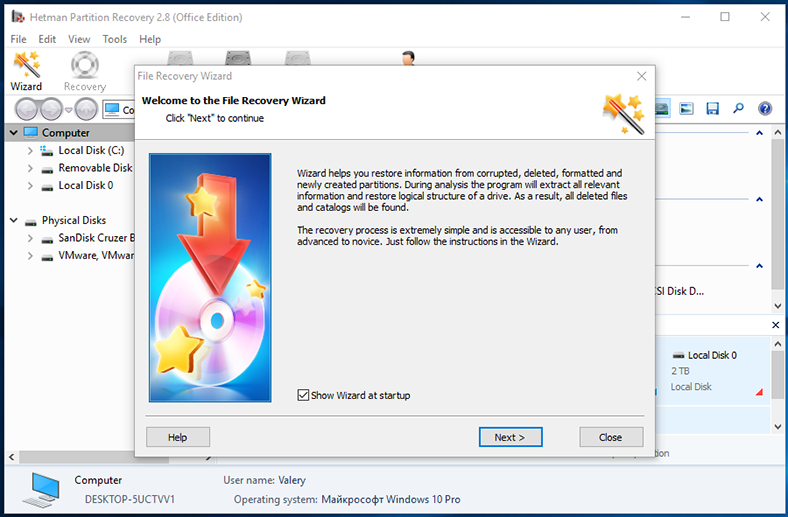
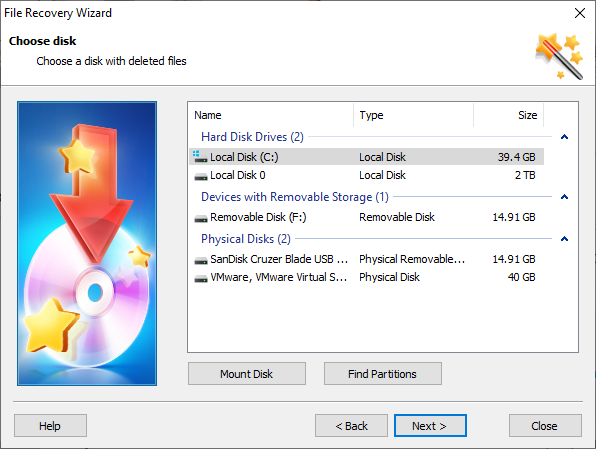
The file recovery wizard will start automatically, and by following its step-by-step directions you can restore almost all files deleted from any kind of storage device. Click Next to select the local or physical drive to be analyzed for deleted files.
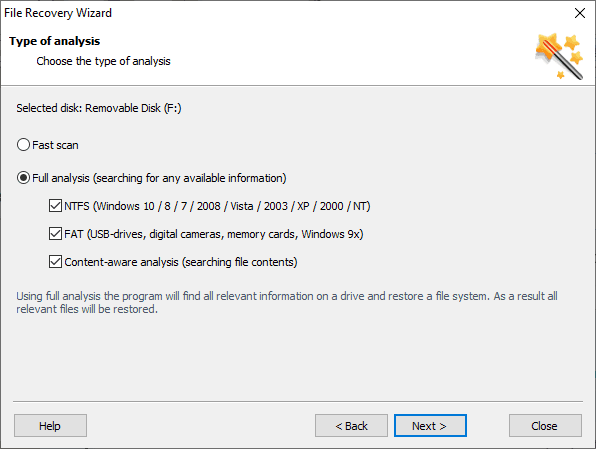
If you click the Next button again, you will see the window with analysis settings you have to confirm in order to scan the disk you have already chosen. Such option as Fast scan can recover recently deleted files (which were removed accidentally or by mistake). If files were deleted because of other reasons (for example, damaged file system), then choose Full analysis to let the program find the information on every deleted file and restore it.
When you click Next the process of analyzing the storage device will start, and its duration depends on various factors, such as the disk size, its file system, the type of analysis, the volume of damaged data and so on. You will be able to watch the process of disk analysis and search for deleted files in the progress bar.
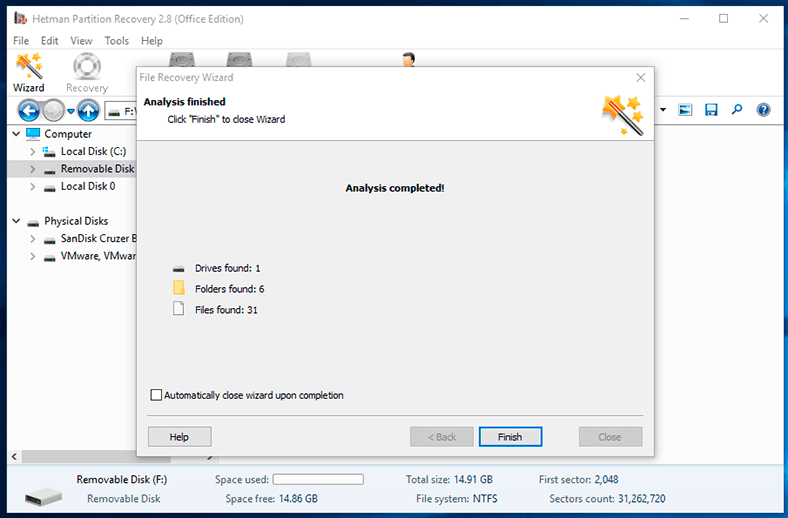
When the process is over, all recovered files will be shown in the program window. When you click on a file, you can view or listen to its contents, which must be very helpful when you have to see if the recovered file is good for use before you decide to save it. Such preliminary check is made possible by the file preview function integrated into Hetman Partition Recovery and available in all of its versions.
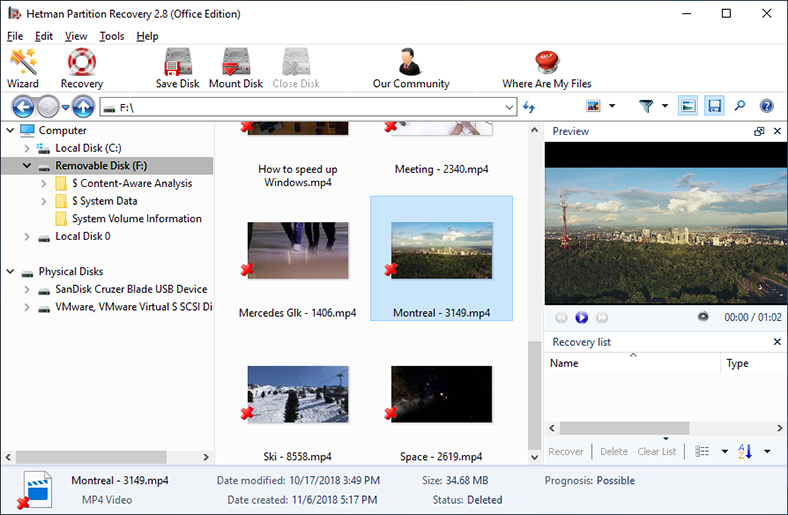
After you have selected all the files you are going to recover, click on the Recovery button which you can find on the program’s main panel.
The file recovery wizard will offer you to choose from the four ways to save your files.
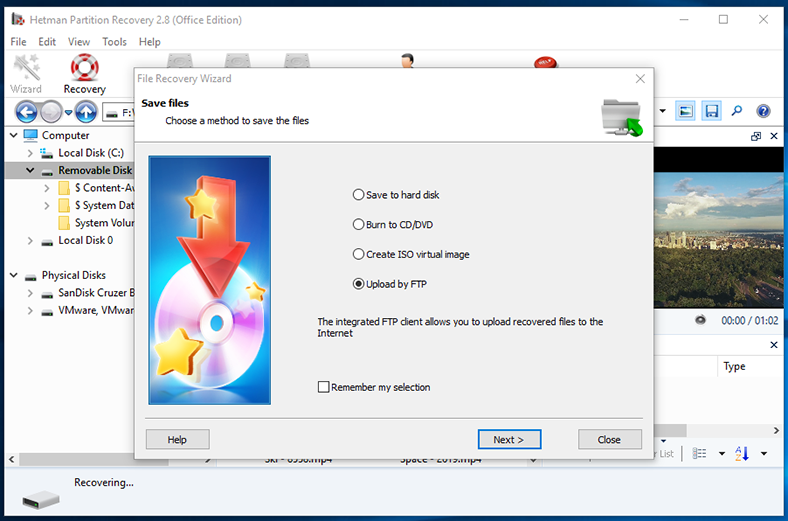
Having chosen the option which is most convenient for you, specify additionally some settings required to accomplish the saving process (for example, give a path to save the files, assign a mark, set server name etc). Then, click the Save button and complete file recovery.
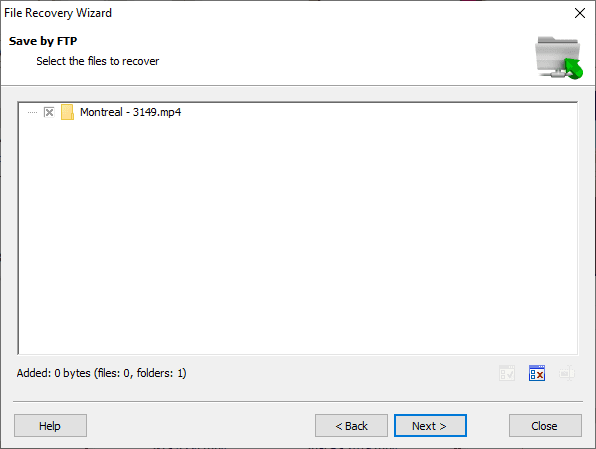
Now you can open the saved files, check if they work properly, and rest assured that they have been recovered completely.
Conclusion
Using modern computer devices increases drastically the volumes of incoming information that is first processed and then stored. It is no wonder that with such giant amounts of data, a part of it gets deleted sooner or later. However, sometimes we need to recover the deleted files. Thanks to functional peculiarities of the Windows operating system and file system of supported devices, file contents are never deleted irreversibly and are available for recovery.
Until the inner space of the hard disk containing the deleted files is not overwritten, there is a good chance that you can restore your files. You can do it with the functionality of Windows built-in tools we have described above.
If the backup service was not configured in advance, or you cannot recover the deleted files for another reason, you can always use advanced file recovery software like Hetman Partition Recovery.
If you possess your own particular experience and would like to share it, or you have questions concerning recovering files deleted without using the Windows Recycle Bin, leave your comments under the article and we will answer them without fail.


Yes, there are several alternatives to using the Recycle Bin for file deletion. These include:
Yes, there are several precautions that can be taken to prevent accidental file deletion: