Recover Data from SmartStor NS4300N NAS RAID!
Need to recover data from a SmartStor NS4300N NAS RAID? Our comprehensive guide has got you covered! Learn step-by-step instructions and expert tips for successfully salvaging your data from the NS4300N NAS RAID system. Say goodbye to data loss worries and hello to recovered files!
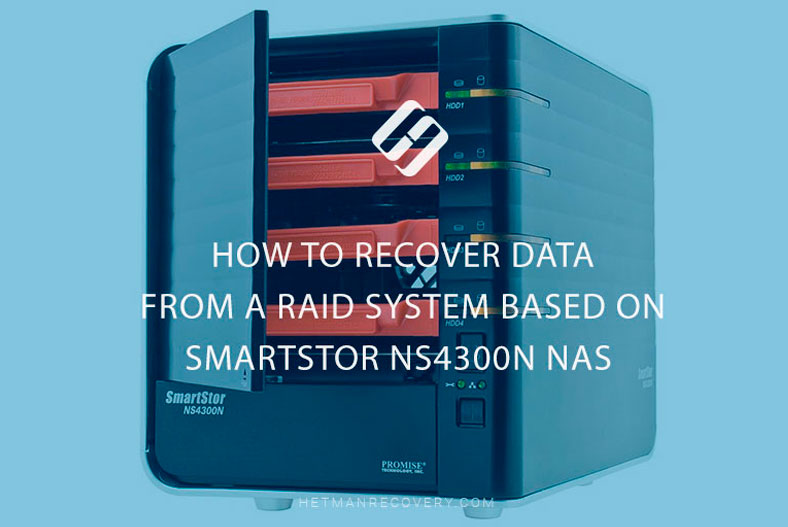
- How to create a disk array with SmartStor NS4300N NAS?
- How to add a shared folder
- How to configure network access and enable FTP
- How to recover data from a non-operable NAS
- Questions and answers
- Comments
Promise Technology offers a wide range of products from consumer-class items to high-end data storage solutions designed for video surveillance systems, data processing centers, cloud computing services, and multimedia applications. As to its network-attached solutions (or NAS for short), they are very similar to models offered by other manufacturers.
Storing data in a NAS system is a good solution because all your information will be secured quite well against damage and accidental loss, as such devices are based on the RAID technology.
Although RAID provides a reliable way to store and access your files, but any NAS is a mechanical device, and it may break down one day, causing you to lose your data the moment you no longer have access to the disk array inside it.
The most widespread causes of NAS breakdown include RAID controller issues, multiple disk failures, failed attempts to recover a volume, server errors, administrator’s mistakes etc.
| Reason | Description |
|---|---|
| Hard Drive Wear | Constant use of the NAS leads to gradual wear of the hard drives, which may cause their failure. |
| Overheating | Insufficient ventilation or high ambient temperature can lead to the overheating of device components. |
| Power Issues | Voltage fluctuations or sudden power outages can damage NAS hardware components. |
| Software Errors | Firmware or software failures in the NAS can cause instability and data access loss. |
| RAID Array Failures | Failure of one or more disks in a RAID array can result in data loss or device malfunction. |
| Mechanical Damage | Physical shocks or damage may cause the failure of NAS components like boards or disks. |
| Malware Attacks | Cybercriminals may exploit NAS vulnerabilities for attacks, leading to data loss or device blockage. |
| Insufficient Maintenance | Irregular maintenance, such as dust cleaning and software updates, can shorten the NAS lifespan. |
When a NAS device breaks down, the data remains intact but inaccessible, unless you have a proper third-party software tool to use. From this article, you’ll learn about a good program to help you recover data from your NAS.

↘️How to Recover Data from a RAID System Based on SmartStor NS4300N NAS↙️
How to create a disk array with SmartStor NS4300N NAS?
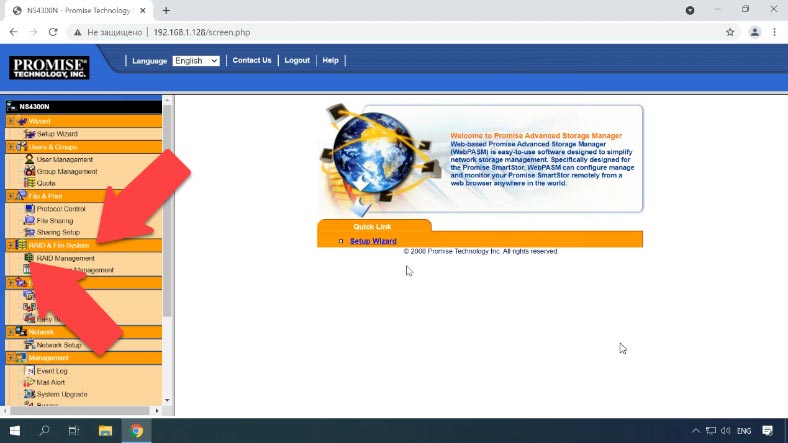
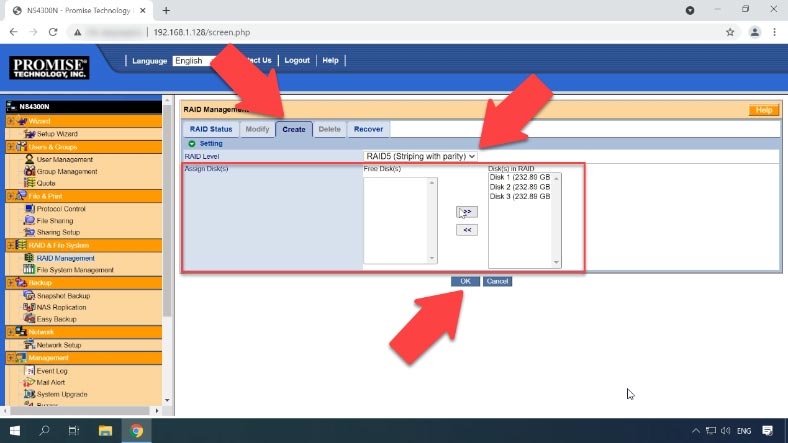
For starters, let’s explore how to build a RAID system. Enter the NAS management interface and look to the left to find the section “RAID&File System” and open “RAID Management”.
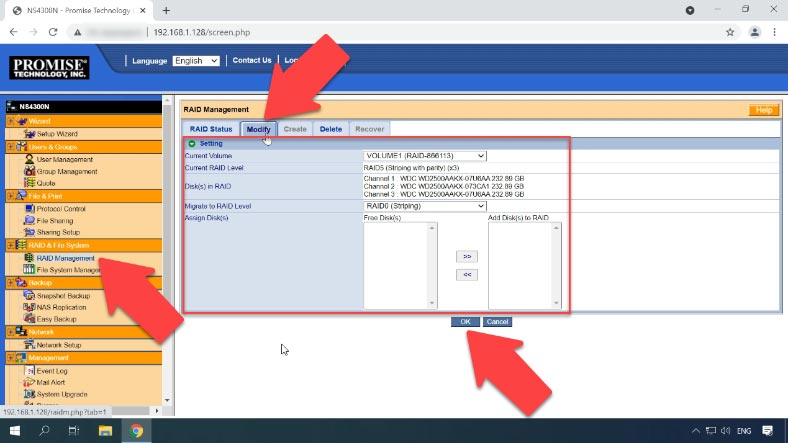
If you need to edit the settings of an existing RAID, click on “Modify”. This is where you can change the array level and add more hard disks. When the settings are changed, click OK to start the migration process that will take some time.
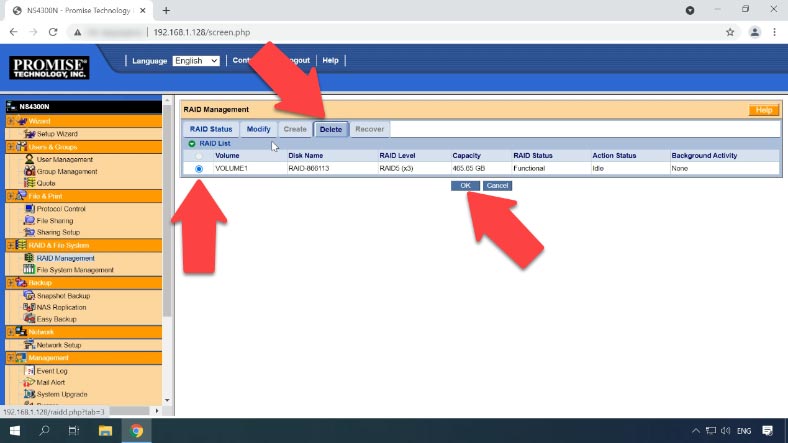
To delete an existing RAID volume, click on the “Delete” tab, click the option button beside the RAID volume you want to delete, click OK, and type “Yes” into the field provided in the confirmation box, then click OK to continue. Now the RAID volume is removed.
To create a new RAID volume, click on the “Create” tab, select the RAID level you prefer for your disk array, add the disks to make up the future array, and click OK to start the disk format operation. When it’s over, you can continue with further configuration steps.
How to add a shared folder
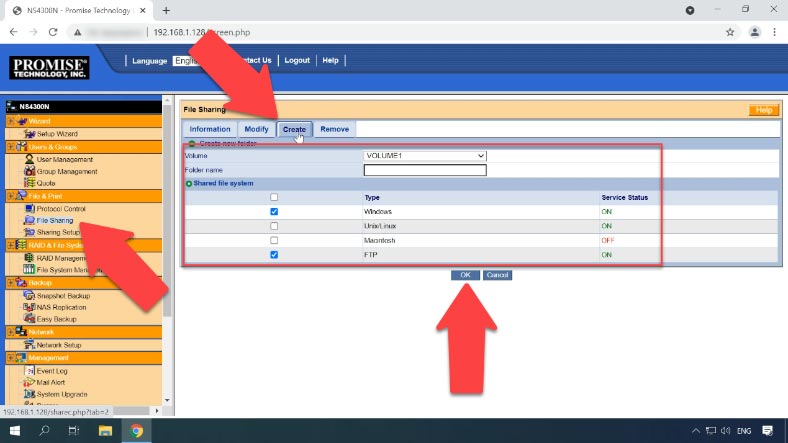
Now let’s find out how to add a new network folder with shared access. To do it, in the “File&Print” section, open “File Sharing”. Click on the “Create” tab, select the RAID volume in which you want to create a new folder, assign a name, check the boxes beside the file systems where you want to use this folder, and click OK to confirm the settings you have chosen. The new folder has been added successfully.
How to configure network access and enable FTP
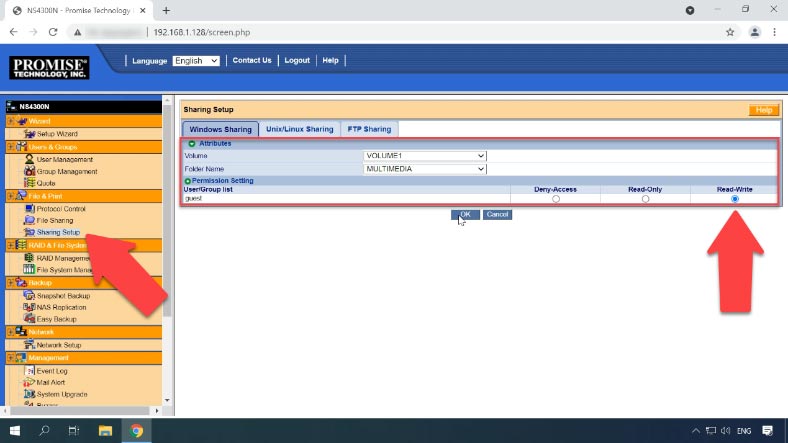
Now let’s enable FTP server and configure network access. To do it, open “Sharing Setup”, select the RAID Volume containing the folder you want to set permissions for, and select the options – click OK.
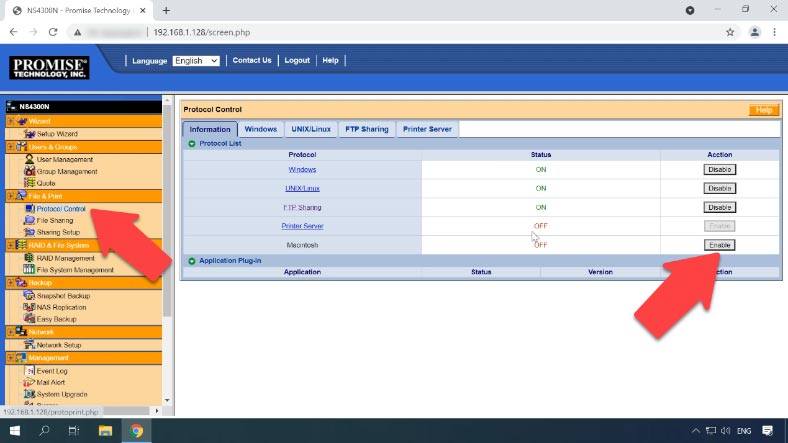
The next step should be to enable network access services. Open “Protocol Control” and enable the services you need by clicking on the “Enable” option. For advanced FTP sharing settings, click on the corresponding tab.
When you’re finished with the settings, you can connect to the network storage and write data to the disk. This model lacks the network recycle bin feature, so if files are deleted by mistake, there is no easy way to have them back.
How to recover data from a non-operable NAS
If files are removed accidentally from a hard disk inside a NAS system, a hard disk is formatted, the disk array is misconfigured, or in other scenarios involving loss of data, loss of access to the network drive, or damage to the RAID volume, a specialized data recovery tool is what you need to restore your information.
| Name | Features |
|---|---|
| Hetman RAID Recovery | Supports all RAID levels, recovery of damaged array configurations, ability to work with NAS devices from various manufacturers. |
| UFS Explorer | Powerful tool for RAID recovery, supports a wide range of file systems, automatic configuration recognition. |
| ReclaiMe | Easy to use, specializes in RAID array recovery, recovery without complex settings. |
| R-Studio | Supports advanced RAID recovery, ability to analyze and recover data even from heavily damaged arrays. |
| Wondershare Recoverit | User-friendly interface, NAS recovery support over the network, optimized for home users. |
| Disk Drill | Intuitive interface, data recovery from various RAID types and NAS devices. |
As most NAS devices are running on Linux-based operating systems, and their hard disks are formatted for Ext file system, while RAID arrays are typically built with the use of mdadm or LVM technology, it becomes impossible to read their contents when such disk arrays are connected to a Windows computer directly.
To read the disks and retrieve any information from there, use the tried and tested data recovery tool for NAS solutions – Hetman RAID Recovery. It supports most popular file systems, technologies and RAID types, and in most cases it will be able to rebuild the damaged RAID automatically.
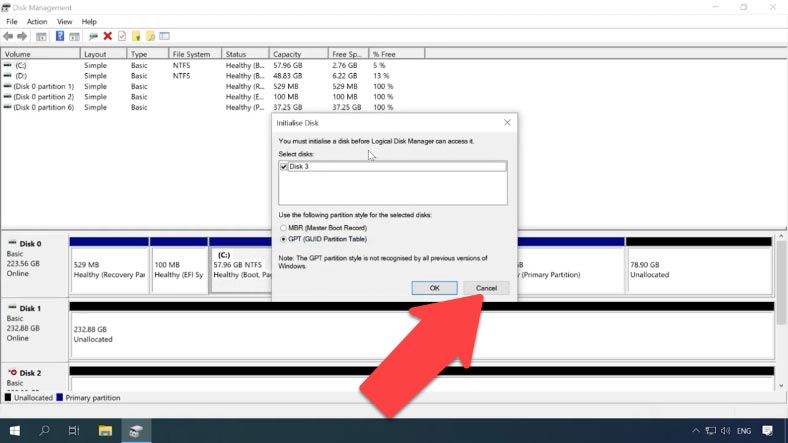
To extract the data from the disks, take them out of the non-operable NAS device and connect them to a Windows computer. When the operating system has booted, open “Disk Management” and check if the added disks are recognized. Windows may suggest to initialize or format the drives to be able to access them. Remember to never agree to either operation, because it can erase the remaining information completely.
Hetman RAID Recovery will identify the disks automatically, read their service information and rebuild the damaged RAID system.
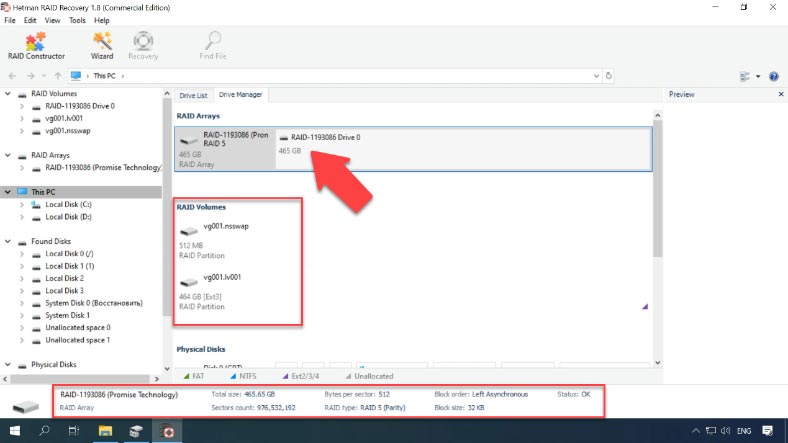
Due to certain peculiarities of building a RAID system on this NAS type, the program shows the volume in a dedicated line “RAID Volumes”. This volume is based on Ext3 file system.
If the program succeeds in identifying the file system of this partition, you will be able to analyze it with “Fast scan” that is going to take considerably less time than running a “Full analysis”. To start searching for files, right-click on the partition – “Open”.
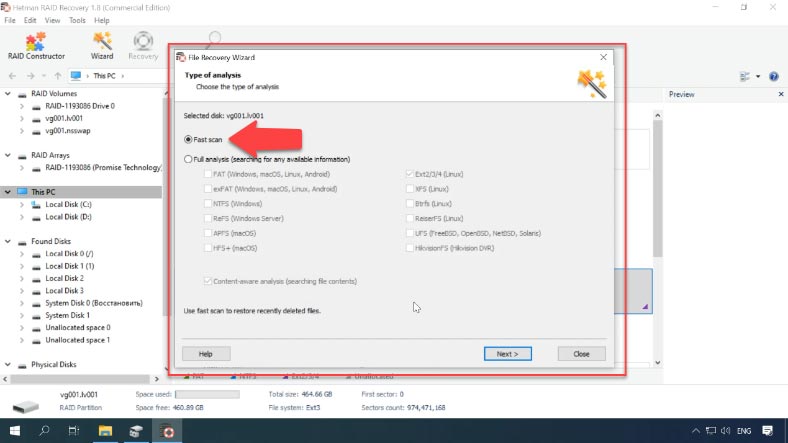
Now choose the scan type: when the array is built properly, “Fast scan” will be available. Click “Next” to start searching for lost files. Wait for the process to be over, and then switch to search results by clicking “Finish”.
Having checked them, we can see that program has found all the files that have been written to this array. All deleted files are marked accordingly, with a red cross. Other files without such crosses are the ones still remaining on the disks within this array.
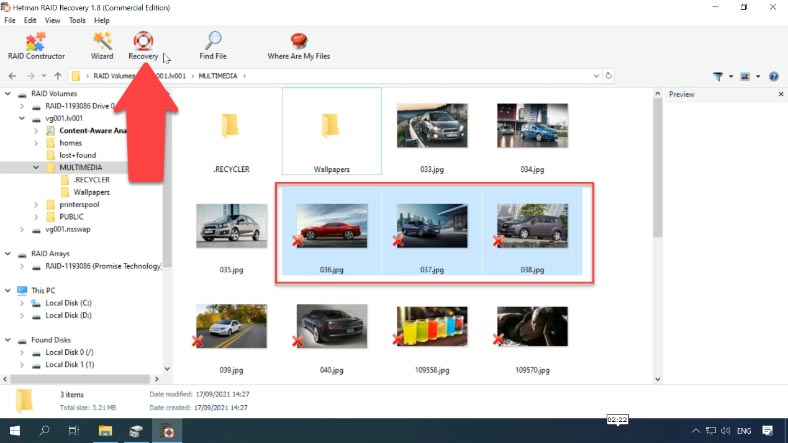
Select the files you want to recover and click “Recovery”, choose the disk where to save them and specify the directory, then click “Recovery” and “Finish”. After that, go to the folder you have chosen and check if the files are there.


The NS4300N is a very interesting and ingenious solution for your requirements.
The NS4300N is a very interesting and ingenious solution that can be used in both a small business office and a home office environment. In either case, it will provide enough space (up to 4TB) for storing and backing up various data and will also take care of its integrity and separation of access.
The SmartStor NS4300N takes up very little space and is a fraction of the cost of a complete file server. In addition, it will be noticeably easier to configure and maintain.
The only disadvantages are higher noise level and impossibility to fully monitor the hard drives temperature and SMART-status.