TrueNAS Core Mastery: Optimizing Installation and Configuration
Get ready to unlock the full potential of TrueNAS Core with this step-by-step guide on how to install and configure it seamlessly. Whether you’re a beginner or an experienced user, this comprehensive tutorial covers everything you need to know. Let’s dive in and set up your TrueNAS Core for optimal performance.
- Step 1. Minimum system requirements
- Step 2. How to create a bootable drive with TrueNAS
- Step 3. Installing TrueNAS
- Step 4. How to connect to a NAS server
- Step 5. How to create a pool with RAID-z
- Step 6. How to add a user
- Step 7. How to configure an SMB connection
- Conclusion
- Questions and answers
- Comments
TrueNAS CORE (previously known as FreeNAS) is a free open-source operating system for data storage applications, which enables you to create your own data server – and do it without spending a single dollar on software.
With TrueNAS, you can turn an ordinary computer into a network-attached storage with the full functionality of a NAS device, a modern file system, ZFS, and various plugins.
Most users seem to view ZFS file system as a favorite choice for NAS servers, because it is designed to ensure the best possible data integrity along with excellent performance and outstanding effectiveness. It offers real-time compression and deduplication which can save your disk space considerably.
| Characteristic | Description |
|---|---|
| File System Type | 64-bit file system with Copy-On-Write (COW) capability |
| RAID Support | Built-in support for various RAID levels (RAID-Z1, RAID-Z2, RAID-Z3) |
| Compatibility | Support for multiple operating systems: Linux, FreeBSD, macOS |
| Backup Integration | Ability to create snapshots and replications for data protection |
| Data Protection | Built-in data integrity check using checksums |
| Compression | Support for transparent data compression (LZ4, GZIP) |
| Encryption | Support for built-in file system encryption |
| Scalability | Support for large numbers of disks and vast amounts of data |
| Caching | Efficient caching for improved performance (ARC – Adaptive Replacement Cache) |
| Self-Healing | Automatic recovery of corrupted data blocks using mirrors or parity |

How to Install and Configure TrueNAS Core 💿
Step 1. Minimum system requirements
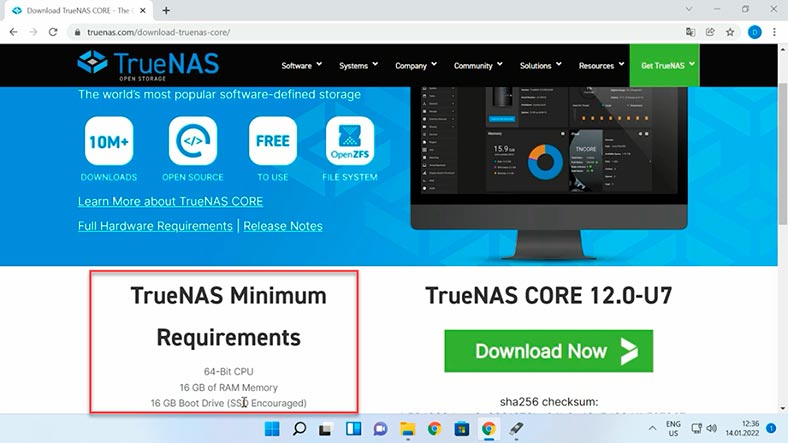
Before installing this operating system, you need to know its minimum system requirements.
For TrueNAS to run properly, the computer should have at least 8 GB of system memory; if you plan to use a virtual machine or additional plugins, it’s recommended to have more than 8 GB of RAM. Also, TrueNAS doesn’t support dual boot, so you’ll have to find a separate hard disk for this operating system.
| Component | Minimum Requirements |
|---|---|
| Processor | 64-bit processor |
| RAM | 8 GB (recommended 16 GB) |
| Storage | 2 disks (RAID can be used) |
| Network Adapter | 1 Gigabit Ethernet |
| System Disk | 16 GB flash drive or SSD |
| Graphics | Not required (not needed for CLI) |
Step 2. How to create a bootable drive with TrueNAS
Before we begin the installation, you need to create a bootable drive from which the operating system will be installed.
You can download an image containing the latest version of TrueNAS from the official website:
http://www.truenas.com/download-truenas-community-edition/The download button will appear as soon as you sign in to the website. Scroll down and click “Download Now”. Now you need to find a USB drive and a utility for creating a bootable flash drive. I’ll be using the well-known tool, Rufus. It’s all very easy: select the USB drive, give the path to the image file, and click this button to start the process.
Step 3. Installing TrueNAS
After the bootable drive is created, plug it into the computer where you’d like to install TrueNAS, and boot from the USB drive. To select this option, press F12 or F2 key depending on the motherboard model. Select the USB drive from the list and press Enter.
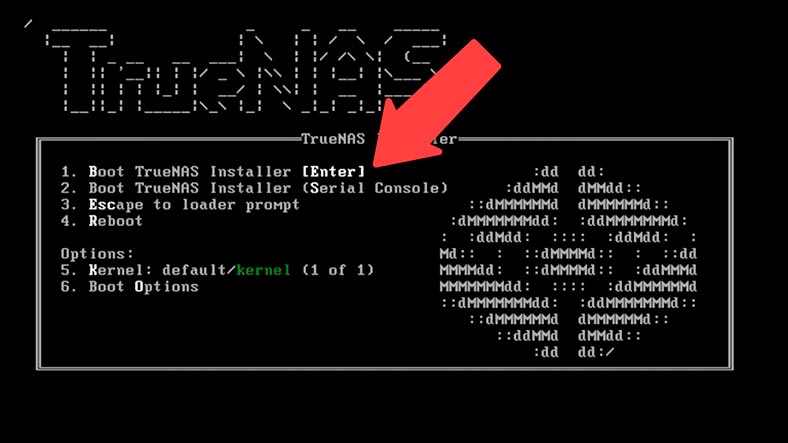
Press Enter again to select the first item on the list – the installer. In the next window, select the first option – Install/Upgrade, and then press Enter. If your computer has less than 8 Gb of system memory, you will see this warning.
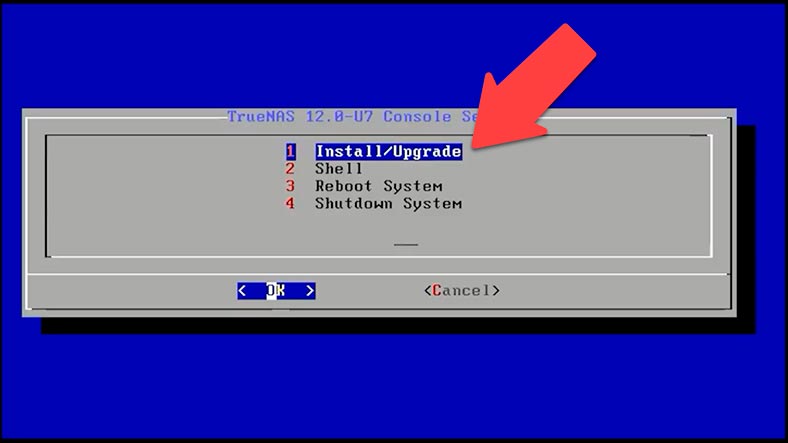
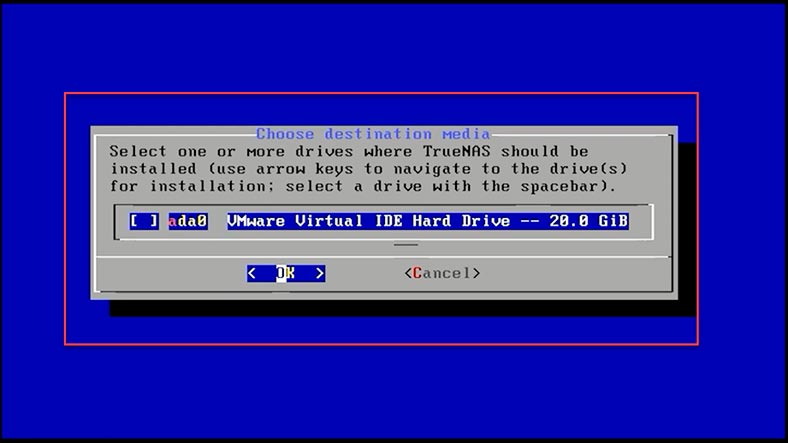
In the next window, select the drive where to install TrueNAS. You can identify the required drive by its size as other drives will have different names. Use the arrow keys to select the required drive and press Space to select it, then press Enter to confirm your choice. After that, you’ll see a warning that all data will be erased from this drive. Select “Yes”, and press Enter to confirm your choice.
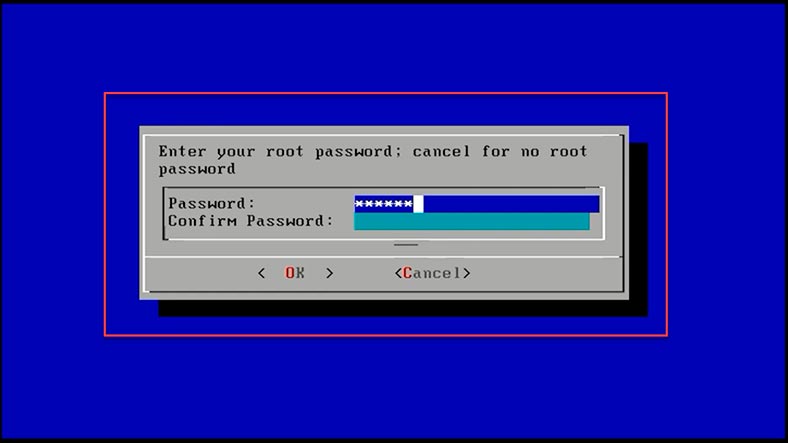
Finally, you need to type and confirm the password for your root (or administrator’s) account which you’re going to use to access the TrueNAS controls.
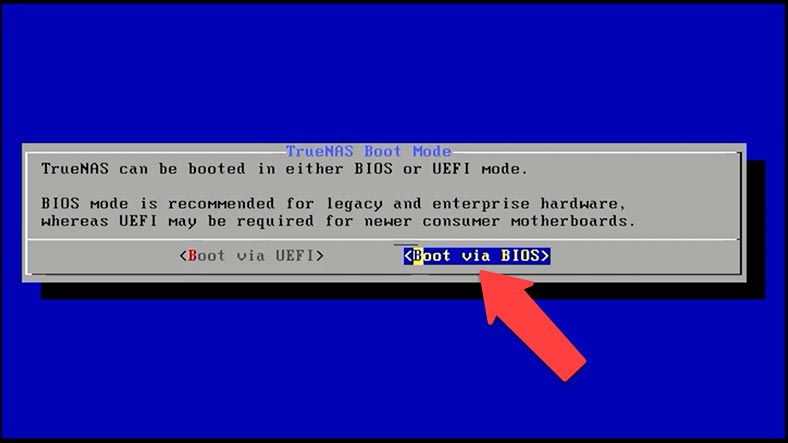
TrueNAS can boot in either mode – BIOS or UEFI. I choose BIOS as this mode works with almost every motherboard. Before you choose UEFI, you need to make sure that your motherboard supports it. As you make this choice, the installation of the operating system begins and it is going to take a few minutes. When it’s over, you’ll see a notification saying it’s time to restart and remove the installation media.
Choose OK and then remove the bootable drive. When the operating system has booted, the configuration console will start, and the server’s IP address is displayed below.
Step 4. How to connect to a NAS server
When the server boots for the first time, there is no need to configure it as the operating system will enable a default configuration for active network interfaces with the help of DHCP. If you want to set a specific IP address for the server, it can be done through this initial menu.
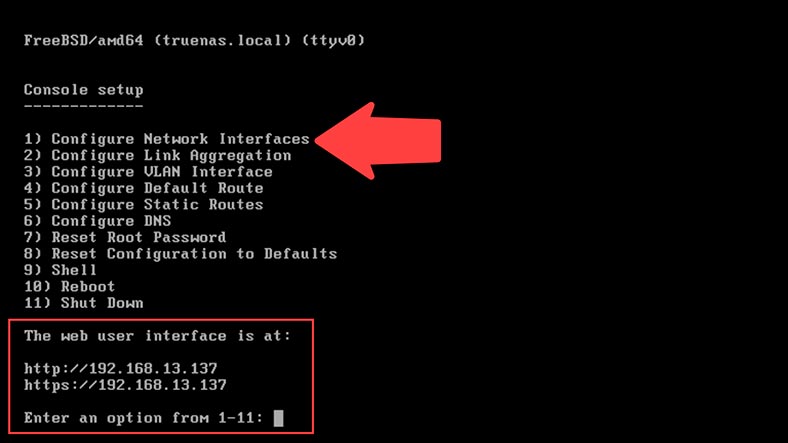
Choose the first option – “Configure Network Interfaces”, then type the number of the network interface you’d like to change; when asked if you want to remove the current settings for this interface, type “n” for “no”, and when suggested to configure interface for DHCP – type “n” again. When you are asked if you want to change IPv4 configuration – type “y” for “yes”. Type the name of your network adapter, IP address and subnetwork mask.
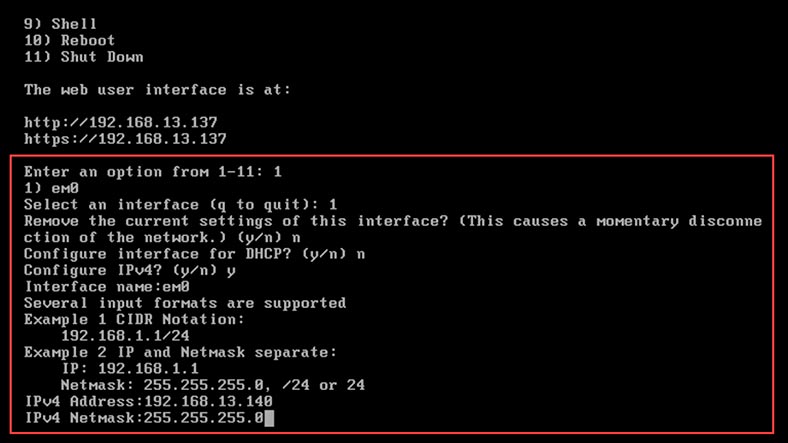
Say “no” to IPv6 configuration. Now that we are finished with network configuration, you can see that the server’s IP address has changed. This is where you can setup a wireless connection, reset root password, or reset the current configuration to defaults.
To connect to the server, open a browser on another computer belonging to this network, and enter the IP address for the TrueNAS server. If only zeroes are displayed instead of the IP address, check if the network cable is connected to the server, and make sure that it appears on the list of connected devices in the DHCP network of the router. To access the controls menu, type the username – root – and the password which you have given when installing TrueNAS.
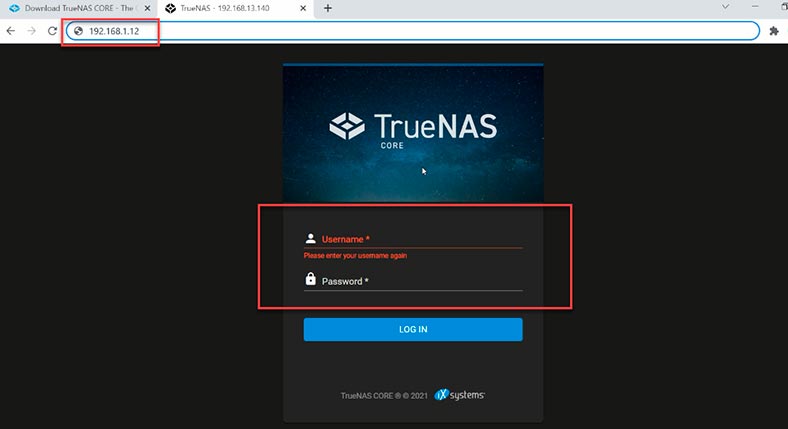
When you log in, you’ll be able to access the TrueNAS web interface and manage the storage, access permissions, view the system status and so on.
Step 5. How to create a pool with RAID-z
In this operating system, there is no wizard to give you some useful hints and help you create your first storage pool, so let’s find out how to do that. In the left side panel, click on the “Storage” tab and choose “Pools”, then click “Add” and “Create Pool”.
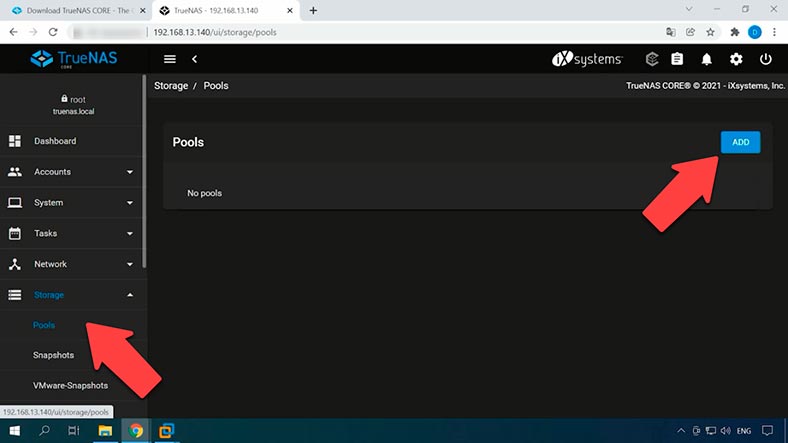
Above, give the name of the pool, and select the disks it is going to include. As you can see, it doesn’t add one more vdev (virtual device) but lets you add a supporting device for it.
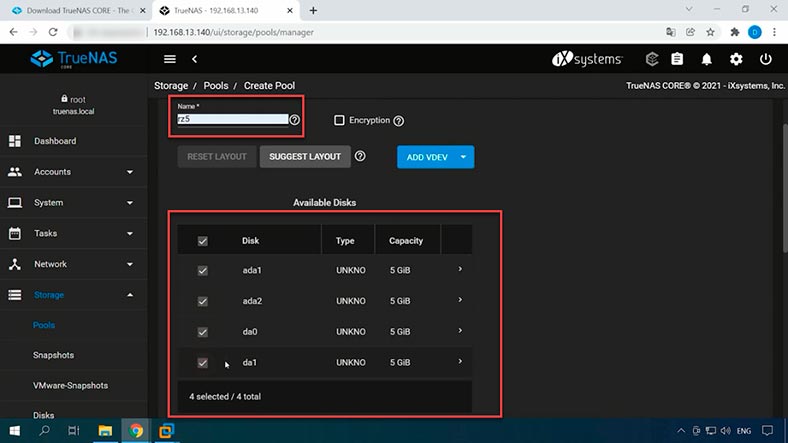
When the disks are selected, click on the arrow to add the disks to the list of storage devices. Select the disks again. The default array type is RAID-z; to select a different one, click on it. The ZFS pool structure is rather simple: it consists of the virtual device (vdev) which is built with the disks. Every virtual device can be a RAID-z array with striping, mirroring, or a single disk.
In the drop-down list you can find such options as Stripe, Mirror, Raid-z, z2 and z3 depending on the number of connected disks. Select the necessary RAID type and click here to create it.
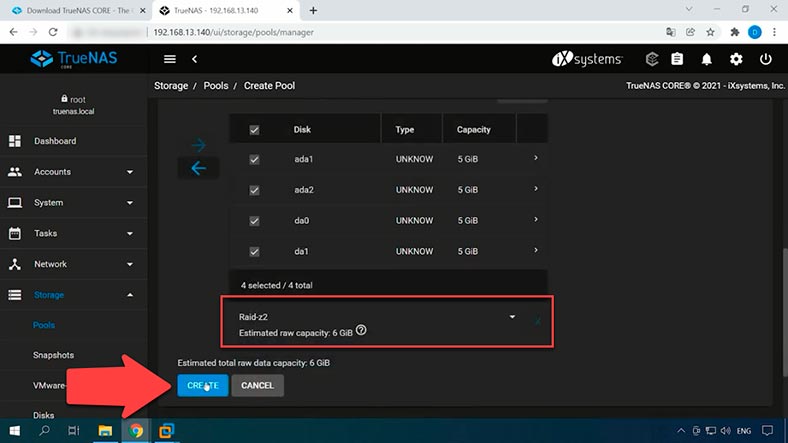
In the pop-up window saying that all data will be erased, check the box here and click “Create pool”, and it starts the process of formatting the drives and building the array. Now the pool is created: here, you can see its status, name, size and other properties; by clicking on the three dots’ button, you can access the settings menu for this pool.
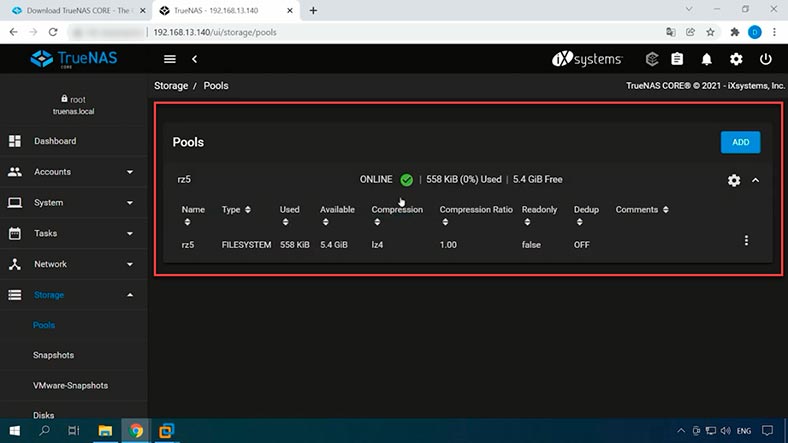
The only step left to take is to configure access to this disk array.
Step 6. How to add a user
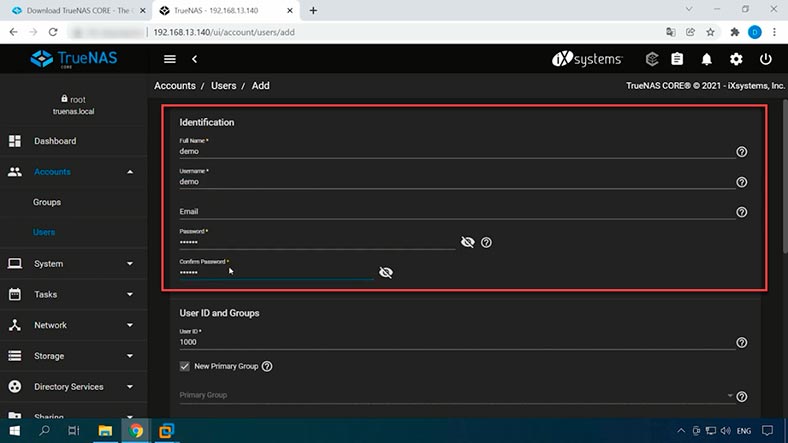
Now let’s add a user. Click on the “Accounts” tab – “Users” – “Add”.
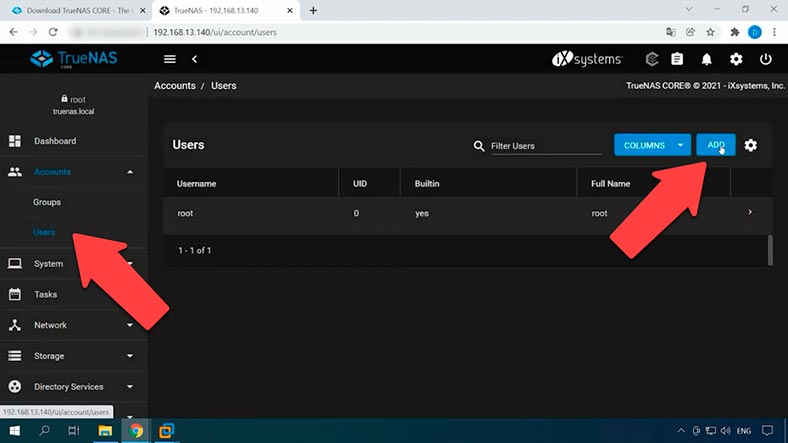
Give the user name, password, and type the password again to confirm it. Check the box for “Microsoft Account” and click “Submit”. Now that the user is added, let’s configure network access to this directory.
Step 7. How to configure an SMB connection
I will show you how to configure network access with the example of SMB protocol.
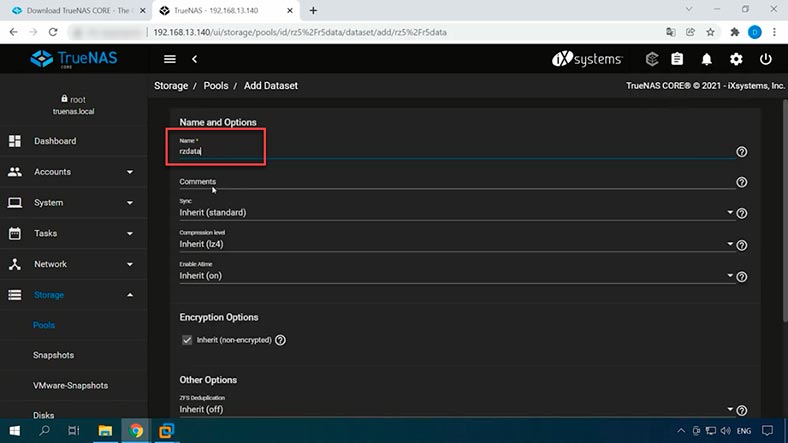
Open the “Storage” tab – “Pools” – click on the three dots’ button next to your array and select “Add Dataset”. In the options, type the name and leave all other settings at their default values, then click “Submit”. The new dataset has been added.
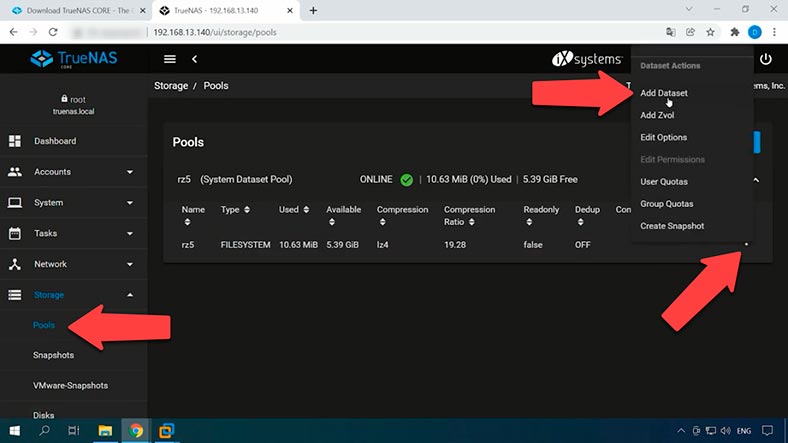
To configure access, let’s create another dataset inside the one we have created previously. Click on the three dots’ button here – “Add Dataset” – type the name – click “Submit”.
Now let’s set the permissions.
Click on the three dot’s button, open “Edit Permissions”.
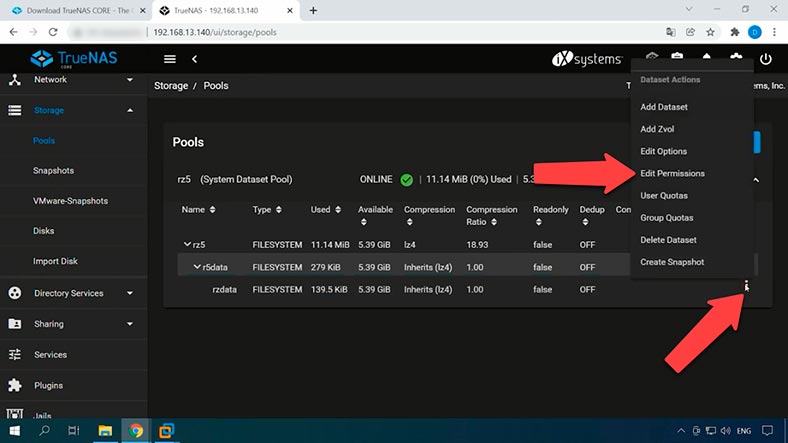
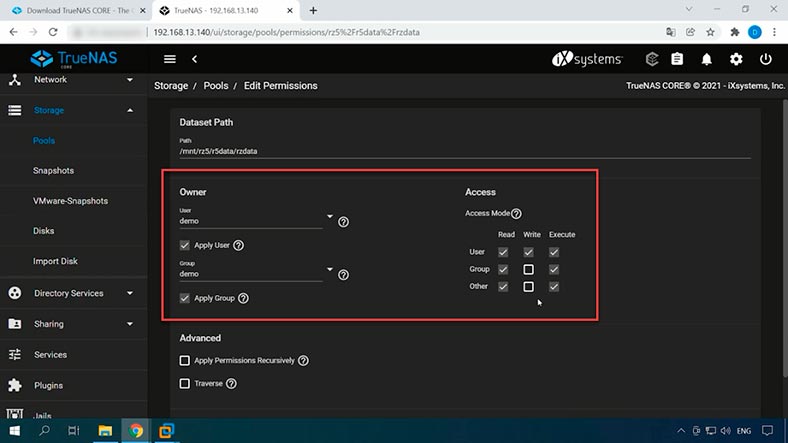
Select “owner” as the new user, select the group, and then check the boxes for “Apply User” and “Apply Group”. Check the necessary permissions and click “Save”.
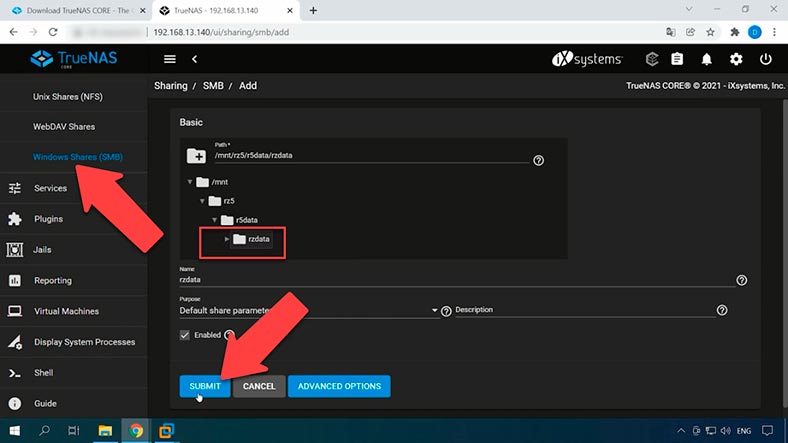
Now you need to enable a special service to access the storage from a Windows computer. Open the “Sharing” tab – Windows Shares (SMB). Click “Add”, select your dataset from the list and click “Submit”, and then hit “Enable Service” in the window that appears. In the new window, choose “Configure Now”.
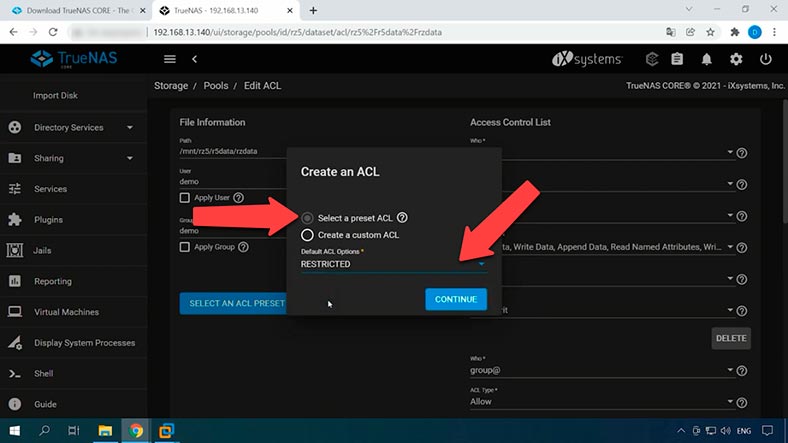
The next window suggests creating an ACL (access control list), so I’ll choose one of the presets – “Select a preset ACL” and select “Restricted” from the list – then click “Continue”. After that, a new setting will appear on the right: click below to save it.
Now SMB setup for this directory is over. Let’s get to your Windows computer, open the Explorer and add a network drive. “Computer” – “Map network drive”; type the server’s IP address and check the box to “Connect using different credentials” – if you don’t do that, the computer will connect using credentials of its main user – click “Finish”. Type the name of the new user which we have added to TrueNAS, and the password.
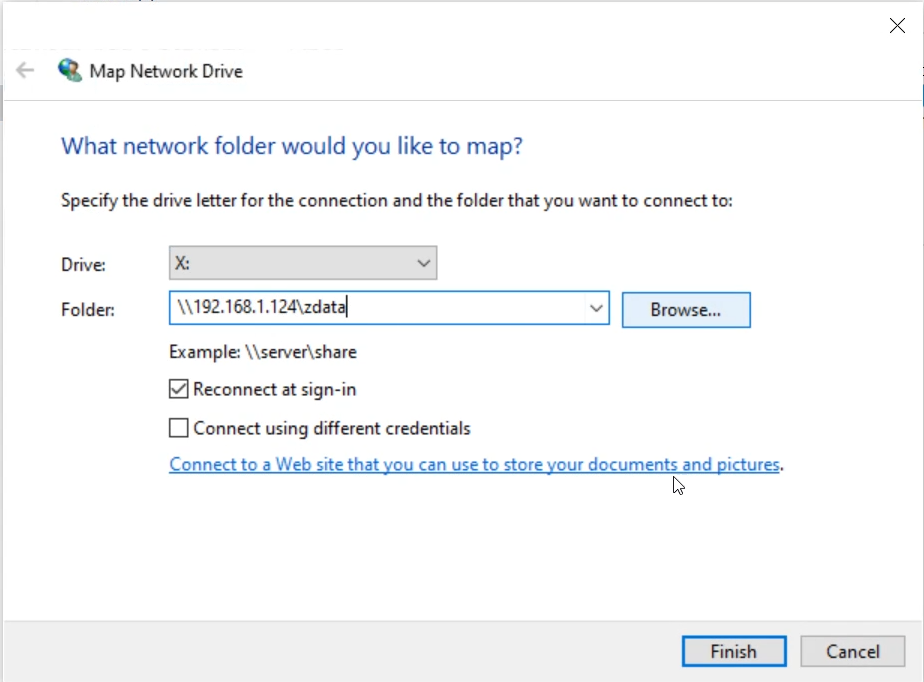
The network drive is connected, so you can create a directory there and write some data to the drive.
Conclusion
TrueNAS is quite an interesting solution in terms of organizing your own network storage without paying too much. If you create a system like that on the basis of your old computer, you’ll get a network-attached storage with a new file system ZFS and a bunch of NAS features.

↘️How to Recover Data from a RAID System Based on SmartStor NS4300N NAS↙️


