Unraid OS NAS Data Recovery: How to Retrieve Virtual Machine Files
Discover how to recover virtual machine files from an Unraid OS NAS. Whether you’re a system administrator or a user facing data loss in a virtualized environment, we’ll explore the best methods and techniques for retrieving your valuable virtual machine files. From troubleshooting to advanced recovery strategies, we’ve got you covered.
- How to create a virtual machine on Unraid OS NAS
- How to recover virtual machine files from Unraid OS
- How to recover data from an Unraid OS virtual machine disk
- Pros and Cons of Raspberry Pi OS
- Conclusion
- Questions and answers
- Comments
Unraid is built-in operating system developed to provide full control of your equipment. It doesn’t only operate as a reliable network-attached storage, but it can also work as an application server and virtual machine host. Unraid is installed and boots from a USB pen drive, and then is put into the RAM file system.
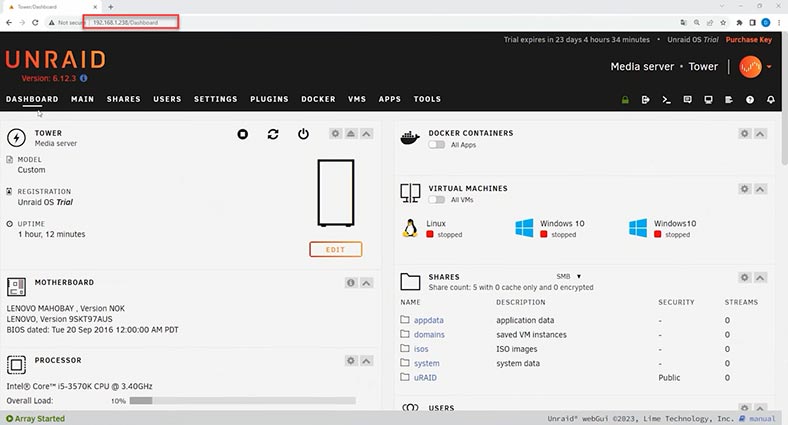
The main point of Unraid OS is that it is a hardware-independent solution capable of turning any 64-bit system into a network-attached storage (NAS). What is more, this operating system is designed to work as a virtualization host. It uses a hypervisor to divide resources between virtual clients in a safe and isolated way, so that users can run several operating systems and apps on a single physical server and optimize the use of its resources.
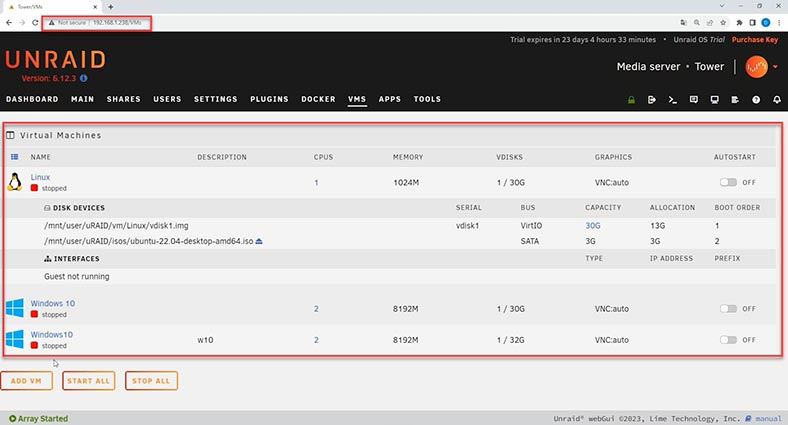
Virtualization in Unraid is based on KVM, which includes modern versions of QEMU, libvirt, VFIO*, VirtIO and VirtFS. It also supports Open Virtual Machine Firmware (OVMF) which provides UEFI support for virtual machines (by adding support for SecureBoot, and simplified support for pass-through feature on graphics processors). This lets users assign a wide range of resources to such virtual machines. Also, such virtualization technologies do not let any negative effects from their use influence the reliability of the main operating system.
In today’s article, we will explore the functionality available for creating a virtual machine on this operating system, and how virtual disk files can be recovered when you lose access to the server.

How to Recover Virtual Machine Files from Unraid OS
How to create a virtual machine on Unraid OS NAS
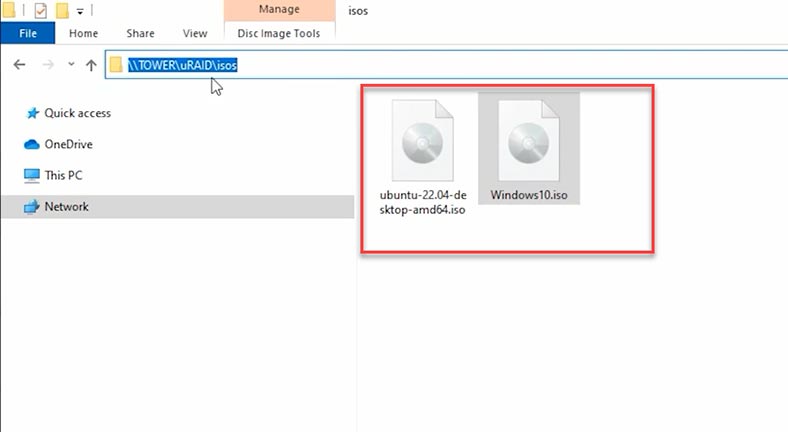
In order to create a virtual machine on Unraid OS, you will need an image of the operating system which should be installed on such virtual machine. Download an ISO image and upload it to the Unraid server.
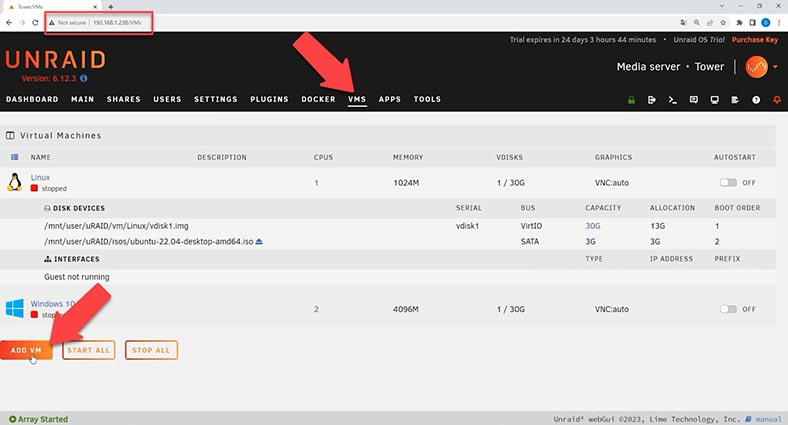
After that, open Web Manager – VMS. Here, click on Add VM button, and specify the operating system version. The settings page will open.
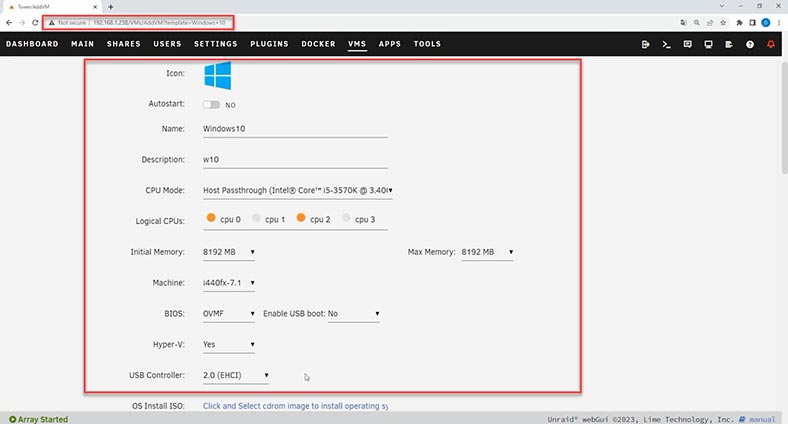
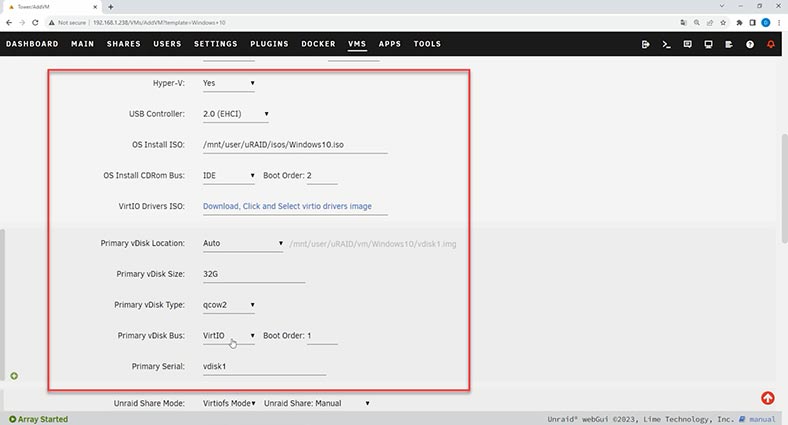
Give this machine a name, select CPU settings, the system memory size, choose the ISO image, and give the path to the image file which you have uploaded to the Unraid server.
Now choose the virtual disk size – in my case, 30 Gb will be enough – and its type. After that, give the path to the directory where virtual machine files should be stored.
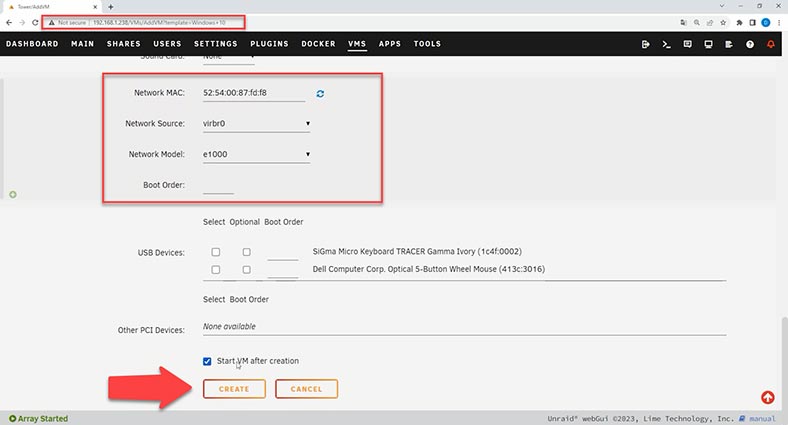
Change network settings, the bridge mode, and the adapter model. After you have finished with the settings, click Create.
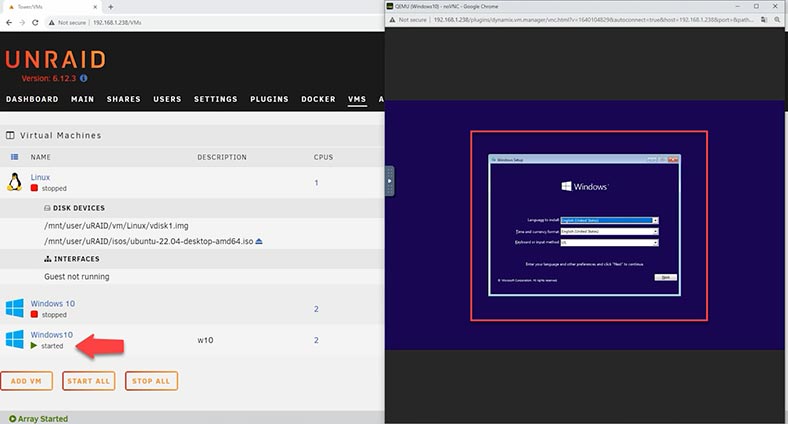
If you haven’t unchecked the box for virtual machine automatic start, the machine will start booting immediately. This is followed by a typical process of installing the operating system. After the operating system is installed, the virtual machine is ready for work.
How to recover virtual machine files from Unraid OS
In some situations, you may have to recover virtual machine files from the NAS storage with Unraid operating system. For example, it may happen when you accidentally delete certain files or a folder containing virtual disks, after an operating system error or NAS failure, which results in losing access to your virtual machine.
A specialized data recovery tool – Hetman RAID Recovery (Partition Recovery) – will help you restore all virtual machine files. This tool supports all popular file systems and can recover files used by various hypervisor types.
For recovery, take the disks out of the storage system and connect them to a Windows computer. Download, install and start the program. Hetman RAID Recovery will automatically scan the disks and display them in the main window.
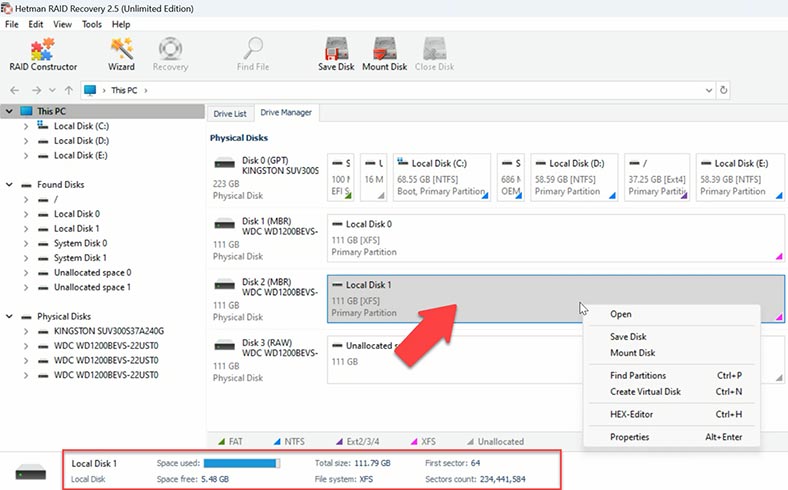
To search for files, right-click on the disk and choose Open. After that, select the scan type – Fast scan or Full analysis. For starters, we recommend a Fast scan – this will take less time, and it can find lost files easily in most typical recovery scenarios.
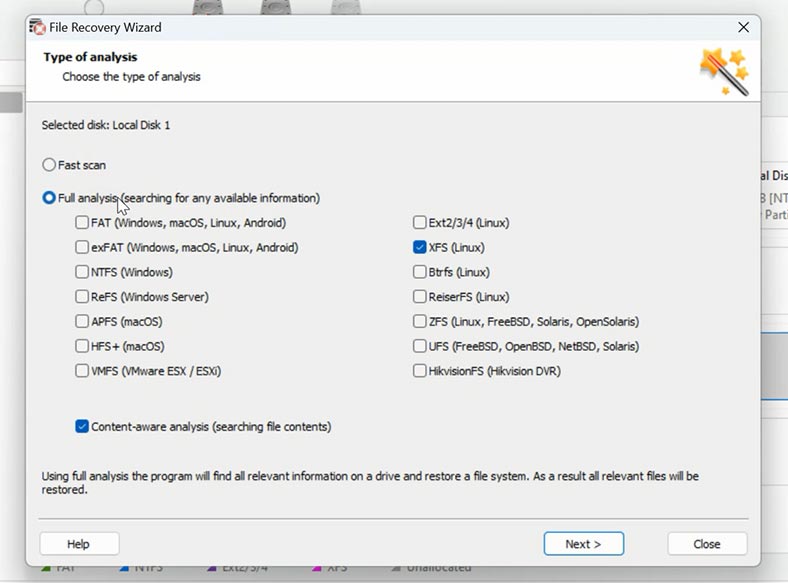
If the program can’t find the missing files after the Fast scan, then go for Full analysis. To do it, go back to the main window, right-click on the disk and choose – Analyze again – Full analysis – specify the file system and click Next. After that, open the folder where virtual machine files used to be stored. If you don’t know the exact path, you can see it in the virtual machine manager settings, by opening the Unraid OS web manager.
Open the corresponding directory, select the files to restore and hit Recovery.
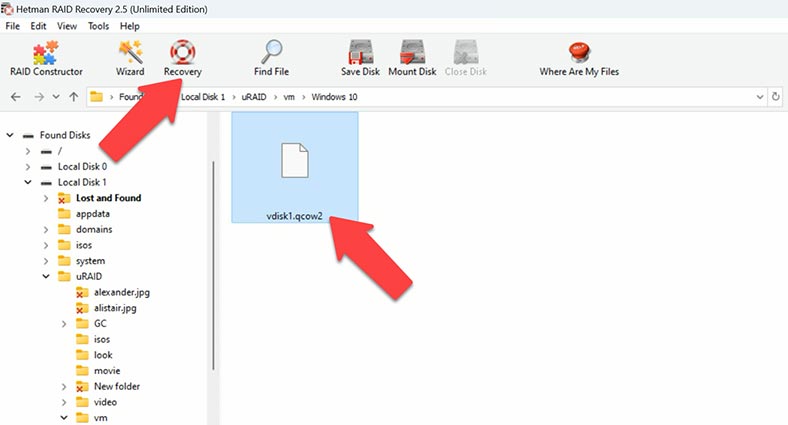
Specify where to save the data (choose the disk and folder), and click Recovery again. When the process is over, you will find the virtual machine files in the folder you have chosen for saving them.
How to recover data from an Unraid OS virtual machine disk
Besides recovering virtual disk files, you can also recover data inside the virtual machine, by mounting an image into the program and recovering files from such virtual disk image.
In the program’s window, open the Tools tab – Mount Disk.
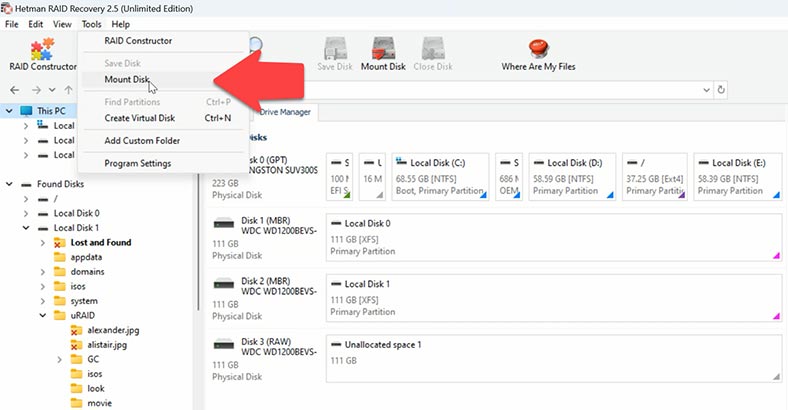
Select a virtual disk type and click Next. After that, specify the folder where the virtual disk image is stored – click OK.
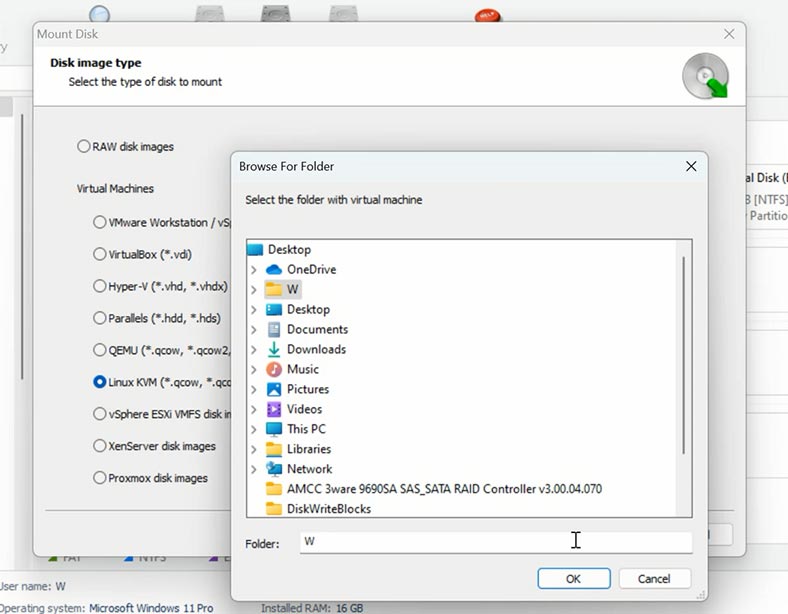
Select the image file – Next – and it will appear in the program’s window.
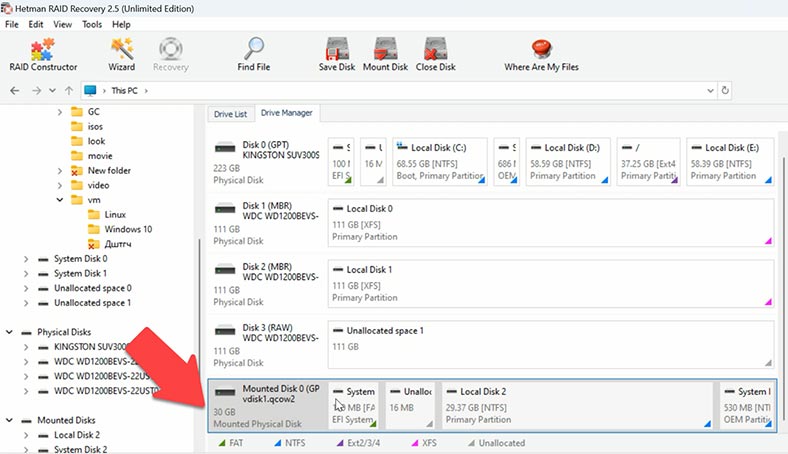
Then start the scan by clicking Open. Choose the scan type and when it’s over, open the folder where the lost files used to be, and recover them.
Pros and Cons of Raspberry Pi OS
Pros:
- Support for Docker Containers and Virtual Machines: Raspberry Pi OS provides support for Docker containers and virtual machines, allowing users to run a wide range of applications and services in isolated environments. This flexibility enables users to customize their setups according to their specific needs.
- Affordable and Accessible: Raspberry Pi hardware is affordable and widely accessible, making it an ideal choice for building home servers, media centers, and network-attached storage (NAS) solutions. Its low cost makes it a budget-friendly option for users with varying storage needs.
- Community Support: Raspberry Pi has a large and active community of users who share knowledge, resources, and troubleshooting tips. This community support can be invaluable for users seeking assistance with setup, configuration, and troubleshooting.
- Wide Range of Hardware Compatibility: Raspberry Pi OS is compatible with a wide range of hardware components, including SATA drives, SSDs, HDDs, and PCIe cards. This compatibility allows users to build flexible and scalable NAS solutions tailored to their storage requirements.
- Flexible Storage Configuration: Raspberry Pi OS supports various storage configurations, including traditional RAID setups, cache drives, and parity drives. This flexibility enables users to optimize their storage setups for performance, redundancy, or capacity, depending on their needs.
Cons:
- Limited Performance: Raspberry Pi hardware may have limited read and write speeds compared to traditional NAS systems, especially when handling large volumes of data or running resource-intensive applications. Users with demanding workloads may experience performance limitations.
- Complex Setup: Building an Unraid NAS or similar network-attached storage solution using Raspberry Pi hardware may require advanced knowledge of Linux command-line tools and system configuration. Users who are not familiar with these concepts may find the setup process challenging.
- Scalability Constraints: Raspberry Pi hardware may have limitations in terms of scalability, particularly when compared to dedicated NAS systems or server-grade hardware. Users with rapidly expanding storage needs may outgrow their Raspberry Pi-based NAS setups over time.
- Reliability Concerns: Raspberry Pi hardware may not offer the same level of reliability and fault tolerance as dedicated NAS systems or enterprise-grade hardware. Users relying on Raspberry Pi-based NAS solutions for critical data storage should consider implementing robust backup and recovery strategies to mitigate the risk of data loss.
Overall, Raspberry Pi OS provides an affordable and versatile platform for building network-attached storage solutions, but users should be aware of its limitations in terms of performance, scalability, and reliability. Understanding these factors and considering their specific use case will help users make informed decisions when building and configuring Raspberry Pi-based NAS systems.
Conclusion
Summing up, we can say that even though loss of data can cause certain difficulties and make you worry, now you know there are methods and tools to help you recover the precious data. With Hetman RAID Recovery, you’ll be able to recover the lost files of your virtual machine disks from Unraid OS.
| Step | Description | Recommendations | Notes |
|---|---|---|---|
| 1. Assess the Virtual Machine’s Condition | Check the virtual machine’s status in Unraid OS to identify issues that caused the file loss. | Review system logs for possible errors or failures. | Use the Unraid console or SSH access to view system status. |
| 2. Stop Active Operations on the Virtual Machine | Stop all active processes on the virtual machine to prevent further data damage. | Ensure the virtual machine is fully disconnected from the network and other services. | Avoid using any additional software until diagnostics are complete. |
| 3. Create Backups | If possible, create backups of existing data from the virtual machine before starting the recovery process. | Use specialized software to create disk images. | Store backups on an external device or in the cloud. |
| 4. Use Unraid’s Built-in Recovery Features | Attempt to recover files using Unraid OS’s built-in recovery tools. | Ensure all disks and virtual machines are properly connected and recognized by the system. | Use “Check Filesystem” to diagnose and repair the damaged file system. |
| 5. Apply Third-Party Software | If built-in tools fail, use third-party software to recover the data. | Popular tools include Hetman RAID Recovery, R-Studio, UFS Explorer, and others. | Perform recovery on a separate device to avoid further data damage. |
| 6. Save Recovered Data | After successfully recovering the files, save them on a secure storage device. | It is recommended to store data on multiple devices to increase reliability. | After this, you can begin restoring full functionality to the virtual machine. |


