Google Chrome Tips: How to Disable Autofill for Enhanced Privacy
Protect Your Privacy: Learn How to Disable Autofill in Google Chrome! Concerned about your privacy while browsing? Disabling autofill in Google Chrome can help enhance your security. In this tutorial, we’ll show you step-by-step how to disable autofill and prevent Chrome from automatically filling in forms and passwords. Whether you’re using Chrome for personal or professional browsing, taking control of your autofill settings is essential for protecting your sensitive information. Watch now and take the first step towards a more secure browsing experience!

- How to disable the autofill feature?
- How to remove data from the autofill options in Google Chrome?
- Conclusion
- Questions and answers
- Comments
One of the main priorities in further development of Google Chrome is to make it more functional and help users save time, which is achieved by adding various extensions, and one of them is designed to help you enter data required by network resources.
When you need to fill in a standard form somewhere on the Internet, Google Chrome can save the data you enter and use it next time so you can avoid typing it again in a similar situation. However, if there is no need to use this function regularly and you don’t feel like storing your personal information inside Google Chrome, there is a simple way to turn the whole thing off.

How to Clear Browsing History and Cache in Chrome, Yandex, Opera, Firefox, Edge 📝🔥🌐
How to disable the autofill feature?
The procedure to disable the autofill feature in Google Chrome is very simple, but requires a sequence of steps to be taken.
Step 1. Open Google Chrome.
Step 2. In the upper right corner of the browser window, click the Customize and control Google Chrome button with three vertical dots on it.
An important note. To quickly access the settings page in Google Chrome you can do the following: type chrome://settings/ in the address bar, press the Enter key and the corresponding page will open at once.
chrome://settings/
Step 3. When the context menu appears, find and select Settings.

Step 4. Navigate the settings page with the help of the scroll bar or the mouse wheel and find the section Autofill, then select Addresses and more below.
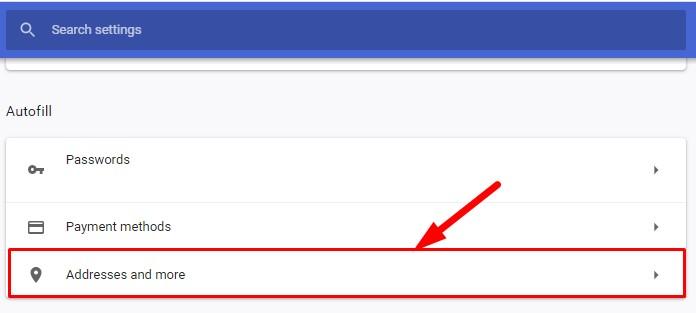
Step 5. In the linked page that opens, click on the slider for Save and fill addresses and change its position (the color will change too, from the active blue to the neutral grey which means that this option is disabled).

When you complete these steps, the autofill function for user data will be turned off, and saving / transmitting data over Google Chrome will be paused.
How to remove data from the autofill options in Google Chrome?
If you want to secure your personal data and remove the autofill information previously saved to Google Chrome, and you want to do it after the autofill feature was disabled manually, then here’s the hint: you can safely erase this data from your browser settings. Below are the steps to take if you want to edit the saved information manually.
Step 1. Open Google Chrome again.
Step 2. In the upper right corner of the screen, tap on the button with three vertical dots to access Google Chrome controls.
Step 3. From the context menu that appears, select the line Settings.

Step 4. Use the mouse wheel or the scroll bar to find the Autofill section and then click on the line Addresses and more to continue.

An important note. To access the address autofill directly in Google Chrome type chrome://settings/addresses in the address bar and press the Enter key to confirm.
chrome://settings/addresses
Step 5. In the new page, look for the section Addresses, select any line containing information saved to Google Chrome for autofill purposes, and click on the More actions button (it looks like three vertical dots and can be found at the right end of each line).

Step 6. Select Remove from the context menu that appears in order to clear data.

The information will be deleted at once without any warnings or confirmations, and there is no way to cancel this step. So before you delete anything, make sure this is the data you want to disappear.
The final step in the procedure for removing user data is to use the Clear browsing data function to erase possible remains of information that could be visible in your browser. For that matter, there a few quick steps to take.
Step 1. Open Google Chrome again to access the Internet from your computer.
Step 2. Click on the Customize and control Google Chrome button (three vertical dots) next to the address bar, in the right corner of the browser window.
Step 3. Select Settings from the menu. Otherwise, type chrome://settings/ in the address bar and hit the Enter key to access the settings page directly.
chrome://settings/

Step 4. In this page, scroll down until you see the link Advanced to display hidden settings of your browser.

Step 5. Find the tab Privacy and security and click on the line Clear browsing history.

Step 6. Google Chrome will show a pop-up window listing all data that can be removed without any effect to the browser performance. In this window, go to the Advanced tab, then scroll down to the line Autofill form data, and check the corresponding box to select it. Look at other boxes and uncheck the ones where you don’t need to remove data. Otherwise, the information contained under the boxes checked by default (such as Browsing history, Download history, Cookies and other site data) and other selected items will be erased. When you are finished with checking and selecting the information for removal, click Clear data.
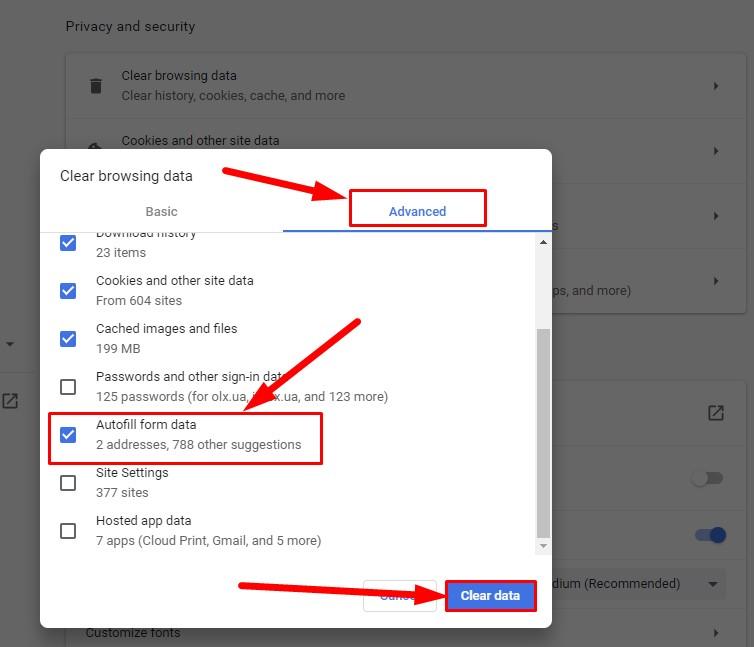
After some time (which depends largely on how much data you are trying to erase) all selected information will be erased from Google Chrome. Next time you need to fill your details into a form, you will have to do it manually, without hints from your browser.
Conclusion
The autofill feature in Google Chrome is one of the ways to relieve users from the tiresome task of having to enter addresses and other data repeatedly. The corresponding service in your browser saves such information and suggests filling it into certain forms. This offers a convenient way to forget about typing the same things many times while you are surfing the Web.
However, you may wish to disable this feature to improve security of your personal data, and this article tells you how. Logically, the final step would be clearing previously saved data from Google Chrome.

How to View Browsing History for Google Chrome, Mozilla Firefox, Opera, Edge, Internet Explorer 🌐⏳💻


