RAID 5 Setup with LVM: Data Recovery Tips Included
Unlock the secrets of RAID 5 creation with the LVM tool in this comprehensive guide. Whether you’re a beginner or an experienced user, this step-by-step tutorial will walk you through the process with ease. From understanding RAID configurations to utilizing the LVM tool effectively, we cover everything you need to know to build a secure RAID 5 system. Don’t let data loss haunt you!
- Introduction
- How to Format Disks and Create a Virtual Group for LV RAID
- How to Create a Software LVM RAID 5
- How to Check the Status of an LVM RAID
- How to Recover Data Lost from an LVM Array
- How to Recover Lost Information From an LV RAID, If Two Drives are Out of Order
- Conclusion
- Questions and answers
- Comments
Introduction
LVM RAID is a method to create a logical volume (LV) which uses several physical disks to improve performance or fault tolerance. Within LVM, physical disks (abbreviated as PV, physical volumes) belong to one volume group (VG).
| Feature | Description |
|---|---|
| Name | Linux Logical Volume Manager (LVM) |
| Purpose | Managing storage space on hard drives and arrays |
| Main Components | Physical Volumes (PV), Volume Groups (VG), Logical Volumes (LV) |
| Flexibility | Allows easy resizing of volumes and merging space |
| Volume Resizing | Supports both expanding and shrinking volumes |
| Mirroring and Distribution | Capability to mirror volumes and distribute data across multiple disks |
| Snapshots | Supports snapshot creation for backup or recovery |
| RAID Integration | Can integrate with RAID for added data protection |
| Advantages | Flexible management, volume expansion or reduction without reboot |
| Disadvantages | Complex configuration, potential data loss without backups |
| Storage Systems | Can be used on both local drives and networked storage |
| Management Commands | pvcreate, vgcreate, lvcreate, lvextend, lvreduce |
| Supported OS | Linux |
| Volume Types | Linear volumes, mirrored volumes, striped volumes |
Although it is much safer to use MD RAID, if you really need to migrate from conventional disks to a RAID system without having to change their file systems, this method can be very useful.
Allocating information with blocks of logical volume data on physical disks is determined by a specific RAID type. Check the video link below for some basic information about various types of disk arrays.

🐧 How to Recover Data from Linux-Based Software RAID 0, RAID 1, RAID 5 🐧
LVM RAID technology uses Device Mapper (DM) and Multiple Device (MD) drivers from Linux kernel.
DM is used to create and manage visible LVM devices, while MD is used to allocate data onto physical devices.
LVM creates hidden logical volumes (DM devices), kind of placed between the visible volumes (known as LV, logical volumes) and physical devices.
Now let’s see how to create a RAID 5 system with 5 hard disks combined into a single group of logical volumes.
How to Format Disks and Create a Virtual Group for LV RAID
Use the command lvcreate to create an LV RAID.
lvcreate
If there is no LVM (Logical Volume Manager) tool on your computer yet, install it first. Follow the link below to check our special video for details.

🏆 Как восстановить данные удаленные с LVM разделов диска в Linux
Install the manager with the help of the command prompt tool in charge of interacting with the package management system. Type the following command: sudo apt install lvm2.
sudo apt install lvm2

Perform all actions from the superuser account. For this purpose, type the command sudo -i. It will remove the requirement to enter the password every time.
sudo -i

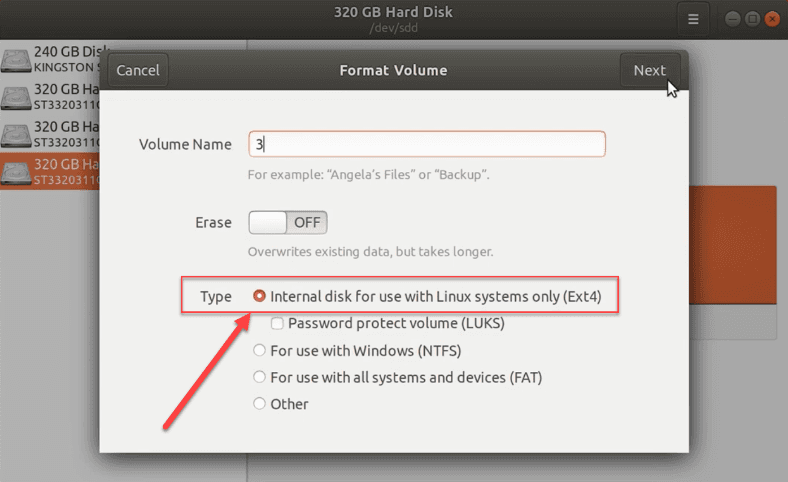
After that, use the disk utility or Terminal to allocate the disk space. Just select the necessary file system type and start the process of formatting the drives.
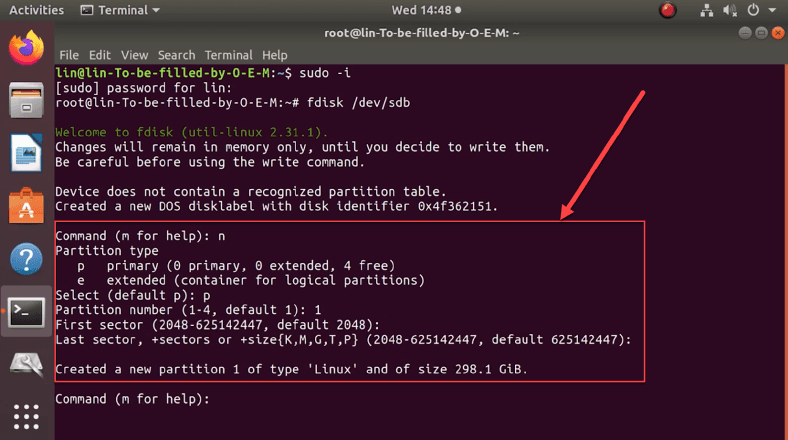
With the Terminal, use a special system command fdisk /dev/sdb.
fdisk /dev/sdb

Before the format process starts, make sure you have chosen the right drive, because this operation will make all data on the selected drive disappear (the operating system will erase it.
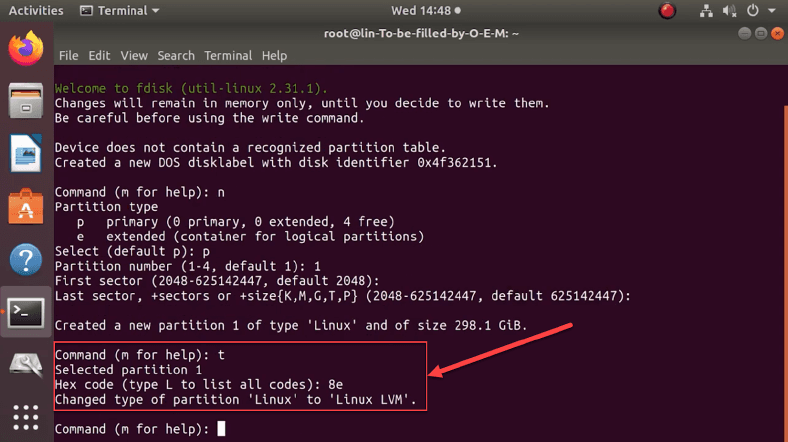
Specify the format settings by typing the following attributes, one by one:
- n – to create a new partition,
- p – to set the partition value as primary,
- 1 – to assign a partition number.
After that, press the Enter key twice to agree with the size of the first and the last sector.
Now let’s deal with LVM settings. Apply the following attributes, each in its own line:
- t – to start the process of modifying the type of the new partition,
- 8e – to set the value for LVM.
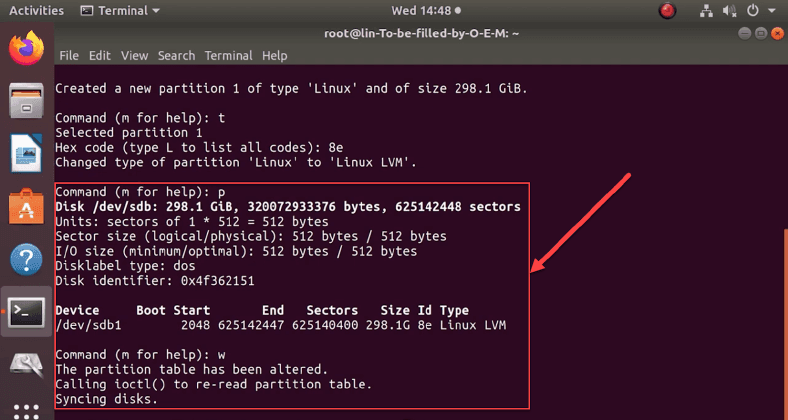
Make sure that the new partition is of the required type. In the command prompt, type the attribute p. The operating system will process your request and show the data in the form of a table. The device will be marked with the value sdb1 and have the system type Linux LVM. After that, record the changes with the attribute w. Repeat this procedure for all unformatted drives and allocate their disk space.
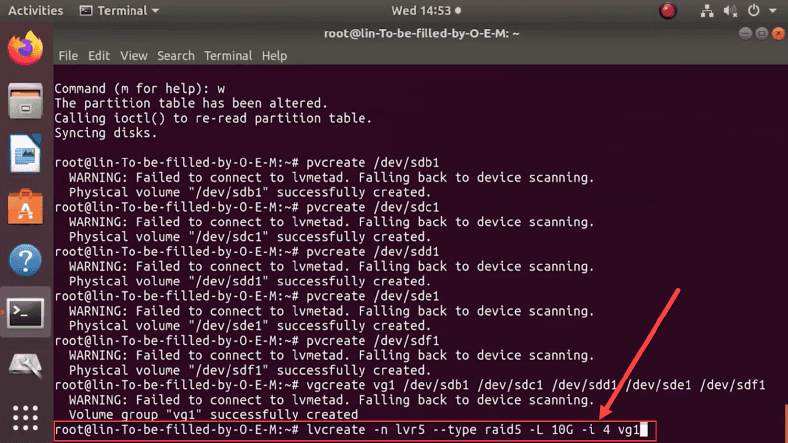
Our further actions will be intended to create a physical volume in the new partition. Type the command pvcreate /dev/sdb1.
pvcreate /dev/sdb1

Repeat the command for every drive, replacing the value sdb1 with the corresponding drive names (sdc1, sdd1, sde1, sdf1).

Now combine all the drives into one group. In the command prompt, type vgcreate, listing the created disks. In our example, the command looks like this: vgcreate vg1 /dev/sdb1 dev/sdc1 dev/sdd1 dev/sde1 dev/sdf1. The attribute vg1 is the name of a new volume group.
vgcreate vg1 /dev/sdb1 dev/sdc1 dev/sdd1 dev/sde1 dev/sdf1

How to Create a Software LVM RAID 5
The process of creating a software RAID 5 suggests running a simple command in the Terminal:
lvcreate -n lvr5 --type raid5 -L 10G -i 4 vg1

In our example, the command contains the following attributes:
- -n – to assign a name to the volume.
- --type raid5 – to set the array type.
- -L – to set a size limit for the logical volume (in our example, its size is 10 GB).
- -i - to indicate the number of devices involved to store user data. It doesn’t include an additional device to store parity blocks, though. The number you give should be 2 or more, because the minimum requirement for this array type is three disks.
- vg1 – to tell the operating system where to take the required disk space from (specify a particular volume or an entire group).
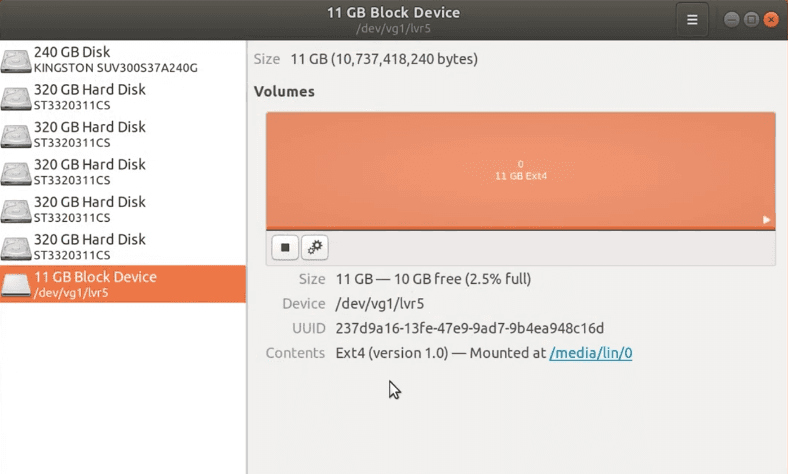
After the command is performed successfully, the process of rebuilding a RAID 5 system in an LVM virtual group is over. The last step is to format the array and mount it. For RAID 5, we select the ext4 format. Type the command:
mkfs -t ext4 /dev/vg1/lvr5

This command contains information on the file system we have selected - ext4, the group name - vg1, and the volume name lvr5.
Now mount the new disk array. Type the command mkdir /mnt/lvr5, and follow it with mount -t ext4 /dev/vg1/lvr5 /mnt/lvr5.
mkdir /mnt/lvr5
mount -t ext4 /dev/vg1/lvr5 /mnt/lvr5

When these commands are performed, the selected volume will be mounted.
How to Check the Status of an LVM RAID
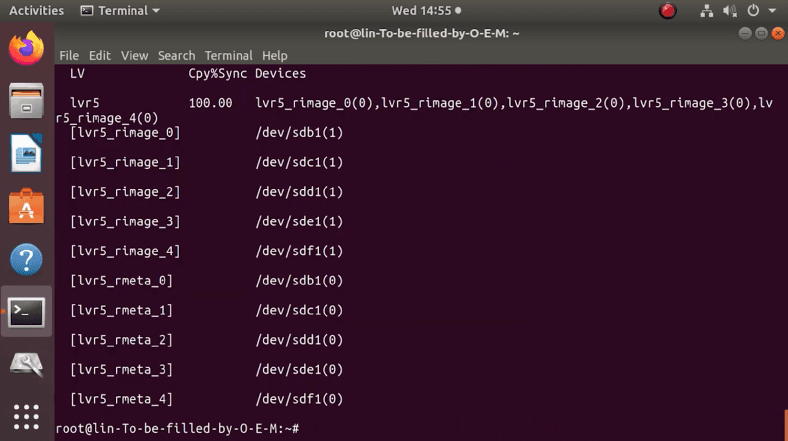
Run the following command to check the LVM RAID status:
lvs -a -o name,copy_percent,devices vg1

Here you can view the information that includes data on the devices and groups involved.
How to Recover Data Lost from an LVM Array
If you lost important data and it needs to be recovered, try a specialized recovery tool from Hetman Software. The product you need is Hetman RAID Recovery.
This software solution supports recovery of lost files from almost all known RAID types. The program lets you recover the lost data easily and quickly, and it doesn’t require special skills or professional background. Unfortunately, it is impossible to install this tool onto a Linux computer. However, it can identify and interact with all main file systems which are used in Linux, Unix, MacOS, and Windows. Also, the program can find and fix various software logical errors which enables it to recover as many user files as possible.
When it is mission-critical to use Hetman RAID Recovery in Linux, here are the three methods to choose from. Start a virtual machine; install Windows as your second operating system, or connect the faulty drives to the computer where Windows is installed as the primary operating system.
As you start it, the program automatically finds and identifies properties of the LVM RAID and displays all the available information about the array.
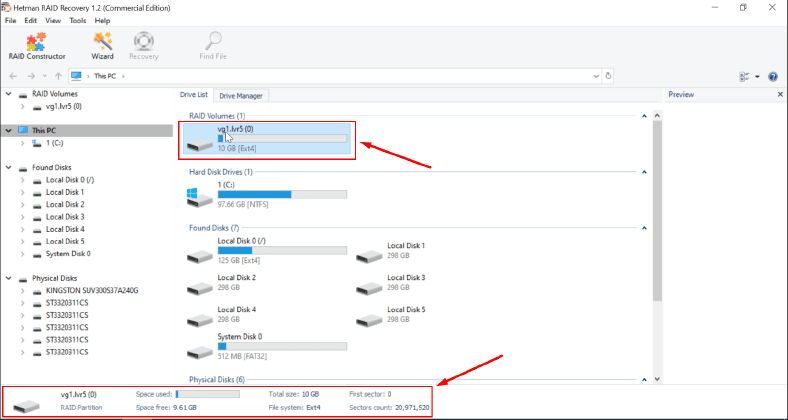
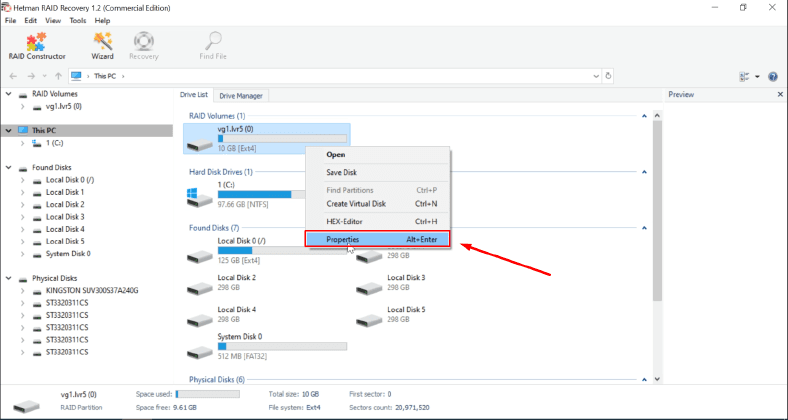
To learn more, right-click on the storage device and select Properties in the context menu. Otherwise, use the key shortcut Alt + Enter.
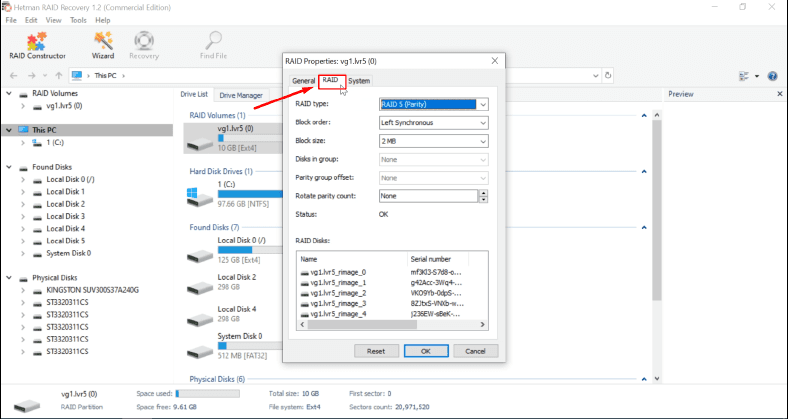
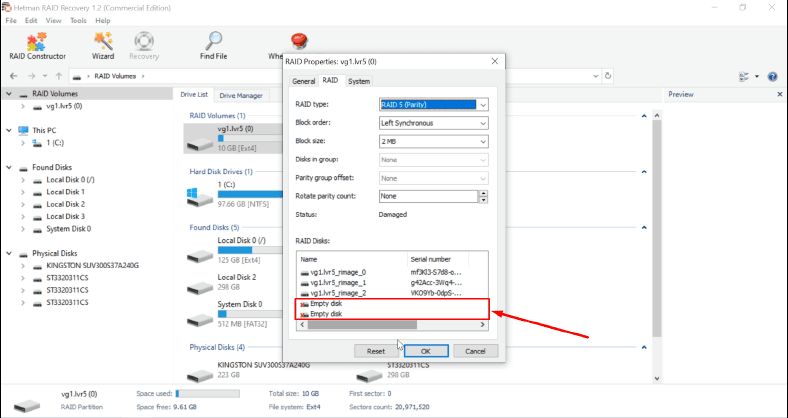
In the RAID tab of the Properties window you can see various information about this array. For example, view the disks that make it up, their serial numbers, size and block order. This information will come in handy when you are going to build an array manually in the RAID Constructor. That is why it is important to memorize the RAID settings in some way while you are creating it.
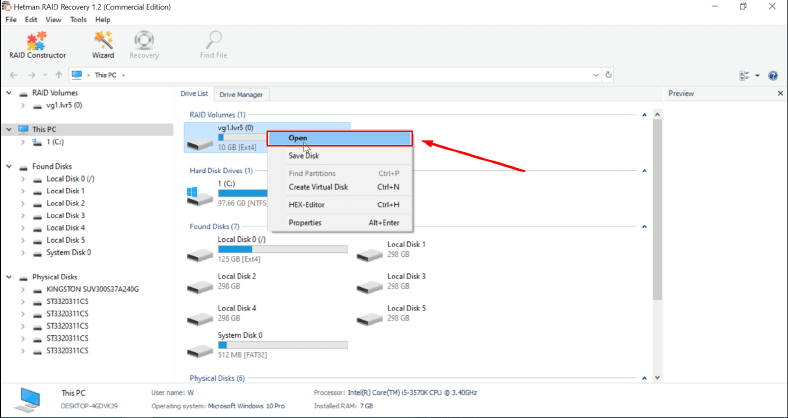
To have your data recovered, run a quick scan first. Right-click on the disk icon, and then select Open.
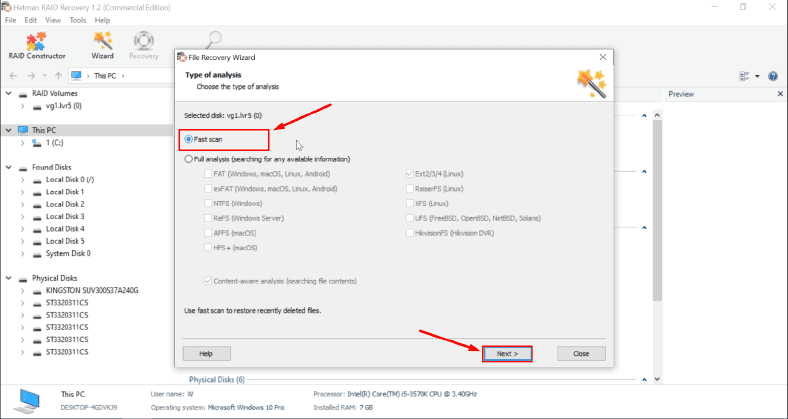
In the new recovery wizard window, check the option for Fast scan. After that, click Next.
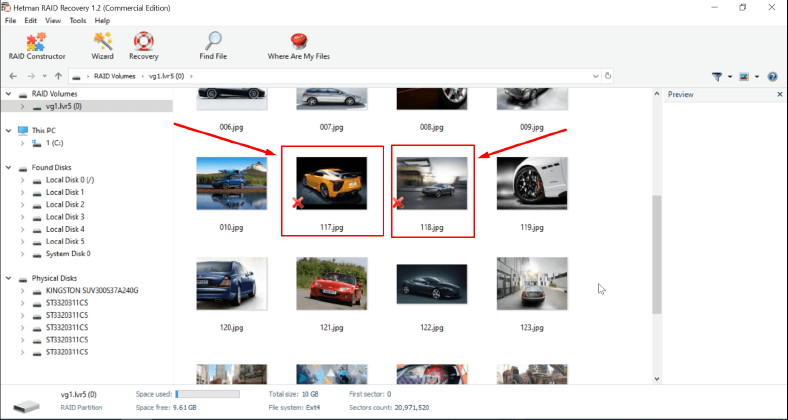
The program will analyze the storage device, identify lost data and display deleted files, labeling them with a red cross.
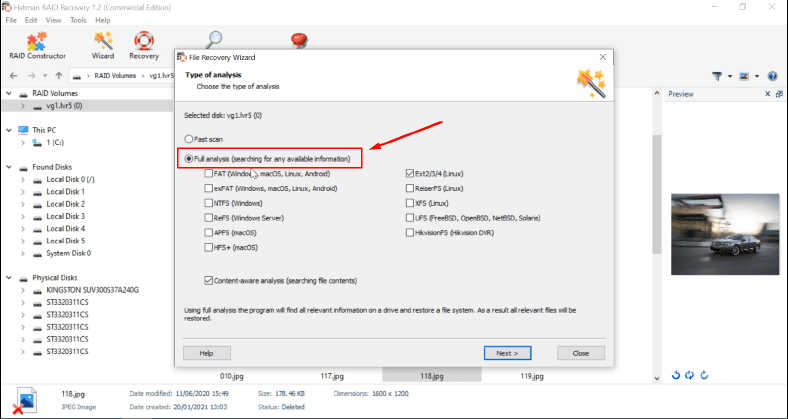
If the quick scan failed to identify the files you are looking for, try Full analysis.
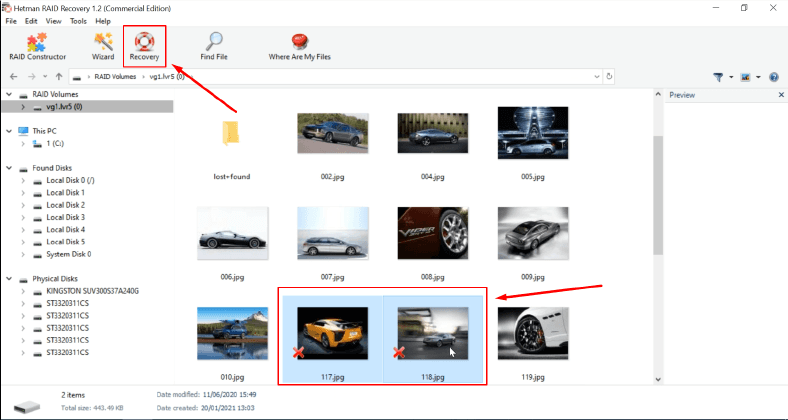
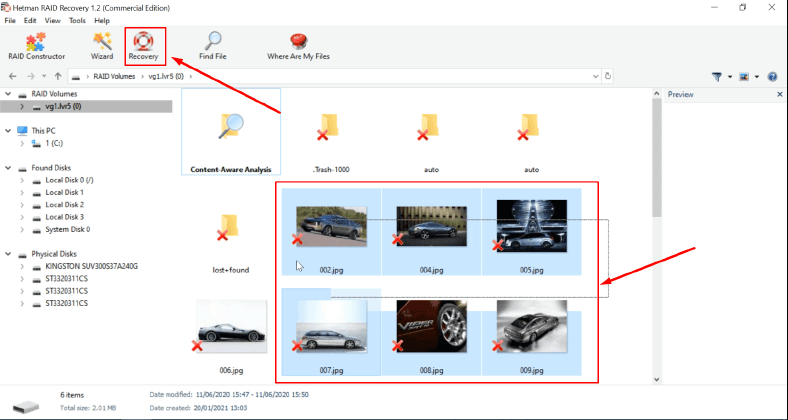
After that, select the elements you want to recover. Click on the Recovery button.
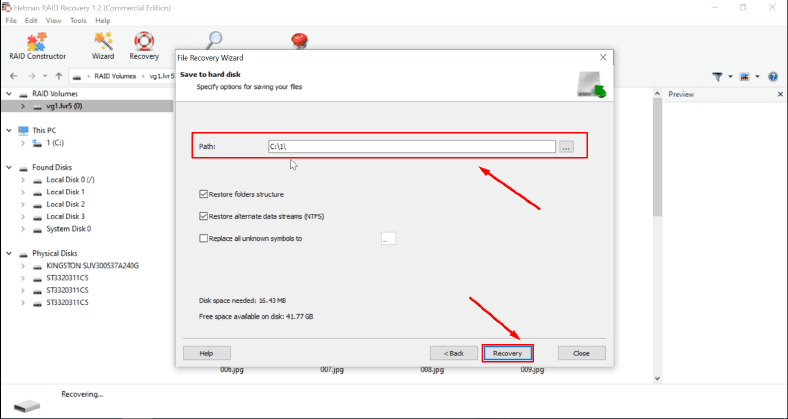
Specify a directory to save the recovered files. Click Recovery again.
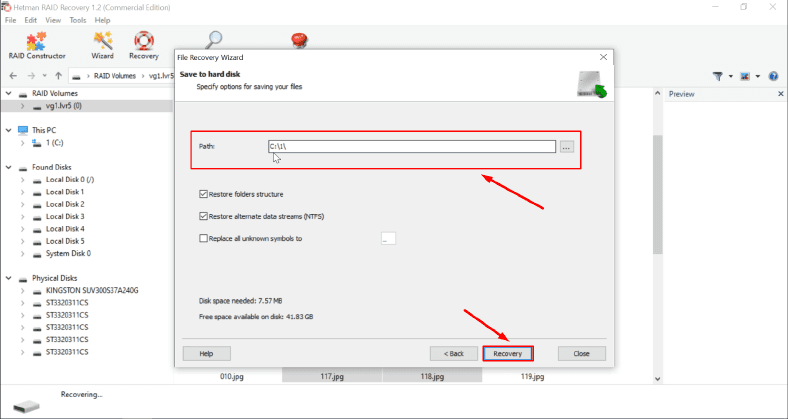
The files you have selected will be recovered and placed into the directory of your choice.
How to Recover Lost Information From an LV RAID, If Two Drives are Out of Order
Even with two drives down, Hetman RAID Recovery was able to identify the array type and provide all relevant information about it.
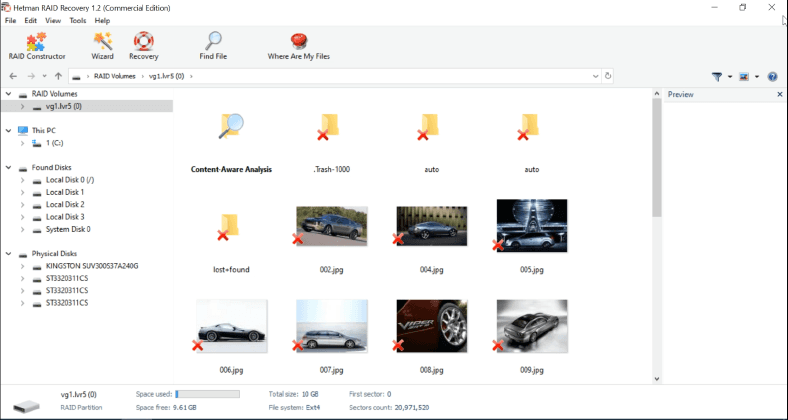
After a quick scan, all the discovered elements are displayed in a separate window. However, most of them are damaged.
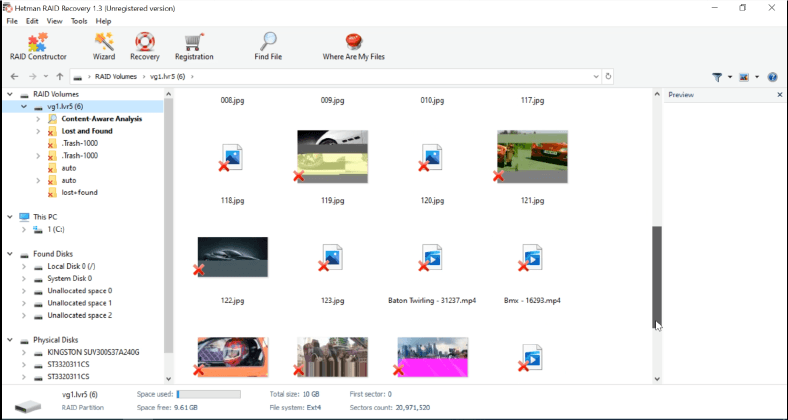
After running full analysis, the recovery wizard was able to display more healthy files.
Select the elements you need, then click Recovery.
Now set the directory for saving the files, and click Recovery again.
All the selected files will be saved instantly according to the settings you prefer.
If the program couldn’t detect your RAID automatically, use the built-in specialized tool - RAID Constructor.

To use it, you need to know all the information about the array - and you can find the data in the Properties window of your RAID system.
Conclusion
LVM is one of the many Linux technologies to give you more flexibility in managing disk space. When combined with the RAID technology, it offers good protection against data loss and an easy way to store, manage and share data.


This can be caused by the following:
- extra space is required for parity;
- MBR is used instead of GPT to create RAID volumes. MBR only allows to create volumes of less than 2 TB.
There are two types of RAID failures:
- one of the disks “falls” out of the array;
- a disk is only partially operable (for example, read operations are fine, but you can’t write any data).
In any case, you will be eventually notified that one of the disks within the array failed. RAID still continues to read and write data, since RAID 5 is a redundancy-type array. However, the read performance will be reduced considerably.