How to Achieve Data Recovery from LVM Volumes in Linux
Dive into the world of Linux data recovery with our step-by-step guide on recovering data from LVM volumes. This article is crafted to help you understand the nuances of Logical Volume Management and the best practices for retrieving lost data. Whether you’re a seasoned Linux user or new to the platform, you’ll find valuable insights and practical advice to successfully recover your files. We’ll walk you through the necessary commands, tools, and precautions to ensure your data recovery process is smooth and effective.
- What is LVM?
- How to add LVM to the operating system?
- How to format a physical disk
- Create a volume group
- Create a logical volume to use LVM
- How to format and mount a logical volume?
- How to change the volume size?
- How to recover deleted data from an LVM volume
- Conclusion
- Questions and answers
- Comments
What is LVM?
LVM (Logical Volume Manager) is a standard disk management feature available in every version of Linux. The volume manager provides a new level of interaction between your operating system and disks or volumes which this system is using. In a conventional disk management pattern, Linux looks for available drives first, and then checks what volumes are available on these devices.
With the help of LVM, disks or volumes can be united into a single space. If the disk space is treated like that, the operating system will see no difference between them and the volume manager will show the operating system only the necessary volume groups or physical disks.
| Characteristic | Description |
|---|---|
| Name | Logical Volume Management (LVM) |
| Main purpose | Manage disk space by combining physical disks into logical volumes for flexible resource allocation |
| Supported operating systems | Linux, macOS, Android |
| Physical media types | Hard drives (HDD), solid-state drives (SSD), external devices |
| Main features | Creating, resizing, and deleting logical volumes without data loss |
| Volume expansion | Ability to dynamically increase the size of volumes |
| Volume shrinking | Ability to reduce the size of volumes without data corruption |
| Snapshot feature | Yes, supports snapshots for backup and recovery |
| RAID support | Yes, supports RAID levels for improved performance and data security |
| Data security | Ability to encrypt logical volumes for data protection |
| Compatibility | Compatible with many file systems such as ext4, xfs, btrfs |
| Flexibility | Allows easy management of disk space and combining it from different physical disks |

🐧 How to Recover Data Removed from LVM Volumes in Linux 🐧
In fact, LVM has several considerable advantages to offer:
- It can create a logical volume based on any number of physical disks which will be represented in the operating system as a single disk space.
- The number of disks included and the size of such volume can be modified without interrupting your work.
- Also, the LVM technology lets you do many things on the fly, like copying certain volumes, or configuring the mirroring feature the way it works in RAID 1 systems.
How to add LVM to the operating system?
If you are going to use LVM options for the first time, you have to install it. Here is the command you need for installation: sudo apt install lvm2
sudo apt install lvm2
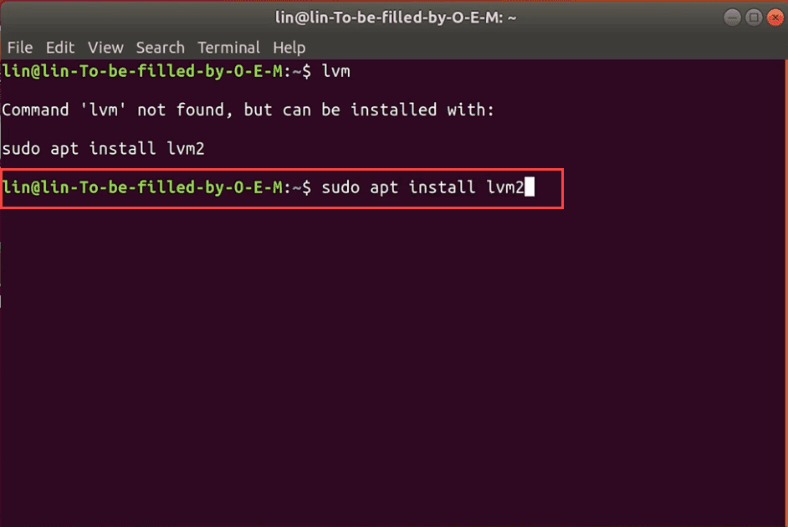
After that, type the administrator’s password, and click Yes to confirm your intention.
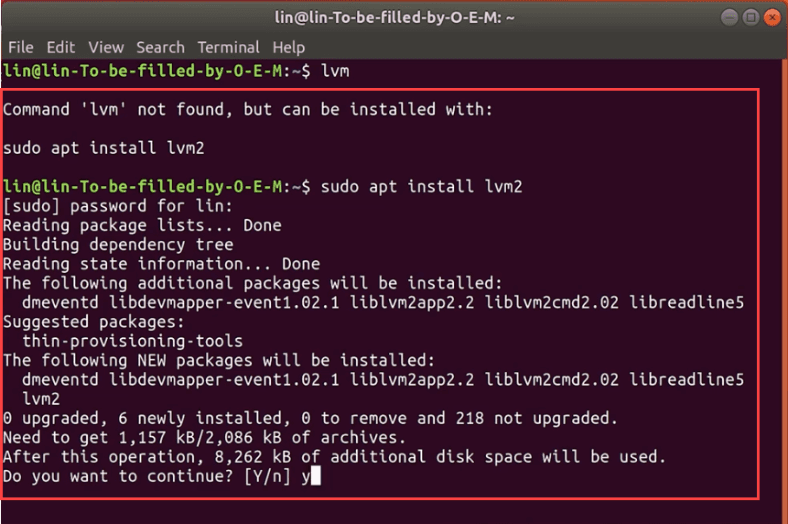
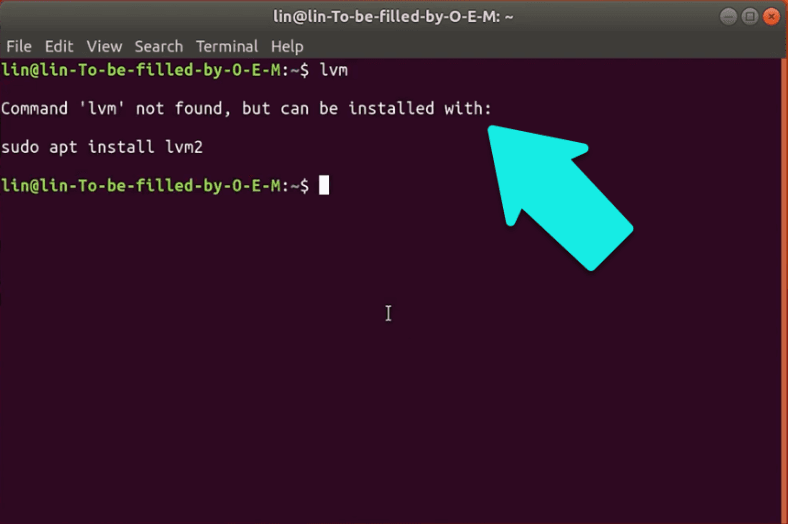
Some Linux versions have this feature installed by default.
This can be checked easily, by typing the command lvm in the terminal window.
lvm
Now you can move on to dealing with disks.
How to format a physical disk
Here we are, with three empty hard disks 320 GB each, which are unformatted and without any partitions.
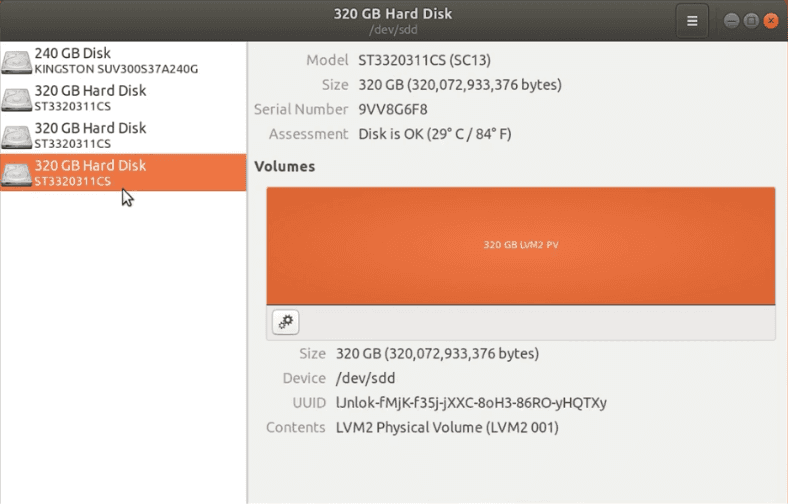
The easiest way to format a disk is by using a disk management utility. Click on a disk - open advanced settings - then format it.
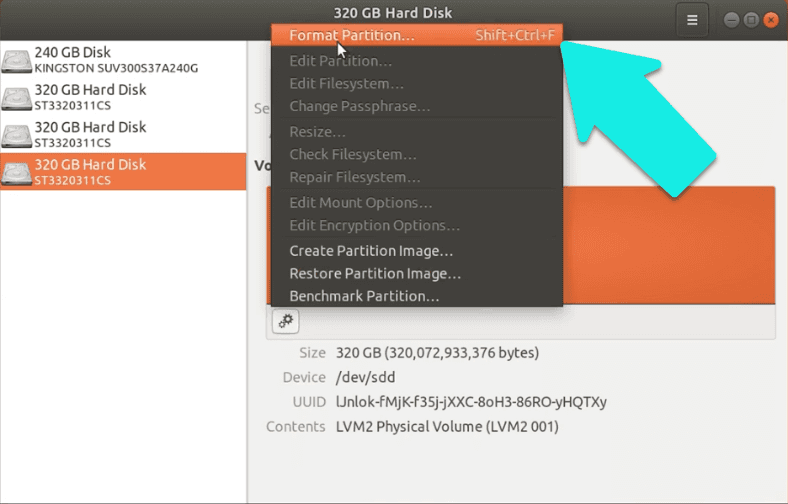
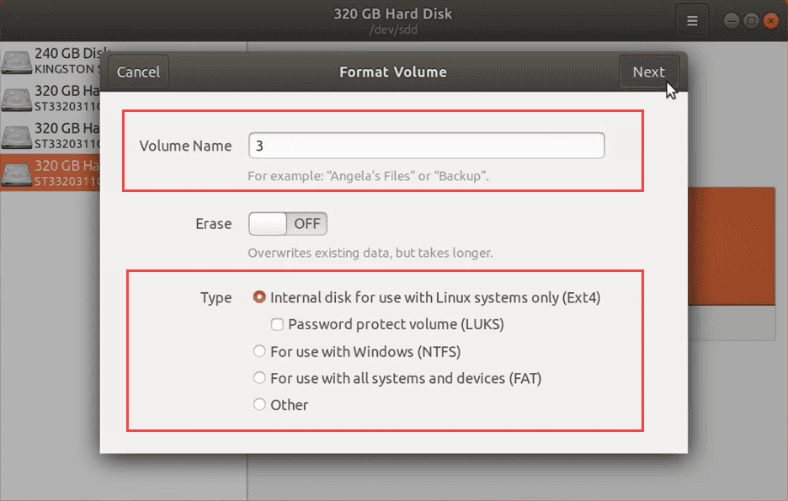
Specify the name and file system - Next- and click Format again to confirm your action
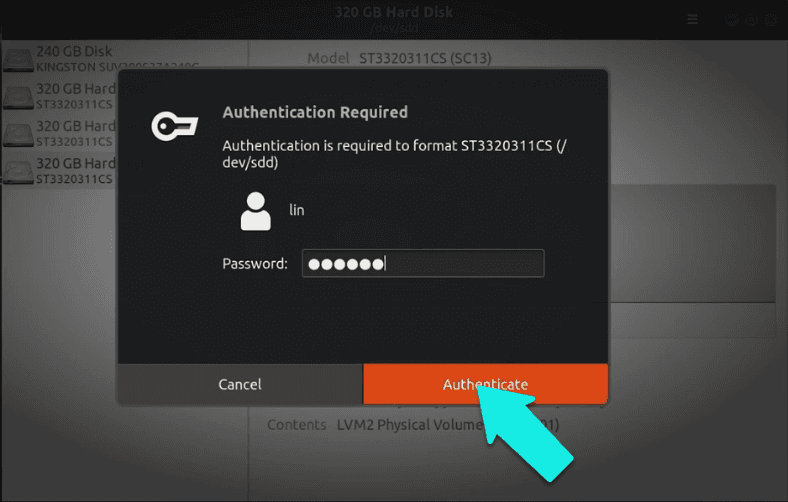
Now you’ll need the password to your administrator account.
Now that this disk is formatted, repeat the operation for every other disk which is not.
Also, a disk can be formatted with the terminal, using the command fdisk.
fdisk
Sign in with a superuser account – sudo –i – type the password.
sudo –i
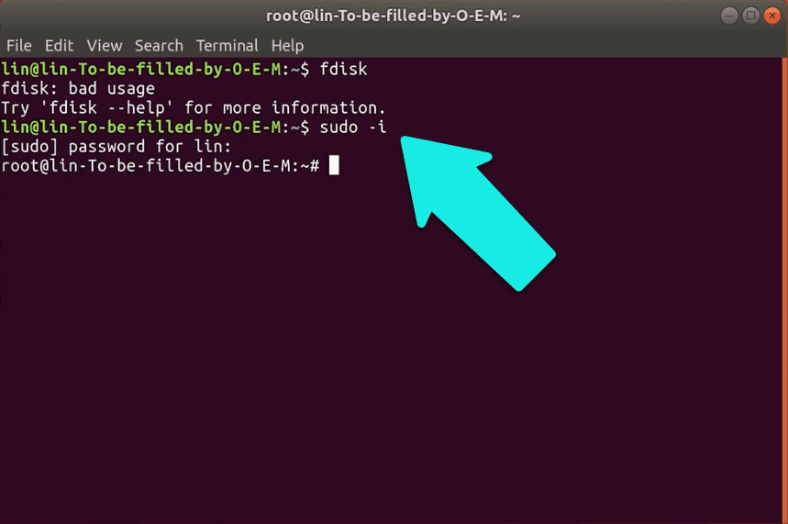
Now run the following command: fdisk /dev/sdb – where sdb is the unformatted disk.
fdisk /dev/sdb
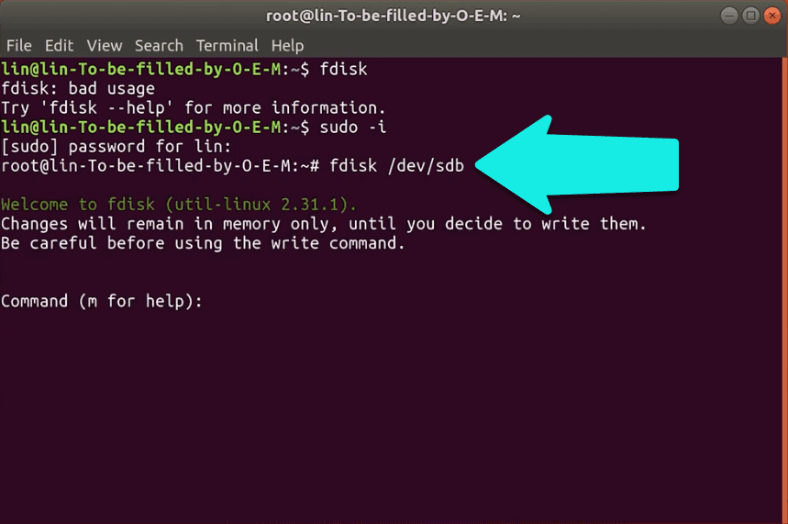
Before you continue, make sure you have selected the right disk, because this operation erases all data from there.
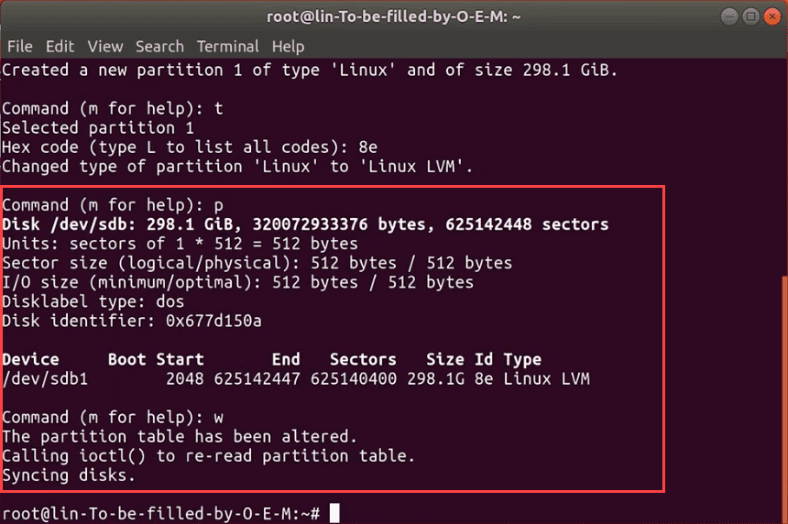
Type n – new volume, p – primary, 1 – first partition, then press Enter twice.
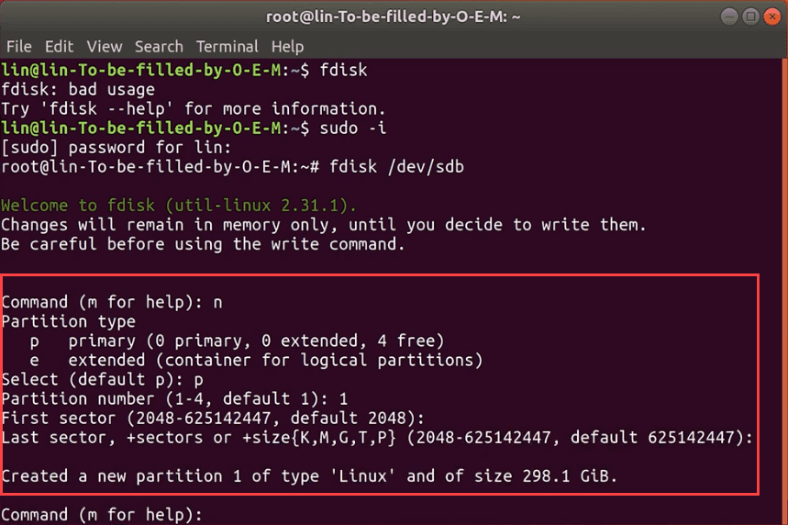
Now let’s get the volume ready to be used with LVM. Type t to change the volume type, and then 8e to assign LVM type.
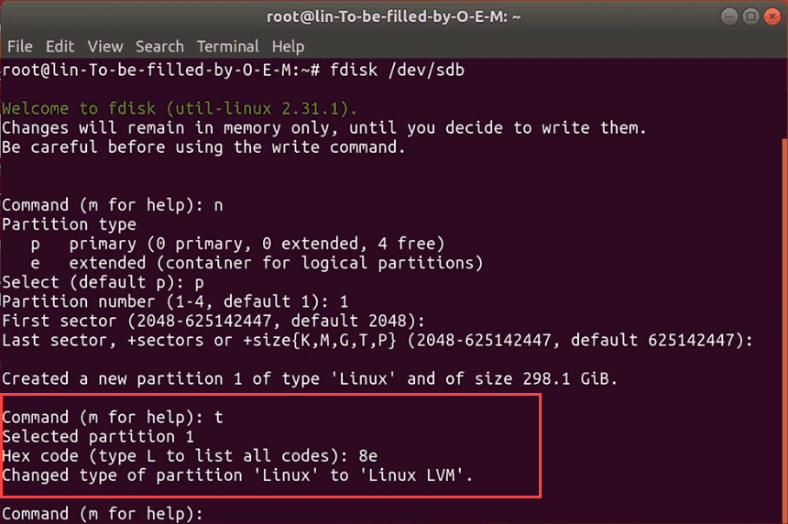
Check the volume properties by pressing p - you can see everything is OK, a new formatted volume with the name sdb1 appeared; press w to record the changes. Similarly, format all the disks which are not formatted yet.
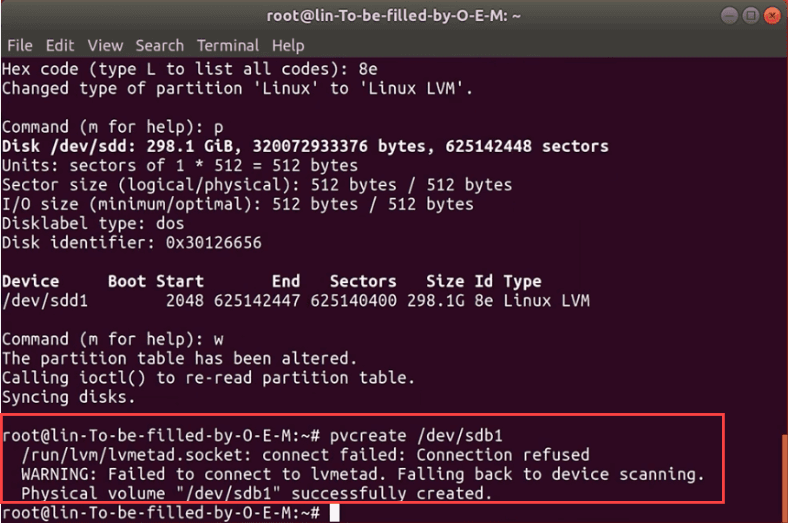
Now create an LVM volume on the partition you have just created, by entering the command: pvcreate /dev/sdb1.
pvcreate /dev/sdb1
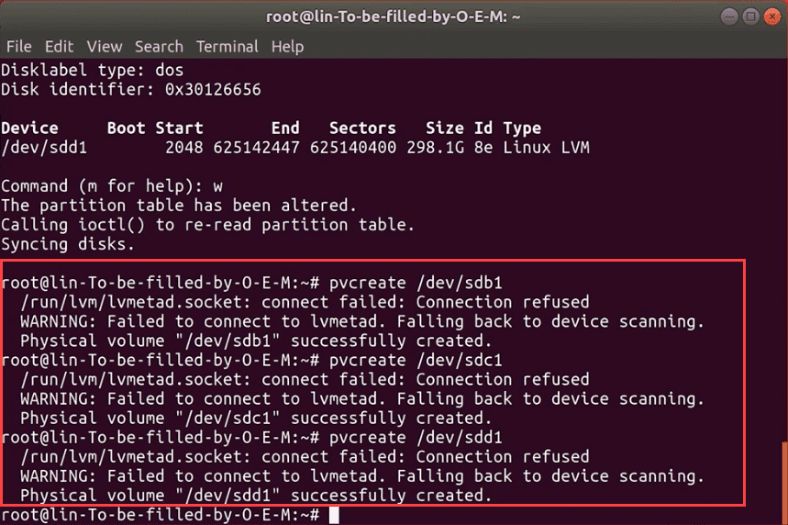
Repeat the command for every disk: pvcreate /dev/sdс1, pvcreate /dev/sdd1.
pvcreate /dev/sdс1
pvcreate /dev/sdd1
Create a volume group
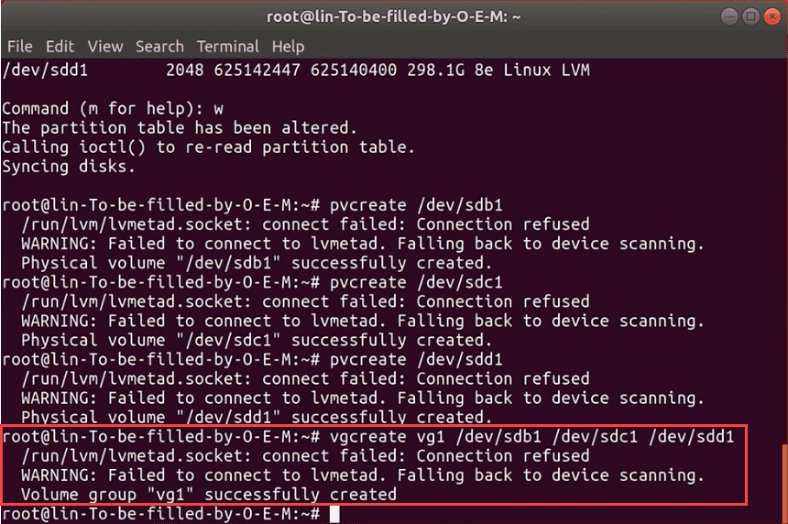
Combine the three disks you have just prepared into an LVM volume. Here’s the command to use:
vgcreate vg1 /dev/sdb1 dev/sdc1 dev/sdd1
where vg1 is the name of the new group. Actually, you can use any name you prefer, but it’s recommended to put the vg letter combination before the name so that you know it is a volume group.
Create a logical volume to use LVM
When the disks are combined into the group, you need to create a new logical volume, so that you can use this group. For this purpose, type the command:
lvcreate -L 10G -n lv1 vg1
Where the -L stands for the size of the logical volume - it is 10 GB in this case, and the -n assigns a name to the volume, and the vg1 indicates from which volume the space should be taken.
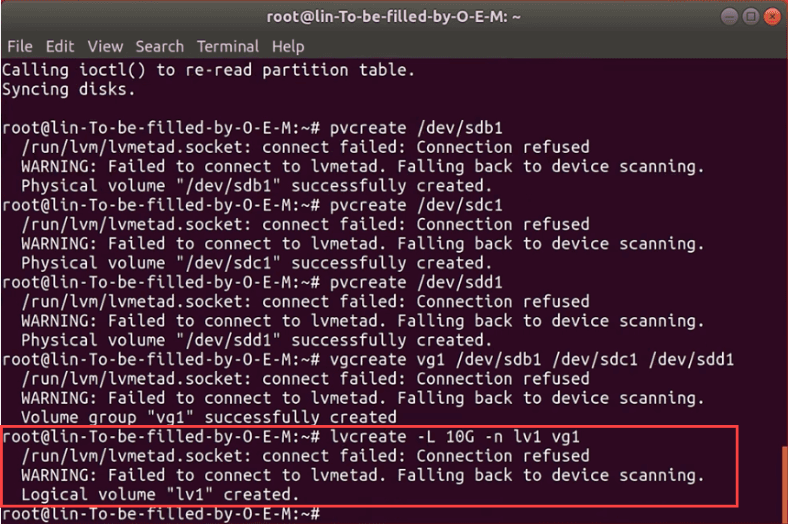
If there is any data on the disk, the operating system will warn you about it: type yes to confirm your decision to erase the information.
How to format and mount a logical volume?
The last step you still have to take is to format the volume in the disk management utility and mount it. Click on it to open advanced settings and then format it; specify the name and file system - Next- and click Format again.
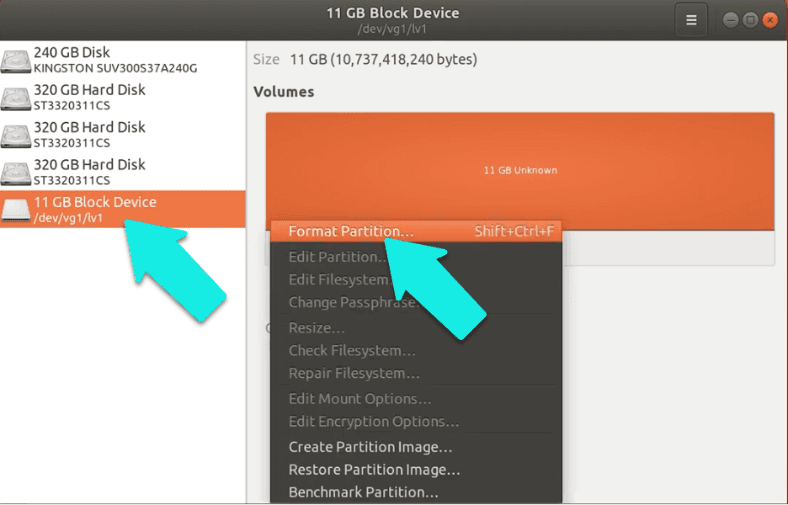
Type the root (superuser) account password, and click here to start mounting. Now you can use the new volume.
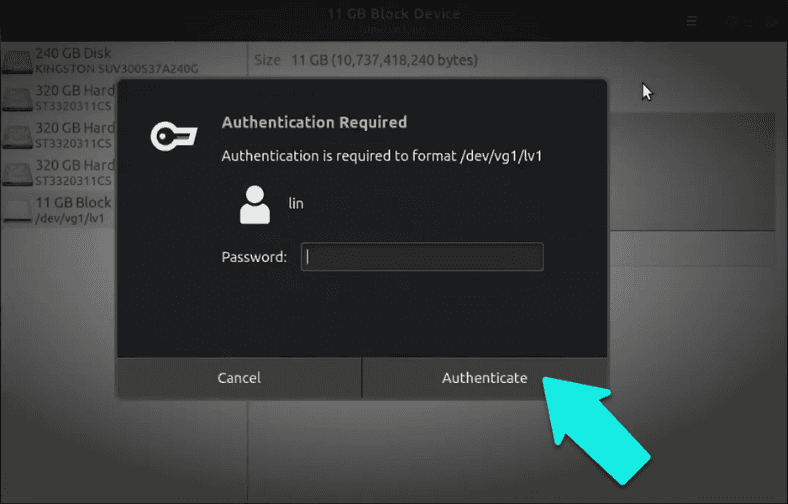
If you need to format it with the terminal, type the following command:
mkfs -t ext4 /dev/vg1/lv1
Specify the file system as Ext4, the group name, and the volume name.
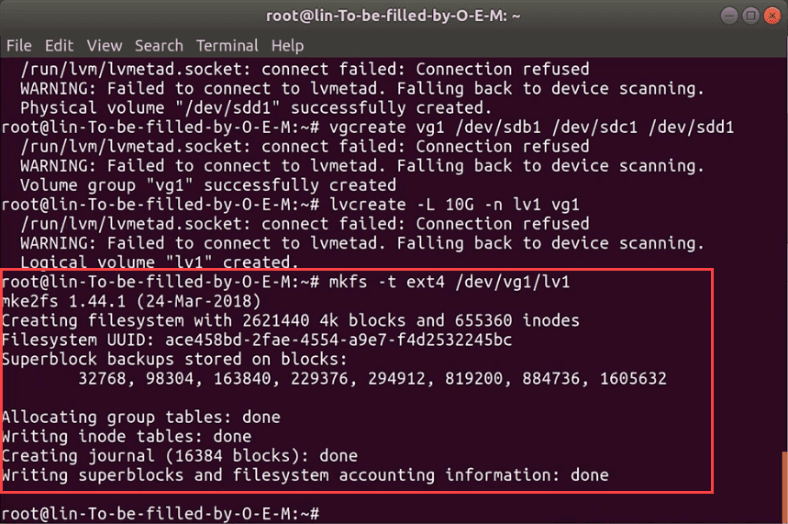
For mounting, type the following: mkdir /mnt/lv1, and then – mount -t ext4 /dev/vg1/lv1 /mnt/lv1.
mkdir /mnt/lv1
mount -t ext4 /dev/vg1/lv1 /mnt/lv1
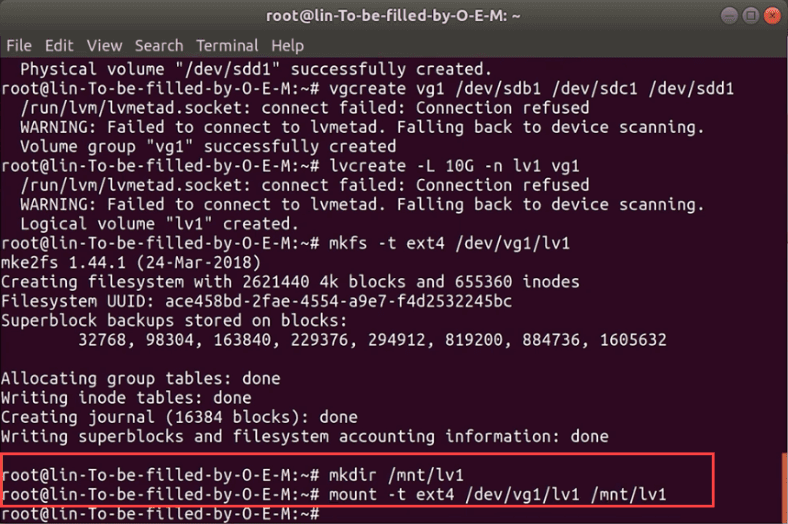
The volume is mounted.
How to change the volume size?
One of the advantages offered by logical volumes is the opportunity to add a new hard disk on the fly and expand the volume group. And on the contrary, if there is a hard disk in the volume group which is not in use, you can remove it.
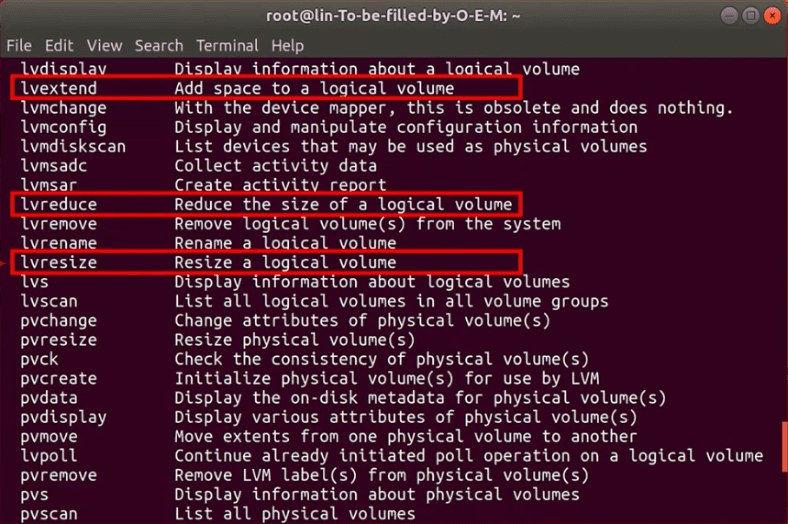
There are three main tools to make physical volumes, volume groups and logical volumes larger or smaller.
- Resize – this command shrinks or extends physical and logical volumes, but can’t handle volume groups;
- Extend – use it to increase logical volumes or volume groups;
- Reduce – it can make logical volumes or volume groups smaller.
Step 1. How to add a new hard disk to a volume group
The first step when you want to add a hard disk to a group is to format it. Scroll up to find a detailed explanation of this step.
After that, run the following command: vgextend vg1 /dev/sde1
vgextend vg1 /dev/sde1
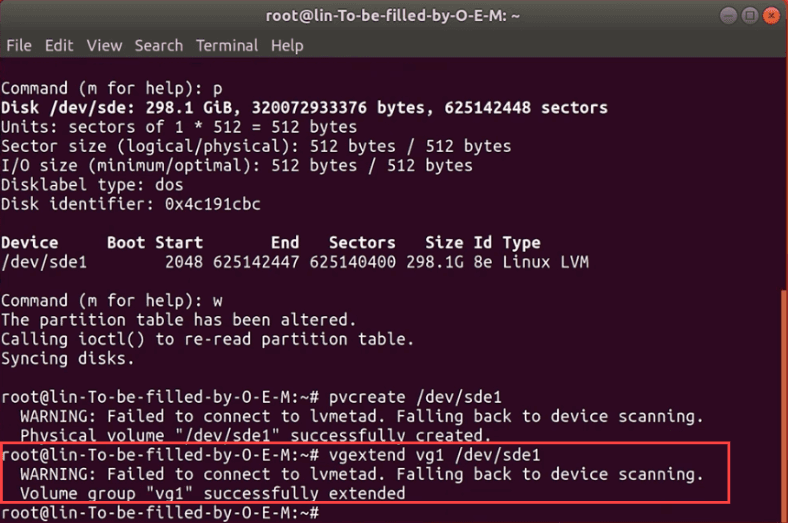
where vg1 is the group name, and sde1 is the new (formatted) disk.
Step 2. How to display detailed information about LVM
To display detailed information on the composition of an LVM group, run the command pvdisplay.
pvdisplay
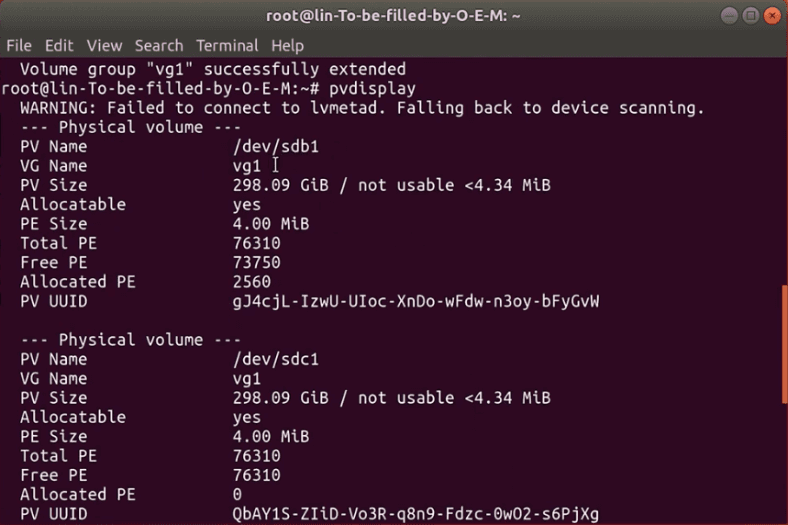
It displays the path to a physical disk, the name of the virtual group where it belongs, the information on the free and used disk space, disk ID and many other things.
Step 3. How to remove a logical volume
To remove a logical volume, make sure that i’s disconnected (unmounted), then run the lvremove command, and the volume will be removed.
This command will help you to remove a volume group, but before that, you need to unmount the logical volume, so use another command first: umount /mnt/lv1
lvremove
umount /mnt/lv1

To proceed with removal, type this command: lvremove /dev/vg1/lv1, and type Yes to confirm this operation.
lvremove /dev/vg1/lv1
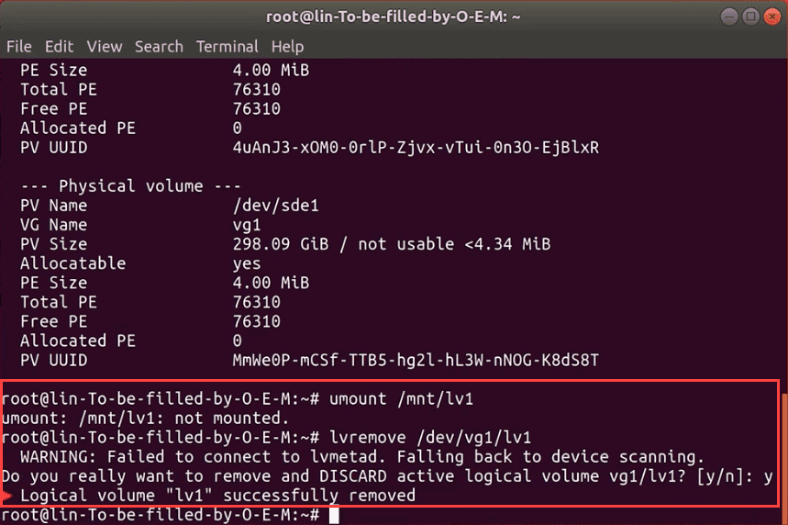
When the removal operation is successful, you’ll see this message.
Now the group can be removed, with this command: sudo vgremove vg1
sudo vgremove vg1
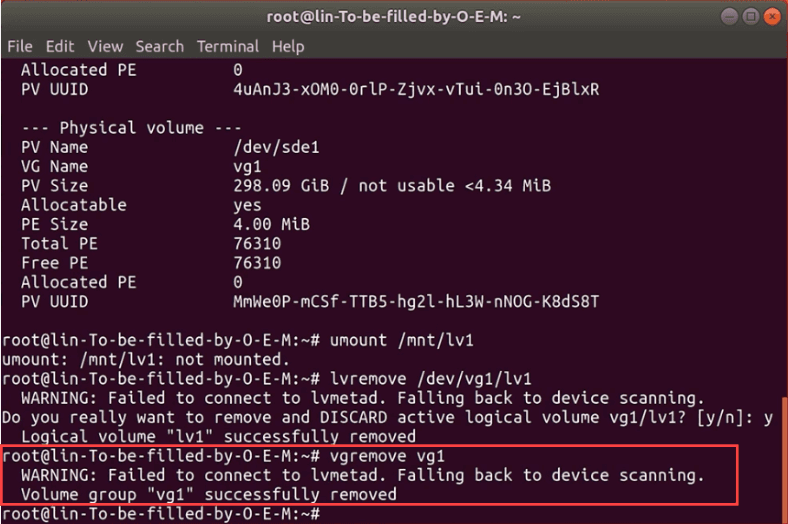
Now it is time to remove all the disks that used to constitute the group; this command will do it: sudo pvremove /dev/sdb1 /dev/sdc1 /dev/sdd1
sudo pvremove /dev/sdb1 /dev/sdc1 /dev/sdd1
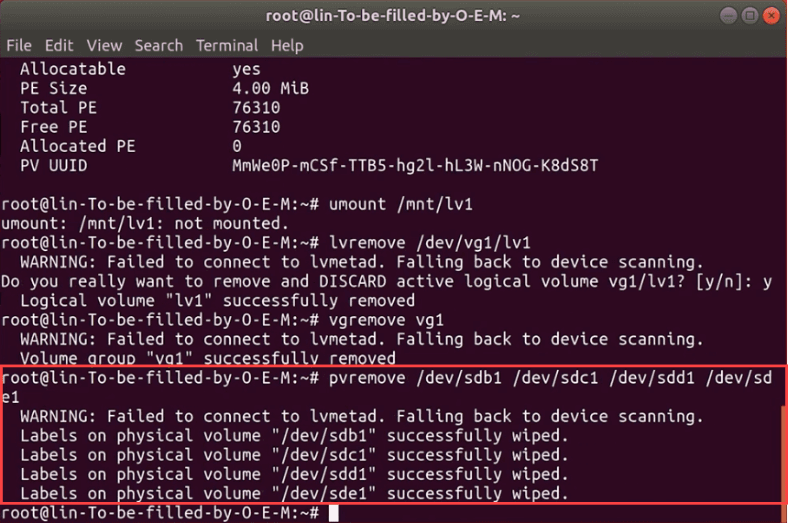
All the formatting of the physical disk is removed, and now the disk is back to its original condition.
How to recover deleted data from an LVM volume
If you accidentally removed important information from an LVM logical volume, you can still restore it with the help of Hetman Partition Recovery.
This utility supports LVM partitions and guarantees data recovery from there. It can handle most popular file systems used in Windows, Linux, Unix, and MacOS. It can ignore errors of the logical structure, scan the hard disk and restore the files you are looking for.
At the moment, there is no version of Hetman Partition Recovery for Linux. However, you can still run it with the help of a virtual machine based on Windows, install it as the secondary operating system on your PC, or connect the hard disk to another computer.
Start the program: after initialization, it recognized the logical volume without effort and now it displays all the data available on this volume.
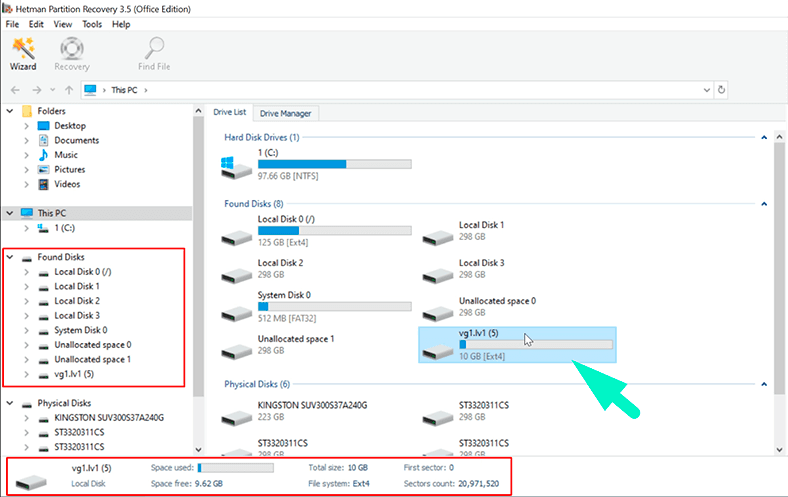
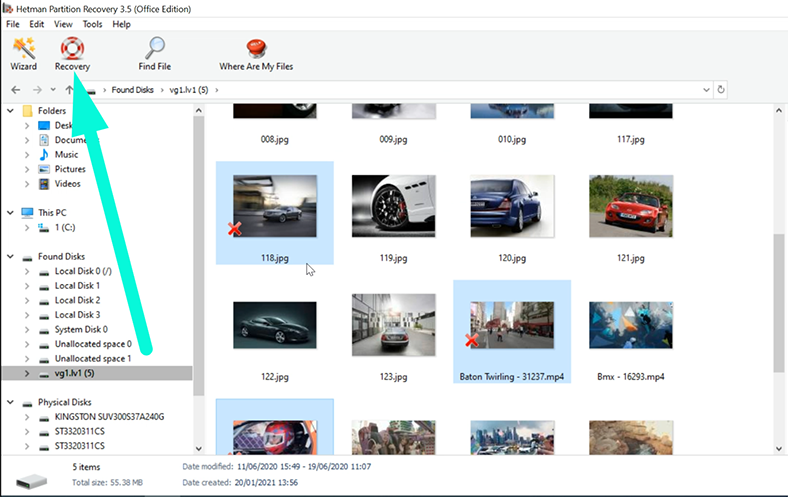
Start with running Fast scan - right-click on the disk, Open, Fast scan - and when the scan is over, the program will display the results in the right side of the window. Removed elements are marked with a red cross.
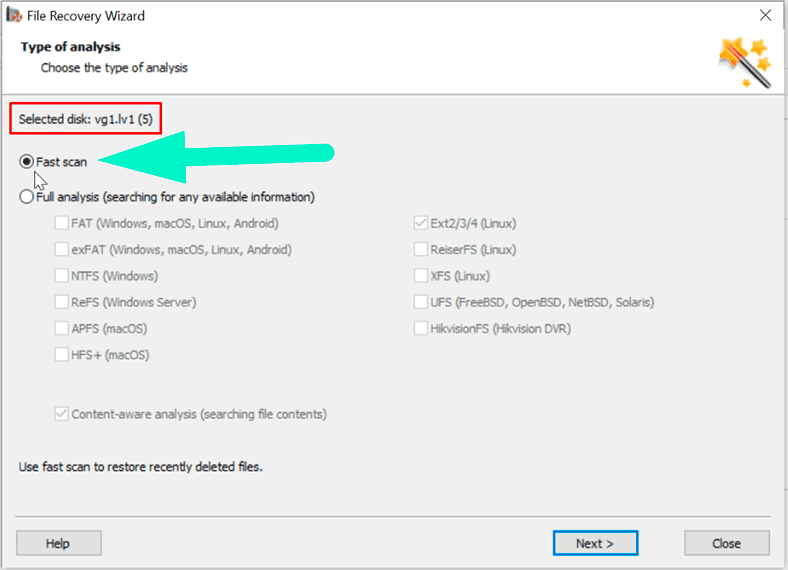
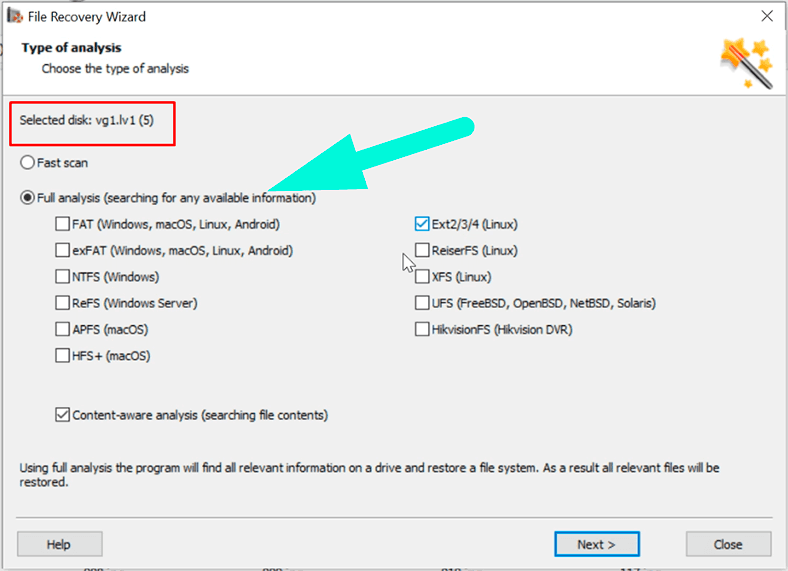
If the Fast scan doesn’t find the data you need, then use Full analysis.
Select the files to be restored, click Recovery, choose where to save them, then click Recovery again.
When the process is over, you will find all the files in the folder you have selected.
Conclusion
In this article, we did our best to explain how to use Logical Volume Management - an integrated feature of Linux. We have reviewed all important stages: creating and configuring an LVM partition, adding and mounting new hard disks, shrinking and removing volumes. The LVM feature has been developed with servers in mind, but now you can enjoy all of its benefits on a desktop PC at home.



If you are using the stable patch 2.4 device mapper patch from lvm2 archive, all main functions you expect from using lvm1 are supported by lvm2 tools.
If you are using the version of device mapper in the 2.6 kernel.org kernel series, the following commands and LV types are not supported:
- pvmove
- snapshots
The main cause of this is that the "dmsetup mknodes" is not run after rebooting into a dm-capable kernel. This script generates the control node for device mapper.
If you don’t have “dmsetup mknodes,” don’t give way to despair! (You should probably update to the latest version of device-mapper, though) It’s quite easy to create a /dev/mapper/control file on your own:
Make sure that you loaded the device-mapper module (unless it’s integrated into the kernel).
Run it.
# cat /proc/misc | grep device-mapper | awk '{print $1}'
and have a look at the print digit. (If there is no result, go back to step 1.)
Run it.
# mkdir /dev/mapper
- if you get an error message saying that /dev/mapper already exists, make sure that this is a directory, and move on.
Run it.
# mknod /dev/mapper/control c 10 $number where $number is the digit printed at step 2.
- Start with removing all LV snapshots from the system. They are not processed with LVM 2 and can prevent source activation when LVM 2 is started.
- Make sure you have a working method to boot the system other than the default boot partition. Have LVM 1 tools, default system tools (mounting) and LVM 1-compatible kernel stored there just in case you need to go back and fix some things.
- Take LVM 2 tool source code and mapping device source code and compile. Before compiling LVM 2 tools, you need to install mapper library with the command “make install.” Also, copy the script dm/scripts/devmap_mknod.sh to /sbin. I recommend installing only the binary lvm file so far, so that you will have access to LVM 1 tools if you need them. If you have access to packages for device-mapper and LVM 2, you can install them, but remember that they can overwrite your LVM 1 tools.
- Get a kernel compatible with device-mapper, either integrated or in the form of a kernel module.
- Fid out where LVM 1 was activated in your startup scenarios. Make sure that by this time, the device display module is loaded (if you use device display tool as a module), and add '/sbin/devmap_mknod.sh; lvm vgscan; lvm vgchange -ay' after that.
- Install a kernel supporting device-mapper. Restart. If everything goes well, you should be able to work with lvm 2.