Windows Doesn’t See Second Hard Disk: What to Do
Learn what to do if Windows doesn’t recognize the second hard disk with this comprehensive guide. Whether you’re facing issues with drive detection, drive letter assignment, or need to update drivers, this tutorial covers everything you need to know. Dive deep into step-by-step instructions and essential tips for troubleshooting and resolving second hard disk recognition problems.

Windows 10 Can't See a Hard Disk - How to Connect One? 💻⚙️🗄️
Overview of the Problem
Sometimes after reinstalling the system or updating it to Windows 10, the computer won’t see an additional hard drive or the other disk partition. This problem can be solved in several easy ways. Besides, using these methods you can get rid of the problems of having the second hard disk which you can see in BIOS but which is invisible in Windows Explorer.
If the other hard disk is connected but you can’t see it even in BIOS – which is often the case after various operations involving PC equipment or connecting another HDD, we recommend checking if all connections are made properly.

How to Check Your Hard Disk for Errors and Fix Them in Windows 10 🔎🛠️🗄️
How To Switch On Another HDD Or SSD In Windows
In this case, you can get rid of the problem by using Windows integrated utility, Disk Management that comes with all Windows-type operating systems. In order to find it, press Win + R and in the window that appears, type in diskmgmt.msc, then click OK.
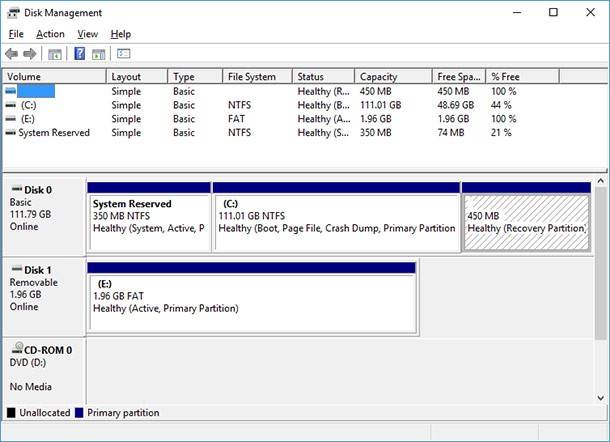
After a brief initialization, a disk management window appears. You should go down to the bottom of the window. There may be storage media with properties No data. Not initialized. It can happen when an HDD or SSD is not shown. If a partition is not shown on an HDD, there will be a line next to it, Unallocated.
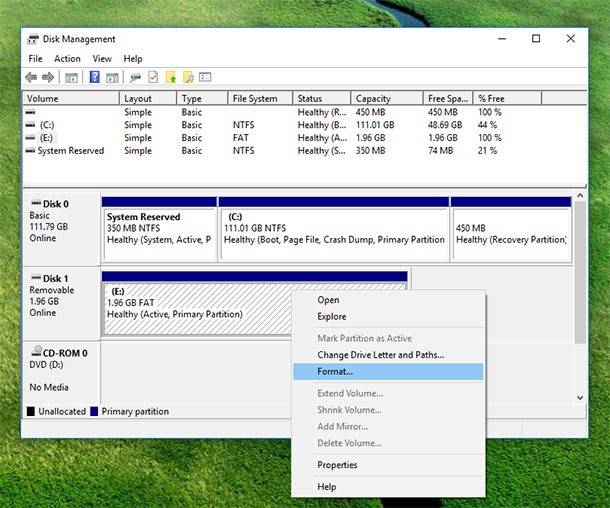
Sometimes there may be no variants at all, but a RAW or NTFS and FAT32 partition, which cannot be seen in Windows Explorer and do not have any letter assigned to that. In this case, you should right-click on it and select Format or Change drive letter. The first action is for RAW, the other is for a partition that is already formatted.
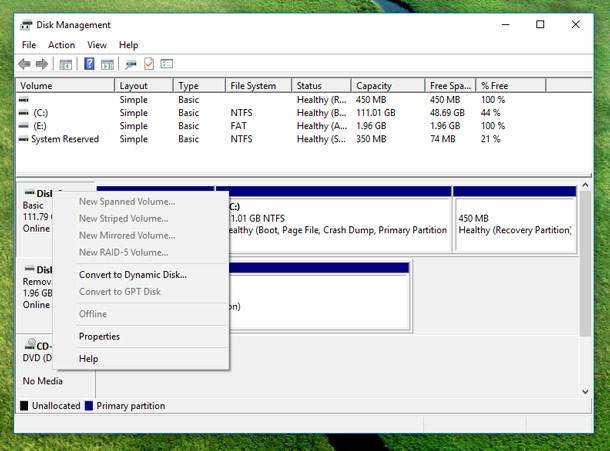
In the first case, you should right-click on the disk name and select Initialize disk. In the window that appears, select the partition structure, GPT or MBR. In Windows systems up to Windows 7 it is recommended to use MBR, while Windows 8 and 10 require GPT.
| Feature | MBR (Master Boot Record) | GPT (GUID Partition Table) |
|---|---|---|
| Full Name | Master Boot Record | GUID Partition Table |
| Maximum Partition Support | Up to 4 primary partitions | Up to 128 partitions (Windows) |
| Partition Size Limit | 2 TB (terabytes) | 18.4 million TB |
| Boot Mode | BIOS-based | UEFI-based |
| Compatibility | Compatible with older systems and operating systems | Requires UEFI firmware and modern OS (Windows 7 and later, Linux) |
| Disk Structure | Uses a single boot record at the beginning of the disk | Uses a protective MBR for backward compatibility and stores partitioning info across the disk |
| Redundancy | No redundancy | Redundant partitioning data for increased reliability |
| Secure Boot | No | Yes (UEFI Secure Boot) |
| Recovery Partition | No built-in recovery partition | Supports recovery partitions with backup data |
| Operating System Compatibility | Older OS like Windows XP, and some Linux distributions | Windows 7 and newer, modern Linux distributions |
| Boot Time | Slower boot time (compared to GPT) | Faster boot time (with UEFI) |
After the disk has been initialized, you will get an area denoted as Unallocated. Then you should right-click on this area and select Create a simple volume. Follow recommendations of the volume creation master, and do not forget to assign a drive letter, file system and size.
It should be noted that the new disk and partition will be located in all of the free space. If you need to partition a disk, you will have to do it manually. Then, you should do similar actions to the remaining free space. Having performed all these actions, you will get a second hard disk.
Let us make the additional HDD visible with the use of command prompt. It should be noted that we use this method if the previous one didn’t work. However, if you have no experience in using command prompt and understanding all commands that you enter, it is better to stay away from this method.
First of all, open the command prompt as administrator. Once you are there, type in diskpart, then list disk. You will have to remember the number of the disk which is not seen or which does not show a partition. Then you should enter select disk N, where N – a disk number, and press Enter.
diskpart
list disk
select disk N
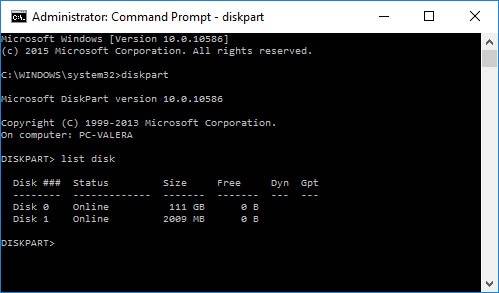
If the disk is now shown, you can use several commands entered in a certain sequence. However, it requires you to know that it deletes all data from the drive. Firstly, you should enter clean, then type in create partition primary, and then format fs=ntfs quick. It will clean and format the disk. Your next step should be assigning a drive letter with the command assign letter=D and then typing exit.
clean
create partition primary
format fs=ntfs quick
assign letter=D
exit
In the second case, you should use the same commands except clean. This way, you will create a partition in the unallocated place of the disk.

⚕️ How to Recover Data After Clean Command in Diskpart (2021)


